


Making of Tugendhat House by Lasse Rode (xoio)
Lasse Rode’s did a remarkable job at 3d recreating Villa Tugendhat, a house designed by master modernist architect Mies van der Rohe. Today he responds to the many requests for sharing more insight about his work on this scene, which was done as a personal project over a period of few weeks to test color-mapping and GrowFX tree creation among other things. In this article he focuses on the exterior part of his work.


Author: Lasse Rode / Studio xoioThe Berlin based studio xoio has been established in 2006 by Peter Stulz and Lasse Rode. It is specialized in high-quality emotive architecture and product visualization. The team at xoio consists of people who have an architecture and design background. That provides a strong understanding of creative processes and the ability to give support in questions of design.
Ive been asked many times to share more insight about the creation of the Tugendhat House scene. Now, that I learned new things by making it, I will share some of the most important topics here.
I would like to thank Ronen a lot for featuring this article here, as I am always happy to provide insight about my work to as many of you as I can
Software Used
Here is the list of software that I used during the creation of this scene
- 3d Studio Max 2012
- VRay 2.1
- Forest Pack Pro
- PSD Manager
- Exlevel’s GrowFX
- Photoshop
For better understanding I will use the following three images for explanation as they contain all essential things. They show the three lighting-schemes I used as well.


Modeling
I built the model of the house after doing some research about it. I gathered all plans and images I could find online and in books. Since classic design, such as this, are well documented, it was an easy task.
I also found a rough 3d model of it on the web, which helped me a lot understanding some of the areas not covered in the photos I gathered. In the end, most of these areas do not show in my renders anyway but it is always nice to have a fully closed building.
The furniture models are from other projects we did in the past for the main part. Actually, I started making these images after we used the Barcelona Chair in a commercial render we did recently. Other than that – the tables, shelves and sideboards are all custom-made. It is all done with very basic box-modeling methods. The most interesting part was actually finding the reference images and understanding the space inside.
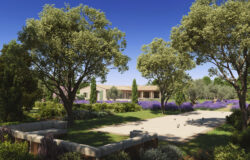
After building the house I started with this first perspective. It is a very famous one, and maybe the one that inspired me the most in the beginning.

And the camera AO view of the model

The Grass
I made some experiments in the past with grass and how to create cg grass in an effective and fast way that will also look real grass that renders quickly and does not eat up too much RAM.
We came up with a method that utilizes the great Forest Pack Pro plugin in two stages. What does that mean?
First I created four different grass patches with Forest Pack Pro in a small circular spline consisting of 4-6 different objects. That would look like this:

The patches have different characteristics such as long grass, short grass, grass plus one plant and grass plus another plant and they are all different Forest objects.
The elements I used on the patches are not many different ones but this little variation is enough to produce convincing grass patches. They are build as very simple meshes

Here are the Settings for one such grass patch. As you can see, the elements are scattered randomly and with slight scale variation and rotation.

The second stage was using yet another Forest object to scatter those patches over the ground plane. I tried several variations of distribution. The option to scatter things not totally random but in groups (clusters) helps here very much and after some tests, the outcome looks like this

The Setting behind that are very basic as said above the key is to scatter the objects in clusters

You can see the clustered distribution very good in this viewport capture

The Trees
Most of the trees in scene are custom-built with Exlevel’s GrowFX plugin for 3dsmax (except the background tree which is a very generic tree we have in our database. Not a very special tree, but it works great far away from camera. Some of the smaller shrubs are from a pre-made library as well).
I built the main tree for this scene as I always wanted to do some large maple or oak tree.
My colleague, Peter, wrote a detailed article about how to custom model 3d foliage using GrowFX for Ronen’s Blog in the past If you are interested in the process of modeling trees like that, I totally recommend it!
Well, the tree I built looks like this

I had a bit of a hard time in getting the twigs like that, but in the end, I was very happy with the result. I used the same tree for the winter and autumn images but with a darker texture and without the leaves.
After adding the trees to my scene it looked like this

The trees in the foreground are not placed with Forest, they are single V-Ray Meshes, even though Forest Pack offers the opportunity to custom edit your distribution and place single objects by “hand” in the desired place.
With all objects, my scene now looked like this from above

You see the large forest consisting of my custom tree, some smaller Forest objects with the background tree mentioned above and some custom placed V-Ray Meshes gathering around Tugendhat House.
The Texturing
The texturing on this project was not very special in the end. But there are some things going on that are worth mentioning.
The Snow
For creating the snow in the street view, I simply applied a snow texture as V-Ray Displacement onto different planes I placed under the street, the pavement and the grass strip.
Why under?
Because doing this you get the effect of snow lying on the street showing the ground in different spots not a very clean method, but it works!

The other snow parts like on the fence, the rooftop and so on are simple beveled planes with chamfered edges.

The Snow on the tree in the foreground was made by copying the tree, moving the copy 2cm up and giving it a white material You see I am a fan of simple straight-forward methods.

I used the snow map above also in the diffuse channel, as well as in the V-Ray Displacement.
The Dirt
I got several questions about the way I add dirt in my images, at edges and under roofs on the walls so here is how I do it
I made it in two stages workflow.
The first stage is to make all your materials you would like to be dirty or leaking a V-Ray Blend Material. As the base material you use your clean one and as coat, you use the same one, but with your dirt structure multiplied over the diffuse texture.
Now you put a V-Ray Dirt Map into the masking channel.
In the slate editor, this looks like this

It looks more complex than it really is, but if you get into the concept it is a very powerful way to improve your textures.
The second stage is made by using a V-Ray Dirt Map as an extra texture render element. In the occlude color channel you put a dirty or leaking-texture. It is Important to shift that whole thing in the Z-direction.
The pass looks like this as it drops out.

At first sight it looks like a normal ambient occlusion pass, but it if you look closer you see the leaking and dirty parts running under edges. You can use this pass in post production and mask it out as you wish and where you’d like to have more pronounced dirt.


The dirt map I used on all the above described materials is this one

works in many cases. I found it on CGTextures.
The Colors
One thing I really must point out is – Get the colors right!
Getting the right colors in your materials is (after the lighting) one of the most important parts in getting a convincing image. I, for my part, had the most trouble in getting the colors of the trees and the grass right. I spent many hours on not getting it too bluish or greenish. Very green poppy grass simply does not look realistic and does not look like grass in the end. I found out that more yellowish shallow colors look more convincing to the eye as being something natural in this case.

The Lighting
As mentioned above, I used three different lighting-schemes
- Standard V-Ray Sun&Sky for the snowy perspective.
- Spherical HDRI with diffuse white sky for autumn images.
- Spherical HDRI combined with V-Ray Sun for all Sunny exterior and interior images.

In the snowy scene you see the clear blue sky with hard shadows from the sun. I used this kind of lighting because after many tries with HDRI this seemed to me the best solution for achieving what I had in mind.
The settings are quite standard It is important to give the shadow bias a value of 0 to get the fine details in the shadows!

For the autumn images I used an HDRI map applied into a V-Ray Dome Light. Both Ronen Bekerman and Peter Guthrie have written very good tutorials about the use of HDRI lighting in the past which I strongly recommend you to read
- HDR Image Based Lighting 3d Scene Setup by Ronen Bekerman.
- HDR Sky Lighting Tutorial by Peter Guthrie.
Often, the key in this kind of lighting workflow is to change the HDRI as little as possible, and build your camera settings around it. Works most of the time at least for me. The image looks kind of dull now, but as you will see later, the rest is texturing and postworking it to final state.

In this case, and all others with sunny weather and cloudy sky, I used an HDRI image applied to a V-Ray Dome Light combined with a V-Ray Sun for the nice hard shadows.
There is a way to enhance too soft shadows you sometimes get from HDRIs, but this method is just one way out of many.
What you do in this case is aligning the Sun as exact as possible or necessary to your HDRI image, so that the V-Ray Sun literally replaces the Sun in the HDRI.
Rendering
I enabled some render elements to enhance reflections, an ambient occlusion pass, the dirt layer I talked about above, among some others too.
I also use the psd-manager by cebas. This great tool organizes your render elements on the fly in a PSD file so you don’t have to merge them together manually later on. It also has great selection features and makes final color correction more easy because it generates custom masks for your trees and grass for instance very nice!


My render settings are not special, really I always try to find a good trade-off of speed vs. quality (as everyone I guess). All renders had no longer render times than 4 hours in a 4k resolution on my i7 workstation. I have to admit my limited ram (12GB) and the multiple AO passes prevented it from being faster.

The Post Production
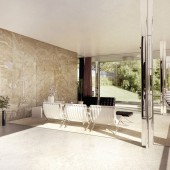
As I mentioned above, getting the colors just right is a very important thing. In the end it is a matter of taste if you work more in 3d or more in post production with Photoshop or After Effects but in this case I challenged myself a bit to get as far as possible (in an ok amount of time) in 3d. The resulting render output of the garden perspective is the following

After that I applied the dirt layer, I mentioned earlier, some fog generated out of a z-map and some final color correction such as contrast, hue and so on to get the final results

I will explain it in a more detailed way on the garage image This is the pure render output of the garage perspective.

I made it a bit lighter by screening the background layer over it and multiplied the dirt layer I got as render element.

Some fog with z-buffer channel which is being screened over the image.

Lighting up and darkening some areas by painting over it.

Adding more contrast with the very old-school brightness contrast tool (I like that it gives you not many options, but sometimes that is a plus) And some final hue and color corrections.

Well I hope I could give some insights about my workflow or answer some questions one may have had.
Best regards,
Lasse Rode,
xoio.


love the grass!! beautiful images!
Can you please tell me the light settings and vray cam settings which has not been mentioned in the above…thankx
@apurva6d
Hi! The camerasettings are quite default. the things I changed for the sunny perspective for instance are: f-number: 2,0 shutter speed : 120, film speed: 200 – just the way the image is not overbright or to dark.
I did no color correction in the camera – I tend to do those things in post.
The multiplyer of the vray dome and the HDR-map is 1 – I just turned the vray sun down to 0,05 to fit on the HDRI. Sorry – but I think I forgot that inthe article.
The other lightsettings work in the same way: HDRI and dome have a multiplyer of 1 and the camera is tweaked to fit (just like you would do with a real camera actually)
best regards
Lasse
Fantastic “Making of”, thanks and congrats for the job!
@ronenbekerman very good
@3dsign_infograf https://t.co/BN6Y3peW
Hi Lasse,
a great making of for a great project recreation…
nice explained detail also for the postproduction process!
you were so useful for “our community” with this making of.
it look like so realistic, great work , keep going Lasse!!!!!
Hi Xoio
Is it possible to know what software did you use to model the building? 3ds, sketchup?
Greetings
@dpizarrom
The building has been modelled in 3ds Max over a rough sketchup-modell for orientation after plans and photos.
Regards
Lasse
Very nice making of, thank you for this contribution !
Hi Lasse,
thanks a lot for the making of, really inspirational in various ways.
How come you made the PSD manager work when you use vrays render elements and VFB….thought the PSD manager doesnt support it???
Yes- unfortunately It does not – But I rarely use the Vray VFB. So for me it works fine with the Max standard VFB. It supports Vray render-elemtents then.
best regards
@xoio psd-manager 3.1 will support the V-Ray VFB. It is currently in Beta and will be available as a free update in December/January. I’m just putting the finishing touches on. It will also have automatic splitting & naming of MultiMatte RE into multiple PSD layers or channels for those not using the builtin selection generator options.
Hi !
Could anyone give me some link where I can find sketch renders made in Cinema 4d with model imported from max?
Hi !
first of all I wish to thank you for this “making of”
Could anyone give me some link where I can find sketch renders made in Cinema 4d with model imported from max?
Thank u!
awesome! Thanks a lot Lasse.. Also looking for making of some nice night view scene.
Thank u so much, Lasse!
Awesome!!! I like that you incorporated the PSD manager your workflow. I never knew that there is a plugin like that for 3ds Max. A big help. A little bit of draw back though is that it doesn’t support VFB right? I guest I need to restudy my workflow to incorporate it in.
@JhanPhillipCo psd-manager 3.1 will soon be out and support the V-Ray Framebuffer.
@JhanPhillipCo psd-manager 3.1 is now available with full V-Ray Framebuffer support. Download the Trial at https://www.cebas.com/psdmanager
can u please share your post production steps for the sunny scenes of how u have achieved contrast im grass area as in your raw render it looks flat. also how to pump up colors of trees. in raw render they look pretty dark. It would be nice. ii always face problem in getting colors of vegetation right.