Making of ‘Viking Pavilion’ NPR / Daytime Basketball Game
Here’s the continuation to Scott Baumberger‘s Non-Photorealistic Rendering (NPR) Approach to Architectural Visualization workflow article. In the previous article, Scott explained the process of making the ‘Viking Pavilion’ dusk exterior. This time he dives into the making of the ‘Viking Pavilion’ Interior, showing a basketball game at daytime.


Author : Scott Baumberger
Scott Baumberger has been offering high-quality illustration services to architects, designers and developers for fifteen years. He uses a digital process to produce imagery that ranges in technique from photo-realistic to simulated watercolor effects.
Scott’s illustrations have been featured in many publications including Architectural Record, Urban Land, Building Design & Construction, 2004 & 2008 NYSR Portfolios, Best of 3D Graphics, Architecture in Perspective (AIP) catalogues 15-25, as well as monographs for KPF, FXFowle, and Callison.
In 2001, 2002, 2005, and the years 2007-2010 his work received an Award of Excellence in the AIP Competition, held annually by the American Society of Architectural Illustrators (ASAI).
This is the first of a series of renderings completed for the Viking Pavilion project on the campus of Portland State University in Oregon. The Client is ZGF Architects, also of Portland. The project is a proposed modernization / expansion of an existing student athletic center and the addition of a new 5,000 seat arena to be used for academic, athletic and community events. It was important to show not only that the arena would be used for PSU athletics but also for community events and concerts. As a result the team quickly decided that we would do a day and night-time view of the interior. The same viewpoint was chosen as a way to emphasize the flexibility of the space.

Non-Photorealistic Rendering (NPR) Approach to Architectural Visualization
This article is an in-depth process breakdown of the ‘Viking Pavilion’ Exterior Dusk image following Scott’s intro to the subject of NPR – Non-Photorealistic Rendering.Make sure you read that introduction to understand what this style is all about and how Scott implements it in his daily work.

For now, Ill focus on the daytime view and then with the nighttime version discuss strategies for re-using many of these daytime assets. As with the exterior rendering, the architect had a well-developed SketchUP model and in this case had already nailed down the viewpoint. Heres a screen shot of the provided model with SketchUPs default style…

I knew right away the big challenge with these interior views, but for this one especially, would be populating the seats. But before I tackle this I want to develop a good base to work on top of. I also need several additional model exports for use in setting up masks in Photoshop. This first one is a color-only export, basically the default style but with edges turned off. Because it is an interior view, I made sure that the use sun for shading box was unchecked in the Shadow Settings pop-up.

Here are the ambient occlusion-only pass and the line work-only pass, similar to the exterior view. As before the line work is darkened somewhat for clarity.


Using the Shaderlight plugin, I added satin and gloss effects to the materials in the model. This is easily done by selecting the material in the model via alt-clicking the object. Open up the Shaderlight Material Editor and change the Type to Glossy, Satin, etc. For the wood floor and metal panel ceiling I added a high-gloss finish and most of the rest of the materials get a medium satin finish. And of course, I change the glass material to get reflections, etc. Although in this case, I made the mistake of leaving the glass visible.
In retrospect, the render times would have been much lower with the glass hidden (or deleted). As a result, rendering this view took about 3 hours. I experimented with different times of day, ultimately settling on an early morning setup which produced nice long shadows on the main seating area on the left side of the view.

As you can see, there are a few problems with the rendered output as-is. The floor pattern has coincident materials and so we get this unwanted zig-zag effect around the edges. Also, the floor near the exterior wall is much too bright. I could have spent time going into the model and fixing it there, which would probably require a test render (or two or three).
Instead, I took a couple of minutes to create the selection in Photoshop and hit it with the Paint Bucket. Done.

Heres a composite of the rendered output, flat fix above, then the AO pass and the line work pass on top. AO & Lines are set to Multiply blending mode. At this scale its a little hard to see the difference, but the curtain wall reads better and the seats have a little more punch.

Now working back to front, I started with the large glass wall. The view outside is key to the architectural concept so the view needs to be fairly accurate. Since I wasnt able to take photos of the context from the camera location (it would be inside the existing building!) I rely on a few screen-captures from Google Earth to get the overall massing and location of the neighboring buildings. Here you can see the heavily filtered and distorted base for the city backdrop.

Its reasonably accurate but I do take some license to avoid any tangents, or points of visual coincidence or tension. (if youre familiar with the Portland skyline you can see that there are two KOIN towers at the moment!)
I cut out the buildings from the sky and add a stock sky photograph just beneath the city in the layer stack. I was careful to look for a photo that has the same lighting as the interior – in this case a strong low light from the side.

Much better… now lets look at the park visible between the arena and the buildings beyond. Working back to front with the park, I first added a tree line to create a new horizon that covers up the base of the buildings beyond.

Next I pasted a stock landscape photo of a lawn with a tree backdrop on top of the tree line image. This layer is set to 70% opacity to help blend the two edges together.

Then I added a few individual hero trees to create a foreground and to cover up some of the remaining artifacts from the background. Like the rest, I composed the trees to create a balance of foliage and voids and also paying attention to points of visual tension.
At this point I also get a late request to make sure Mt. Hood is visible in the background. (and the second KOIN Tower is now covered up too!) I also added a little color balance to the trees and horizon so that the greens outside are in sync with the green floor & seats inside.

Pulling back, I included the existing library just across the way, visible at the left edge. (this building is prominent in the exterior tutorial) I knew that only the top of the building would be visible so I didnt need to be especially careful with transforming the photographs. The only real work here was to get the return walls to follow the perspective. I had to set up a temporary perspective grid for these walls and paint them in. Luckily they are all solid gray so its not too much trouble. Its essential in these types of views to be faithful to the perspective. Small mistakes can really stand out and be very distracting.

The last step for the glass is to set it back a bit with a wash. I filled in the glass selection just like the exterior rendering with a medium blue color.

I then applied a layer style to the glass base layer and drop the opacity down to about 30%, again similar to the exterior example. Once applied, here is the finished glass surface.

A couple more items before we move on to the crowd…
I add glass handrails with the same layer style as the curtain wall, and also add scoreboards on the far side from client-provided photos of another stadium project (slightly altered to include the Vikings and their logo of course). There are a few areas where people will be in front of these items so I keep them low in the layer stack.

Now lets tackle the crowd…
The first set of people in the right foreground need much more attention than the people further away. Before I get too far into it, I want to be sure the technique will work. I basically rounded up all of the entourage I could find of birds eye or similar angles of people from behind, especially at a three-quarter angle as similar as possible to this view. As you move up to the right edge, people are in more of a profile view. Even with tens of thousands of photos I quickly exhausted the supply of people that will work in this angle. There will have to be some repetition.
The process is simple but a bit tedious: work front to back to get as much overlap as possible (to reduce the amount of masking) and then paint in a mask where you would see the back of a seat. The guy standing at the lower right corner helped a lot too. At first I pasted in the people at 100% opacity but they felt really strong and the lights & darks were very distracting.
Here they are at 100%.

And here they are at 60% opacity.

Better, but the lines of the seats are distracting and ruin the effect. After a little experimenting, I settled on smudging these offending lines on a flat copy of the render. A tablet is very handy for this part. Here is the flat copy with the people turned off so you can see the effect.

And here it is with the people turned back on.

Much better, and once the foreground washes are in place the squiggles will go away whereas the straight lines would still be visible. I then moved on the next set of seats beyond, reusing a lot of the same people but mixing it up so there is no recognizable pattern.

Continuing around the bowl using the same technique I fill up the rest of the seats, reducing the saturation overall so I can add green color back. I also add a fully desaturated version of the close people group on top at about 50% to help them blend in.

Although the crowd is built up from individual photographs, once they get smaller I can get away with copying and pasting whole rows to fill up the seats. Here it is once all of the people are in, still very grey but now we have our crowd!

On top of the people group, I added a new layer set to Color blending mode and paint green on top of peoples shirts to get the feel of a home audience. I can sample green colors from the seats or even outside to get a good range. I dont want it to be too static. I also add a bit of blue (sampled from the sky) to get a little more contrast – this further disguises the copied rows.
On the same layer, I also painted in skin tones to the peoples faces. This step really helped make the blobs look like people again. The strong red-green color contrast helps differentiate too… had their mascot been red or orange I suspect it would have been much more difficult!

Here is a closeup of the far stands to see the effect a little more clearly.

Next, I added the players and coaches on the floor.
There were also a few cheerleaders behind the goal at right to help break up that large blank area. I was given several photos from the client of the Vikings basketball team which really helped get the uniforms right. I was also able to find a few generic photos of other players in plausible positions on the court. In some cases, I adjusted the color & tone of the uniform to get it close to the Vikings green.
Originally, we were considering a scrimmage or something more casual, but we got a late request to make the scene as energetic as possible. So a full set of five players on each teams as well as a few on either bench fill it out. Soft shadows on the floor ground the player photos.

And here is a closeup of the action…

Next up is adding the logos to the floor and at the press box. These were all added non-destructively in Overlay and Multiply blending modes. The large PSU VIKINGS logo in the foreground has a bit of Inner Glow (set to Multiply) Layer Style to give it some depth – a variant of the glass style. Scoreboards and glass rails are turned back on.
Getting close now…

Now were into the finishing touches.
I added a few god rays coming in off-camera from the right. I experimented with different sizes and strengths of the effect but settled on just a couple limited to the court action and the seats just behind. I kept them really blurry so they aren’t too obvious. This effect really brought out the long shadowing from the original Shaderlight render, and it put additional emphasis on the focal point of the scene. I typically use Color Dodge blending mode at 100% opacity for this layer. Paint in large streaks with a low opacity brush (10 – 20%) and then a heavy Gaussian Blur filter to soften it up.

Pretty heavy dark blue washes set to Multiply were added to the lower third of the image. These are a bit stronger than usual again to emphasize the court and the daylight streaming in. This is the wash that also tames the foreground people.

At this point, we have pretty good overall tonal balance. Next I add the paper textures, which tend to lighten up the scene a bit.

At the very top of the stack I added two adjustment layers.
The first is Black & White – this is a nice trick that can help add some punch to a flat image. Dont overdo it though. Add the B&W Adjustment Layer, but change the blending mode to Overlay or Soft Light. In this case I used Overlay set at 30% opacity. Play with the sliders and see what happens. For this image it brought back the tonal balance that I had without the paper texture and also seemed to add more contrast between the light and dark areas, moving attention once more away from those troublesome closeup people.
The second adjustment layer is Color Balance. Add this to the top of the stack and leave it at Normal 100%. Experiment with the sliders but use a soft touch, usually no more than +/- 10 is plenty to get the right effect. Look at all three tones (Shadows, Mid-tones, Highlights) and again just see what happens. With so much green in this scene I pulled several sliders towards red and magenta to help balance the color. This is a really good way to unify the rendering.
Were done!
Here are a few closeups at 100%:
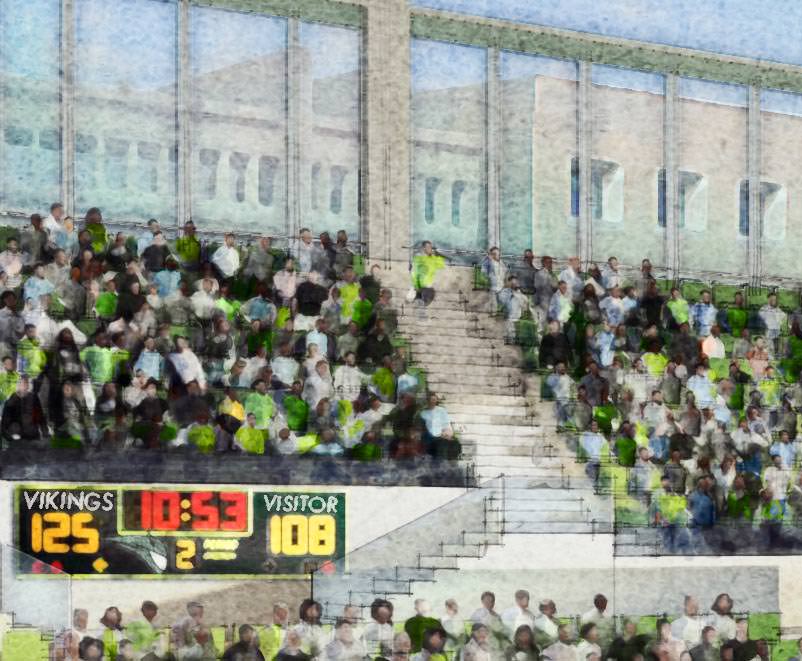
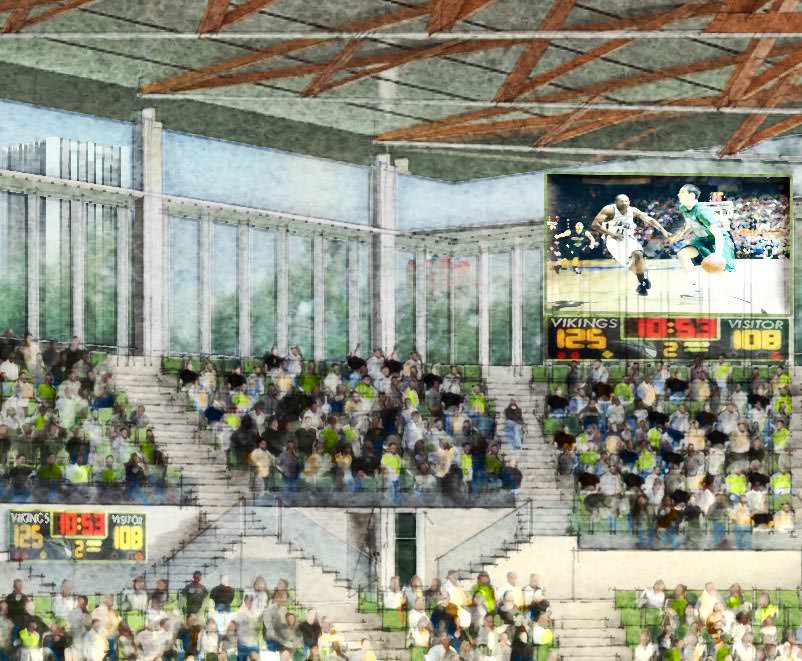
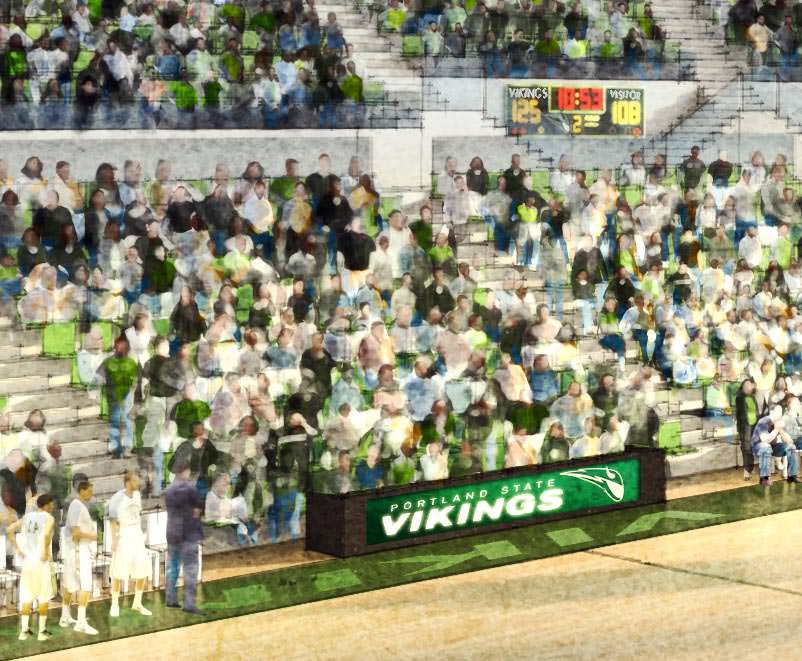
Looks like the Vikings are going to win!
Thanks for taking the time to read the article, I hope you will find it helpful to your work. Up next is the night time version of the rendering.
Scott.