Forest Fly Over, Part 1
I’m happy to bring you the first of the Tutorial+ article series – “Forest Fly Over”. The ‘Plus’ represents the start of the premium tutorials tier on this blog, something I had planned for and got a serious boost with requests submitted by all of you in the latest blog survey. In this, 3 parts in depth tutorial series, Javier Pintor will guide you through the process of creating a forest fly over animation (one that is rather common in many films) using 3d studio max & After Effects as the main tools. Part one, however, covers the creation of the tree cutout images and background sky from original photography material.


Author: Javier Pintor
Javier Pintor has recently finished six months of 3d archviz school and work on preparing his portfolio. He has written several times for this blog and now I’m happy to present his 3 part Forest Fly Over Tutorial.
Tutorial Details, Part 1.
Software: Photoshop
Difficulty: Beginner
Completion Time: 1 hour (est.)
Resource Files Available at the Shop.
1. Introduction and overview of the final result
This tutorial will guide you through the creation of an exterior camera animation using 3ds Max, Photoshop and After Effects. It will cover topics like creating cutout trees, merging panoramas from various pictures, path animation constraints, multi sub-object materials, creating particles in After Effects or tracking camera motion.
This tutorial series requires a basic/medium level of knowledge in the programs mentioned above as I won’t be explaining where is every single tool or how each and every parameter behaves in it.
Before we start, let’s see the final result and recover a bit of the background and where the idea to make it came from originally.
A few weeks ago I was looking for some good cutout tree images, I actually don’t remember why but I found Michal Kotek’s website – www.michalkotek.com, where he has a nice free collection of cut out trees. There is also a couple of misty forest environments videos which caught my attention, one of them done by the VFX artist Henrik Bjerregaard Clausen – www.henrikbc.com.
Immediately after seeing these videos I wanted to do something like that and share the process with the community so who ever wanted to do the same, will be able to follow the process.
2. Gathering information and material
At this point we don’t need any references to start this project, we already have the source of inspiration, Michal and Henrik animations plus the point that this effect has been done over and over in films and archviz. So it will be more on the technical side of things rather than the artistic.
The things we will need are, a bunch of cutout trees (or at least few), some sky for the background, a single cloud because we are going to do some particle clouds effect and a displace map to generate the mountains. You can model them if you want it but I will go for a faster solution.
You have a set of files to work with in the Resource Files Pack should you choose it, or gather up a few of your own. We have the starting point, so let’s get on with it
3. Preparing the textures inside Photoshop
3.1. The Displacement Map
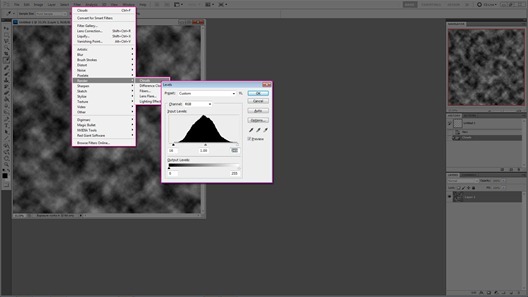
I first created the displacement map used to give the shape of the terrain. If you have access to real topography data the results can be much more interesting, but in this case create a 2K square map inside Photoshop, then go to “Filter/Render/Clouds”, clamp the levels a bit and save the result as your displacement map.
3.2. The Cutout Trees
I provided some tree pictures with the tutorial so we can cut them out ourselves, If you want, you can jump ahead and use your own or download from some website.
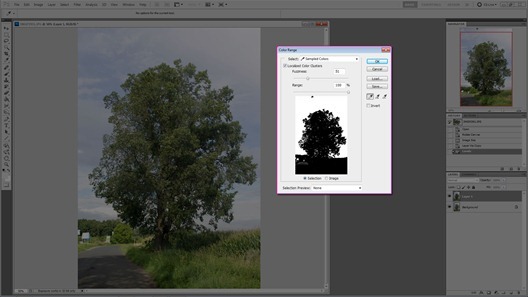
For the cutouts let’s open the file “IMGP2951.jpg”, duplicate the layer, then go to “Select/Color Range…” and select all the sky with the eyedropper, hit ok and invert the selection, with the selection active create a layer mask, the selection will be removed in a non destructive way.
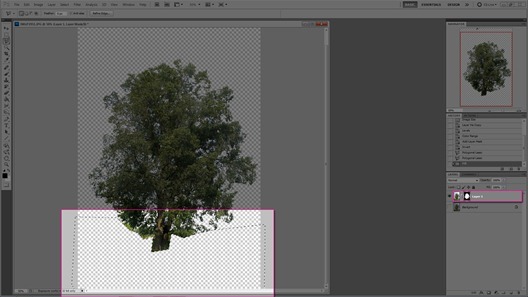
Now make a rough selection of the bottom part of the picture with the “Polygonal Lasso Tool”, select the layer mask and go to “Edit/Fill…” and fill the selection with pure white color.
Select a small brush and paint over the rest that we didn’t cover from the selection, it can be a tedious process, that’s why it is very important to take pictures of isolated trees with sky background or homogeneous color. Once the tree is completely clean we can apply the layer mask to the layer itself so the changes can take effect.
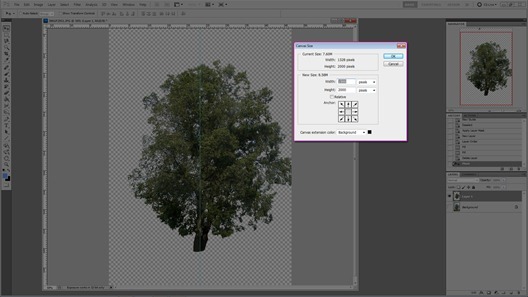
Now we need to center the trunk to the canvas. Let’s first activate the “Ruler” by going to “View/Rulers” and create a vertical guide line in the center of the actual canvas, next move the layer to center the trunk to the guide line, see how the tree offsets outside the canvas, go to “Image/Canvas Size…” and change the width to cover the all tree.
Finally crop the image with the “Crop Tool” and make sure the anchor point stays aligned to the guide line.
If you enjoyed or at least found interesting this tedious process, go ahead and repeat it for the rest of the tree photos…
3.3. The Cloud
Next we have to paint the cloud. We will use gray-scale values for masking it out later on inside After Effects, but before we start we need to download some cloud brushes or make our own. The one that I used is from Vyonyx. They give it freely with a very useful tutorial so check it out and download it at Tutorial02 : Painting Realistic Clouds in Photoshop.
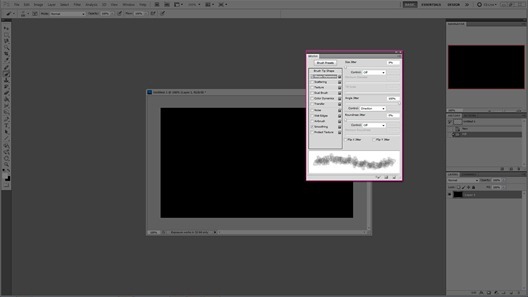
Now create a new document in Photoshop of 700 by 400 pixels. It is way to big but easier to paint than a really small one. Fill it with pure black, create a new layer and, with the Vyonyx brush start painting kind of Cumulus shape cloud. The next picture shows the properties I used for the brush.
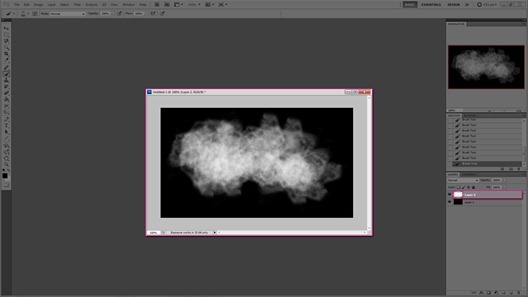
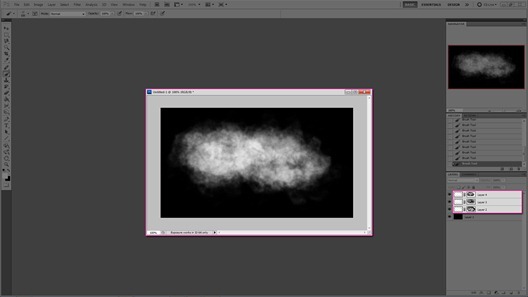
Now duplicate the layer and repeat the process twice, this time concentrate the strokes towards the center of the cloud to create a volumetric feeling. Depending on your painting skills you will need more or less tweaking. Once you are happy with the result, you can add layer masks to each layer and fine tune each level of your cloud.
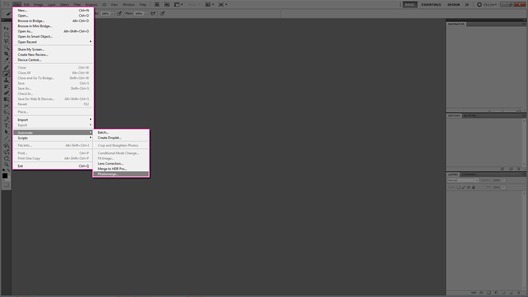
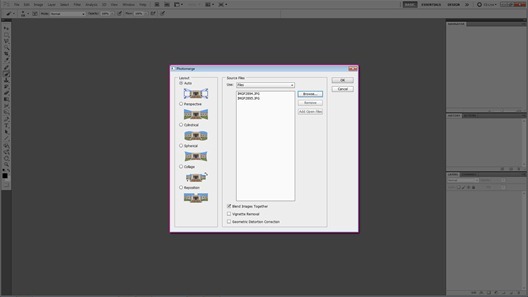
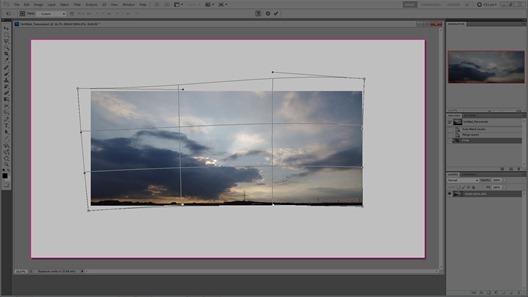
The last step in Photoshop is to create the sky background. Go to “File/Automate/Photomerge…” and select the images “IMGP2894.jpg” and “IMGP2895.jpg”
The process is very straight forward so the images are self-explanatory. Now we can merge the two layer together, crop it to frame better the photo, then go to “Edit/Transform/Warp” and click and drag to fill the empty parts and clean up the distortion.
This ends the Photoshop part of this tutorial series. Go ahead and read Forest Fly Over, Part 2 and get into 3ds Max and more fun stuff. See you there
Tutorial Resource Files
This tutorial comes with a pack that you can grab from the shop. It contains the full 3 part tutorial, two 3dsmax 2010 scene files setup with MultiScatter or Particles and ready to render with V-Ray, final animation, after effects composition file and the original and postworked photos used to create the trees and sky.






Javi very good job, is an amazing tutorial, well explained, I hope the next part, 😉
Ronen is a fantastic idea for the blog, congratulations.
Greetings.
@toni fresnedo Thanks! I’m happy you like it – It was also suggested by many followers on the Survey… So bug thanks to all of them too 😉
Thanks Toni, I’m glad you like it, and thanks Ronen for the effort and nice job. @toni fresnedo
Hi, Ronen. Can you please tell me how do you define tutorial files as sold commercial basis or for free ?
@ElvinAliyev Not sure I follow… Each resource file pack has it’s own policy with the prime aim for them all to be allowed to be used in personal and commercial work. They are not to be transferred to others… obviously 😉
Did it answer your question?
Hi, Ronen.. I bought these files but do not contain the PDF, only the project files.
How do I can get?
Thanks!
@archiexelent It is two files – did you see only one in the download links? anyway – you can find it in your email 😉
@archiexelent Please reply back to the email, so I know you got them 😉
Thanks.. waiting for second part 🙂
Javier, muy interesante, gracias por compartir tus conocimientos.
Saludos.
can you make a tutorial how to render 2d trees without noticing it as 2d. i know you know how to do it because you render the forest using only 2d trees. i have a project and i want to make forest using 2d trees but i can’t make it good to look real and not just 2d.
In the second and third parts you have explained how to… @SawHack
Hi! I want to buy the files but it seems it’s impossible at this moment, the bottom doesn’t work… How can I do? Thanks!