


3D Ground Cover Modeling in 3D Studio Max
Following a great thread in the finished works section of the forums, Chris (blowback) was very kind to send me a ‘Making-Of’ article about the 3D modeling of the ground cover in the architectural visualization of ‘Jeff’s House’. I hope you’ll enjoy this article and learn from it as much as I did!
 Author: Christopher Kowal (blowback)
Chris is a freelance 3D Artist & a 3D Instructor at the Vancouver Central College. Check out Chris’s personal blog at: kowalventures.blogspot.com
Preparing the ground.
I started the process of modeling the ground with a simple plane, adding a displacement modifier to it. To the bitmap slot of that modifier I then added a Height map that I manually created in Photoshop. You can see the map I used below.

To further adjust the shape of the ground surface I added a FFD Modifier to allow for general and quick adjustments. For more detailed deformation work I applied an edit poly modifier and then used the brush tool to paint those details in.
To blend it all together I add, at the end of all the little adjustments, a relax modifier.
 Creating the Gravel Path.

Once I got the ground shape I liked, I saved a copy of the un-collapsed stack, just in case, as a backup. I then converted it all to an editable poly. I did this so I could detach the polys that will make up the gravel path part of the ground. This also allowed me the freedom to raise the poly count and paint in some finer landscaping
details and adjust the other UVW maps separately. It also gave me the freedom to add a displacement modifier if needed to a smaller area of the environment.

Creating the Steps.
Now that I had the gravel path ready, I created the steps. The steps were made out of 3 copies of a chamfered box with some noise and varying settings that were then instanced around. I also added a few spheres for the massing of the larger leaf piles. Again, these were spheres with the FFD modifier added to them.


Creating the Stones.
Creating the small stones was pretty easy. I started with a simple sphere, adding a noise modifier to it. I then add a FFD modifier, yet again, to drastically change the overall shape, making it look more stone-like. I made 12 copies of varying size & noise levels. Once I was happy with the small collection, I individually create VRay proxies of the stones, so they could be scattered on the path. I also created a few versions of the diffuse maps, just to stretch the randomness a little bit further.


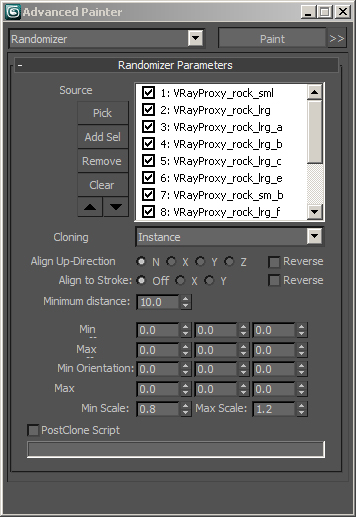
Using the Advanced Painter script.
Advanced Painter script (found here at the script spot) was used to paint / scatter on the ground surface. I loaded the objects I wanted to paint on the ground into the list, selected the ground as the surface to be painted on – and started to paint away!
You can adjust your settings according to your needs as you go along. The Advanced Painter script is really powerful It has become a regular part of my workflow.


Creating the Wood Pile.
3D Studio Maxs internal reactor system was used to create the wood pile. I am new to it but it was rather easy. First, I modeled the wood parts. I created three shapes and then copied them multiple times.

I then created a plane and added a rigid body collection gizmo into the scene. I added both plane and wood objects to the rigid body list. Setting the physical properties of the objects is done under the rigid body properties menu.
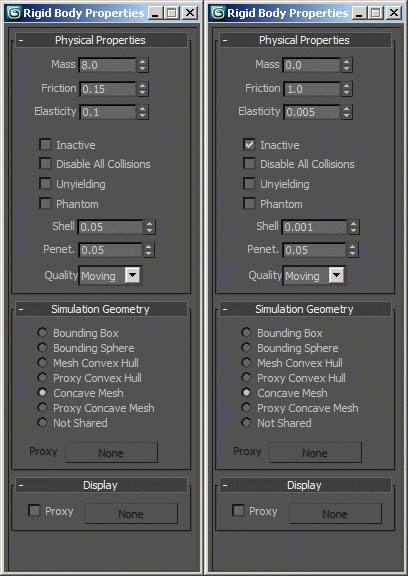
Setting the Physics of the Wood Pile Simulation.
Most of the settings are default with just some adjustments on the col. tolerance. Now click on the preview in window tab to bring up the preview window. You can now play your simulation until you like the results, or reset and adjust some of the physical properties to your liking. Once I was happy with the output I updated it to 3D Studio Max. I then manually adjusted some of the logs for to add that final touch.


Creating the Grass.
The grass was created based on Peter Guthries great two-part grass tutorial (part 1 | part 2). I will not cover that here, but I recommend you all to read that tutorial and visit Peters inspiring blog.
Once the grass clumps were made, I followed the same procedure as I did with the gravel. I loaded them into the Advanced Painter script and painted them on the ground surface.

Creating the Leaves.
Now that I had the grass in place I created 4 different leaves. These were made out of simple planes with a bend modifier and noise modifiers applied to them for variations.

I then painted a couple different versions of smaller piles.

The last step was to attach them to all together as one object. This is where you can randomized the material.

These leaf piles could now be scattered around the scene to cover up the ground. I also had some single leaves that I changed the pivot point on to scatter as well.

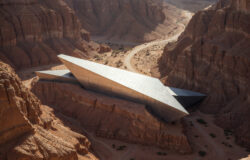
Overview of the model & finished render
All that was left to do now is to check all is placed correctly.

Choose the camera POV.
And render the final image.

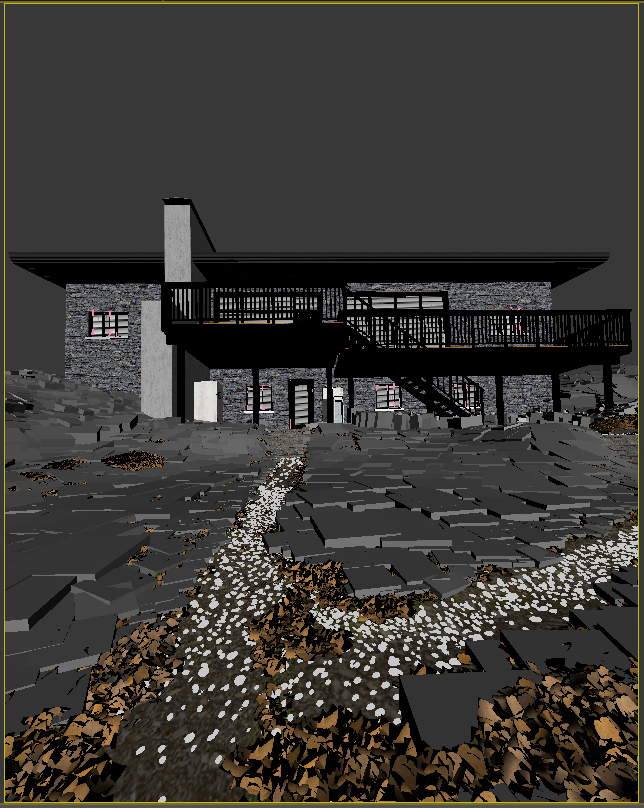
Here is the always needed clay / wire render too…

You are welcome to comment on this article and ask questions using the comment box below!


A really useful Making-of / Tutorial, thanks a lot for sharing it with us.
Thanks. I am glad you like it.
Hello, nice tutorial…how did you combine the gravel path to the terrain?
@3dbybrunolopes Thanks I selected & detached the poly’s to the terrain when I start. I do not attach it back .
I agree very good tutorial and superb realistic result. Thanks
Great work of art! & also powerful PC..:)
Very nice tuts!
Thanks
Thanks everybody.
Pretty amazing work dude, and your render is impressive! cool man!
It’s a great tutorial. Thanks for sharing it with us.
Thank you everybody for the positive feedback. I look forward to doing another.
Any reason you used spheres instead of the more efficient, uniform poly size geosphere?
Amazing result. Your technique is really impressive using Advanced painter and reactors, it shows your interest and hard work.
Great works. thanks 4 sharing.
Any ideas (plugins) about how to do the actual surface painting inside 3ds max?
How do you mean Ronen? Are you referring to using the brushes in max and deforming the geometry.
No… Actually painting in color on the surface – Painting in the texture itself. I want to use it for Black & White masking of areas on the surface to later be used as control maps in Multiscatter.
Off the top of my head….. I would unwrap the UV and paint the maps in ps and then bring it back.
Um, i know it’s about a year ago you did ask this question, but as far as it hasn’t been answered yet, i thought i’d reply- better late than never 😉
You probably know you could use a vertex color map within the ground texture as an instance in multiscatter distribution mask..
@yellowpinkfox Better late then never 😉
Great work,
The heigt map you created in photoshop, is it all manually brushed with a clouds or difference clouds filter? I’m trying to make my own height maps, but could use some advice.
thanx,
Aris
Thanks Aris,
It’s a little bit of both. Diff clouds and then some brush work.
amazing!!!
Hey, how was the background forest made? Looks so realistic
The BG image is a photograph. 😉
The BG image is a photograph. 😉
ck_1138 Do you know any place I could find some realistic background forests images?
Wow