


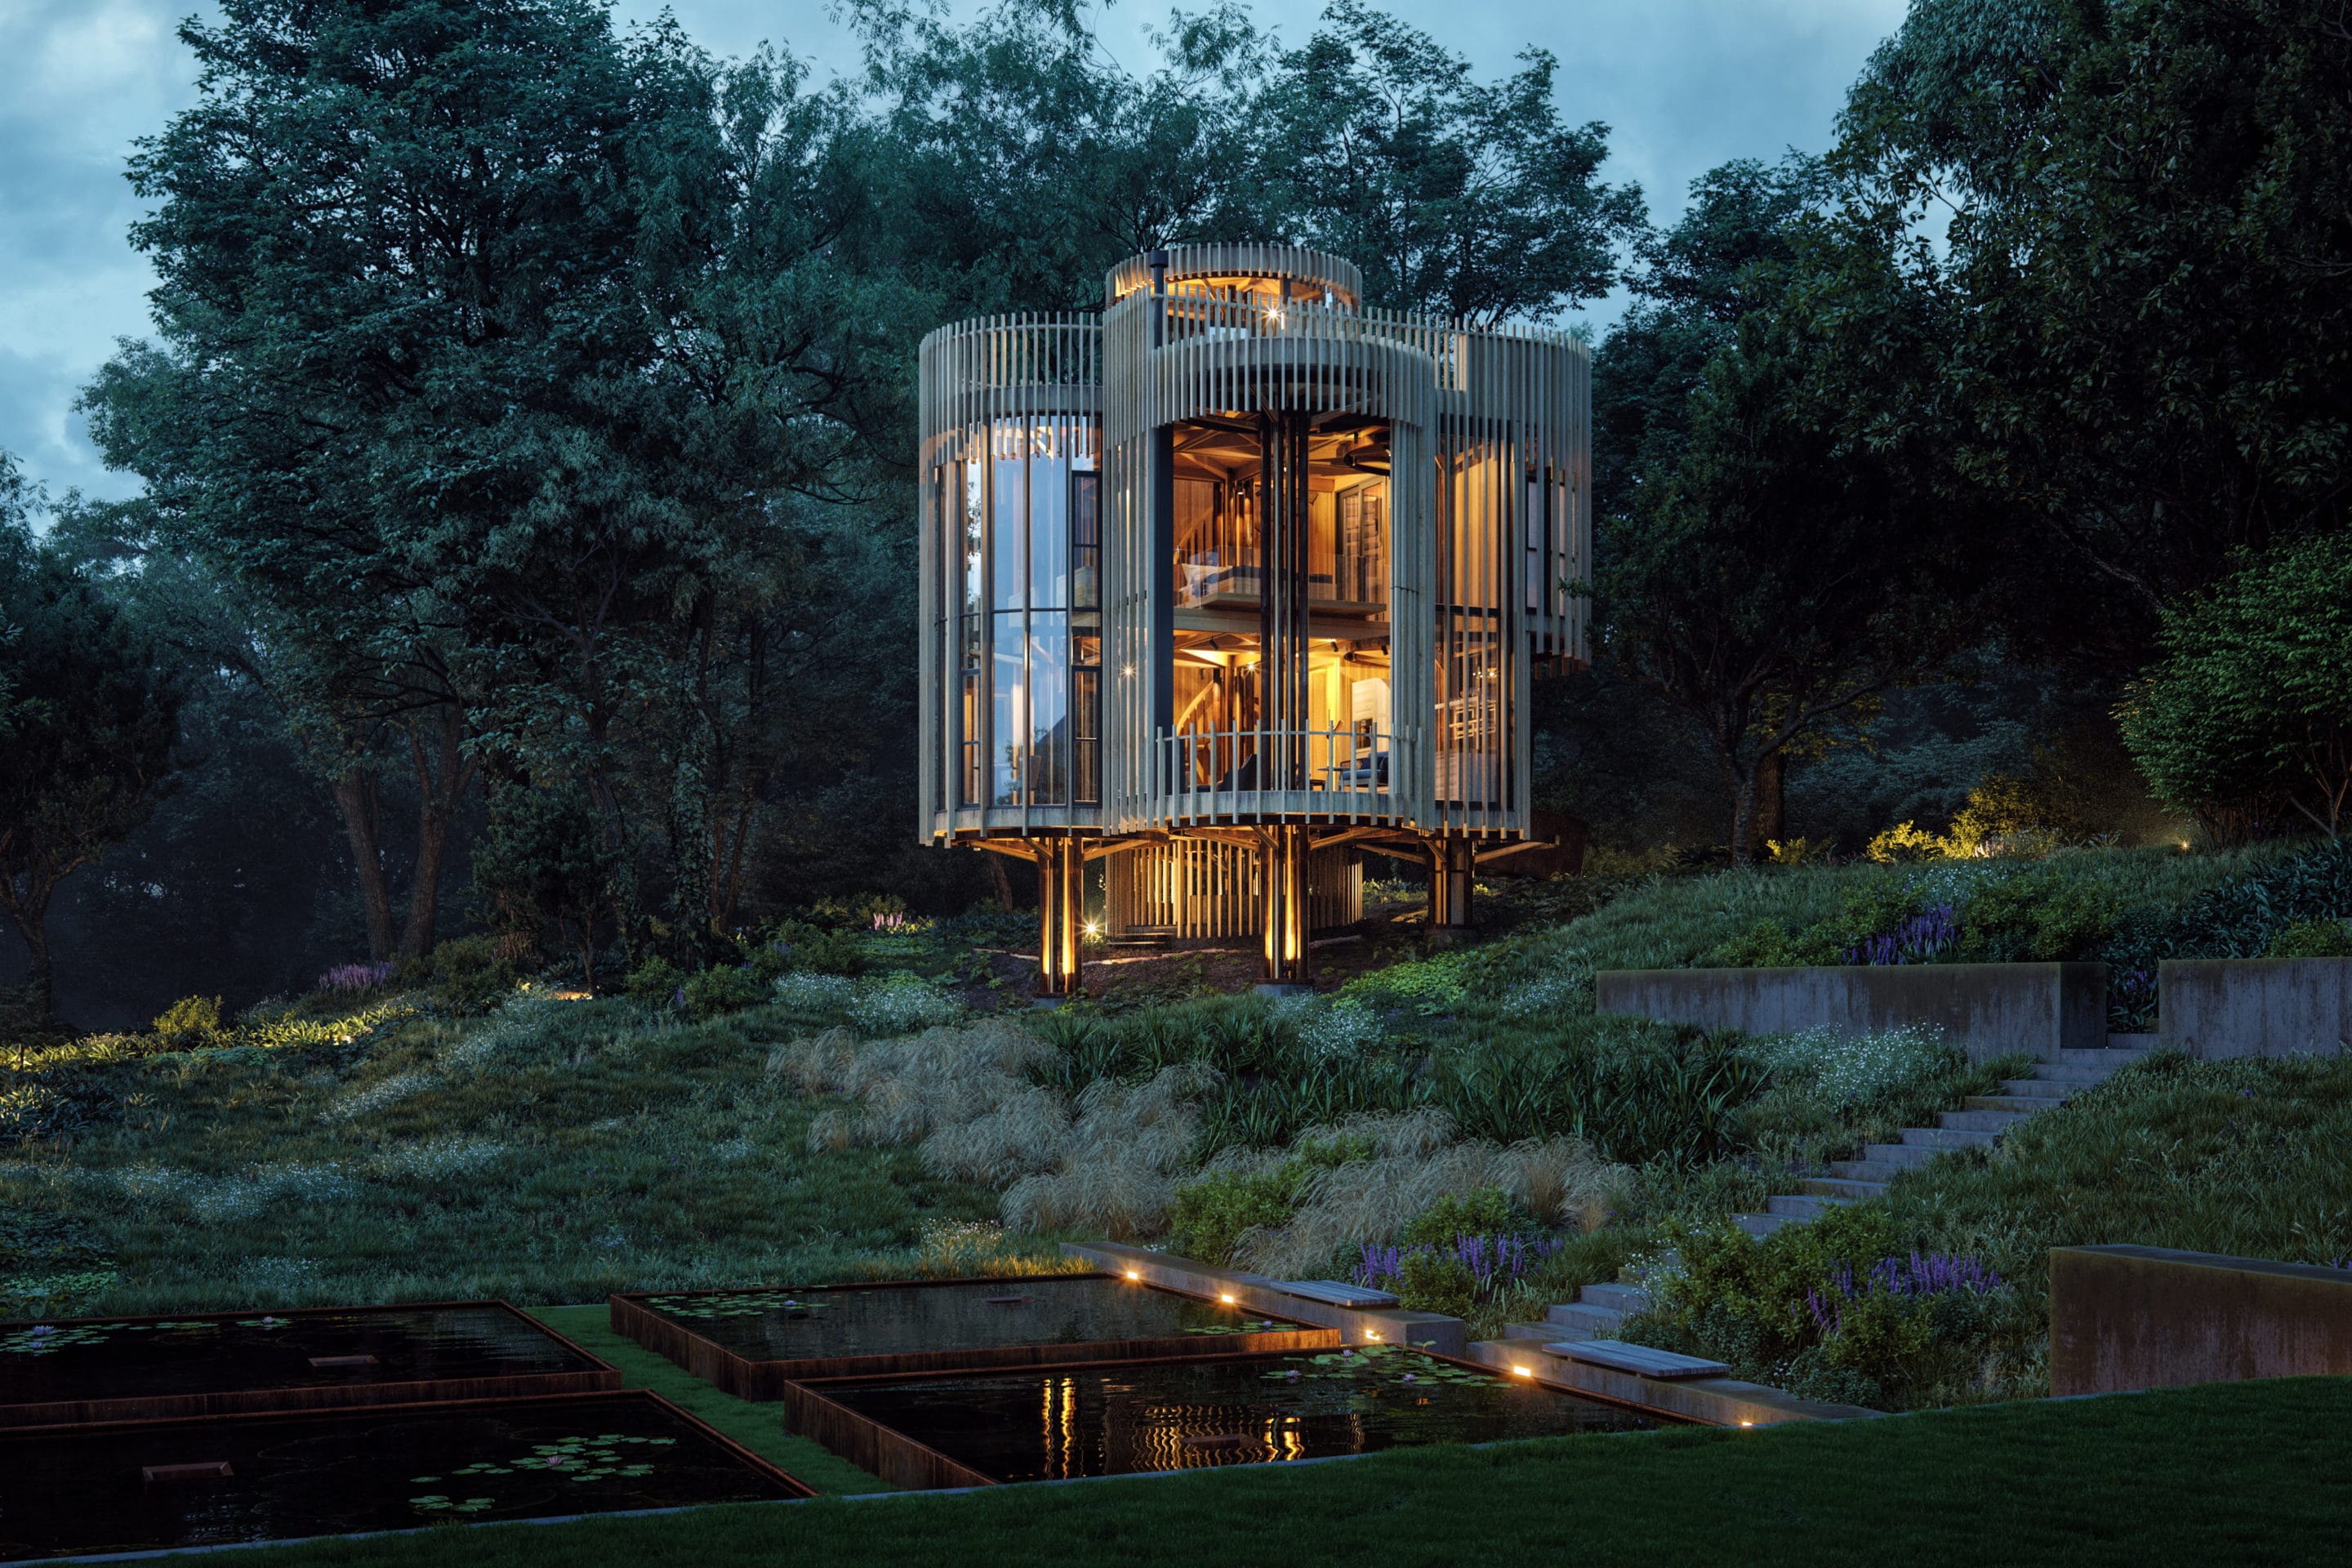
Making Of Tree House Constantia
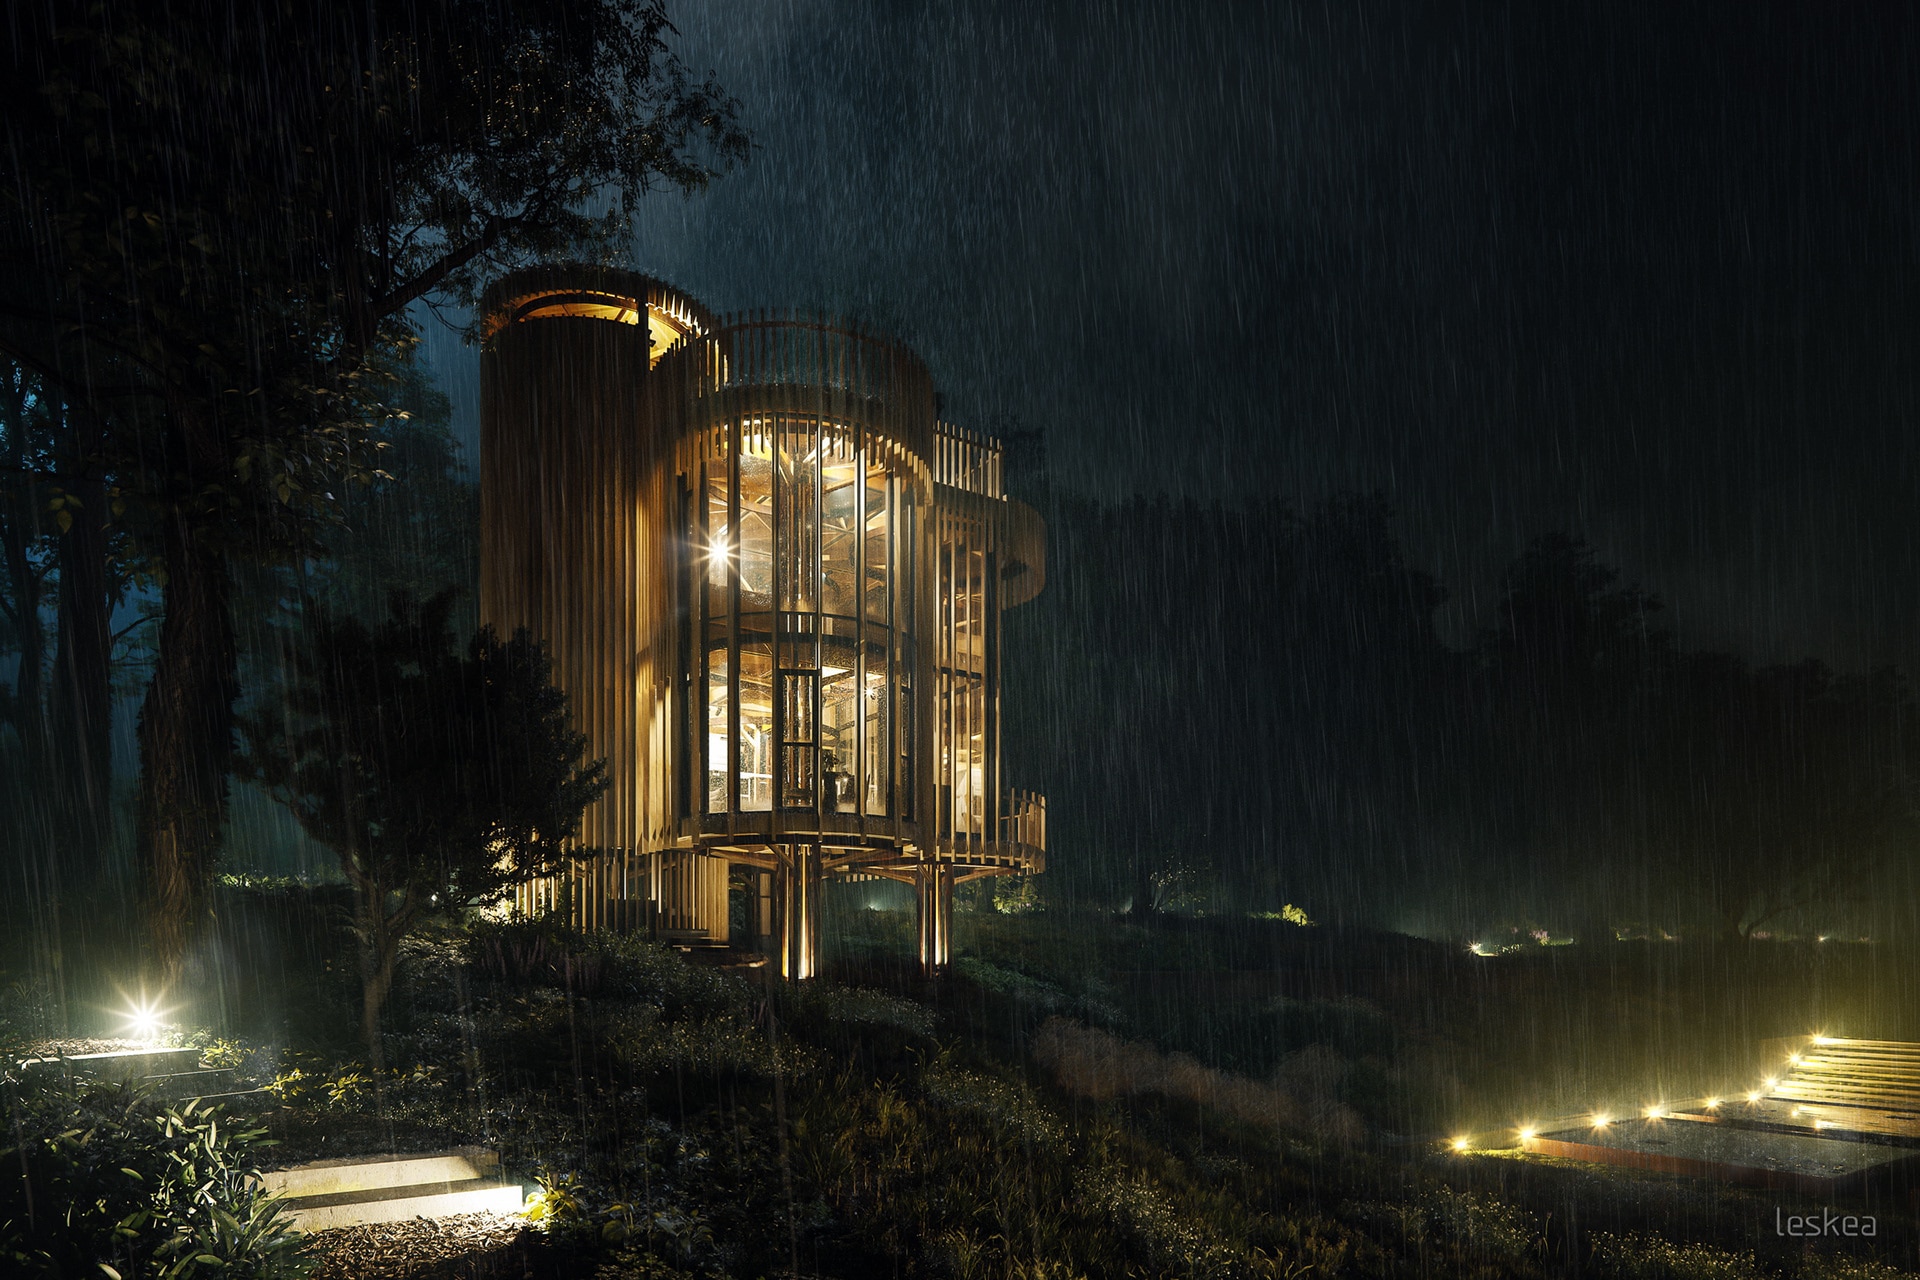
The Making Of Tree House Constantia is a first-person narration about one day in a house without any connotations with people living in it, their fantasies and routine. Just architecture and nature.
We are happy to have the opportunity given us by Ronen Bekerman to share our experience, approach, and vision with the Making Of Tree House Constantia
It’s a question of vital importance for us to share the experience we’ve got from this project. We are sure that this information can help a large number of professionals to achieve a new level, to find power and desire to improve. It’s a big pleasure to know that our work can inspire.
About Leskea
Leskea is a small but ambitious studio based in Brest, Belarus led by Yauhen Liashchynski. It specializes in architectural design and visualization. We are a multidisciplinary team of open-minded enthusiasts who can do smart architecture. We want not just earn a living, but to express our own artistic view, to promote diversity and sustainability. Leskea is ready for fruitful cooperation on a contract basis.
Introduction to Tree House Constantia
To be frank with you, dreams come true only after hard work. The project we invite you to see is not about “momentary inspiration,” but about a long way from the goal setting to its achievement. This Making of is more about technical aspects of creating than artistic ones. As the basis of our approach is managed design. A few months ago we decided that we can do the project which quality would make happy not only us as it’s authors but our colleagues and customers.
The project we represent below – the visualization of Tree House Constantia project designed by Malan Vorster Architecture Interior Design – was among the first projects created within methodology ARCHIREPLICA.
ARCHIREPLICA as the author’s methodology of Yauhen Liashchynski was established to help newcomers to adapt to the corporate culture and working approach of Leskea through creation 3D copies of vivid examples of modern architecture.
ARCHIREPLICA helps participants to increase personal effectiveness by empowering them with:
- the techniques and methods of collecting and systematizing the necessary information.
- the methods of architectural analysis.
- the graphic ways to transfer specific professional information.
- the knowledge of integrated design.
- the possibility to complete the whole cycle of creating a quality product from scratch.
Workflow
Basic software within the project: AutoCAD, 3ds Max, Corona Renderer and Forest Pack. Creation of the project can be determined as a team sprint, during which each participant of the working process could work on the project in a unified space.
The structure of the project, including the most essential elements, is graphically presented below.
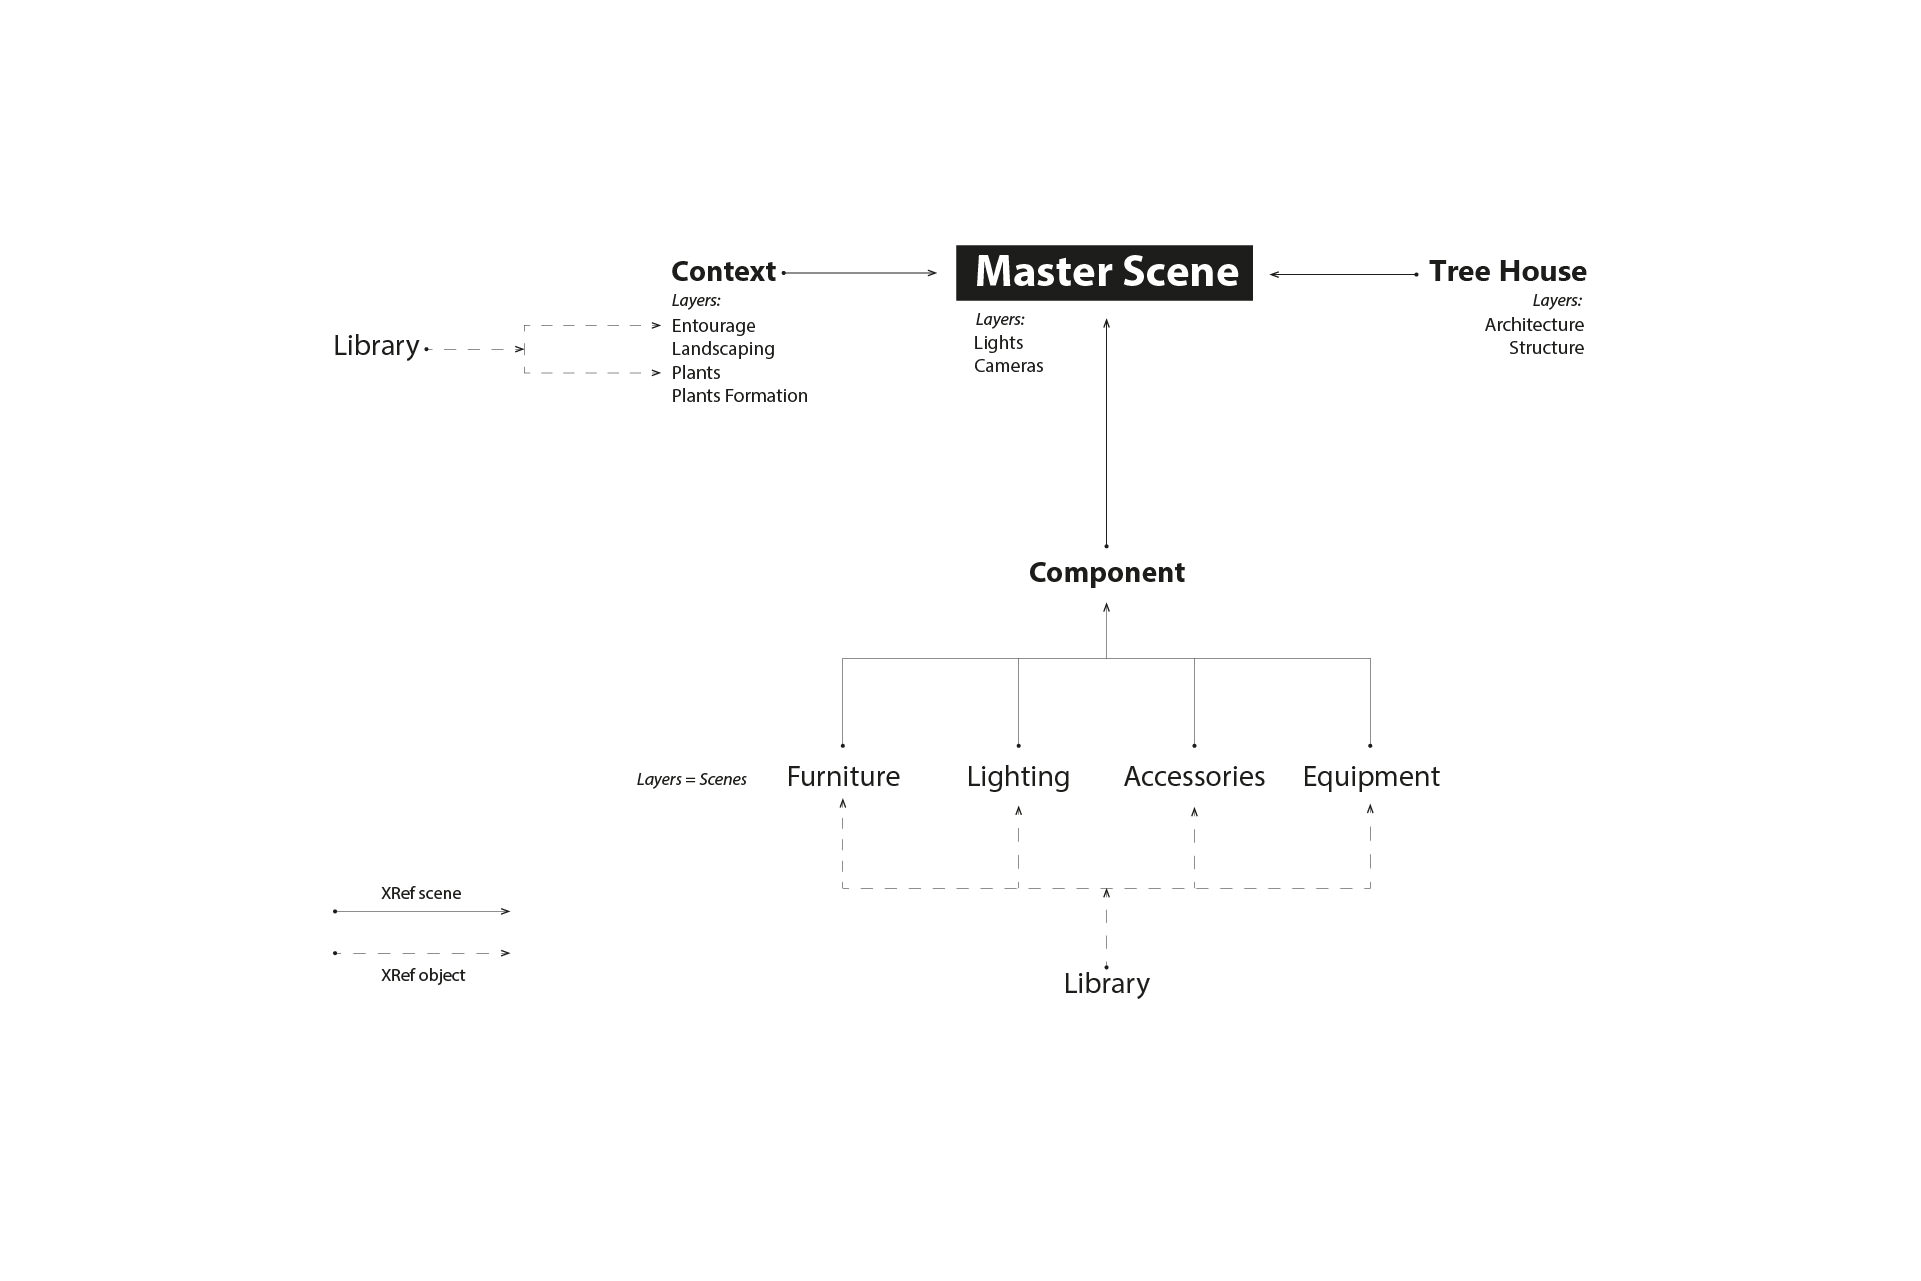
Tree House Constantia – Project Structure
Project Structure
Master Scene is the pivotal scene that includes all the constituent elements of the project. By using Xref Scene, you can save disk space, and the scene can be saved in seconds. The Master Scene has a predefined layer organization. In essence, this is an empty scene containing the render, light and camera settings. We managed to create 10 scenes of different lighting while not controlling all the changes in geometry – an identical set of links was loaded into each Master Scene. It is essential that each participant can work on his part independently of the rest of the team. During this process, the Master Scene will be updated continuously.
In complex scenes, the use of Xref Scene makes it easy to optimize the operation of resources: for particular views (cameras), where objects do not fall into the frame, we can disable resource-intensive external links.
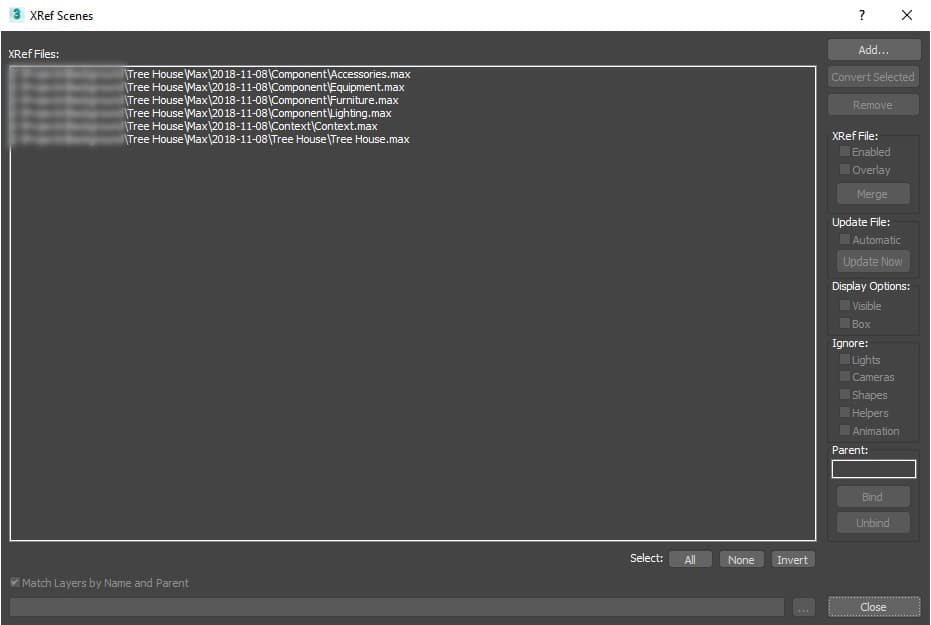
Xref Scene is loaded into the central scene – Master Scene
We use the predefined layers. The screenshot with the layers of one of the Master Scene, when all external links of Xref Scenes are connected is presented below.
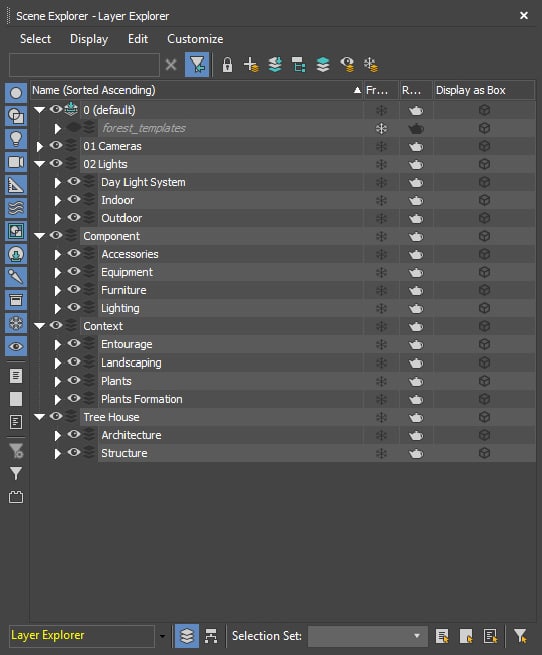
Layer Explorer in the Master Scene
Components
Components are all objects that we store in our library. The file organization is identical to the layer structure used in 3ds Max scenes.
Further, we will briefly describe how the model is processed before it gets into the final scene.
A set of rules have been worked out, here are some of them:
⦁ The model must be at the origin (X=0, Y=0, Z=0)
⦁ The pivot point is at the base of the model
⦁ Units Setup Settings: Display Unit Scale: Millimeters, System unit setup: Meters
⦁ Set the path to all textures
⦁ The model should be in the appropriate layer (to avoid further random names of layers in the Layer Manager)
A studio in which IBL (Image Based Lighting) is used has been created to set up materials.
HDR image Reading Room was used for setting up shaders of indoor objects. You can download it from hdrihaven.com at this link
The Corona Renderer settings for the Studio are presented below :
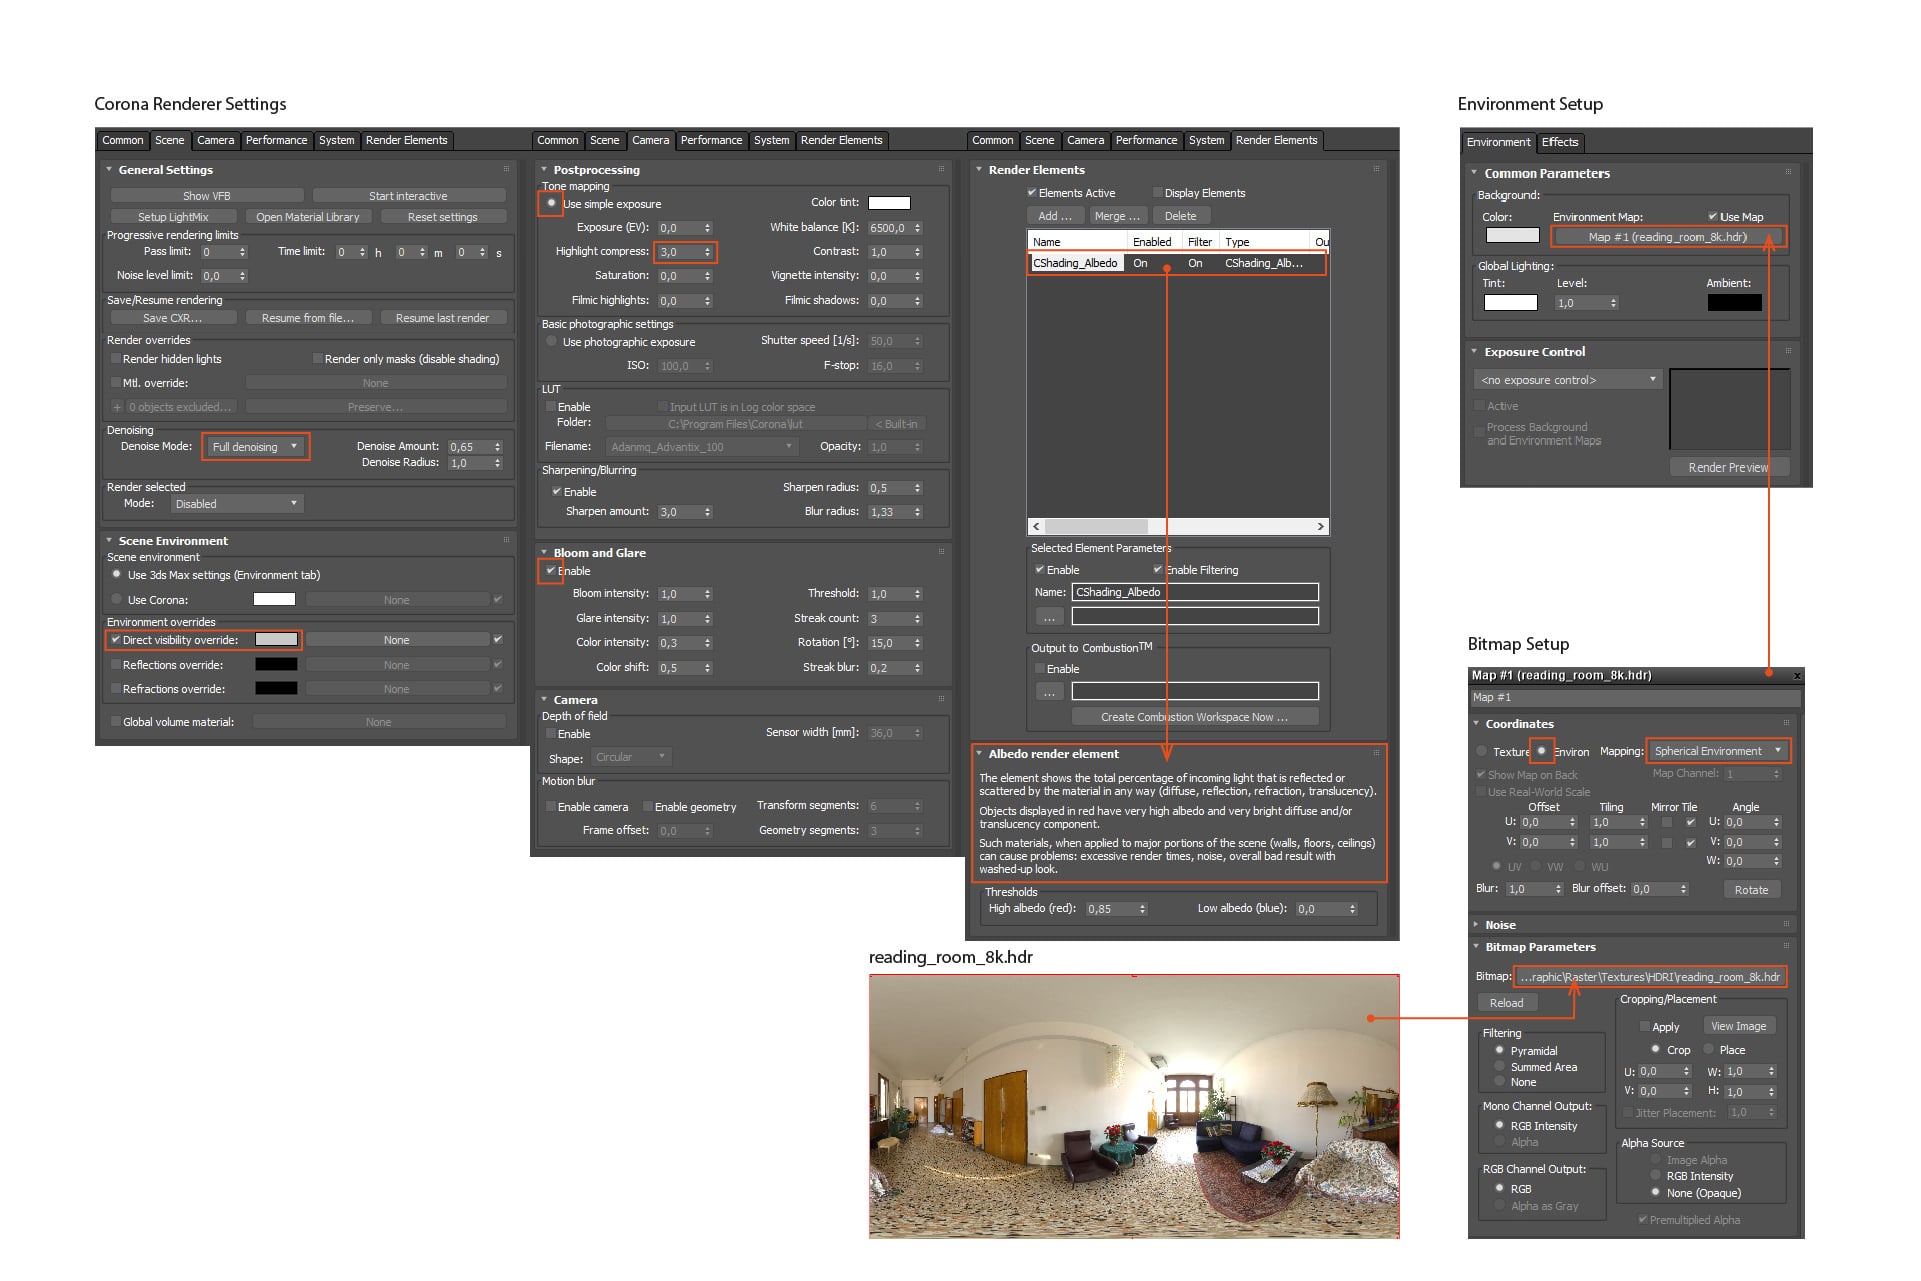
Corona Renderer settings for the Studio
The Studio presets can be loaded to the scene further and you can set up the shaders and be sure that they will be exactly the same in the final scene.

Loading presets for shaders customization
Thus, all the components used in this project were prepared, and then loaded into the working scene as Xref objects.
Context
Any object interacts with the Context, which, in essence, is the environment. The architectural context can be urban, suburban, rural, mountainous, steppe, or whatever.
The conditions in which the object will be located are important. In many cases, it is the context that determines the approach to the design of an object.
In our case, Context is a base scene containing all the objects surrounding Tree House.
After analyzing the vegetation in the area around the Tree House, the following assets were prepared.

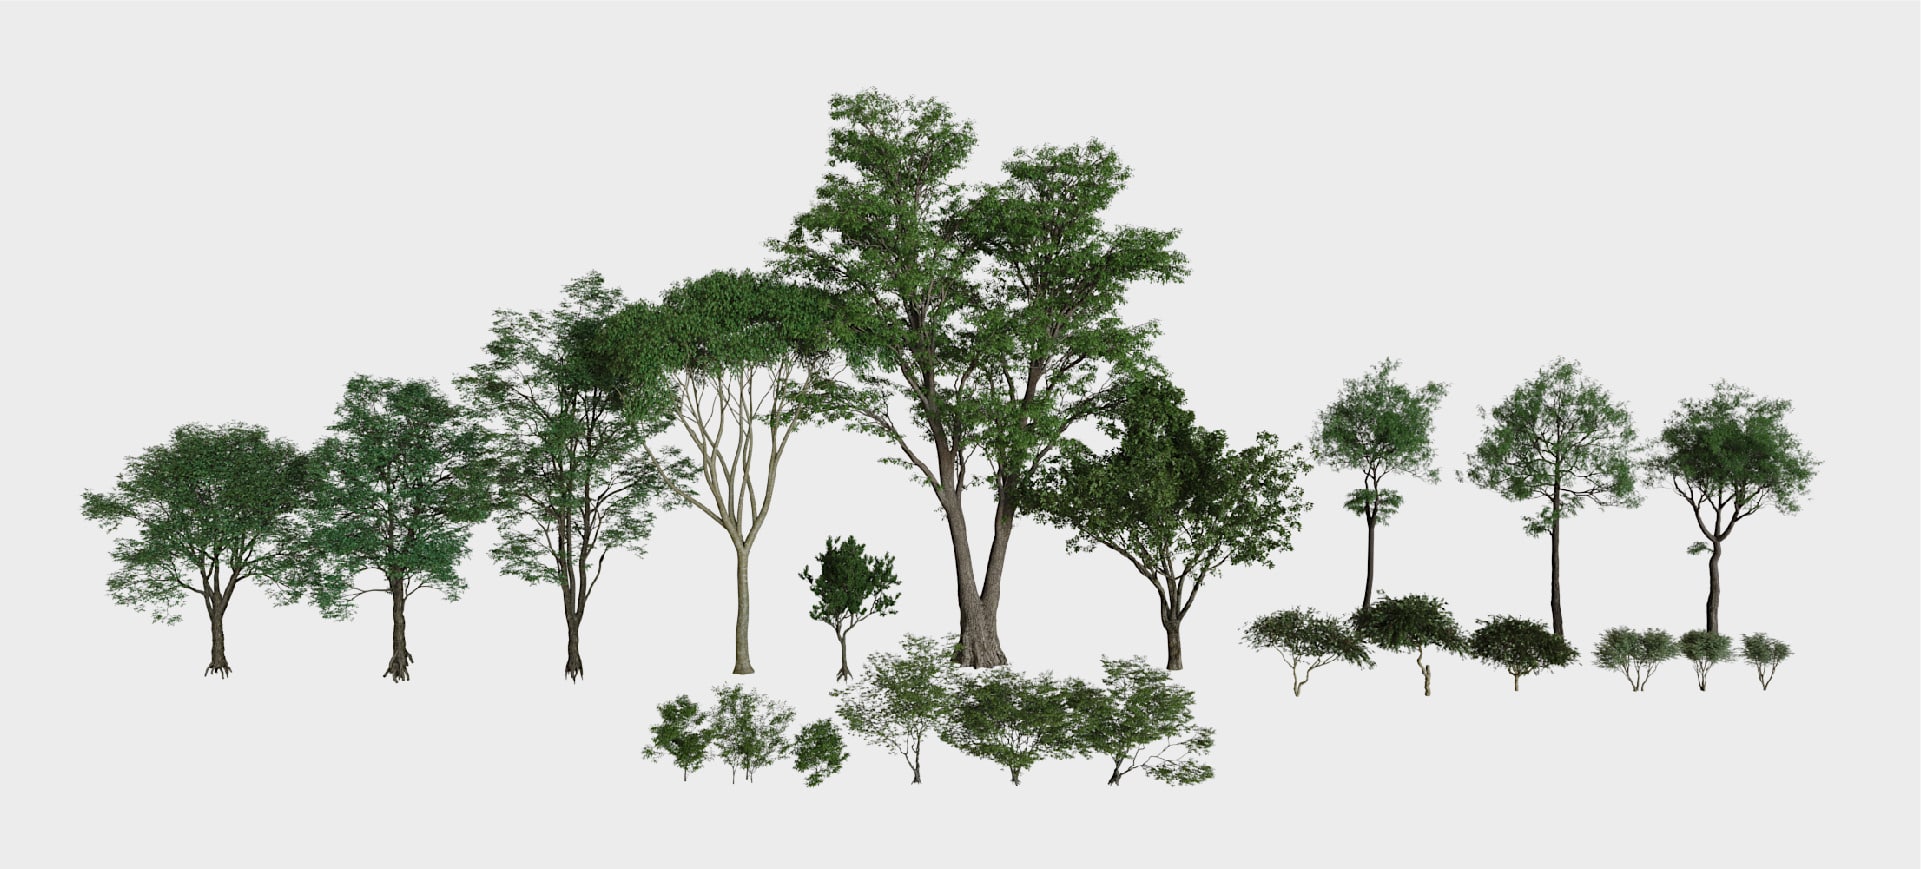
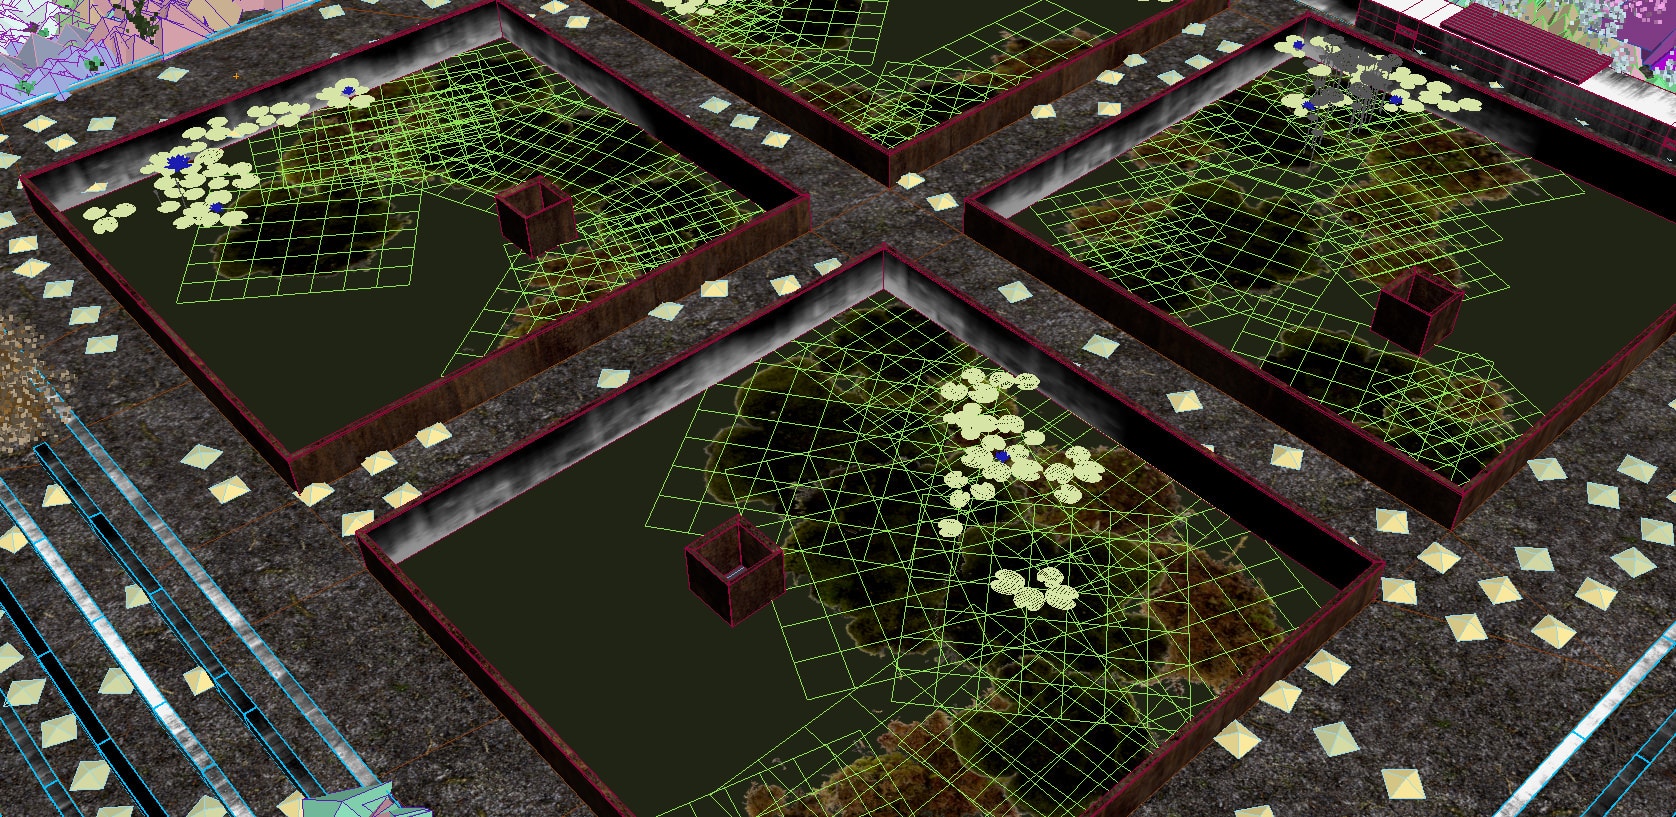
In separate scenes with the help of the Forest Pack, the Plants Formation Sets were developed – this is convenient, it allows you not to be distracted by other elements of the environment, the scene is simple, and the resulting asset can be used in future projects.
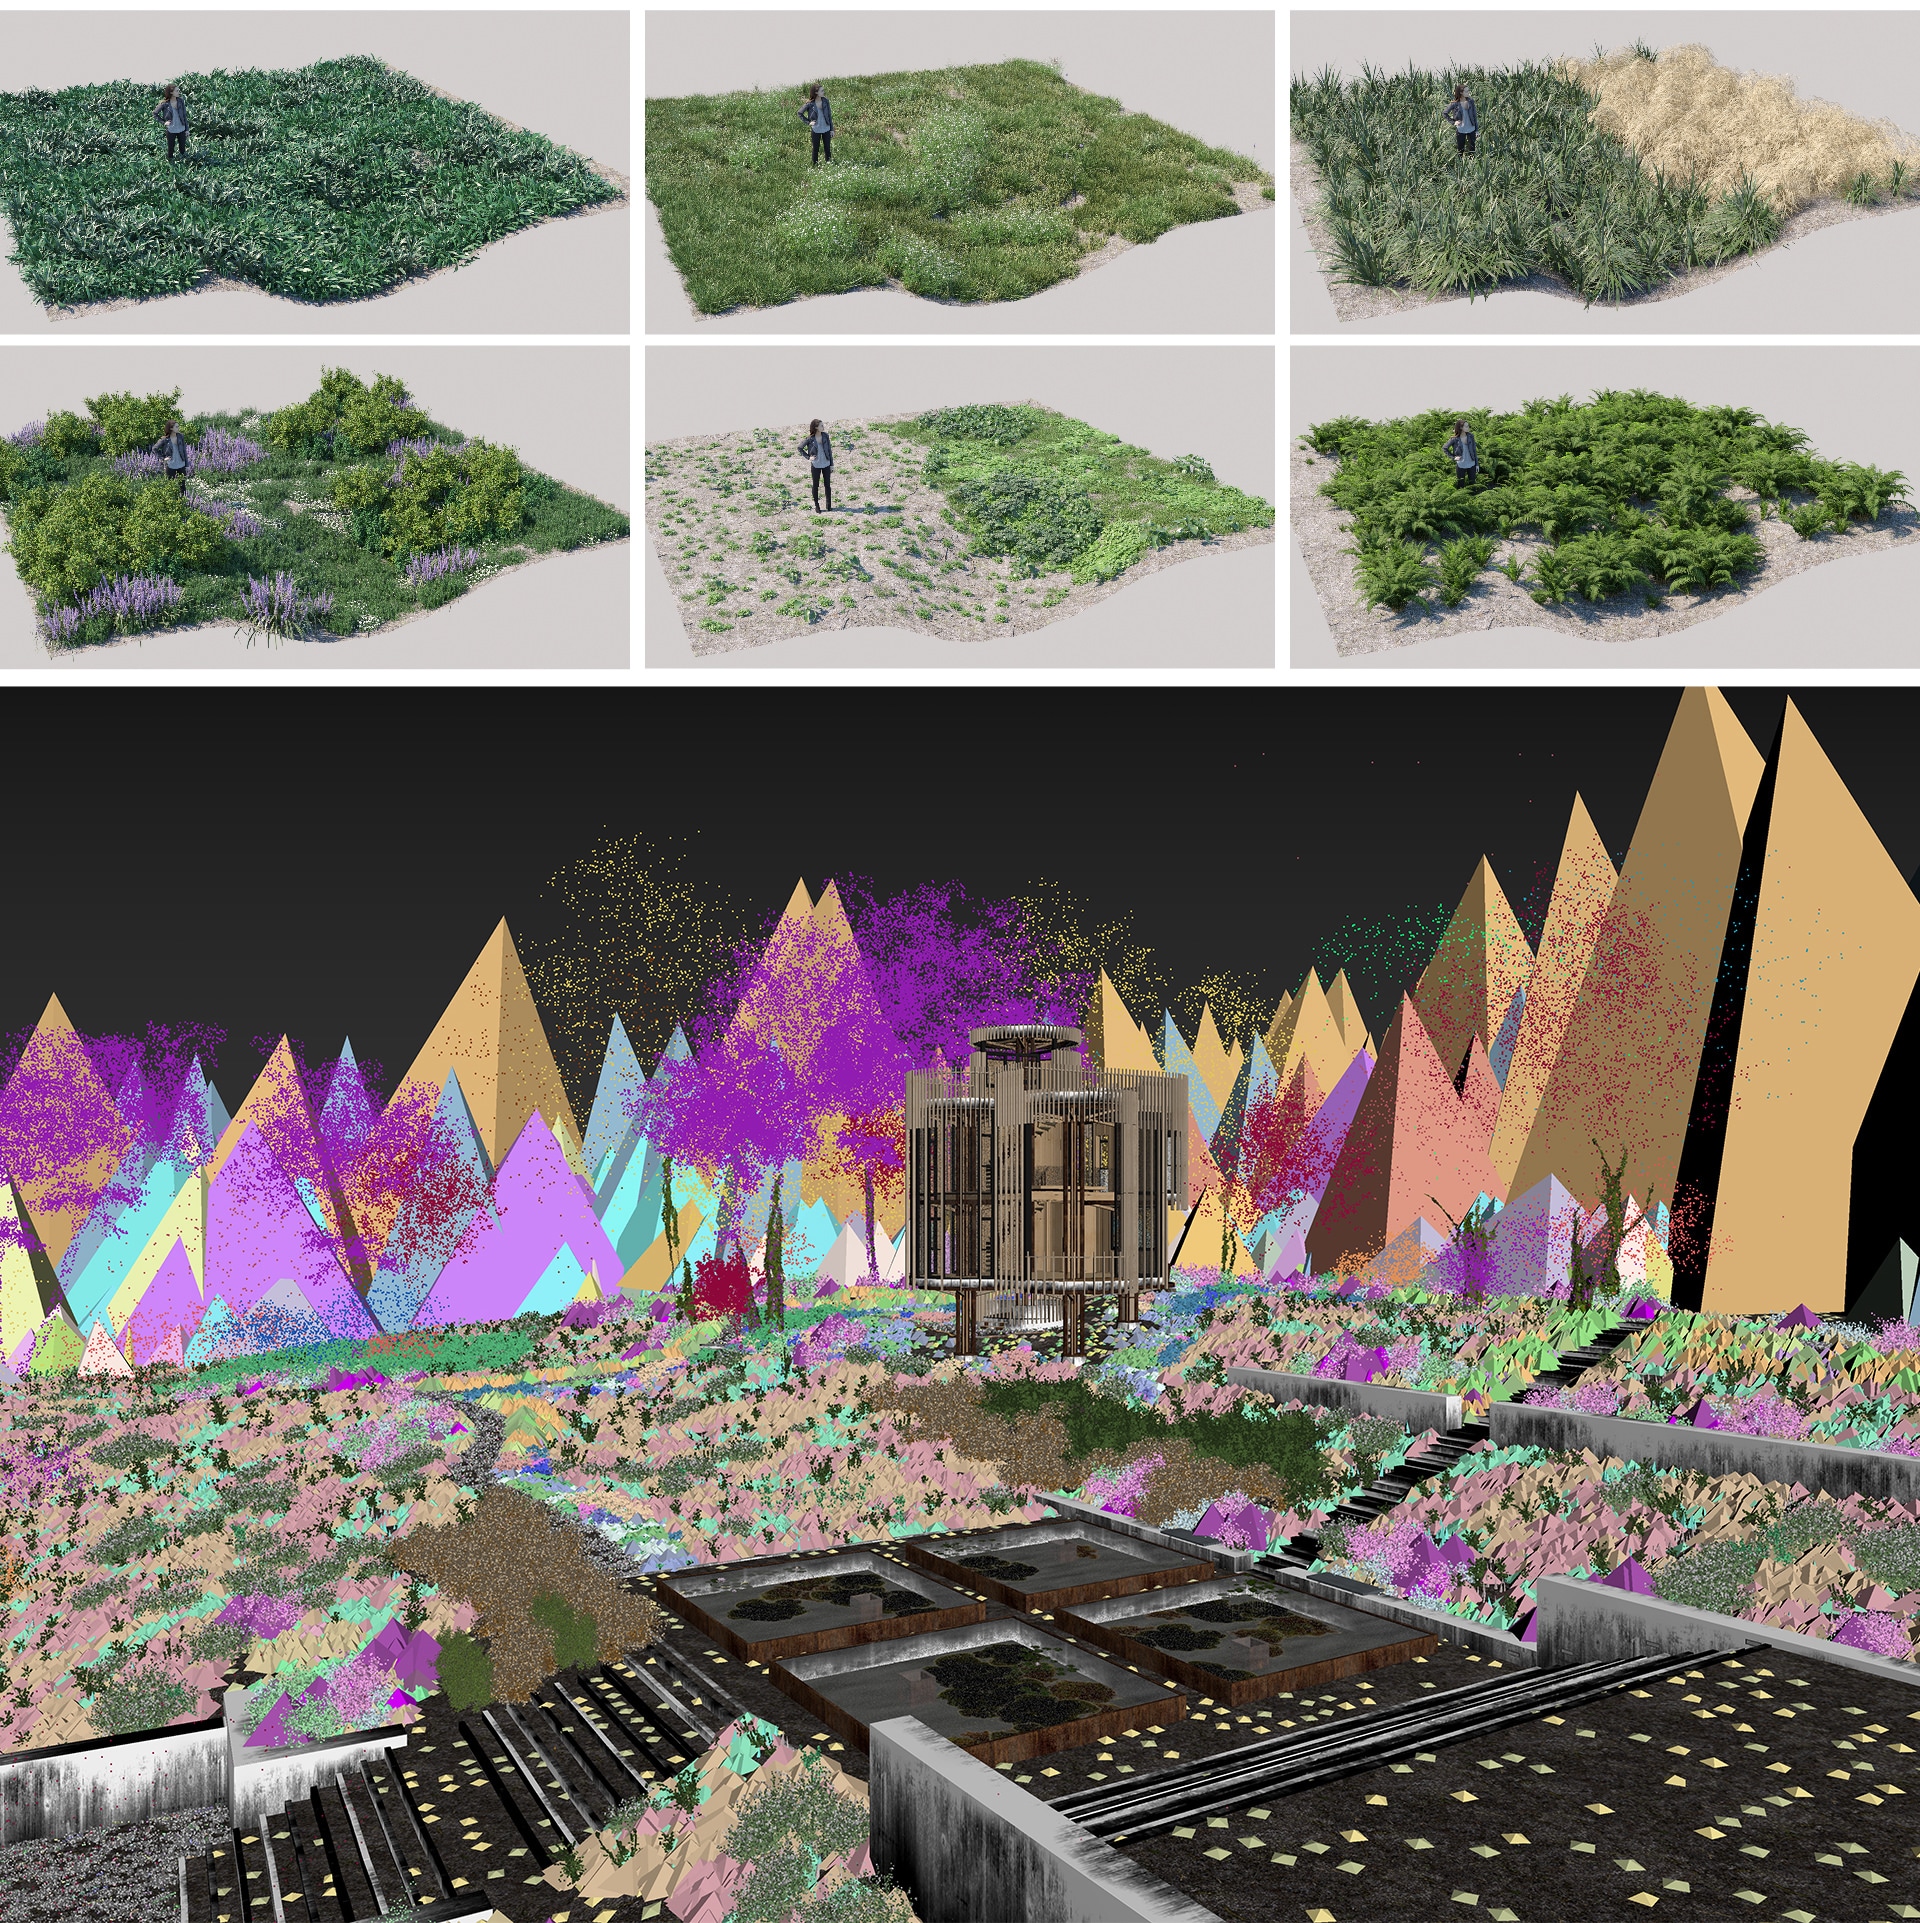
Plants formation sets
We used splines to define different areas of the Plants Formation distribution.
In total, the project used 19 Forest Pack objects.
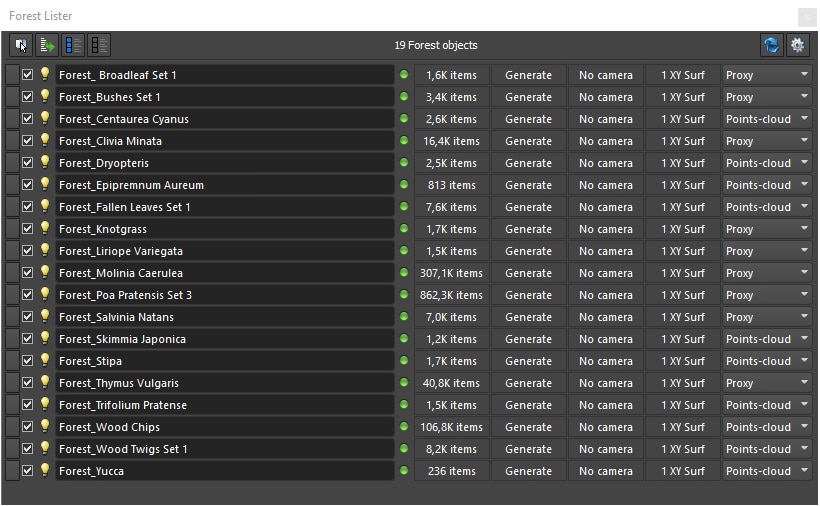
Forest Lister
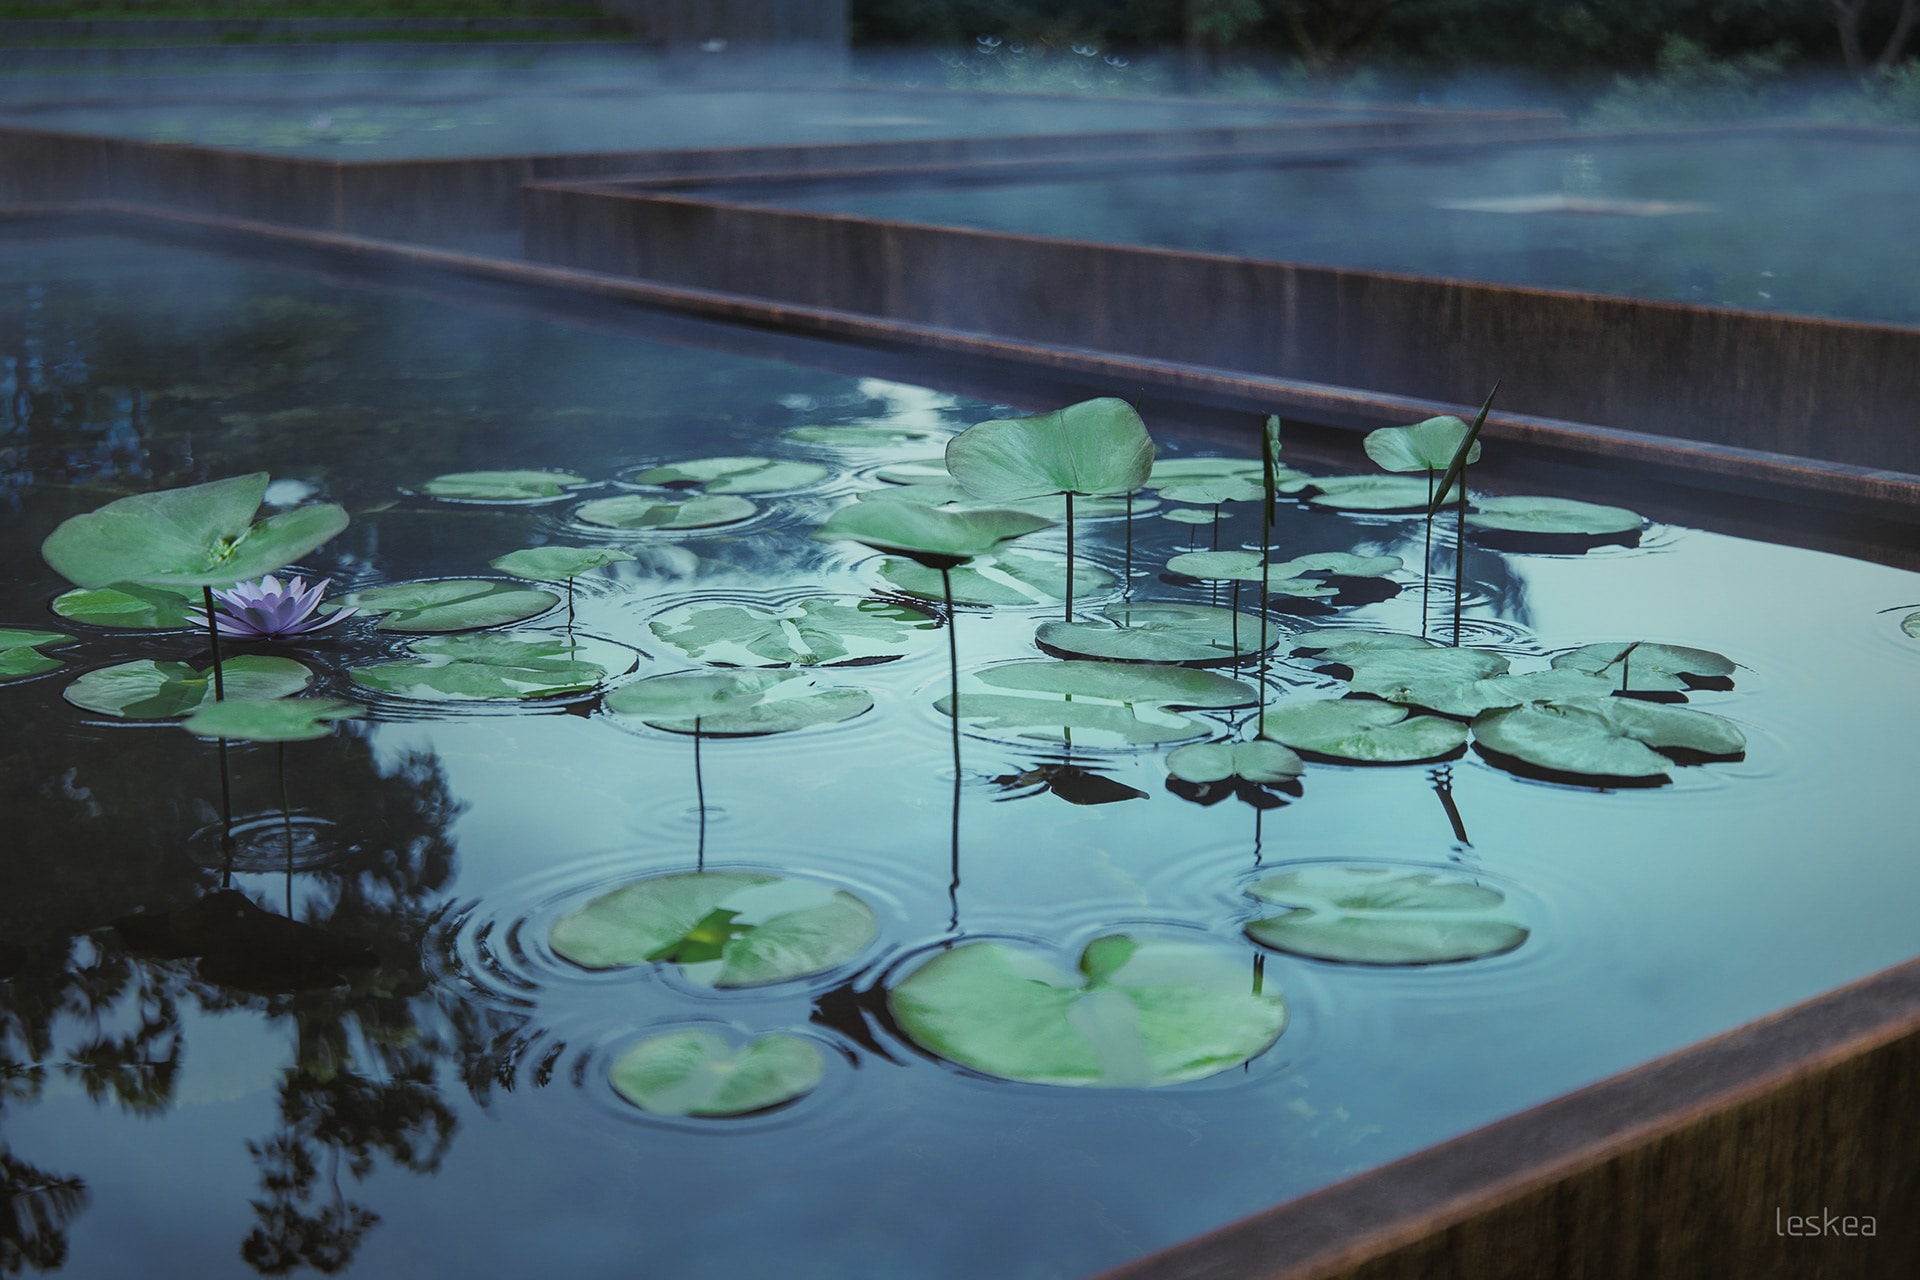
The project received a large number of positive reviews, many were interested in the reflection ponds, in particular, the creation of algae, creeping mist, and ripples on the water from lilies.
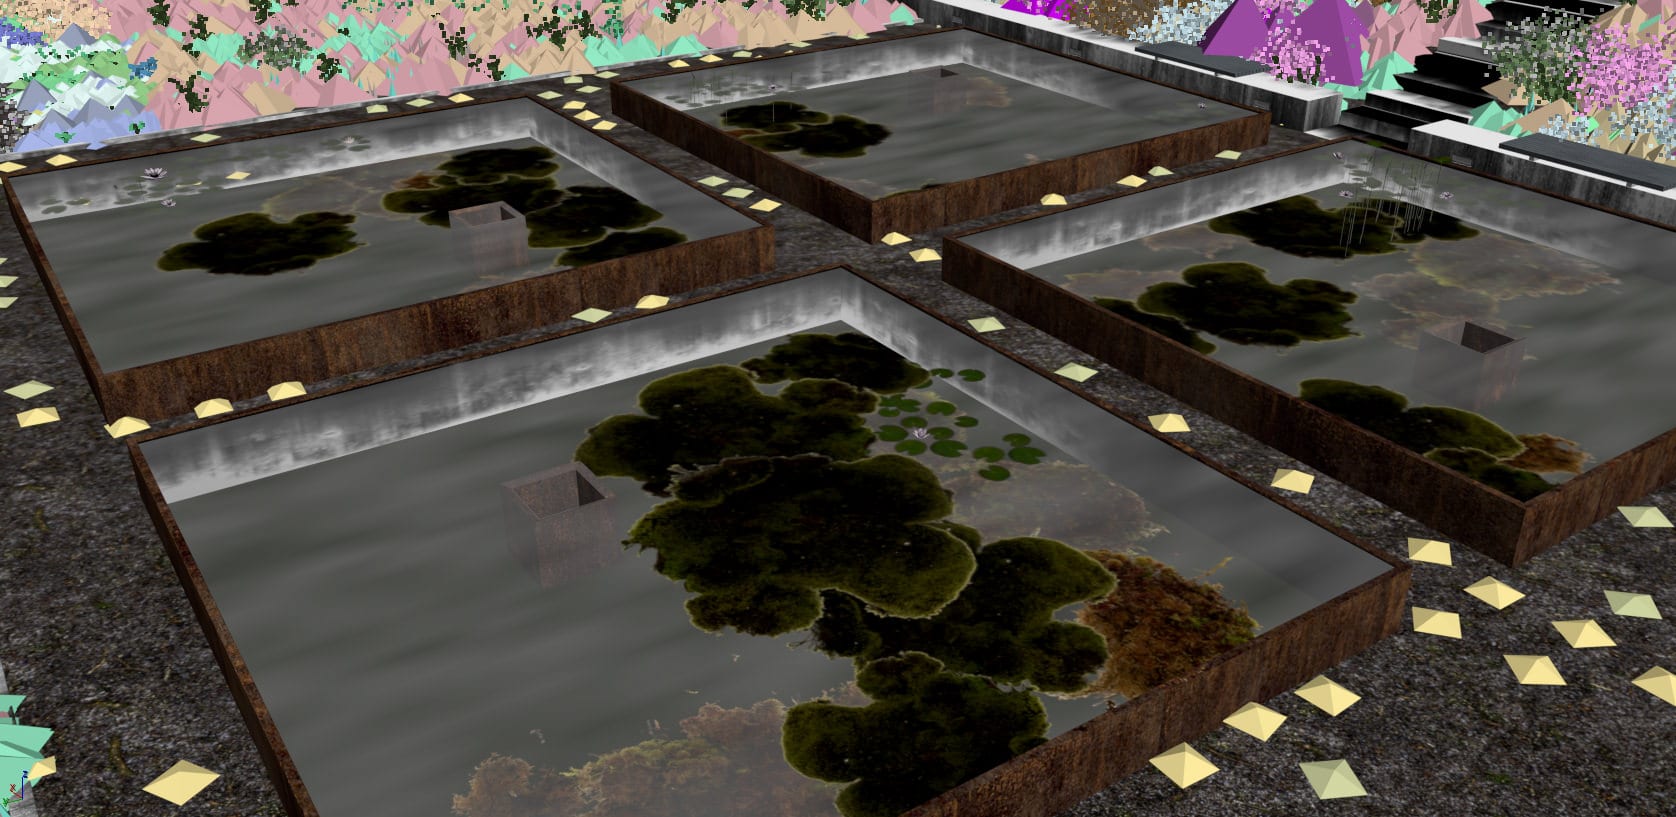
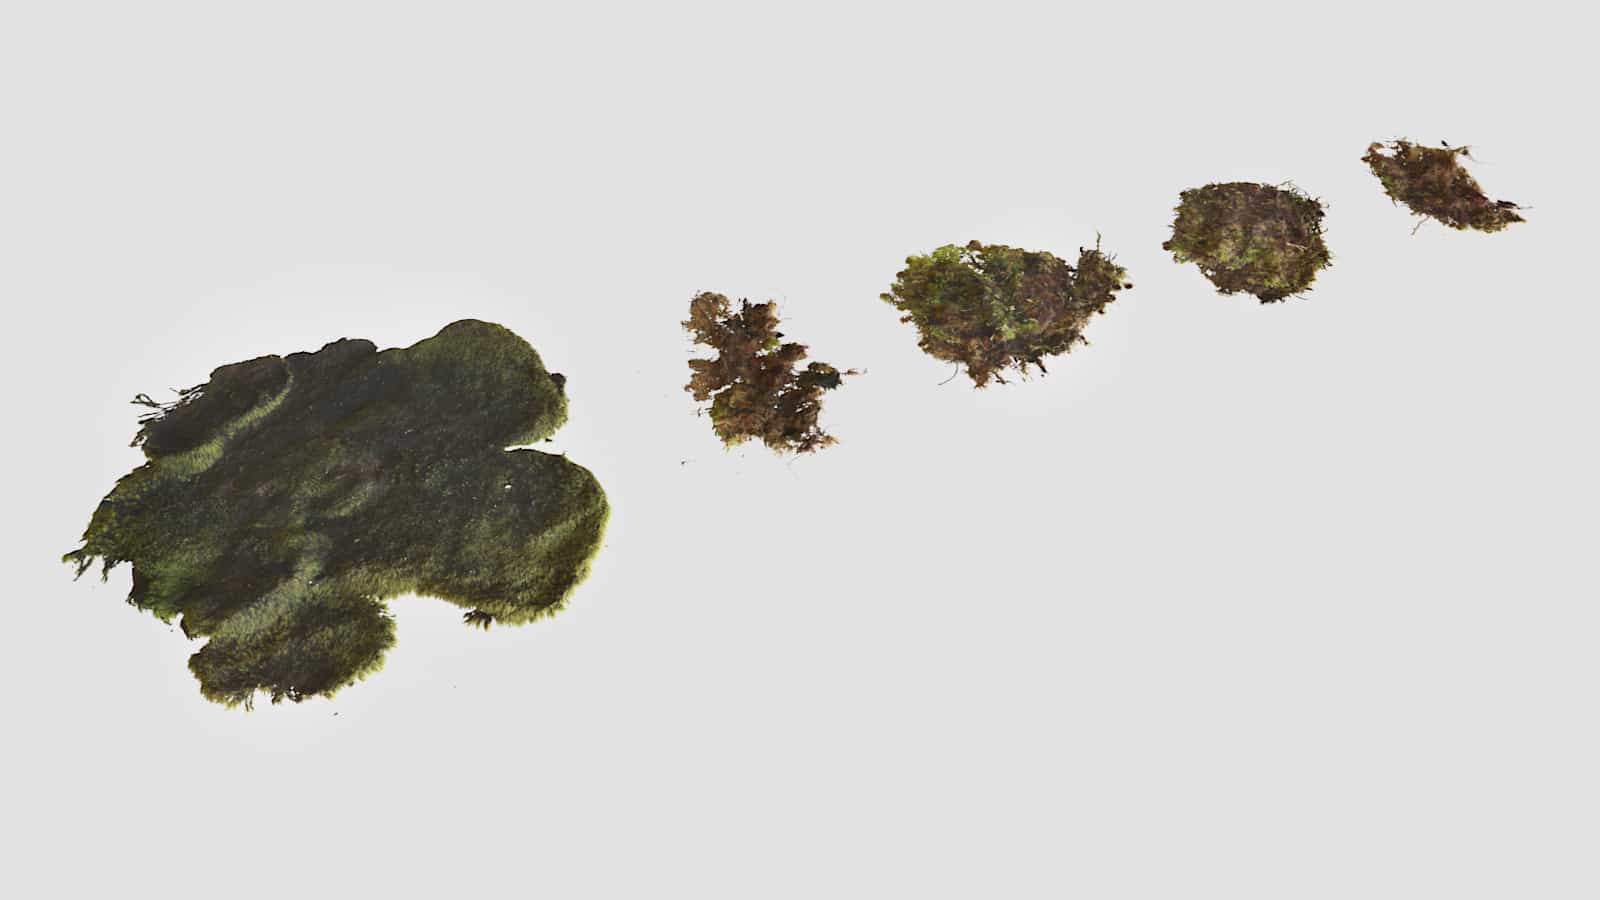
Pond Algae
We used the moss texture from Megascans for algae, which was projected onto a simple plane. The shader had a displacement and an opacity map. Further, the resulting model was randomly scattered across the bottom of the pond.
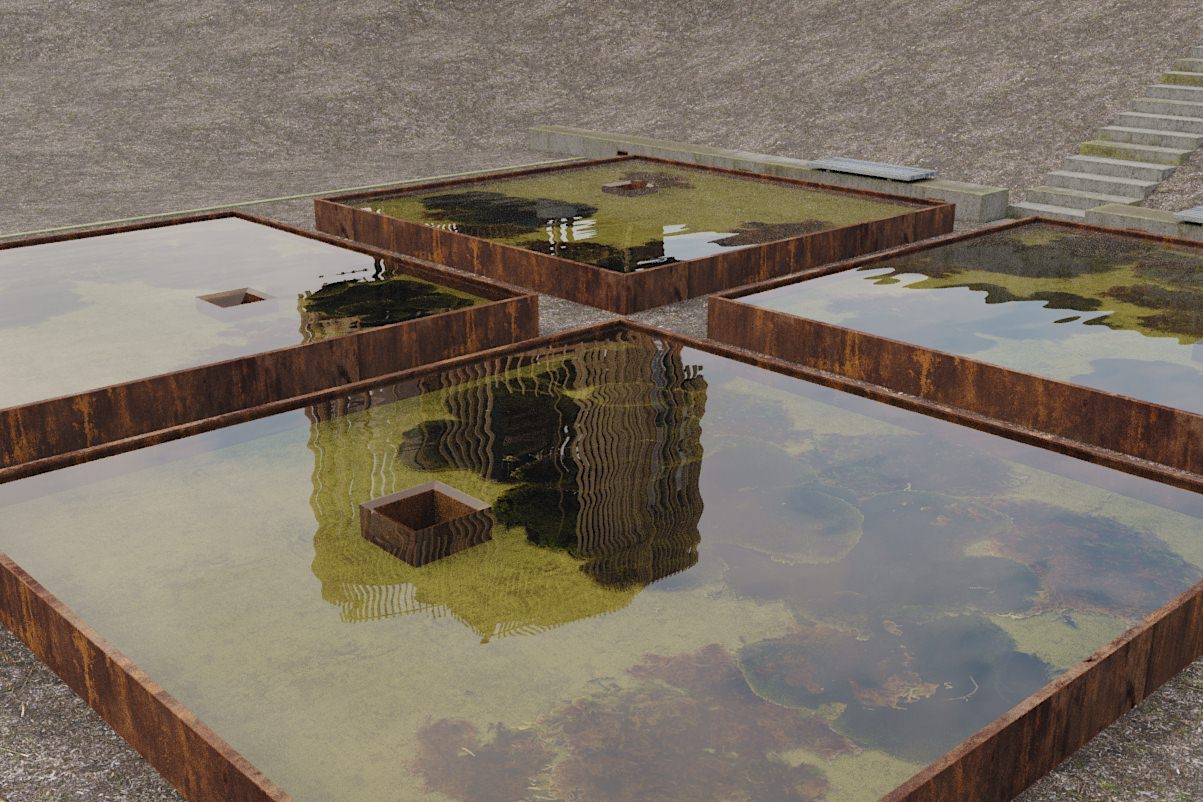
Ripples
A water shader was created using the Corona Distance map. The ripples were obtained by displacement, which used the procedural Gradient Ramp map. Corona Distance map was connected to the “Source Map” slot. When the lily stems touched the surface of the water, waves were generated. Material settings are presented below:
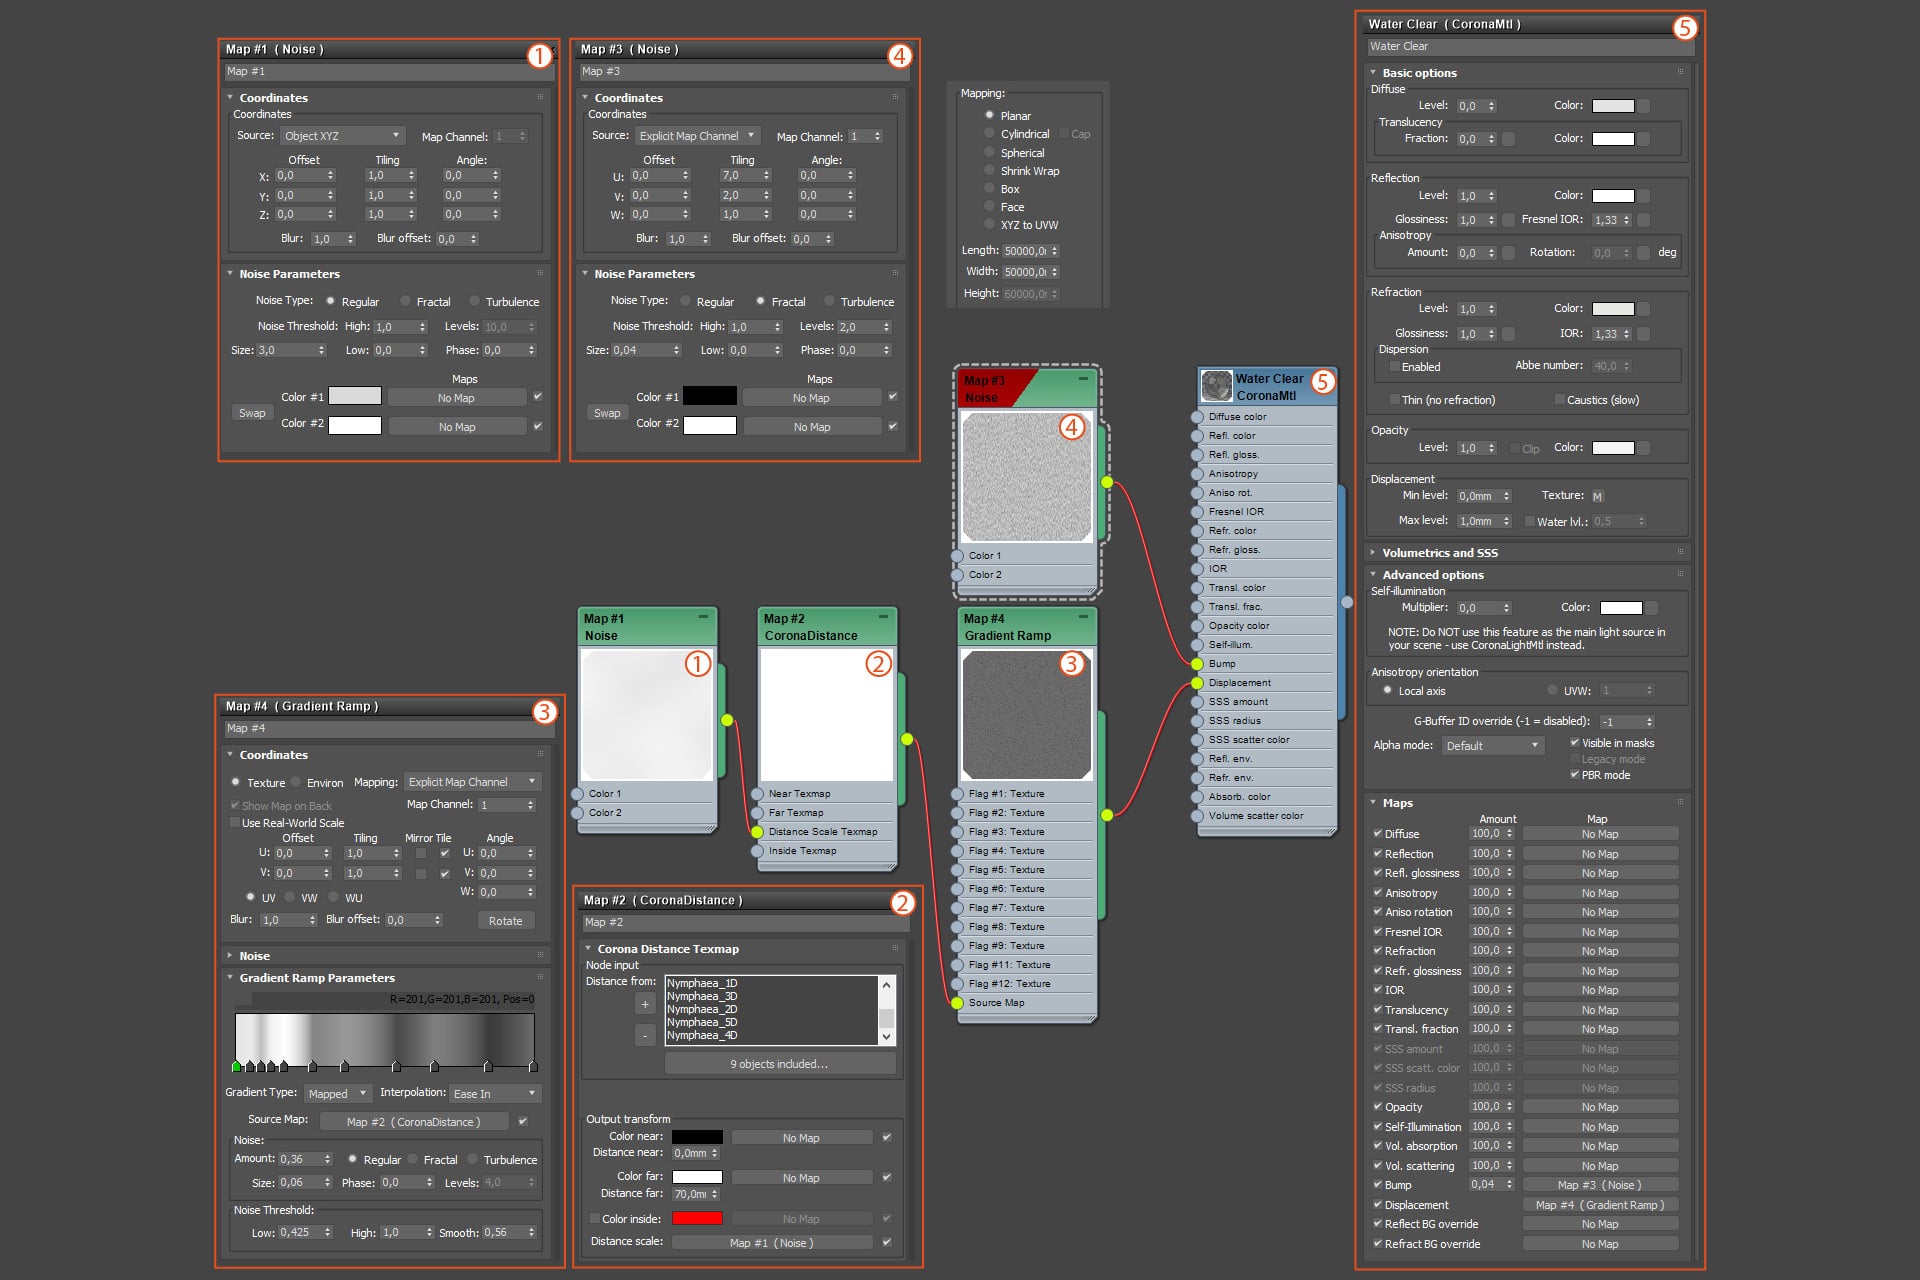
Ripples on water from lilies – water shader
Creeping Mist
The creeping mist was also produced with the usage of the Corona Distance map.
A Fog Container was made above the ponds and planes (Fog Surface) were placed flush with the water.
It’s crucial never to put the camera inside the box volume, otherwise, the effect won’t work due to a limit of the Corona Renderer.
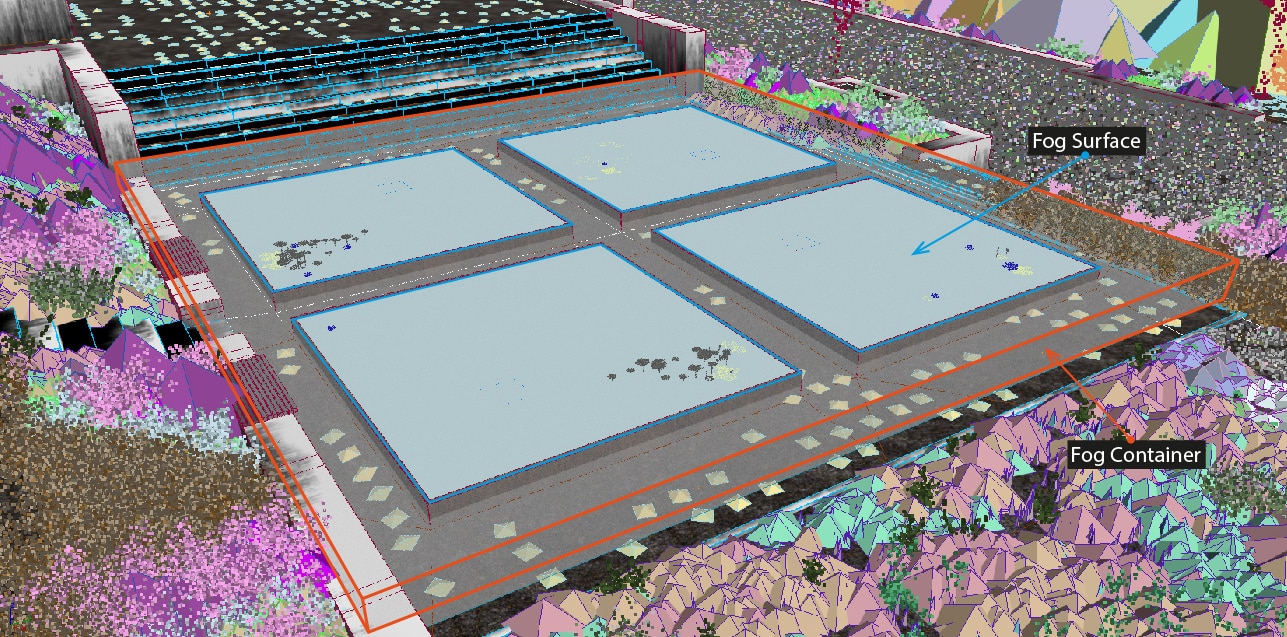
Base geometry to generate creeping fog
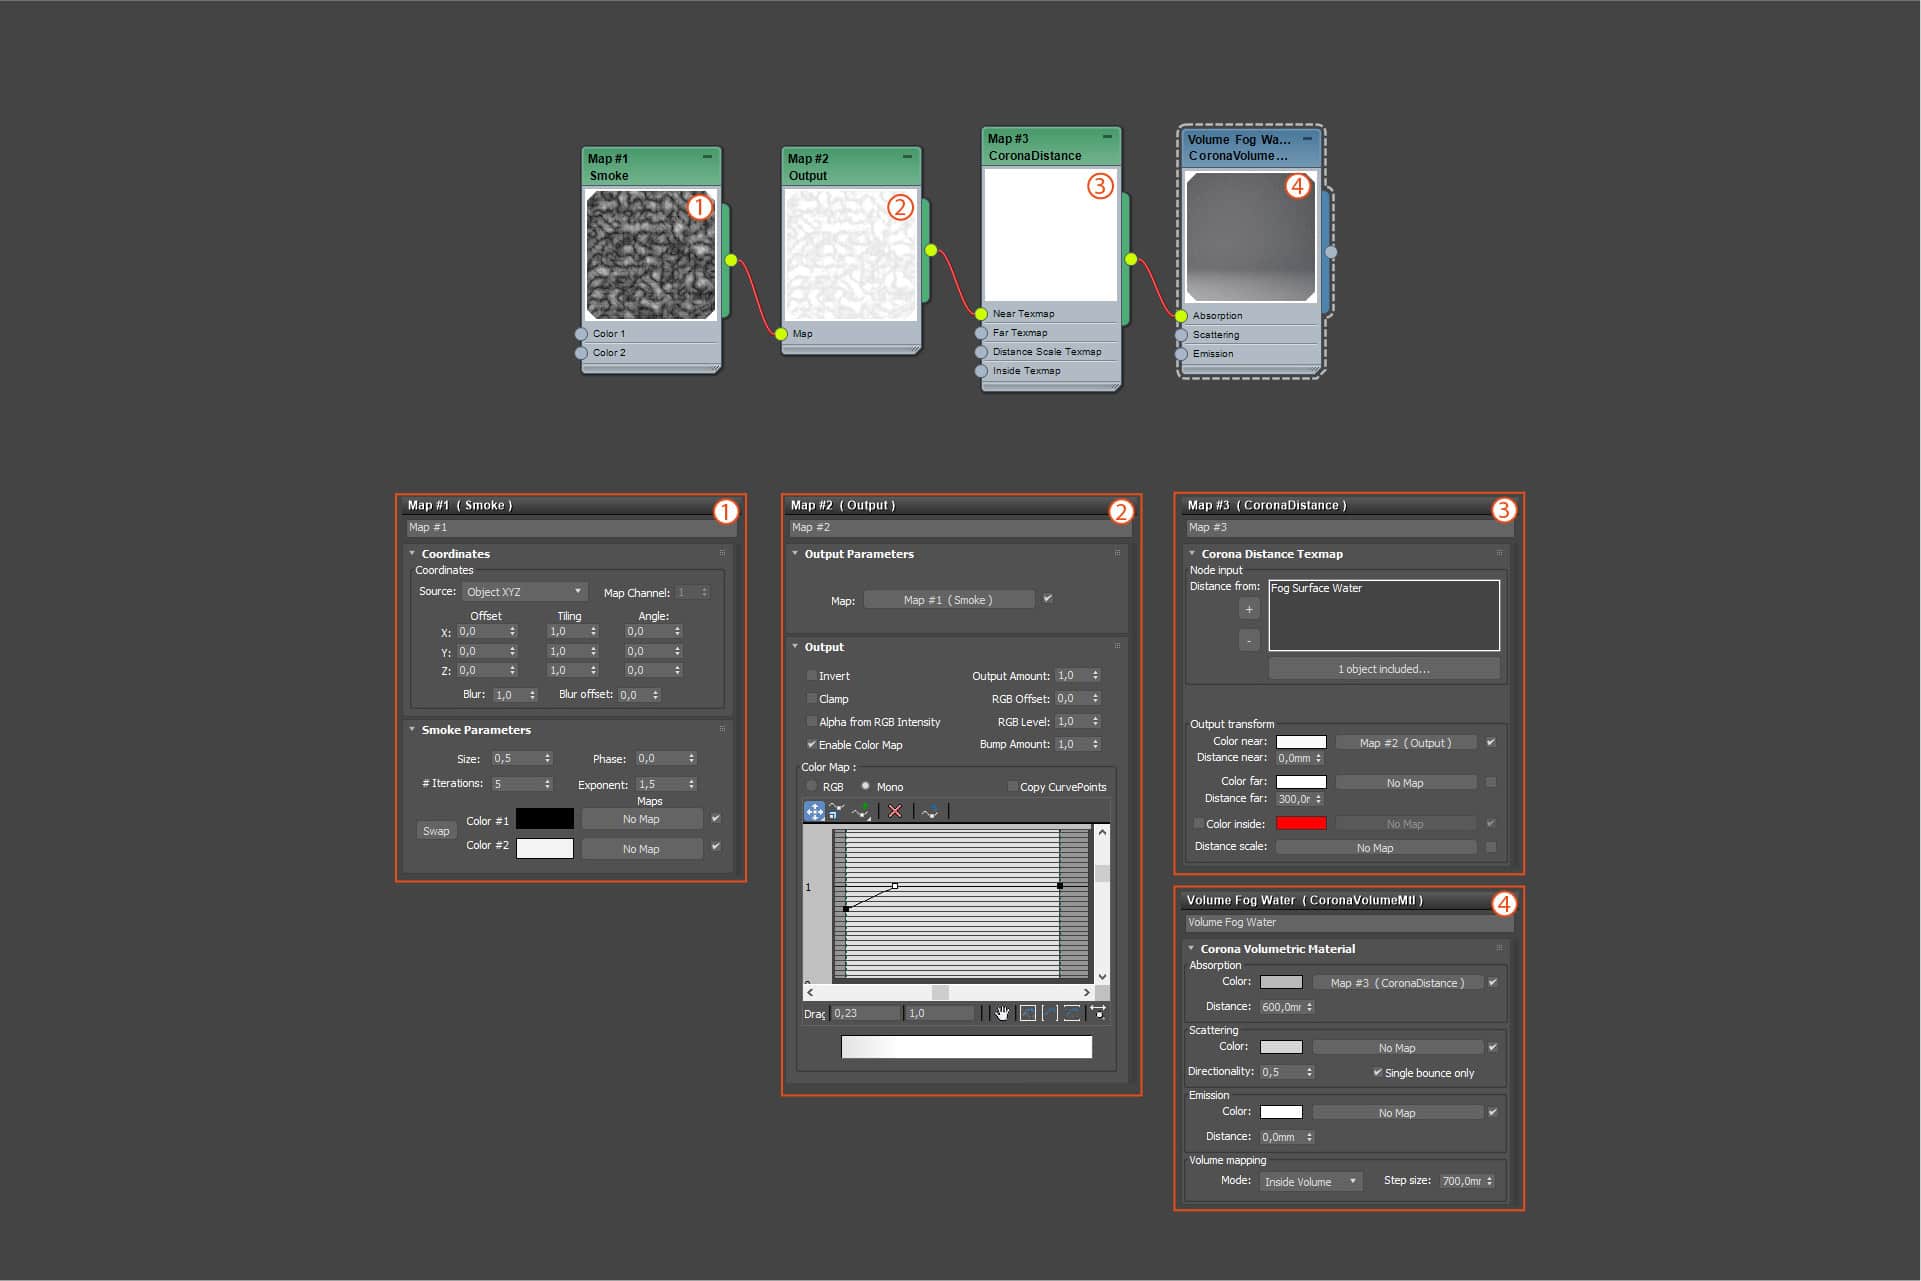
Fog shader setup in Corona Renderer
The Tree House
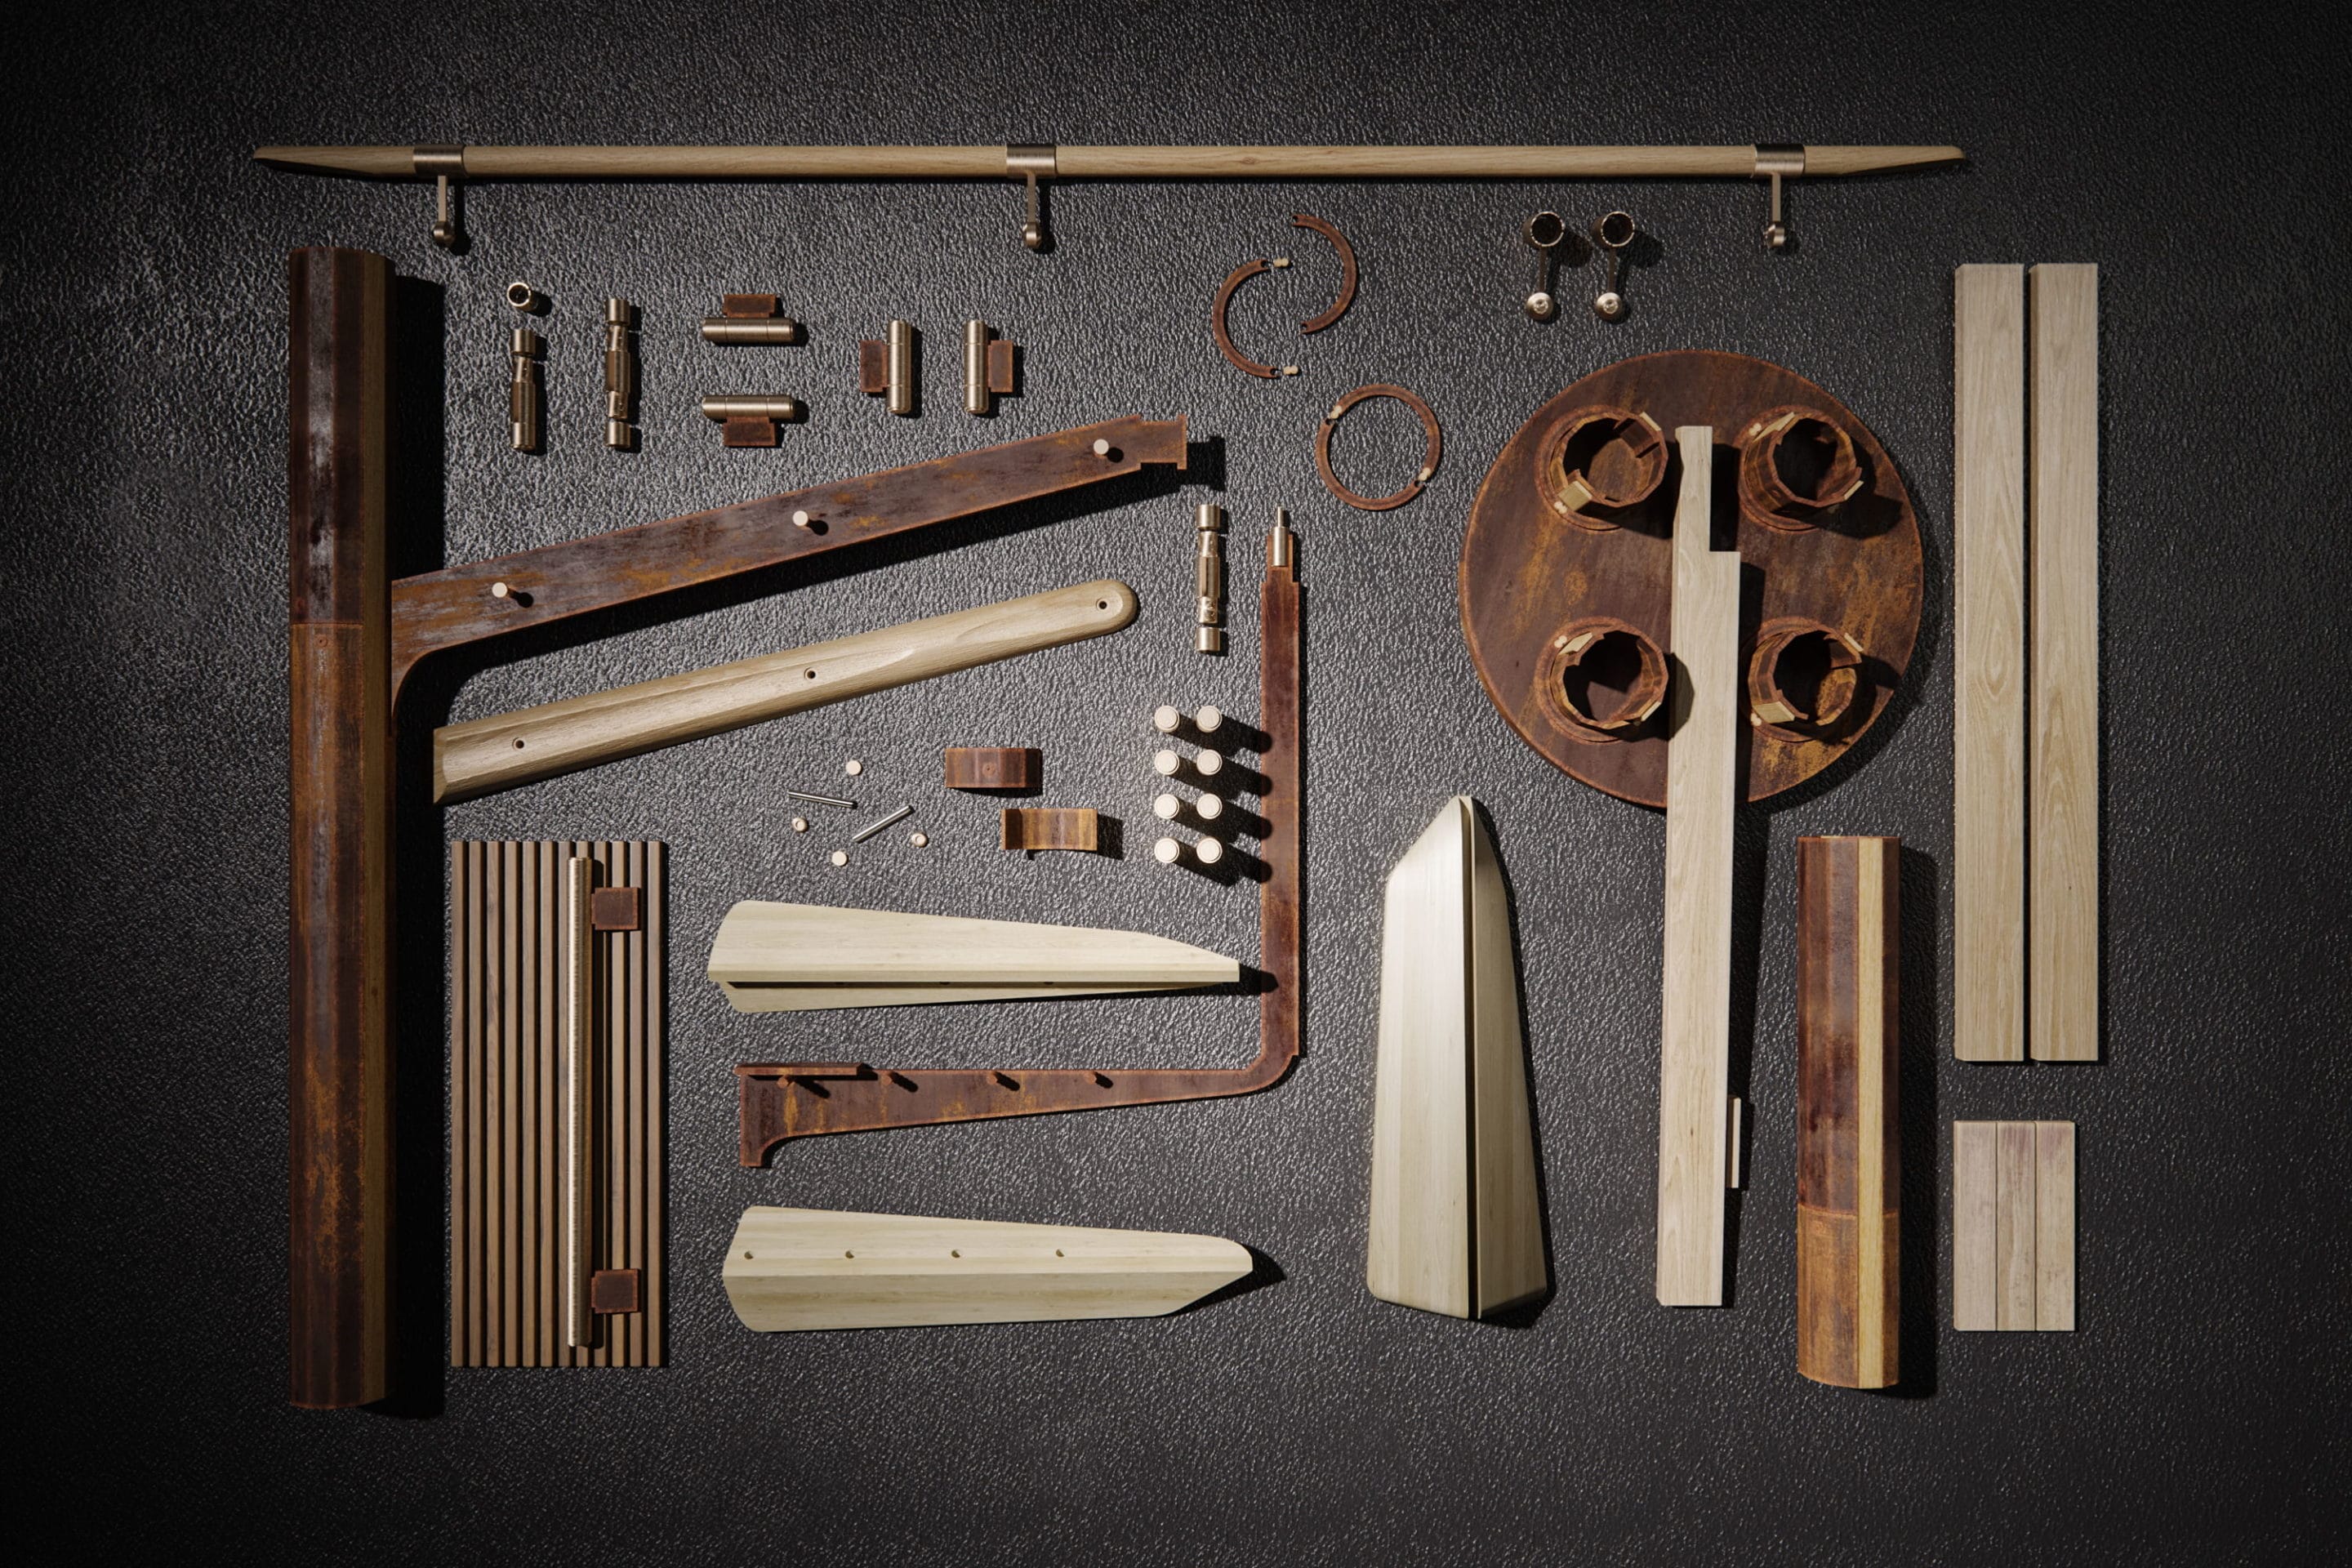
The main object of our scene – Tree House.
We divided the building into constructive and architectural parts. It was necessary to disassemble the building into its constituent elements.
Tree House layers are ordered according to architectural and structural elements (for example Structure: Slab, Floor, Column, Beam, etc.)
The basis for the model were the drawings that we made in AutoCAD. The name of the layers in the drawings fully correspond to the layers in the 3ds Max scenes.
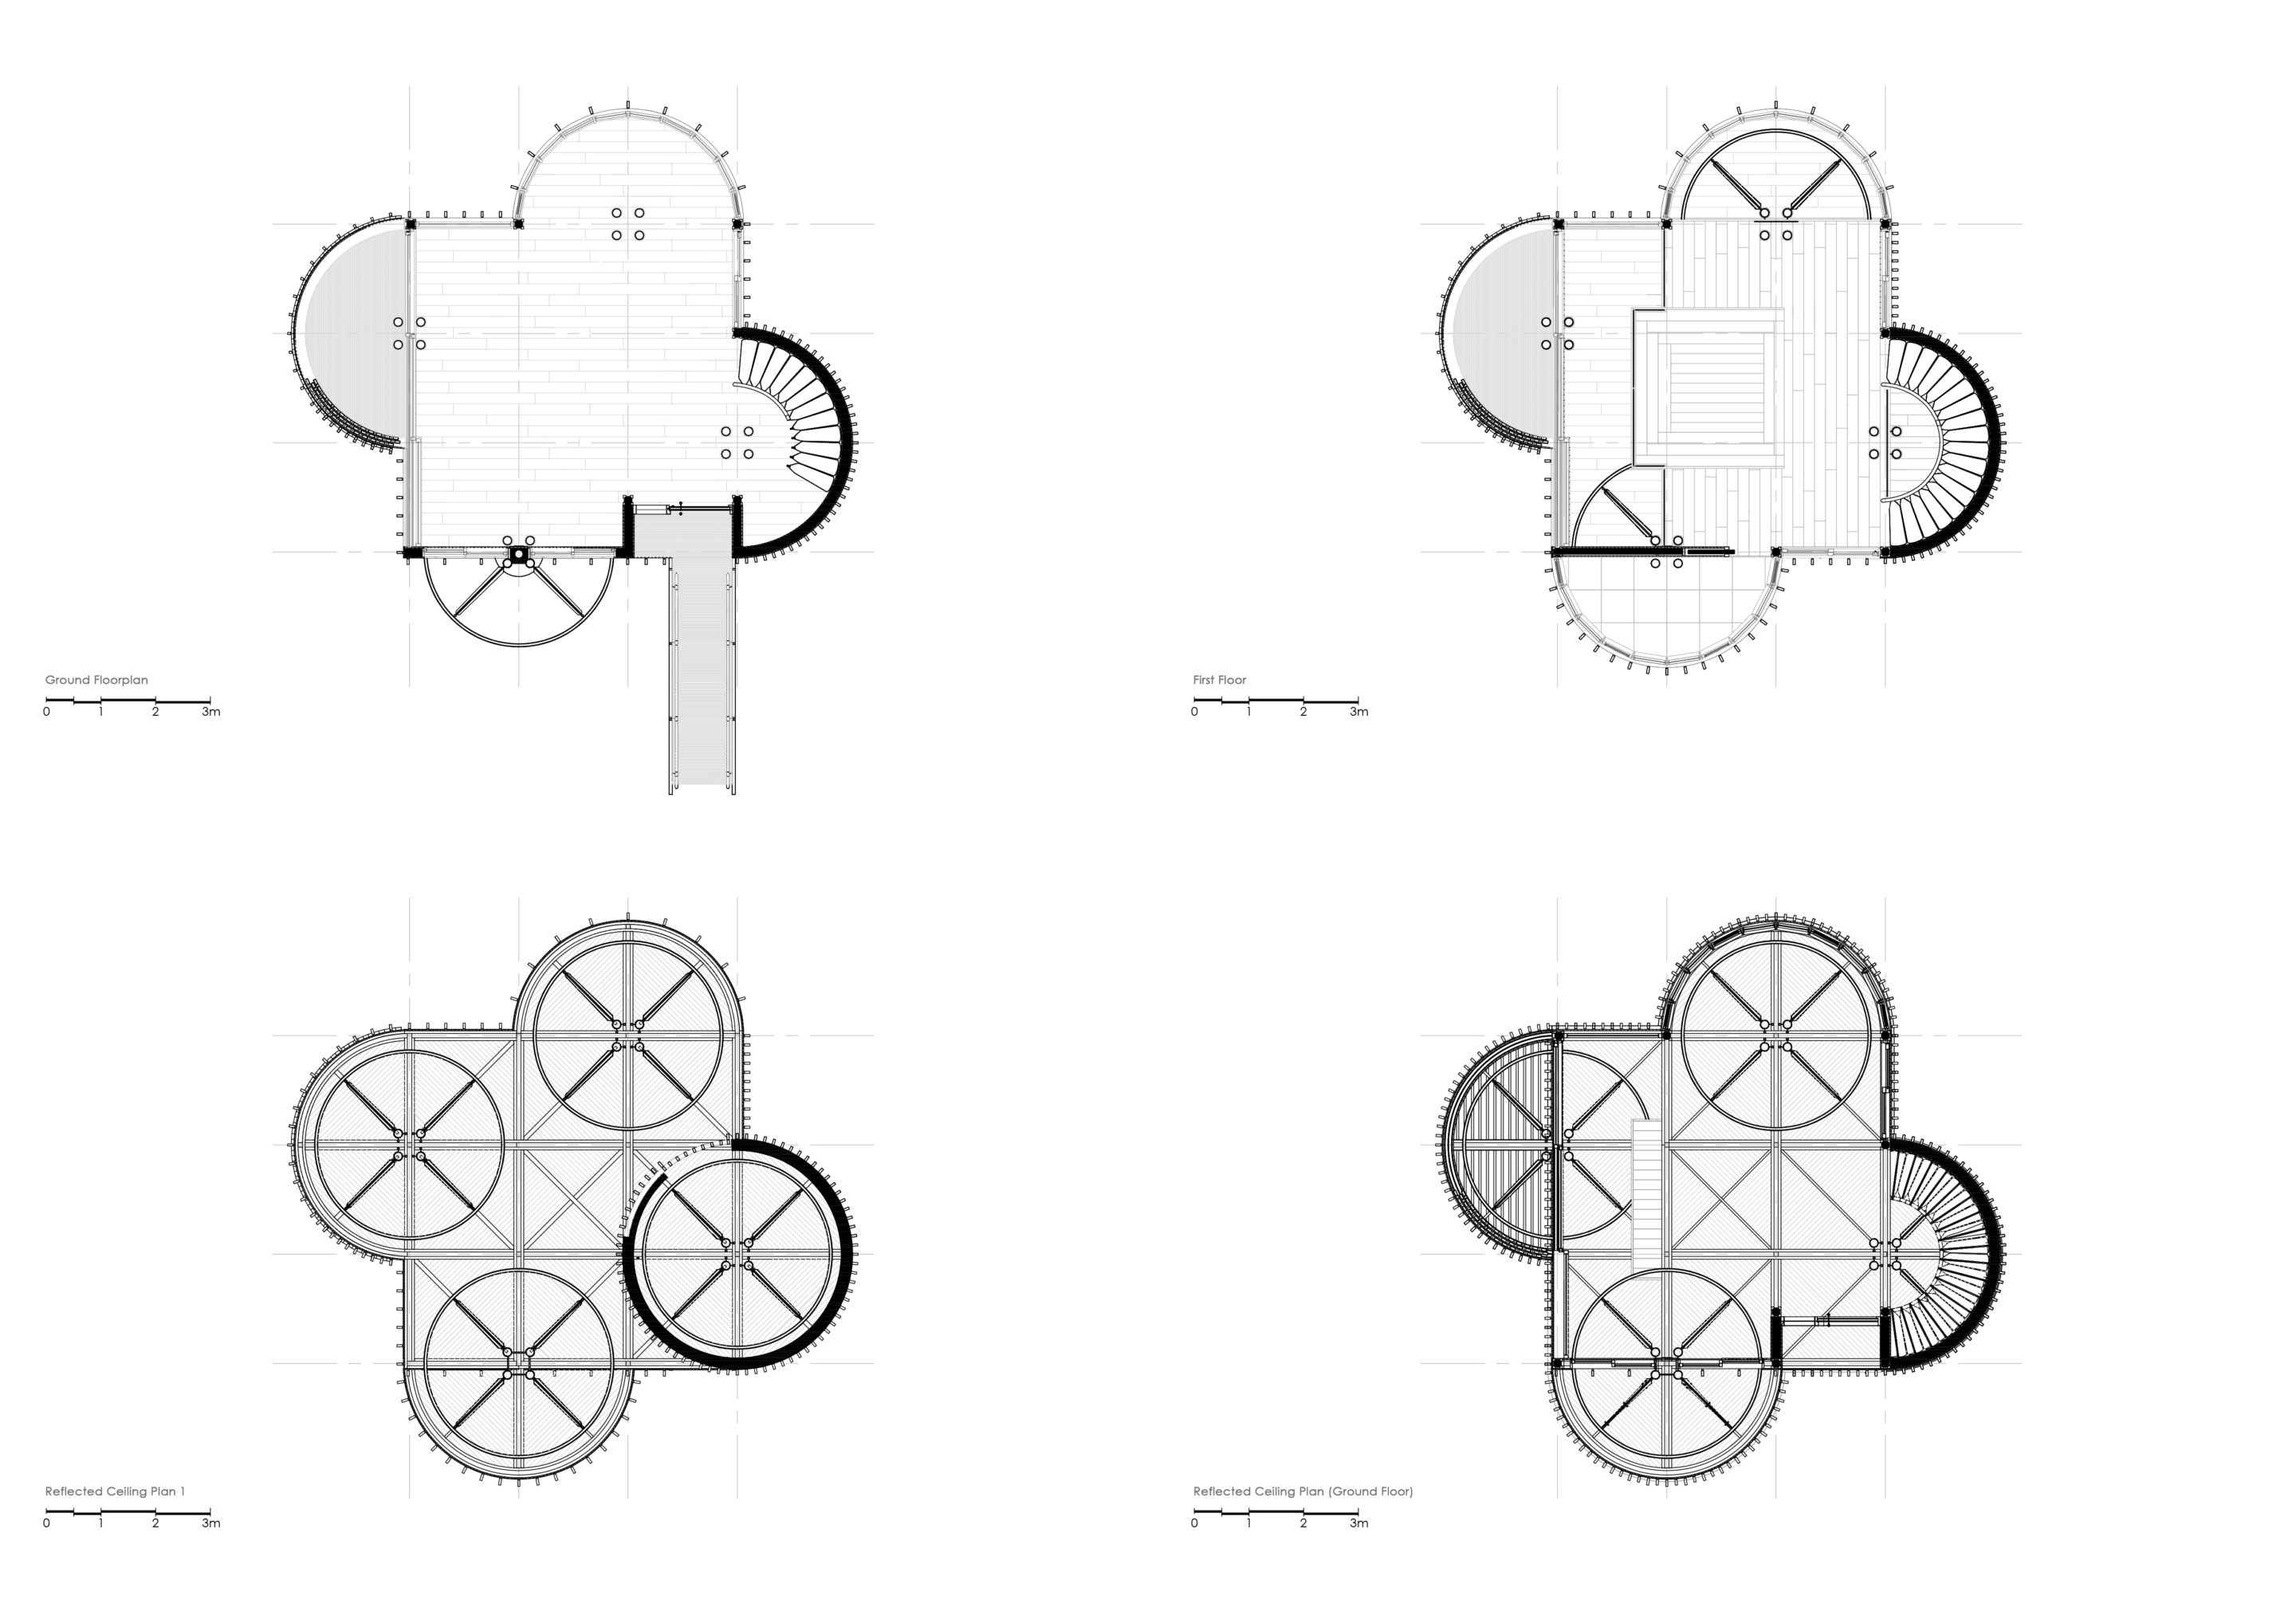
Precise drawings
These images were obtained after the building model has been ready. When modeling the building, all the constructive aspects were taken into account.
Materials
Particular attention in the project was given to shaders. The building did not have an abundance of materials. That is why those that were used needed to be diversified thoroughly. MaterialByElement modifier was used, which allows applying different material IDs to objects containing multiple elements randomly. Dirt (Corona AO) was implemented in each shader too.

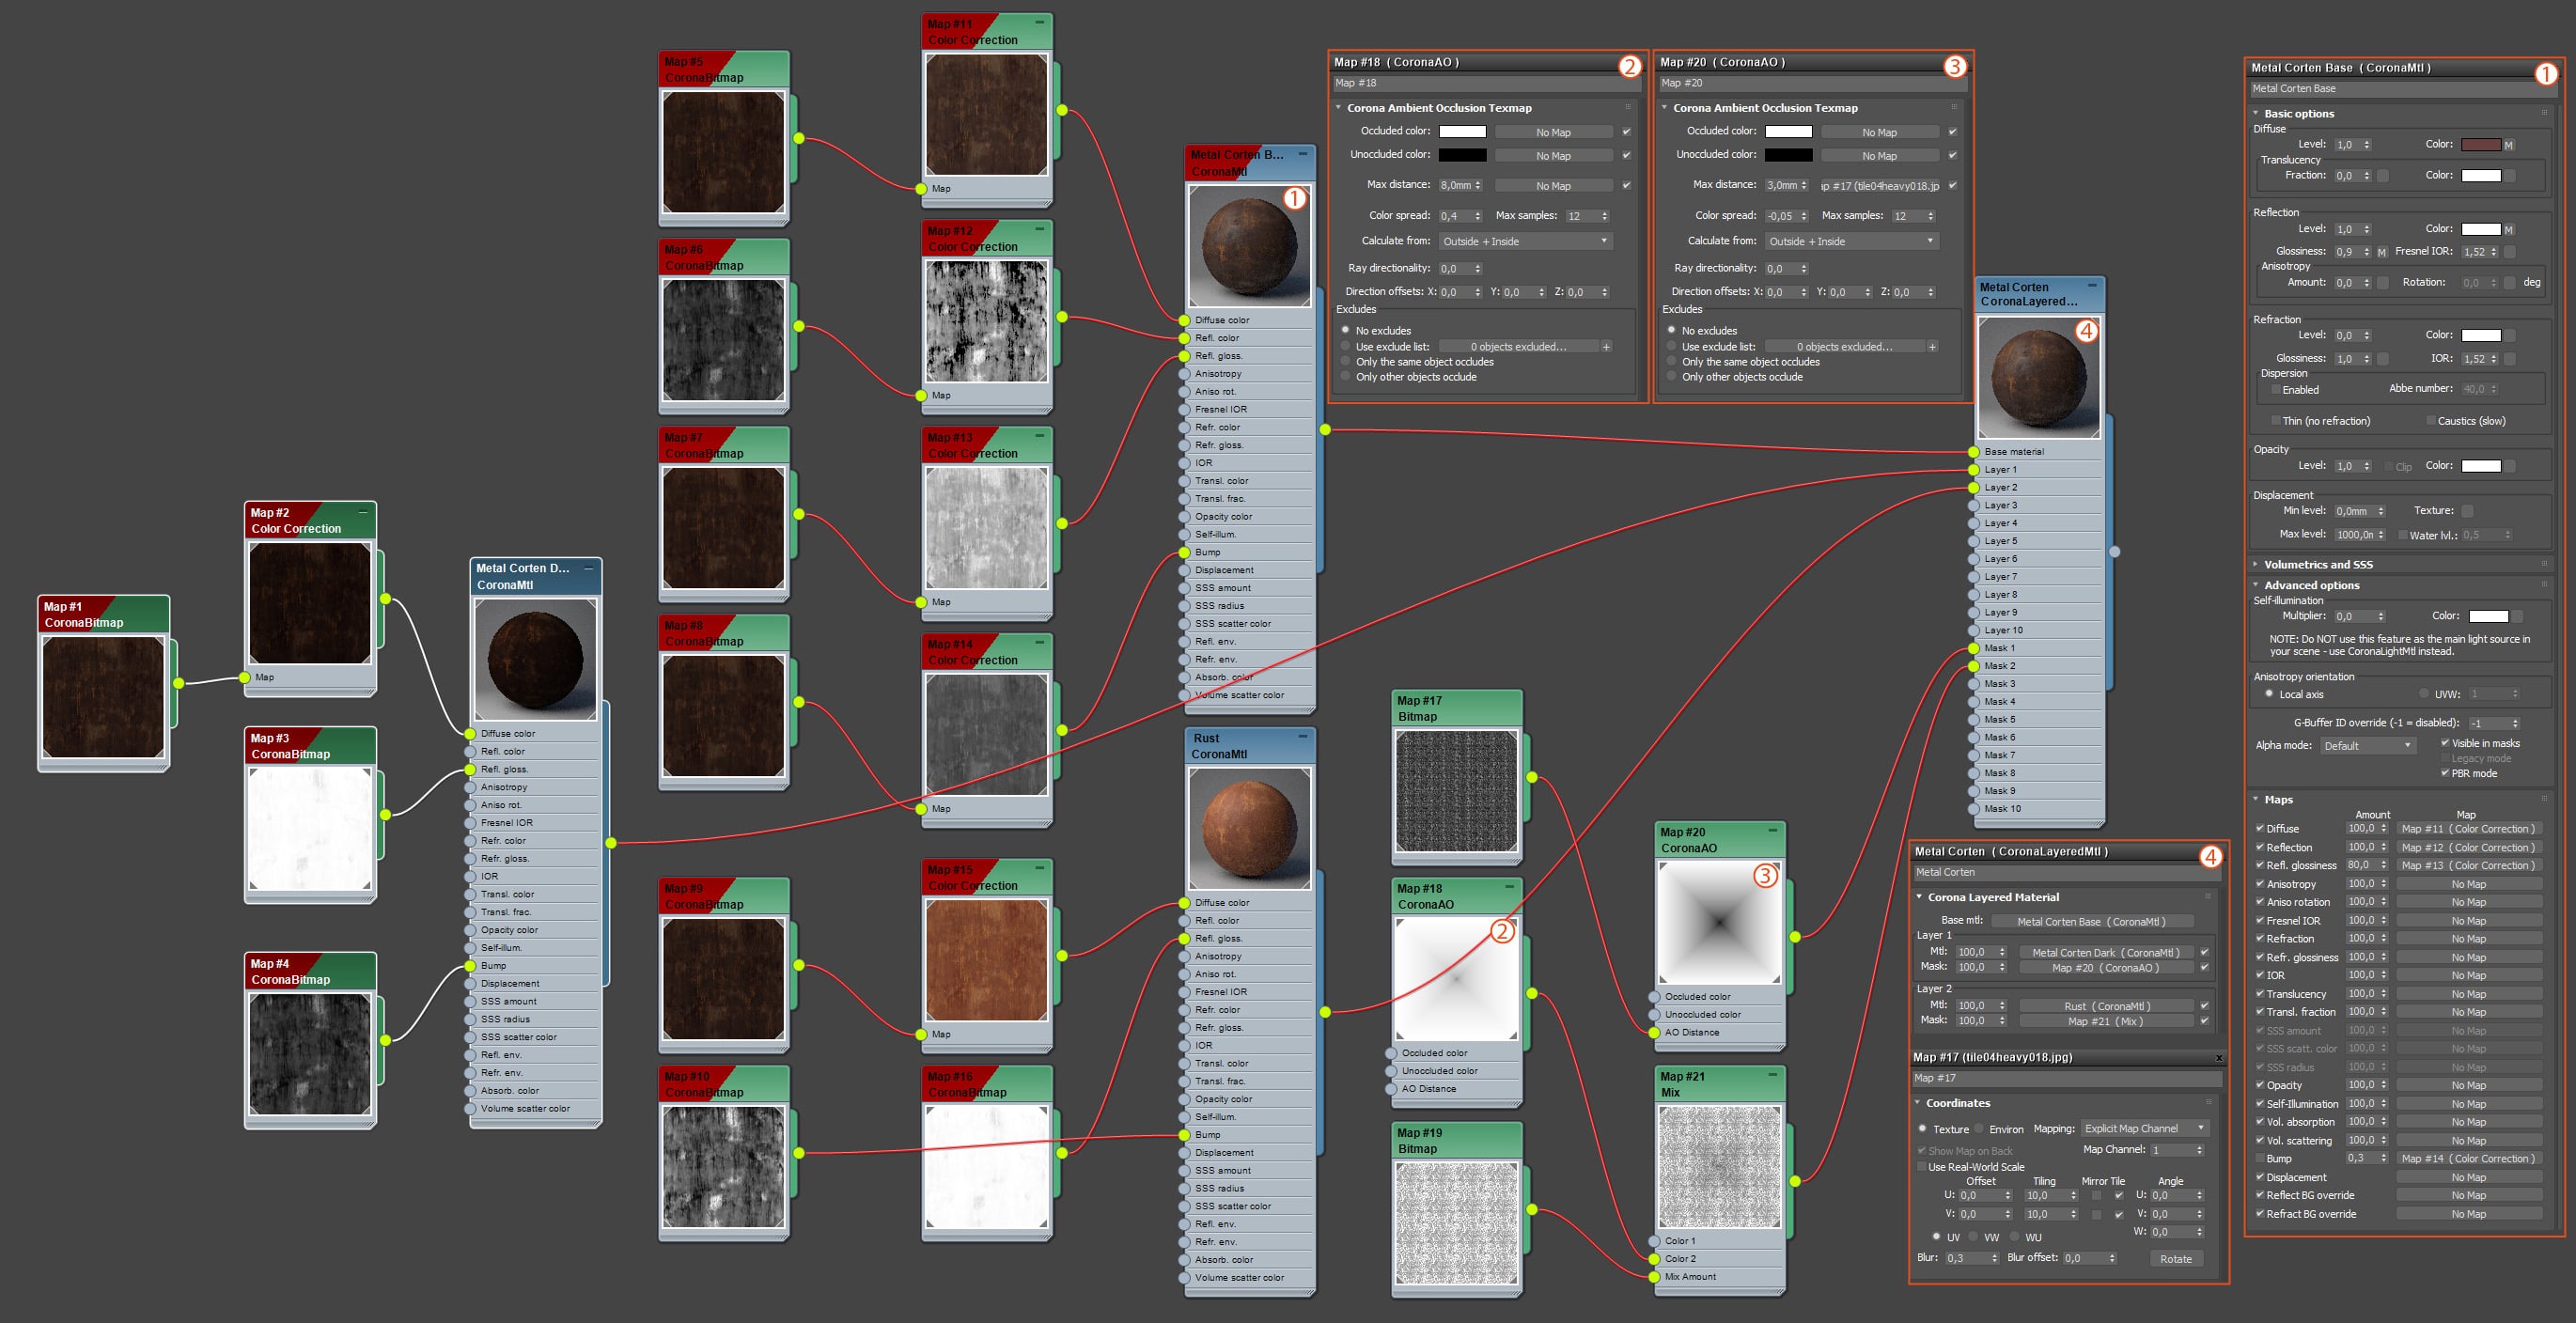
Wood Shader
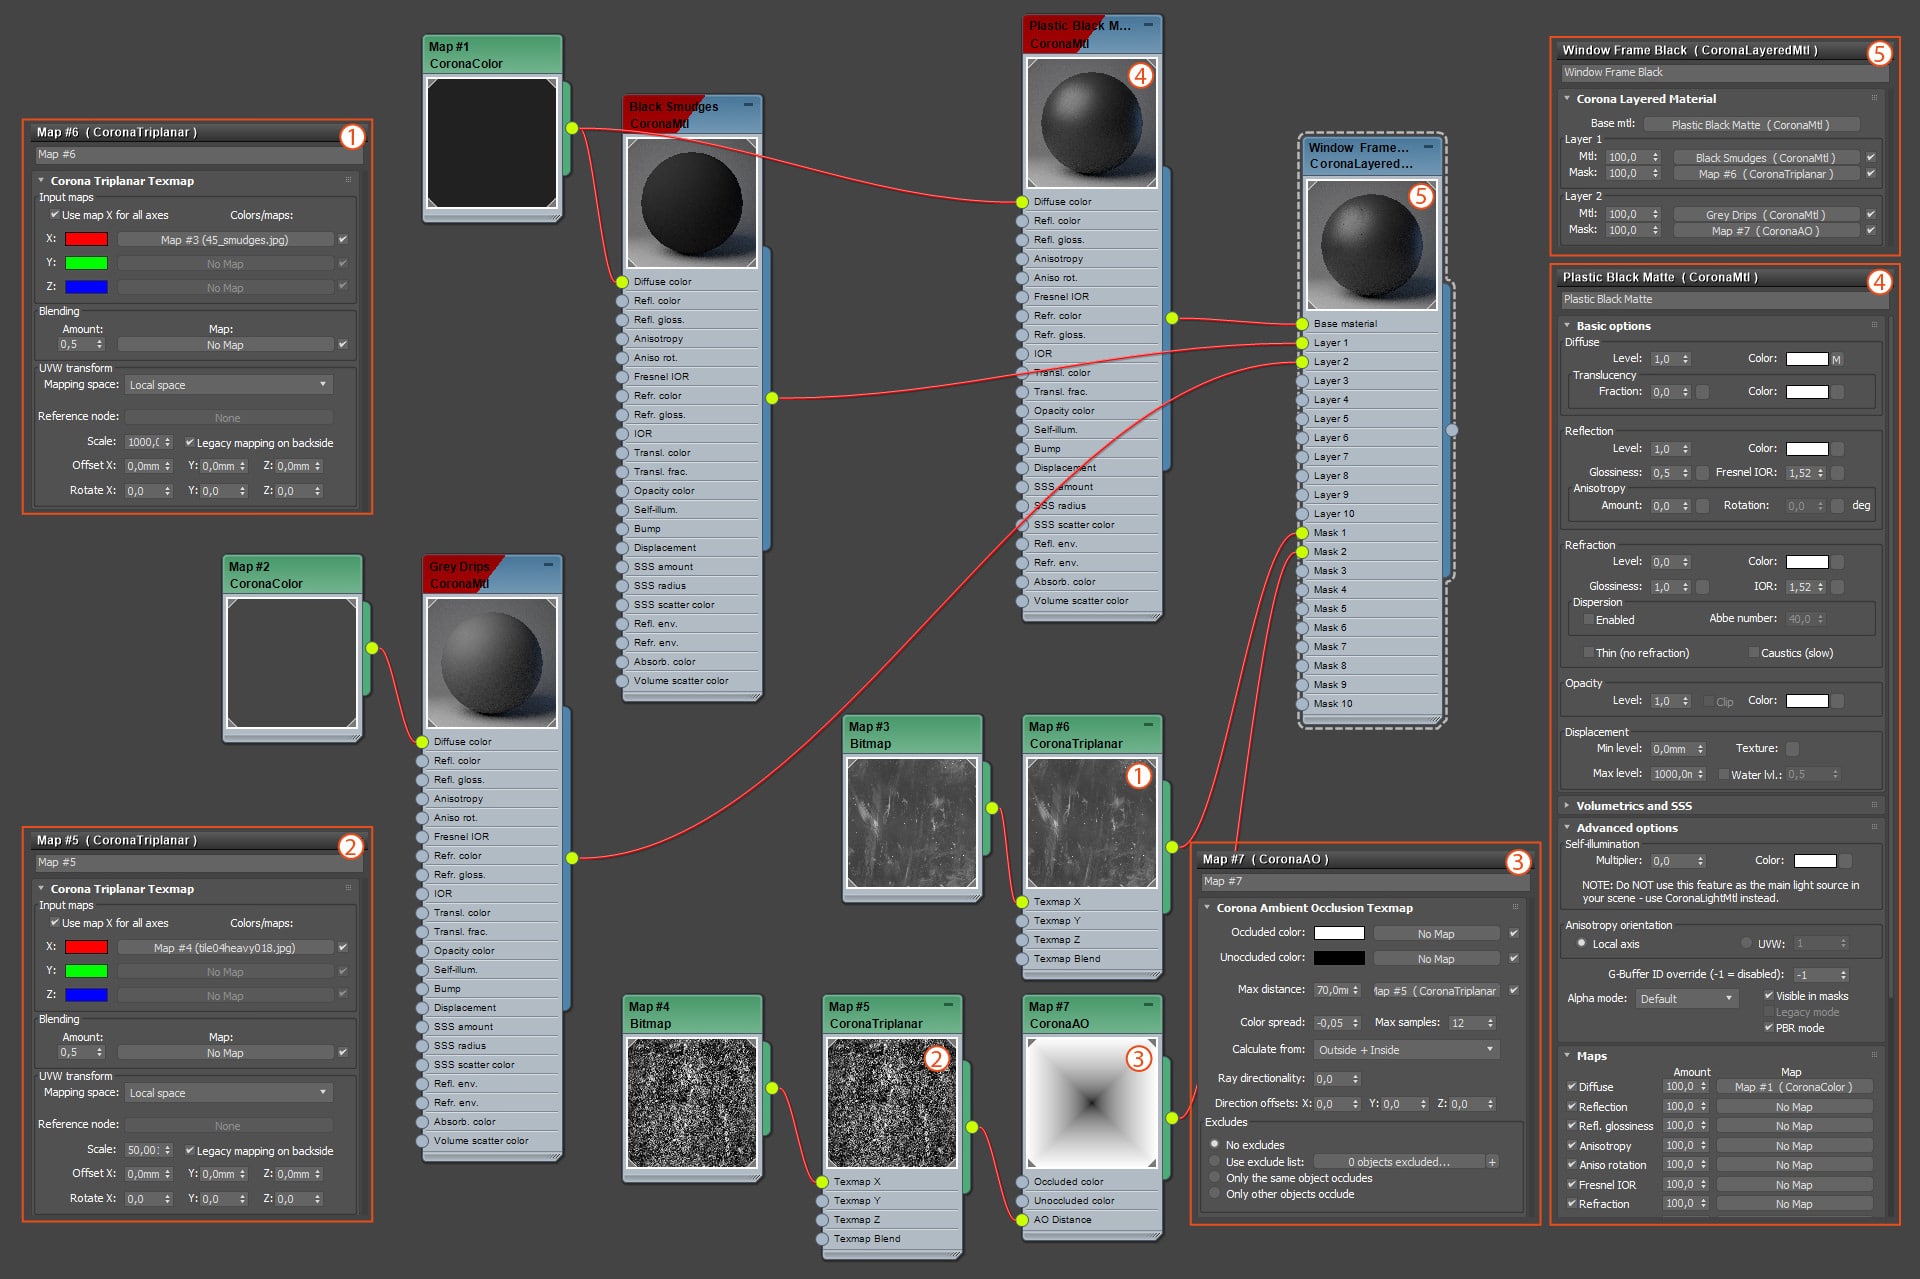
Window Frame Paint Shader
Window Frame Paint Shader
Master Scene Setup
As a result, we wanted to get a smooth and relaxed narration about the Tree House. The plot that was chosen – the house’s one day starting from early morning until late at night.
A storyboard consisting of ten lighting scenarios was developed to achieve the idea. Each master scene contained presets for its scenario. The plot developed linearly.
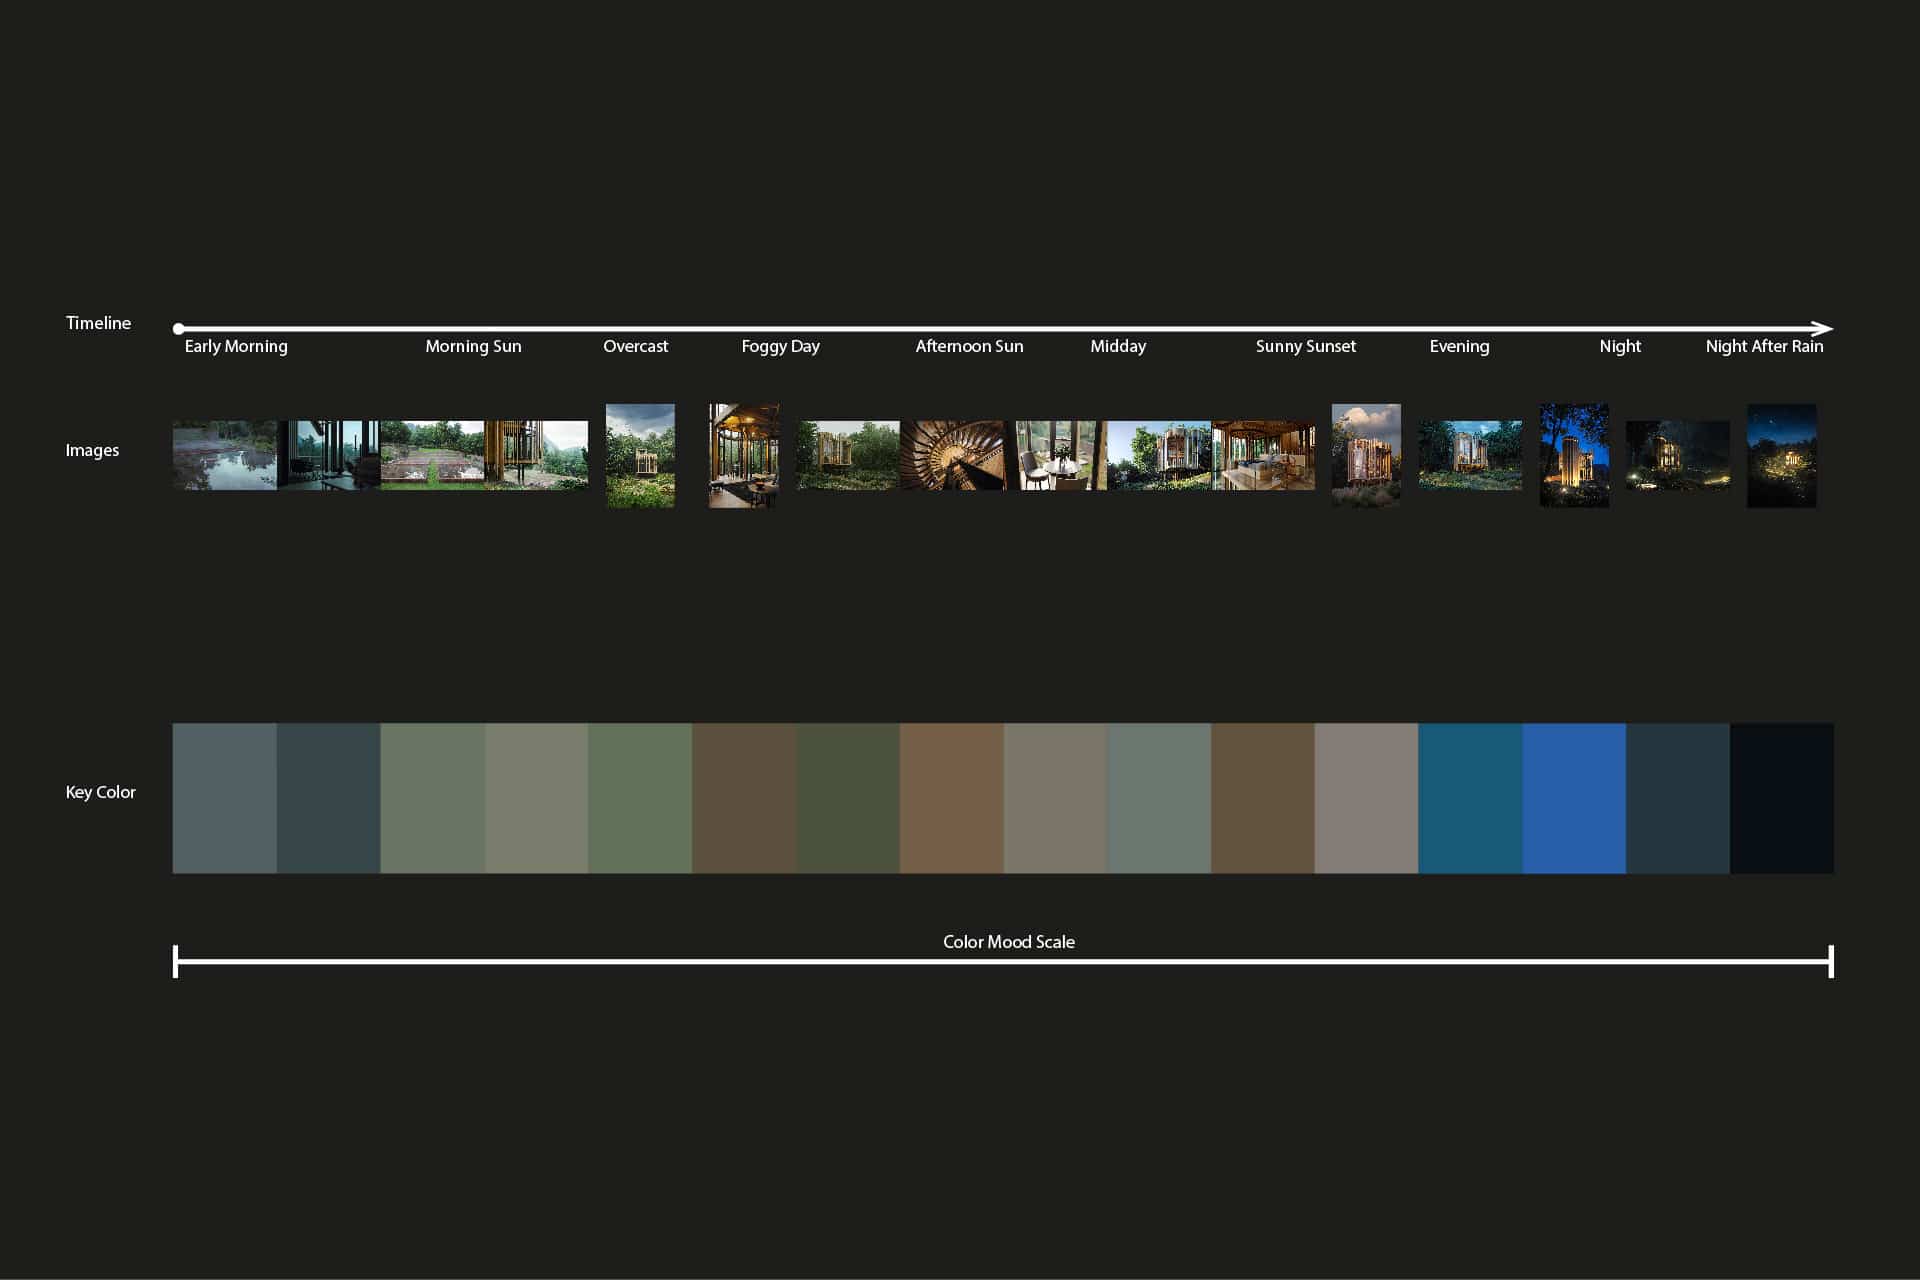
Color mood scale of Master Scene
Lighting
Lighting was one of the most important aspects of the project. It was based on the HDRI from PGSKIES. We also used atmospheric fog in many cases to soften the light.
Corona Renderer allows you to adjust the exposure in two ways: Simple mode via the EV exposure parameter and Photographic exposure mode. We prefer to use basic photographic settings.
Let us turn to the settings of those Master Scenes that we selected as the most interesting from the point of view of the lighting scenario:
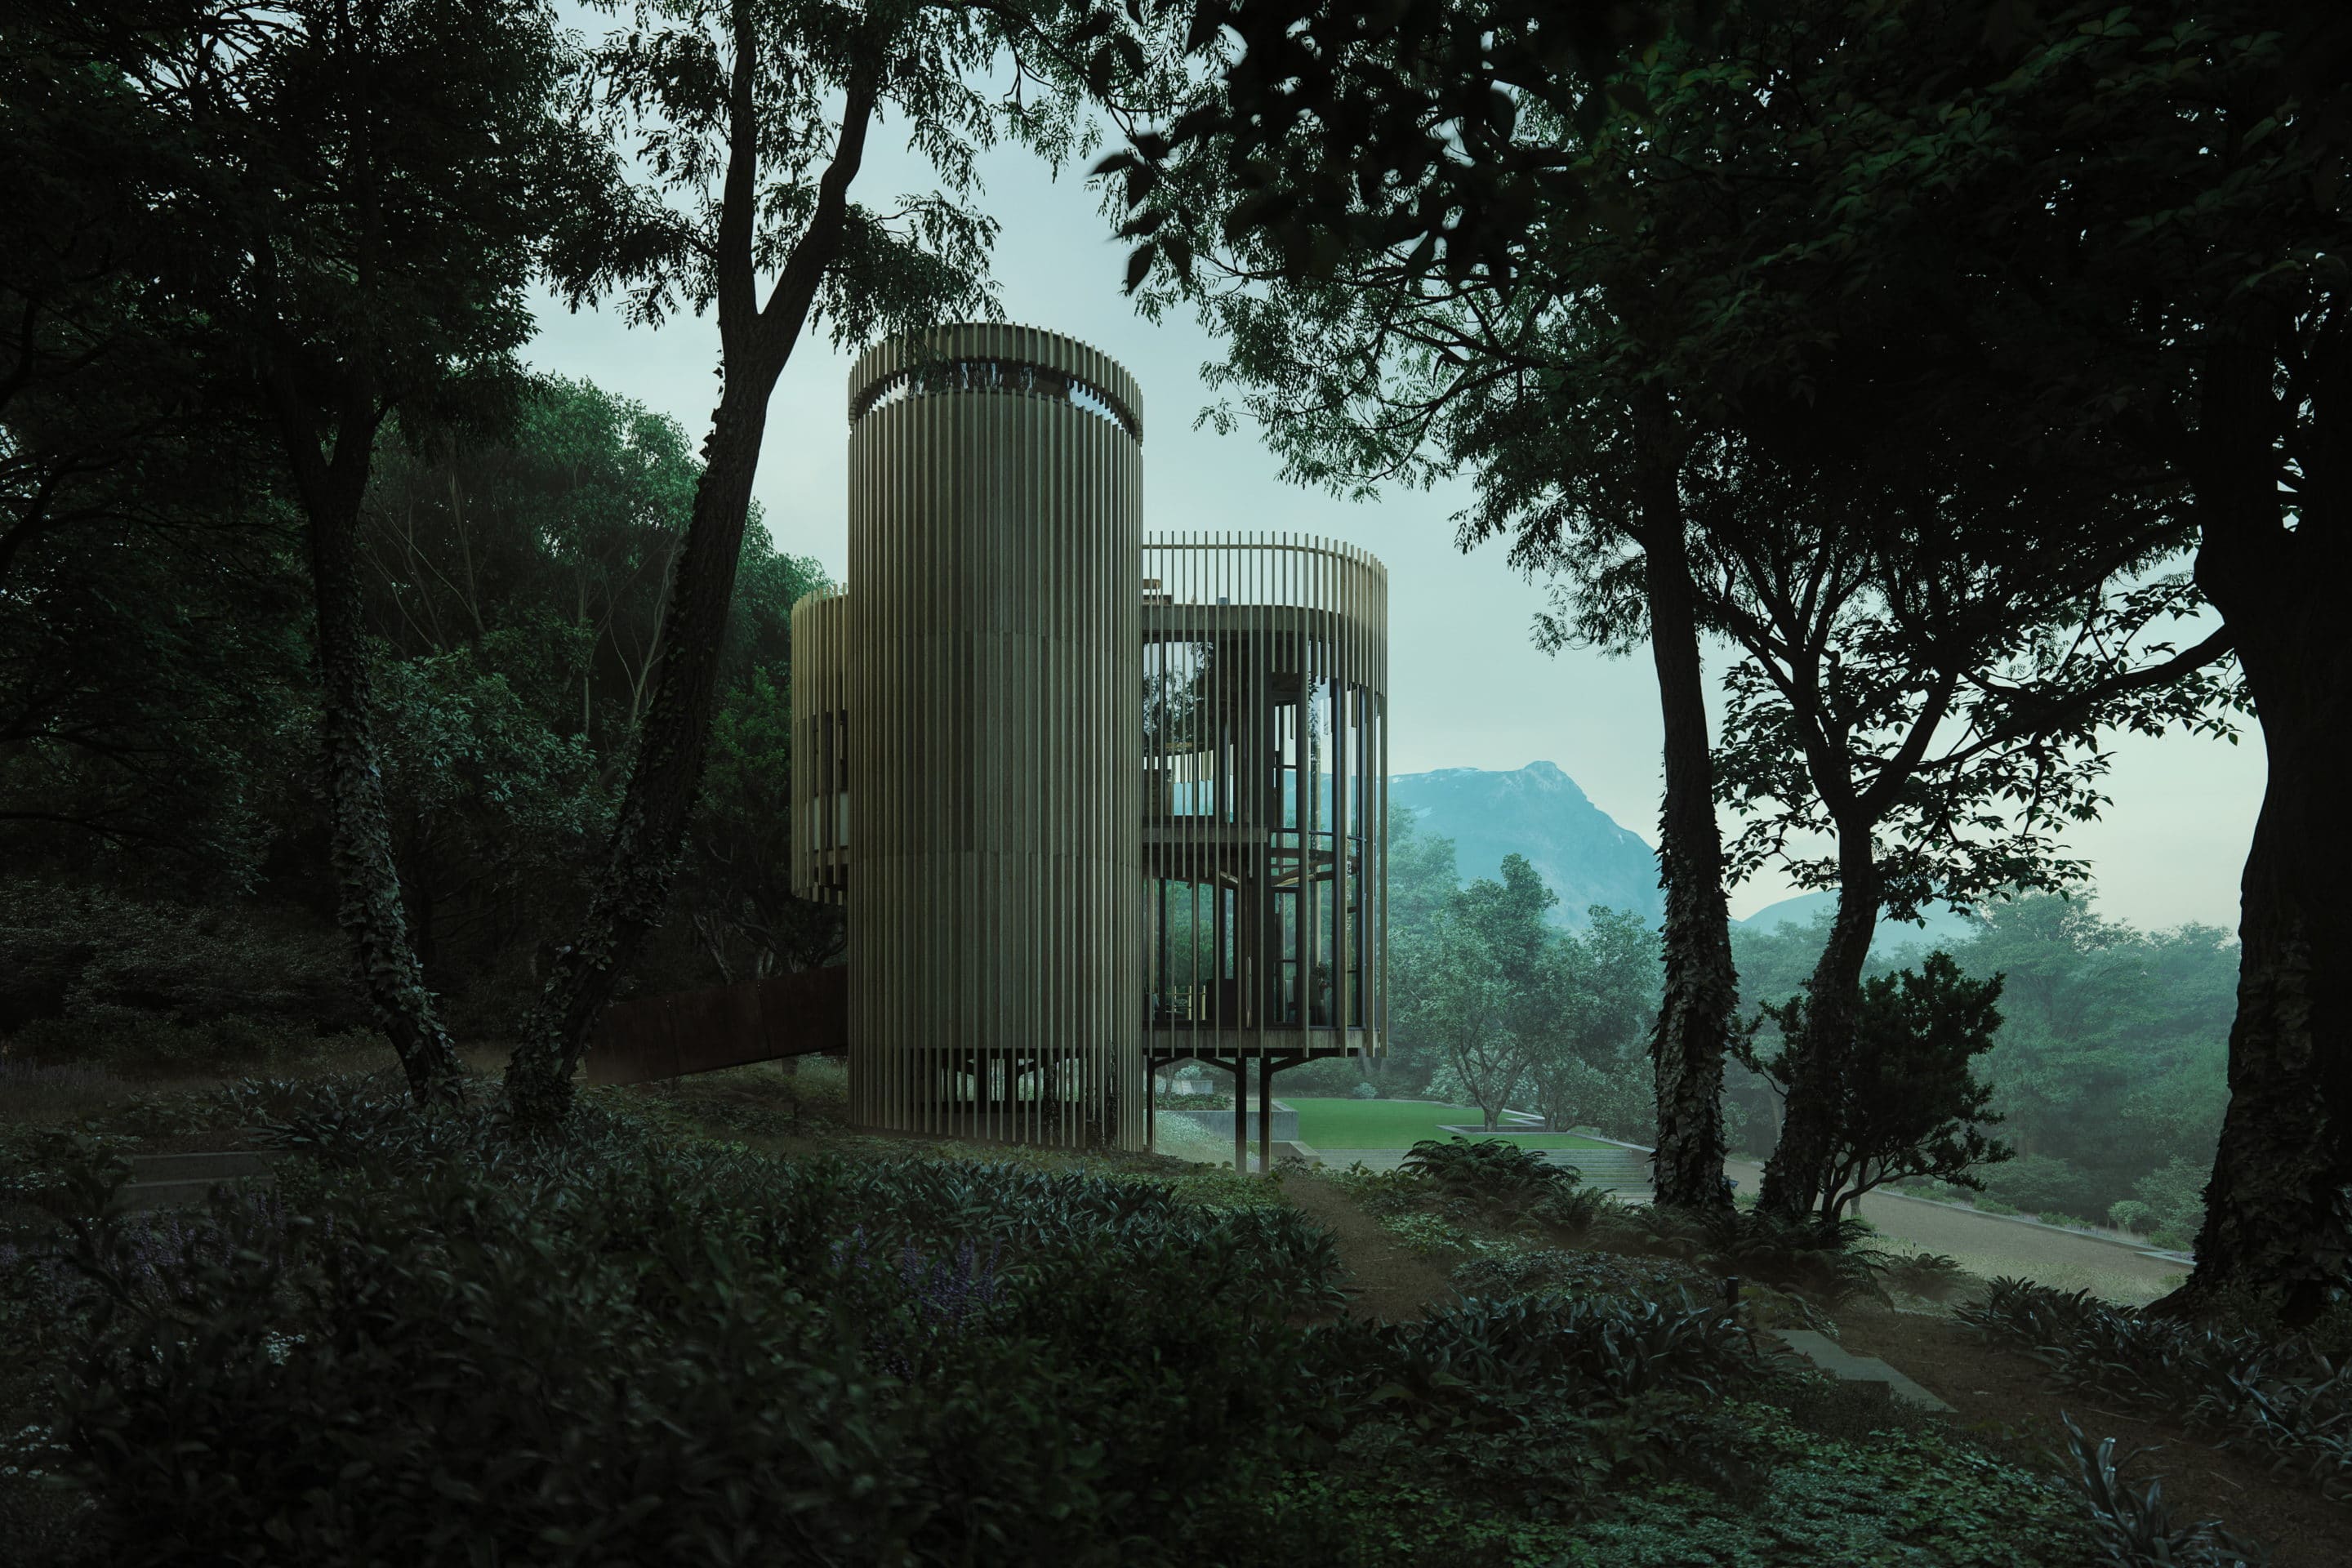
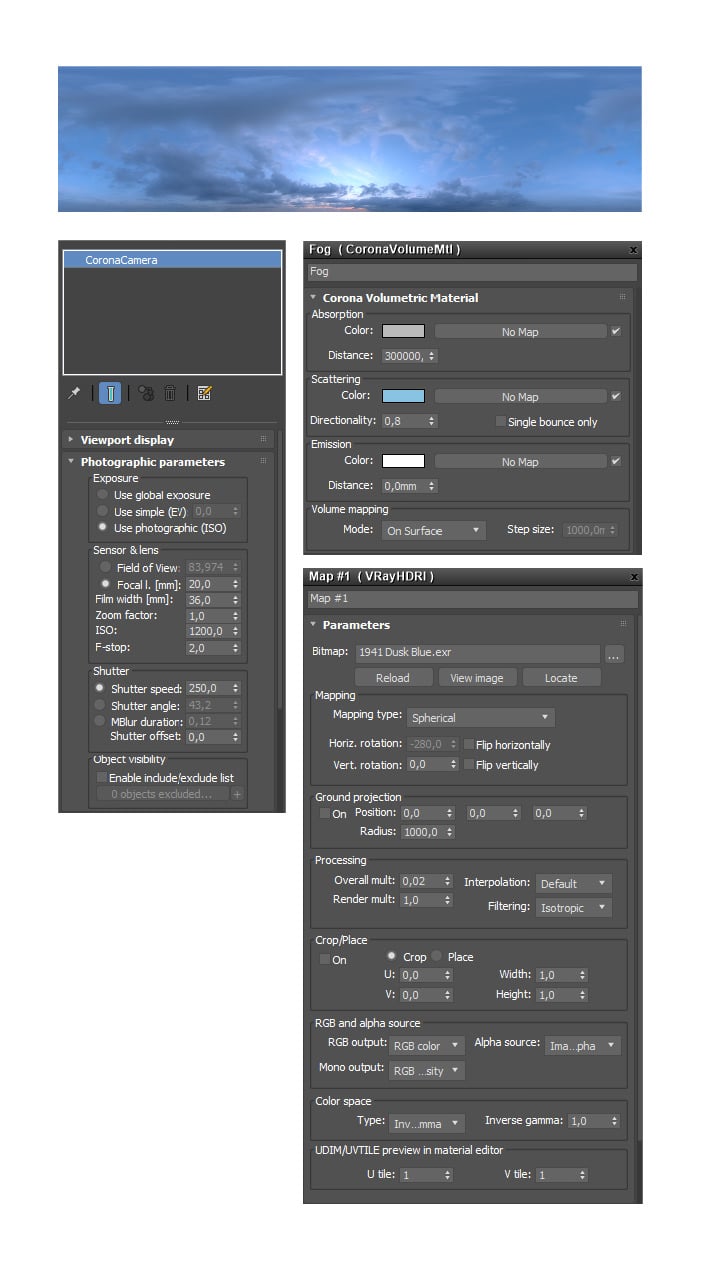
Scenario “Early Morning”
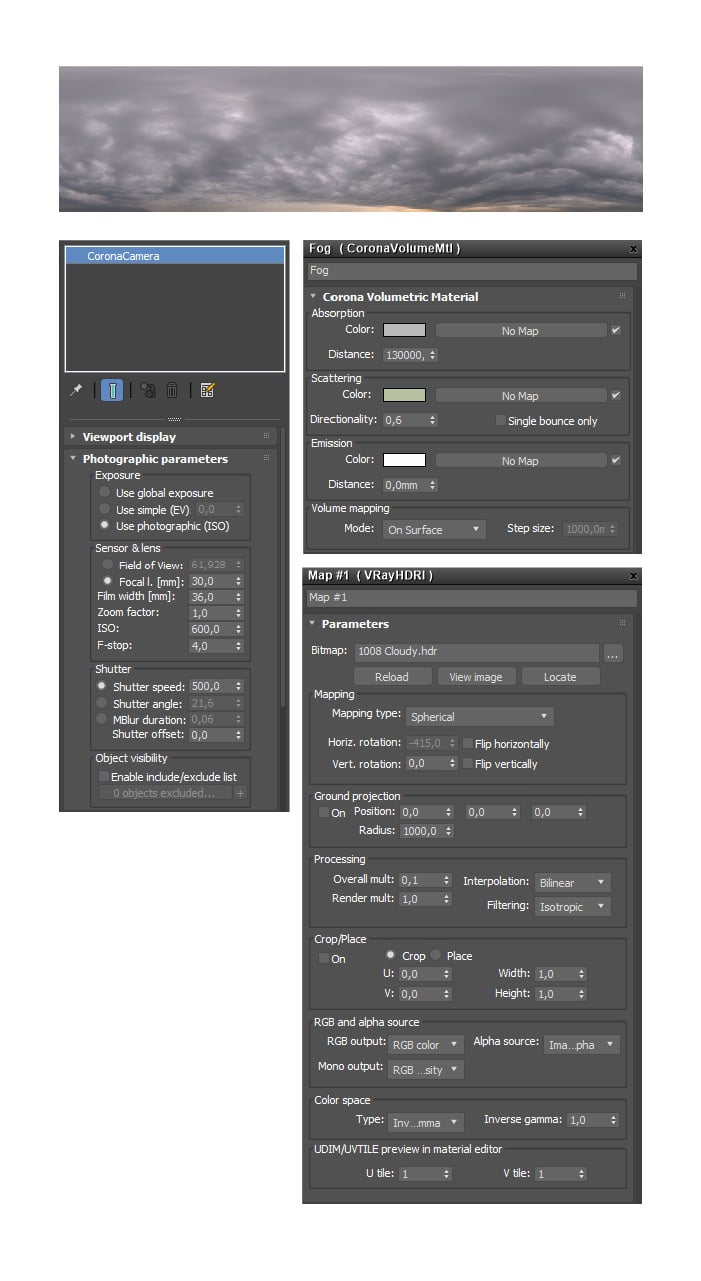
Scenario “Foggy Day”

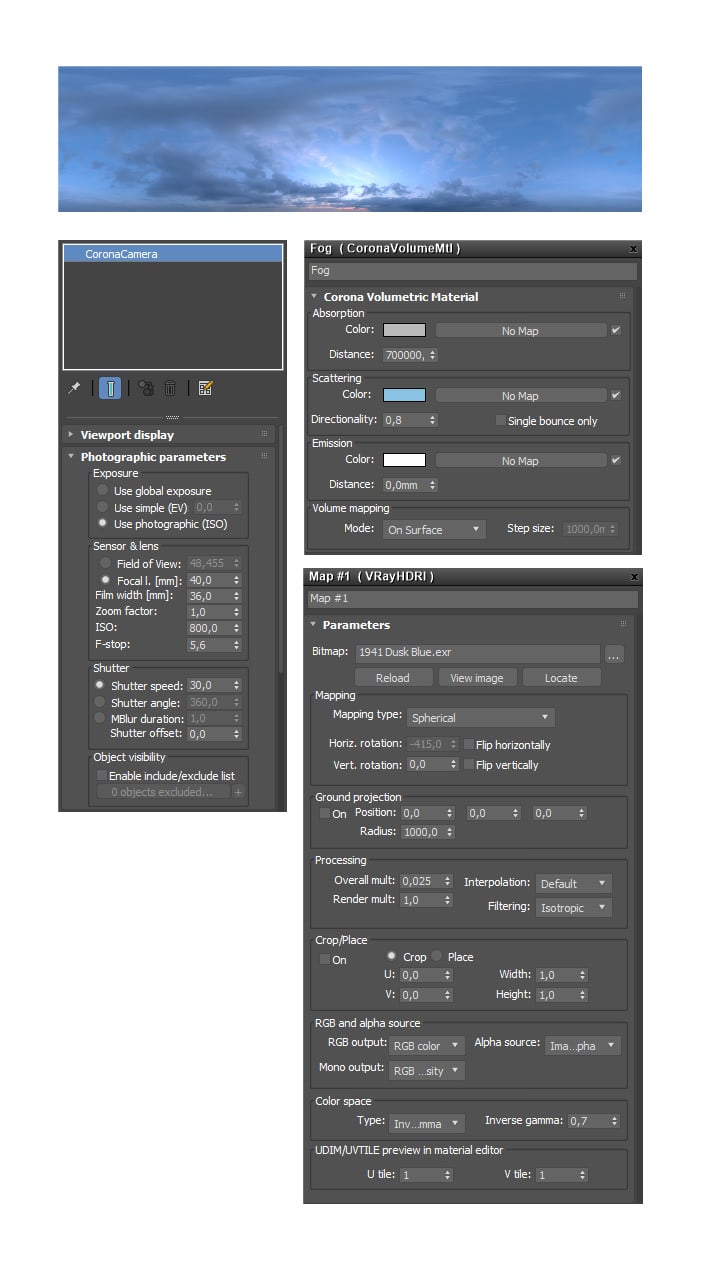
Scenario “Evening”
The Rain
In the narration, we had chapters where was heavy rain.
Raindrops were rendered separately and combined with the main image in the post-production. This allowed us to adjust the effect (rain) more flexible, and also we were able to get a DOF blur in the foreground. To cope with this task, the camera used a short shutter speed with a wide open aperture. And the raindrops were rendered with long exposures so that Motion Blur slightly smeared them in motion.
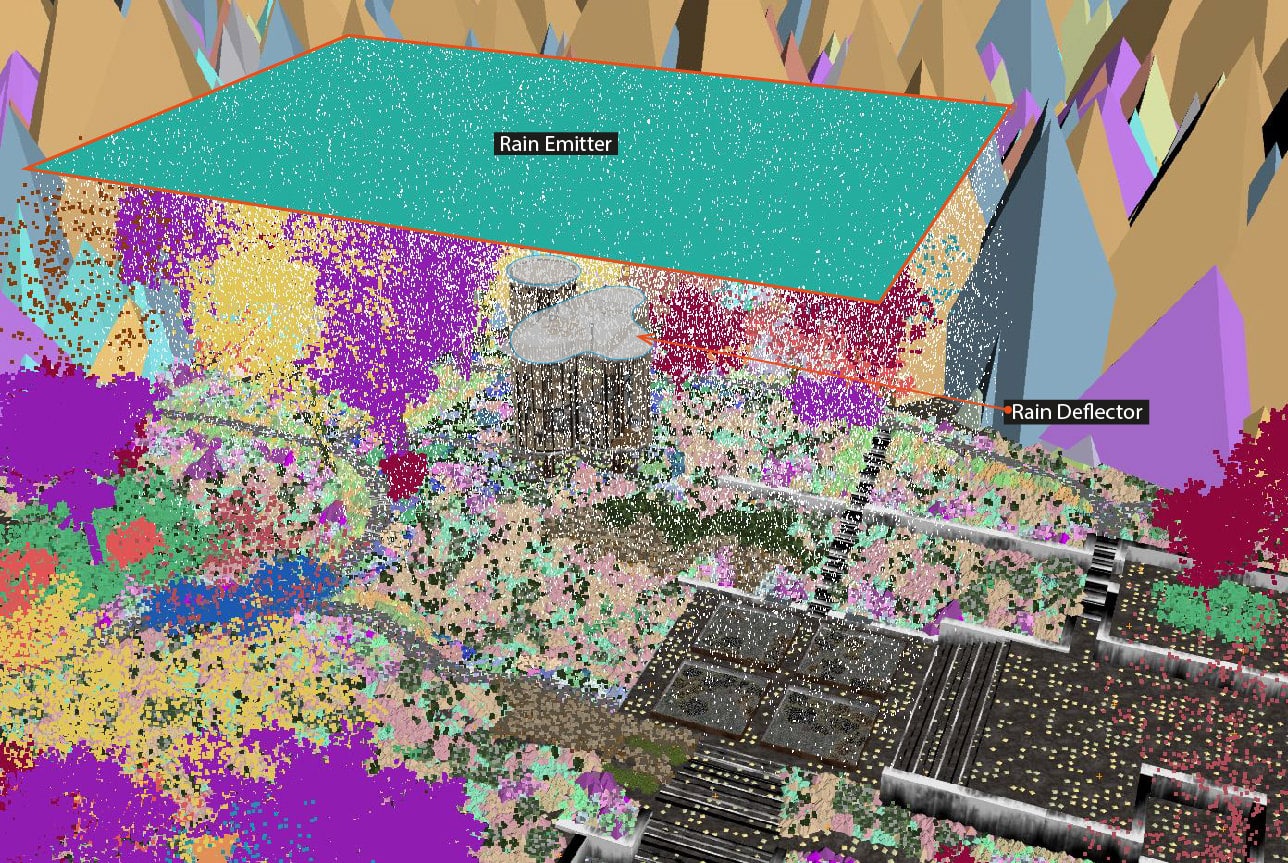
Basic geometry for generating rain with PF Source
A Particle System PF Source was used to create rain. The source of particles was the plane located above the building (Rain Plane). To prevent drops from entering the building and flying into the interior, a model was added above the roof of the Tree House, which was called the Rain Deflector.
Further, we will try to explain the PF Source setup process :
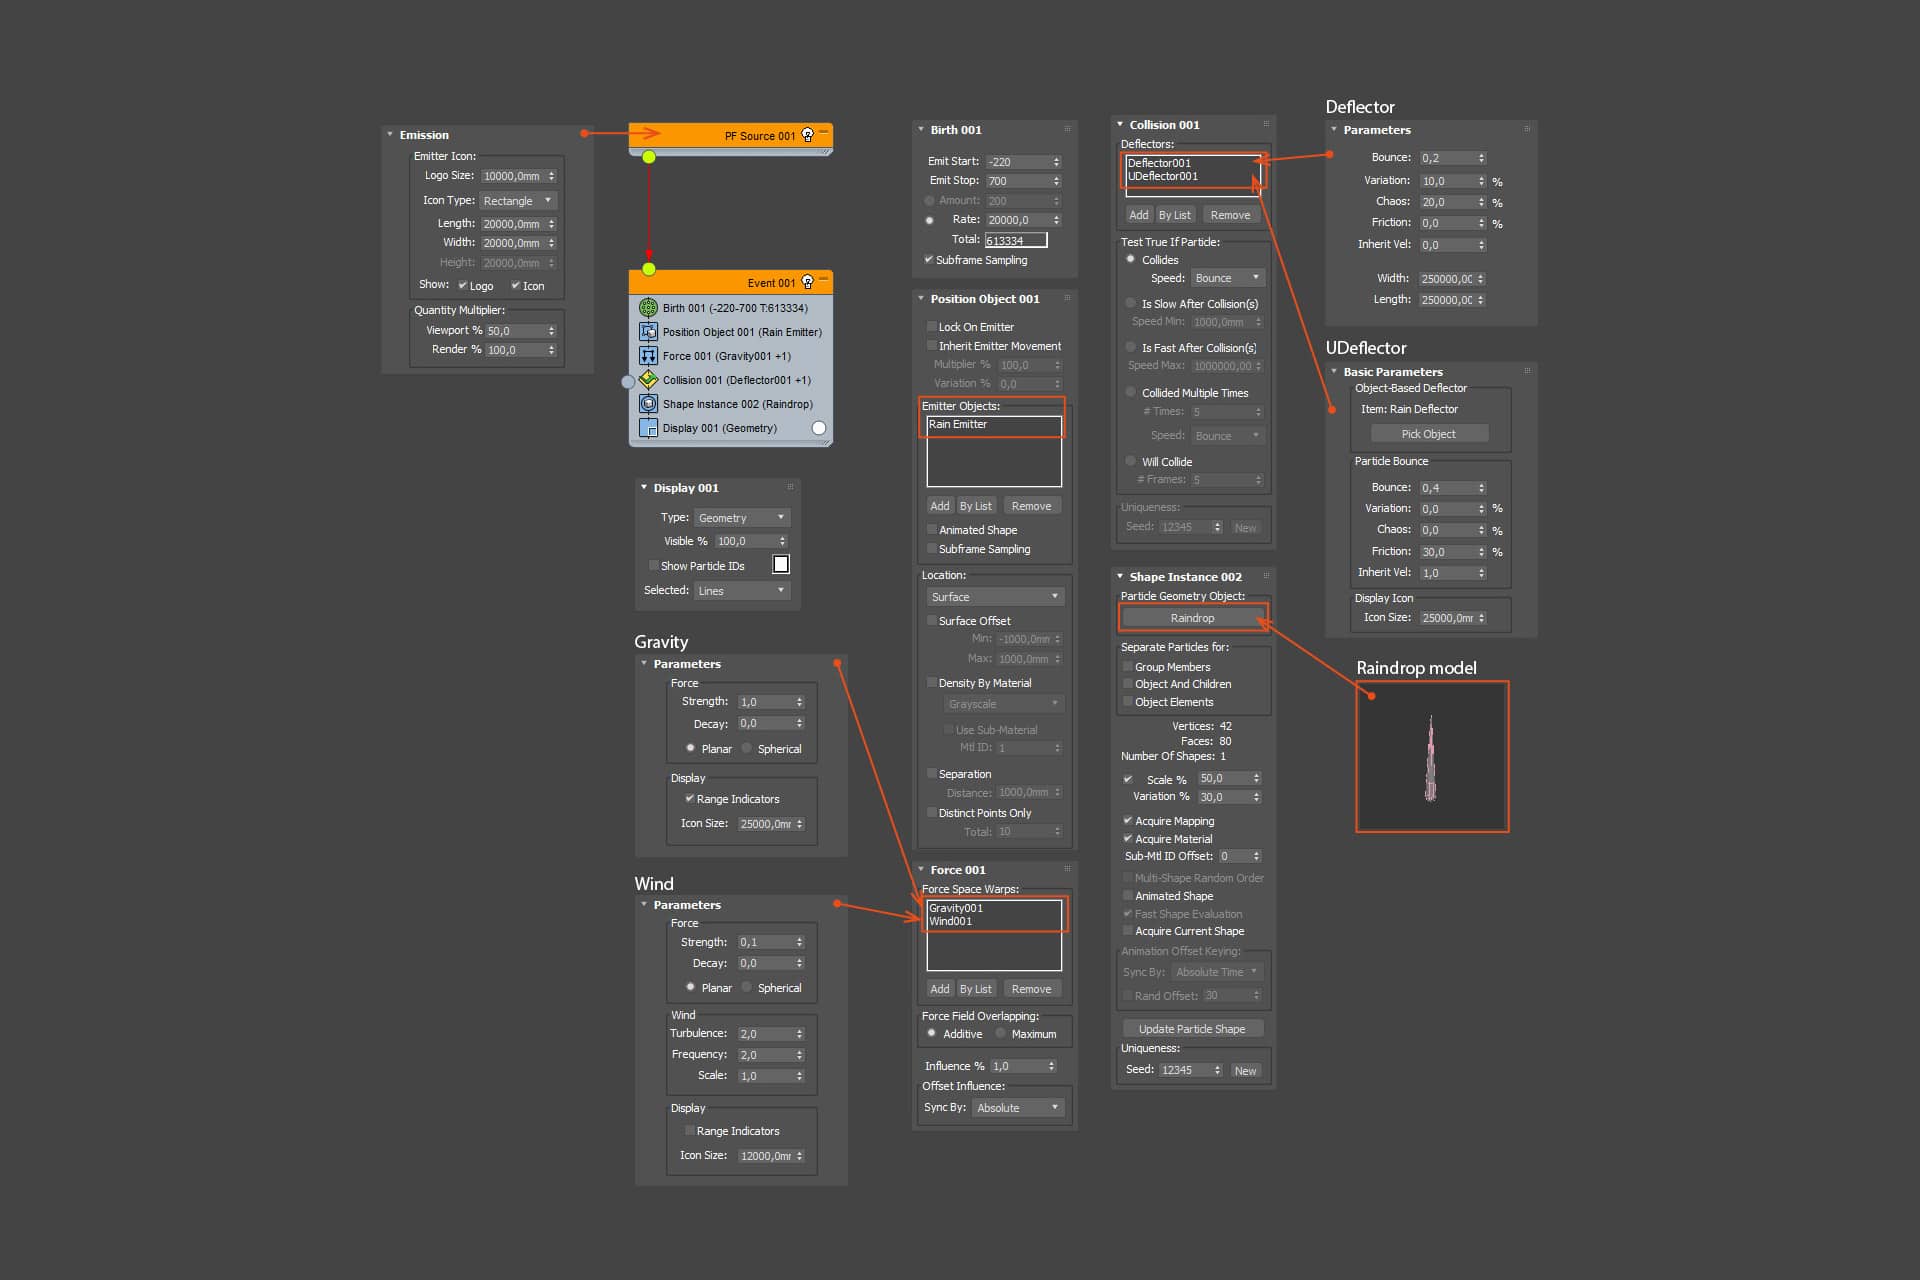
PF Source setup process
Corona Renderer Setup
Setting up the render, you should pay attention to the format of the saved image. This is Corona EXR (.cxr) – an image that can be opened in Corona Image Editor (CIE)
For beautiful bokeh in the settings of Corona Camera in the Advanced effects section, the Center Bias and Vignetting values were set to 1.
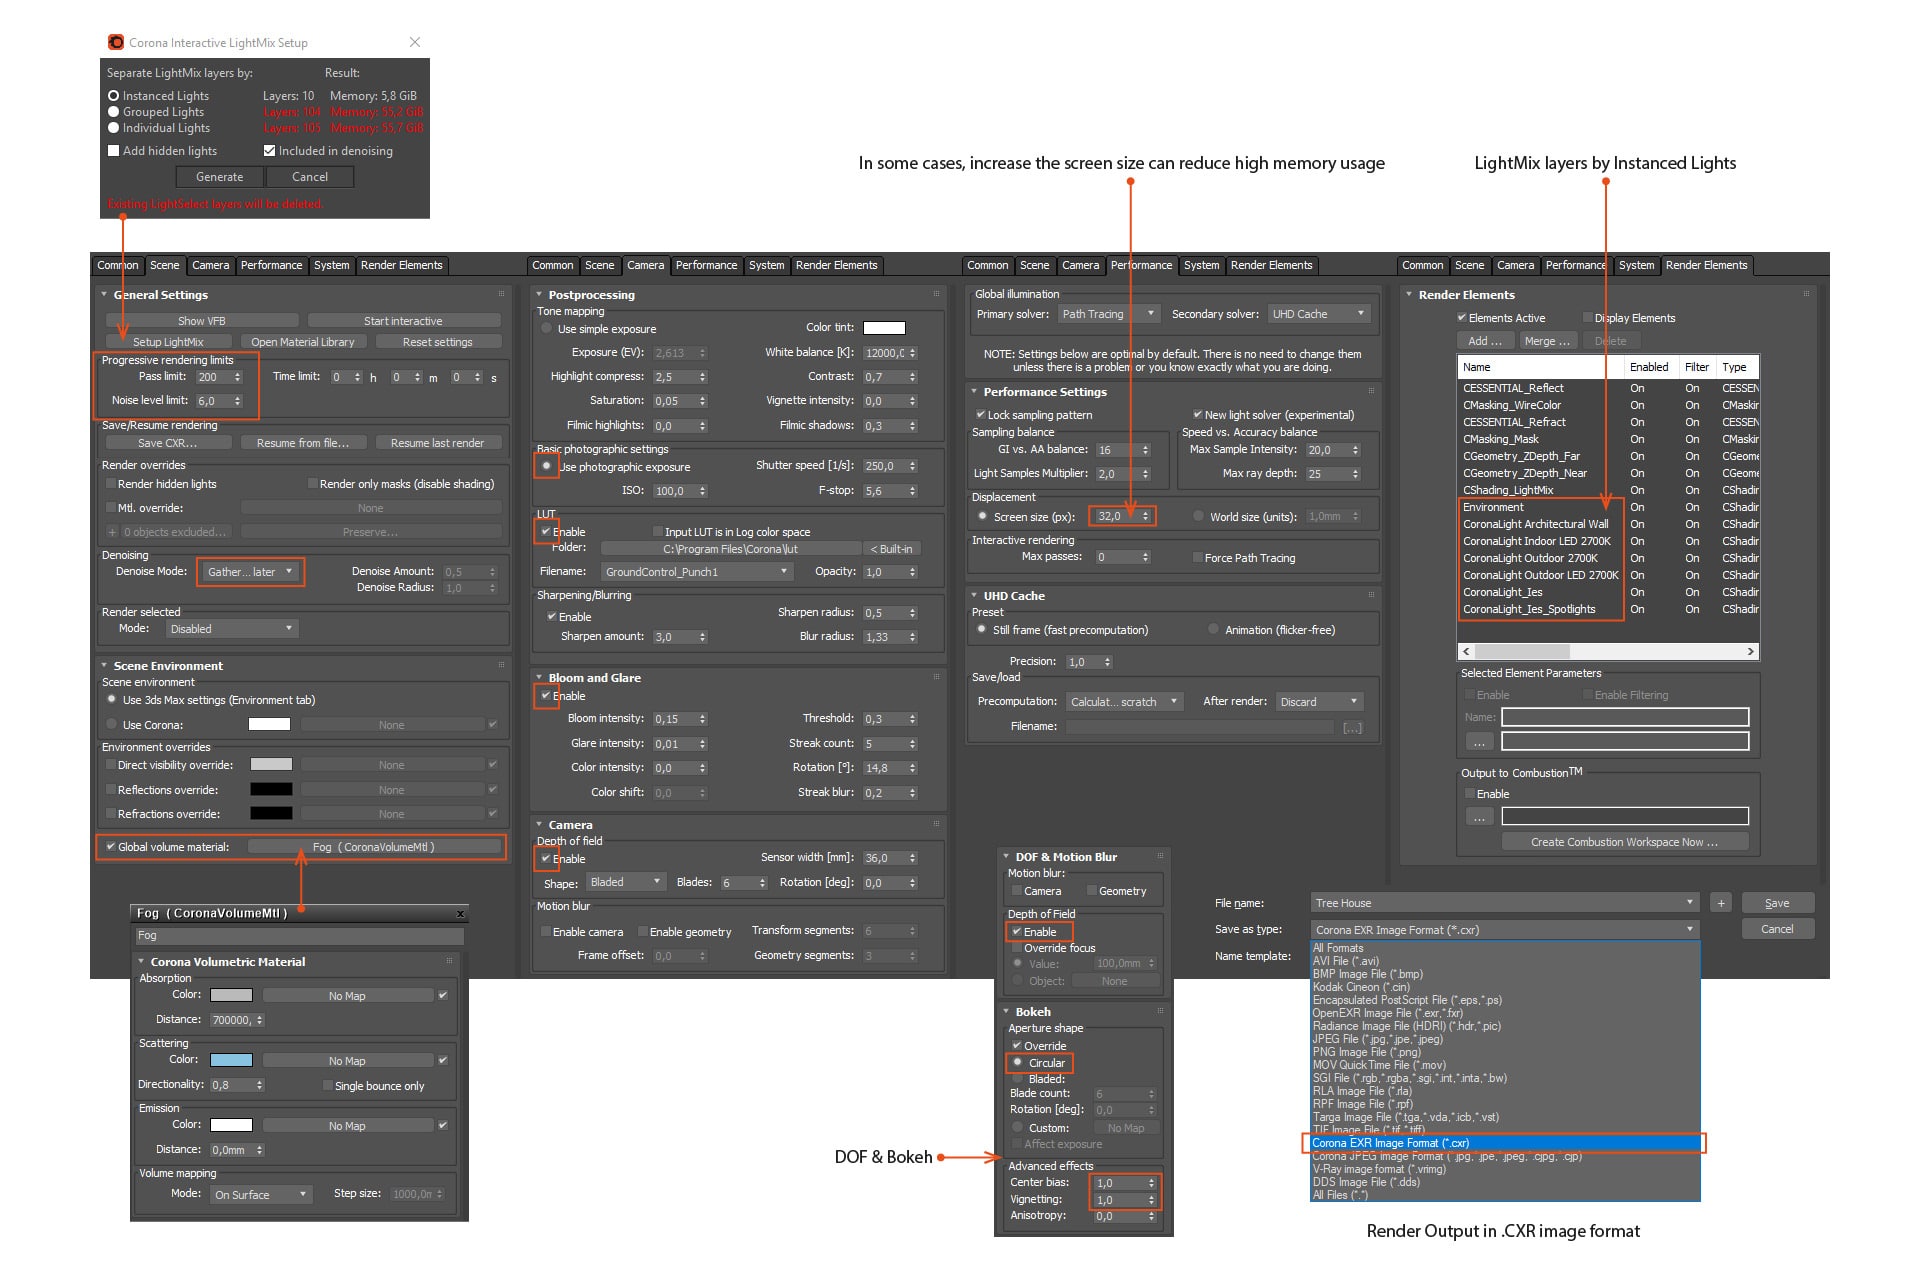
Corona Renderer setup
Corona Image Editor (CIE)
CIE is a portable, standalone application which allows loading a Corona EXR (.cxr) file and applying all post-processing operations which are available in the Corona Renderer VFB to it, including adjusting LightMix, running Denoising, LUTs, bloom, and glare, without the need to create a new render.
If you save the image in CXR format from 3ds Max, activating the “gather data for later” in Denoising mode, you can open this image later in CIE and then perform noise removal.
While working on Tree House Constantia, this application has saved a huge amount of time resources and influenced the approach of post-production.
You can save the image with all the LightMix layers turned on, and then adjust the LightMix settings in CIE. To do this, simply upload your image and select the “LightMix” tab. You’ll see exactly the same settings as in the Corona VFB, including options for saving and loading LightMix presets.
In Corona Image Editor (CIE), final adjustments were made and all Render Elements and masks were saved in .png format for subsequent post-production in Photoshop.

The Corona Renderer Editor interface is completely identical to the VFB
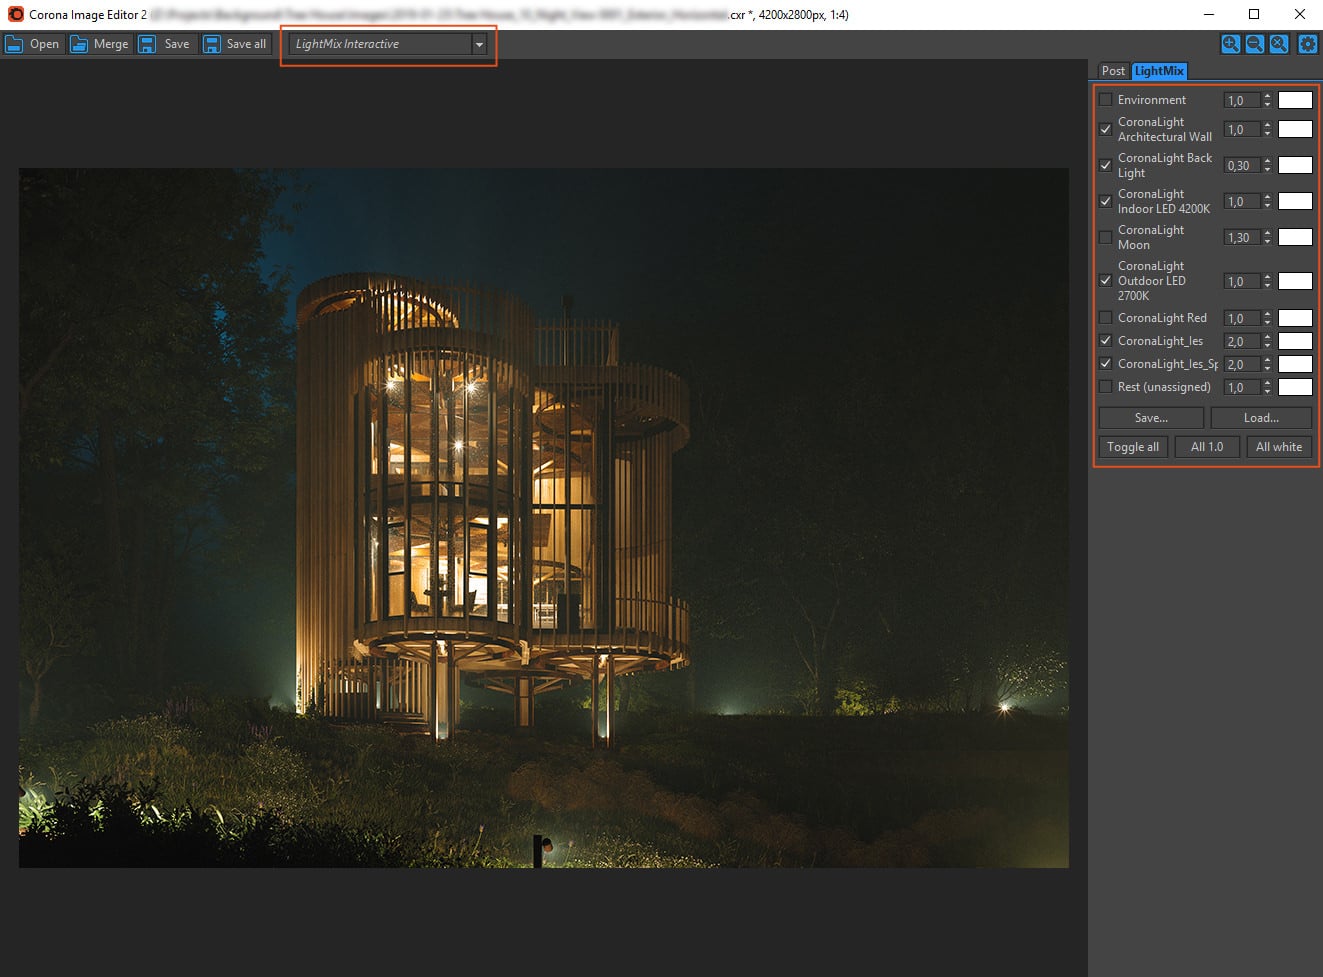
Setting LightMix options in Corona Image Editor
Post Production
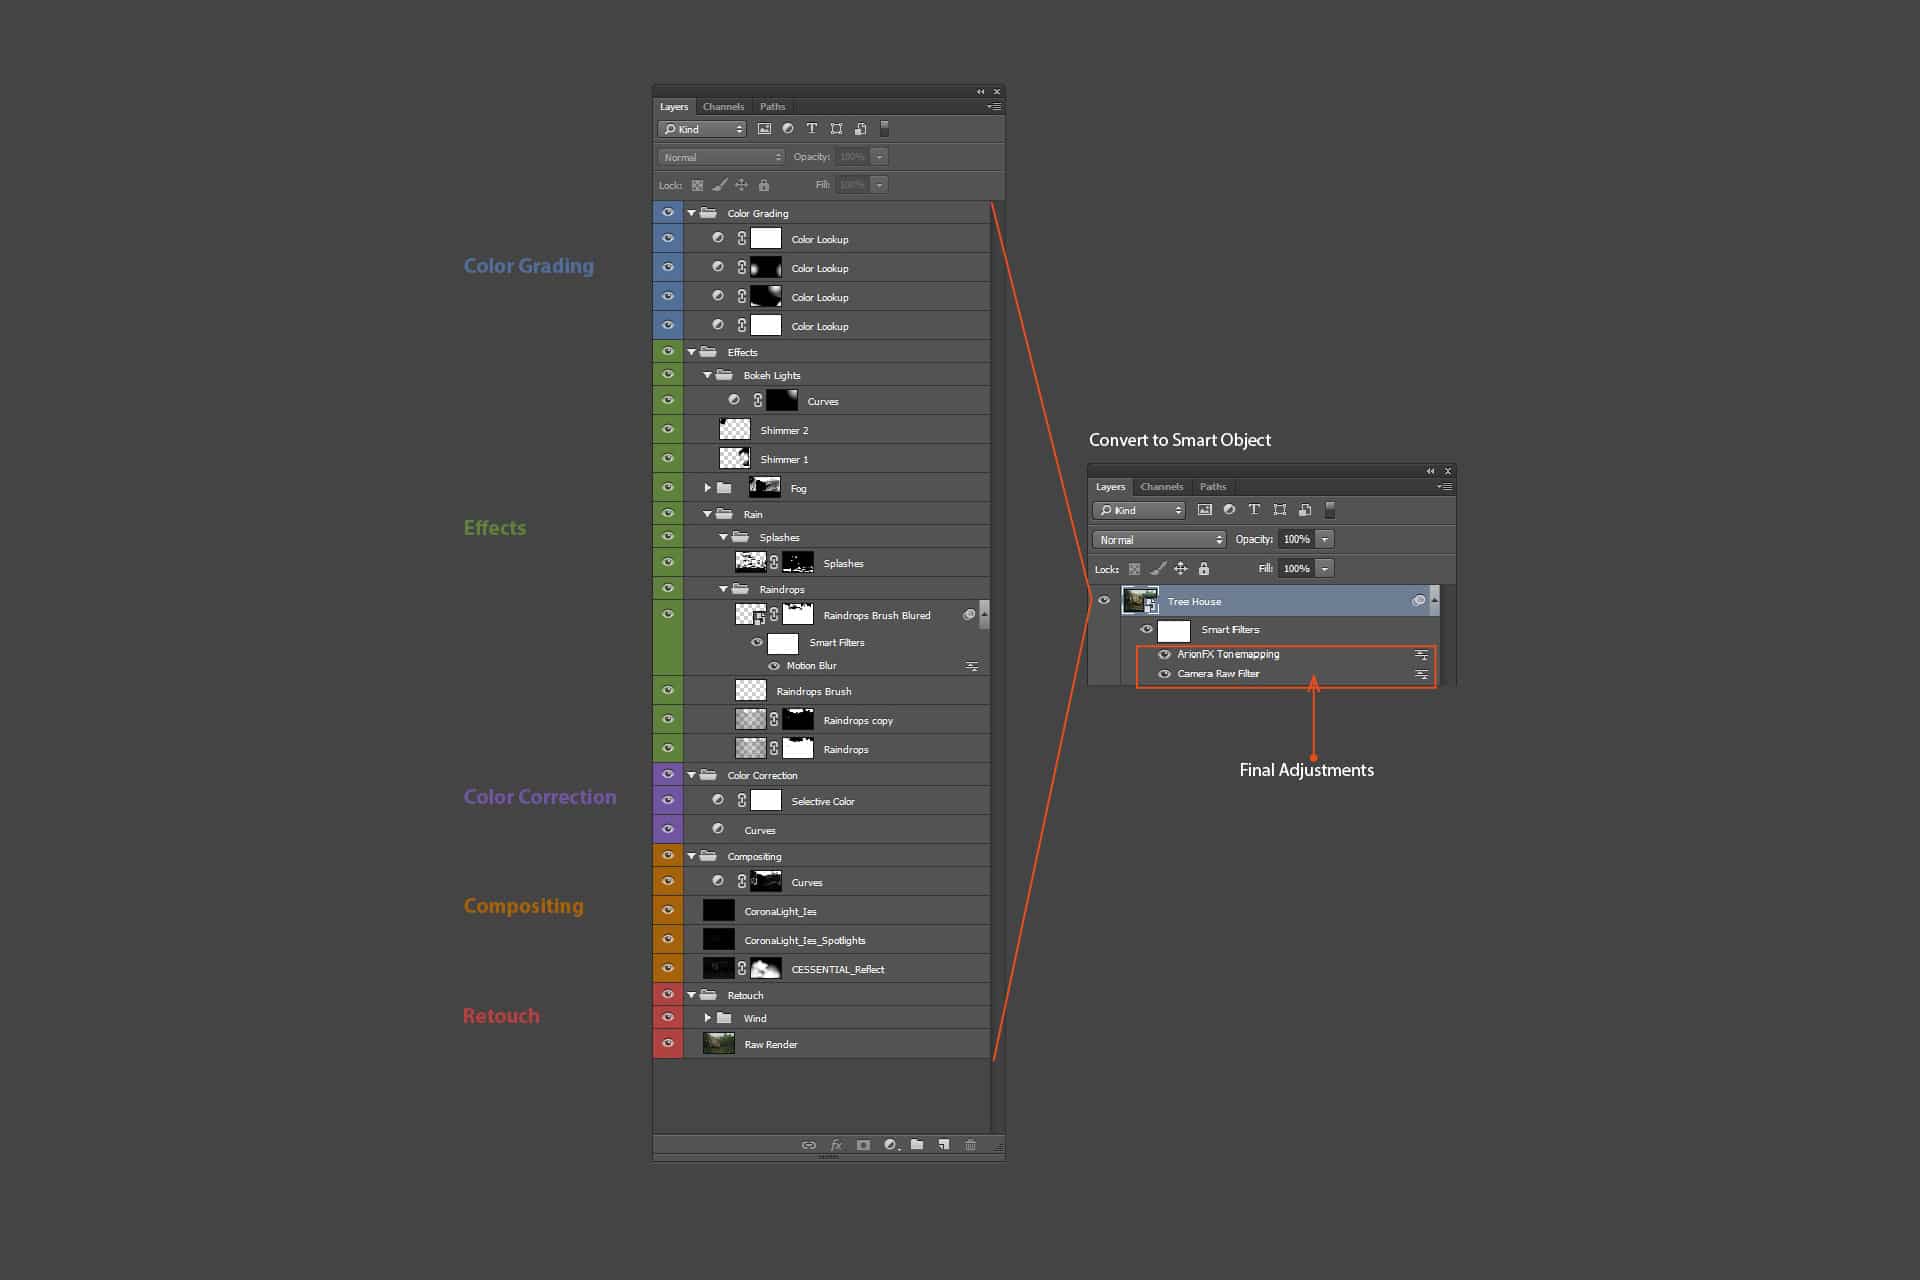
PSD File Layout
Performing post-production of numerous images, a special approach to the organization of the PSD file was developed. In this project, this approach was not fully used, since 2d elements and matte painting were not used. In general, the post-production of this project was quite gentle – a lot of work was done in the Corona Image Editor (CIE).
The slide shows the structure of the PSD file and lists the groups of layers. When the main work on the image is completed, select all layers and convert everything to the Smart Object. Next, apply the final corrective filters and effects.
Let’s proceed to post-production images…
Thank you for your attention to our work!


Start the discussion at talk.ronenbekerman.com