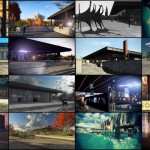


Making of Neue Nationalgalerie in the Rain
The Neue Nationalgalerie has become a great case study lately, seeing artists testing personal skills based on it. Such is the work by Romuald Chaigneau, a newcomer to the forum, who took the NNG for a spin in the rain. Seeing his original raw render makes his postwork on this really shine, and I was very interested in seeing his process and for him to share it with us all here. It reminds me of the work Christopher Malheiros did with his NNG at Night, and it is very interesting to see how both took the bare model to final result using a similar approach. Enjoy this short breakdown, and let us know what you think!

Author : Romuald Chaigneau
Romuald is a freelance 3d artist based in France. He usually uses 3ds Max, VRay, ZBrush and Photoshop for creating his images.
Hi,
I wanted to, for some time, create an image with a lot of rain and a stormy weather in it. I had never done this before, and I wanted to start this personal challenge. After seeing the The Museum competition featuring the Neue Nationalgalerie that Ronen was hosting, I thought that this museum could be a good test case and a good exercise.
During this making of, I’ll try to explain the process I followed to make this image.
Thank you all for reading.
Starting with the result in mind…

3d Modeling
Modeling is really simple. For each object, I started with a box, and I played with the Edit Poly modifier. Around the scene, I placed some buildings and trees to create reflections on my ground.

I added some puddles with a plane and some modifiers.

The Camera
I used a VRay Physical Camera for this project. Note that I work with gamma 2.2.
I changed some parameters such as the f-number, shutter speed and ISO. Also, I lowered the vignetting because I prefer to create it in Photoshop instead… Not having it burned into the render output.

Exterior Lighting
I started to illuminate my outdoors scene with an HDRI. I prefer to work the lighting before starting any texturing. Get the light balance right first. I created my HDRI with a VRay Light Dome, where I put a VRayHDRI in the texture slot. I can then work with it, in the material editor.
Also, I put a light gray material in the override slot to give this color for all my objects, except windows. It is a habit that I developed over time…


Texturing
Nothing difficult for texturing. I used a lot of maps from CGTextures. I happened to make some small adjustments in Photoshop, for example to the contrast of maps.

Interior Lighting
For the interior of the gallery, I added two types of VRay Plane Lights.
The first is a high intensity to light the insides, but I disabled “affect specular” and “affect reflections” because the reflection was too intense on the ground.
The second is of low intensity, but I left all options activated to simulate the reflections on my ground.

Rendering
Now, it’s time to render that. Here are the settings I used.

Before running the render, I also disabled the visibility of trees and buildings. These are used only for the reflections on the ground. My render is in 5000px X 2170px. LARGE, I know 😉
This one here is a smaller version of it…

Post Production with Photoshop
I started retouching some elements, including the ground, the wall, puddles and stairs. I work a lot with layers “brightness contrast” to give more contrast to objects.

In addition, I add some texture such as the dirt on the wall, or droplets on the ground.

After that, I worked on the background.
For the sky, I used two maps. I also placed some buildings and trees that I found on the net. And finally, I created an atmosphere. For this, I used a layer with the cloud filter. I added contrast and a blue tint.

Next, I added an ambient occlusion pass that I calculated before. I put some characters on the outside and inside the museum. And I added reflections on the windows. To do this, I placed some buildings and trees in “soft light”, and played with the opacity.

I realized the rain with a fiber layer. Then I played with motion blur and opacity. I created several layers. Two for the general rain, and two for the rain falling on the edges of objects.

Next, I decided to put leafs to enhance the intensity of the wind. Back in the 3d scene.
I modeled a leaf, and I used the 3dsmax built in particle flow tool to simulate a multitude of leafs in the wind. So I placed a gravity, wind source, and a deflector to simulate the collision with the ground. And I played with some parameters, such as the rotation of leafs before and after the collision, or the wind parameters.

After that, I made ??an orange light in the center of the image. For this, I used several orange photo filter and orange layers in “screen” mode. And a curve to enhance the intensity.
Then I made a folder where I place my final filters that give the right colors that I want for my image. In general, I use the color balance very slightly. I added a blue photo filter on the edges because I wanted to make a contrast of orange / blue with the center / edge of the image. Also, I slightly desaturated it.

After that, I added back the vignetting. It is composed of a black vignetting in “normal” mode and a blue vignetting in “color” mode, always for the contrast of orange / blue I aimed for.
Finally I duplicated and merged all layers, to put a slight accent. I finally finished with a glow layer to accentuate the intensity of parts of white color.

Final image once more…

Conclusion
I hope that you enjoyed this short tutorial…
Also, I’m aware that I’m a beginner. So if you have any constructive comments, constructive criticism, which will progress me and advance me, I’ll be really delighted to read them.
Thank you all,
Cheers, Romuald.