


Making of Neue Nationalgalerie at Night
A creative mind, critical eye and honed skills were on Christopher Malheiros’s menu when he dished out those visuals you see here. It seems he didn’t really do much… taken a bad-looking raw render, did a few steps in post and BAMMM! Well… sometimes Less is More! and how great it is being showcased with Mies’s Neue National Gallery as the subject matter. Great concept, great compositions, great coloring and very emotive quality to it. If done with Maxwell Render and on time… hmmm… Anyway, we can now enjoy this breakdown Christopher was kind enough to share with us.

Author : Christopher Malheiros
Christopher lived and studied architecture in Portugal and obtained his master degree in 2009. After graduating he joined mecanoo architecten in the Netherlands for a year. In 2010 he started collaborating with luxigon and later that year moved to France. He is beginning his freelance career and often works in some visualization projects for luxigon and mecanoo.
Hi all
We’ll start with the final result below, and a link to the forum thread should you like to visit it along side or later – Nationalgalerie.

thanks for reading this article, and thanks Ronen for the opportunity to showcase my workflow on this piece here on the blog. I hope this small tutorial will help whoever reads it maybe open up your mind for a different workflow then yours.
I tried to make it simple, going step by step with screenshots of the process.

The image above shows the overall scene. The software I used to model is Cinema 4D and the render engine is the one built in Cinema 4D. This same scene was used for the 4 different images I produced.
General Scene Setup
I used an HDRI sky which I darkened a lot for this scene as I wanted a really dark ambience only lighten by the aquariums. I modeled some quick boxes adding luminance textures for windows to make the surrounding buildings.
The buildings and trees are just placed randomly in the scene. They are just there to add detail to the glass reflection. It also gives some detail in the backgrounds but I didnt really want to worry about copy the exact real world scenario for these images.
Basic Texturing
This is the HDRI Sky I used after darkening it

One of the textures for the aquariums

Im not going here into too much detail about all the textures. I just created some simple textures for metal with a nice blurry reflection which increased my render times a lot!!!
For the interior I created a stone texture for the stone walls and for the ground with some cool images I found on CGTextures. For the exterior plaza I used an arroway textures stone.
The most important thing was the aquariums. And answering a lot of questions No, I didn’t model the fishes! I created 3 different textures for each aquarium, basically those are aquarium photos I had. I gave them some reflection and luminance and thats it. This texture was just to generate lots of light and to create some more realistic reflections as I was going to make the aquarium details in Photoshop.
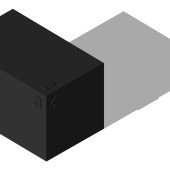
I should probably say something about the modeling of those aquariums! They are simple boxes with a very thick glass and two closed boxes on top and bottom. You can see bellow the 3d scene before render.

Rendering
Render time was around 7h at 3000px with a core i7 3.4Ghz 8GB RAM.

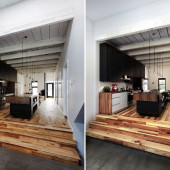
So above you can see the base render coming straight from Cinema4D. Looks crappy right? Ill make it better
I did this on purpose! As I had a pretty good idea of where I’m going to take this in Photoshop. I prepared the basic render for my needs. First thing is that in Photoshop if you have a render with bright parts (for example the aquariums) those will be pretty hard to darken and to detail. Therefore the image is not very contrasted, it shouldn’t be very bright but the dark parts shouldn’t be too dark either, in case I want to brighten them. This base raw render will allow “painting” the light in PS later.
For example, I think the first thing I did was to de-saturate and darken those annoying wooden partitions and those bright people! They are bright because I needed to brighten a lot the scene but this is just a minor problem I knew I could solve in post production.
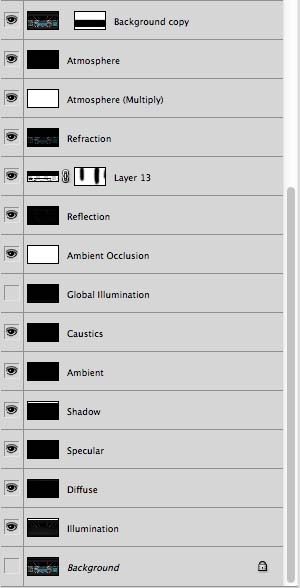
Second thing is that my basic render is already organized in a .PSD file with different layers (one for reflections, one for lights, one for GI, etc.) so that I can tweak all this in post. see image below
Post Production in Photoshop
I started by darkening those bright things like the wooden walls, people and ground.

Then I made some collage for the aquariums with some images I had.


Then, as I mentioned before (about those different layers I outputted) I played
around with those to find some materiality for the facade glass.

Then adding some dirt in the metal and glass.

A guy in the foreground (No, its not Mr. Mies!).

Rain.

Final color and contrast balances. I wanted a nice blue / greenish mood for this one! And some final adjustments to add more focus and light to the interior.

And there it is. I think I explained the whole process.

Here are 3 more images Ive done in this set. Same process was used for all.


You can also see them on my Flickr page.
Just to explain about the concept behind this.
At this point you know this was a personal project for The Museum Challenge Ronen published some time ago. I didnt make it on time for the competition so I decided to do it later when I had time.
Why aquariums? Well I always had this fascination for them so I decided to give it a try and make some images by myself!
I also wanted to remind you guys that this was a personal project with the sole purpose to create images I have a degree in architecture, but Im no aquarium specialist, structural engineer or oceanographer. No fishes were harmed during the making of these images!
Im saying this because I already got some comments about the aquariums structural
solution or even complains about the size of some fishes. I tried to give it my best and to keep it simple creating something nice!
So if you have more questions or comments I stay available to answer! Ask away below
Cheers!
P.S.
Here are the original raw renders of the other three images shown up above… nice, right?


in adding to useless comments, as a joke wouldn’t the shark make minced meat out of these fishes?
I love the theme and great work!