


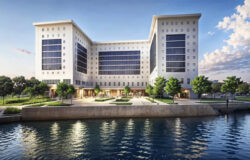


Making of Esherick House, Part 4
After covering the initial stages in Part 1, Materials in Part 2 and Lighting in Part 3, Ludvík will now finalize the Esherick House series with insight about his rendering setup and post production up to final image output. I hope you enjoyed this series as well as I did and that it helped shed light on the inner works of the Mental Ray render engine and will help you in your own workflow with it.

Author: Ludvík KoutnýLudvík is a 20 years old self-taught 3D artist based in Czech Republic, who has been interested in 3D for about 4 years now. He’s been working professionally in the architectural visualization field for the past 2 years in Michelle Bivotti visualization studio. Not having any official CG or Architecture related education, he gains all the knowledge that is directly tied to the Archviz profession in his spare time, thus actively educating himself and working at the same time.
Rendering
The rendering setup in MR is probably not as complex as some of you might think. There are several settings you need to focus on, to successfully setup and render your scene.
First, I will cover two most important ones
Indirect illumination and Antialiasing
For indirect illumination, MR offers Global Illumination, which is basically a very stupid confusing term for photon mapping (GI from now on), and Final Gather (FG from now on).
The workflow is meant to work as follows
GI first emits photons around the scene, saves photon map, and FG then calculates for fine indirect illumination while using data from GI to estimate secondary bouncing.
You can not use GI without FG if you want to get good results, but may use FG without GI. Every method has its drawback which Im going to try to explain here.
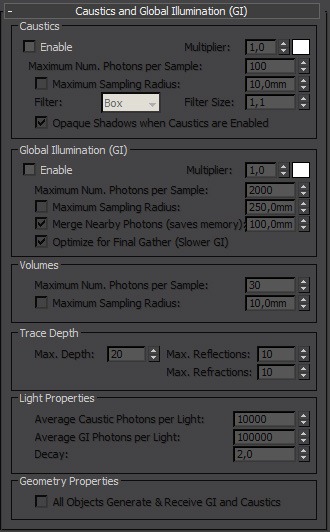
Global illumination calculation is extremely fast, and provides also secondary bounces for FG, so it speeds up rendering quite a bit. Unfortunately, it is emitted from light sources, thus you always have to focus your photon flows in order for it to pre-calculate correctly. Photon emission is in general very inefficient, and its inefficiency grows even further in complex scenes.
You also cannot use photon mapping without portal lights to light everything, because photons are not emitted from the environment (sky). That means if you use FG + GI on some scene without portal lights, FG will only pick up first bounce from sky, because once GI is activated, any FG secondary bounces are disabled. Then any secondary bouncing comes only from sun, not from sky, and ratio of secondary bouncing is extremely incorrect (only yellow light contribution of sun, but no blue light contribution of sky).
Only real lights, those you can create and manipulate in viewport, can emit photons. Environment maps or luminous materials can not.
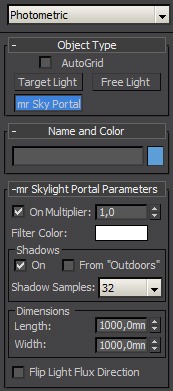
Portal Lights
Portal lights, are lights that basically take the environment color, and project it inside of an interior on area light basis. They do not add nor subtract intensity of environment, just pass it through on a directional light basis.
This has several benefits:
- Superb shadow definition from environment lighting.
- Emits photons (thus balances contribution of secondary light bouncing when GI is used).
- Helps FG to get environmental illumination through openings into an interior.
Drawbacks are:
- Directional area light sampling increases render time, especially when many light sources are present.
- When used, only interior (area inside of openings covered by portals) has correct indirect illumination. So exterior has only 1st bounce from final gather, and photons from possible sunlight, but not skylight.
- Does not pass FG rays through, so it is very problematic when looking from an exterior into interior through an opening covered by portal light.
Final Gather
FG is a bit similar to Irradiance cache. Rays get basically shot from camera into the scene, with some spacing that is defined by several importance parameters, such as geometry density, lighting contrast, etc… And then bounce around the scene to the light source, and deliver light back through the path they traveled, in order to indirectly illuminate all the surfaces. You can set an amount of indirect bounces, or use GI to handle secondary bouncing.
FG secondary bouncing is a lot slower, and produces high variance that can result in blotches and artifacts, but is all around a lot more universal solution, and works in many scenarios where GI tends to fail.
So now, when you know all of this, I can explain why I made the rendering decisions I made. Esherick House was quite a difficult scene to illuminate with MRs indirect illumination toolset.
I could not use portal lights, because there is a lot of windows, those large ones are divided into smaller ones, and every one of them would require its own portal light, and that would make my render times extreme, as well as add significant amount of noise. Also on a lot of the shots, you could see the interior from the exterior, and since portals do not pass FG rays through, there would be some artifacts on the edges of window openings.
Then, portals would only pickup environment, but would ignore all the objects outside of the house, and provide me with incorrect illumination. Portal lights have an option to sample outdoor objects as well, but that is very slow, would be even slower considering the amount of objects (foliage) I had there, and add that to slowness due to the high portal light count…
I would see first final frame finished when I would be like 90 years old 😀
Definitely no portals. And that directly leads to impossibility of using GI because if there were no portals, then there would be no GI from sky environment, and my secondary light bouncing would get corrupted.
So, the only option left is… FG alone with multiple indirect bounces.
Now, lets break down important FG settings. There is not many of them, and they are very easy to understand 🙂
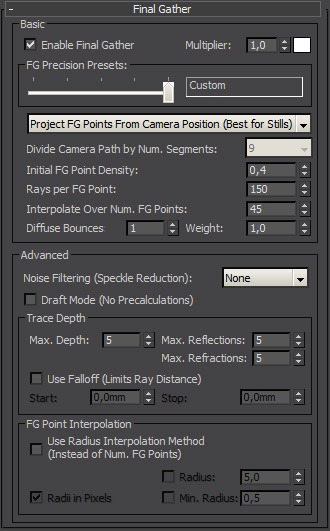
- Initial FG Point Density is basically a density of samples. Amount of samples that will be shot from camera.
- Rays per FG Point is quality of those samples. How many rays will be shot from every samples to estimate illumination of the surrounding environment, and use it to illuminate sampled area.
- Interpolate Over Num. of FG Points is simply amount of interpolation. It is a tradeoff. Higher value will make your indirect illumination smoother, with less blotchiness, but will reduce the shadow detail of indirect illumination. Lower value will increase variance (blotchiness) but also increase accuracy and thus retain more detail.
- Diffuse bounces is general amount of indirect bounces.
- Weight value is multiplier of FG intensity. You should never, ever… EVER, change this value!
- Noise filtering is a filter that is supposed to reduce amount of blotches, by ignoring rays, that carry light information, that is in significant contrast with average of all other values collected by other rays. This might sometimes be useful, but in general, it introduces significant bias, and its basic principal is really lame and not very beneficial. So I suggest you always set it to none.
- Trace depth defines how deeply will be traced reflective and refractive components of shaders. Max. Depth value should be sum of Max. Reflection and Max. Refraction. values. For final gather, you should get by with using depth of 2 Reflection, 2 Refraction. and 4 total.
- Radius interpolation is legacy interpolation method. While it retains detail significantly better than point interpolation, it does not know how to interpolate samples in reflections, which renders it pretty much useless. So I advise against using it.
Esherick House Render Settings
Now, finally for the settings. For the Interiors I have used:
- 0,5 point density
- 1000 rays
- 80 interpolation points
- 4 diffuse bounces
I had to use pretty high ray amount to make sure enough rays get from the interior all the way to the skylight, and bring back enough illumination.
For exteriors, you can get away with significantly lower settings, in my case:
- 0,5 point density
- 200 rays
- 30 interpolation points
- 2 diffuse bounces
When you use conventional method of FG + GI, then simply use the presets that are there. Low is usually good for previews, medium for final rendering, draft for drafts. Do not forget to set filter to none, and if you encounter blotches, just leave preset as it is, and increase point interpolation value until they go away.
Also, in order to reduce amount of data FG needs to calculate, and thus speed up my rendering, I have excluded glass covering windows from FG sampling.
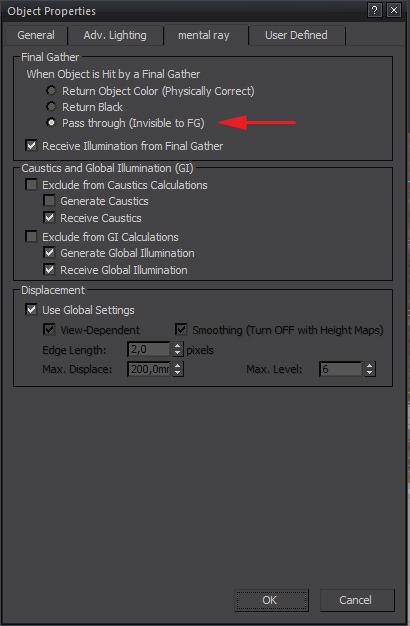
Make sure you leave Receive illumination from FG turned on. Only switch tick box to Pass through.
It is also good to disable shadow casting of glass planes, so directional lights have easier work. This applies only for glass planes in windows. For all other glass object in your scene, leave shadows enabled! Also, leave Receive shadows enabled.
Antialiasing is pretty straightforward and very easy, you have several settings at your disposal:
Min. and Max. defines minimum and maximum amount of AA samples.
- Spatial contrast is a color threshold, that defines where Min and where Max amount of samples is used. Lower setting generally increases quality, but render time as well. You will not need to change this value very often. So if you do not know what you are doing, just leave it as it is, at 0.051
- Lock samples is a feature, that helps maintaining sampling integrity in animation. (Thats how I understand it, I did not really dig deep into it, I just leave it turned on)
- Jitter is a function, that offsets AA sampling rays in random direction, to increase chances of picking up thin lines, that are parallel to horizontal or vertical edge of a picture. If the sampling was not jittered, then some very thin lines could slip between sampling pattern, and would not be picked up at all. So leave this function turned on.
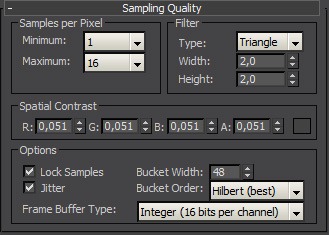
Filters are just filters… What can I say, I just cannot think of any definition right now. They are basically different curves used to blend between pixels when they are antialiased. I already feel like I am writing a book here, so I will not explain every one of them. Just a simple advice:
Use Triangle at Width = 2 & Height = 2 for previews, and Mithchell at Width = 4 & Height = 4 for finals. 🙂
Now for the settings themselves:
- Use Min 1/16 – Max 1 for fast drafts.
- Use Min ¼ – Max 4 for mid-quality previews.
- Use Min 1 – Max 16 for final renderings.
- Use Min 4 – Max 64 for some extremely fine renders. This is usually good for shots of objects, where you need superfine detail, such as studio shots of cars.
It is as simple as this 🙂
Next tab that was important in setting up Esherick House scene was Rendering Algorithms tab. I will not dig through every setting, I will just explain why I have set it this way.
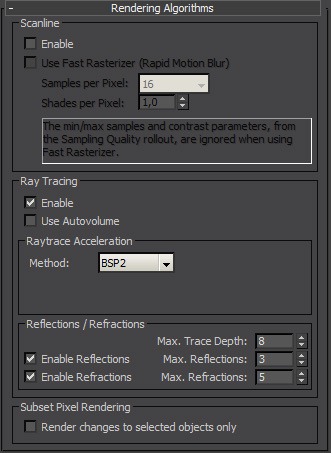
I have disabled Scanline. It might by enabled by default. Anytime you are about to create any complex scene, pretty much anything that has 1,000,000 polys, always disable it. It will allow MR to work with memory more dynamically.
Ray trace acceleration
Always use BSP2, it is a new ray trace acceleration method, very memory efficient, fast in complex scenes, and fully automatic, just use it, simple as that 😉
Reflections and refractions settings are self-explanatory. It simply sets amount of ray tracing depth for reflections and refractions. Same as in FG applies – Total trace depth should be always sum of reflection + refraction depth. The settings you can see on the picture usually work for me very well in 99% of the cases, so i do not change them 🙂
Do not worry if your refraction depth is not large enough, you will not get black refraction. After a ray runs out of refraction depth, it just ignores any transparent objects, and returns color of a first opaque object it hits, or in case there is no object, it returns environment color. This smart mechanism is introduced in MR 3.7.
That is pretty much all about rendering. I know I did not cover a lot of the remaining settings, but I already wrote more than enough, and I did not cover them because I did not use them / their setup did not differ from defaults.
[wpsharely]
[/wpsharely]
I did not cover standard interior lighting approach as well as GI settings, so I am attaching a classroom scene (shared above), originally made and kindly shared by Alex Sandri, shaded and lit in MR, so you can use it as a reference of standard interior lighting setup. You need at least 3ds Max 2012 to open it.

Post Production
I will try to describe my usual Photoshop post processing process. First of all, I always flatten image, always, after every step I do. I know that I lose a lot by not keeping layers, and that I cannot go in previous layer and make some adjustments, but I feel like flattening image after every step gives me a lot more freedom. This is my way, and might not fit all.
Starting with raw render

Usually, when I open any rendered image, its little dark and strongly washed out. First step is to brighten the image up using brightness/contrast function. I usually add about +20 to +40 brightness points, depends on how dark the initial image is.
Next step is to add some contrast. I duplicate the image into a new layer, set mode to soft light, and set layer opacity to about 25%. Then I blur the image using Gaussian blur with some large radius, lets say 25 pixels. This will give the image some slight contrasty glow.

As a next step, I repeat the same process, but without blurring, and I set the layer opacity to about 10-30% to make it even slightly more contrasty.
Next, I duplicate the layer again, and I use auto color function. This turns most of my images into bluish cold tones, I then set the mode of layer to color. That will transfer cold bluish color tones on the bottom layer, but without transferring additional contrast to it.
Once I got slightly washed out cold-toned image, I duplicate layer once again, put rich 100% yellow color in my primary swatch, and rich 100% red in my secondary swatch, and then apply gradient map function on my duplicated layer. After that, I set layer to soft light mode with about 20% opacity. This will combine cold tones with some warm tones, and give you pretty nice color mood.

After that, I select all the bright sky overexposed areas with magic wand tool, that has tolerance of about 25, create a new layer, fill selection with blue sky color, deselect, apply Gaussian blur with about 50-100pix radius, and then set layer mode to screen. That makes those nice blue glow effect around the windows, and around the sky on some exteriors.

I repeat the similar process on very bright sun streak areas, with some slight differences. I use smaller blur radius here (10-50px) orange color, and sometimes I use color dodge mode instead of screen mode.

In next step I use lens correction filter to add some subtle vignette effect and sometimes also to add slight chromatic aberration effect. But be careful with CA, it tends to blur your image a bit.
Then I usually sharpen my image using unsharp mask filter, set to 50% with 0.5px radius and 0 threshold.
After that, I use color balance tool to fine tune my color tones. I often put 5, 0, -5 in shadows, and -5, 0, 5 in highlights. I have Preserve luminosity always active.
Last step is to add noise, for that i simply use add noise filter set to monochromatic Gaussian at 1%.

Then I just once more fine-tune brightness using brightness/contrast function.
I sometimes also experiment with Nix Color Efex filter set for PS i got with my Wacom tablet. It is really great set of filters with some neat features to control them. I recommend you give it a try 🙂
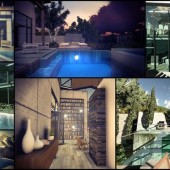
The final image

Summary
I think thats all folks 🙂
This was a long stretch and Im sure I forgot some things I wanted to cover in this 4 parts series, but I still hope there wont be some significant missing pieces of the puzzle. I am also sorry for possible grammar mistakes. My English is not that bad, but I could not pay attention to it while writing this article, since my head was full of Esherick House and Mental Ray 😀 (Luckily, Ronen is going to do some editing, so I won’t be as much embarrassed as if I published it on my own 😀 ) And of course, my fingers were a lot slower than my mind, so I was writing it down in a rush 🙂
If you have any questions, just publish them down in the comment box, and I will do my best to try to answer them 🙂
I hope that these articles helps you mainly when you decide to give MR a shot. And if you already are a MR user, then you might find there some tricks to incorporate in your own workflow 🙂


F*cking hell! I don’t even use 3ds Max or MR but this is by far the best making-of I have ever seen! Thumbs up, Ludvík. 😉
@katewrss Happy you think this is – Ludvík bust some major a$$ on this one 😉
@ronenbekerman@katewrss Eh… thanks? to both of you… 😀
Cheers for taking the time and gifting of files. Most appreciated to see info on MR. I prefer it to vray any day of the week.
Definitely incredible. So many other pros should take example from this and be more generous with information :- D heh. Great job, now I am really almost sad that I don’t use MR either.
I use almost same Post-work approach, heavy contrast and same color correction, it produces somehow un-realistic result, but at same time it’s somehow peacefully interesting to my eye.
Ludvik, This is brillant…have been holding my breathe since i saw the images…as a fellow MR user…thanks for being so explicit in your ‘making of’ tutorial…I learnt so much… Thanks Ronen [ Your the man]…Ludvik, one thing though… How different would your workflow [FG] be if you were doing an animation [do a part 5, if you can…lol] and would it be less of a terror if you were using Vray…. Again Thanks a bunch for sharing.
@nnamdiakubuiro I would interpolate the s**t out of final gather, even 200 points if necessary, and combine that with Exact AO feature of A&D material, which i described in part 2. That should give you stable, flicker free, yet quite detailed result at acceptable time.
Wow, wow, wow.. as a fellow MR user (hobbyist) I am really happy that a pro would actually share such detailed, extensive and valuable information. Thanks to @ronenbekerman Ronen for featuring this and Ludvik for the tutorial. Bookmarked!
Hi Ludvík. Congratulations for writing the excellent articles and sharing so much high level information!
I use Vray on almost 100% of my work (a matter of taste) although I use MR on some projects to keep up to date ( I really love the A&D materials). A couple of questions: What if you have used area lights (instead of portal lights) and GI + FG? From a pure speed point of view, would you get faster render times comparing to high settings pure FG? Did you have to boost the lighting in Photoshop on the interior renderings? Thanks.
Hi Ronen. Your website is already my daily first stop to check “the latest” on the architectural CGI field. http://www.ronenbekerman.com is quickly becoming an invaluable and refreshing resource and pool of knowledge on the field. Congrats for publishing one more excellent article!
@ChristianMiranda Area lights are out of questions. If i used them to light interior, incoming light from area lights would not even remotely match correct illumination from outside. Especially light bouncing of foliage. It would be some boost, and significant quality loss.
I am always willing to do things, that sacrifice very little realism, for very high rendering speed boost, but not things that sacrifice significant amount of realism, this being one of them.
For interiors, yep, on some of them, i had to increase brightness a bit. It depends on your initial exposure value from max. I usually set it lower than i would want to, because in contrast with dark UI of 3ds Max, it looks bright enough, but once i bring it in PS, it looks little too dark, so i boost brightness a bit always as a first step. It is not that much of a deal. Certainly faster process than doing dozens of renders while looking for perfect EV value 🙂
@rawalanche I agree about the loss of quality, that´s why I said from a pure speed point of view. It´s a pity that the portal lights have those drawbacks.
Regarding the interiors, in my tests, I always had the impression that pure FG didn´t bounce enough light realistically like GI does. That´s why I asked you about boosting lighting in PS. Now…after seeing your images I will investigate pure FG more deeply. Thanks!
@ChristianMiranda You need about 4-5 diffuse bounces and quite sufficient amount of rays to get close to correct secondary bouncing intensity. That is of course not very rendertime friendly 😉 In more open interiors, with large window openings, you could get away with 3, sometimes even 2 diffuse bounces.
This is truly inspirational work. I am teaching my self to use 3d max MR by following tutorials and information posted by other Artist. . I have one request. Is it possible to do a standard interior lighting setup with 2011 3ds max? Thanks again for sharing your knowledge.
@RicardoSnaggs Of course, process is not any different. If you download the classroom scene i provided, you might ask someone who has 3ds Max 2012 to resave it for 3ds Max 2011 for you, and it will work properly. Recent version of 3ds Max have a possibility of saving to previous version 😉
Thanks for your reply. I will check it out.
Great stuff and great to see another MR-based arch-viz artist out there.
Amazing work Ludvík, both from the quality of the image and also for your explanation. I’m a teacher and I’ll show this making of to all my students. I just think you should change the ending phrases because this is not just for MR users, many of the concepts you explain can be used easily in VRay.
BTW, you seem to have some knowledge in VRay, I’m curious about why you did this job in MR, I work with both renders and I completely agree with all the complains you made about the problems that MR has, so why did you used it in first place instead of vray?
@fla3dmadness Indeed there is lots of insight here that is relevant to other render engines too 😉
I guess one keeps using the render engine he started with first… right? else why all of you Mental heads remain with it even though you know the cons?
That said… I had a small play with iRay the other day. and it was a nice one. not a reason to make any drastic changes in life style yet 😉
Cheers
@ronenbekerman I agree that some people are reluctant to try a different render than they are used to, but its always good to give it a try. I started with scanline a long time ago, tried that crap radiosity and light trace until I got Mental Ray in max 6 and used it for a long time until I moved to a company working with vray. Had some bumps on the beginning but now I just use MR here and there to keep used to it because I can’t stand all the problems it has and the lack of options like multiple GI solutions, so for me VRay worth the extra bucks it costs. But I’m always impressed when guys like produces an amazing job with mental ray. 🙂
And thanks for the blog, you’ve got some amazing works here and great tips.
Cheers!
@fla3dmadness While Vray might usually perform better, give you more options, i stay with MR mainly because i know it very well and i know what to expect from it. I also think shading quality of A&D shader is slightly better than the one of Vray material.
Second thing is that i do not own Vray licence, and it is not exactly cheap, while MR is free with a license of Max.
Lastly, i feel like when i use MR, i have to put a lot less effort into setting up my scene than with Vray.
For example with Vray you got to control LWF twice, once in Max preferences and once in Vray properties. Same with exposure scattered all over the place. Color mapping in preferences + exposure controls in camera or exposure settings. 2 rollouts on different places to control AA quality (AA and DMC settings). Need to use custom Vray VFB for everything to work and perform properly. It requires simply a lot more effort to set up scene in Vray than in MR.
That itself is a very reasonable cost for benefits of Vray performance and abilities, but that, combined with not having a license and not knowing that renderer too well makes it just 50:50. So i think i would get by with Vray, and i would probably save some time and headaches, but at the same time, i do not urgently need to switch over to another renderer 🙂
@rawalanche Hey Ludvík, thanks for yout reply. Now I understand your point and totaly agree with you, I work with both renders and I even got more experience with Mental Ray, but I use VRay at work and agree with you about the cons about VRay, I just find it a bit more solid on a day to day production, but its really a matter of personal taste as both can output great images, its all in the hands of the artist.
Cheers!
Hi Ludvík, thank you u so much for sharing this hi-quality informations about MR. I am a MR user too and there were many things I colud never imagine did work like that. Can you tell us how much time does each image take to render at full resolution, just an average? And what’s your hardware setup?
Thanks to Ronen too for this great website!
Best Regards.
@grnakamura average was 8 hours on an i7 870 @2,93Ghz with 16Gb of RAM. I could push rendertimes down to half with minimal quality loss, but i did not do any optimizations, i went straight for quality.
Hi, just saw one of your pictures on archdaily :
http://www.archdaily.com/202759/ad-classics-esherick-house-louis-kahn/
@fouinard Yep, mentioned as a photo! Ludvik will love that 😉
I mentioned it to them and hope they will change the credit as soon as possible.
This is the best MR making of I ever seen! Lot of excellent tips! Thank you Ludvik and Ronen!