


Making of Esherick House, Part 3
After covering the initial stages in Part 1 and Materials in Part 2, Ludvík will now shed some light about – Lighting. This is the point in which all the hard work of setting up the scene and taking the time to fine tune the materials is being brought to life. Ludvík covers the making of Overcast, Sunlight and Night lighting scenarios with lots of additional insight about this process in Mental Ray.

Author: Ludvík KoutnýLudvík is a 20 years old self-taught 3D artist based in Czech Republic, who has been interested in 3D for about 4 years now. He’s been working professionally in the architectural visualization field for the past 2 years in Michelle Bivotti visualization studio. Not having any official CG or Architecture related education, he gains all the knowledge that is directly tied to the Archviz profession in his spare time, thus actively educating himself and working at the same time.
Lighting
Lighting is the part I enjoy the most. Even a simple building made of a few boxes with clay material on it can look very nice when lit properly. It is this phase, where you take all the parts you have done, and make them look photorealistic.
But before I dig into it any further, there is one very important thing – Linear Workflow.
You often hear various artist saying they do or dont prefer LWF. That they sometimes use it, that it has some highlights and some drawbacks. Well… NOT in Mental Ray!
In MR, LWF is not a matter of option. It is a must, it is as simple as this:
- No LWF = Incorrect result.
- LWF = Correct result.
LWF with mental ray is not a rocket science, as many people might make you think. All you have to do, is go to Customize>Preferences>Gamma and LUT tab, and set it exactly like on the following picture

Do not care about reflectivity maps, bump maps, etc… Many people will tell you you do not want some of these maps gamma corrected, and some you do. Just do not care about that. Once you develop a workflow, these things do not matter. This is not Movie VFX production, this is Archviz, and for simplicity sake, think this way – Gamma and LUT settings set according to the picture above = Enabled and correct LWF.
That is all you need to care about.
Now, lets go on and dig into the lighting…
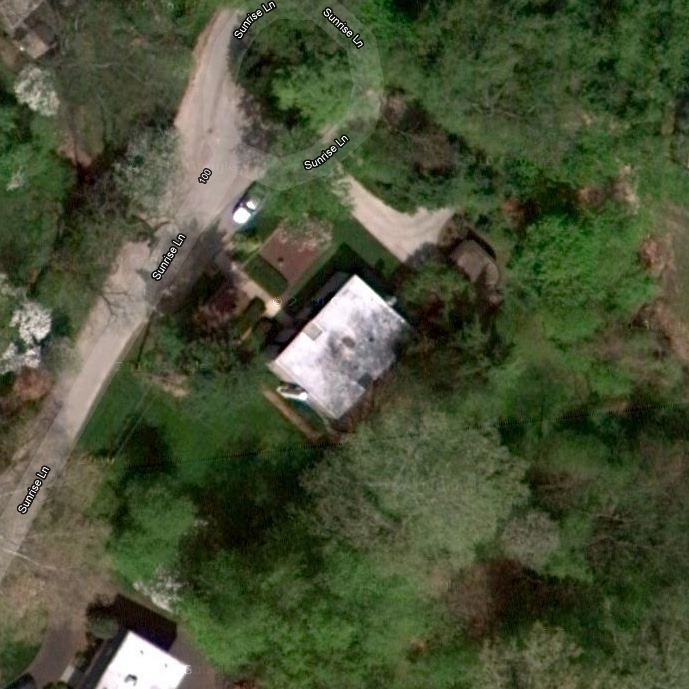
When I had a rough house finished with materials, I started to play around with sun angles. First of all, I deployed a standard MR daylight system. It is integrated within 3ds Max native daylight array that can be found in MCP>Create tab>Systems>Daylight. It allows you to pick exact position on earth, set exact time, day, month, year, daylight saving time, etc.
Esherick House is located in Philadelphia. So I picked it from the list of locations in daylight system. I found exact Google Maps coordinates of Esherick house on Wikipedia, and from that information, I estimated the orientation of the house in relation to north, and used north offset in daylight system, to orient the daylight system accordingly. After that, I was sure, that my lighting will be exact, as it would be in reality on real place where the Esherick house stands.
After some experimenting with different dates and times, I still could not decide which sun angle would be best. Then, after a long decision crisis, mental breakdown and nearly lethal consumption of caffeine, I decided to go with overcast weather, simply because that freed me from the need of sun angle decision.
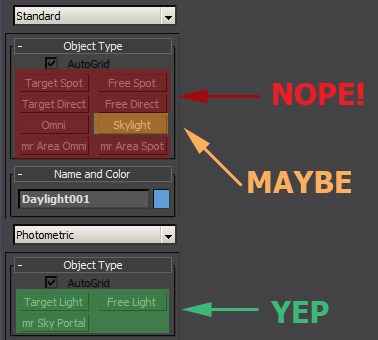
Before I go on, there is another important thing. When you use Mental Ray, you should not use any old Max native lights. Especially, ESPECIALLY NOT mr Area omni and mr Area spot (Those are extremely old legacy lights). For physically correct and problem free results, you should use only lights from Photometric category. From Standard category, you will need only Skylight, and that is used only in specific cases, which I am going to describe in a bit.
There is no difference between free and target photometric light, except target one having a target controller. Photometric light is a universal light. Sort of like V-Ray light. You can make it point, Area shaped (Rectangle, Sphere, Disc, Line, etc.), IES profile based, and spotlight. It has a lot of options. You can also control its intensity by very convenient physically based units. I suggest you use Candelas 🙂
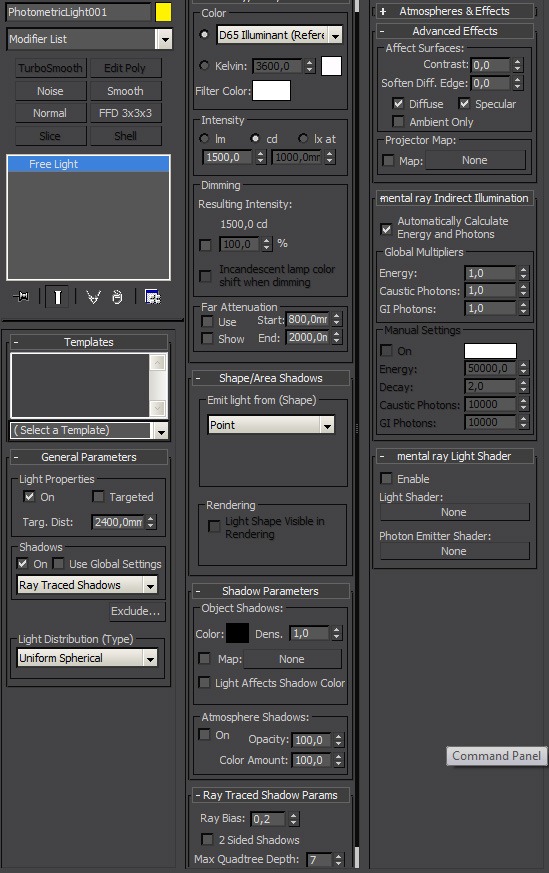
Every time you create a photometric light, make sure shadows are on, and they are set to ray traced shadows. Not adv. ray traced shadows, or shadow maps, only ray traced shadows! If your light is supposed to shine only from single direction, then change distribution from uniform spherical to uniform diffuse. This way, when using rectangular light for example, it will only shine from one side. This can give you some rendering boost by not having to deal with twice as much light sampling.
There is a feature called Light shape visible in rendering. Unless you know what you are doing, you should never use this. Otherwise you will end up with fireflies on your materials. MR current AA solution simply cannot handle such a big intensity difference. The light surface can be for example thousand times brighter than white.
If you want to create a glowing light bulb for example, then model a simple bulb mesh, and put an A&D material on it. Then set it to not cast, nor receive any shadows, and put it there with your photometric light. Set the glow intensity in A&D shader to be only slightly above white, so it looks bright on render, but AA sampler still can handle it. Of course, glow in reflections then does not have proper strength. But in primary reflection, it should not be much noticeable, and in secondary reflections it does not matter, because it is still a lot better, than having a render full of fireflies.
Here is an example of proper glow material.
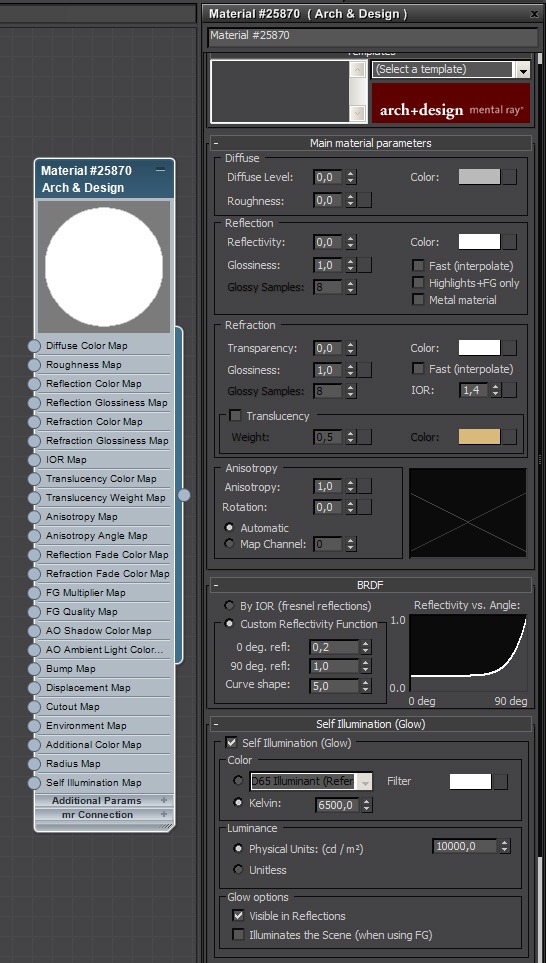
You should not have any diffuse or reflection contribution to your shader, only glow, so make sure you set diffuse level and reflectivity to 0. Then you enable glow, set it to physical units, and set the value in candela units only slightly above white. You will know when it is under white, because the shade ball will turn gray, or some tinted color in case you have set some kelvin temperature color.
Now finally for an actual lighting
Overcast Lighting Scenario

So as I already mentioned, first, I decided to go for an overcast weather. I have set my daylight system to about 14:00 to see where the sun would be. Then I downloaded some nice cloudy 360° bitmap from cgtextures and in Photoshop, I doubled vertical canvas size, to have horizon in the middle, and thus properly spherically mapped it to the environment. I filled the empty space with some neutral ground color.
Next, I added a bitmap to the environment slot, and loaded the texture there. I then instanced map from environment slot into the material editor, set mapping to spherical environment, and of course, disabled blur.

Next, I located a bright sun spot scattered behind the clouds, and I oriented it at the place, where sun at 14:00 would be. I used U (horizontal) offset in bitmap to do it. You can easily preview background in nitrous viewport in real time, and then adjust it in real time. All you have to do, is to select viewport, hit alt+b, and enable use environment background and display background. Then you simply can adjust mapping of your environment in real-time.

Now, in order to get proper illumination from the map, you need to do a few things:
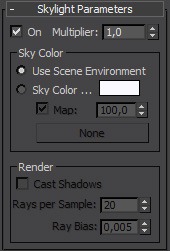
1. Skylight
You need to add a skylight in your scene, and set it to use scene environment. This is that only rare case where you need to use a light from standard category, that I was talking about above. This will ensure environment map will get picked up by FG, and illuminate our scene.
2. Exposure
You need the environment to have a correct exposure. That means you have to establish mental ray photographic exposure control.
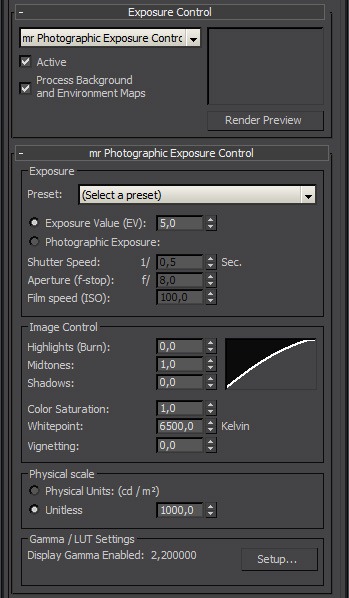
Photographic exposure emulates real camera response. As you can see, you can set up a lot of things here. I prefer to use simple EV parameter, rather than setting real camera exposure settings. I also suggest you set your Highlights and Shadows setting to 0. This will generally produce more washed out clamped results without contrast, but that pays off in post processing.
It is always a lot easier to add contrast to your images, than remove it.
Most important is the physical scale box. Here, when you set it to unitless, you are going to set a value in candelas, which will define the light intensity of native 3ds Max lights. Those standard ones. That means if you use standard max omni light with multiplier of 1, multiplier of 1 will equal to the value you set in the unitless box. Multiplier of 2 will double that value, and so on.
Why would we need this, if we do not use standard max lights in first place, you ask… right? Because even bitmap node is considered a native max light! Thus a bitmap with output value of 1.0 will equal to the intensity you have set in unitless box. This means that when in my case, I have set unitless value of 1000, our sky intensity is going to be approx. 1000 candela per square meter.
Now, when we have our correct sky intensity set up, you can tweak EV parameter, until you get a brightness you want. Lower EV = higher brightness! Keep that in mind. You will also need different EV for interior, lower than the one for the exterior. With a 1000cd/m2 emitting sky, EV of about 5 for exteriors worked well. 3 for interiors.
3. Sun Matching
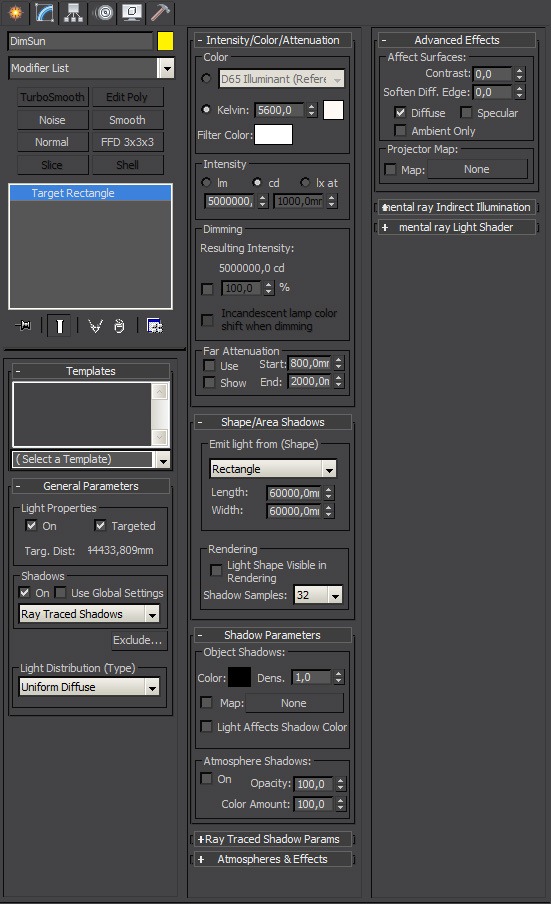
Since our map is not HDRI, so it is not captured with correct intensity, and would not give you very contrasty shadowing, I chose to improve the lighting with one photometric area light, placed on the hot spot, where sun is hidden behind clouds. I placed the light very far away from the scene, about 0.5km, so it looks more like a sun, than a close light source.
There is a nice trick to position sunlight, or any light to the exact position of sun disk on your environment map, or to position sun disk at the place of your sunlight. Here I will demonstrate the first scenario – positioning light at the center of a sun on environment map.
I created a target photometric light. I have aligned target exactly in the center of my scene. Then I isolated only photometric light and target in my viewport. I selected only target object, without light, and used zoom extents on selected function (z key by default) and orbited around it, until the target directly intersected with position of the sun on the sky. Then, without moving my perspective view, I selected a light object, without the target, and positioned it right between the target and the sun on the bitmap, so from perspective point of view, it is exactly in one line.

After that, I adjusted the area light size to cover approximately the space on the sky, where light comes from. I also adjusted the intensity to the point where I liked it. Since the light source was very far away from the scene, and photometric light has a realistic light falloff, I had to use a pretty high value – 5000000cd. I also set kelvin temperature to 5600 kelvins, which is slightly yellow, to give the sun some slight warm tint. 6500k is considered to be neutral white in default white balance point used by MR. You can change it in MR photo exposure control.
After this, the overcast light setup was pretty much done 🙂
Sunset Lighting Scenario

After I made a few shots with overcast weather, they all seemed to look quite sterile and boring, without atmosphere. So I decided to add a few sunset shots, and also a few night shots.
The creation process of sunset lighting was very similar to the overcast lighting, with some differences that i will now cover
First of all, I made a daylight system, set it as I described above to match the location, and set the time to be late afternoon – 17:35. I decreased the multiplier of the sunlight a bit to 0.65, because on the sky bitmap I used, it was slightly covered in clouds. I also changed red/blue tint value to 0.15, to give it slightly warmer color. (Positive value = reddish light, negative = bluish light)

Once that was done, I needed to match the exposure of my sky bitmap texture to the intensity of sun light. I did that by eye. I ended up using unitless value of 20000 cd/m2 in photo exposure control. Also, when you are using daylight system you do not need separate skylight light in your scene, because skylight is already part of daylight array. You should not have 2 skylights in your scene.
After these steps were done, all that was remaining was to match bitmap orientation to daylight orientation. Since daylight system was exactly set according to world position, I had to reposition environment map according to it. I used similar approach as before, but this time, I isolated daylight system and compass object, then I selected compass only, hit Z key to focus, and orbited it to exactly intersect with daylight object, after that, I opened material editor, instanced environment map to it, and using U offset I aligned it with sun direction. You will rarely find a map that will exactly align with your lighting vertically, but important is that it aligns horizontally.

And that seems to be all for sunset setup 🙂
Night Lighting Scenario

Night lighting is created in the same way as overcast lighting. Added skylight in the scene set to use scene environment and oriented the hot spot on the bitmap on the place where sun falls behind the horizon according to properly setup daylight system. I once again used a twilight bitmap from CGTextures.

Since night lighting is very dim, I used a value of only 100 cd/m2 in unitless box of photo exposure control.
After that, first shot was interior shot with fireplace lit on. I simply added a rectangular photometric area light with very low kelvin color (1800) value inside of a fireplace, adjusted area light rectangle size to roughly match desired size of flames, and since I did not check light shape visible in render I just had light illumination without a visible light source. That is what I wanted, because my intention was to add flames in post process. I used uniform spherical distribution this time, because flames illuminate the scene from all sides.
The second shot was exterior with lights inside turned on. I simply created and instanced several photometric lights with spotlight distribution. I had 3 original lights that were instanced around:
- Strong light bulbs in reflectors and ceiling lights.
- Weaker light bulbs in floor and table lamps.
- Small light bulbs on night tables.
First 2 light types had distribution set to spotlight and shape to disc, third type (night table lights) had distribution set to uniform spherical, and shape set to sphere.
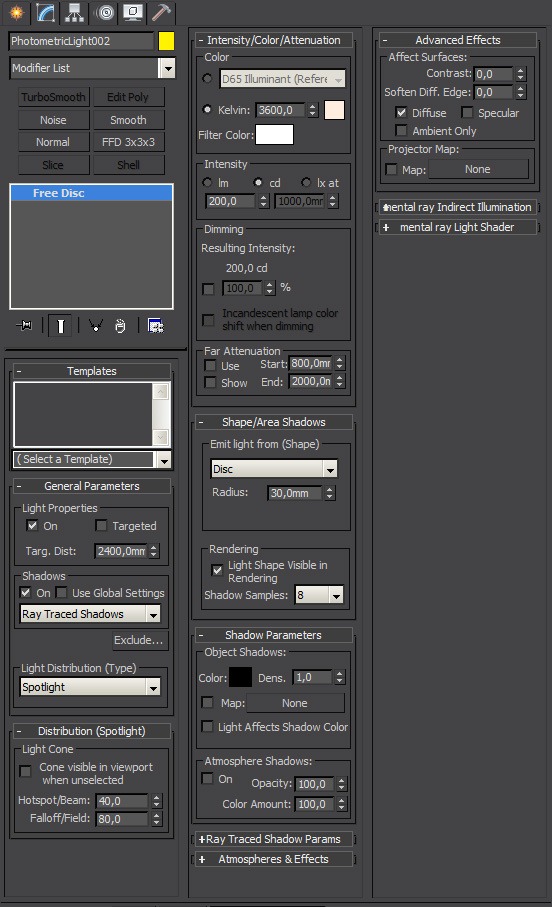
As you can see, I used low light sampling value. That is because there is a lot of lights in the scene, and generally, the more lights you use, less sampling is needed. Of course that only applies if all the lights illuminate the same surfaces.
In general, you could try to stick to this rule with area lighting:
- 1 light – 64 samples
- 2-4 lights 32 samples
- 4-8 lights 16 samples
- 8-16 lights 8 samples
- 16 + lights 4 samples
This, I think, is all for the lighting part. I probably forgot something, but I just cannot remember what it was… 😀
See you in the next and final Making of Esherick House, Part 4 – Rendering and some Post Production.


This is just awesome 🙂 Thanks a lot mate !
You should write a book you know… 😉
@fouinard Already writing this was quite time consuming and exhausting. If i had to write a book, i would need to quit my job. I can not afford that 😀
@rawalanche I can well imagine it took you some time, you wrote those 3 articles at an incredible speed ^^ Thanks again 🙂
great!!i am working with xsi, so i have to translate it for this app. i guess some issues are similar (materials) and some are different (lights, i can’t the exact lights you use)…
@ThomasGruender Recent build of Softimage (2012 afaik) should contain mia_photometric light, which should be suitable. Additionally, you can use Wom_archlight 3rd party plugin, which gives you slightly faster photometric lights with more options.
nice nice 🙂 thanks
Hello Ludvik!
Thank you for an excellent “making of”. It´s always nice to get some tips from fellow mr-users. I have two questions. In the overcast setup, you disable the daylight system after you have created your custom skylight and sun, right? Exactly why do you not use the same technique for the sunset setup? /Kristian
@KristianSchling Yes, once i estimated approximate direction of sun at given time in overcast setup, i deleted daylight system.
The reason i use daylight setup in sunset, and not in overcast is that for overcast, large area light is better suited for soft shadows created by sun scattered behind clouds, while in sunset setup, sunlight is a lot more appropriate for distant small light source that creates relatively sharp shadows, as well as the fact that MR sun dynamically changes color tint according to the time of day.
@rawalanche Ok! thanks. I was wondering because I have tried the technique using a bitmap (hdr) in a skylight to light a scene but I have never been happy with the result. Do you feel it adds to the realism in the skylight when using that technique instead of the daylight system skylight? Why don´t you just adjust the shadow softness in the mr sun settings?
@KristianSchling Sunlight with very high shadow smoothness creates some issues. You may see, that sun shadows look completely sharp in FG precalc phase. This is a performance optimization done by Mental Images.
While when softness is low, for example 1,0 as default, difference between FG result and raytraced result is so small it is not noticeable, but if softness was very high, FG result would differ a lot from final result, and indirect illumination would not look correct then.
I add lights to environments because my maps are JPGs, not HDRIs, so they do not have correct intensity. If you use HDRI, then you will not need to add additional lights.
But FG alone will not be sufficient to sample environment enough, to create crisp shadows from HDRI map. For this, you will need to use experimental feature called BuiltIn IBL.
https://docs.autodesk.com/MENTALRAY/2012/ENU/mental%20ray%203.9%20Help/files/manual/ibl.html#fo:ibl
You can activate it using script you can find here:
https://www.infinity-vision.de/page/ro_menue
IBL is basically a huge spherical area light turned inside, that projects environment map onto your scene on direct lighting basis.
@rawalanche Thank you for your quick replies. I will have to check that feature out. I have already been experimenting a bit with the ctrl_ghost scripts (don´t know if they unlock the same feature) but all of the features unlocked by that script make my MAX extremely unstable. Let´s hope that future versions of MAX will support it better along with importons and irradiance particles and so on.. =)
???yeah, thats mr how we know it, all the features are there but hidden since years.
???yeah, thats mr how we know it, all the features are there but hidden since years.
@rawalanche@KristianSchling
@rawalanche@KristianSchling
??
?yeah, thats mr how we know it, all the features are there but hidden since years.
hello ludevik,
thx for the great tut, was a big help! one question, you mention in the sunlight scenario, that you use the built in skylight of the daylight system. isn’t it better to switch that off and use instead a extra skylight which is driven by the scene environment map? i always use a hdri map with very low rgb level (0,02-0,04) and a unitless physical scale about (1000- 40000) as a environment map. greetings joerg
@st.germain In sunset scenario, i replaced MR physical sky in environment slot with environment bitmap, which i then rotated to match direction of sun. Skylight, that is component of daylight array works exactly the same way as separate skylight with “Use scene environment” selected.
@rawalanche wow! thx for the quick answer! did i got it right, that the skylight (without mrsky) of the daylight system acts exactly the same as a extra skylight? i have to try that . . .
@st.germain Yes, actually you do not even need to switch it to skylight. You can just leave MR sky there, and as long as you swap mr physical sky in your environment for spherical bitmap, that bitmap will be used.
@rawalanche is there a magic trick? i soon i switch off my normal skylight an switch on the mrsky, my environment is not anymore influenced by the bitmap (hdr bitmap)??
@st.germain No idea, it works for me. I could just put together some example scene and put it up. But its going to take a while, i am quite busy lately 🙂
would be great! no hustle :O)
@ronenbekerman thanks ronen and thanks ludvik
Hello
Really , your work is amzazing. I’m happy to see some project made with mental ray!
Just a question , did you used Skylight Portal for rendering interior scene ??
@archijex I did not, and in Part 4 I am explaining why 😉
Thanks for answering so quickly
i’ll read with caution the part 4 ! 🙂
I’m french so it’s not so easy to understand all the “technical words”.
@rawalanche@archijex
Just a last one 🙂
For your interior rendering did you used overcast config or Sunset Config ?
@rawalanche
Dude!, I haven’t finished reading your tutorial yet and I already love you.
You just fixed a problem I have with the following explanation:
“There is a feature called Light shape visible in rendering. Unless you know what you are doing, you should never use this. Otherwise you will end up with fireflies on your materials. ”
I posted this issue on cgarchitect:
https://forums.cgarchitect.com/70468-reflection-sparks-issue.html
I actually gave up and disable the photometric light and rendered another view, but I’ll go back and try it again.
Thanks!