


Making of Esherick House, Part 1
Two weeks ago I showcased a remarkable 3d recreation of Louis Kahn’s Esherick House made by Ludvík Koutný, and today I’m happy to publish the first part of making this project. Ludvík was very kind in taking the time and write an insightful article about the use of Mental Ray in architectural visualization based on the Esherick House rendering project. This first part serves as an introduction and will cover the gathering of references, modeling, texture and foliage. The next parts will cover in depth materials, lighting, rendering and post production as well as providing some sample files for you to play with. Enjoy!
As you’ll read along, you will notice that Ludvík shares insight about the use of Mental Ray and other tools beyond the scope of the Esherick House project. You’ll be able to implement these in any project, and might even translate the principles when using other render engines too.

Author: Ludvík KoutnýLudvík is a 20 years old self-taught 3D artist based in Czech Republic, who has been interested in 3D for about 4 years now. He’s been working professionally in the architectural visualization field for the past 2 years in Michelle Bivotti visualization studio. Not having any official CG or Architecture related education, he gains all the knowledge that is directly tied to the archviz profession in his spare time, thus actively educating himself and working at the same time.
Introduction
Kicking off with a little bit about me, I started with 3D graphics about 4 years ago with Blender and got more serious about it once I jumped ship onto Softimage (XSI back then). Since the only available integrated renderer for XSI at the time was Mental Ray (MR from now on), it was my only choice.
After 2 years of trial and error approach, I learned to handle XSI and MR well enough to get my first job at MichelleBivotti visualization studio, which I still work for the past 2 years. When I started to search for a job, I could not find any because XSI was not exactly a package suited for architectural visualization. Eventually, I had to transition from XSI to 3ds Max, but since MR was integrated there as well, migration went quite smoothly.
Aside from 3ds Max and MR, I also use the MultiScatter plugin, OnyxTree generator and Photoshop for post processing work.
Why Esherick House?
The idea to embark on a personal project creating a complex architectural project sparked out of multiple impulses
First of all, Ive seen all those pretty houses on Evermotions front page, with all the dense foliage around them, and I wanted to see if Im able to create such a thing too – handling such a complex scene. Something I always had problems with.
Another impulse was the very inspirational The Third & The Seventh video by Alex Roman, which I am sure the majority of you have seen and admire as well.
Next impulse was the benefit of gaining experience from such a complex scene and creating workflows for handling complex scenes to be implemented in future projects.
And the last impulse was that I had gained a lot of experience from my professional works that I couldn’t show anyone, and I had no up-to-date proof of my current skill level in my online portfolio. I wanted to make something new and better than before, to show off my skill.
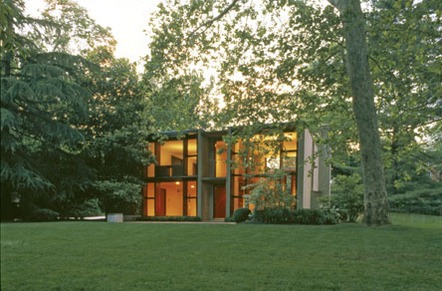
My first plan was to make a building by master architect Louis Kahn. His architecture is always playing with light in harmony, and lighting is one of my strong sides. But of course, I was able to point on most of his works and say Alex Roman already did it. Most of them except this little house on a regular street full of mid-sized family houses in Philadelphia – The Esherick House.
credit – www.architectureforsale.com
credit – www.architakes.com
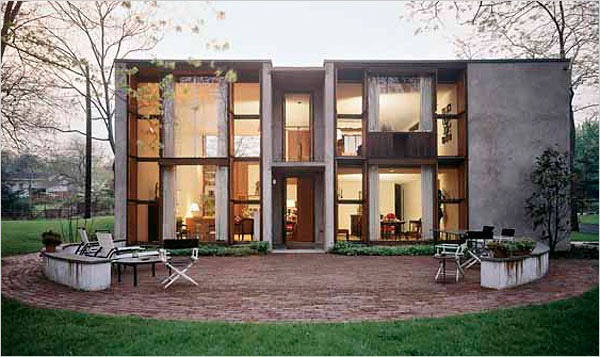
Once I found out about it, I started to Google some details, and once I saw a shot of afternoon sunlight crawling around a construction made of a precise wooden blocks, I fell in love with it.

credit – www.dezeen.com
I downloaded as much photo references as I could, and started to look at the place more closely. Thanks to that, I could sort out all the things that need to be done, and plan my workflow around it.
I decided to make both interior and exterior in one shot, and to make the scene detailed from all sides, not built for single camera. That slowed down the creation process a bit, but allowed me the freedom of just walking around and taking pictures like a real photographer and the possibility of making so many renders of it.

Gathering References
Of course, every successful recreation of an existing structure needs good references, and lots of them. In case of Esherick House, it gave me some rough time. While there was a reasonable amount of photo references, there were not many technical references. The best blueprints I was able to find were two 450×300 pixel floor plans, but it eventually proved to be enough 🙂

First good source was of course good old Google Images search. When you click any image, you can get to the source page. In many cases, a found image is only one of a whole series, so you will find more of them on that source page. This way I ended up on some flickr and photobucket galleries, where I found lots of images I needed.
I wish I had known about The Esherick House website earlier. I discovered it when my project was nearly finished already. It had on it many pictures in angles and position, which were drawing out some deep corners of a house, that I had to speculate about before.
After I collected reasonable amount of reference images (reasonable = the more, the better), as a first step, I divided them into 2 folders – interior and exterior where I sorted them out accordingly. After that I just browsed them for a while, and in my mind, I was slowly building a map of the positions images were taken from, in order to better realize positions of some elements.

Next, I chose all the detailed parts, such as reflectors on the walls, library ladder, front yard, etc… and built a collage of them on a single image, so I would not need to browse back and forth in them in order to look at them from different angle. It was some extra work, but it paid off in a long run 😉

As a last step, I browsed the SketchUP model library for a rough model of the house that I could just iterate upon (Yes, I know you are thinking it… I indeed stole that idea from Alex Romans making of video, and I encourage you to do the same).
Once I found, downloaded and imported the SketchUP model, it was in a horrific state. It had incorrect proportion, dimensions and was too simplified. In spite of all that, it still helped a lot because fixing it was faster than modeling it all from scratch. When I roughly corrected the base model, I created some ground plane around, deformed it a little according to references, and started to create some basic layout.

By doing that, in combination with looking at references, I realized I will have to customize the place a bit, because there is no way I am modeling electric wire poles, road and neighboring houses. It was not hard to decide what to do. The original idea of the isolated single house in the woods was pretty much a sure bet 😀
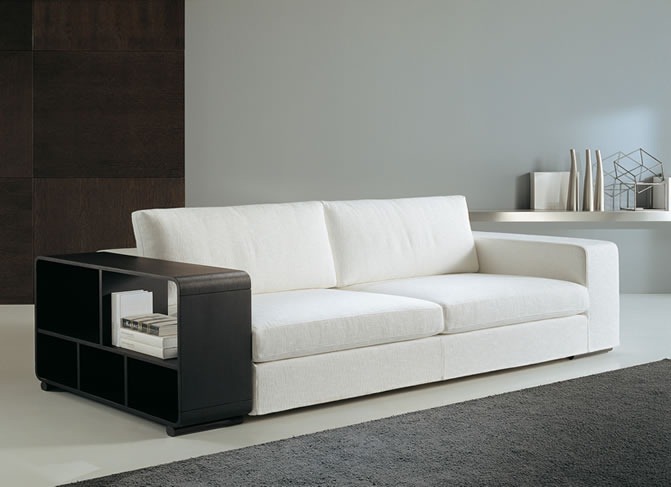
Once i had exterior sorted out, i started to look at interior references. I wanted to keep as much of the original things as possible, but I really disliked the old furniture I saw on those photos. It looked too archaic. I dont really understand much of design, so choosing furniture on my own was not a good idea either, but it was still better than recreating that ugly furniture from references.
I used a lot of furniture from Fritz Hansen website. They have really good-looking stylish furniture, and biggest benefit is that you can download models of their furniture in .max format for free 🙂
I also Googled for some nice modern looking sofas, until I found one that I hoped would not break the style of the house much. Since Im not a designer nor an architect, and have no education in any of these fields whatsoever, I tried to be as careful as I could. If I left my wild imagination and sense of anti-design kick in, I would fill the house with so crazy stuff, that Kahn would start spinning in his grave so fast, it would throw the earth off its orbit and cause a collision with the moon 🙂
Modeling
So now, when I had everything sorted out and the base imported model corrected, I could start to work. First of all, I re-blocked the whole house in detail using primitives, mainly boxes, but I pretty much modeled every plank of wood separately. When you use vertex snap, it goes quickly. I separated large rough object into small pieces that I planned to edit further.
Once that was done, I chamfered the edges of all the planks, subdivided them and applied some subtle noise to give wood planks some variance. I noticed on reference images that they were a bit wavy after being exposed to weather. If I used only bump map, the plank deformation would not be visible on edges, and they would be perfectly straight.

The floor was done using the very handy floor generator script about which you can read here Using Floor Generator by Bertrand Benoit
The rest of the house and stuff inside was modeled using basic polygonal modeling, so there is not much to talk about.
I had a nice reference image for a sofa along with exact dimensions from designitalia so I tried to model it as close as possible, including fabric folds and deformations. I modeled these by hand using a very useful tool from ribbon called paint connect, which lets you paint edges on geometry in freeform way, making this process quite fast. Then I chamfered them, collapsed some points at ends, and tweaked using freeform tools on ribbon. It requires some practice, but once you do it 3-4 times, you will eventually learn to make some convincing folds.

I know a lot of you dislike ribbon, and so do I (it is slow and makes whole Max laggy), but you can map most of the functions on some hotkey. I suggest you explore the ribbon for any tool that could improve your workflow speed, and then assign it to a hotkey. I got paint connect assigned on Shift+C.
Another very useful tool is the swift loop, which lets you add edge loops interactively and very quickly. It might really speed your work up in some cases. I got it assigned on Shift+S.
I also assigned some modifiers I often use to hotkeys. Such as turbosmooth being Ctrl+T and UVW Map being Ctrl+U.

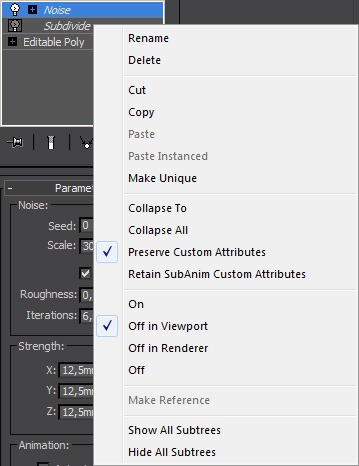
I also wanted to add some variance on the glass planes in windows, because glass is pretty much never perfectly flat, and makes slightly wavy reflections. I knew I will have some bump map for dirt around the glass corners on my material, and I wanted to avoid complex mixing of bump maps, so I attached all the glass planes into a single poly object, then added subdivide modifier on it to make geometry reasonably dense, and then noise modifier was added on top of it to make the glass geometry a bit distorted. Once I switched to orthographic view, the subdivision wireframe of the windows was quite dense, as well as viewport performance decreased a little, so I disabled the modifier only in viewport, so I could still render it with full modifier stack, but work with light non obstructive version in viewport.
In a similar way, I created wooden chips ground and stone wall in the front yard. I used displace modifier, where I instanced a bump map from material bump slot, and set it to use existing mapping, and I put it above the subdivide modifier, which was off in viewport.

I realize that displacement feature in MR would give me better detail, view dependent adaptivity and quicker setup, but I was willing to give it up for WYSIWYG workflow (being able to view final result in viewport) which I found more comfortable.
The ground plane which grass was on was simple plane converted to poly, and then deformed using freeform tools on ribbon. It is simple and quick process.
Stones / Rocks
There is a nice and easy way to make a lot of random stones very quickly. You just start with a spherified box, and then layer Noise and Turbosmooth modifiers onto each other while halving Noise strength and scale values with every layer of noise. Then after you got enough of density, you just change random seed it the bottom noise modifier, and that way you will get a lot of different stones in procedural way. They look good with some nice texture and bump on top.

Then if you add about 5-6 random stones in object list of something like advanced painter script, or object paint tool on ribbon, set random 360° rotation in X, Y and Z, and add some random scale, you can easily paint a pools of seemingly random rocks 🙂

Grass
The grass was modeled using pretty much the standard approach that Peter Guthrie describes on his blog VRay Grass Tutorial Part 1.
I also made some clovers and downloaded some flowers from seek.autodesk.com, where you can get a bunch of plant models for free even for commercial usage. Then I painted those on circular polygon using object paint tool-set on ribbon in the same way as grass blades. This way I made about 6 different grass patches, that I then scattered using the MultiScatter plugin.

Trees
Most of the trees, shrubs and bushes I used were from Evermotion. There where a few key trees I saw at the references that I just could not find any similar looking ones in the Evermotion set I bought, so i decided to make them in OnyxTree Broadleaf.
I will not go in-depth with OnyxTree here, but for some of you, who might find it confusing when you first use it, here is a tip
In bottom left corner of UI, you can toggle all the elements of tree (Trunk, Boughs, Branches 1, 2 and 3, twigs and leaves) Turn them all off except trunk, tweak trunk to your liking, then enable boughs, do the same, and work your way up.
It’s a lot easier than trying to make an exact tree you want with everything in your way. Also read the manual. It’s not that long, and it really comprehensively describes every setting and basics of UI.
Interior Fabrics
Blanket and pillows on the bed were simulated using Cloth modifier.
Cloth modifier in 3ds Max has for some reason negative popularity, but I found it acceptable to work with, and not that complicated at all. It just takes some experimenting. Additionally, there is a plugin called simcloth, known to be even simpler than cloth, but I found the native Cloth modifier to be somewhat faster.
If you want to experiment with cloth, I suggest you check out this tutorial for some good setting starting point Making Interior Scene by Kuba Dabrowski.
Just do not be afraid of cloth modifier, it takes some time to learn, but it definitely pays for itself in long run.

Texturing
There is not much interesting information about the texturing process. I tried to avoid unwrap as much as possible, since I am not good at it, and it is a time-consuming process. 99% of my scene is mapped by basic UVW projections, such as box, cylinder, sphere, etc… Even when mapping a concrete texture on house, when I wanted to have leaks on exact places, I mostly just detached some geometry, mapped it separately using projection and attached it back. Entire house is mapped with one huge concrete texture – (7136x7136px) which I composed of some smaller textures in Photoshop. I mostly used textures from probably the most known texture library cgtextures.

For the wooden parts, like windows, wooden constructions and doors, I downloaded several textures, color matched them all to similar tones, randomly assigned them to components of wooden construction, and then finally randomized them by randomly translating and rotating projection gizmos.
There was no any advanced texturing process such as texture painting involved.
On the picture below, you can see the sets of various textures. I will explain what all the different maps are for in the materials section.

But before we take a break, lets talk about
Foliage
As I already mentioned, most of the tree and shrubs models were not made by me. Those I did do myself were made in OnyxTree using an approach described above, and i already described grass patches creation as well. That leaves us with description of materials, which I will cover in material part, and distribution, which I am going to cover now.
MultiScatter
All the settings in MultiScatter are self-explanatory and easy to pick up. In the image below, I highlighted all the settings I adjusted to get a result I needed.

There are a few good tips, that should help you with using MultiScatter:
- You can have multiple MultiScatter objects in the same scene, each of them with different objects or combinations to be scattered. Use them to create various mixes of vegetation.
- You can simply control distribution area by splines. Inverse checkbox defines if spline marks an area of exclusion or area of distribution. You can attach multiple splines into one to use one MultiScatter object for distribution in multiple area. You need to make sure all the attached splines are in same direction. If not, you might get crazy results. To invert closed spline direction, just select a spline, select spline sub object, and hit reverse button.
- Use wireframe color selector to change viewport color of MultiScatter object, and then apply same wire color to spline it uses. It helps you with orientation in your scene.
- If regular pattern distribution is used, distribution density is directly related to size of UVW mapping. You can compensate the density of distribution using size parameter.
- If there is not enough objects scattered no matter what size you use, make sure your Max count value is high enough.
- You can set various settings of scattering behavior on the edge of a spline. This is useful for example when a grass intersects side of a sidewalk or something like that. Best way is to control scale, rather than density. Use the curve to tweak scale falloff.
As I studied the references of grass distribution, I saw that there are various pools of different mixtures of weed, grass, and things like that. I tried to recreate it as closely as I could using distribution by curves, but I have still a lot to learn, because it could be a lot better. Here is my setup of distribution:

Pretty much all the foliage objects in my scene are converted to MR proxies, to work efficiently in viewport, and for better memory management. I strongly suggest you scatter only proxy objects with MultiScatter, to avoid certain errors and crashes. Before I converted some of the trees in proxies, I added displace on their trunks to boost the realism and add some geometric variance.
I instanced a bump map from bark material bump slot into displacement modifier, so it corresponded with the material. You do not really need to care that much about poly count on objects that you will convert to proxies because MR can work with proxy geometry in a very dynamic way.
Proxy object creation and usage in MR might be a bit more tricky than doing it in V-Ray, but if you complete the following process carefully, you should not run into any problems:
- Get your source object with all the materials into an empty scene.
- Attach all the meshes into single editable poly object.
- If your object is not in a correct scale, rescale it to proper scale.
- Set a pivot of your object to the base. This point will be used by MultiScatter as an indicator of where the object intersects with ground. In case of for example a tree, put pivot at the base of a trunk.
- Reset xform of your editable poly object using reset xform utility.
- Collapse the modifier stack to bake xform modifier onto the mesh.
- Pick a material from the object into your material editor. It will most likely be multi/sub-object material that got created when you attached all the mesh objects together.
- Create a MR proxy object. MCP>Create tab>select mental ray in rollout>MR Proxy button
- Drag into a viewport to create an empty proxy object.
- Switch to modify panel (or source object button will remain gray).
- Click on source object button, pick your object and click Write object to file.
- Once file is created, leave settings on following dialog as they are, and hit OK.
- Once the process is done, a proxy object appears in your viewport. Apply the material you picked from your source object to it.
- Delete the original poly object, and save your scene.
- Now when you need to use the proxy, just merge it from the scene you saved it in.
Do not create a new proxy object in your scene, and load a proxy file into it. It will load without any material applied.
It might seem a bit complex, but once you get used to it, you will manage to do it within a minute 🙂
There is a script that comes with 3ds Max installation, which automates this process. DO NOT use it! It will mess up your scene, crash it, and any further attempt to create a proxy in the scene you ran the script in will result in a crash. (Hi Zap! 😀 )
Most of the trees are just randomly scattered with MultiScatter, but there was a bunch of trees in references, that I wanted to match as closely as possible, so I made some of them in OnyxTree, and picked some from Evermotion library i had at my disposal, that were close to the ones on reference images. I started with these key trees, before i moved the process further.

I found also this very nice looking old wooden bucked with plants inside it in the references, and decided I just must have it in my scene, so I took some extra time to make it pretty. I used good old ivy generator plugin to grow some ivy on it 🙂

I handled the creation of the garden step by step. I took my house scene, that was already finished, deleted all the stuff from it except light rig and ground plane, and made a large lowpoly placeholder for the house.
This way I could work in well-performing scene without house geometry in the way. Once the garden was done, I merged the house model in. After that, I opened the house scene without garden, filled interior with furniture, and merged furniture back into the scene with both house and garden. This approach allowed me to put all the scene together while still retaining some freedom and organization.


Thanks for reading this far!
And I’ll see you in Making of Esherick House, Part 2 – Materials


GREAT! can’t wait to see part 2…greets from berlin, thomas
Cooooolness
Liudvik, Can’t wait for the second part!
Great piece to read! Thanks!!!
Congratulations, great renders!! Very good usage of RAM too, wow!
very nice 😀
woh it is so great…..user pro mental ray
exactly…! it is so real. i dont belive it rened by mental ray. i think, it rened by vray and edit by AE….
This is great! Thanks a lot Liudvik for the detailed making of. I’m also working professionaly for about 2 years now (graphic design with 3d-viz as focus, in a design office) and know how you feel… Actually I’m in the same situation and I’m also into a personal project for those same reasons right now. I guess those who used to be obsessed with perfection and very few compromises in their own work start to feel caged when working in a limited space (time, money, type of project)… ofcourse depends on each and every person 🙂 Squezing the little free time you have is hard at the begining but man, from the moment you do it you remember again how great it ia when you do stuff just for yourself, without deadlines, without worry about somebody wanting something else, just for the heck of it… fulfillment and meditation 🙂
Hehehe, maybe a bit too much “off topic” but could empathize with you too well.
Cheers,
Andreas
I wonder when did my name became Liudvik 😀
Anyway, client is usually the one who kills a commercial projects. Quotes like “Make that sky blue, so it looks happy” when sky is under given conditions overexposed, or “That shadow there looks wierd, please ‘shade it out’ ” make me confused not knowing if i want to laugh or cry 😀
About free time, i usually have enough of it, but when i do 3D 8 hours a day professionally, it is not that often i want to do same thing in my spare time too 🙂 So unless there is some strong inspiration, i just end up killing my free time playing Battlefield 3 or watching House m.d.. 😀
Hahaha sorry for that, Ludvík.
I know some of those kind of comments as well and I’m sure all the archviz-seniors here have thousand of those to share. In my case it’s less about comments from customers regarding the aesthetics/feel but the fact that I mainly do 3D-Infographics with many different buildings in one pic.
When you have to visualize around 10 specific buildings in a “small city/town panorama” from a height of second floor you reach certain limits of authenticity.
Hahaha, ever tried putting a soccer sports ground, a kindergarden, an eldery retirement home and a first-aid post around a “small town’s market square”? 😀 Even if the buildings, the textures, the lighting and whatever are realistic (given enough time)… the probability that you’ll ever see such a constelation is not that hight 😀 In these cases the information type and its density pressures the illustrational aspects of the visualization.
For me, one who was always obsessed with reaching high realism, this is sometimes simple horror. But then again; “Form follows function” … all the more when it comes to infographics.
cheers,
Andreas
Ah, forgot to mention that I’m also looking forward to the second part of the making of!
And good idea, wanted to try out BF3 aswell sometime soon 😀
@rawalanche
Funny, i´ve seen you around as “rawalanche” on some other forum threads, nice to see your work featured here!
I´m also learning everything on my own and i´m still not convinced i wanna do archviz, but i still have an unfinished project where i can use a lot of your great tips…
I left my project with a not very well organised sketchup model and since i also don´t like unwrapping, i kind of stopped when i had to texture the concrete walls and was faced with the horrible tiling…
It was interesting to see you only use one large concrete-texture, can you shed some light on the process of mapping it correctly?
Do you tile the texture at all or is it just wrapped around as one big piece?
I also wanted to learn more about foliage, so i think i´ll get back to my scene soon…Glad i don´t have a job yet, so every project is a “personal project”….;)
Hello
Really , your work is amzazing. I’m happy to see some project made with mental ray!
PLEASE, can you give me the house measurements!? I need it very much to make an architecture project..
thank you very much..
HI whta is the scale of the drawings thank you!