


Making of ‘Zen Garden’
Sérgio Merêces wrote for the blog in the past, featuring how he creates his recognizable style of visuals. Last time it was a Making of a Garden Office, and today he dives into the creation of his latest magical “Zen Garden” project. From modeling to final post-production – Enjoy!
Introduction
In this tutorial I will show you how I’ve created the Zen Garden 3D image from scratch using 3D Studio Max tools and V-Ray render engine as well as how-to do the post-production in Photoshop to achieve the best results.
I will cover all the important steps in the creation of a 3d image. I will begin with searching for the best references and where I can use them as reference to model my scene assets. Then I will show you some of my modelling processes for the scene in general and assets. I’ll cover how I create my textures and materials. I’ll cover the light setup with HDRI maps and how to use V-Ray RT to setup my lighting properly. Than I will show you how I use Forest Pack, the 3d scattering plugin by iToo Software, to create and spread my vegetation all around the scene. Finally, I’ll show you all the post-production steps made starting at the raw render all the way to the final look for the image, using Photoshop filters and some plugins.
Starting with References for the Concept
I start all project by searching for good references that I use as base for modelling the assets or just to get generally inspired. For this I use Google images, flicker, etc.
The 3D Modeling Stage
Let’s start covering how I created the scene and key elements in it…
Terrain Design and Modeling
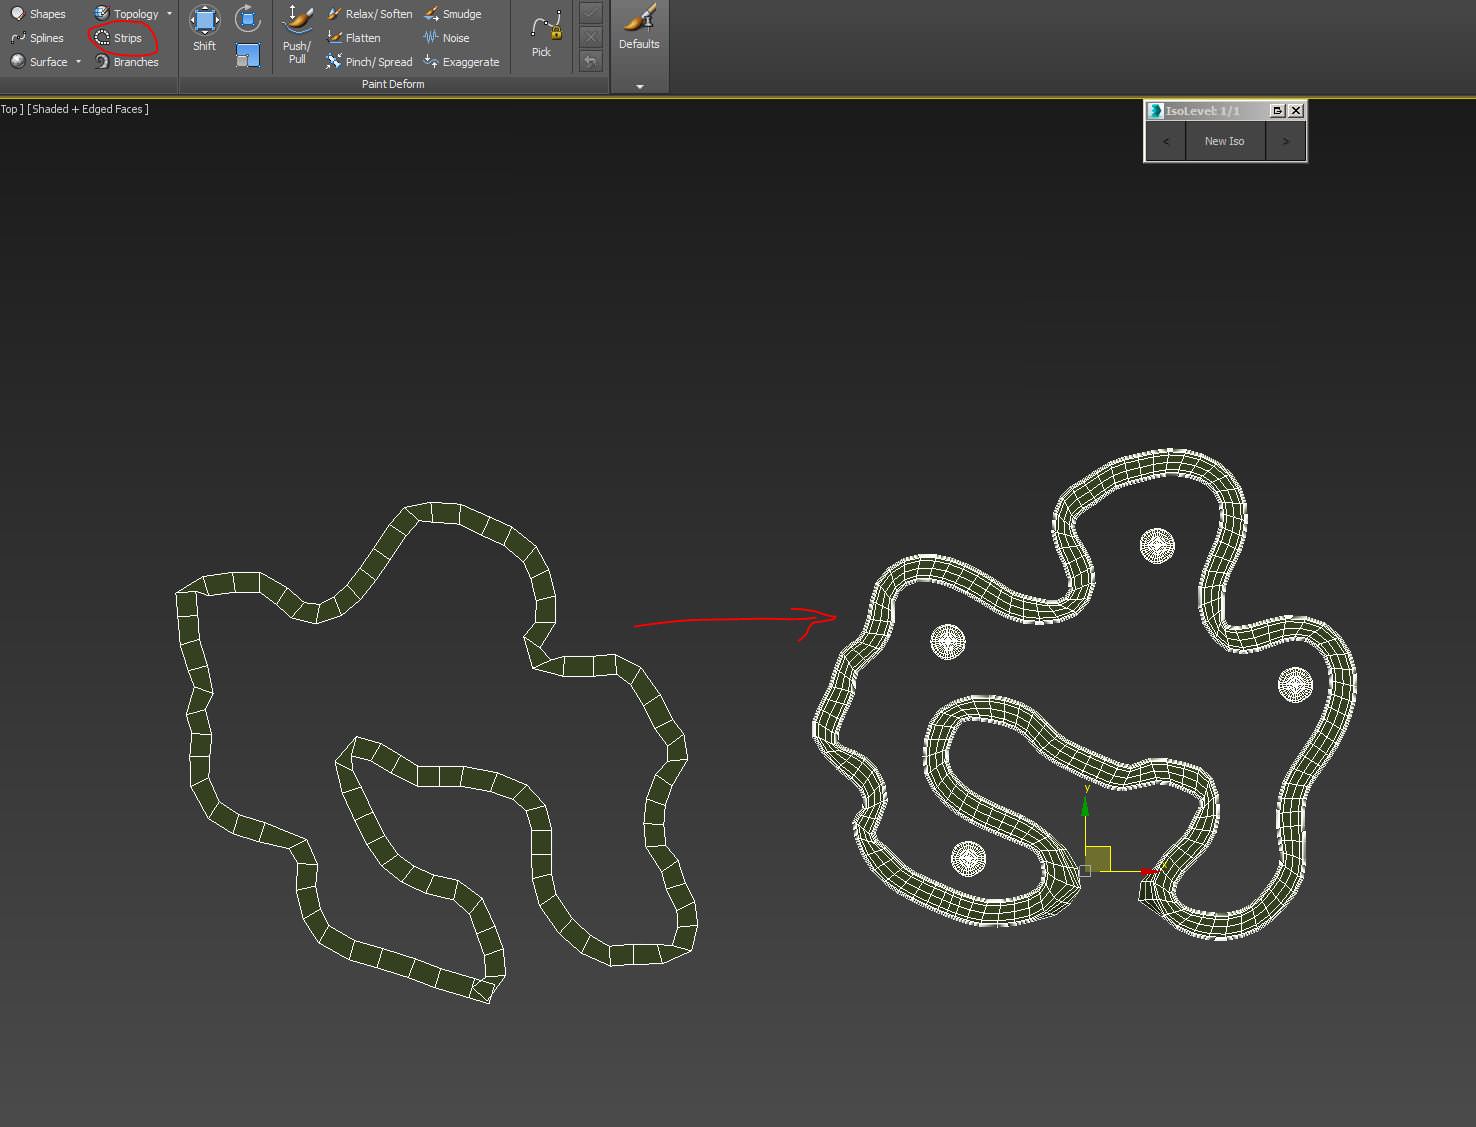
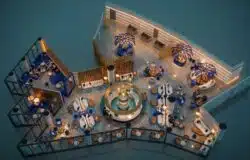
I decided to create a secret zen garden, a beautiful and peaceful place to be in. So to begin, I created the grass parts that will delineate the perimeter of the garden. I used the “Strips” tool in the edit poly group to draw in freehand the desired look, after which I selected faces and used extrude to get the elevation and apply some bevel to the edges to give a smooth finish to it all. After this was done, I created the part of the terrain that will be filled with the gravel present in zen gardens. For that i created a normal plane in the middle of the grass part and in edit poly mode selecting the edges I began to extrude and adjust the terrain to fit with the grass parts.
The Bridge Modeling
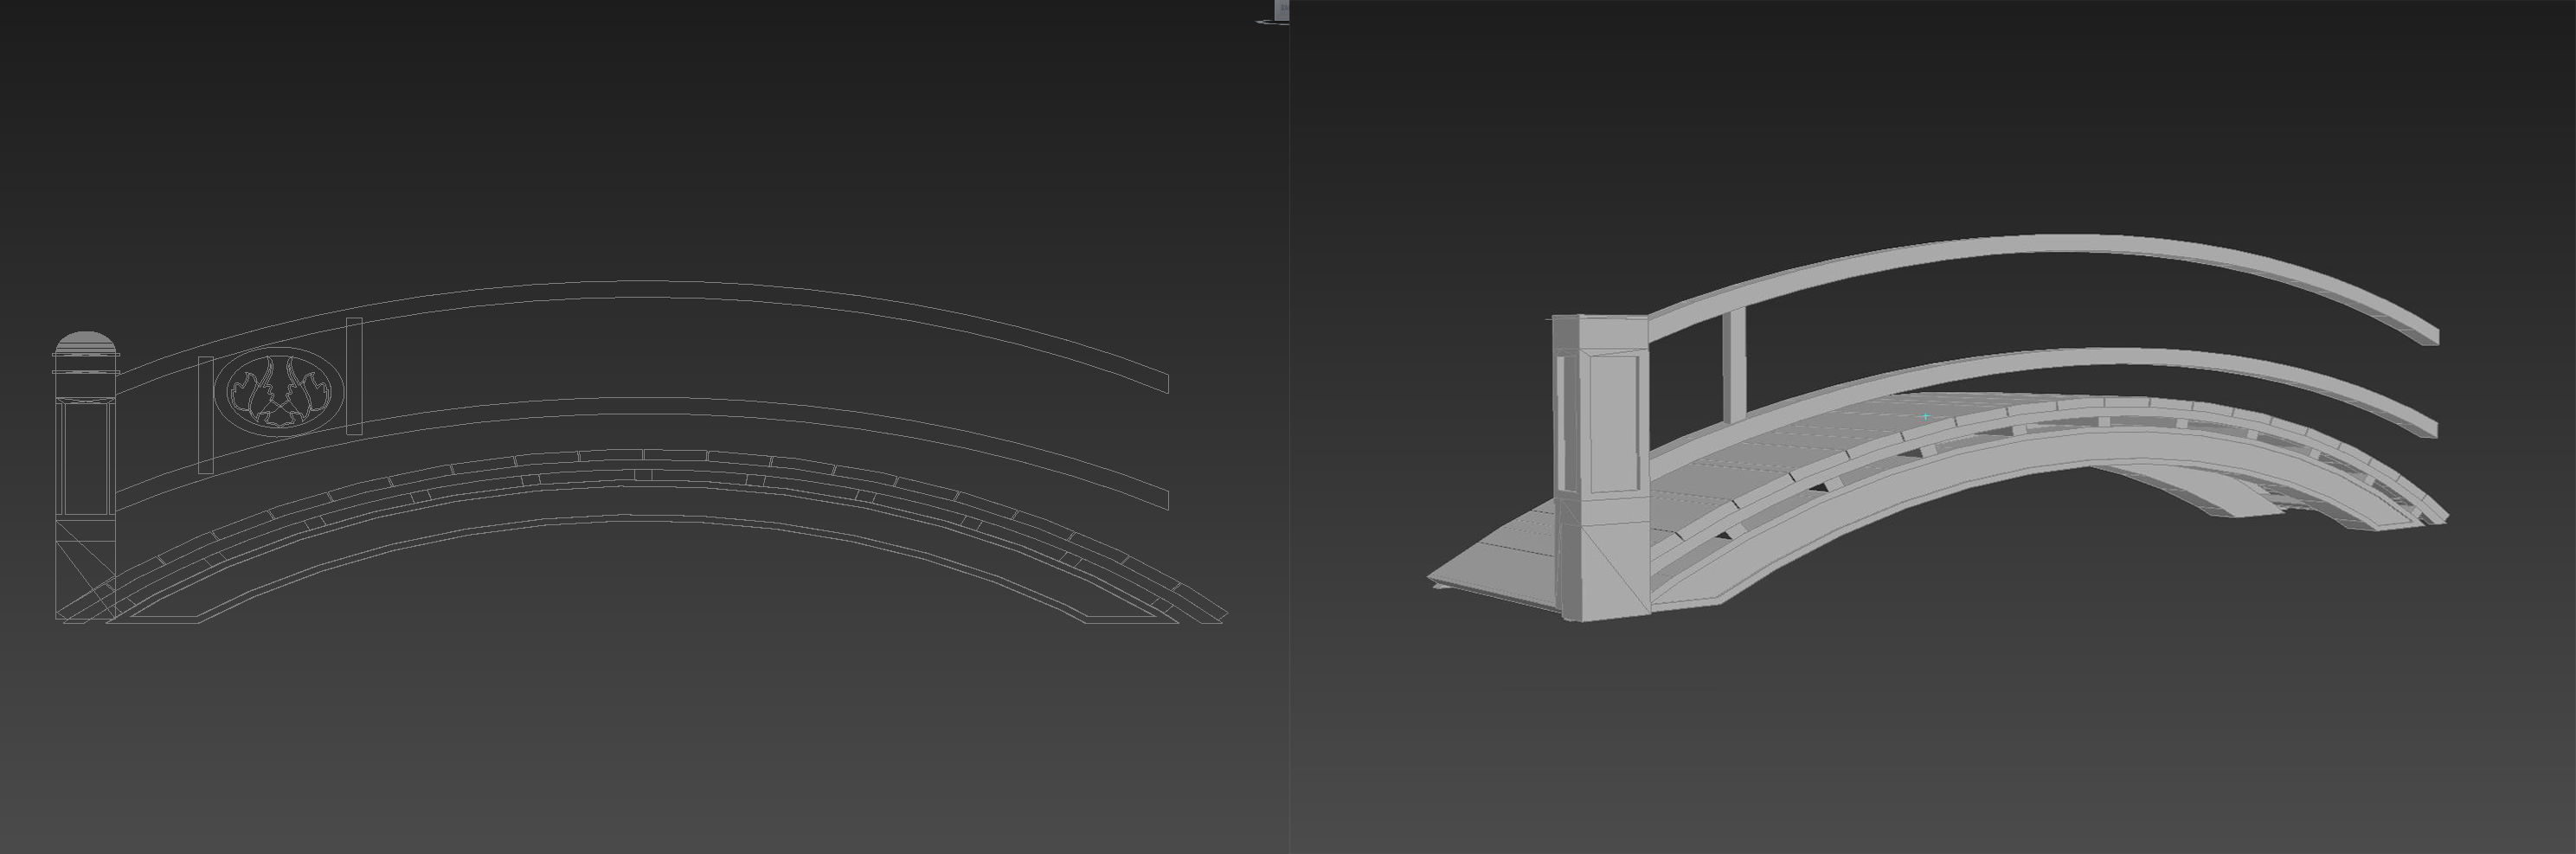
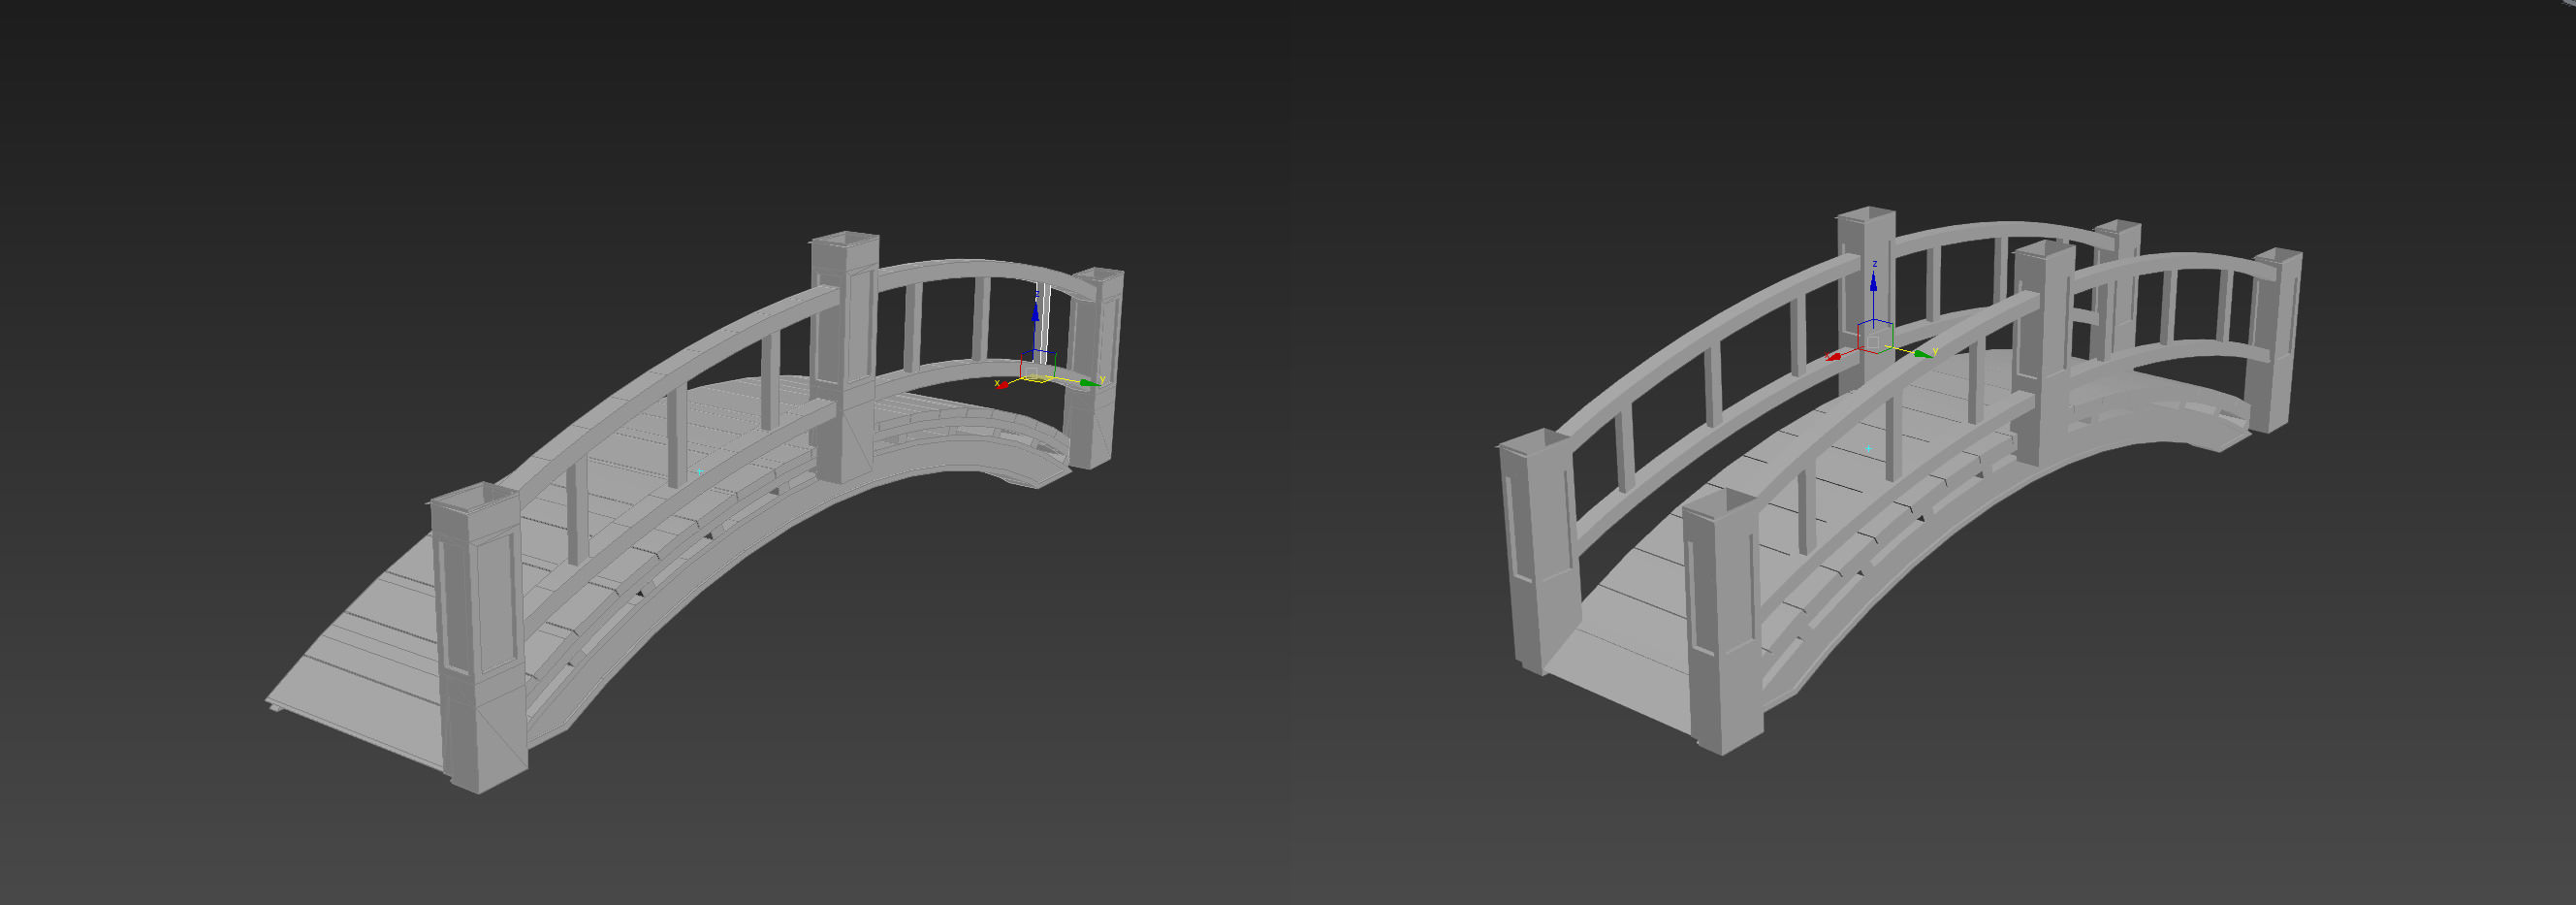
For the bridge modeling I opted for the fast way of using splines to draw the entire sketch of the bridge. When I get the desired design, I select each part of the bridge separated and I extrude them and convert them to edit poly. After I get all the bridge parts modeled I will copy and position all the repeated parts and set them in place. And finally, I copy all the side parts of the bridge to the other side, mirroring them as they are exactly the same.
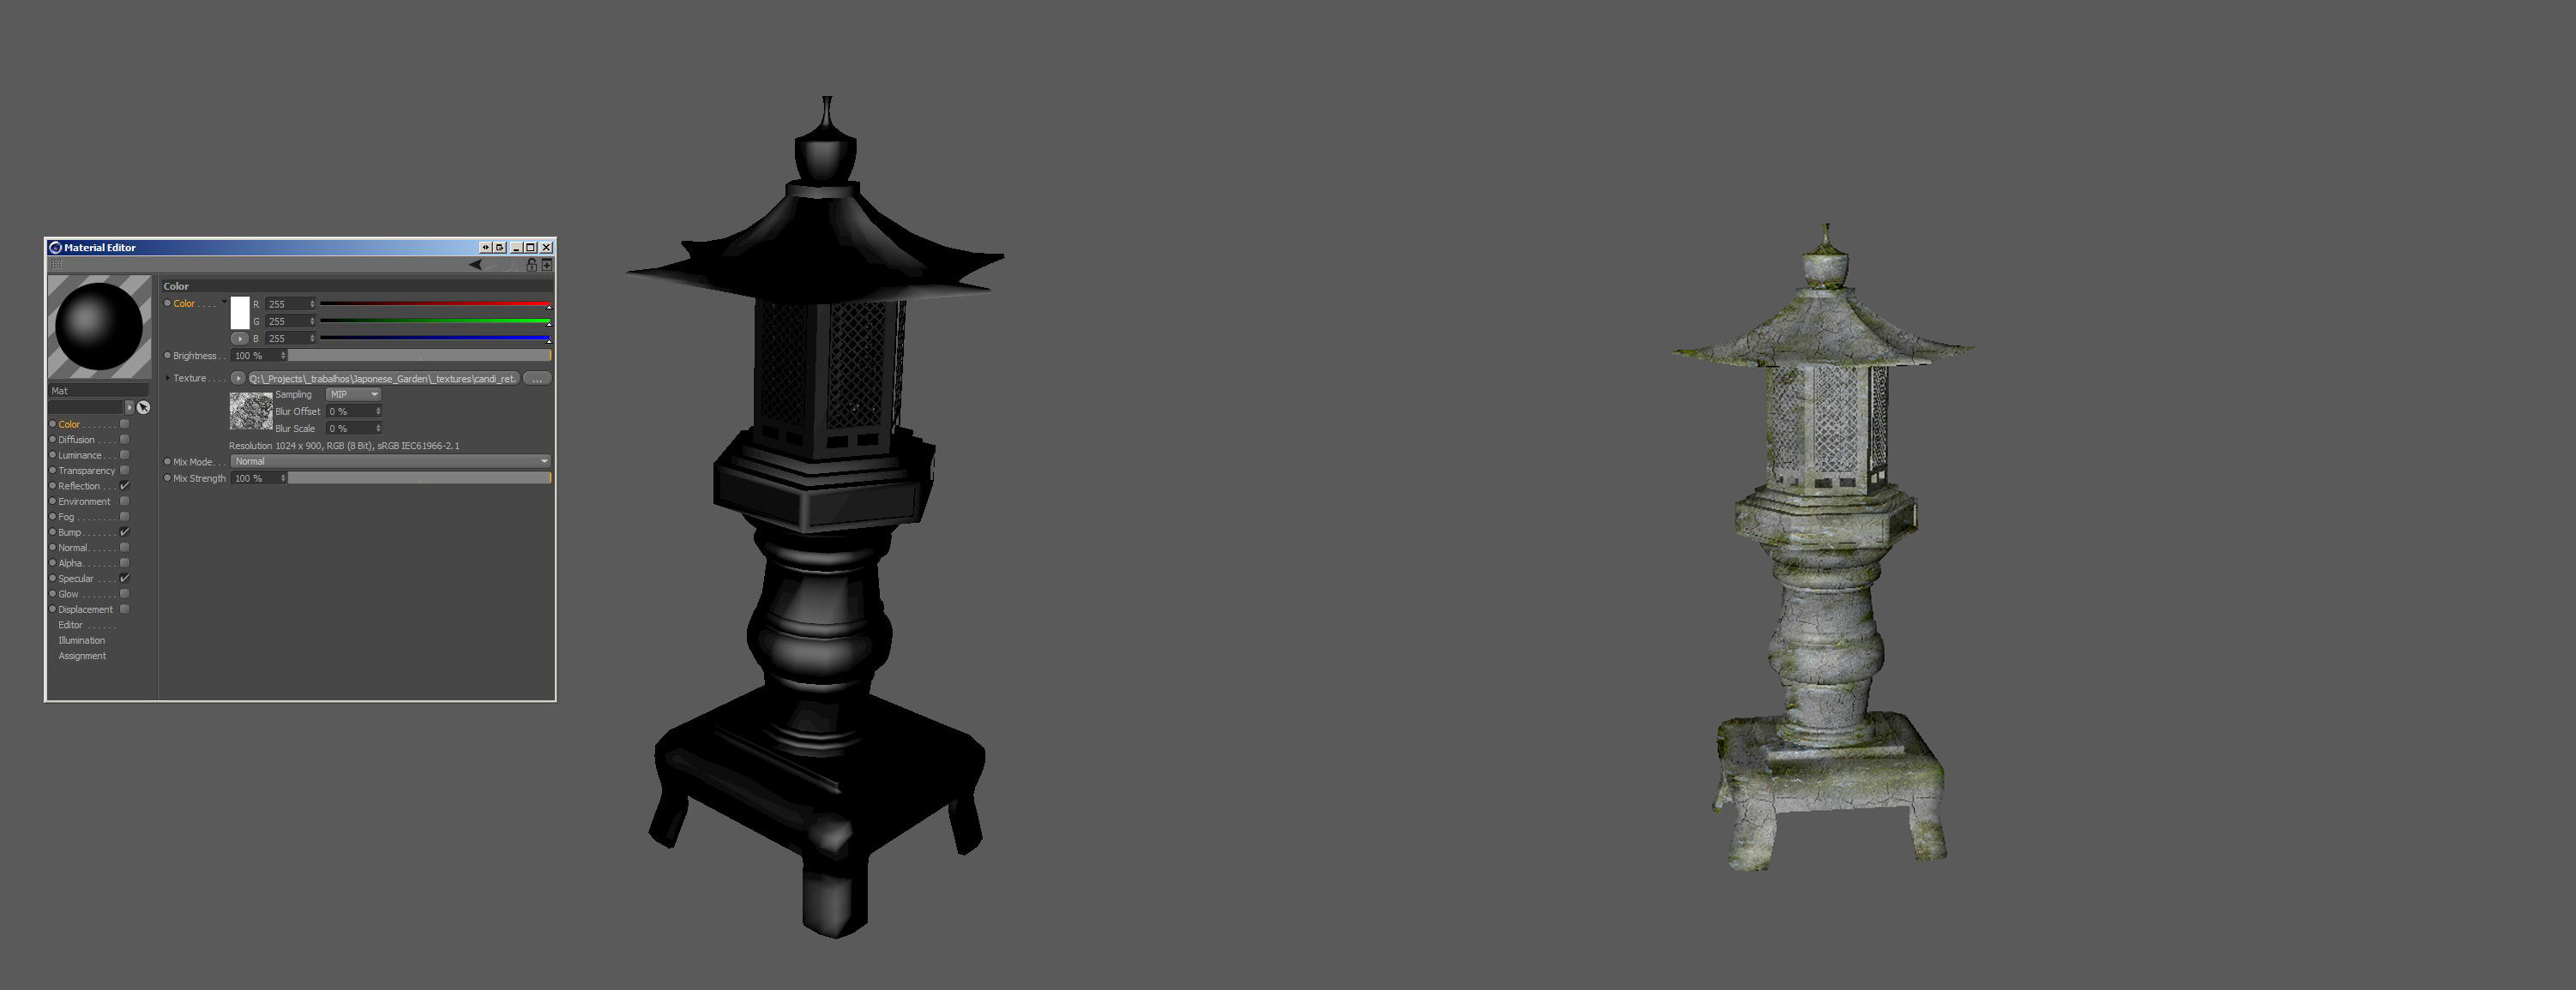
Modeling the Stone Lamp
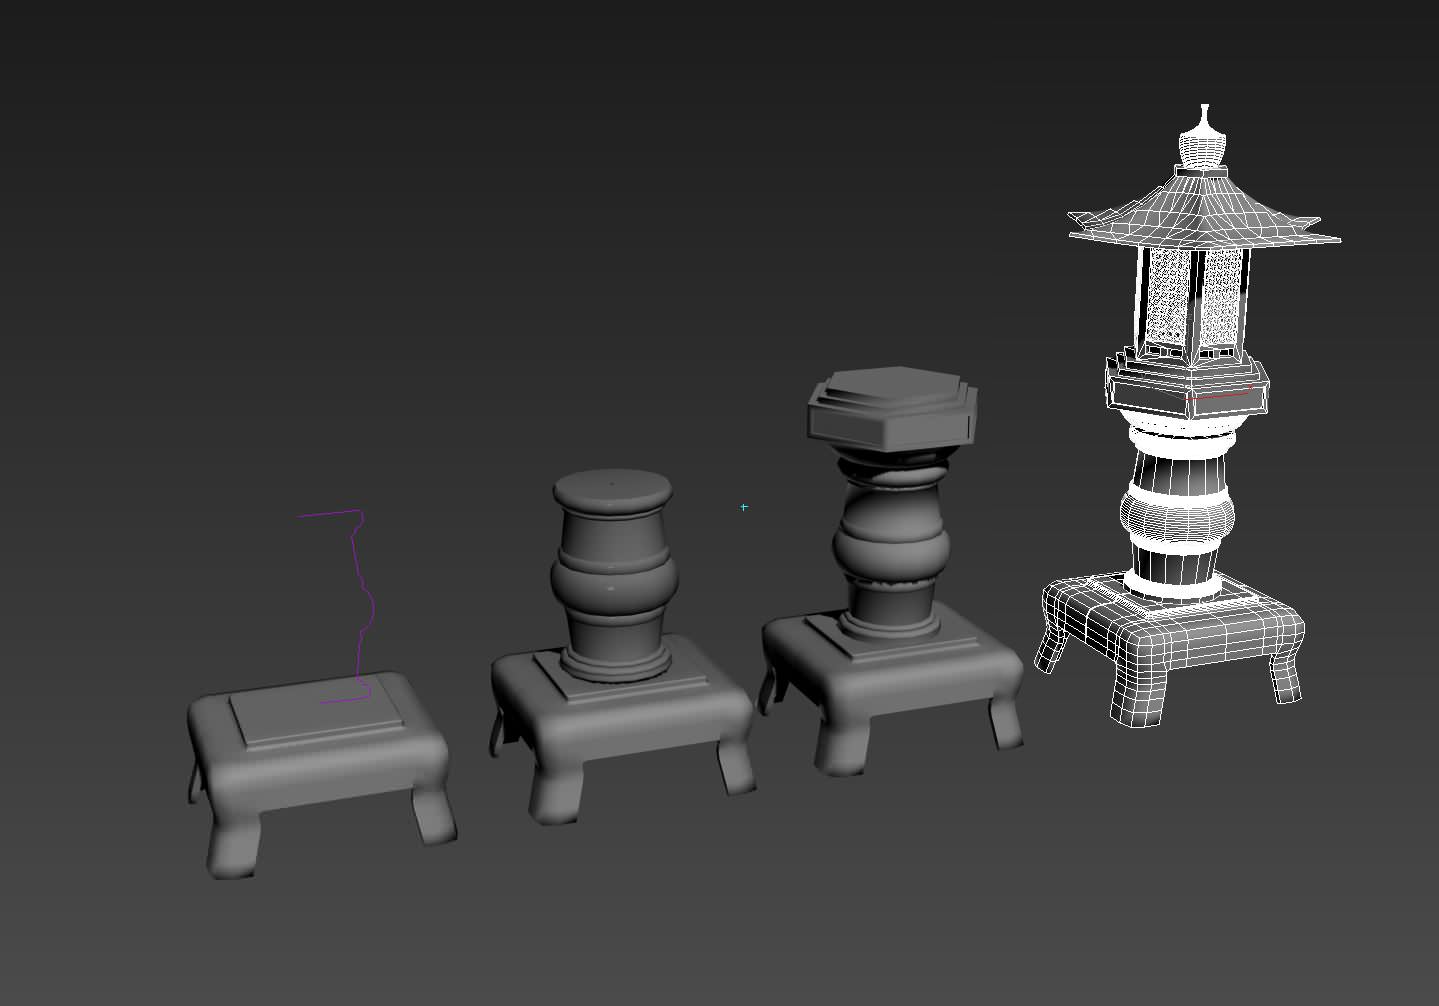

The stone lamps started with modeling of the base with box modeling in edit poly extruding the faces. Than I model the middle part of the lamp drawing a spline to get the desired shape than I apply the lathe modifier. Next using a box with edit poly I model the next part and extrude some details. The light cover grid I modeled with the help of a great script from iToo Software called clone, this script is great to clone objects and creating this way cool patterns.
Vegetation
GrowFX Plugin for 3D Studio max
I usually like to use a great plugin called GrowFX for 3d Studio Max to create my vegetation models. This one have the advantage of being integrated into 3dsmax so it is much more easy to manage and do fast modification of models.
Lasse, from studio xoio is sharing their experience working with Exlevels GrowFX plugin for 3ds Max as a tool for creating custom 3d Foliage models. This article will offer you an introduction of GrowFX so that you can better understand the concept of using it and set you on the right path for creating your own growth 3d models.
SpeedTree Cherry Tree
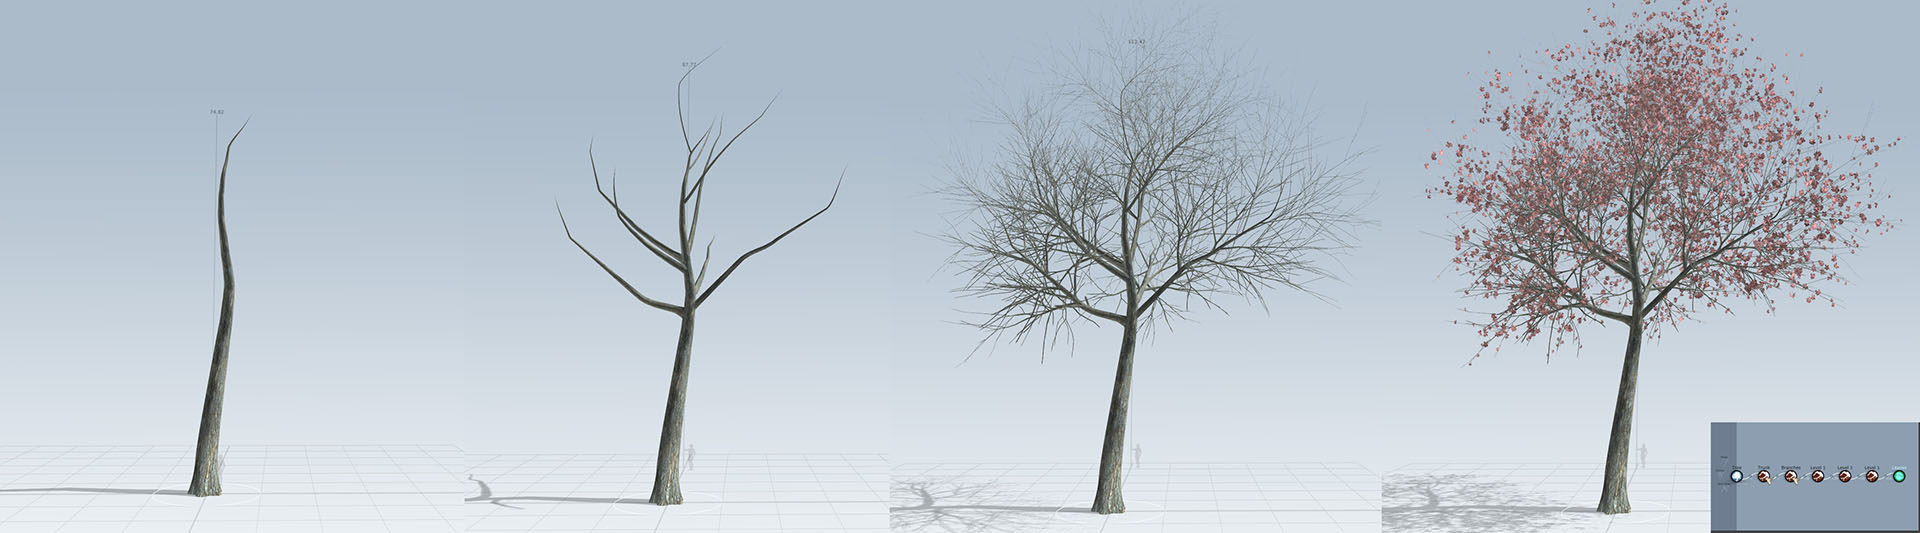
In some cases I need to model a specific vegetation species to use in my projects and for that I usually use the SpeedTree Software that offers a great set of tools to model vegetation quickly and precisely. I Began to create a base trunk. Then I added another layer of main brunches to give some variations for the main spine of the tree. Then I will add 2 more layers for the small branches to fill them with the cherry tree flowers.
To get different variations of the tree, SpeedTree have a random button that will help to auto generate different results based on the settings we set.
Types of Vegetation

For other types of vegetation in the scene I used some packs of pre-made models such as VIZPARK vegetation models, Forest Pack grass presets and one type of Evermotion tree. Some models needed improvements on the materials to get the best results for the final render.
Scatter with Forest Pack
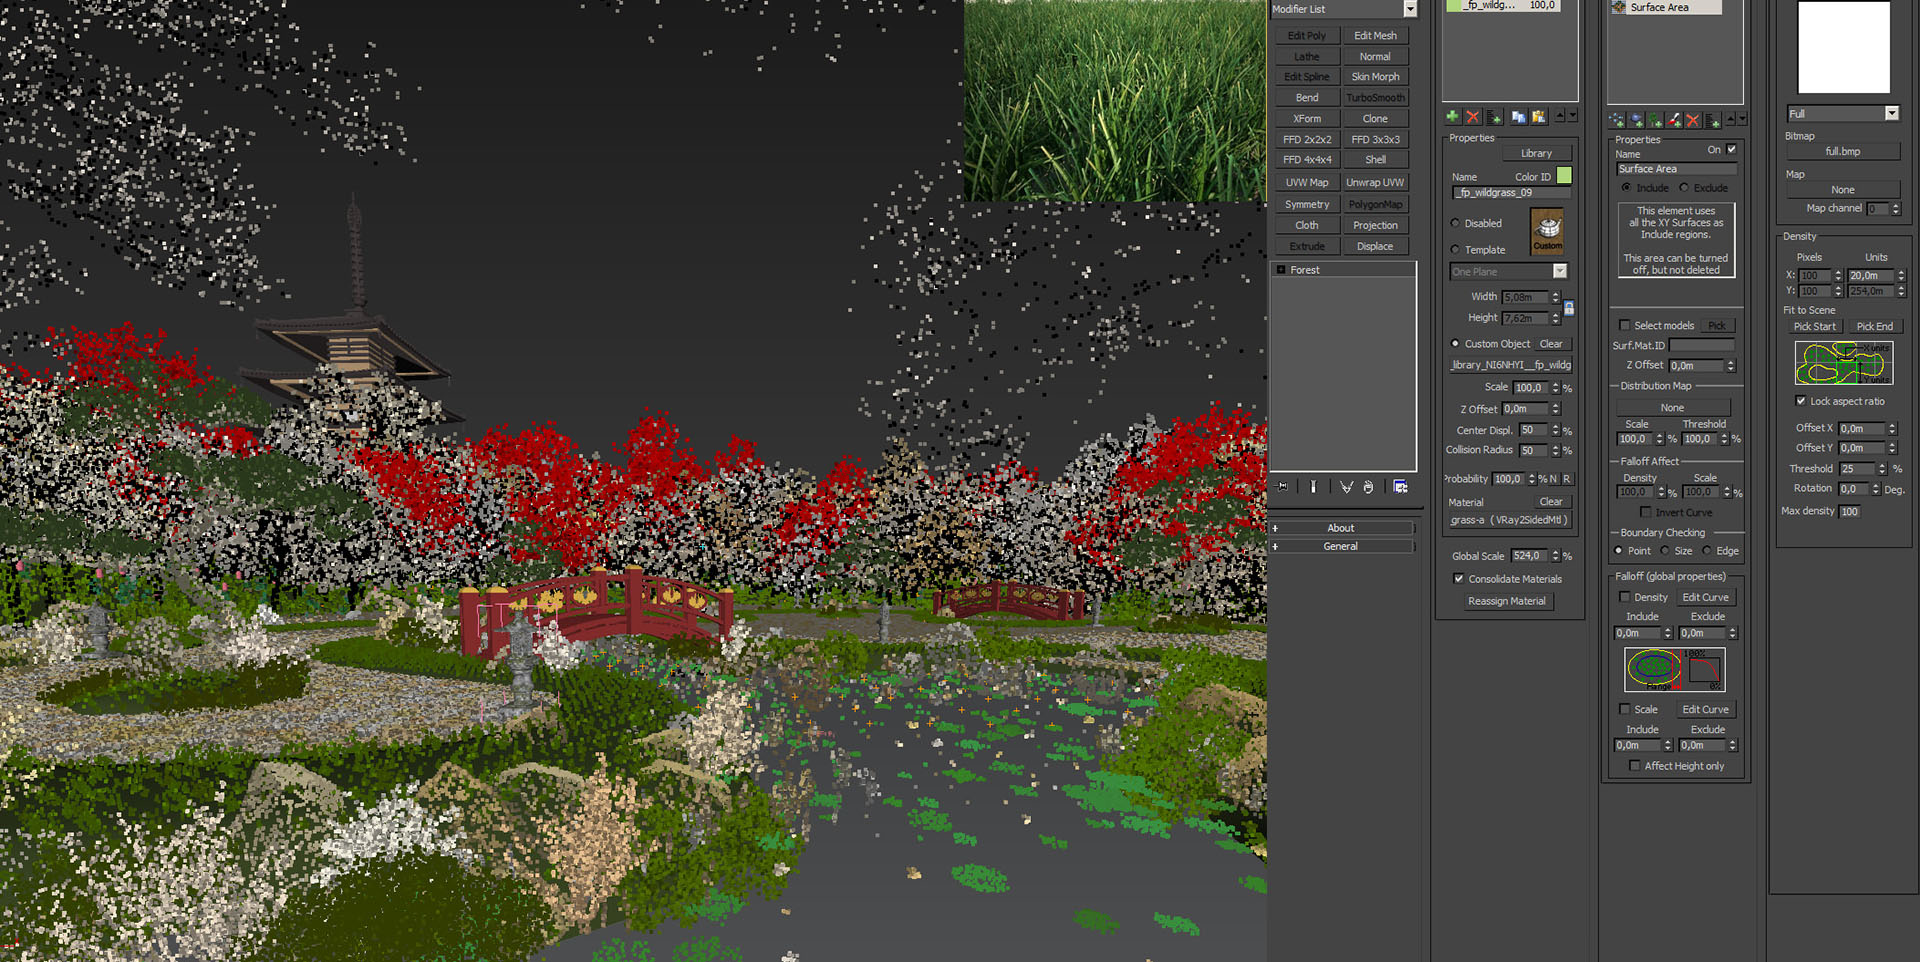
To scatter and create all the vegetation and rocks ecosystems I always use the Forest Pack plngin for 3dsmax. This is a great tool to manage huge amount of models and keep your scene well behaved in terms of performance!
Forest Pack comes with great controls giving me all the power I need to scatter my models all over the scene. For this project I used it for spreading around the Grass, Trees and Rocks. The usage of the plugin is quite simple and you get great results. For example, for the lawn grass and the gravel of the zen garden I used the built-in Forest Pack presets that comes with it and I show the settings in the image.
Lighting
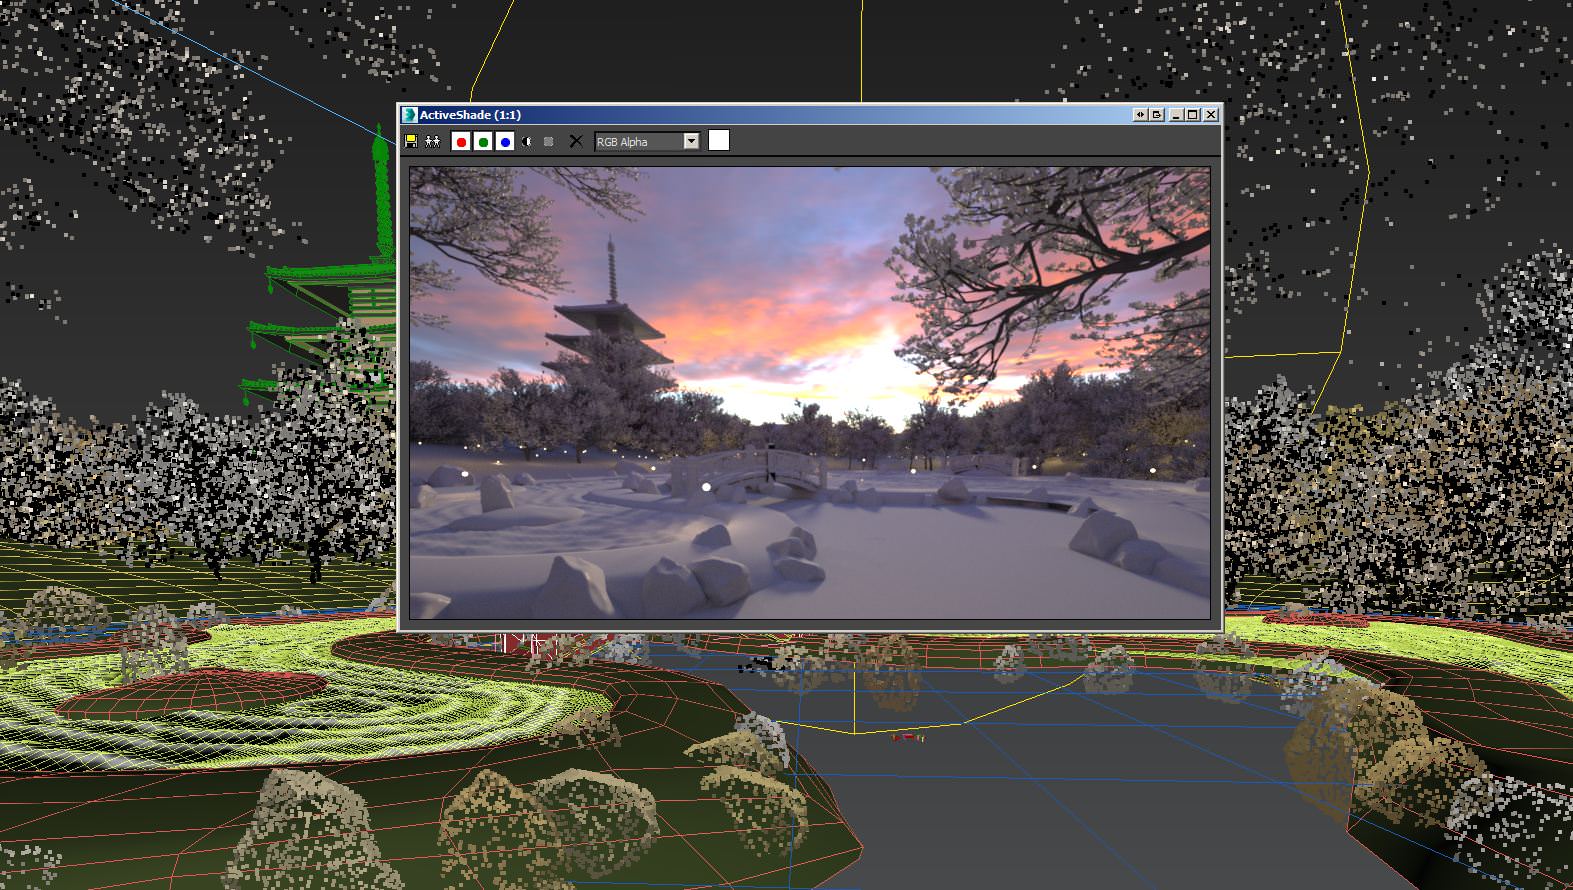
For this scene I use a simple V-Ray dome light with an HDRI map applied into it. The HDRI map that I choose was one of the free ones kindly provided by noemotion.net.
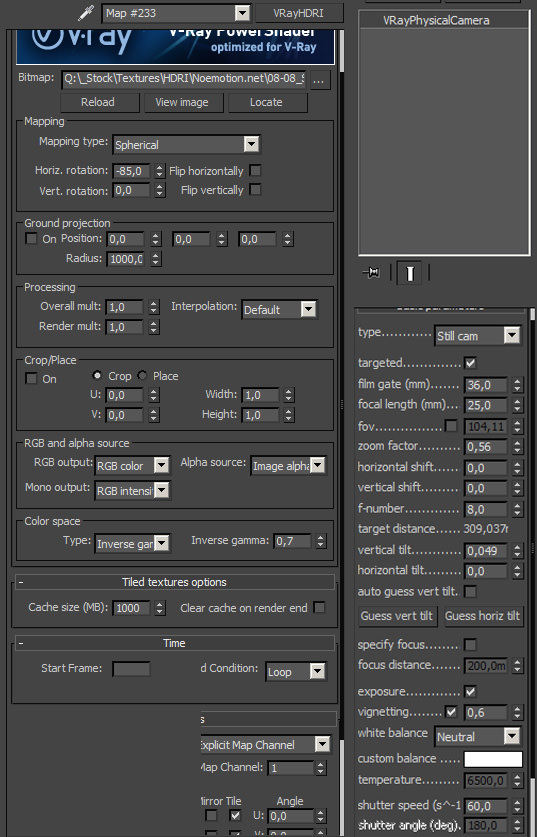
I placed in the scene a simple V-Ray Dome Light object and added the HDRI into it. Then, I lunched the V-Ray RT rendering and in real time I adjusted all the parameters of the V-Ray camera and HDRI map to achieve the desired look of the entire scene light.
Texturing – Unwrap UVW’s and Materials
For texturing the object details I like to do a complete UVW Unwrap mapping. This will allow me to paint all the desired details in the textures of the scene objects and even to bake light and other things in a unique texture map! 3D Studio max has a great UVW Unwrap tool that allow me to unwrap an object quickly and easy. Pelt tool in most of the cases work really well to unwrap your objects and you just need to tweak a bit to archive the final mapping result.
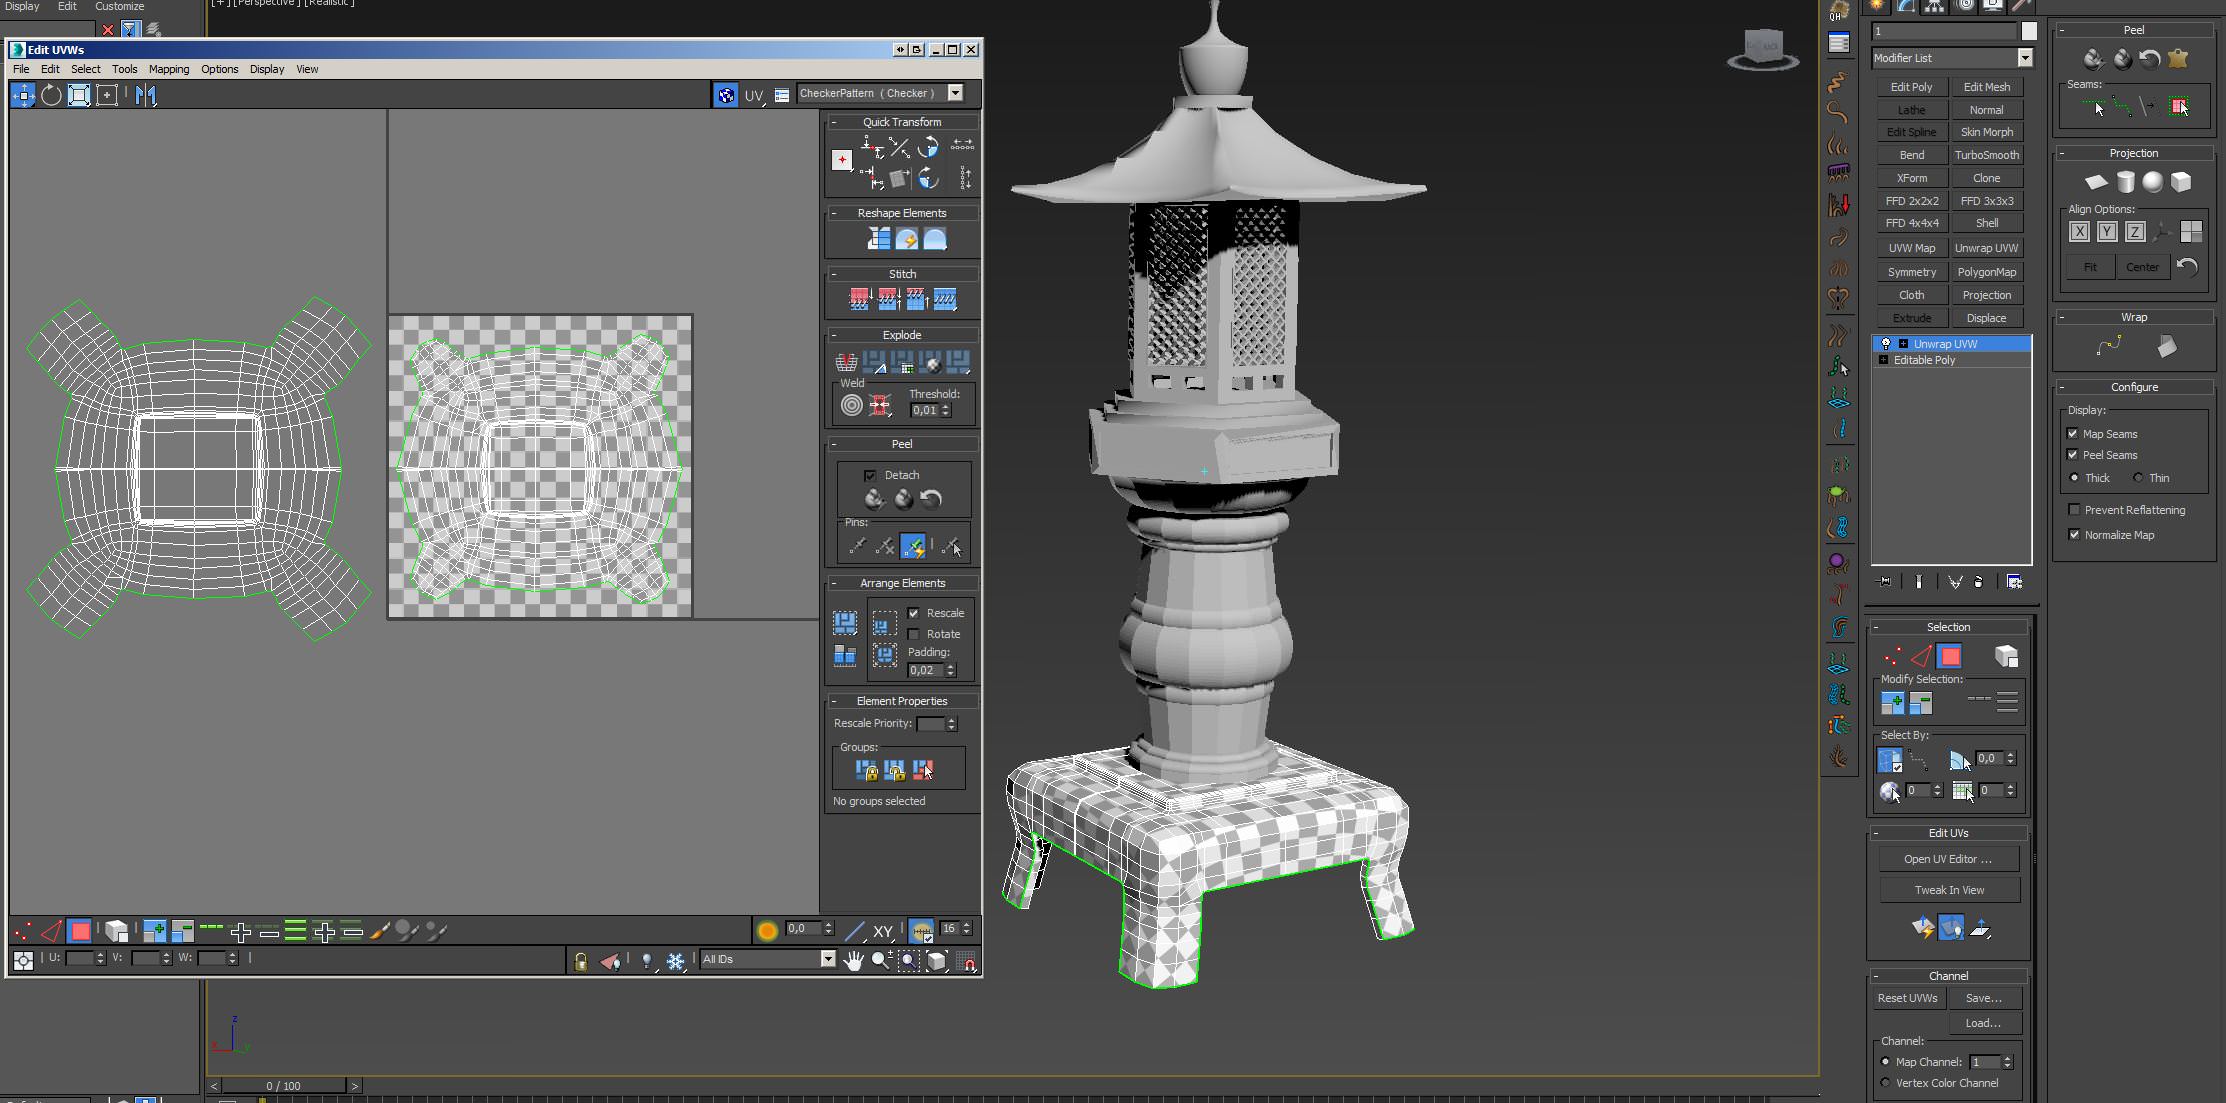
I do all UVW mapping in my scene and in this step I will show you how I use UVW Unwrap to do my mapping on a specific object. I separated the lantern object into parts, so I select the base of the lamp and I apply the UVW Unwrap modifier and next I choose the tool “point-to-point seam” and I select the edges that will separated the object in 2 parts and in this way I can apply the pelt tool and get a fast and clean unwrapped mapping. For the other parts I use the same process to get all the UVW’s setup.
Searching for Textures to be used in the Project
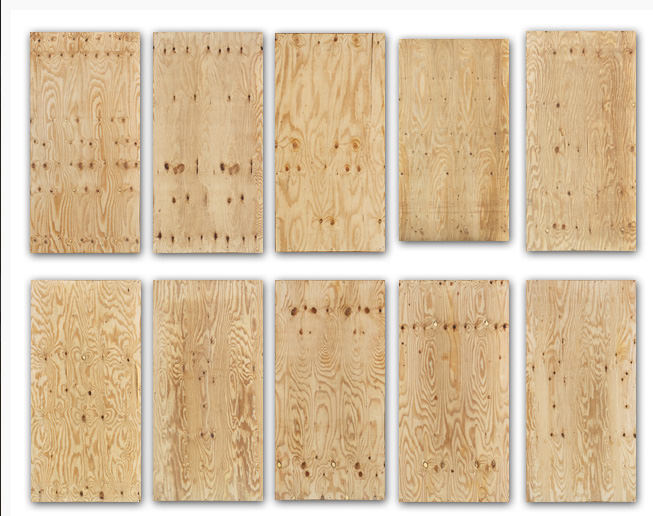
Getting the right and great textures is not always easy! I usually search at cgtextures.com, extremetextures.com, texturelib.com, freestocktextures.com and openfootage.net and if I fail to find what I need there I go to sites that sell textures like vizpark.com, cg-source.com and arroway-textures.com. Remember that to get great results you need high quality and fitting textures as a base for all your materials.
Texturing
Having all my scene objects with a unique UVW maps that I created with the unwrap tool allows me to texture all details in a single texture map. For that I love to use the Bodypaint Software from Maxon. With this application I can paint directly in on the 3d object with a Photoshop-like process. To paint and apply effects I export my objects into separated FBX file and import them into Bodypaint.
First I need to set my material texture size and the channels needed. For size I use 1024×1024 for small objects, but foreground or large objects I set to 4048×4048. This will allow me great details in large scale. For the material channels I use Color, Reflection, Bump and Specular.
Next, I create a new layer and I begin to paint over my 3d model using two textures… One for the stone base and another for the moss effect that I will paint in the areas that I want with a new layer.
Materials
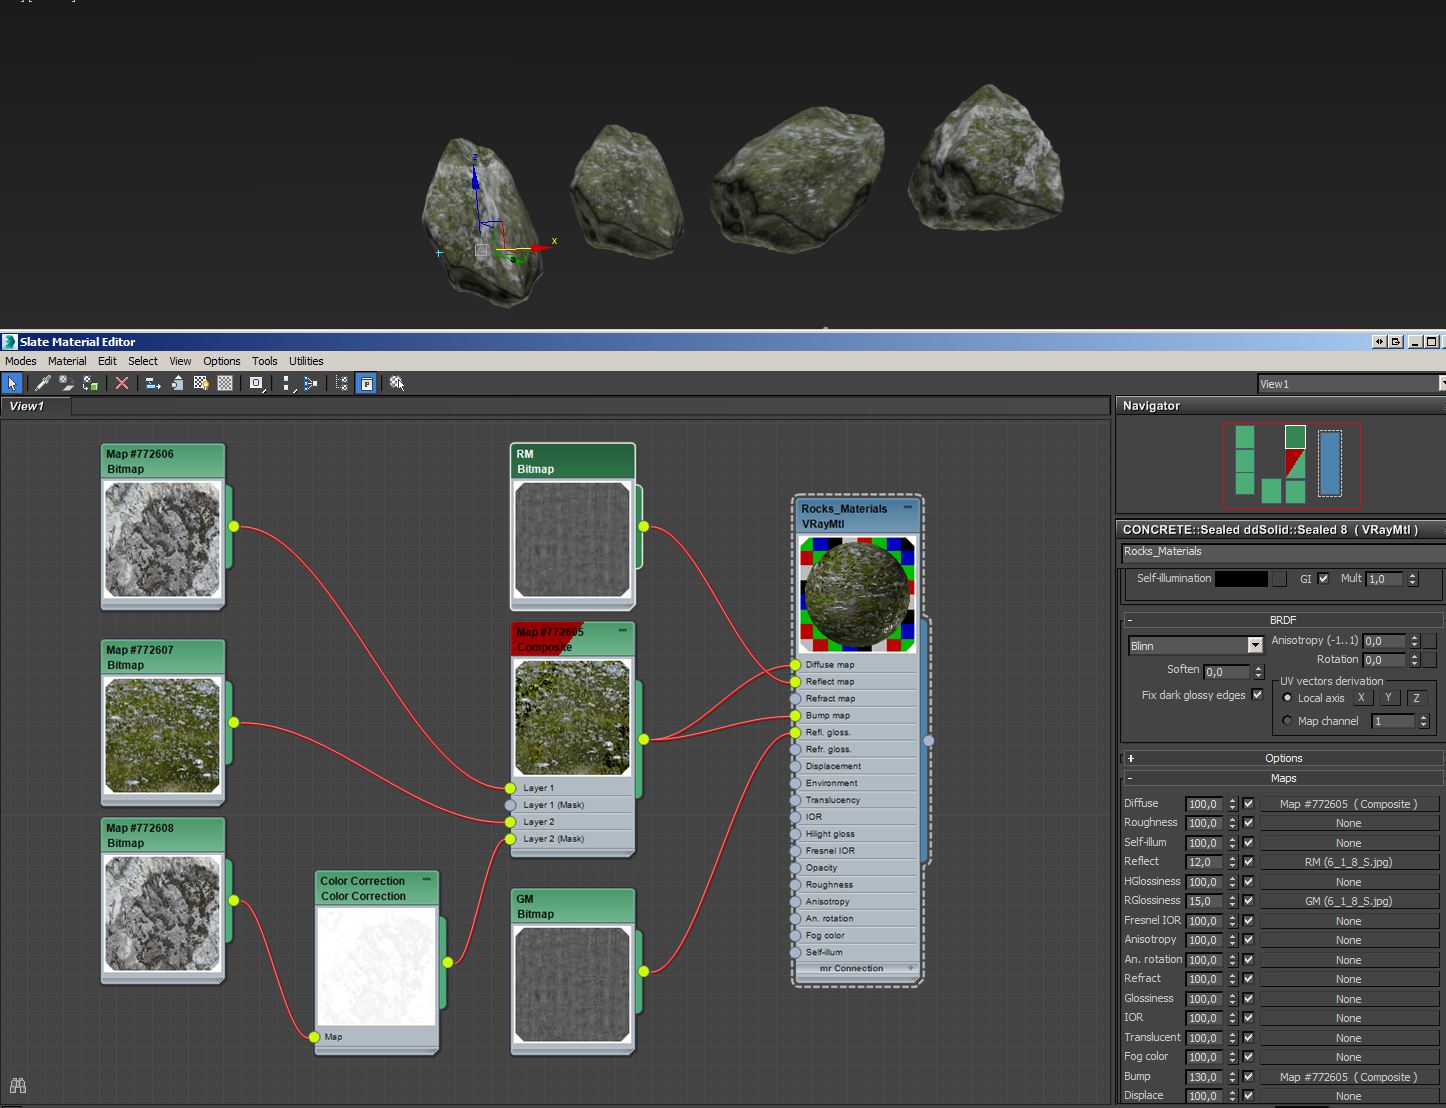
For the scene materials I use the base VRayMtl material. In this example I will show you how I create the rocks material. I set a composition shader into the diffuse channel. With this composition shader I can mix multiple textures types and mix them with custom alpha maps. For this rock material I choose 2 textures again… one for the stone base and another for the moss. Then I setup an alpha channel to mix both using a noise shader.
This is a really fast way to create procedural textures to use in your scenes.
Render Settings

This is where we will setup our output image quality for our 3d renders. In all my projects I like to render my images with an output size of 4000x pixels as a minimum. For the V-Ray settings I create 2 presets… One for quick renders, but where I can get good results and the other one for projects that I have the time to spend with render, of course this will let you much better results in the end but sometimes with extreme tiny deadlines for the projects we need to have a faster render option.
For this project I use the best option because I have the required time to spend with the Render, you can check the render settings in the image.
Render Passes
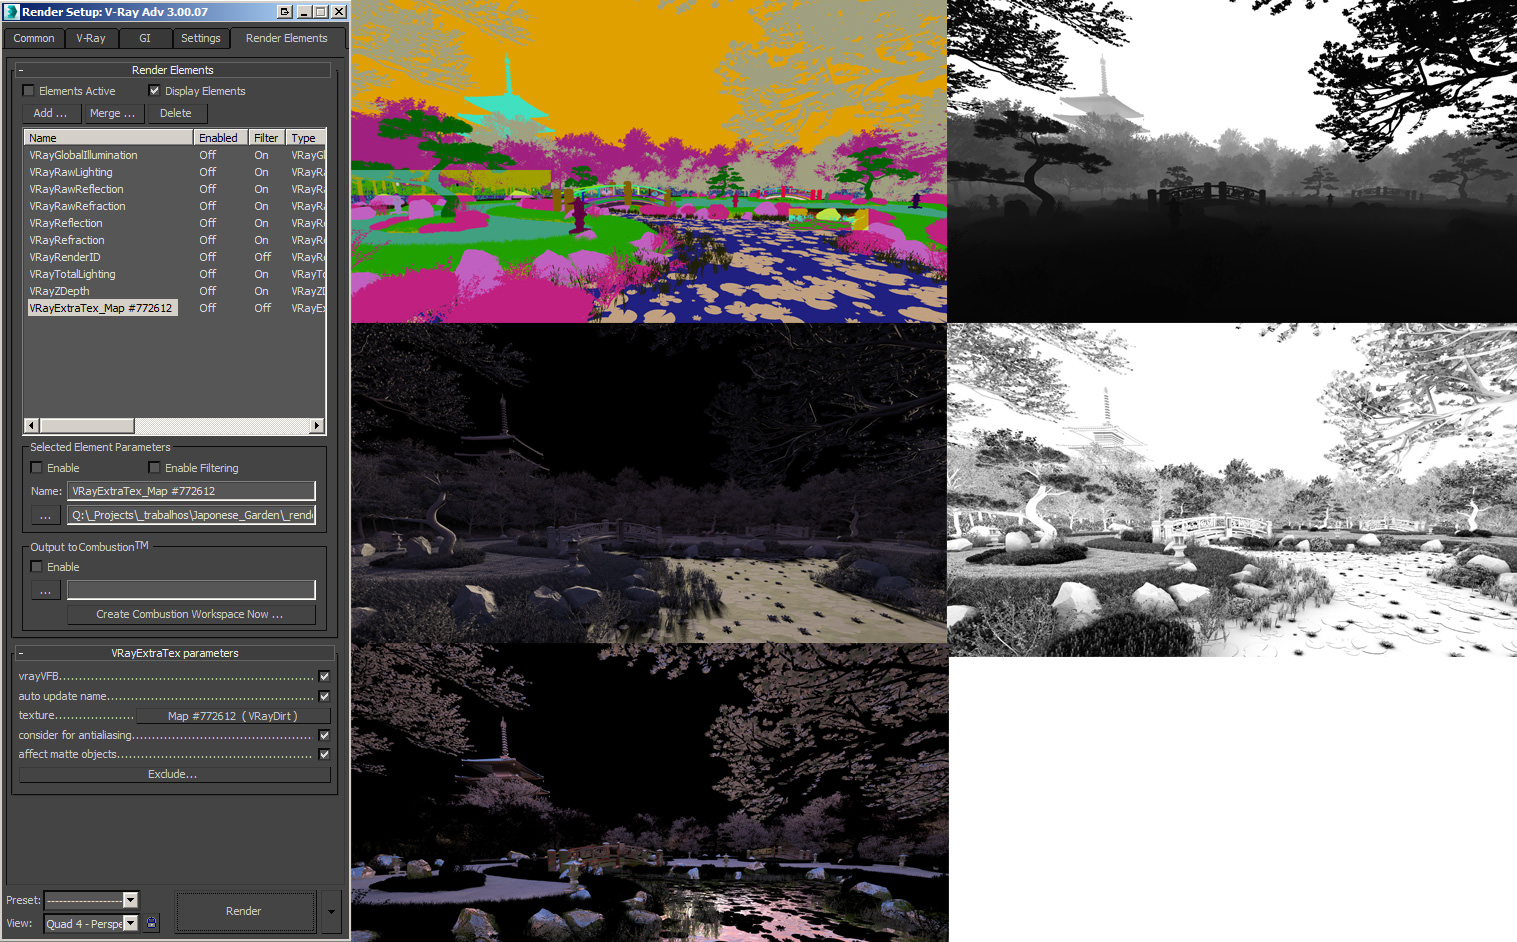
Here is where you will setup all the output render passes needed later for the post-production process. There are 4 really important passes for me to manage all my post-production in Photoshop or After Effects. The VrayRenderID is a pass that masks the entire scene and where we can select quickly the parts in the image to mask in Photoshop. VrayExtraTex is where you setup your AO pass for the scene. And finally the VrayRawLight and VrayReflection. These are the most important ones but in some cases we need more such as the VrayZDepth, VrayRefraction, etc. This will depend on your own style of postwork I guess. There is more than one way to go about this.
Post-Production Tools and Plugins
We can find great plugins that will let us improve our images post-production in Photoshop or After Effects. In my pipeline I use a few like Magic Bullet Photolooks, Nik Collection and Red giant Knoll Light Factory. These tools with along with Photoshop adjustment layers give all the power to get the post-production you aim for.
Importing and setup of the Render Passes
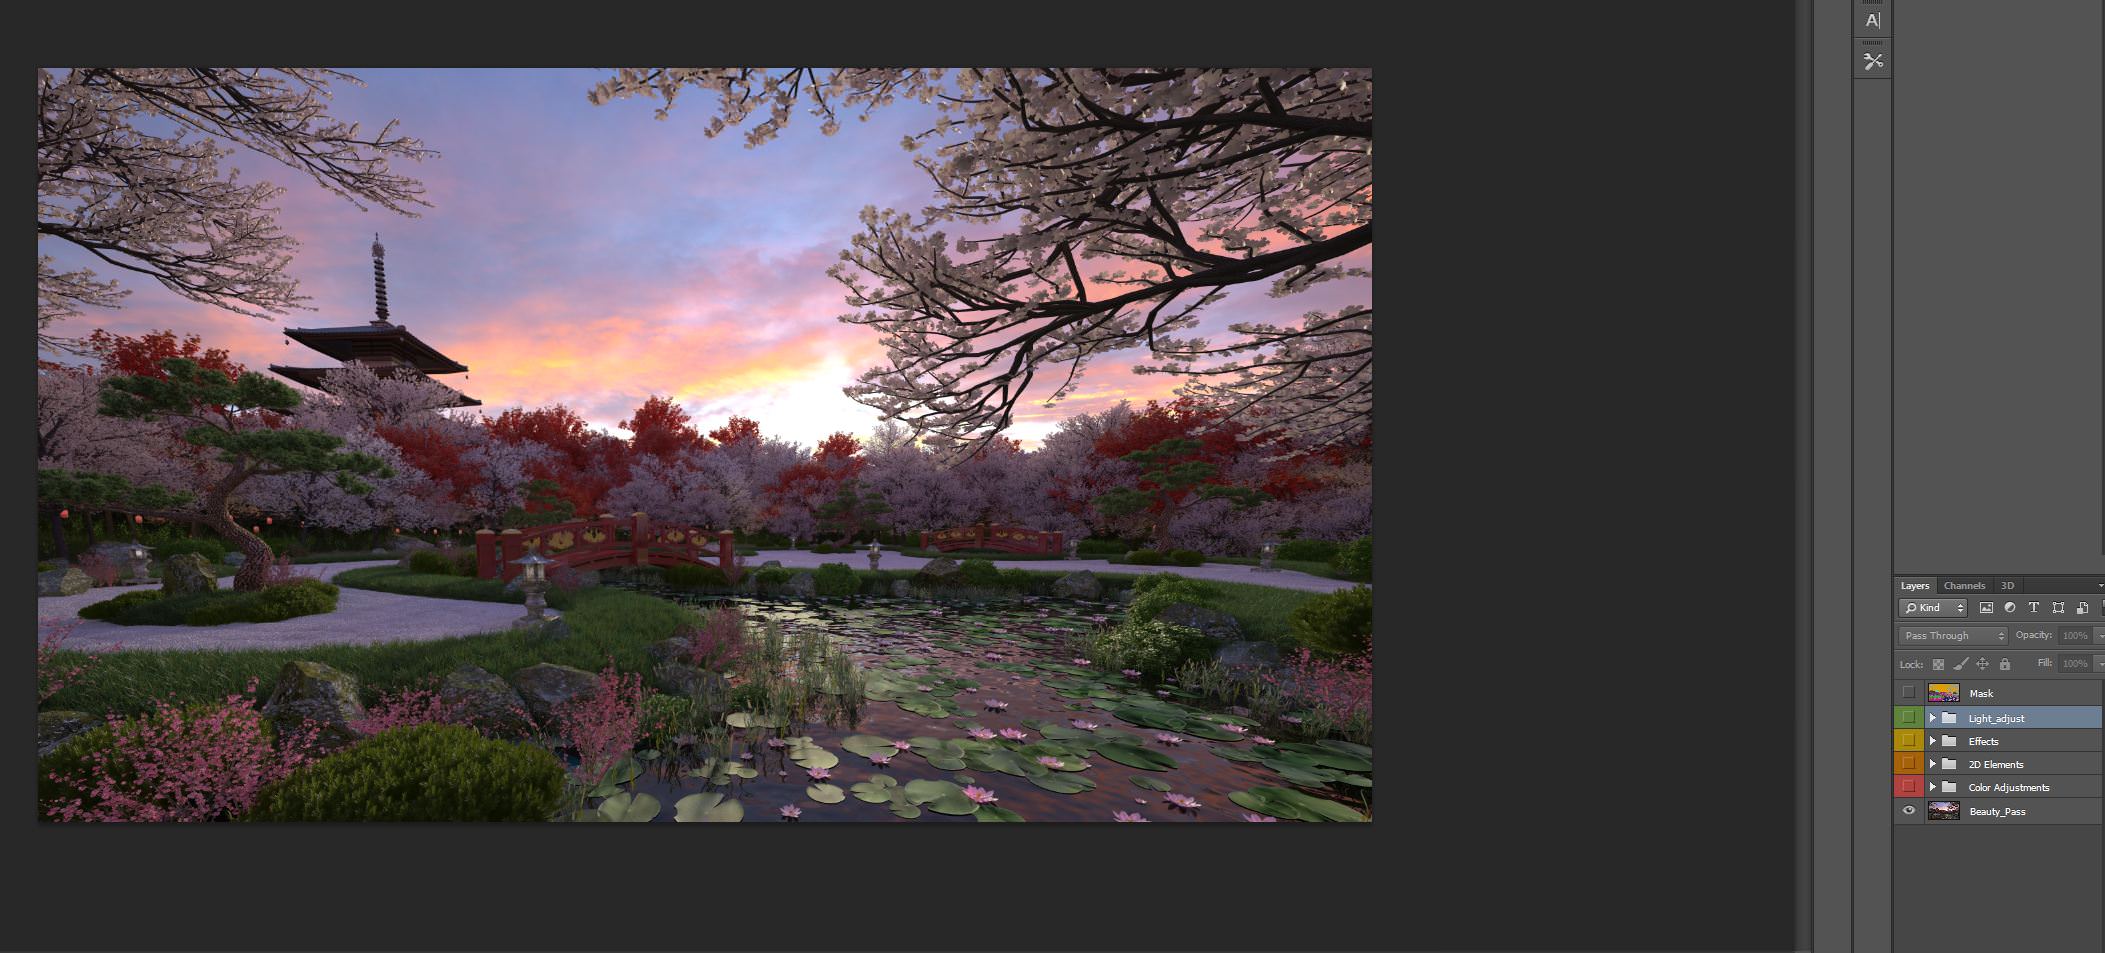
Before I begin to work on the post-production, it is important to import and organize all the render passes into a single PSD file. Photoshop has the folders and colors to help with this organization process of the project, so first I open the beauty pass image and than with the Place option located in the File menu I bring into the PSD all the other render passes. I create all the folders where I will put my layers while I’m working and this way all gets organized nicely.
Fix some minor Errors
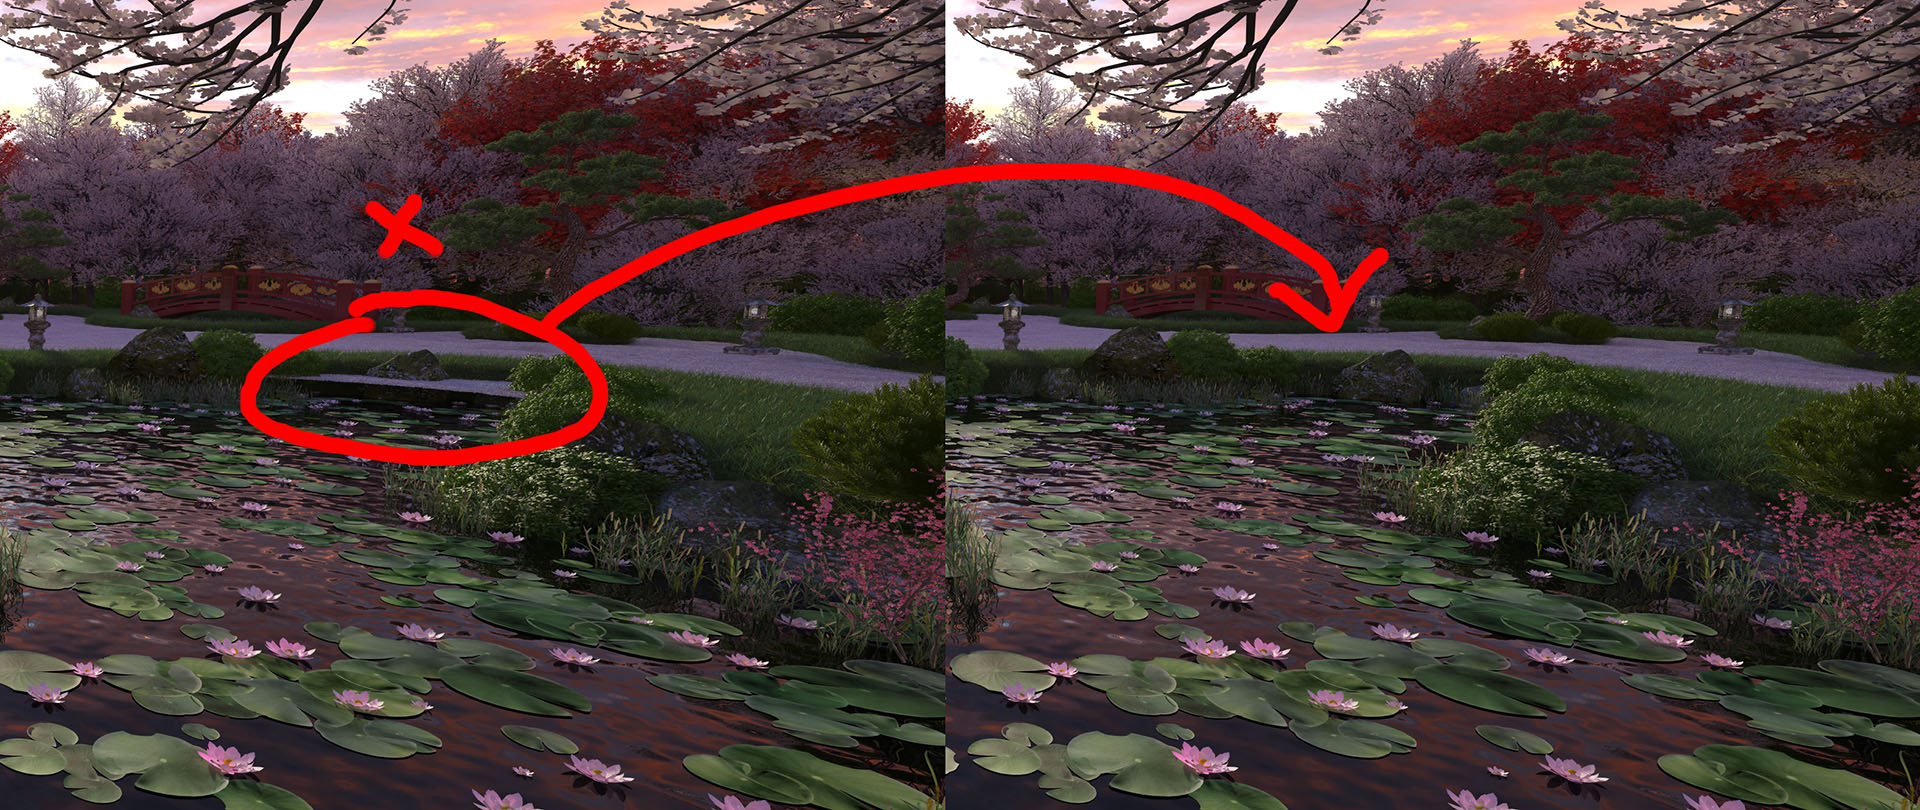
Sometimes after the render is done we find errors that we missed before because this is only visible in the final render resolution! The best way to go about fixing such things is to do a render region in the zone that contains the errors and after you get them rendered you bring them into Photoshop and compose them on-top of the raw render image before you begin all the post-production. Be sure you also get the relevant passes done as you will need these to updated.
Applying the Initial Adjustments
At this stage I work aiming to achieve the desired look for the image. I begin to apply some basic color corrections to gain better balance in the image with the adjustment layers, curves and levels. Than I apply some basic effects such as the fog and sunlight with the help of the V-Ray Z-Depth Pass, where I use it as a selection mask based on the depth in the image. This way I create a new layer masked with it and paint the fog with a normal brush with opacity set to 50%.
Final Color Grading
This is the most important step in the tutorial. This is where we get the final look of the image!
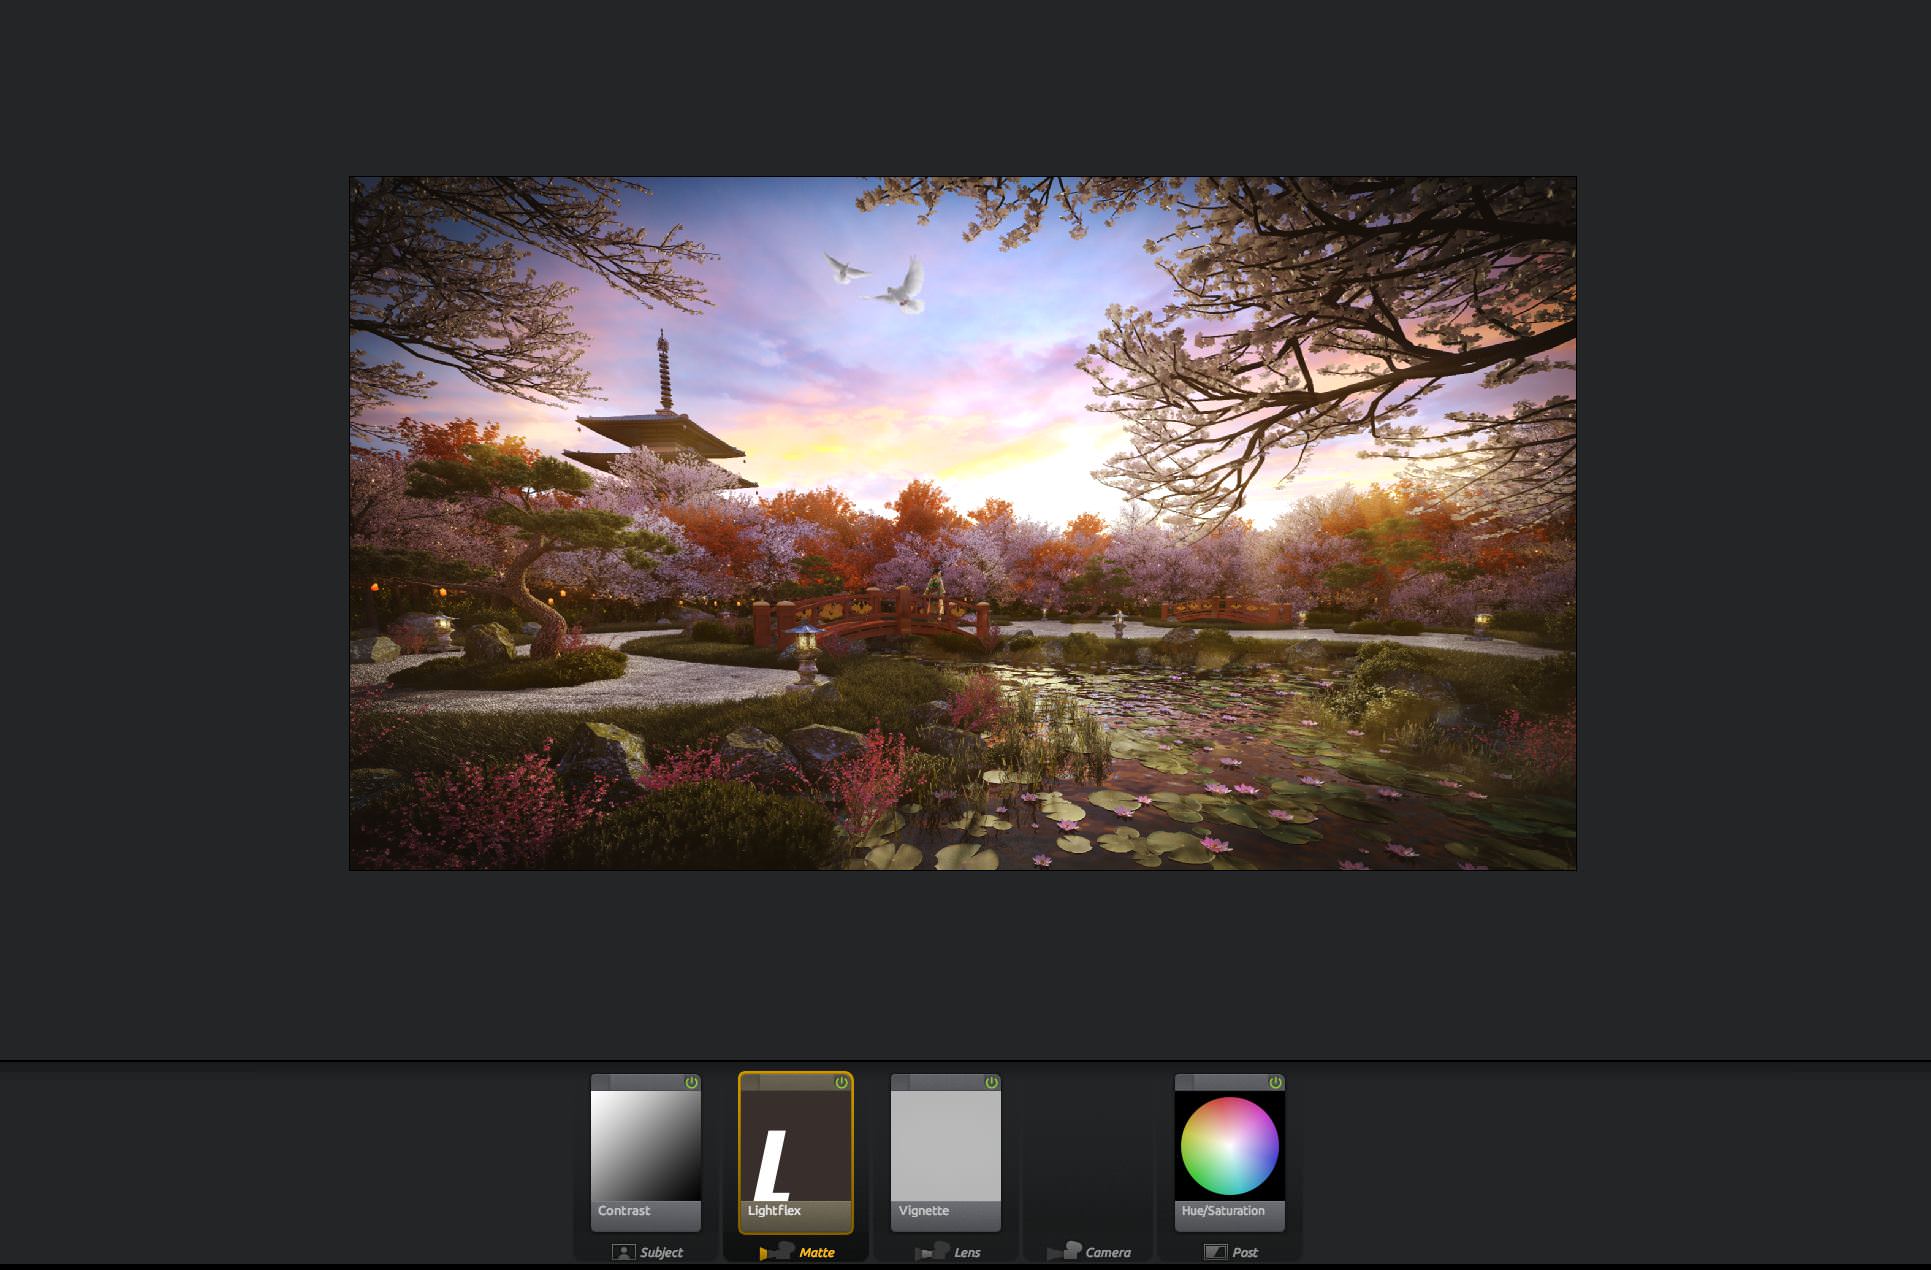
Having all the initial steps done, I advance to work on the final color grading for the image. For This I will use first adjustment layers (Curves, Color Adjustment, Selective color), after these steps I will flatten the image to bring the image into Magic Bullet Photolooks and there I will apply the final adjustments. Check the video file to see the entire post-production steps made on the image.
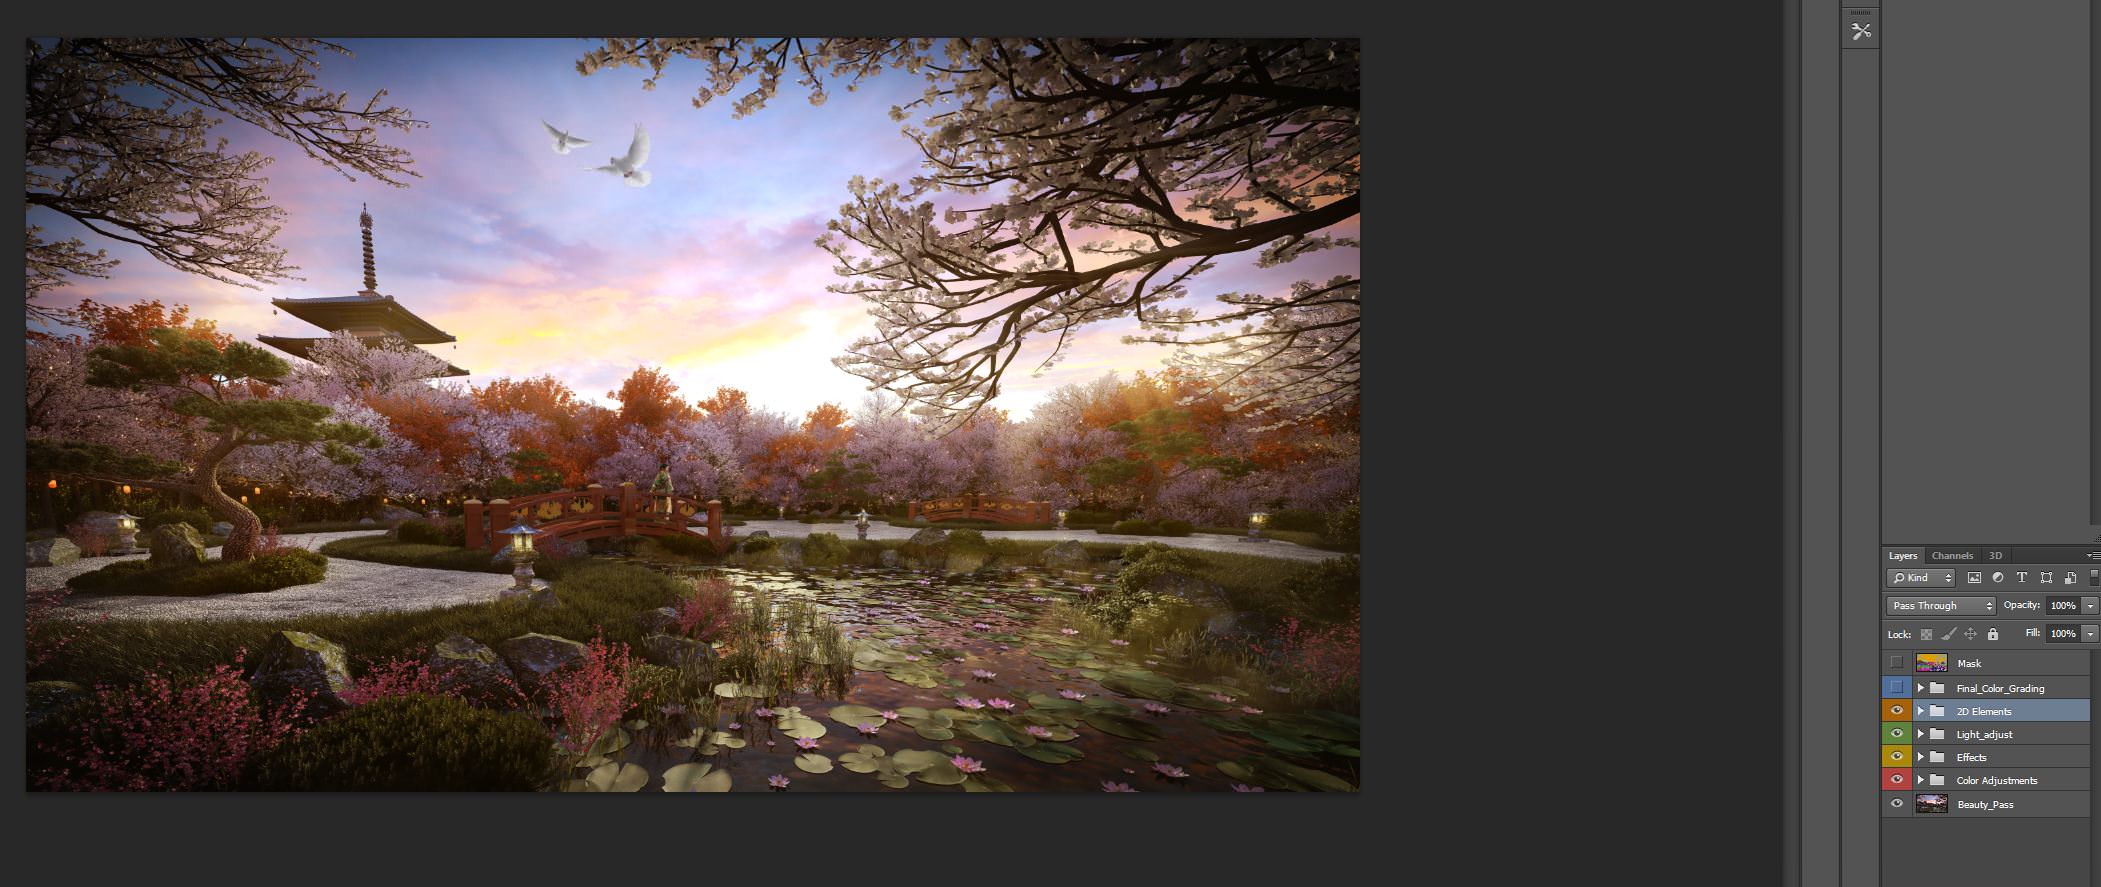
Apply 2D Elements
I usually apply a few 2d elements to get a better composition in the 3d image. The 2d elements that I use are people and animals, in this case of the Zen Garden image for the women and the 2 flying doves.
I hope you found this article useful. Good luck and see you next time!
Sérgio Merêces is a Portuguese 3d artist living in Evora / Lisbon Portugal. He’s working in 3d visualizations for the past ten years, with experience in national and international projects for both architectural and non architectural practices.


Sergio, this is great work !!!
Sergio, this is great work !!!
Great work as usual 🙂
Great work as usual 🙂
Great article and final result. Thanks.
Great article and final result. Thanks.
amazing !!!
Thank you Indrallya, Nicolas and Yuriy.
Thank you Indrallya, Nicolas and Yuriy.