


Making of Rumyantsevo Park
A virtual tour on a grand scale by Biganto Visual, “Rumyantsevo Park” is a residential complex located to the west of Moscow, Russia. Follow this breakdown of how seventeen hundred apartments, large courtyard and landscape park around it got visualized and showcased as a VR Tour!
Introduction
Before we start, let me express our gratitude to Ronen for his blog and for giving an opportunity to become a part of it. It is an excellent source of inspiration for us, and it feels great to share some of our experience here.
Our experience – is an experience of creating virtual tours and accompanying services for clients, who want something more interactive than still images.
“Biganto Visual” started several years ago with an idea and a couple of scripts and today we work both as an ArchViz studio and VR products supplier for architects, designers, and CG artists. Here we want to share some insights from our latest project – “Rumyantsevo Park.”
The Project
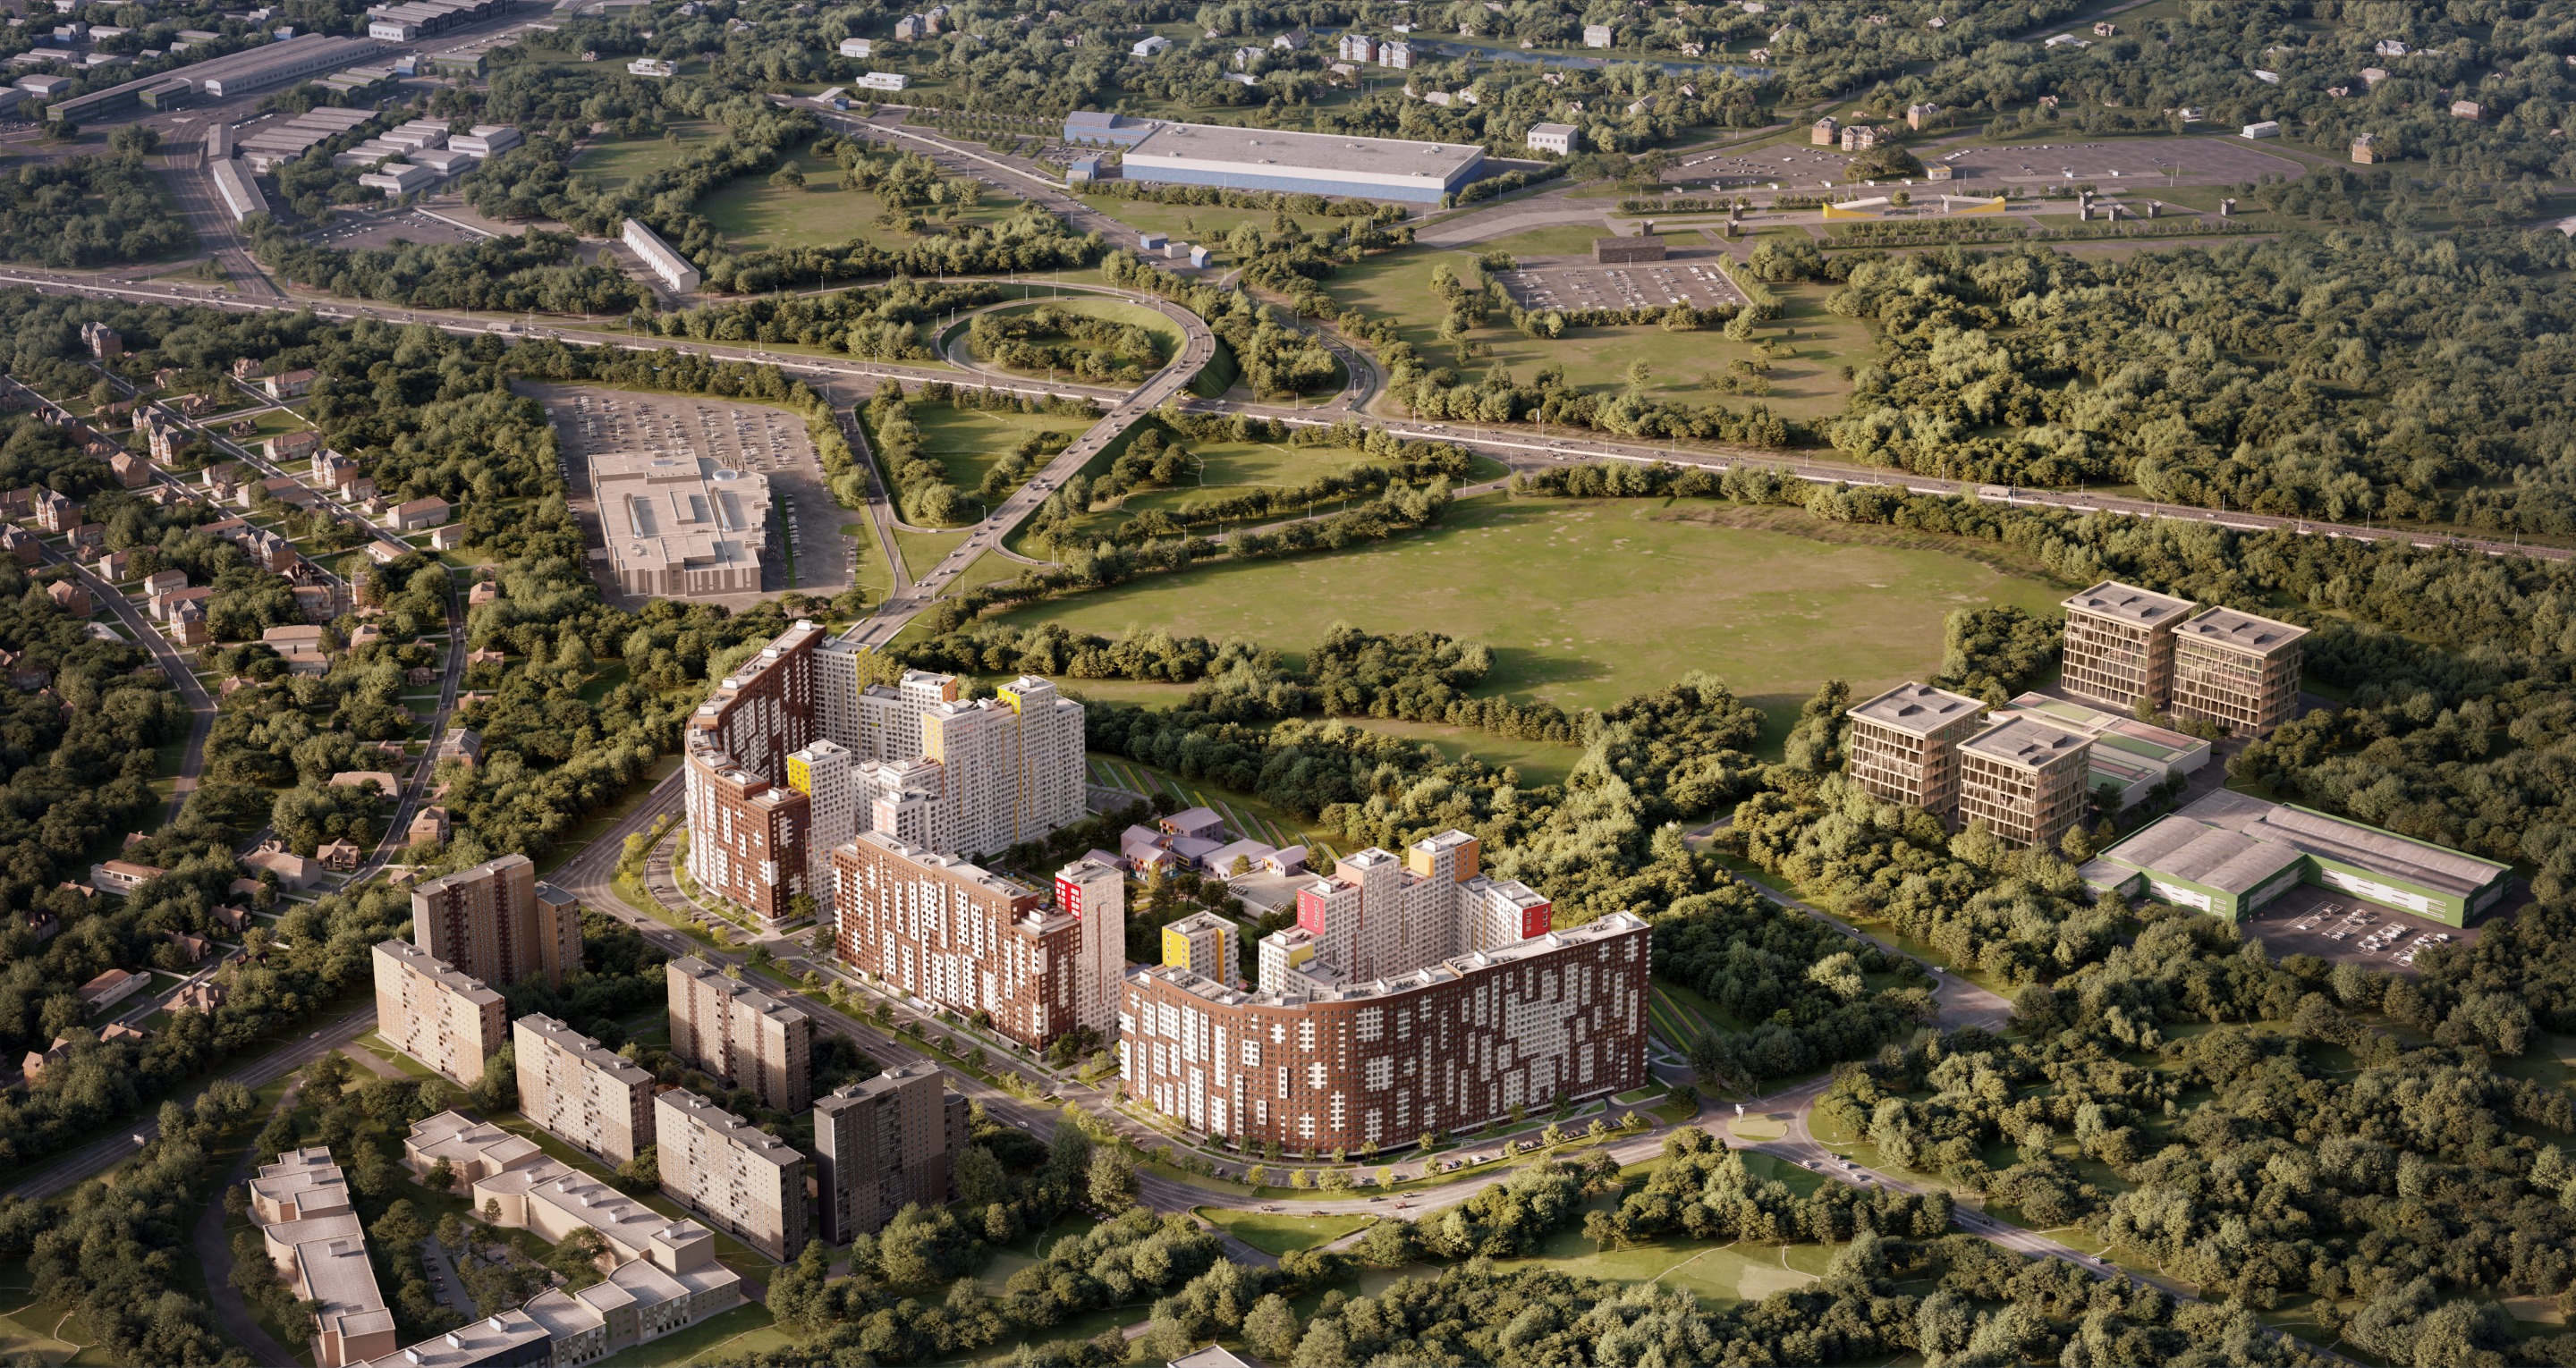
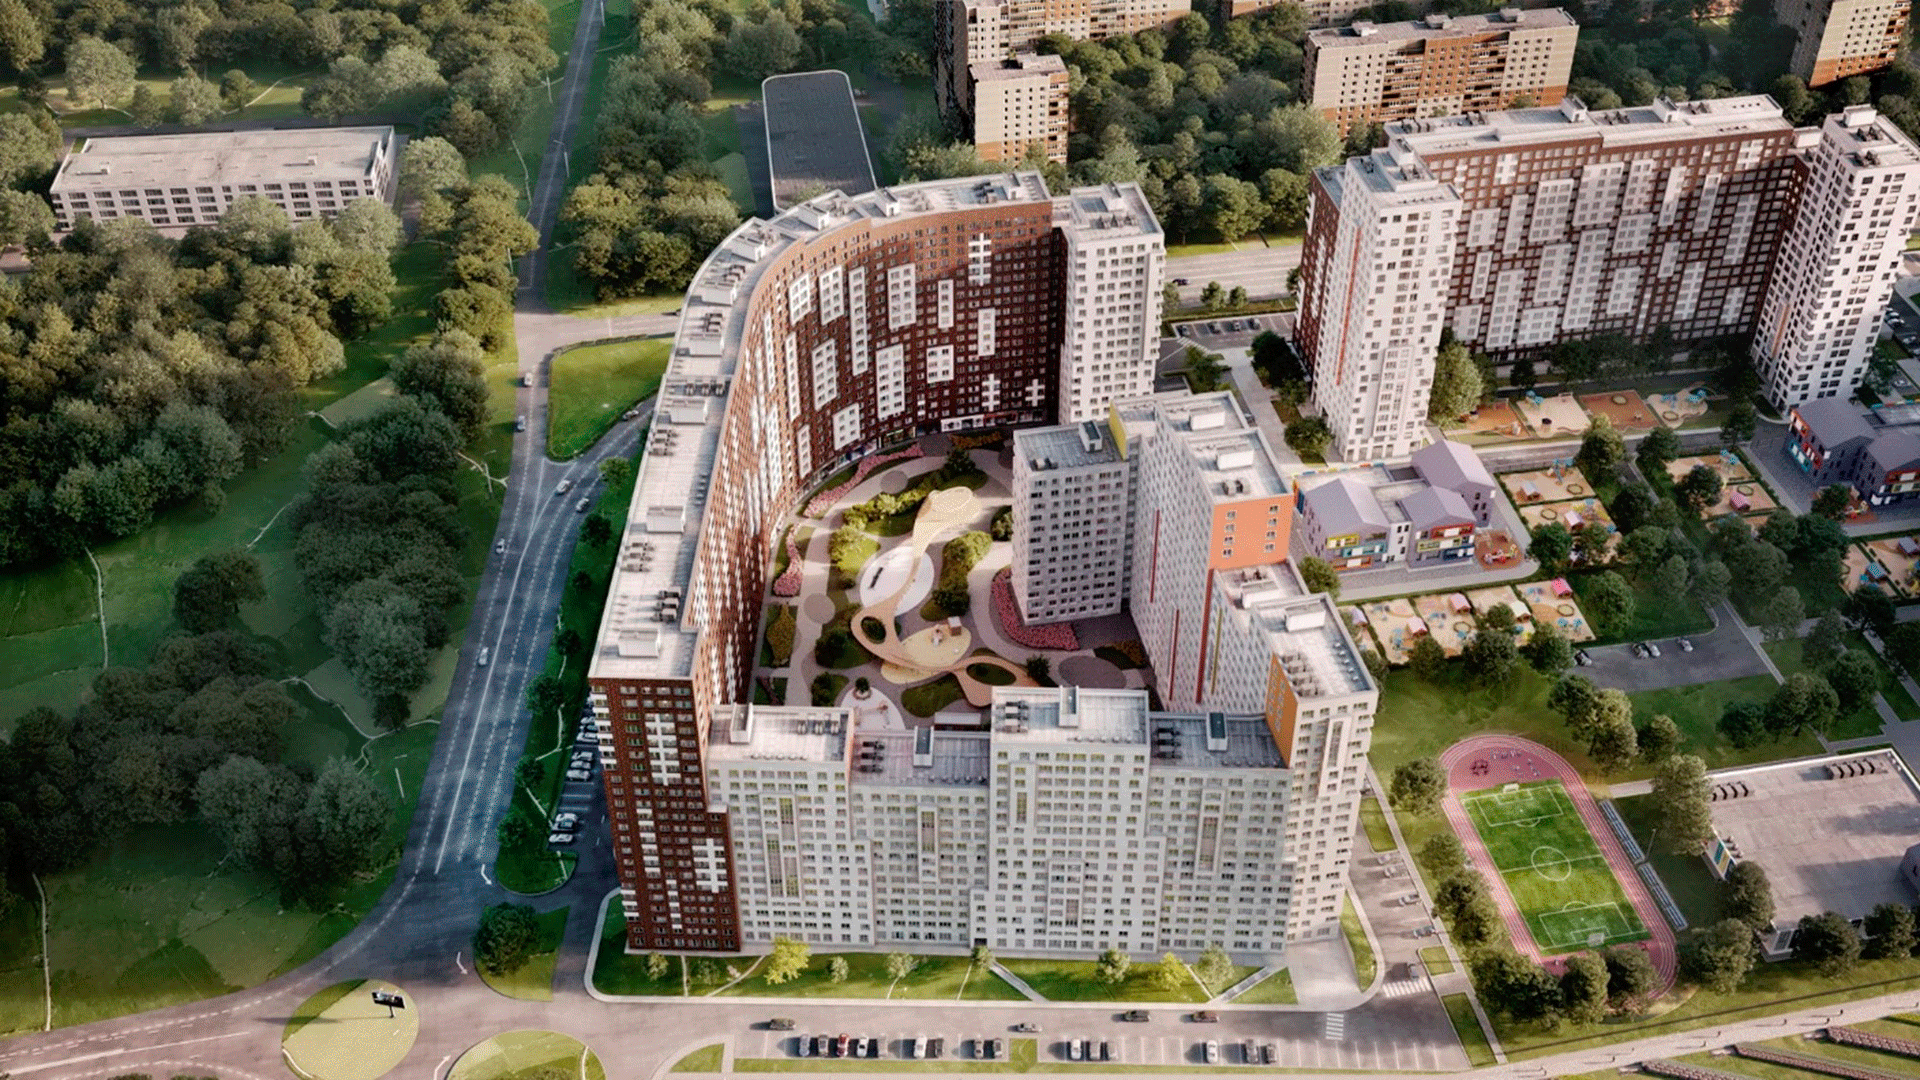
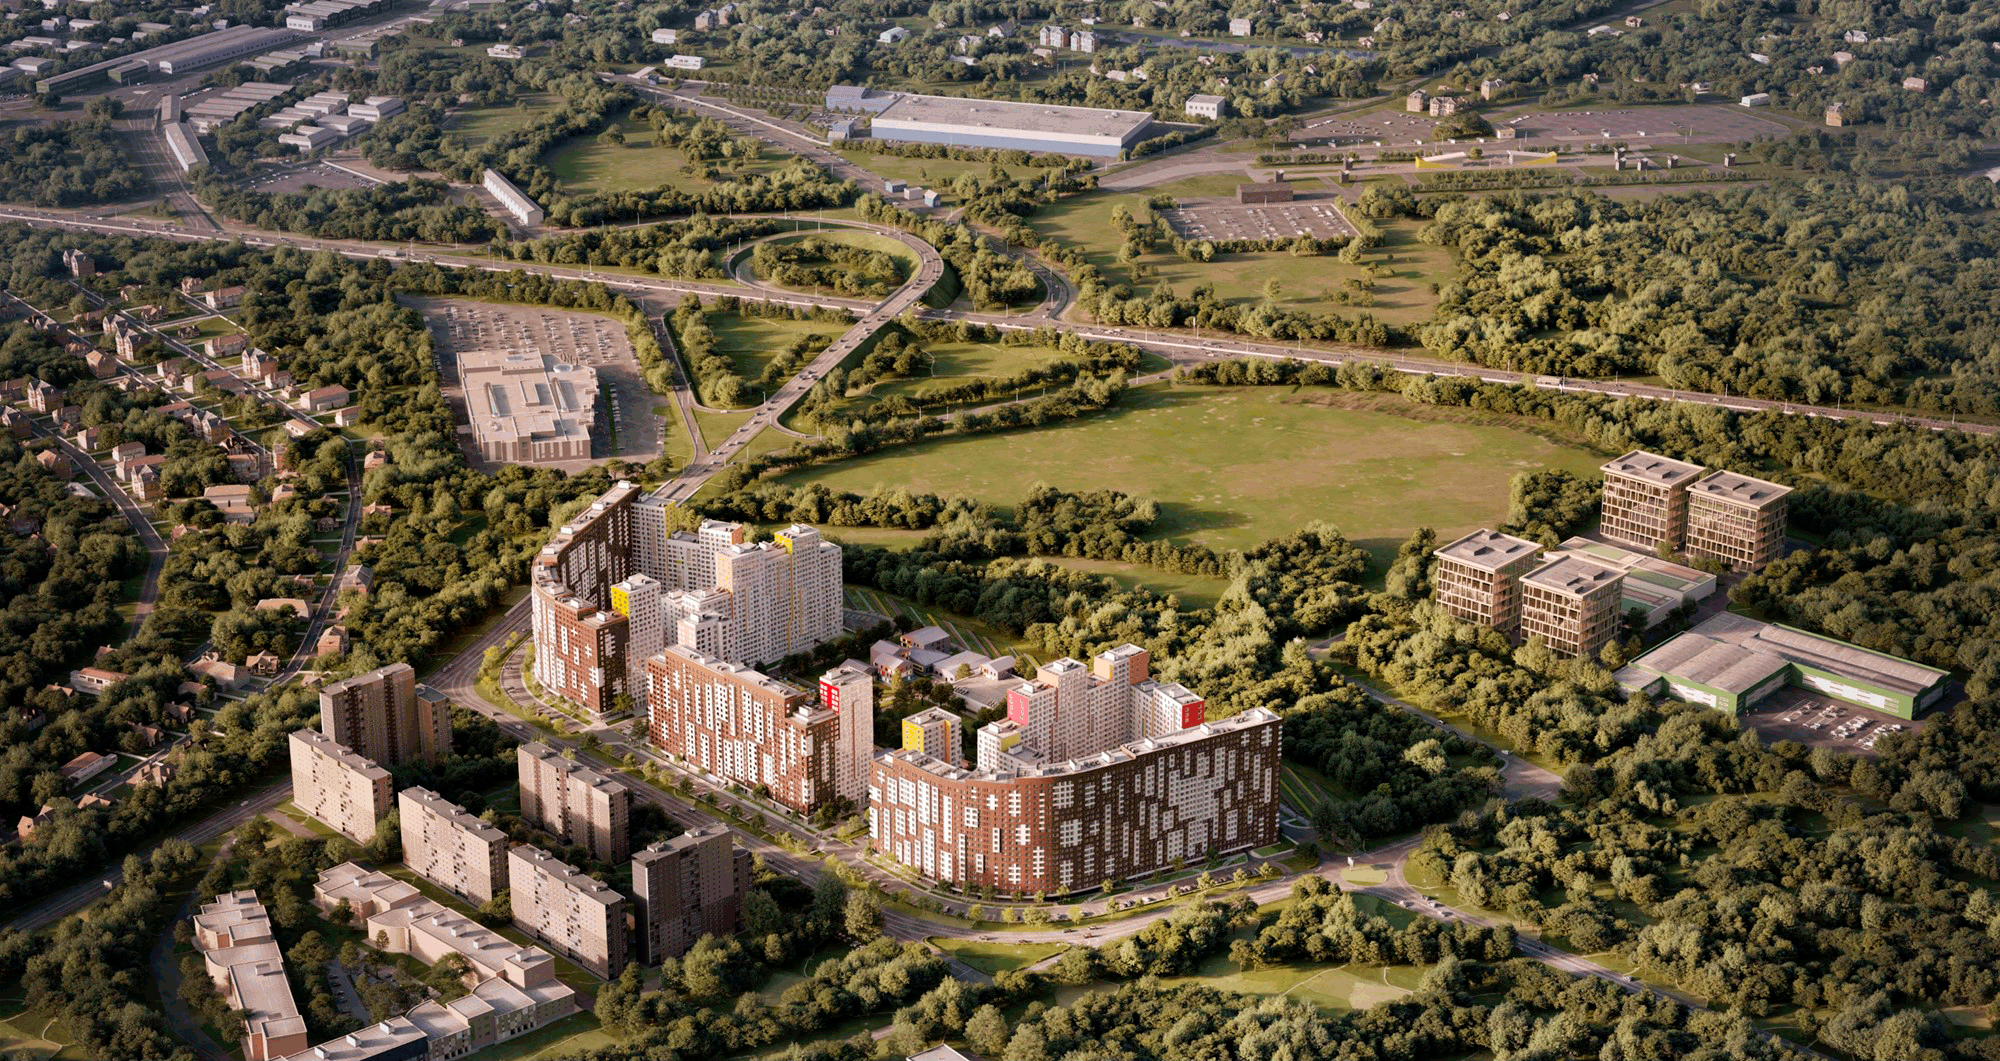
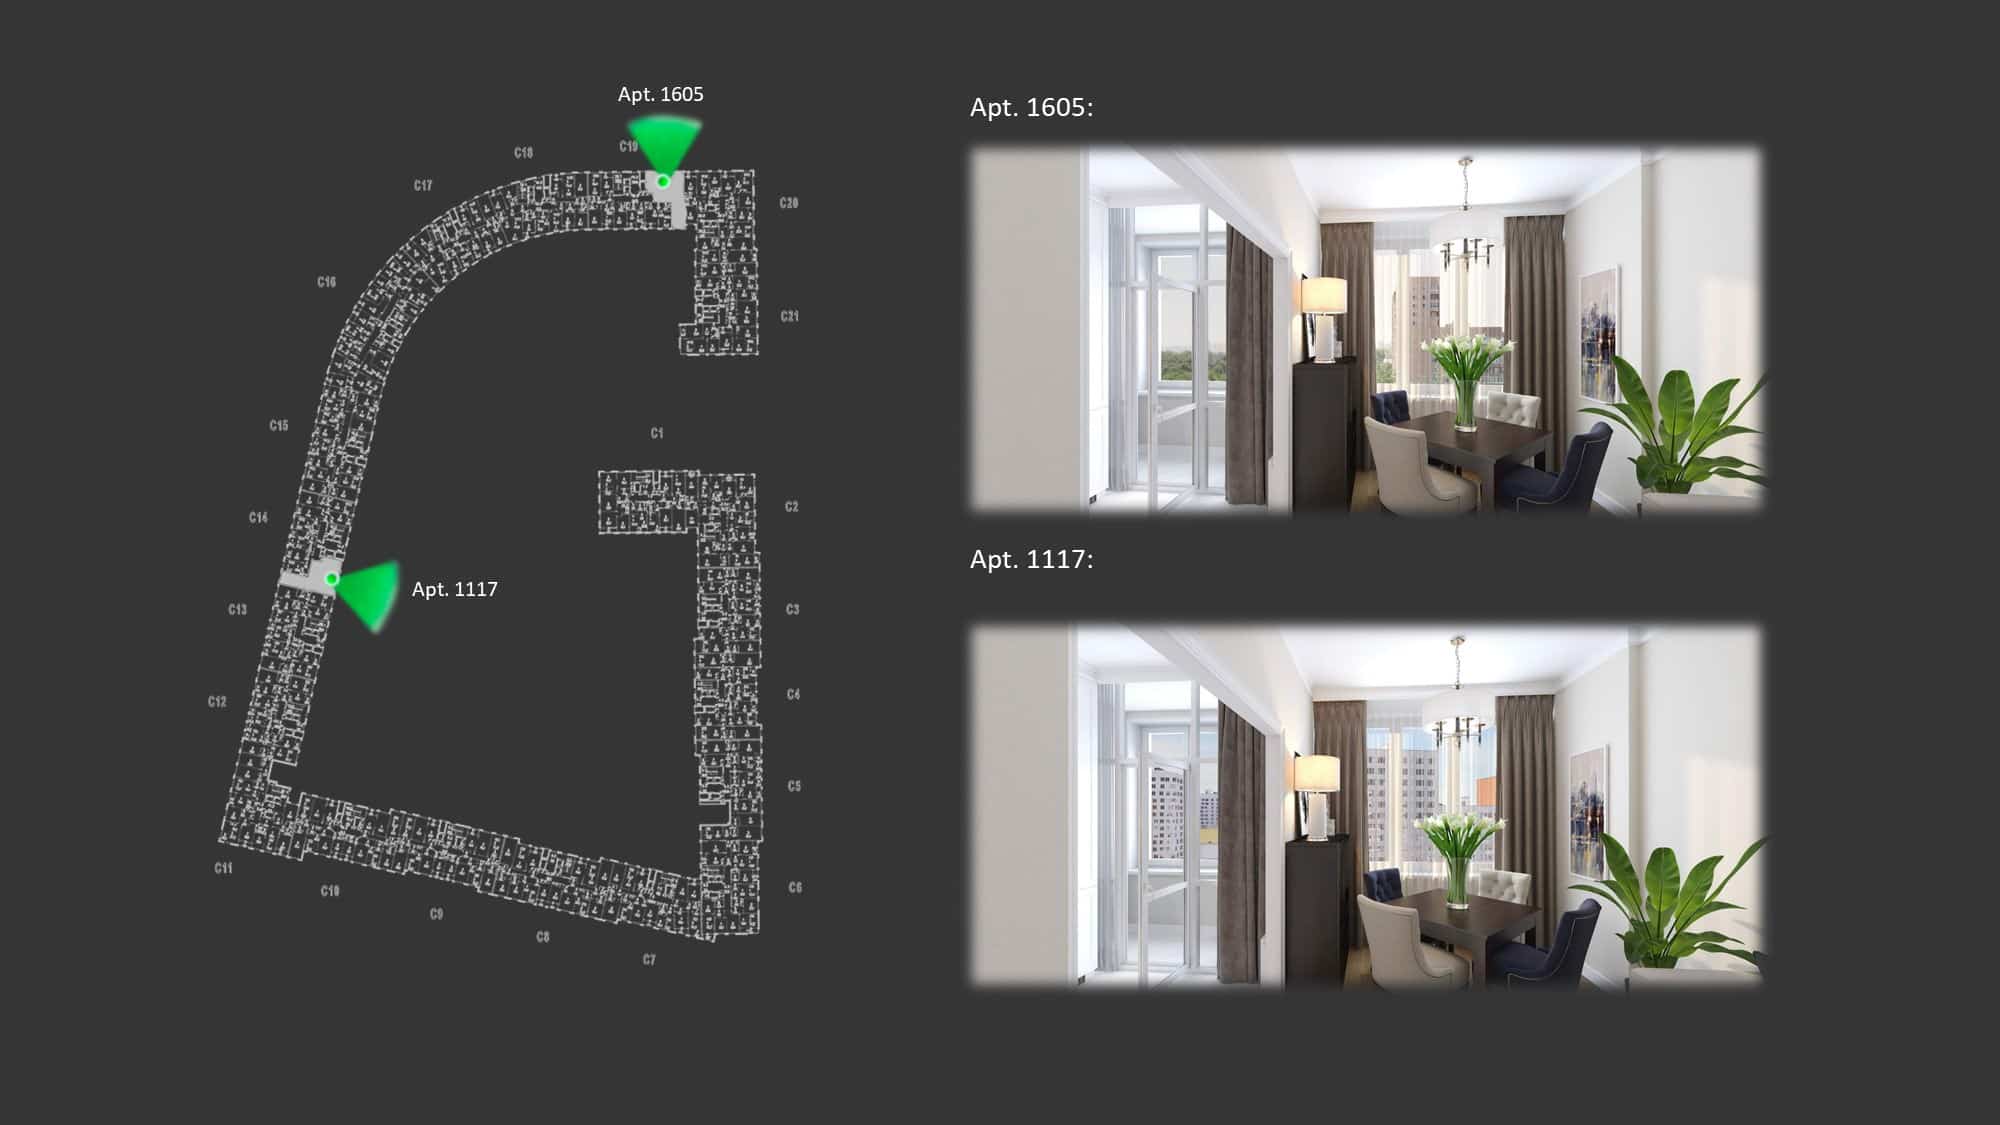
“Rumyantsevo” is a residential complex located to the west of Moscow, Russia. This is our largest project so far with more than seventeen hundred apartments, large courtyard and landscape park around it.


The best part of it – each exterior area and interior, including apartments, lobbies, stairway entries, they all covered by virtual tours. You can walk through the court, enter the building and access apartments on any floor (yes, all 1700!), which I encourage you to do via the links below. It should work on modern mobile devices as well.
https://biganto.com/tour/9289/
Technology Overview
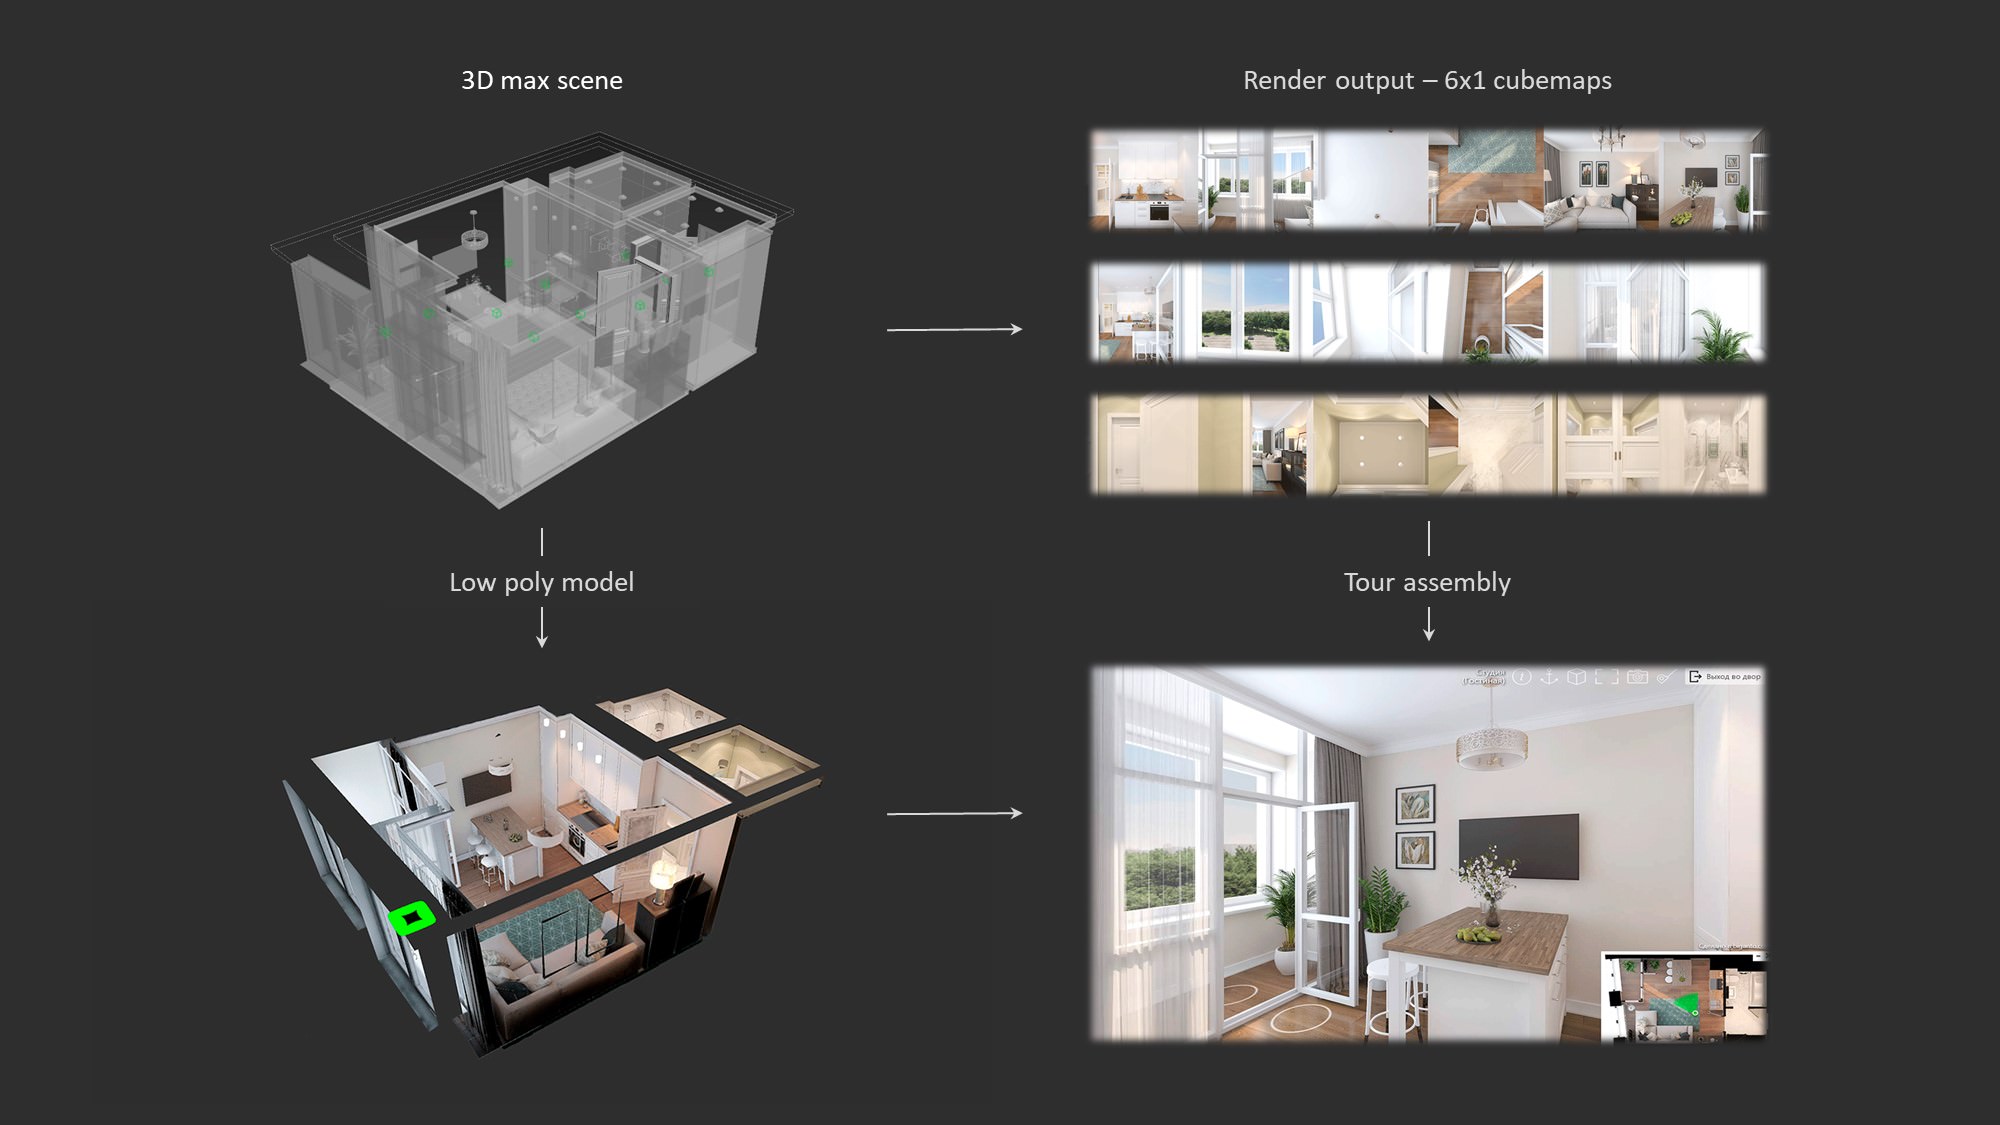
To understand our approach, it is necessary to understand the technology behind it. Our solution is based on many 360 degrees panoramas rendered from a familiar Corona Renderer or V-Ray scene. These panoramas then are being processed through our engine to assemble them into a 3D tour via the low poly model of the scene.
Working with panoramas ensures image quality and ease of production comparable to still images. We can work with any ordinary 3d scenes, including scenes supplied by our customers with no to minimal additional efforts and to keep current visualization pipeline. Our engine, in turn, gives us required 3d features: stereo effect, relative freedom of movement, proper VR devices support.
This approach allows us to replicate core features of right 3d engines like Unreal or Unity, keeping their advantages without most of the disadvantages and associated costs.
Tour Production
Our technology relies on multiple panoramas to showcase the space. More panoramas per space result in more freedom to move around, so there is a certain minimal number of shots we render to ensure fluid movement through the scene.
To make these shots we use camera animation together with some markers – objects to anchor camera position. The marker is a hand placed helper object, e.g., a point. We saturate the scene with these markers manually and then use a simple script to create and animate the camera and also to record camera coordinates for the 3d model.

To render panoramas, we use both V-Ray and Corona Renderer. It is worth mentioning that we are using cube maps, not spherical panoramas. Cubemaps have several advantages: they can be used with our engine right away, without additional transformations; they are easier to work with in post-production; finally, based on our experience, they are usually faster to render (not always the case though).

We usually end up with 15-20 renders for single room apartment, whereas for exteriors at Rumyantsevo we’ve reached 250-350 panoramas. As you can imagine that’s quite demanding concerning hardware, so having meaty render farms at our disposal is a must. When it comes to rendering hundreds of images even minutes of render time saved adds up very quickly, so any scene optimization pays-off greatly.
The second essential asset is a low poly model of the scene. There are different techniques to create it we continually experimenting with, from common modeling techniques and scripting to models created from photos by lidar.
Once we have all the assets required we use a web interface to upload them to the server, preview the tours and add some additional features (e.g., clickable objects to show tooltips, move to a different tour, etc.).
Because our visualization pipeline isn’t that different from a common one, I’ll skip some minor parts of visualization, and instead will focus on more challenging parts of the project and technical aspects related to 3d tours.
Exterior – Overview
For exteriors we mostly use Corona Renderer, here’s a brief overview of the scene we ended up with.
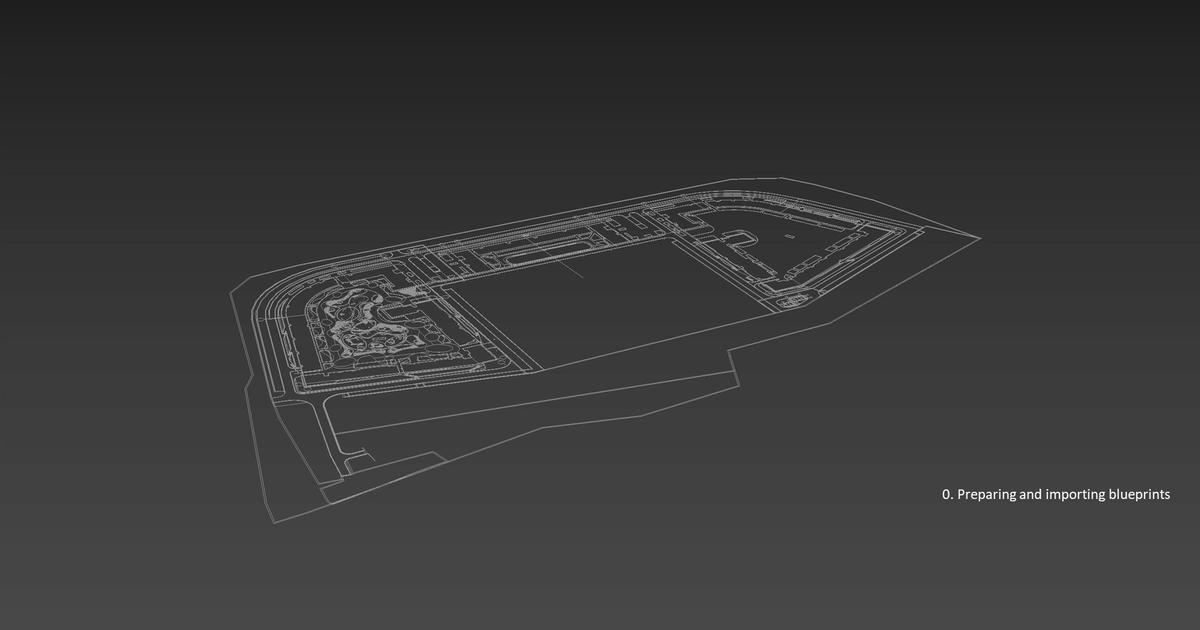
Any large scene requires optimization right from the start, and, considering the same scene have to be used to render panoramas for 3d tours, optimization is even more critical. Using instances, proxies and XRef’s is a must. Maintaining order in every scene, sticking to predefined layers structure and the blueprints are also crucial. Finding out that your objects are all over the layers and something is wrong with their positioning is the last thing you want to see when preparing the scene for render.
We always start with preparing all blueprints for import to 3da Max, and once it’s done, you keep building the scene element by element, building by building.
To add most of the repetitive details we used RailClone (road signs, road illumination, surface markings, etc.). For adding additional trees, cars, and 3d people for close views, ObjectPainter is indispensable. Most high poly assets are proxies of course.
Lighting setup is fundamental: HDRI/Corona Renderer Sky + Corona Renderer Sun.
Exterior – Details & Materials
Most of the scene is pretty straightforward, but here are some minor interesting details.
Windows and Curtains
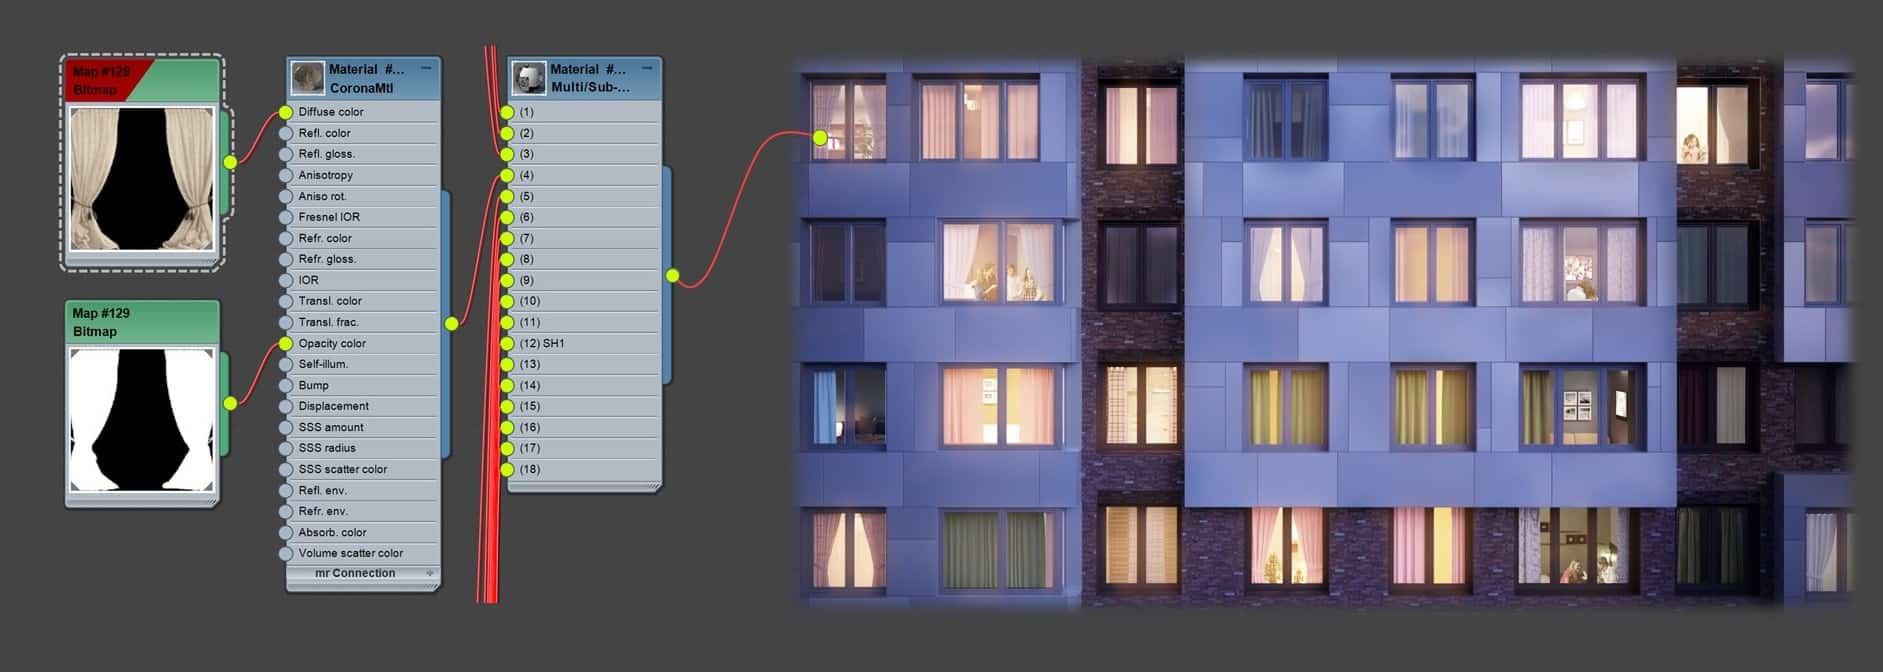
For the main building we had only six types of window frames, and once we detached corresponding faces, it was an easy task for RailClone to distribute frames. For blinds and curtains, we used facets as mentioned earlier and “MaterialByElement” modifier. “MaterialByElement” randomizes material ID’s so we can use Multi/sub material to create lots of different curtain patterns in sub-materials. Sub-materials are simple curtain images in the diffuse slot with an Opacity Mask.
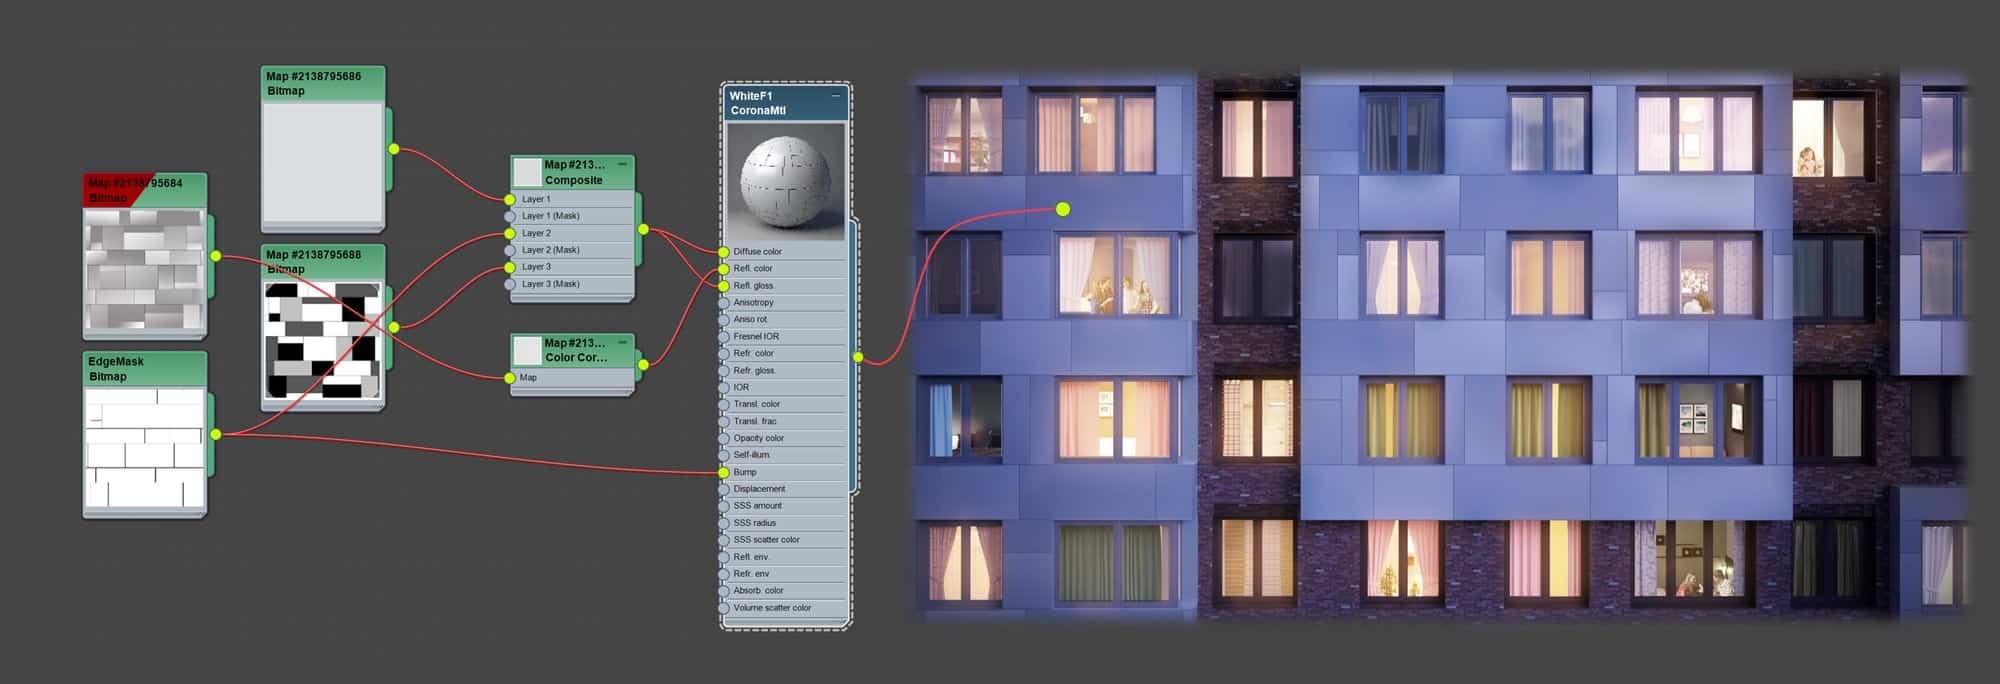
Facade Material
Another tricky part was to make tiles on certain facades and bay windows. On the one hand, we needed to have some detail for street views, on the other hand, tiles should not impact performance a lot. Geometry would have cost many polygons here, so we ended up drawing maps in PS to create the desired effect. We did the mapping according to the blueprints, so there are no cropped tiles between the floors.
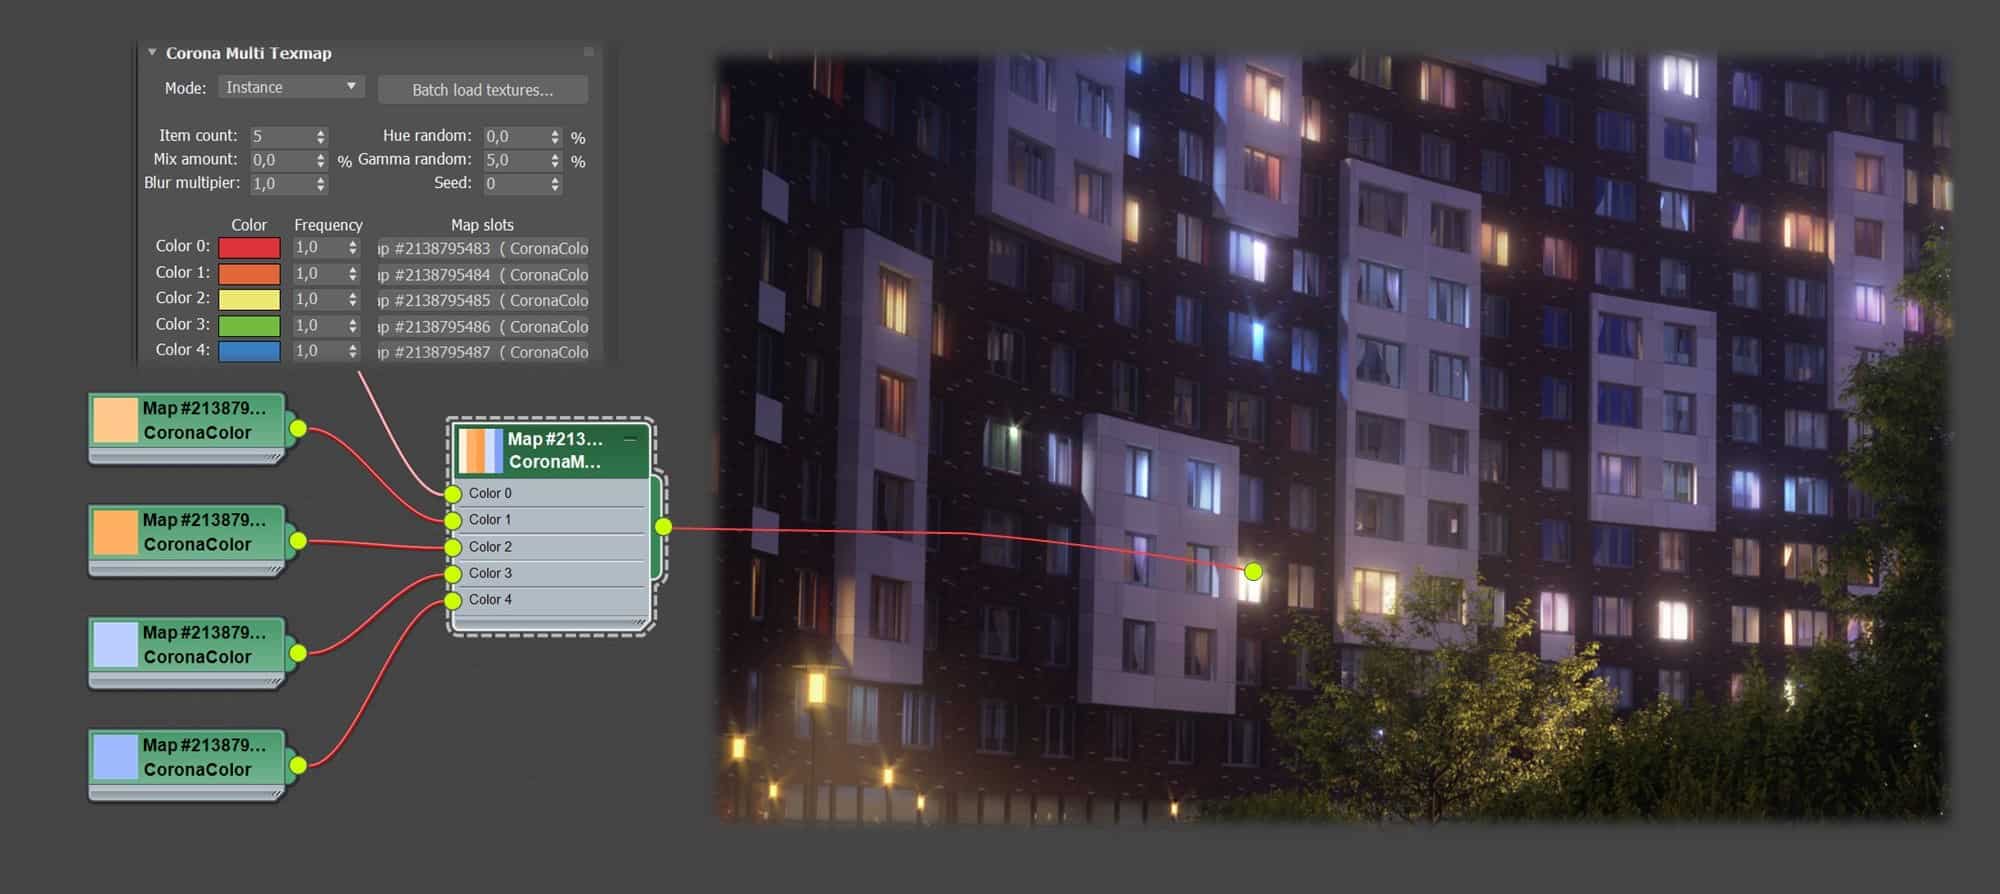
Random Lights for Evening Shots
For evening shots stray light from the windows is an essential part of the realistic look. There are several ways to achieve that, but we prefer to use CoronaMultiMap. Step one is to distribute instanced CoronaLights where necessary. Step two – put CoronaMultiMap into texture slot of light using Instance mode. If it is necessary to turn off some random lights, it is as simple as adding one more map with black color.

Interiors
For the building interiors, we use a master scene containing all client-approved furniture, decor, and materials. Materials and meshes are optimized to speed up both rendering and production.
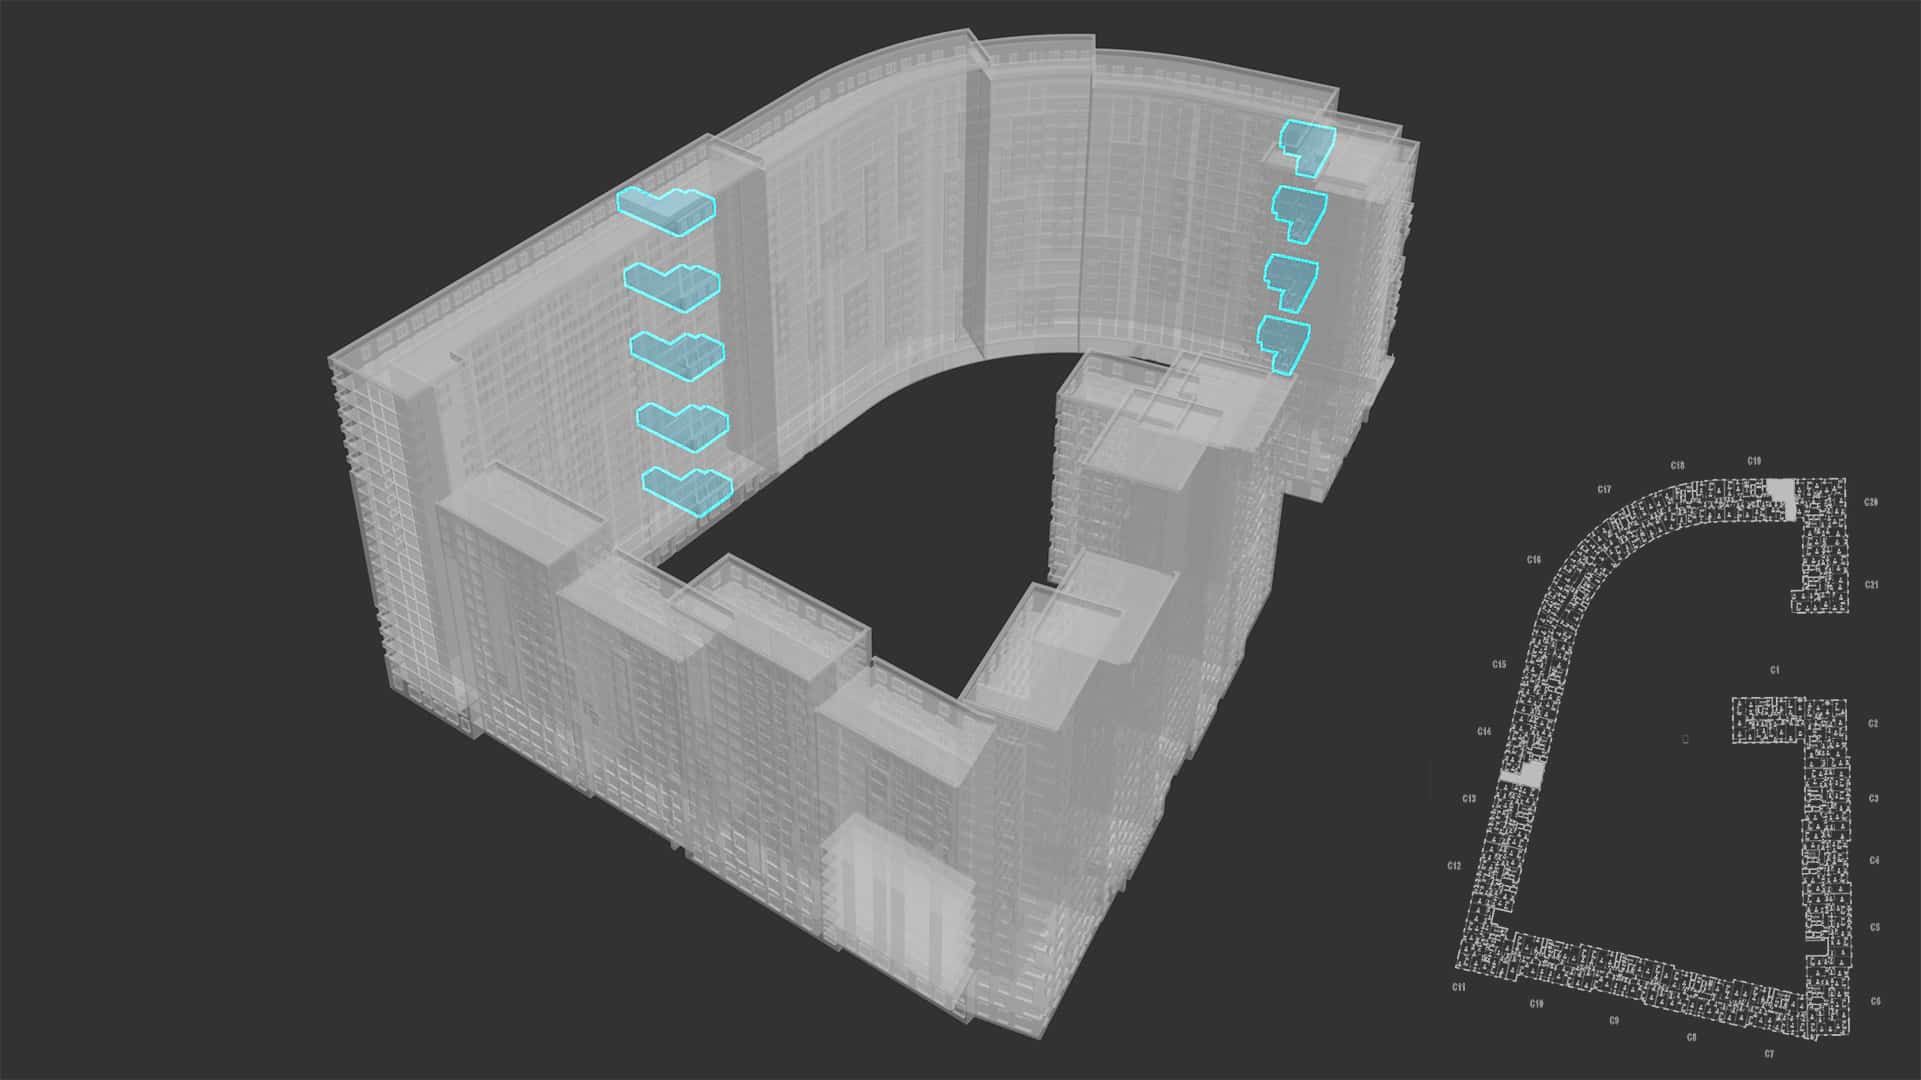
Seventeen hundred apartments is a lot, but surely there is no need to model each one of them. There were only 88 unique layouts, so we made 88 scenes with the same assets and materials inside. Tours created from these scenes we can copy in our web interface to create as many apartments as we wish. At first, glance making 88 scenes with different walls doesn’t sound challenging, but rather dull instead. However, the real challenge is to create realistic and accurate window view for each apartment.
The first problem is the scale – each apartment has at least a dozen of panoramas with visible windows so at the bottom line we are talking about processing thousands of images (and double that cause every apartment has 2 variants – with and without furniture).
The second challenge is the architecture of given building. Each apartment from the same layout can be located in several sections on different floors.
Manual work is definitely out of the question, so we ended up with an approach based on scripts and some neat tricks in 3d Max and Fusion.
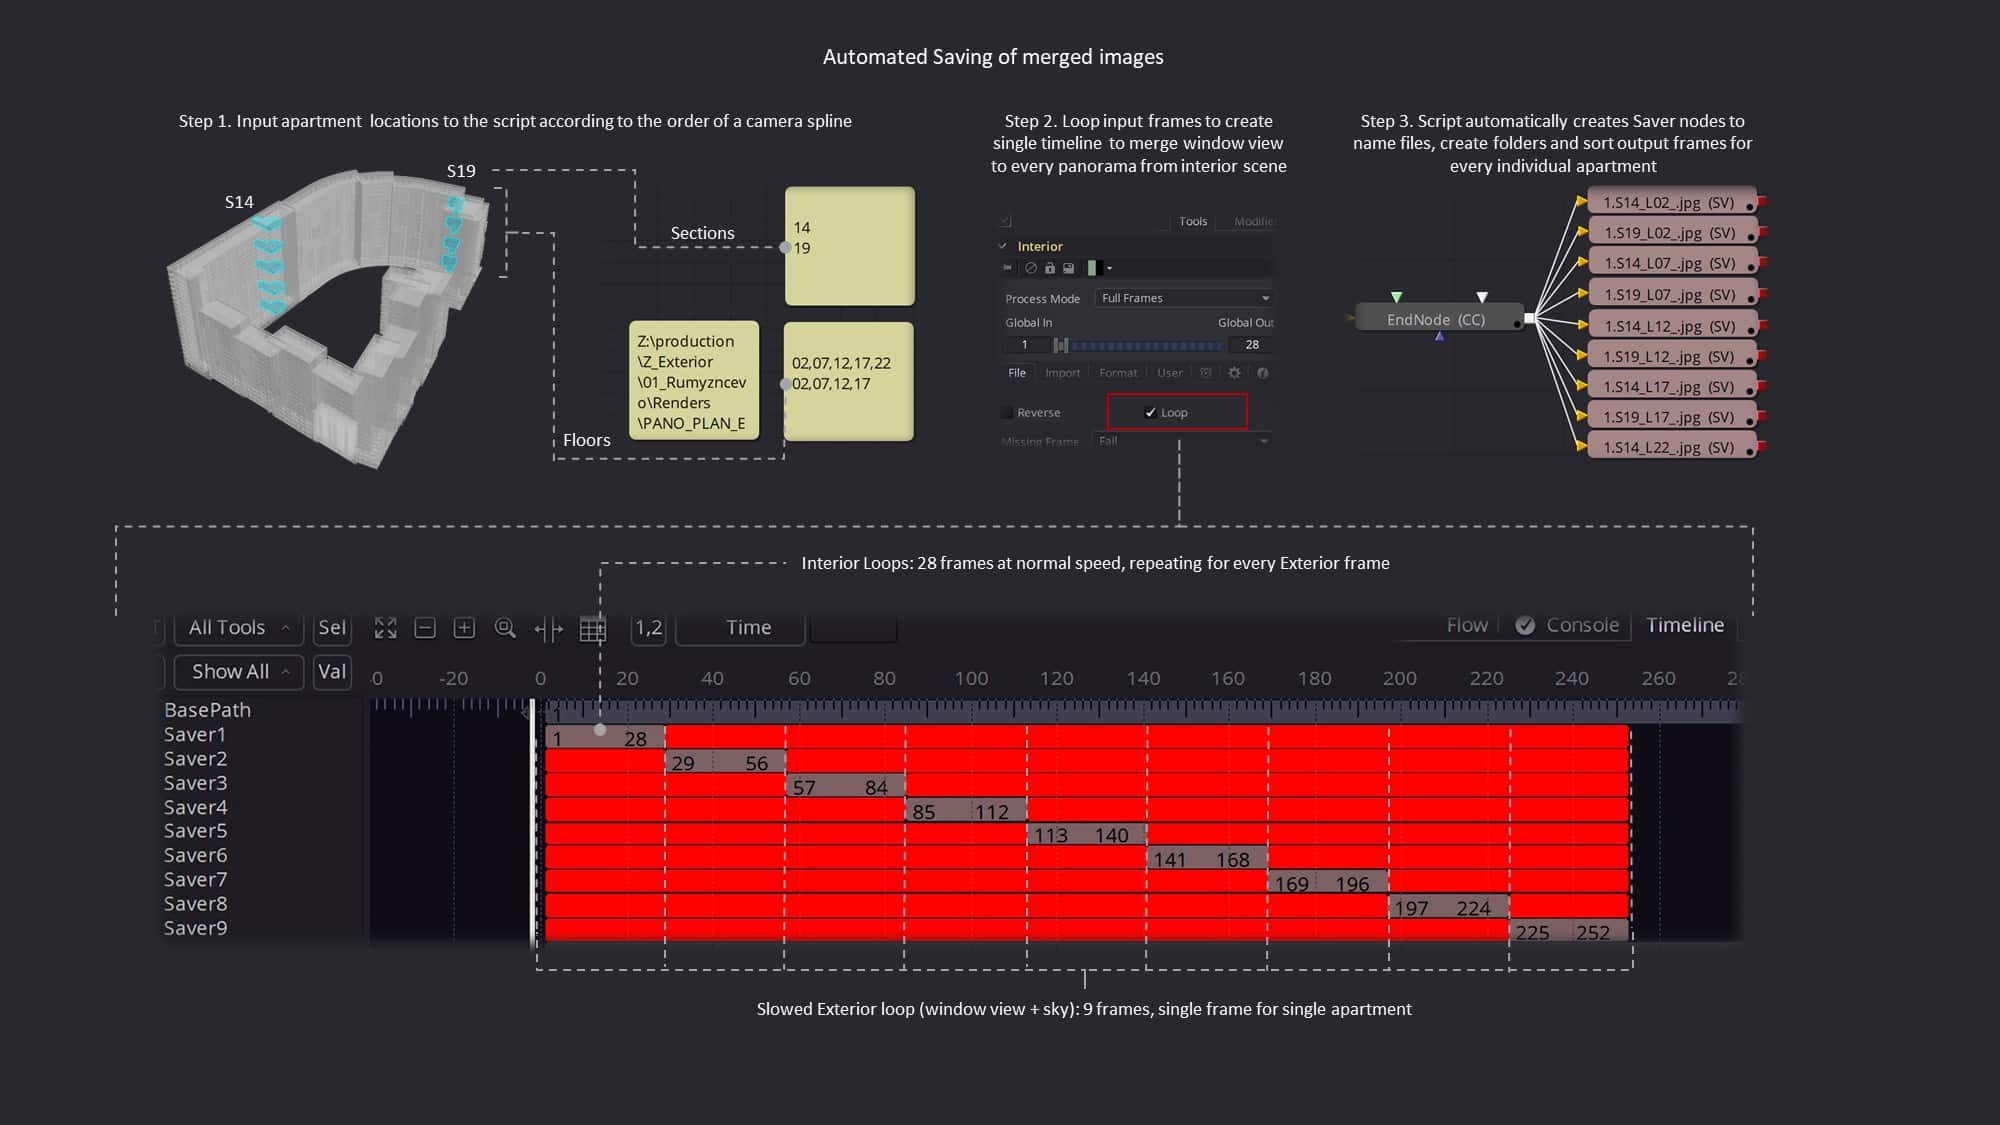
The first step was to obtain accurate images from exterior scene to put into alpha channel in interiors. To do that we used an animated camera traveling along the spline. The camera uses vertices of the spline for each frame, and each vertex is located near the window inside the building. Single spline covers all apartments from particular layout (88 total), single vertex covers single apartment. Vertices are located in a strict order. This will be important later for image merging.
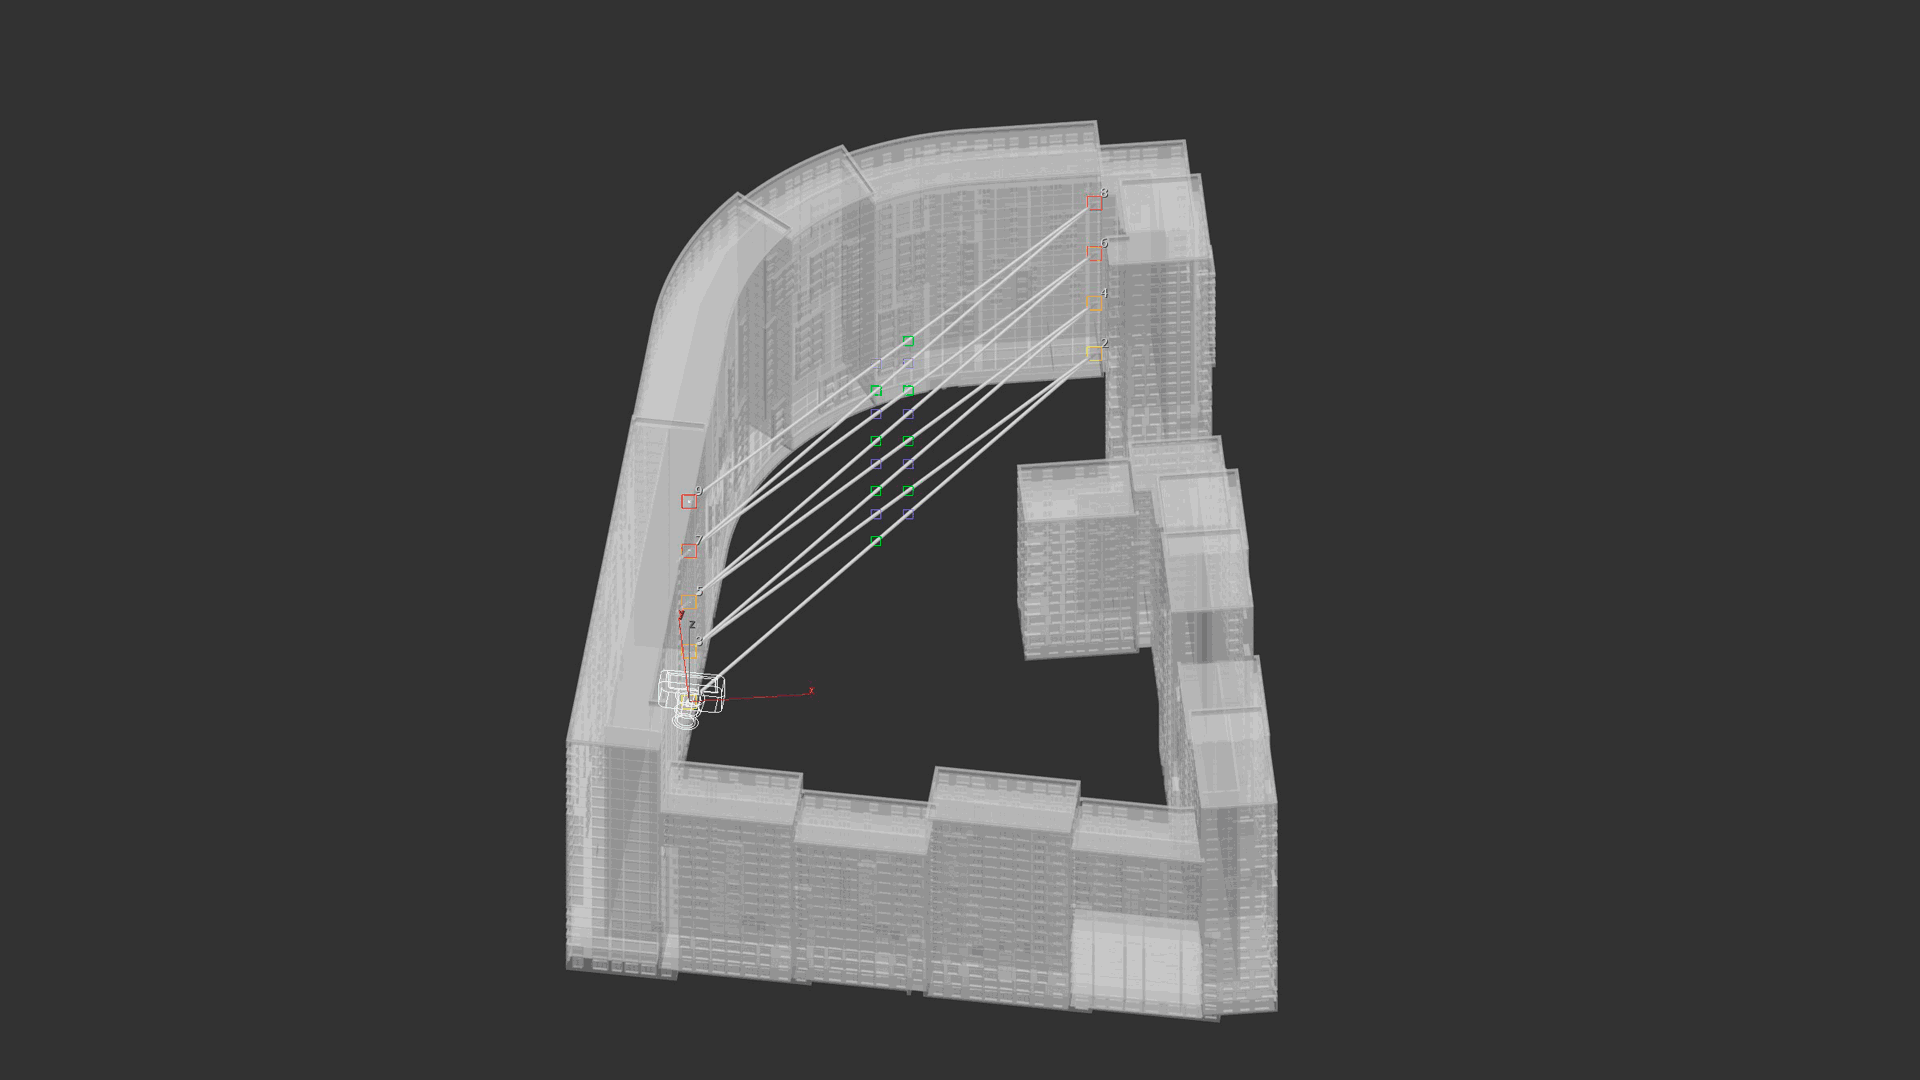
Our camera in the interiors is always facing North, so to receive matching cube maps we rotate window view camera with the position of the window. It also turned 90 degree clockwise due to the difference between V-Ray (used for interiors) and Corona Renderer (exterior scene) cube maps (this is why it’s looking to the side of a building on the image above). By using the alpha channel and matching cube maps, we can use simple overlay to merge interior shots and window view. Corona Renderer Sun is bound to a camera position to maintain similar lighting outside the window for every apartment to simplify post-production.
Just rendering the view from these camera positions is not enough, however. We only require the view outside the window, without any adjacent house geometry. To remove unnecessary building pieces, we did the trick with opacity.

First, we created a “shortcut” Output Map for every sub material in Multi/Sub on a building. Instead of manually connecting opacity node to each of 20+ sub-materials we used a script called “Slate Connector.” It isn’t perfect but works quite well for this particular task.
Next step is to create a mask so that opacity only affects everything close to the camera. Essential part here is a geometry piece bound to the camera position and Corona distance. By changing this additional geometry piece, we had complete control over which parts of geometry to exclude.
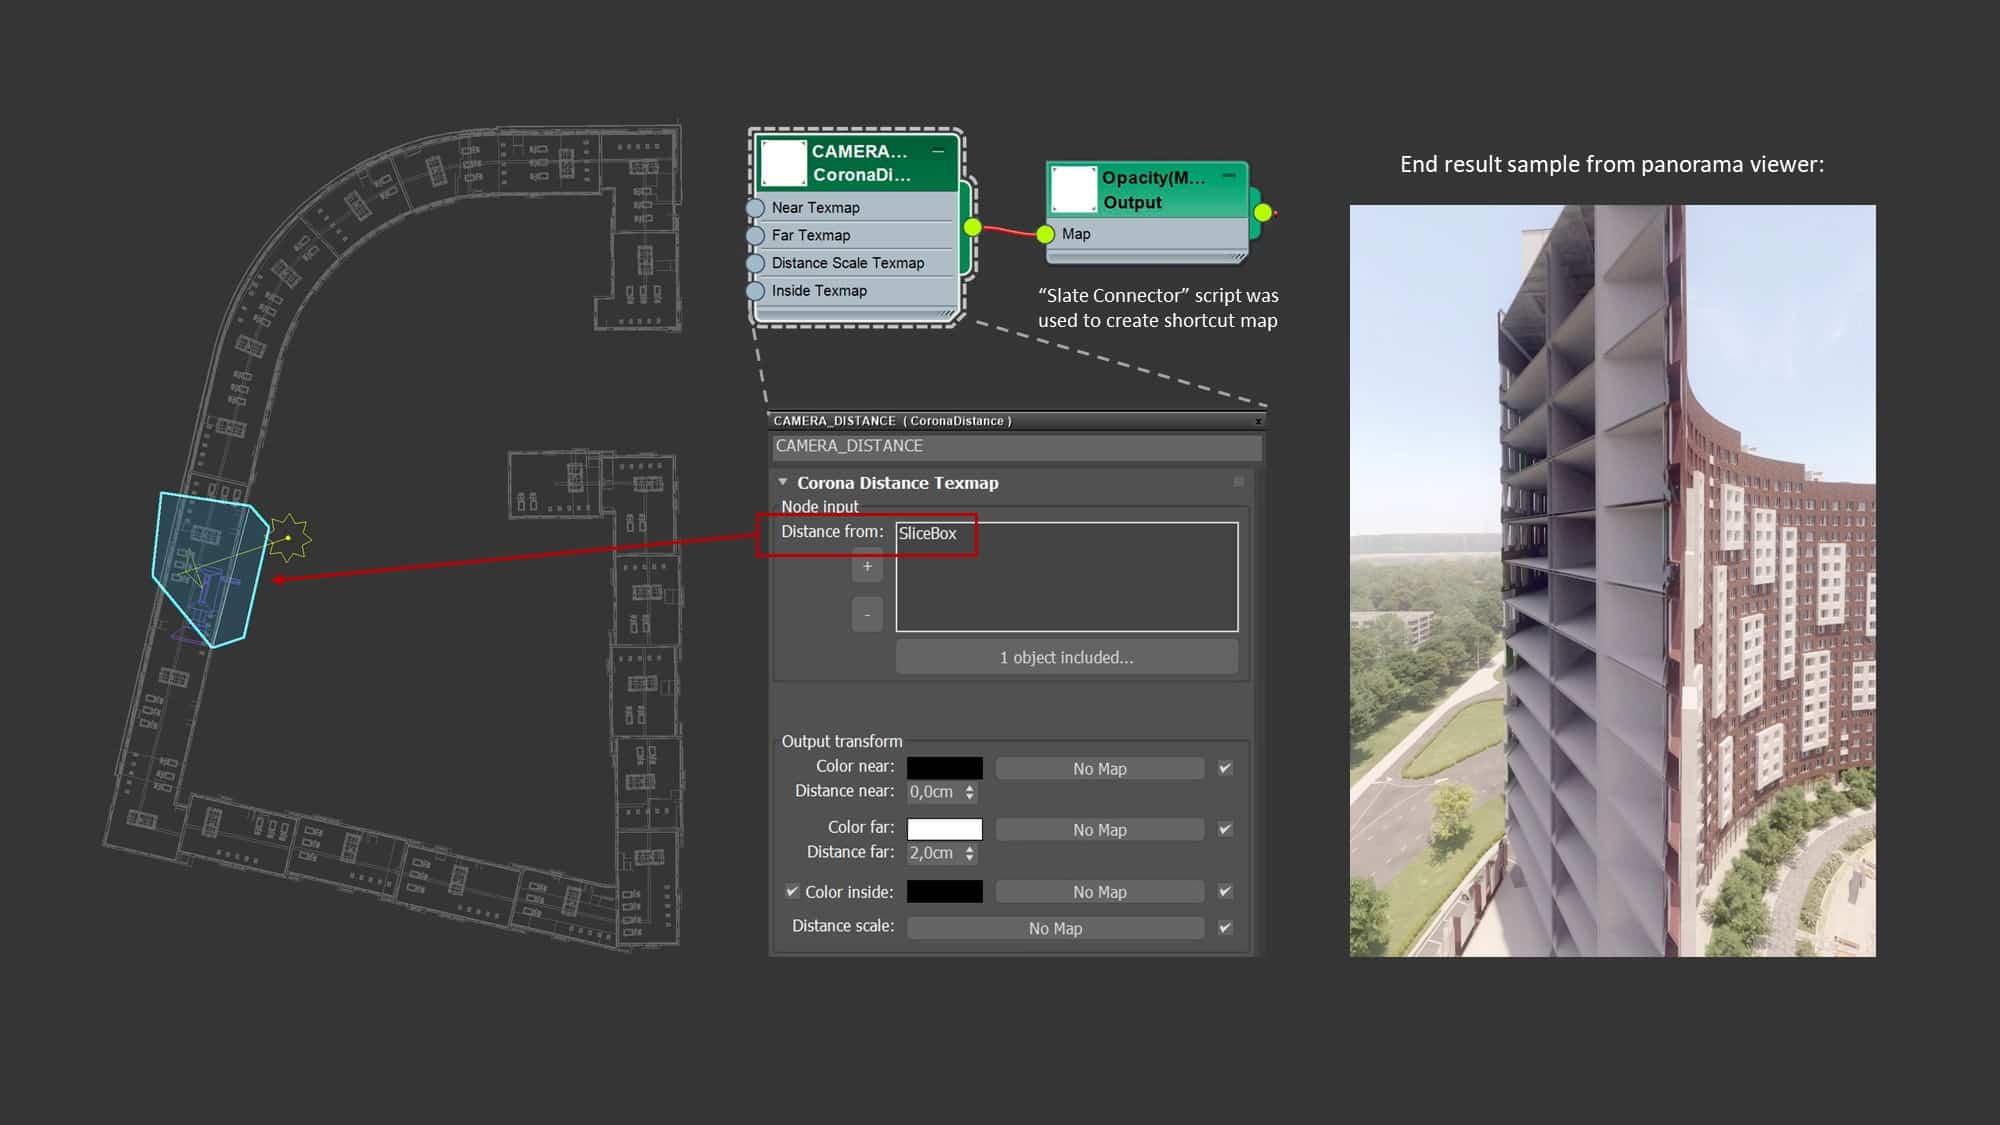
As a result of these operations, we received a sequence of unique window views for this particular apartment layout (“Exterior (LD)” node in Fusion).
Next task is to add window view to the interior shots of this layout. Fusion and some scripting were used to accomplish that. The idea is to use Fusion timeline to automatically merge Sequence 1 (Exterior – series of unique window views) with Sequence 2 (“Interior (LD),” series of interior panoramas).
By using “Loop” for input sequences (Interior, Exterior) and slowing down Exterior sequence relative to Interior we can create common timeline, where Fusion first process whole Interior sequence for first image from Exterior, than for second, third and so on, just like basic mathematical multiplication, e.g. =(28 interior frames x 9 exterior frames). We made a script to calculate by how much we need to slow down the exteriors depending on the numbers of shots in both sequences and to create folders and save corresponding images into them automatically.
That may sound complicated, and it was not easy to get there, but once the process is established, it’s very convenient.
Check the diagrams below for better understanding.
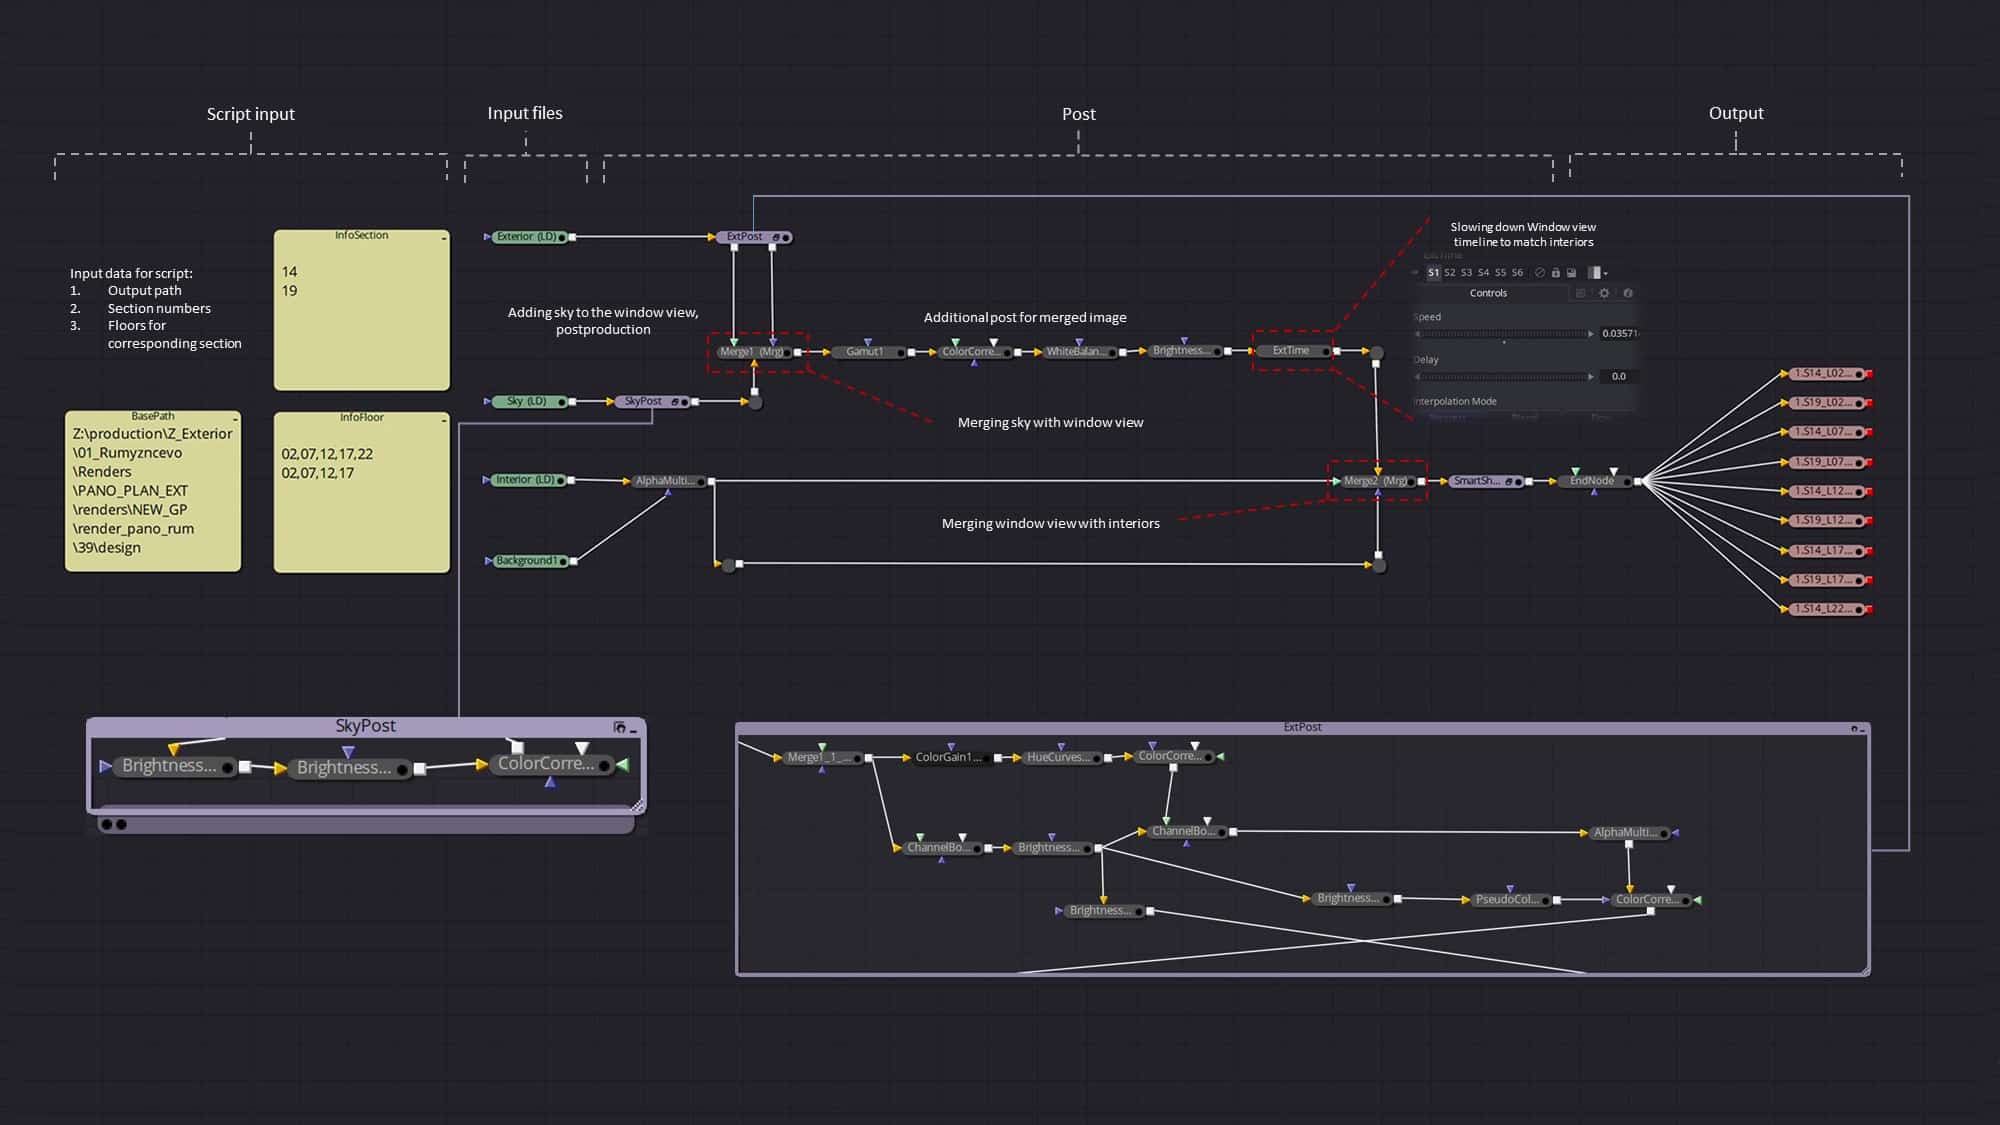
Also, there are some nodes to replace the sky and to make post-production. Since we are using more or less the same lighting for every interior and the same lighting for exterior shots these adjustments can be applied anywhere.
By using this approach, we were able to reduce the task of editing thousands of images to several simple actions:
- Set the camera spline in the exterior scene.
- Wait for the render to finish.
- Choose file paths and input data for the script (import from Excel in our case).
- Enjoy accurate window view for every apartment from this layout!
- Repeat 87 more times for every layout in the project.
Post Production
There are some things to keep in mind when it comes to post-production.
First, from a purely technical point of view, there are minimal limitations for image editing when we speak about Cube Maps. Sure, any edits on the seams of a panorama will result in strange artifacts inside the tour (that’s why vignetting in 3d max is a no-no). However, by creating some node systems in Fusion, Nuke, Natron and like it’s not that difficult to deal with that. The idea is to break panorama into six separate images, add an effect and then merge them back.
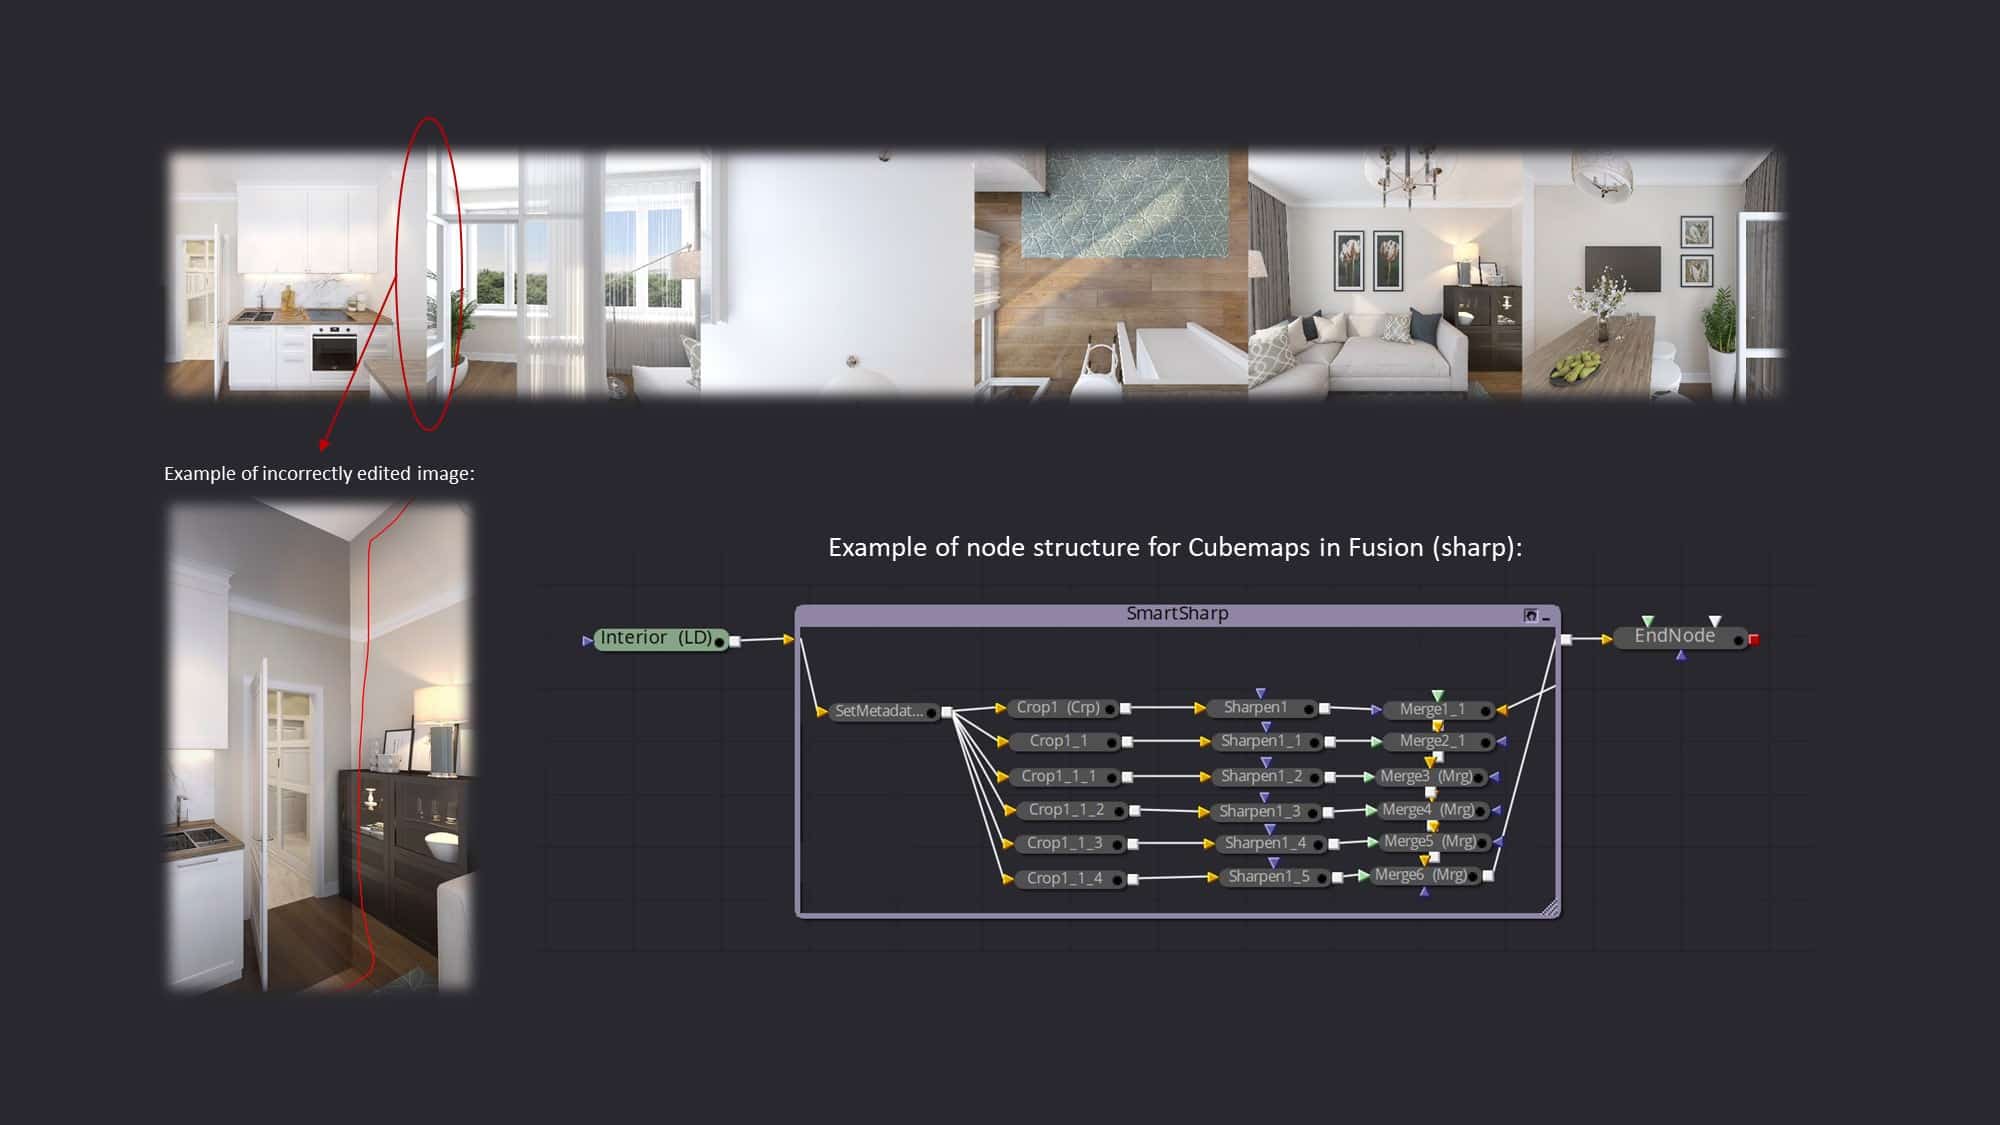
Second, to achieve a natural look in a tour every frame from a single object should have roughly the same visual adjustments. It is just a matter of common sense – if there is a bright sun in a kitchen, there should be no moonlight in the adjacent room, unless you want to create an utterly surreal experience. The editing process is very similar to video editing. This is why editors mentioned above are so convenient to process number of images simultaneously.
Other than that postproduction is not too different from any everyday workflow. For promotional materials (like Rumyantsevo) we keep things simple with only basic sharp, contrast, color and balance corrections.
More final images.
That’s it! Once we have all the assets, we can assemble the tour and finally, generate links to embed the tour into the customers or public website. It’s not that different from integrating YouTube video or other embedded media content.


Hopefully, it was interesting reading for you and see you in the comments section!


That’s a massive one. Kind of my nightmare project in which I underestimate the cost of the single panorama and have that reminded hundreds of times.
Thank you for showing us a lot of clever ideas. What are your main reasons for differentiating your workflow between corona (exteriors) and v-ray (interiors)?
Historically we have different people working with interiors and exteriors. It is up to them to decide whether it’s more convenient to use VRay or Corona. In fact, we can use any render and modelling software for asset production, there is no difference for our engine, it’s just the matter of personal taste.