


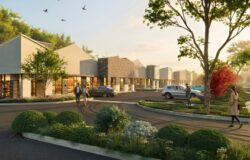


Making of Oak Pass House
Today I’m happy to share with you the Making of Best of Week 18/2017 – “The Oak Pass House” by Ján Morek. This one is unique, being an amazing recreation of the house and done fully in Blender, using blender tools, plugins, and scripts. Furniture aside, all was made by Ján, and so represents what one can do in the Blender ecosystem.
Introduction
Hi,
My name is Ján Morek. I am 25 years old, and I come from Slovakia.
First, I want to say that I am pleased that thanks to Ronen I can share the experience from this project with you. Working on it was a joy, and I hope that this MAKING OF will be interesting and helpful for you. The project was created in Blender, rendered in Cycles with very gentle post production I made in Photoshop.
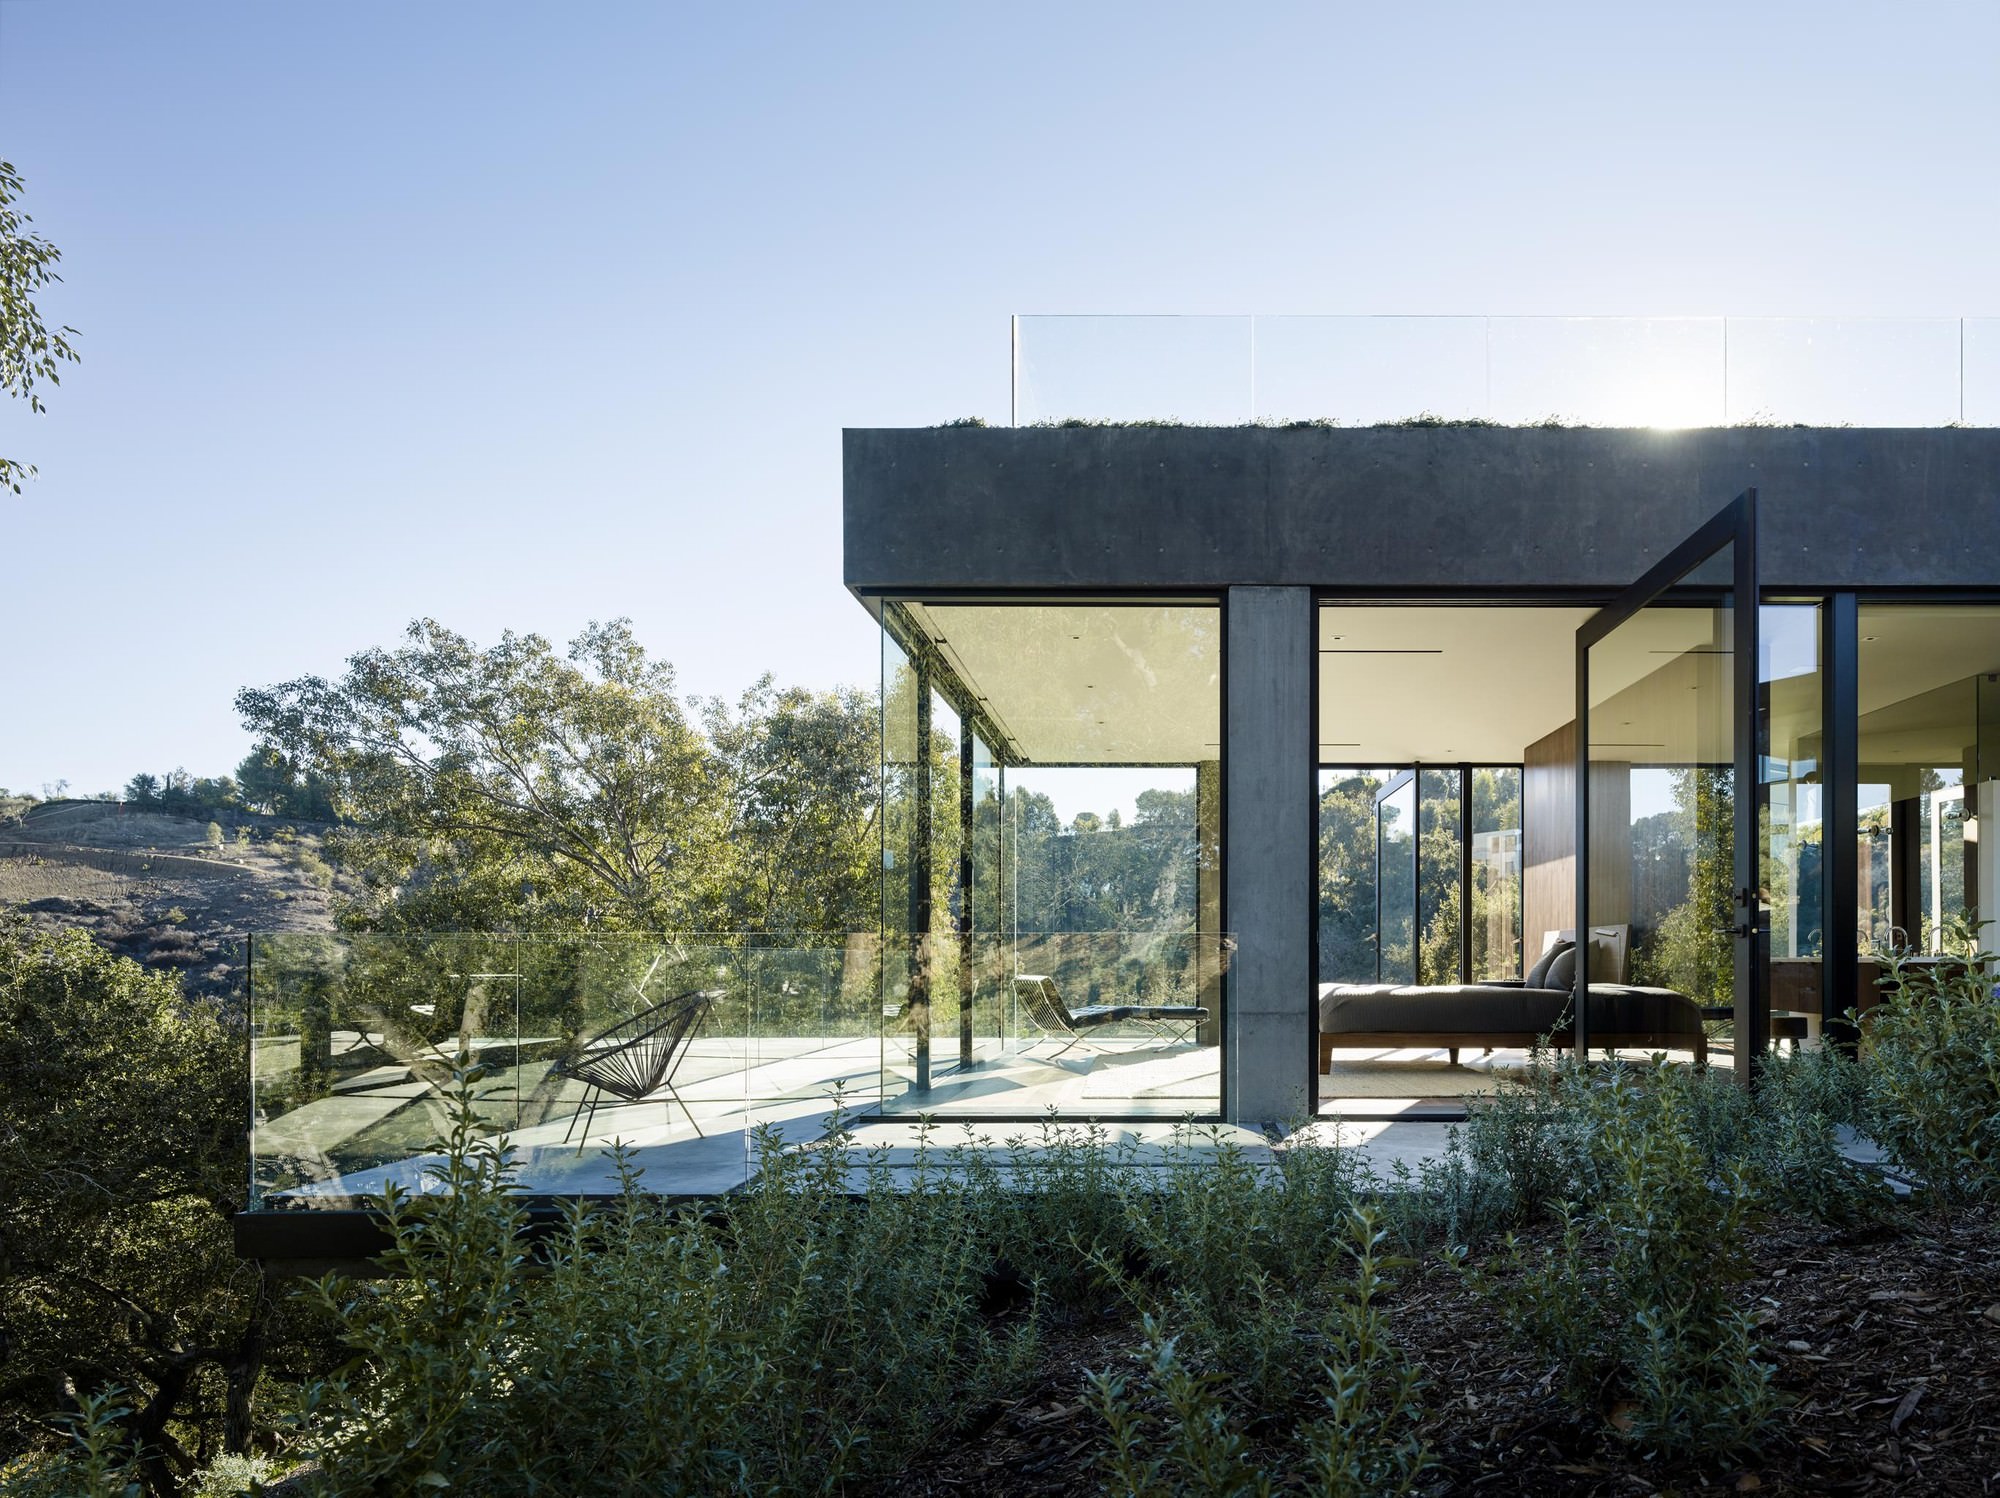
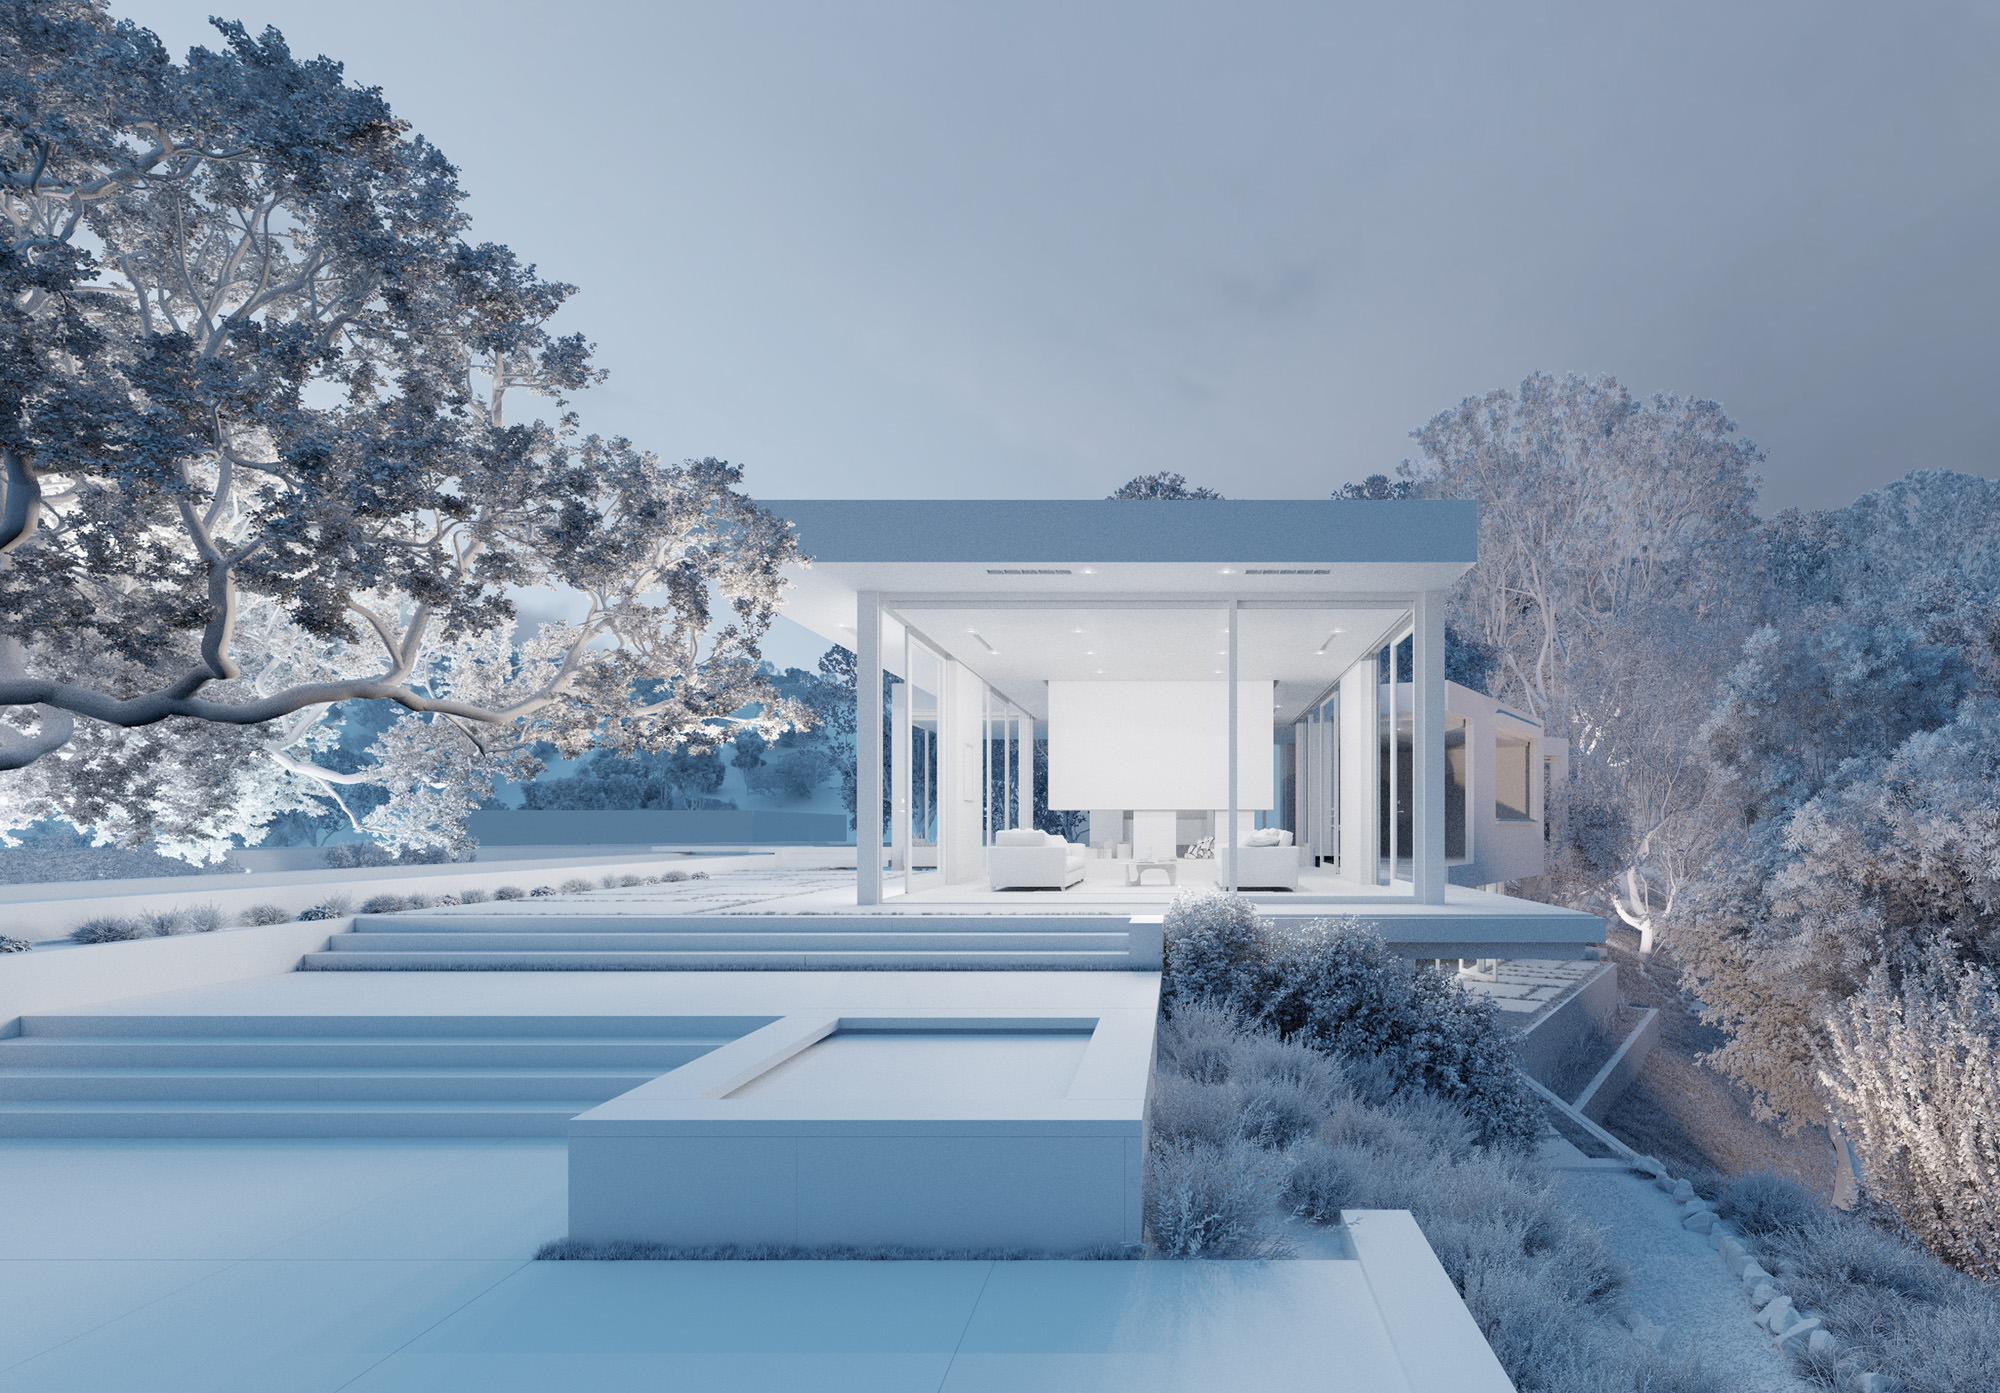
Original shot by Masao Nishikawa – “Beverly Hills House”
The Story Behind the Project
More than a year ago I was without a job, so I decided to do a personal project which will make me famous and rich 🙂
I spent some time searching on Archdaily and found photos of this beautiful house. The name of the project is Oak Pass House by Walter Workshop architects.
The reason I chose this project is that the pictures I saw looked like something that I can´t create in 3D, it was just out of my range. Trees, bushes, plants… all high poly models full of details. At that time, I had no idea how I can manage such complex scene and fit all this geometry and textures into my graphic card memory (6GB).
It sounds crazy, but I needed a challenge because I knew that if I try to make it as realistic as possible, I will learn a lot of new skills and create something special what moves me forward.
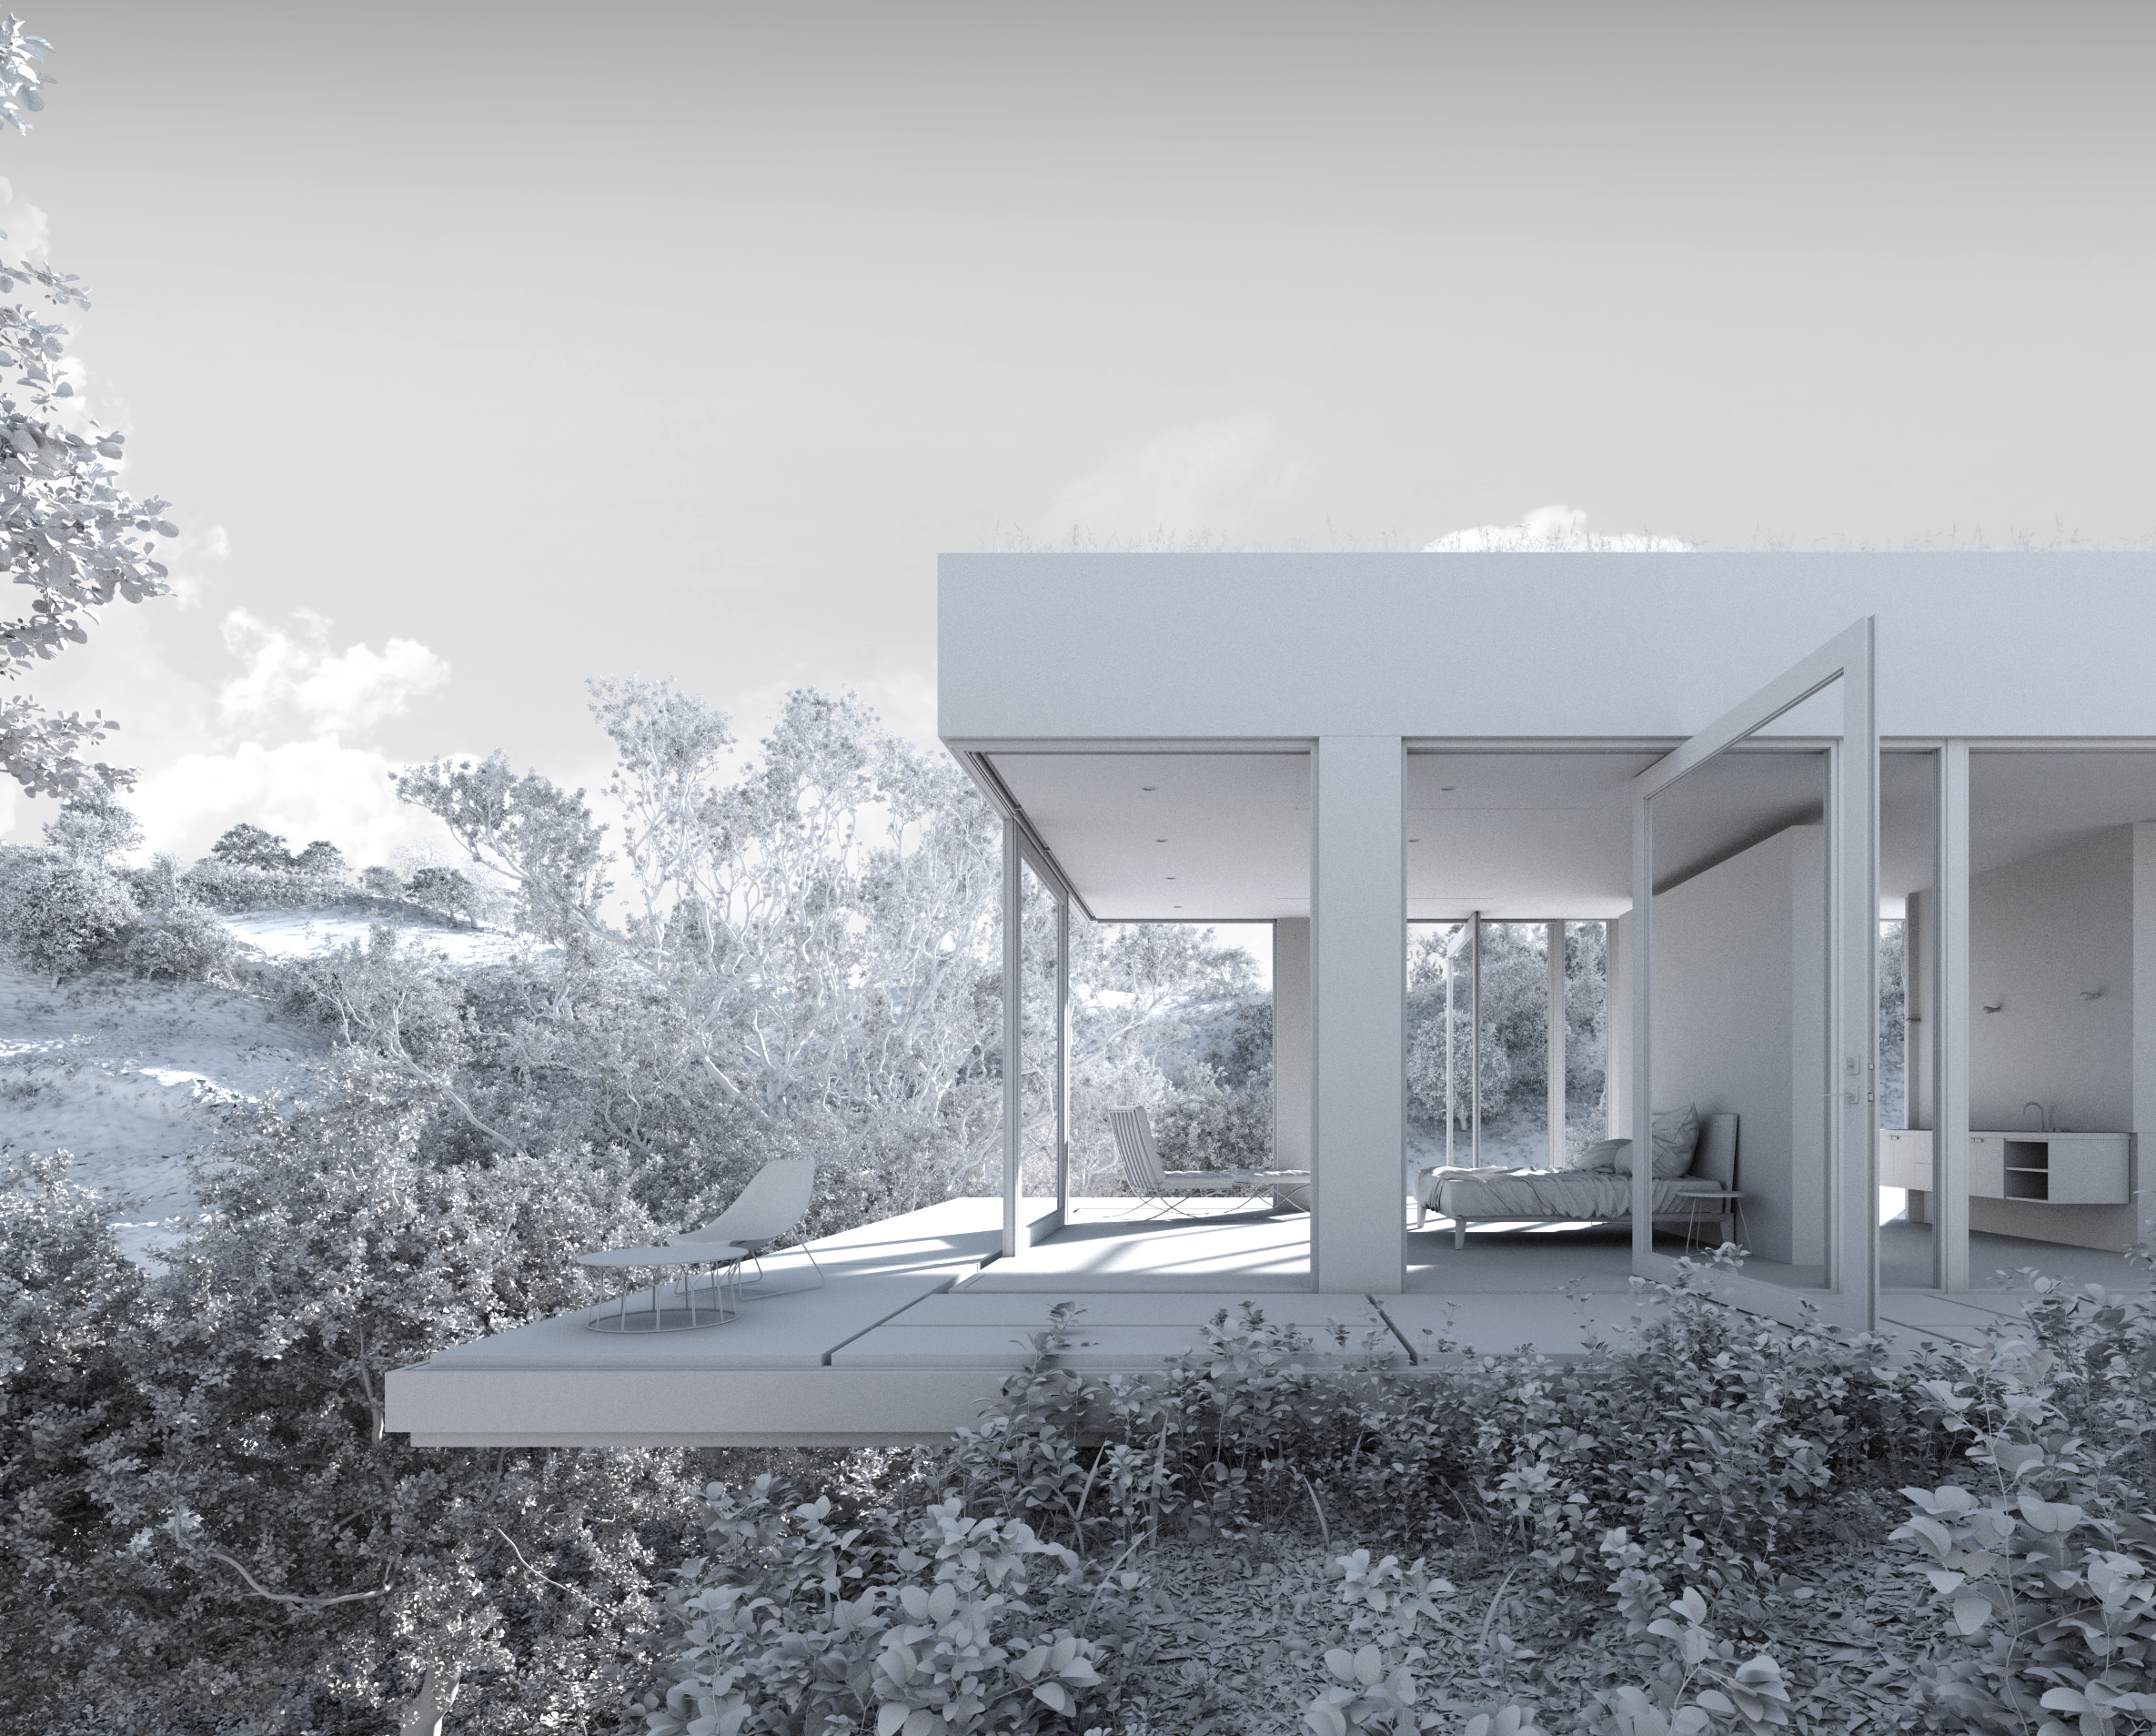
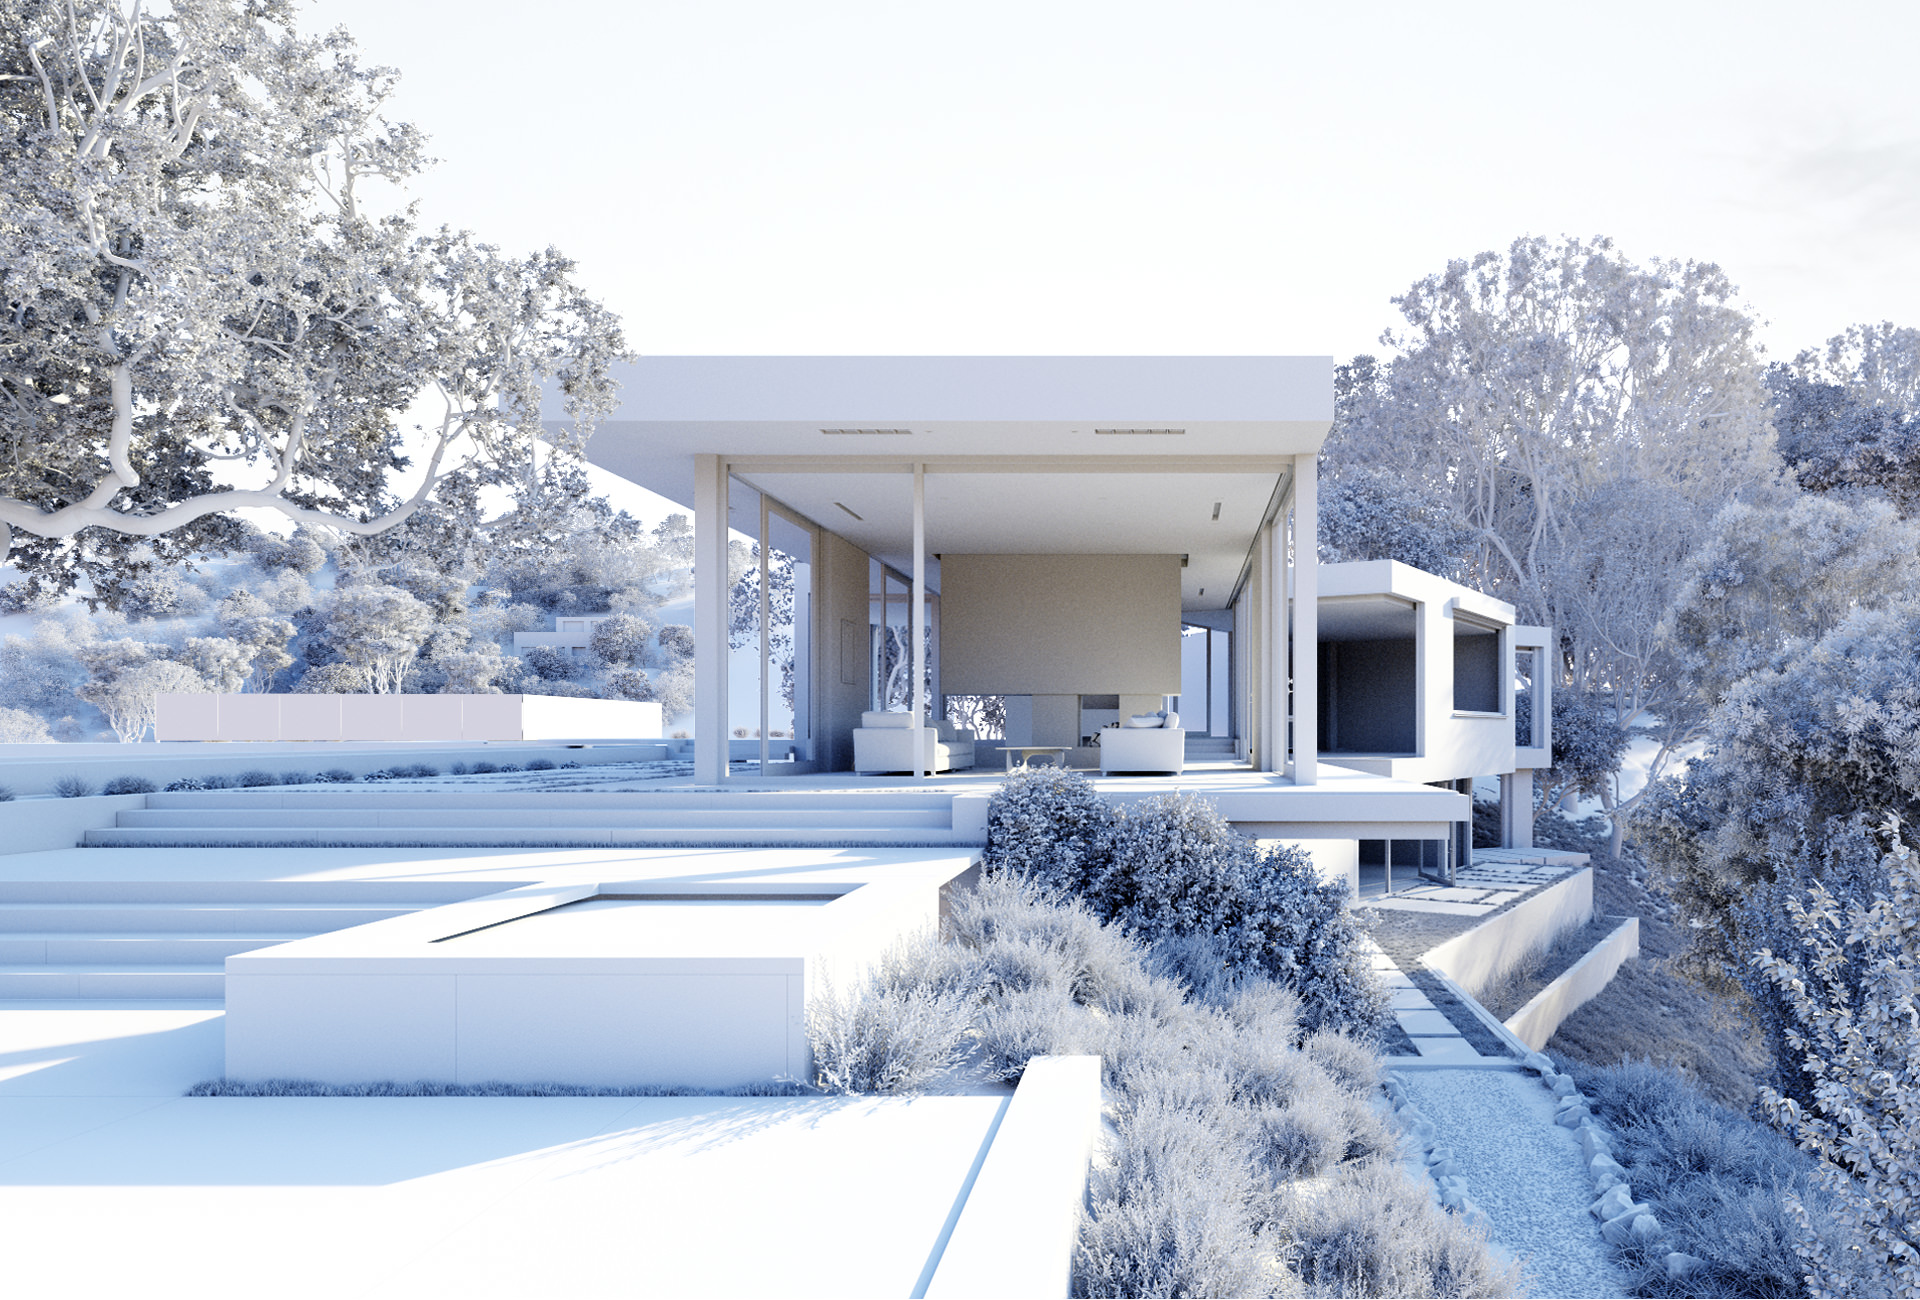
The clay render
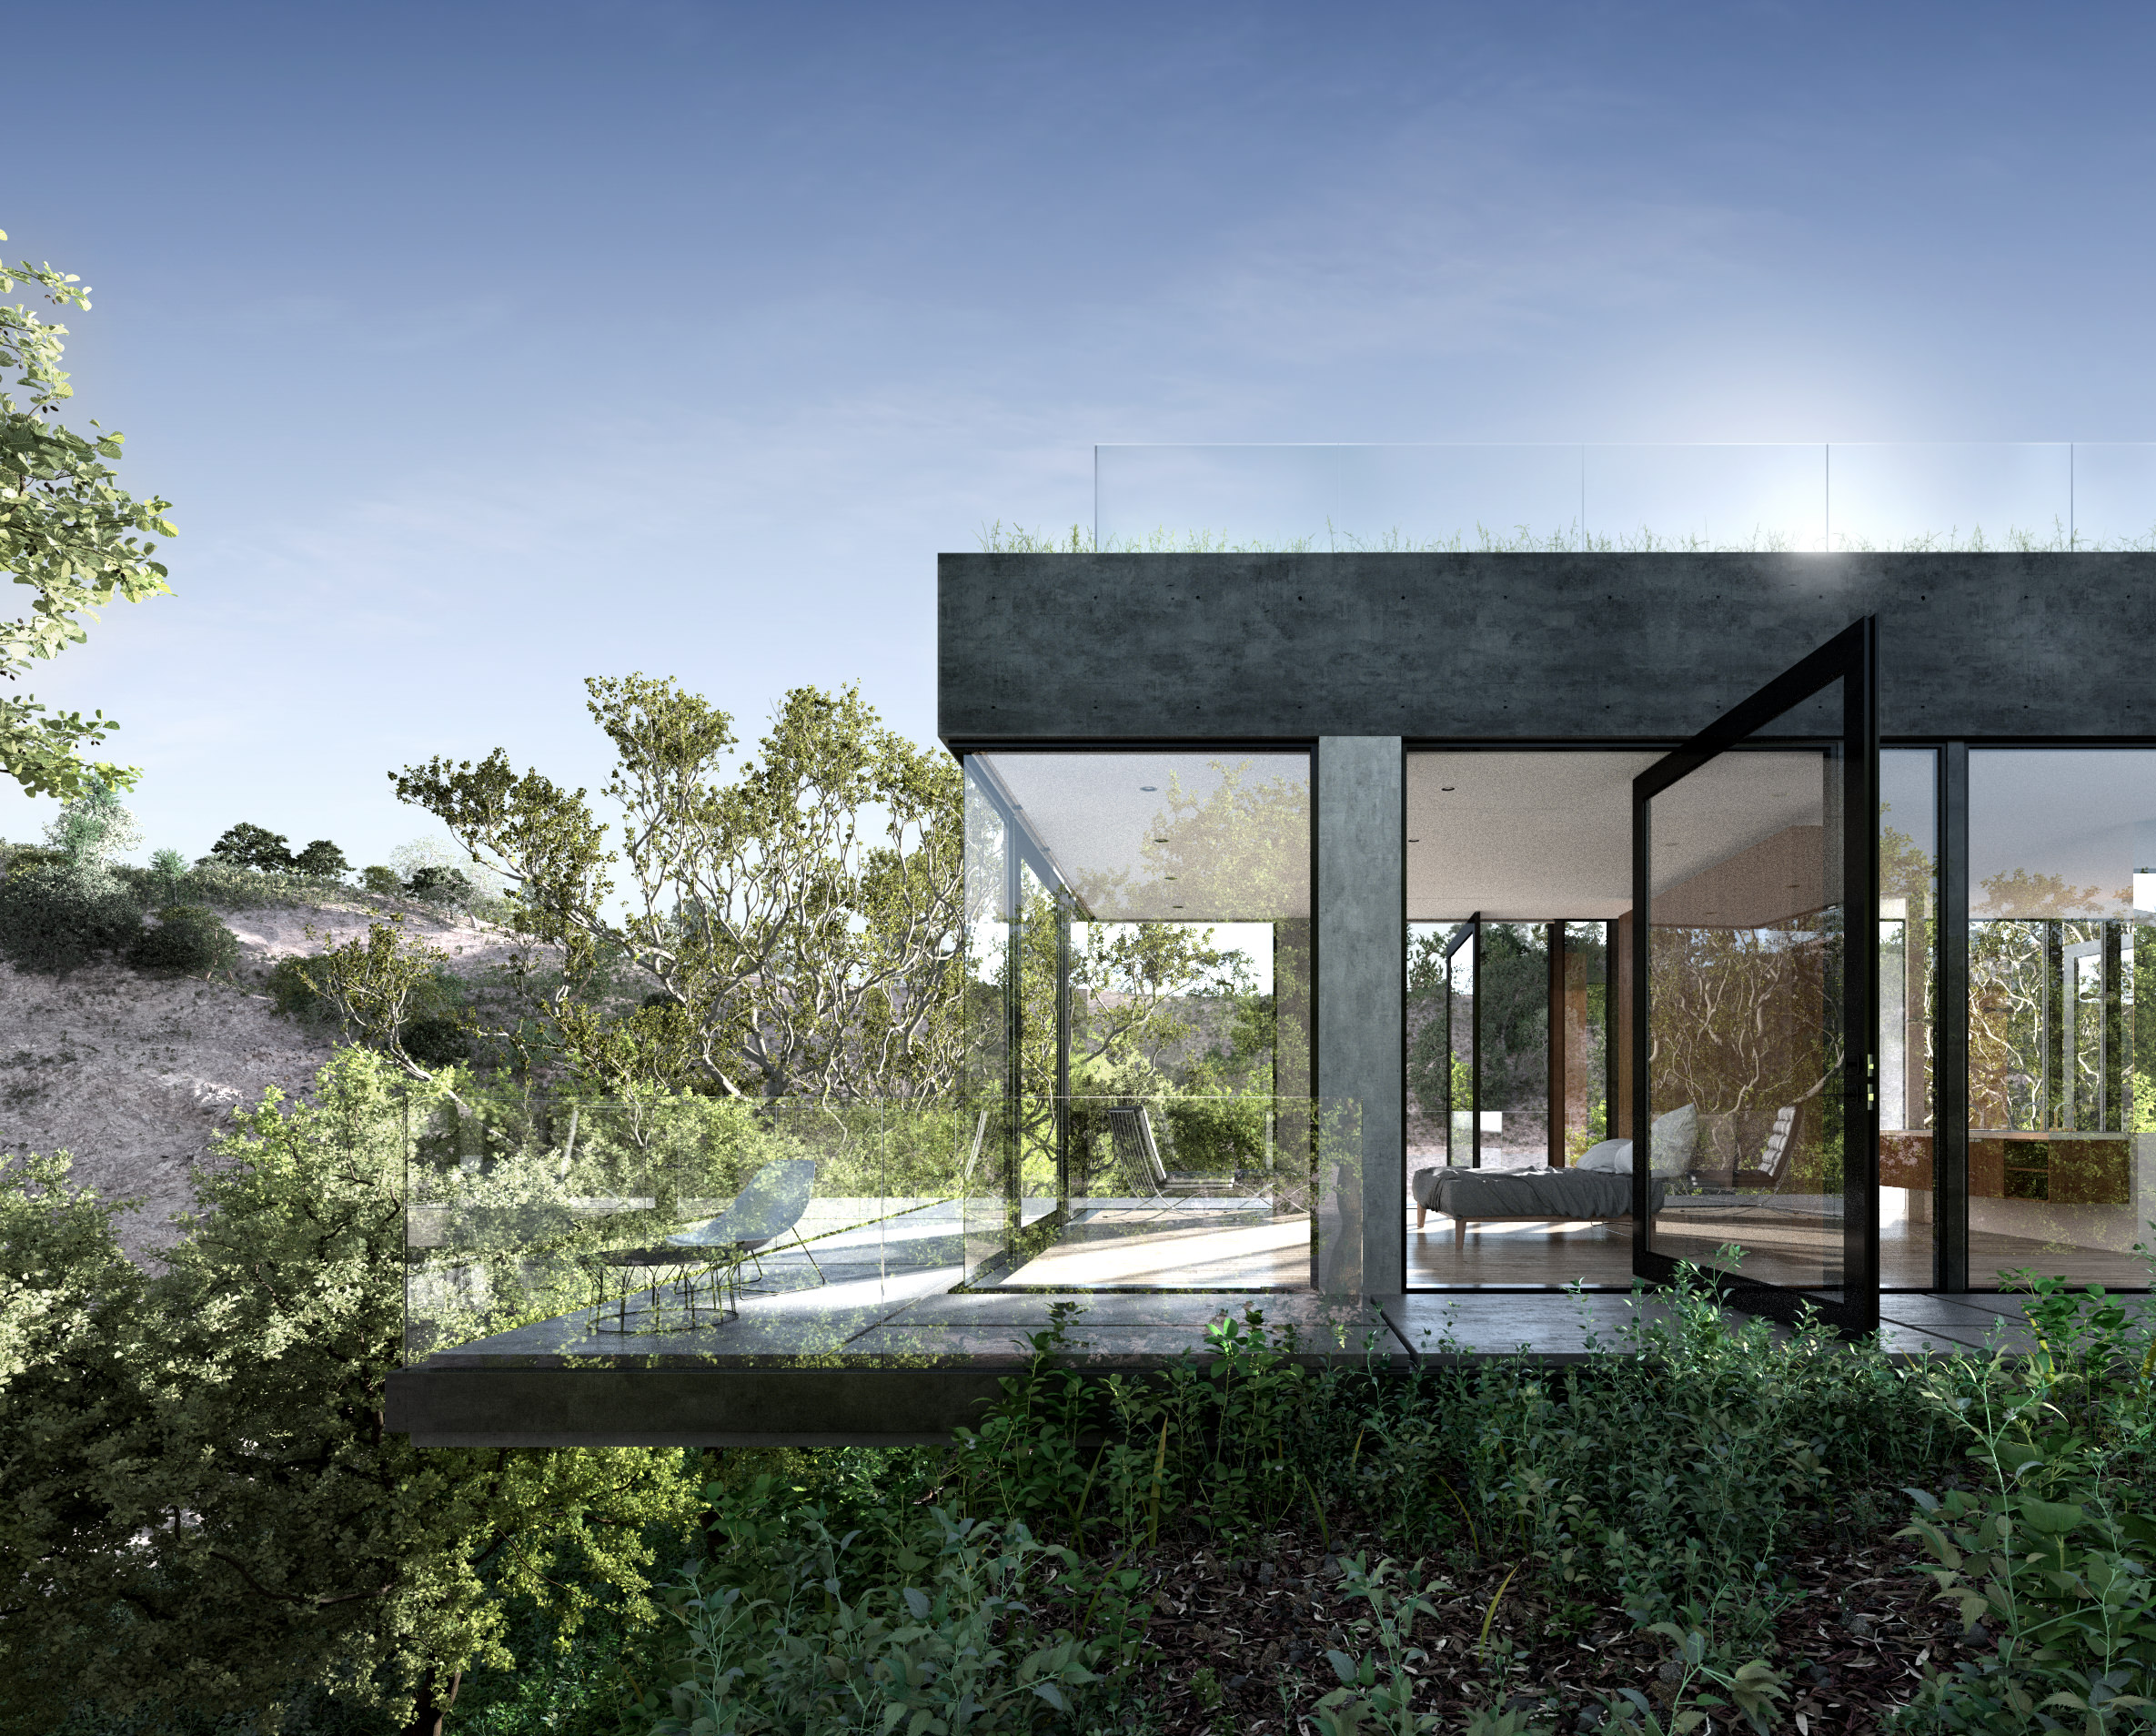
Final render in the first round
So the image above was created at that time.
I didn’t become rich and famous 😉
However, I did learn tons of new stuff!
Later I got some commissions, bought a better computer and one year later I decided to continue with this project and reproduce another photo of this great house using Blender.
This article is about how I did it.
A TIP : When you are facing a very complex problem, try to divide it into the smallest parts possible and concentrate on each of them separately. It’s hard to solve a complicated problem at once, but it is easy to solve a lot of simple tasks.
3D Modeling
I started building the scene in the simplest way possible, from rough blocks to detailed geometry. When I’m modeling something, I always think about the way it created in real life.
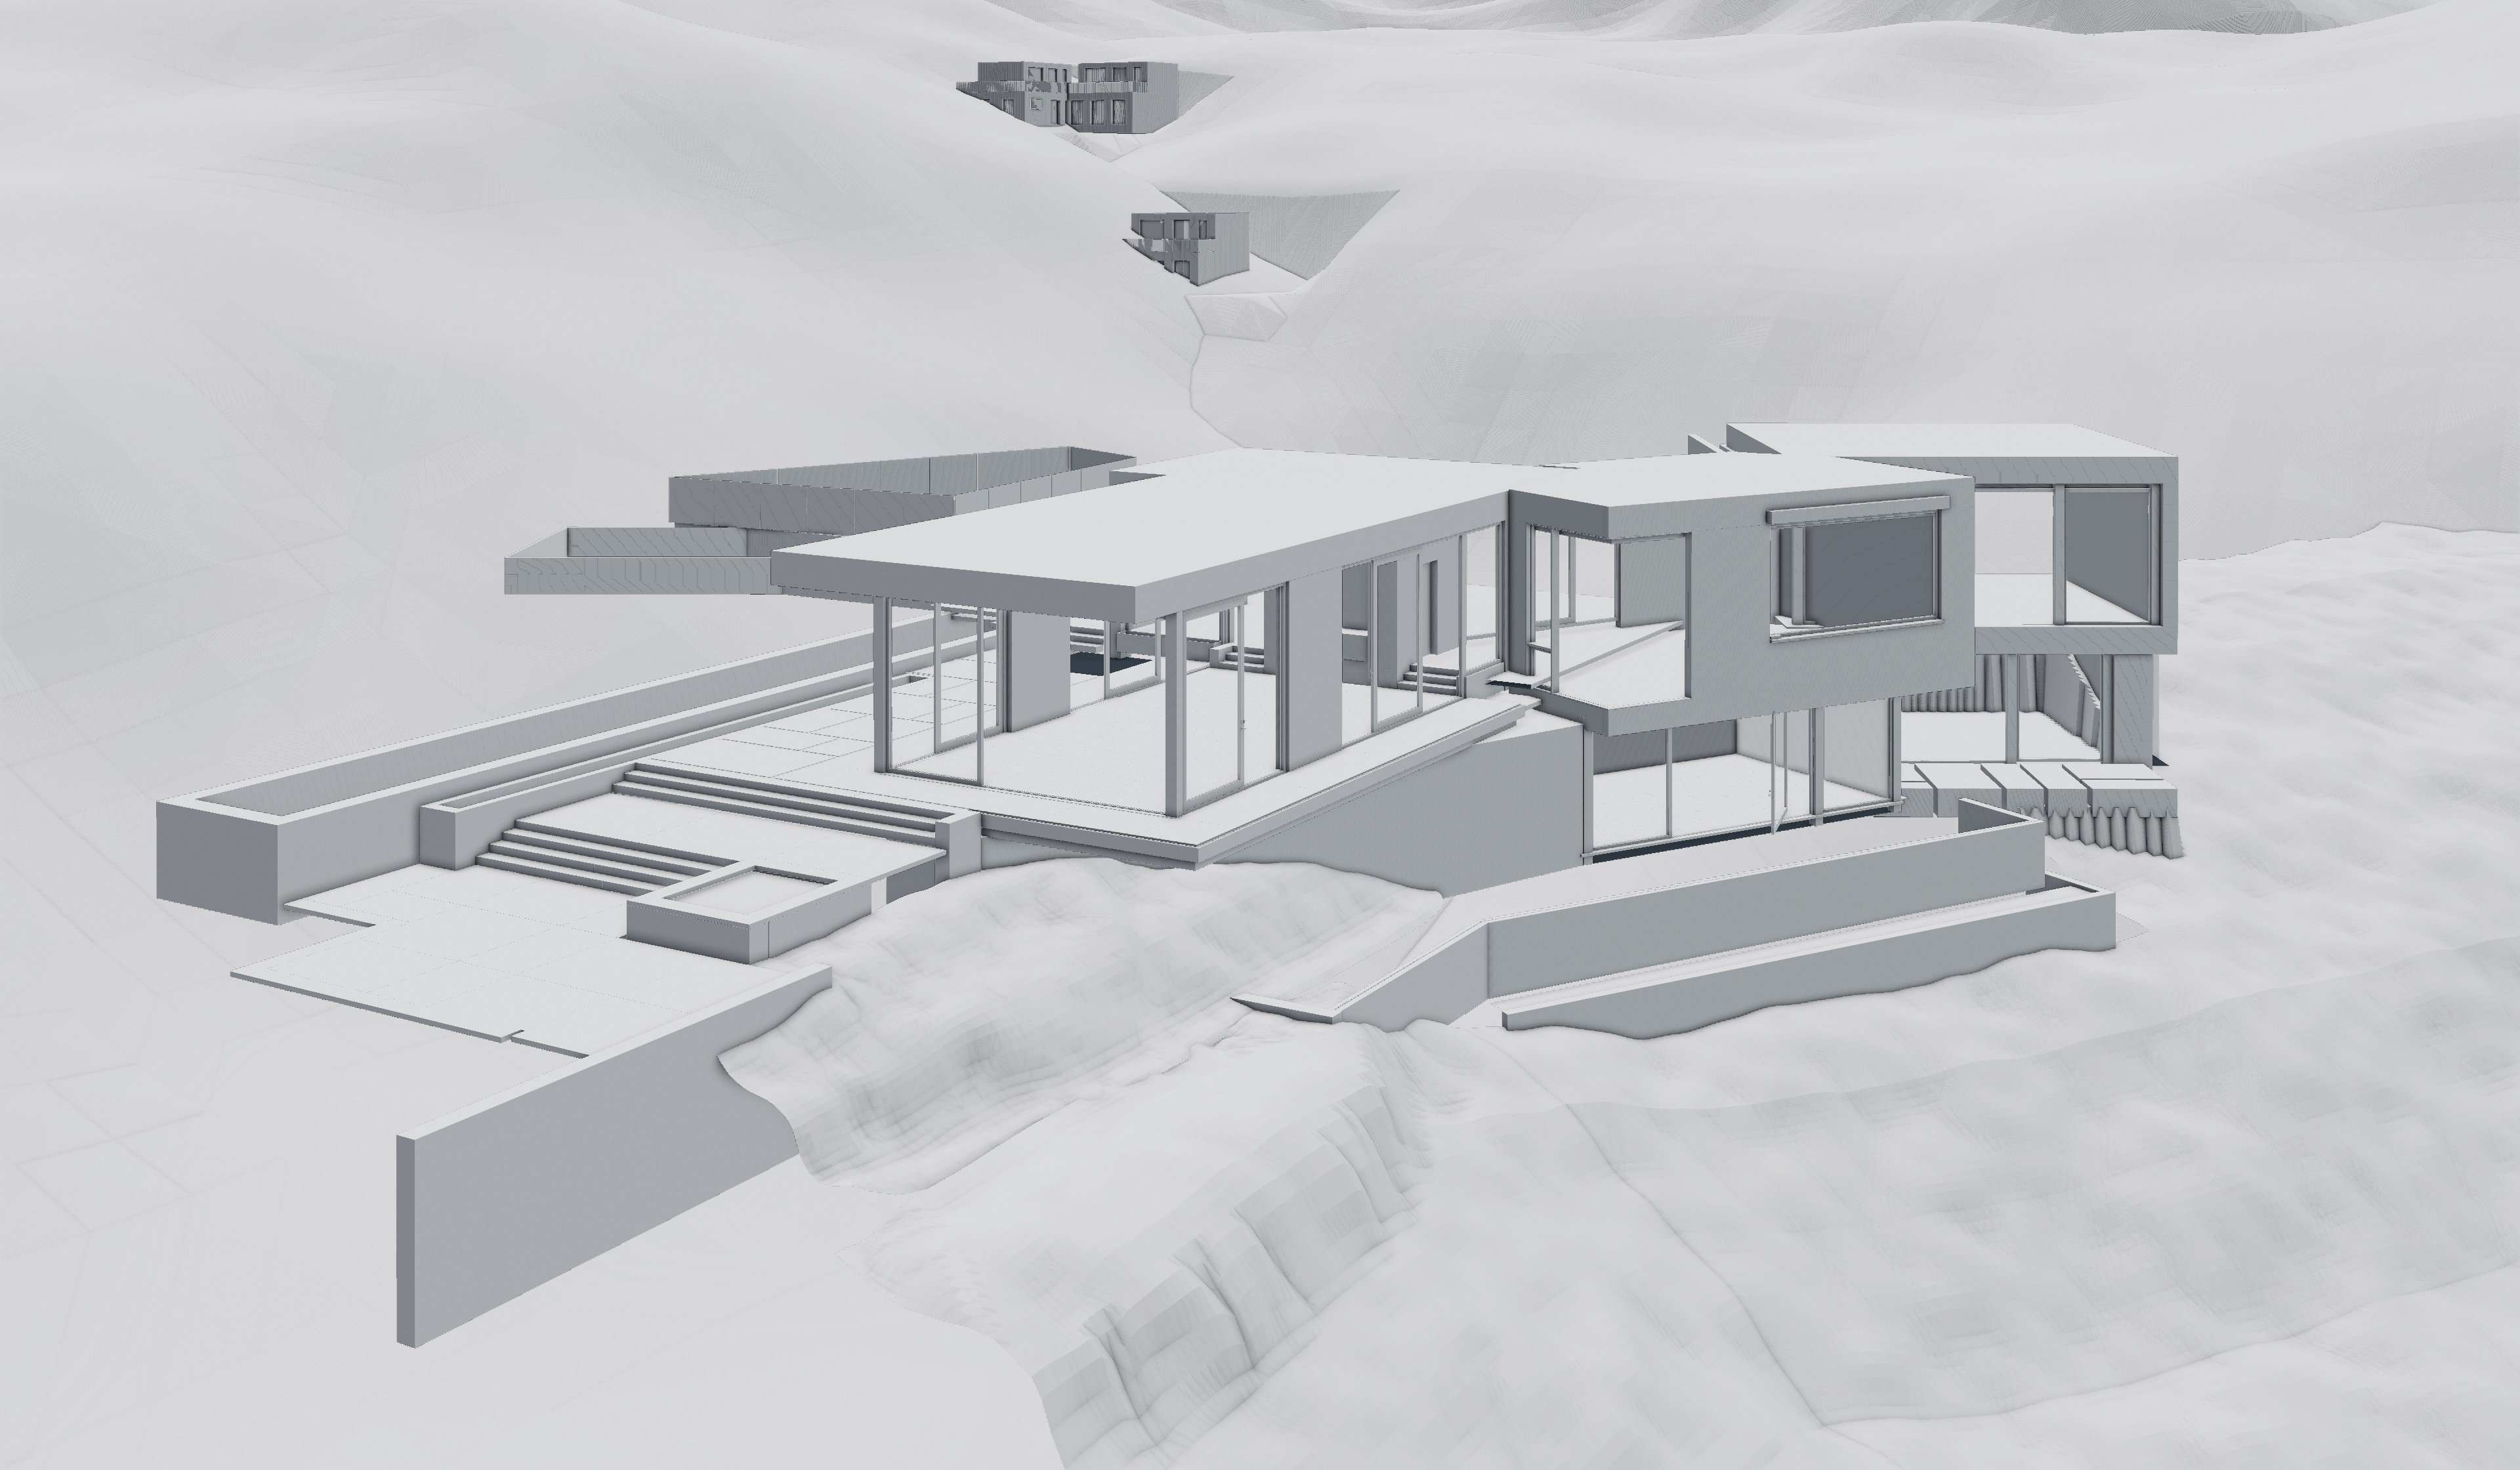
3d model of Oak Pass House
How carpenter make a chair or bricklayer build a house, and I try to imitate that process. At first, I operate just with the most basic representations of objects, and then I increase the complexity and details.
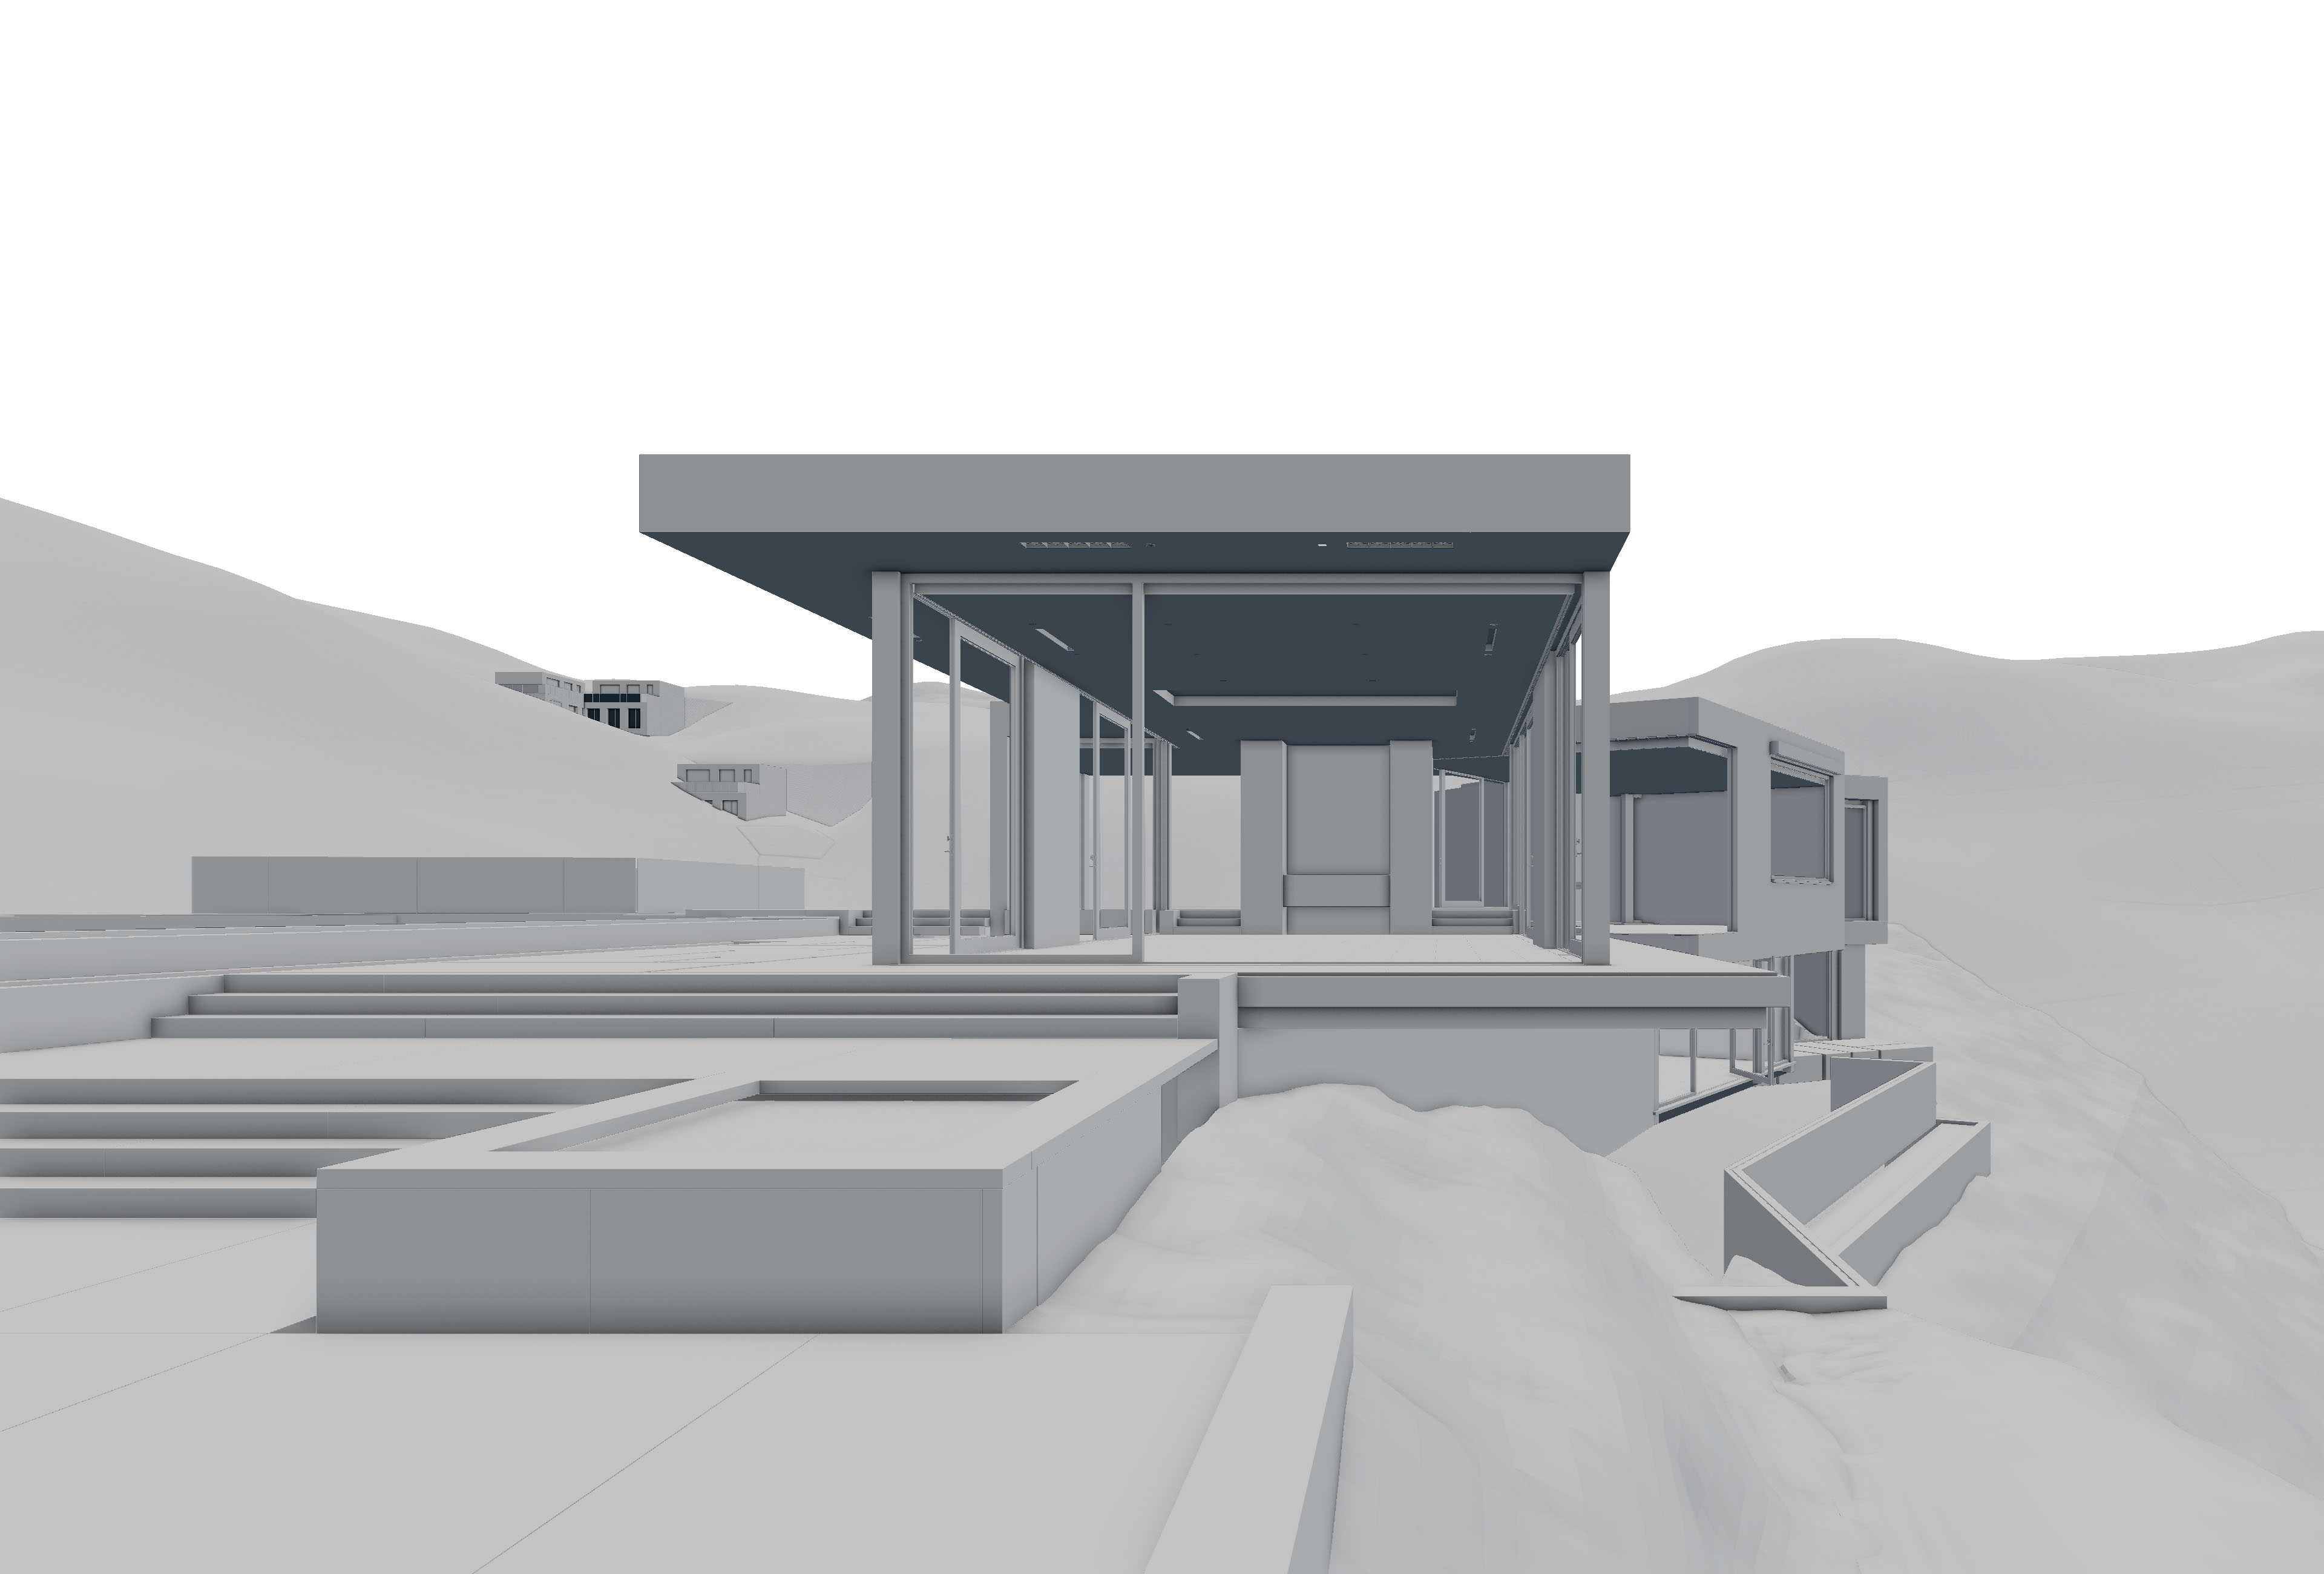
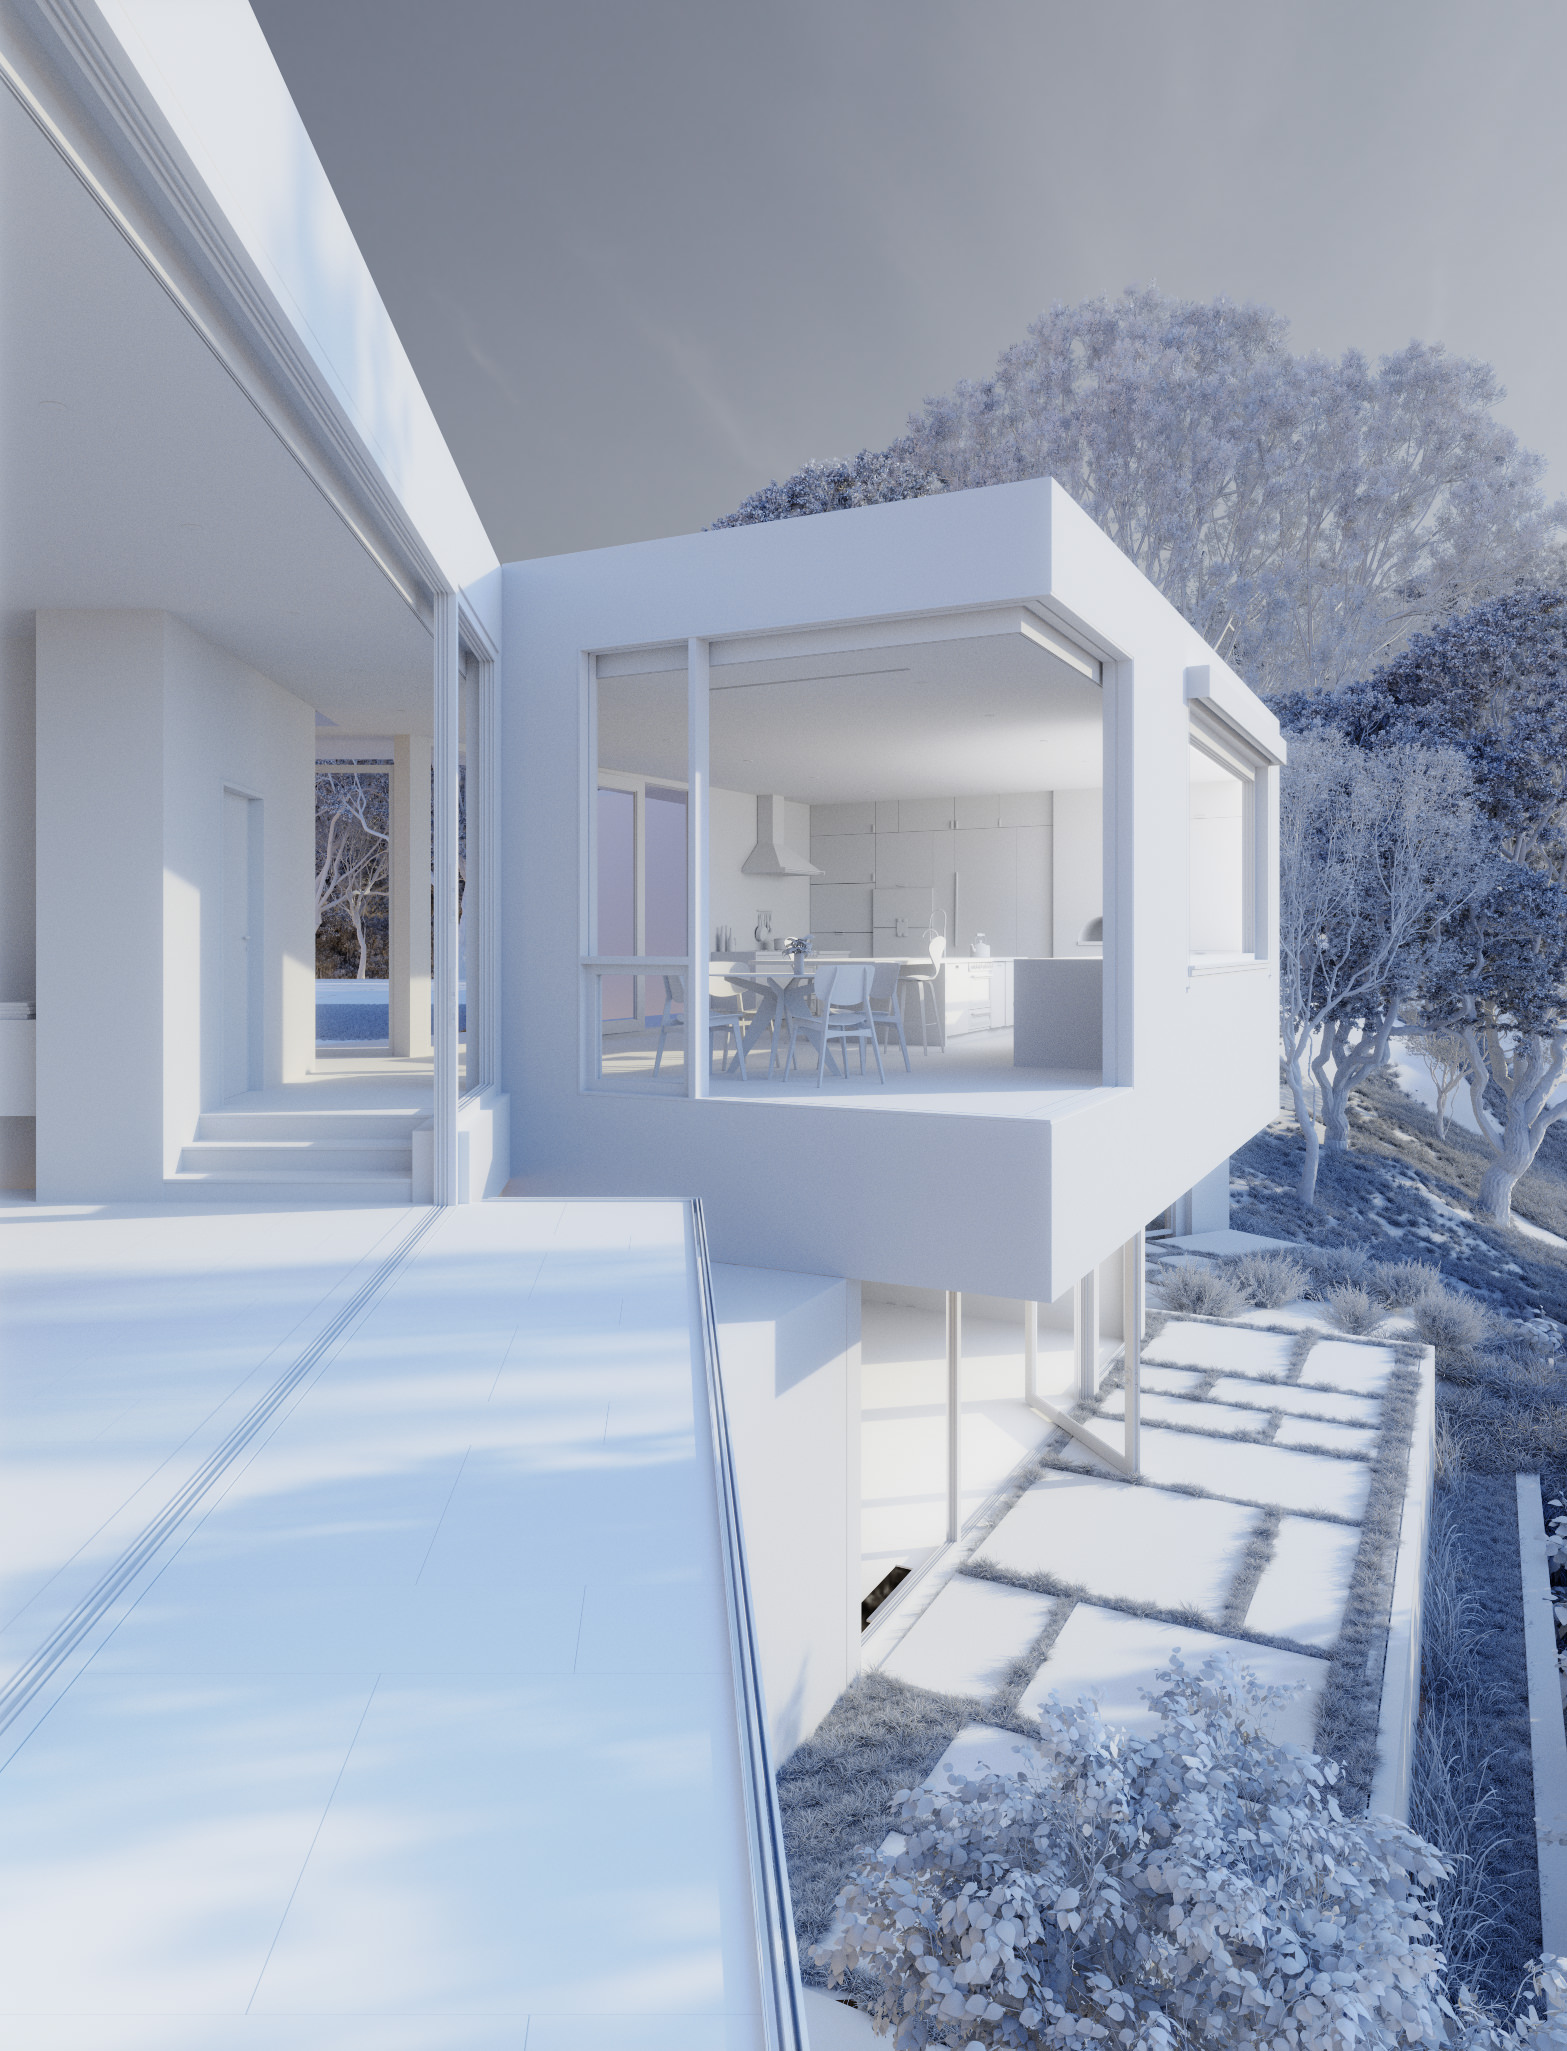
The Oak Pass House 3d model as seen through the camera
In this case, the model creation was straightforward.
It was just extruding and moving vertexes around, nothing special.
For modeling in Blender I suggest you read these articles, posted here on the blog as well :
- Making of Vertical Garden with Blender
- Making of House Breukelen with Blender
- Making of 93 Tram with Blender
I modeled the building according to blueprints, which I also found at Archdaily. I was not trying to be 100% precise, some parts were adjusted, or I made a guesstimate if necessary.
A TIP : Blender has a great addon called Layer management, but is disabled if you use default settings. Jump to the user preferences CTRL+ALT+U and in add-ons section activate this feature. It helps you keep the scene tidy so that nothing will disturb you and you can focus on creating great art.
Texturing
Some artists model all of the objects in the scene in the beginning and then they texture them and create materials. I do it continuously after I finish parts of the model.
For unwrap I use mostly the function Smart UV Project, and then I position UV islands on the texture in the image editor.
A TIP : Don’t forget to apply scale before you unwrap (CTRL+A). This way you will avoid problems with stretched UV islands.
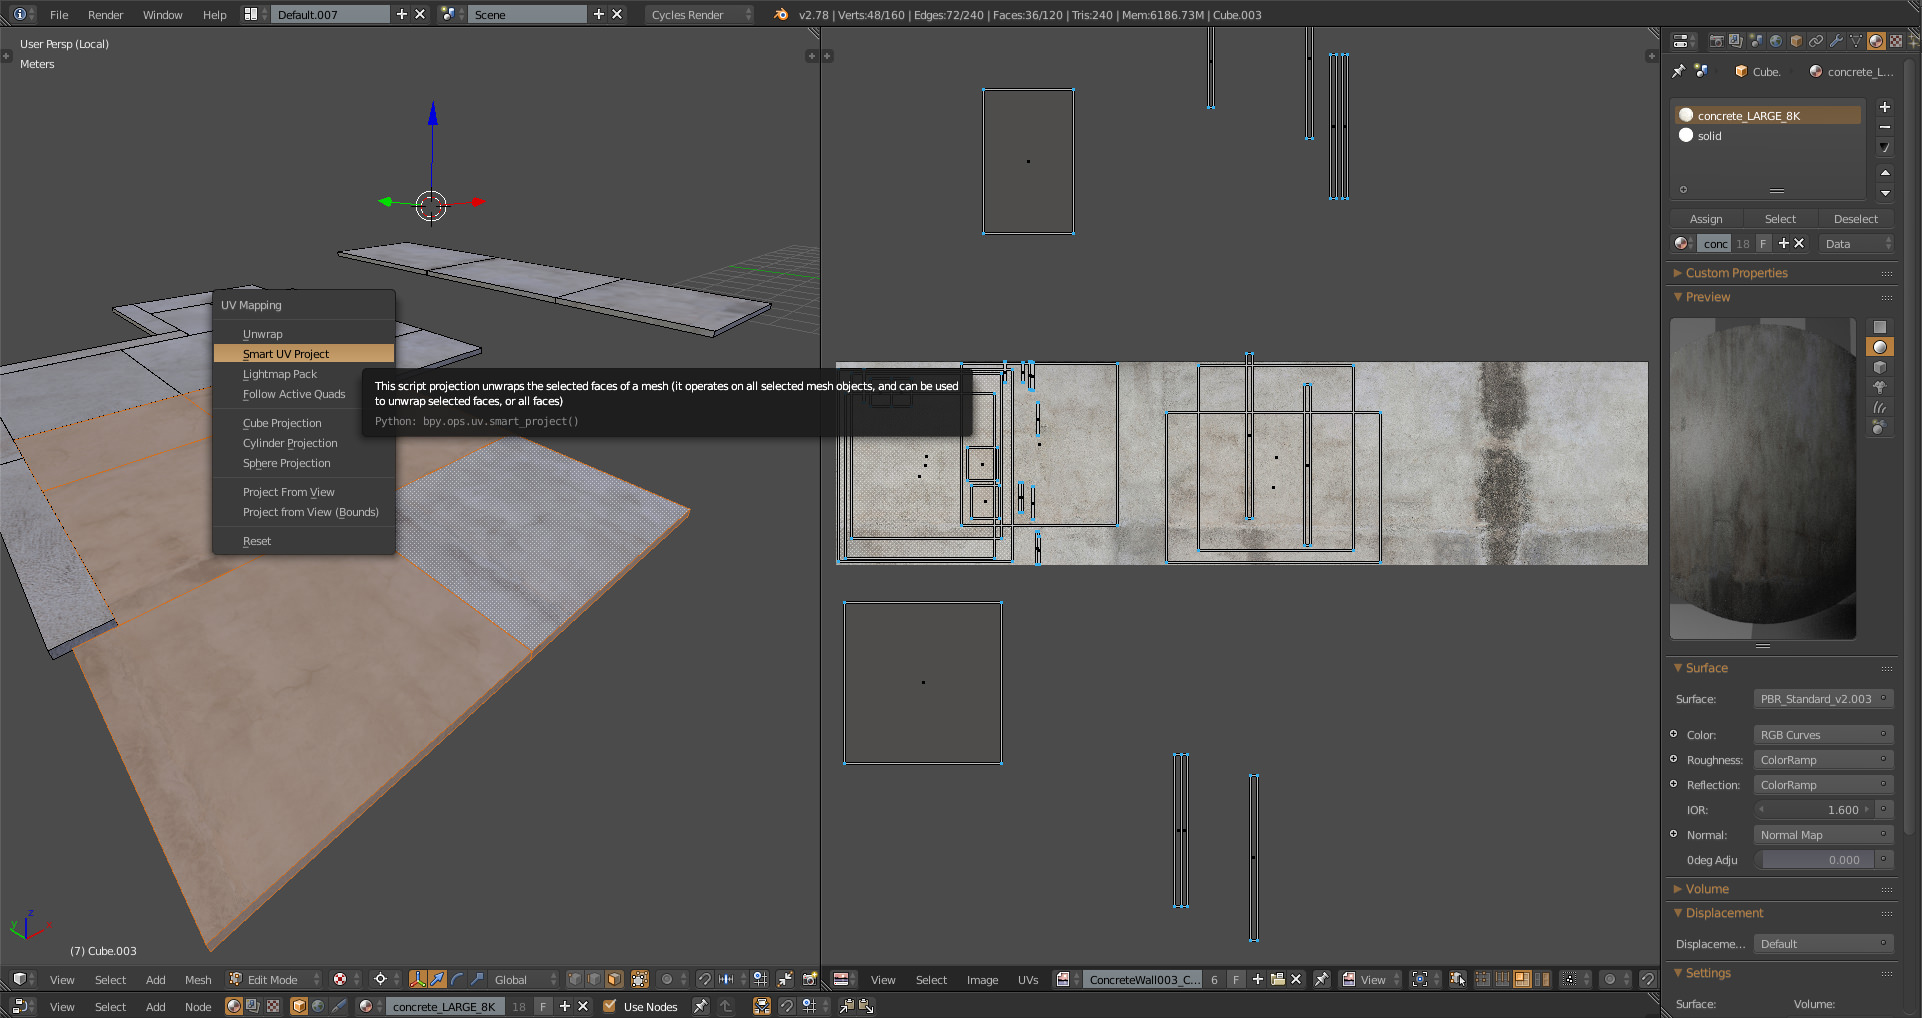
Unwrap with Smart UV Project
Materials
The fundamental principle of the materials I use consists of PBR node group by BlenderBRIT
Into this node group, I connect PBR textures, which I often adjust and edit using RGB node, Color ramp or Hue and Saturation node.
I love the node based process of creating materials because it gives me absolute freedom. However, I try to keep node setup as simple as possible.
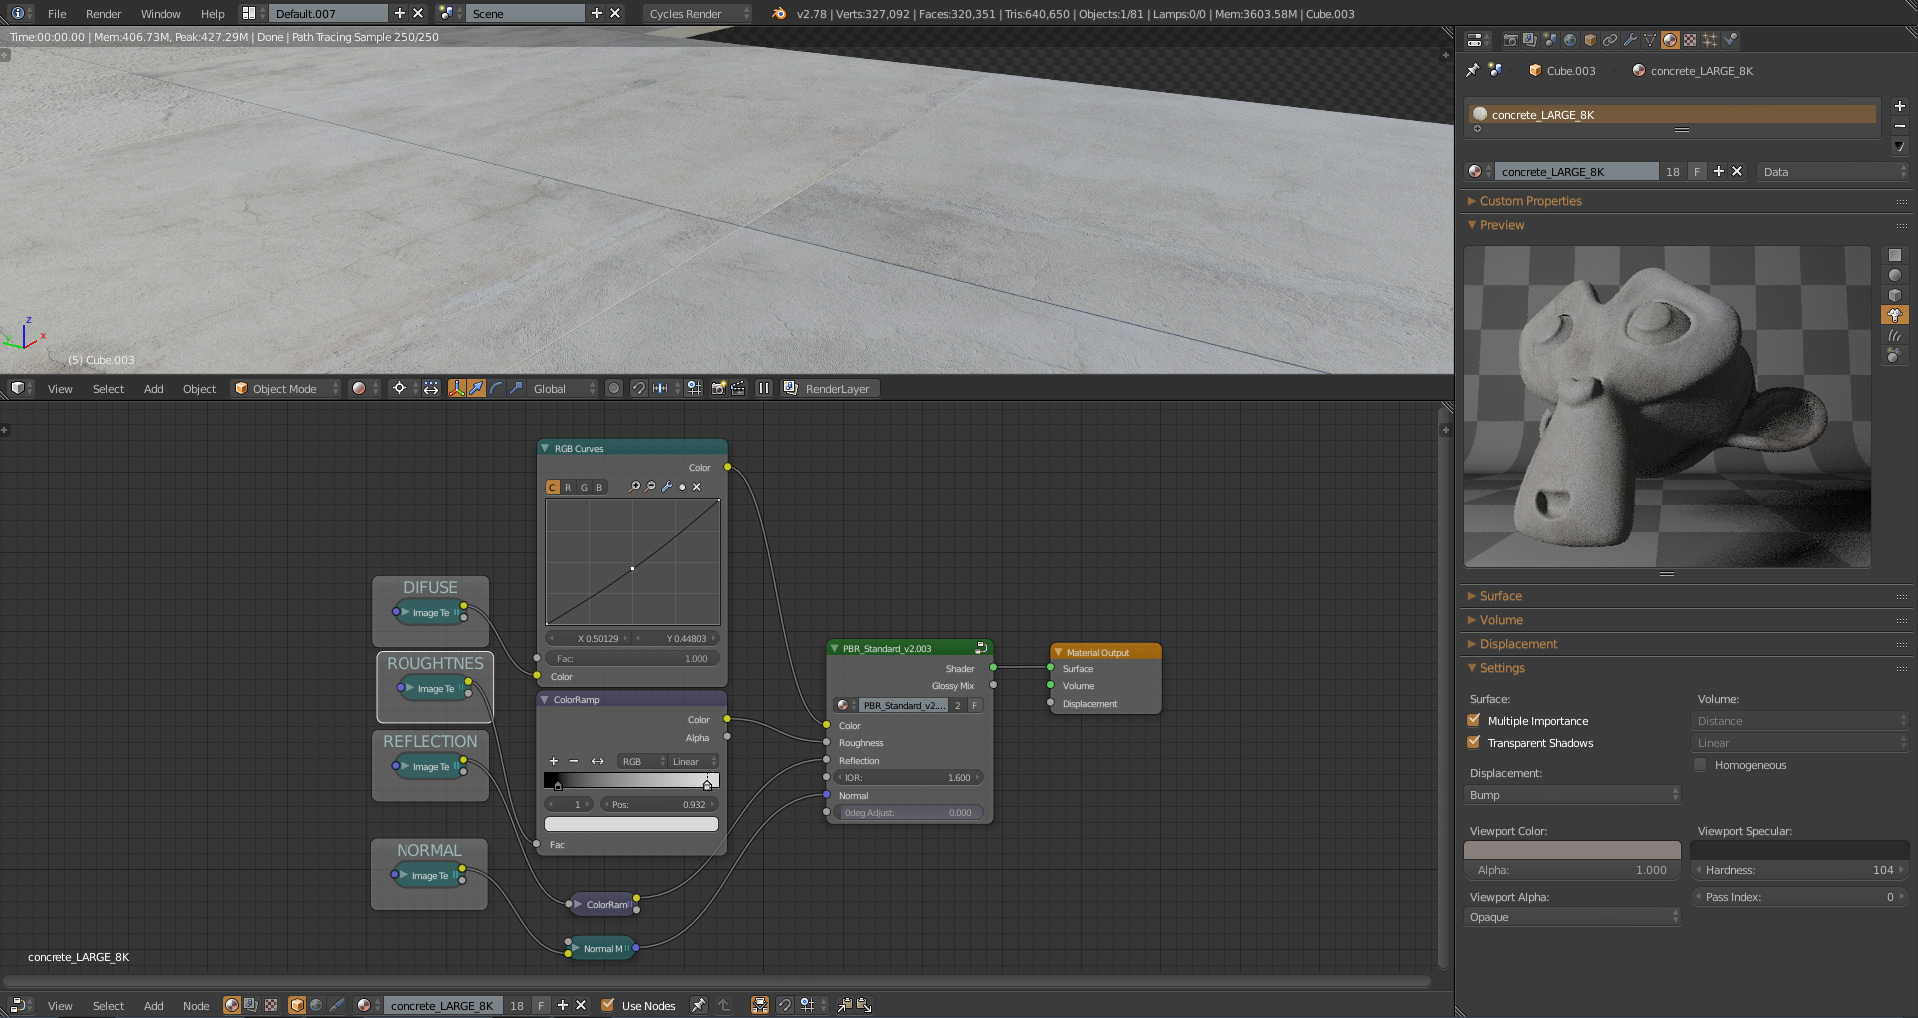
An Example of Concrete Shader
I don’t create all the materials by myself. Sometimes it is better to use the materials which were designed by someone, who knows it better than you.
The glass which you can see in the scene was downloaded from Chocofur. On their website, they have a lot of free materials, textures, models, and tutorials ready for you. The advantage of this material is that it is packed into one node group, so you don´t have to care about how it works. You can easily change the attributes of the glass by moving sliders.
A TIP : for the viewport, you can set your materials to transparent. It can be especially helpful when you work with glass material. In the section Materials lower alpha and the section Object – Display – turn on transparency.
ONE MORE TIP: I am often changing viewport color for every material as it provides easier orientation in the scene.
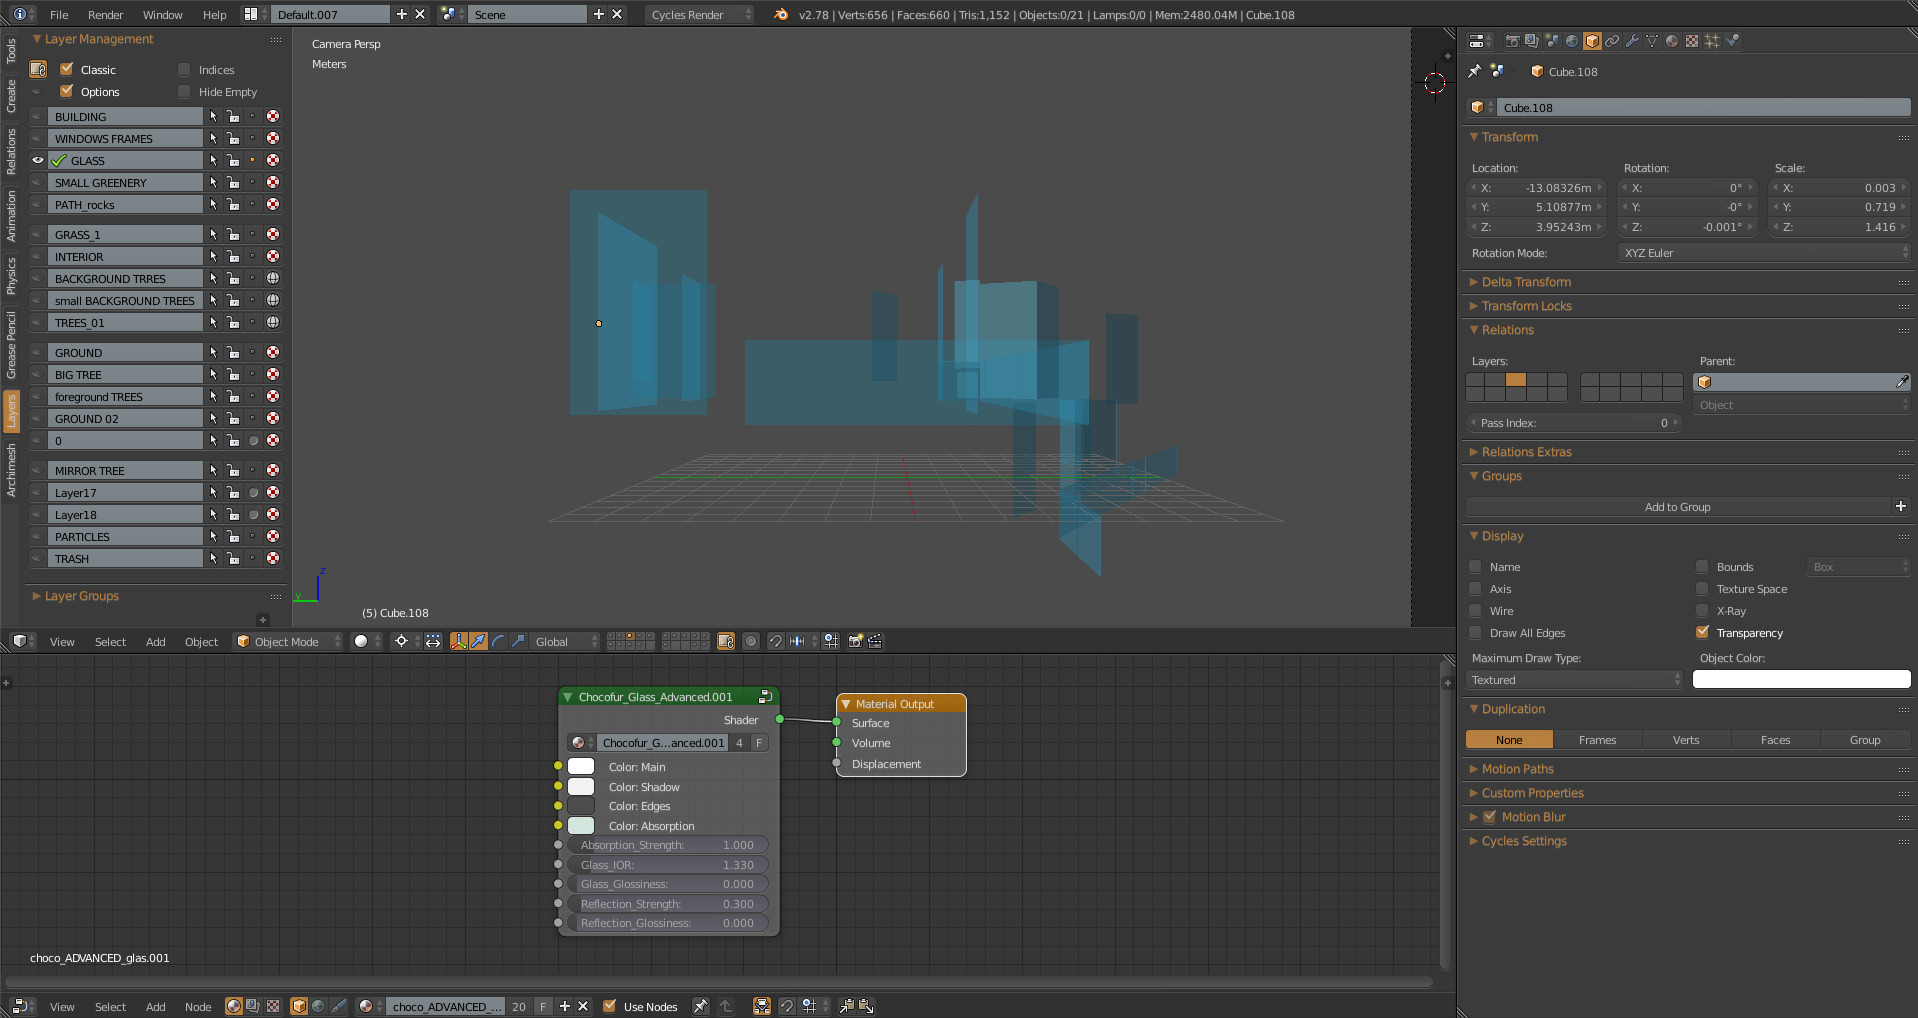
Glass material by Chocofur.com

View in solid mode with specific viewport color for each material
Grass
Creating the ground
The grass is one of my favorite topic in the process of making visualizations. My workflow for this project and most of other projects look like this…
At first, I created a base – The ground from where the grass grows. I start with a simple plane, which I shape, subdivide and then I cut holes into it using the boolean modifier tool. The holes are located in places where the concrete blocks will be placed so the grass won’t grow there.

Base for grass – Top view
When the modeling of the ground is done, I need to unwrap it. The function I used this time was an Unwrap from view (top view). Grass will cover the whole ground which is placed far from the camera, so I didn’t spend much time with unwrapping, and also the material of the ground is just a simple color texture.
Particle systems
About a year ago, I purchased The Grass Essentials by Andrew Price, and now my whole grass workflow is based on this pack of grass models and particle systems that you can quickly import to any scene to achieve beautiful grass in short amount of time.
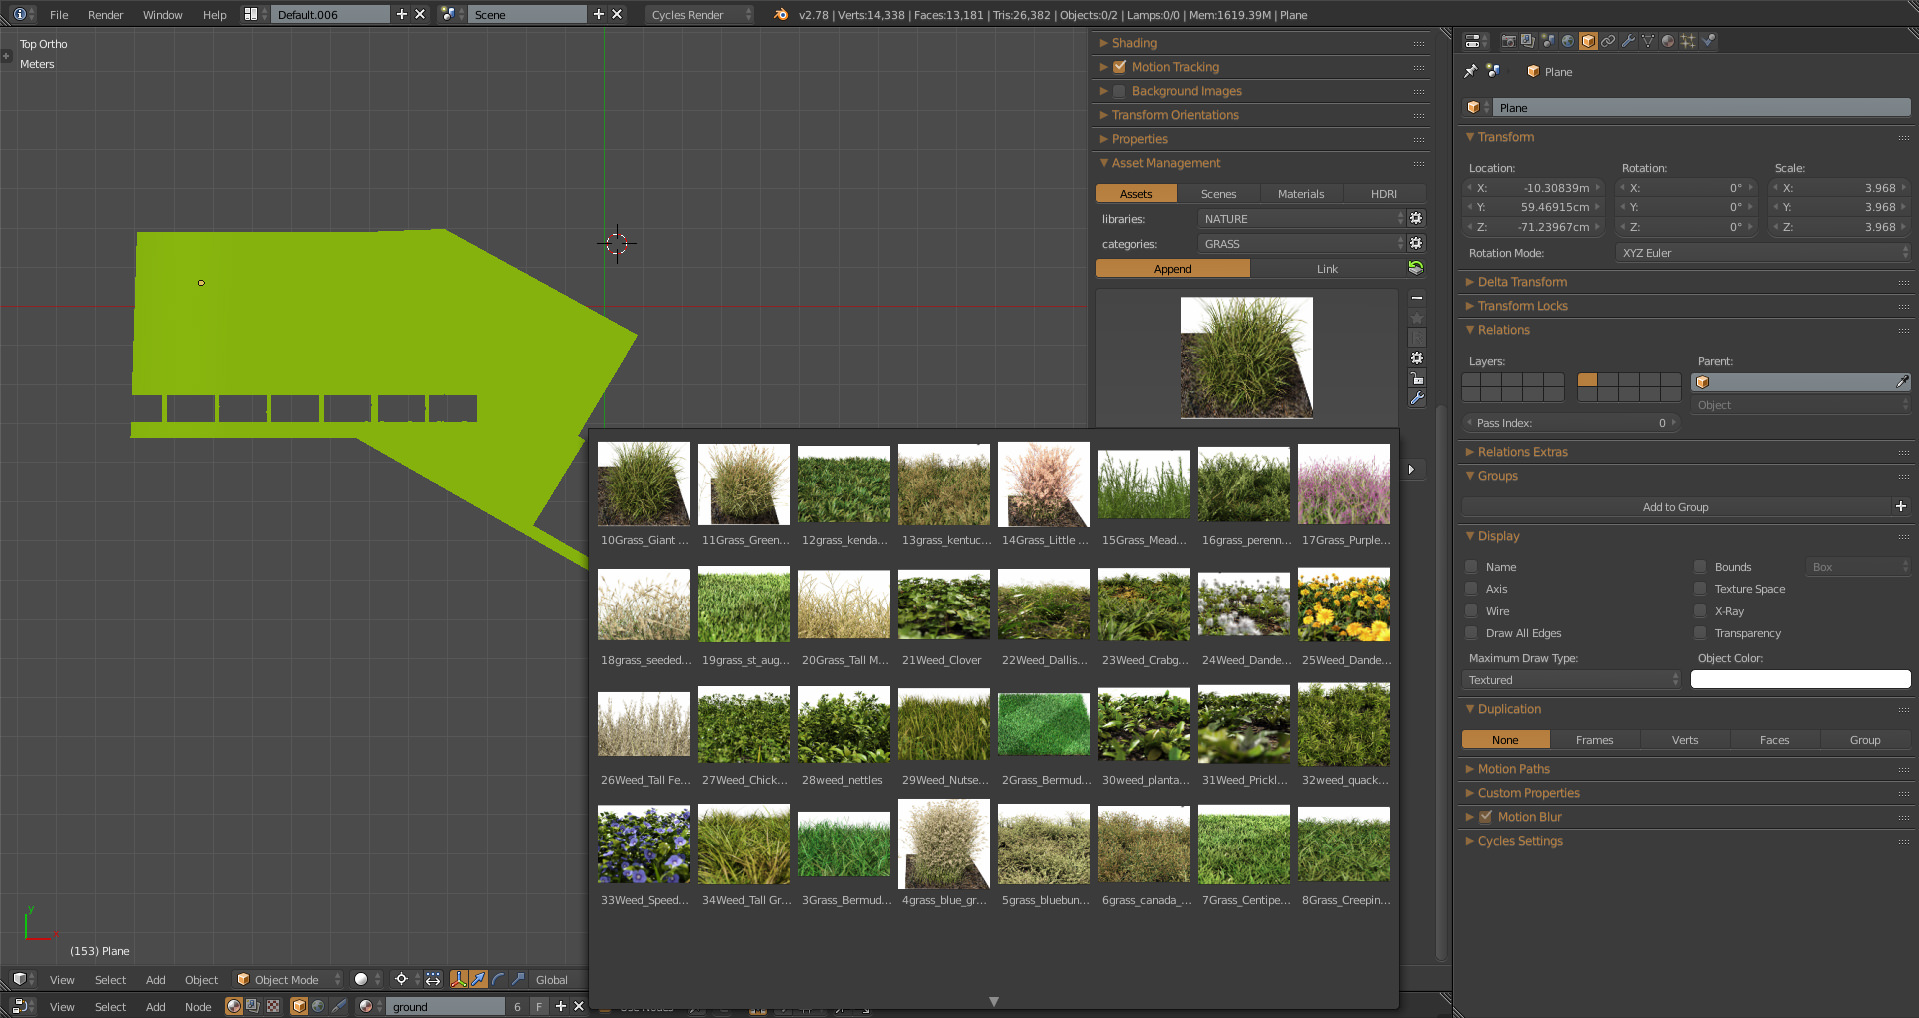
Grass types in Asset manager add-on
A TIP : I’m using an Asset manager add-on, which was one of the best deal in my life. I strongly recommend this add-on if you want to build your library full of models, materials, scenes, and HDRI maps. This add-on you will allow quick access to all of it directly in the Blender.
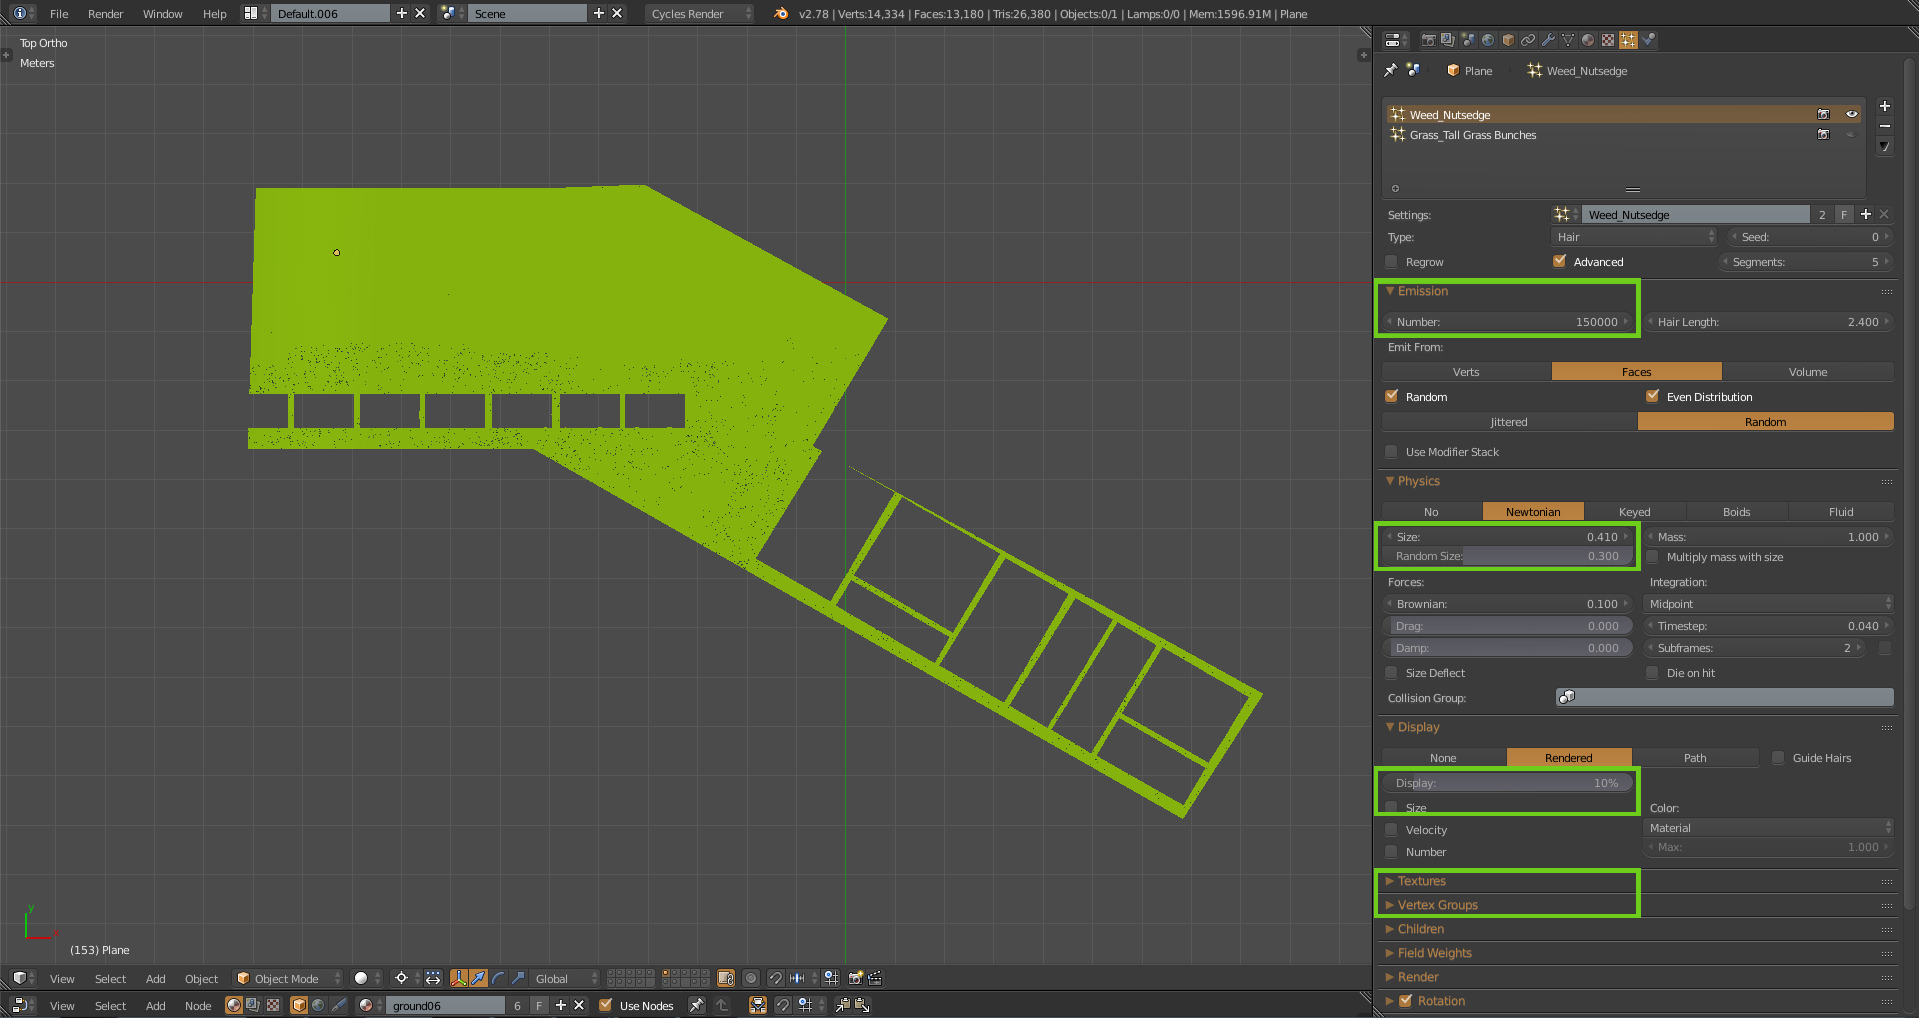
Particle system settings for grass
I appended two types of grass and kept almost all default settings. I changed only some particles, their size, a number of displayed particles in the viewport and I spent some time with particle textures and vertex groups.
Particle Texture
I used Particle textures to create an interesting distribution pattern and get rid of uniformity. It is a black and white texture which influences the particles, and how they should behave.
You can choose what aspects will be affected by the texture. I chose density and size. It means that brighter parts of the texture are places where the number of particles will be greater and the size bigger than in the dark areas.
For each type of grass, I used different settings of particle textures. I chose a procedural texture, but you can also draw your texture for the particle distribution.
A TIP : more about Particle texture you can find at – https://www.creativeshrimp.com/blender-quick-tip-8-particle-textures.html
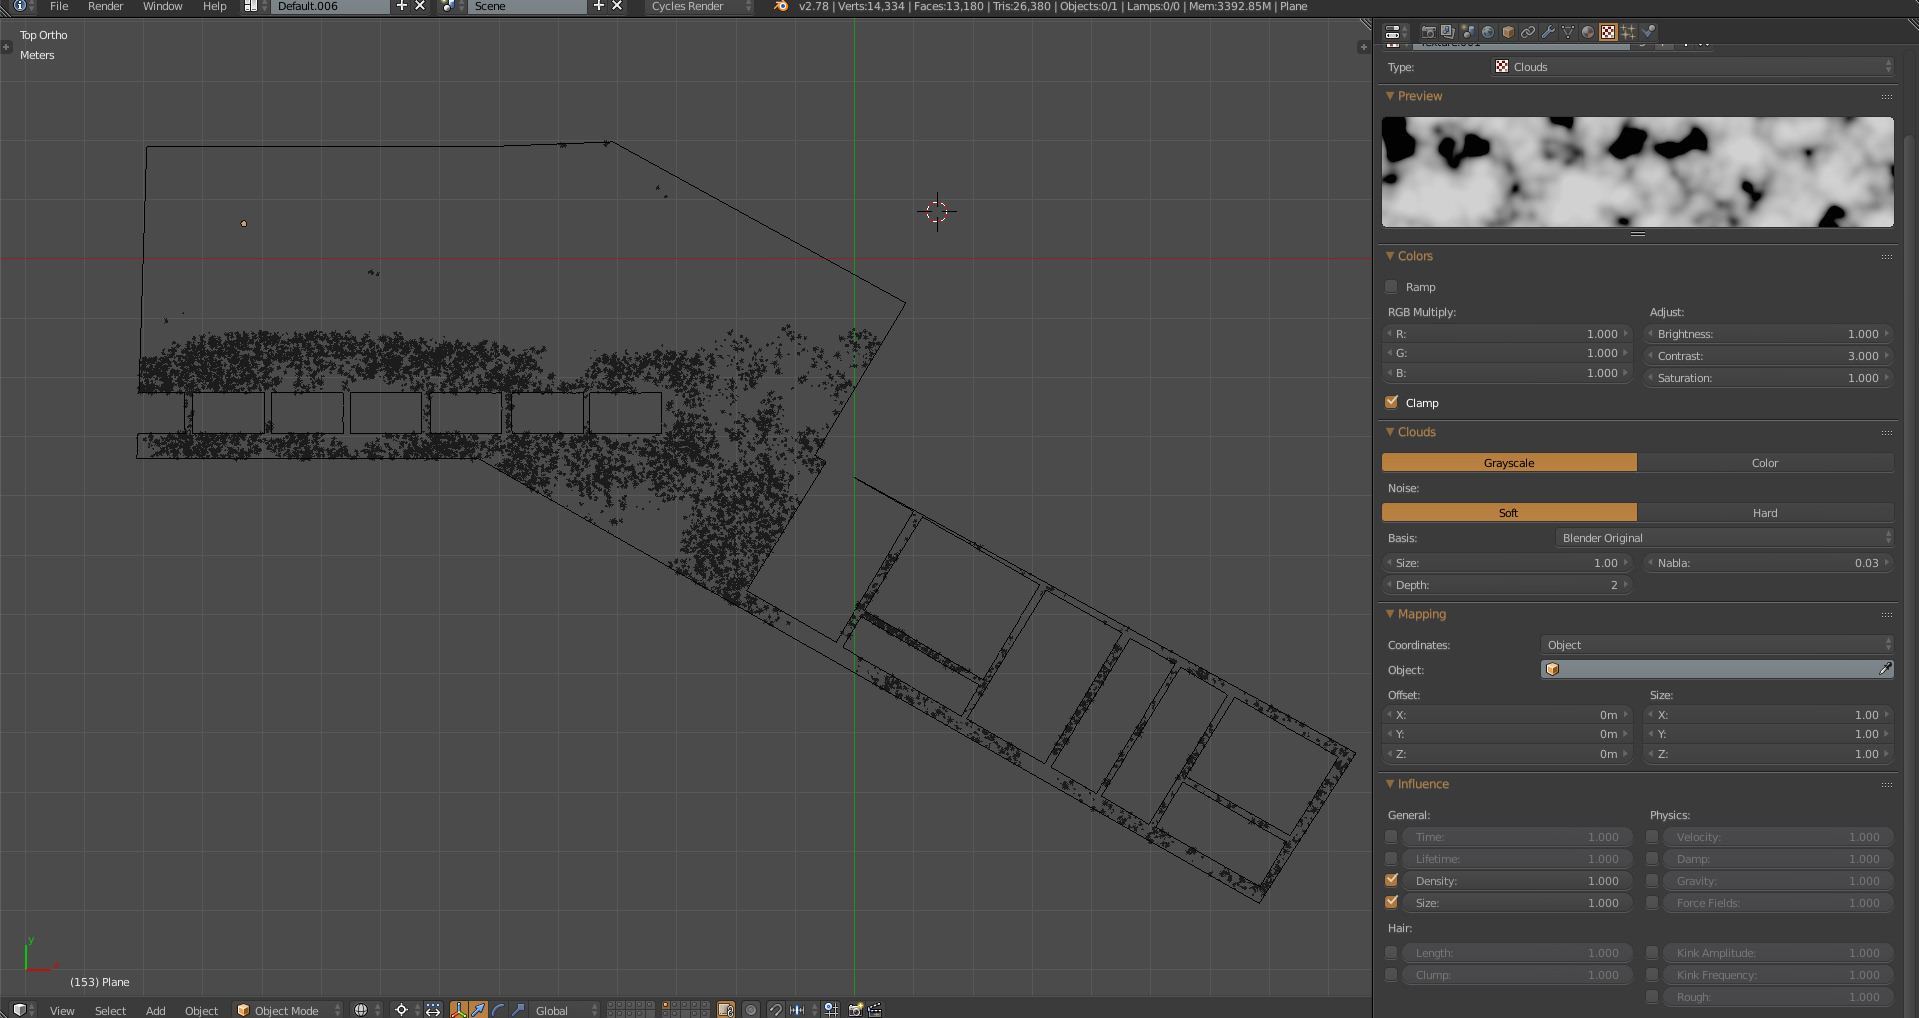
Distribution of particles influenced by texture
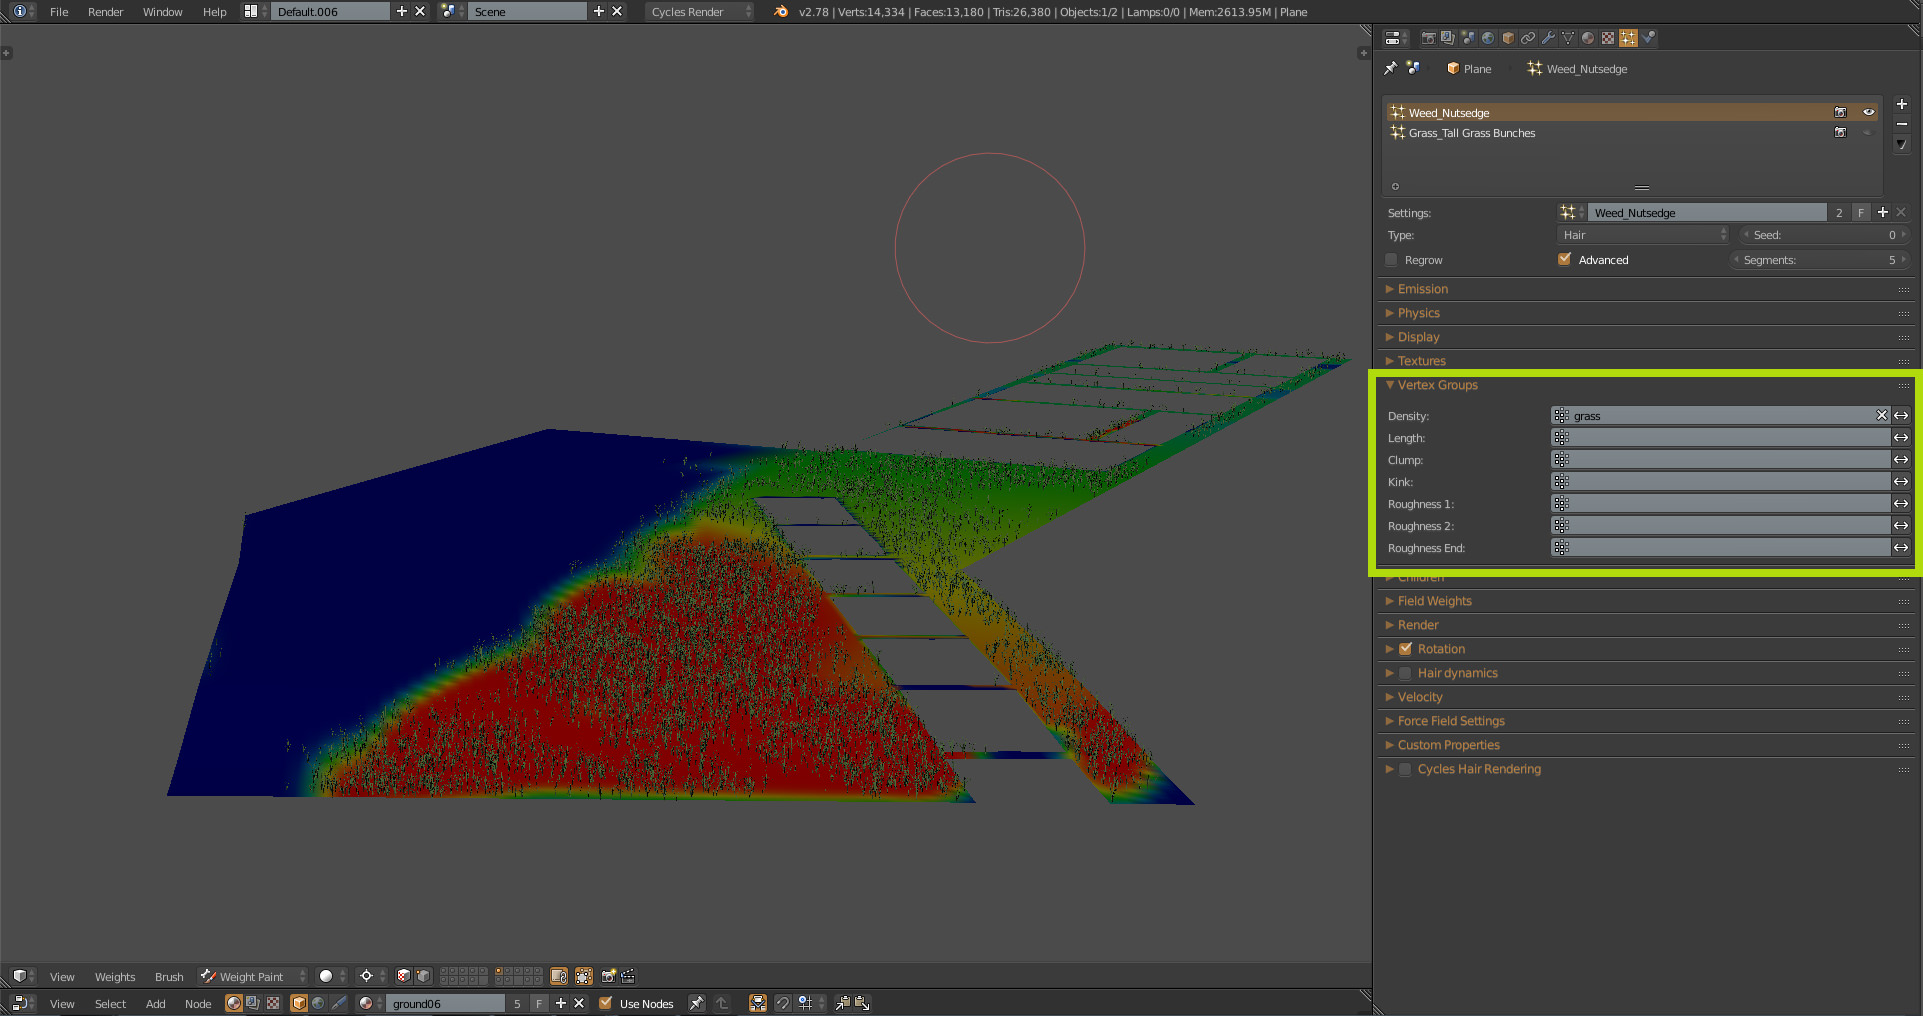
Vertex Groups
If you want to create a realistic looking grass field you have to use a lot of particles. However, the more particles slower the response by software is, and it also causes longer rendering time. In most of the scenes, you need to show particles just in the area visible on camera. Therefore is important to optimize where and how the particles are distributed. For this project and all my visualizations, I rely on Vertex groups.
Vertex groups are a versatile way to store information used in various parts of Blender to control such things as particle distribution, hair length and modifier actions. You can select part of geometry in edit mode and assign it to new vertex group.
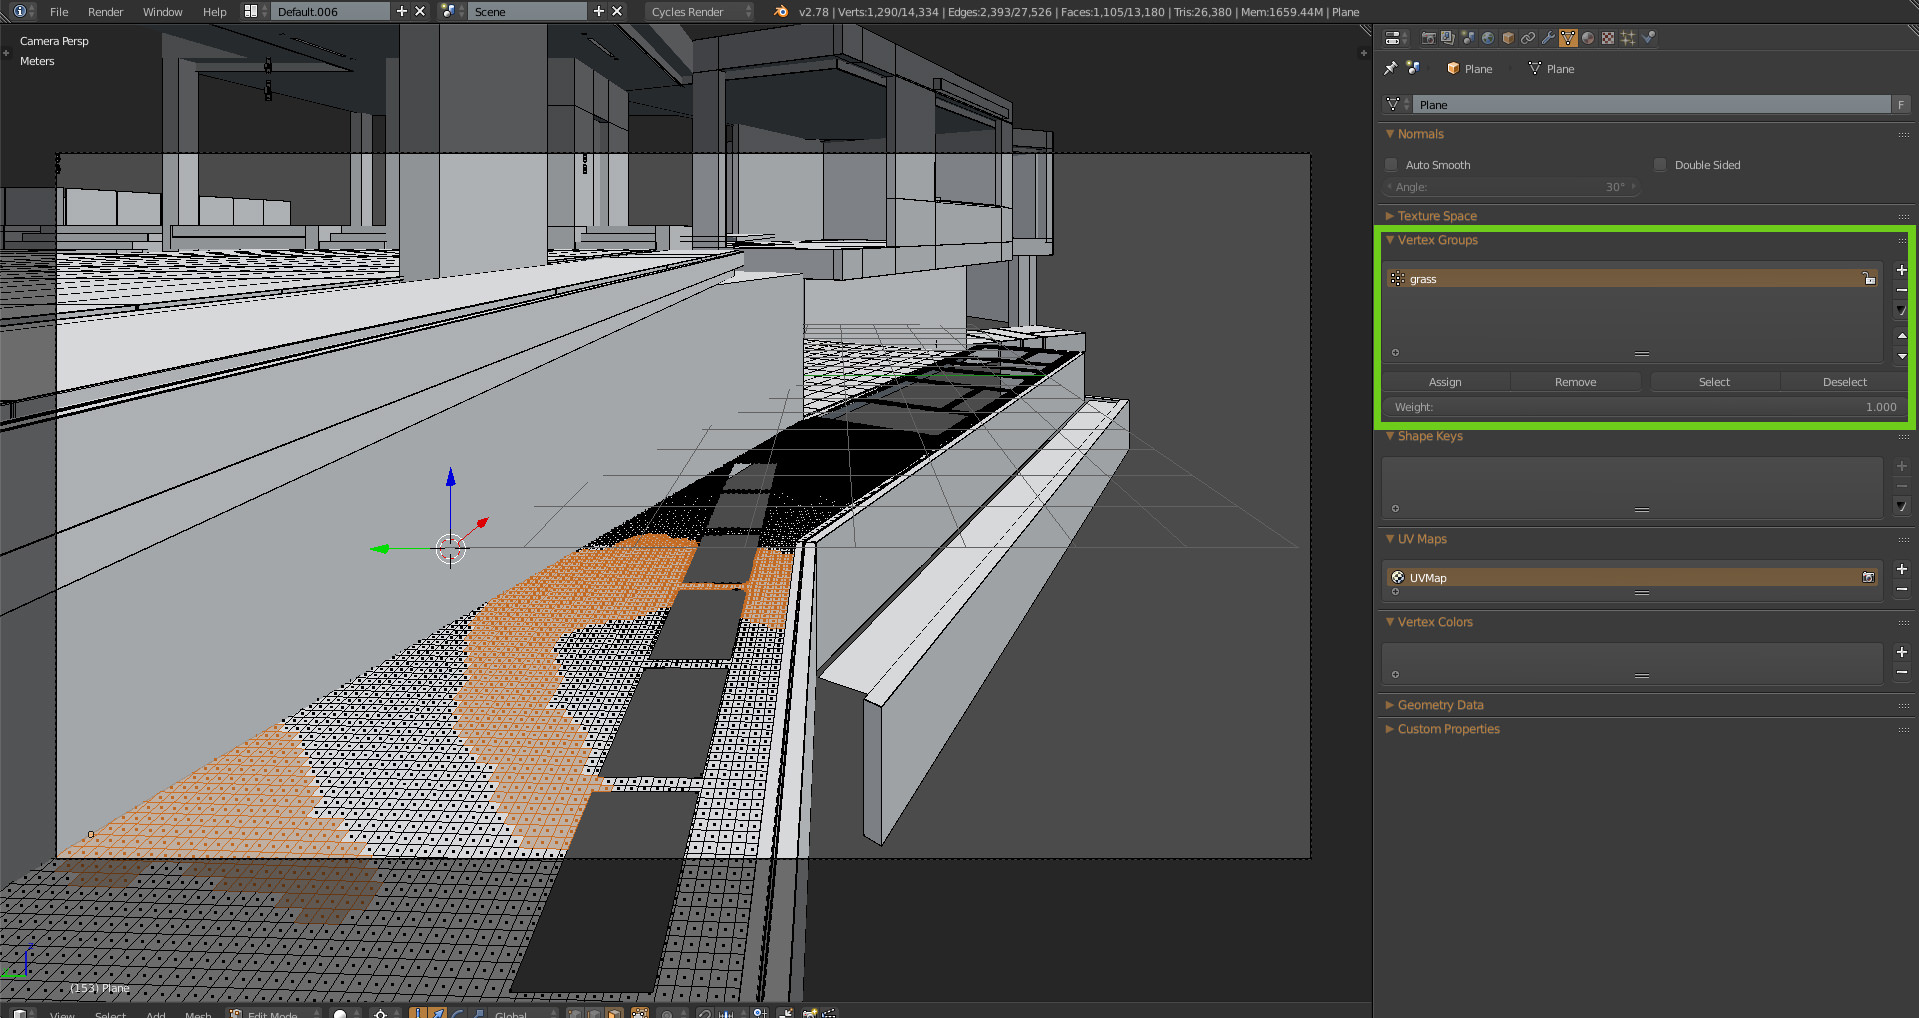
Selecting geometry for a vertex group
Or you can add new vertex group, and in the Weight Paint mode, you draw weight color texture for distribution of particles.
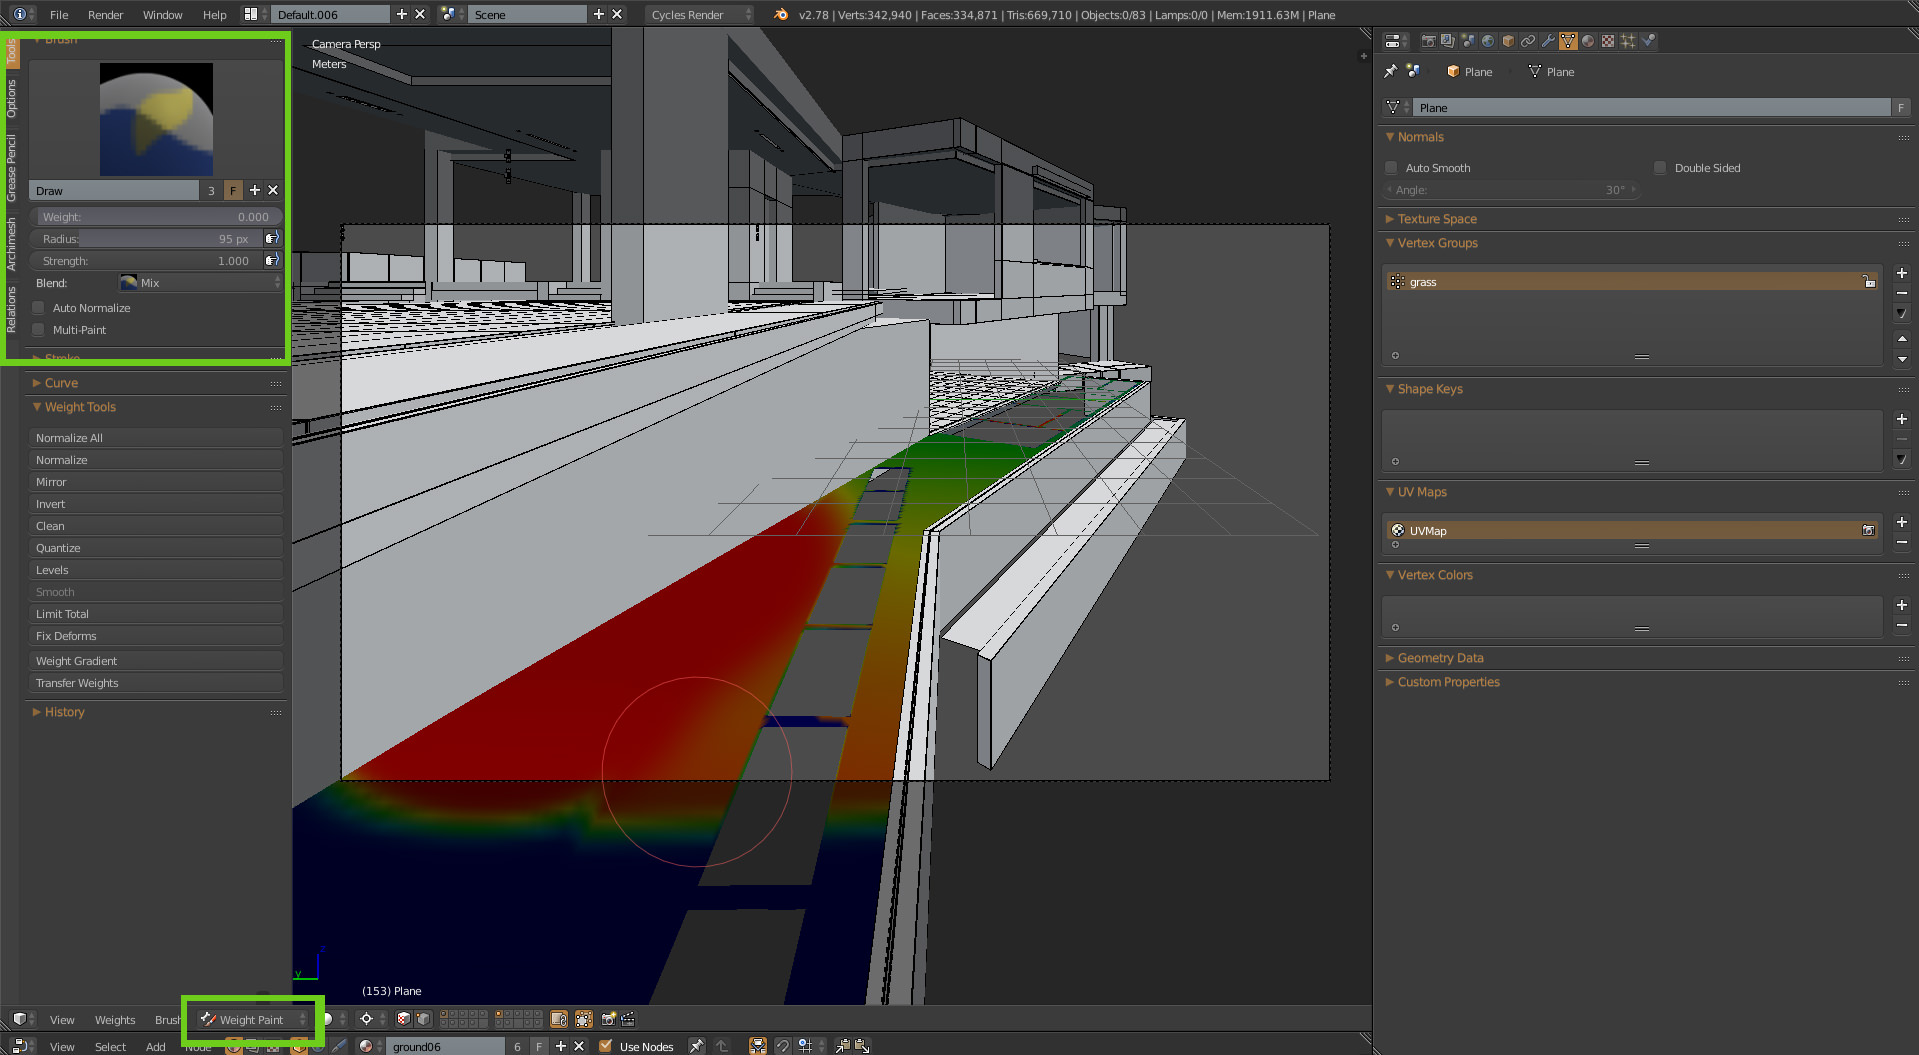
Painting weight color texture
After you just pick suitable vertex group for each particle system.
A TIP : More about Vertex groups and Weight painting you can find at – https://www.youtube.com/watch?v=PgtFlShmdro Also, look at this cool addon called Weight lifter. It helps you work more efficiently with vertex groups and vertex color layers. https://www.blendermarket.com/products/weightlifter
Small Greenery

I would like to show how I created one of the several models of plants and bushes used in this scene.
Particle settings for bush
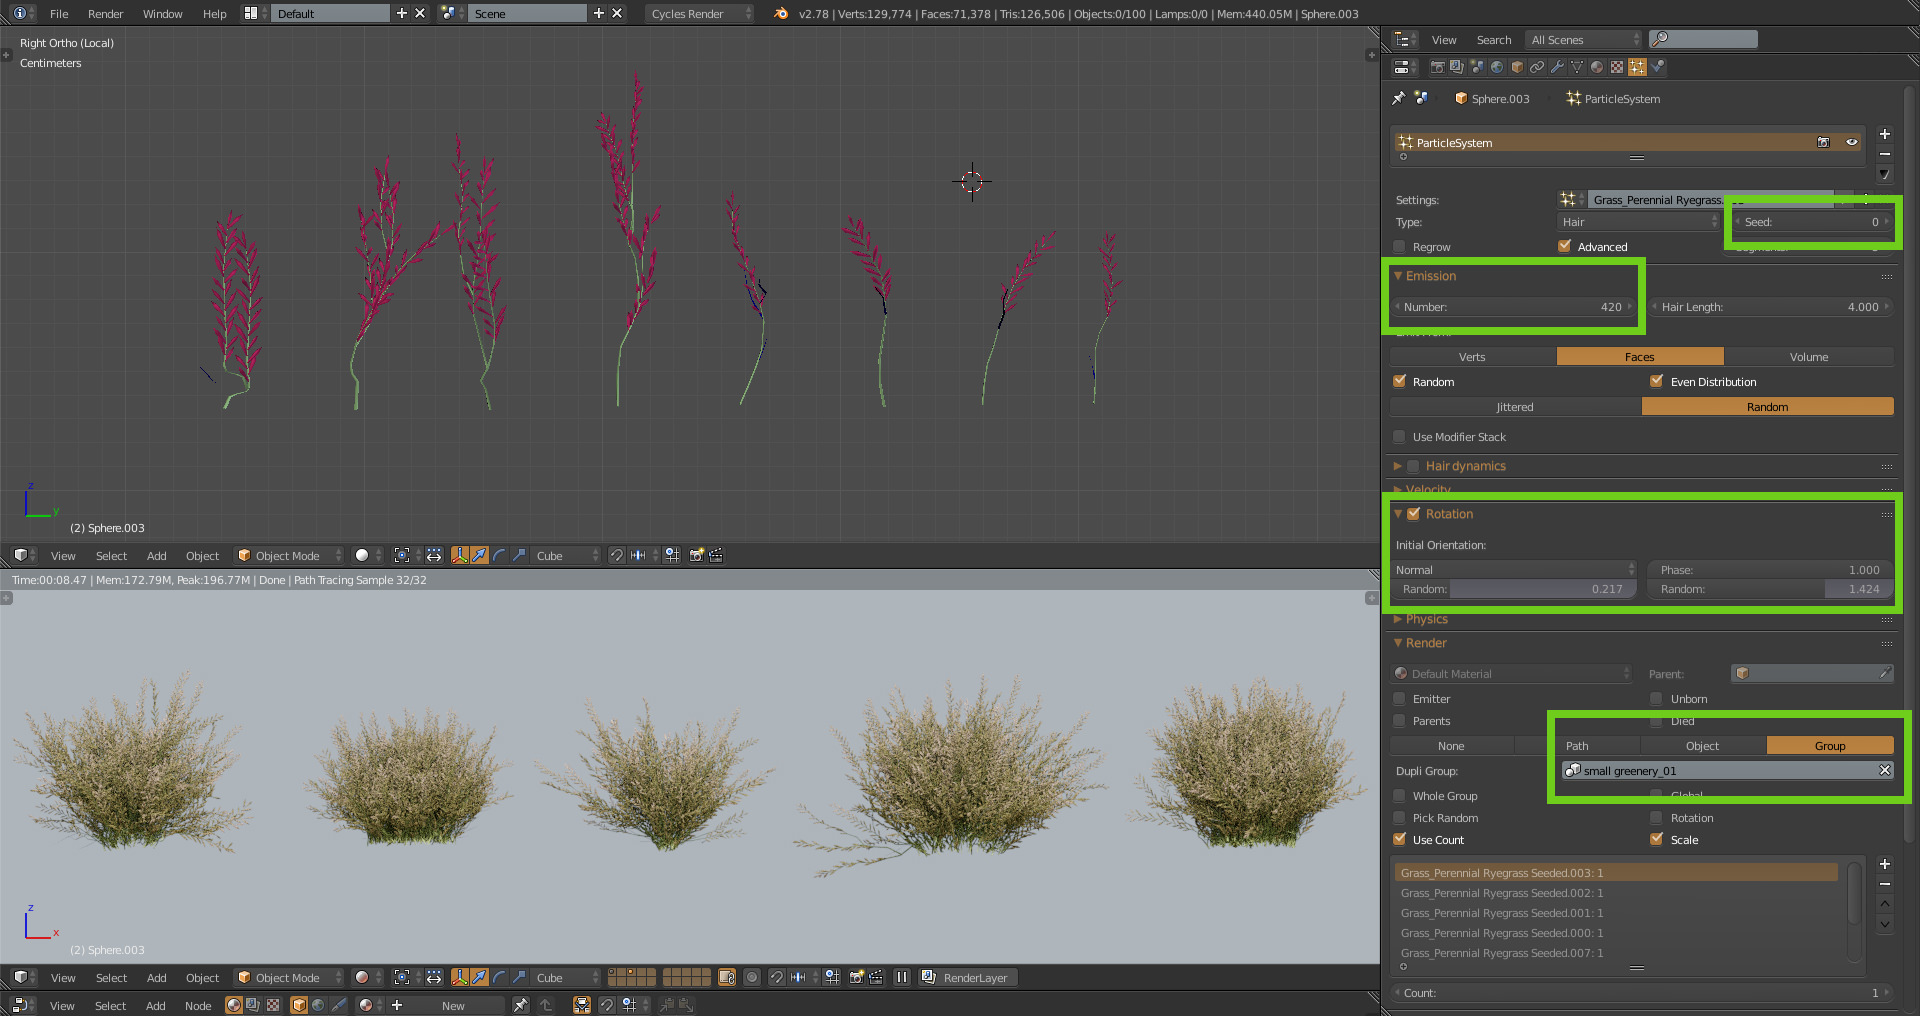
I started with one type of weed from Grass essentials. I modified it a bit and created a few different versions. Then I assigned those versions into one group called small_greenery_01.
After that, I created a base mesh for the particle system for which I used a half of a sphere. As objects, which should be distributed to the base I choose group called small_greenery_01. After I increased emission to about 420 and spent some time with setting rotation and ta-dah, a small bush was ready.
Then I duplicated the bush five times, changed some settings like a number of particles, rotation, and seed. That is how five different versions of the bush were created.
A TIP : When you duplicate an object with a particle system, the copy will share the same particle system as the original. The changes on one object will also affect the other one. That´s sometimes handy, but if you want to create versions as I did, you have to click on the little number on the right (red rectangle in the picture) to make a single-user copy.
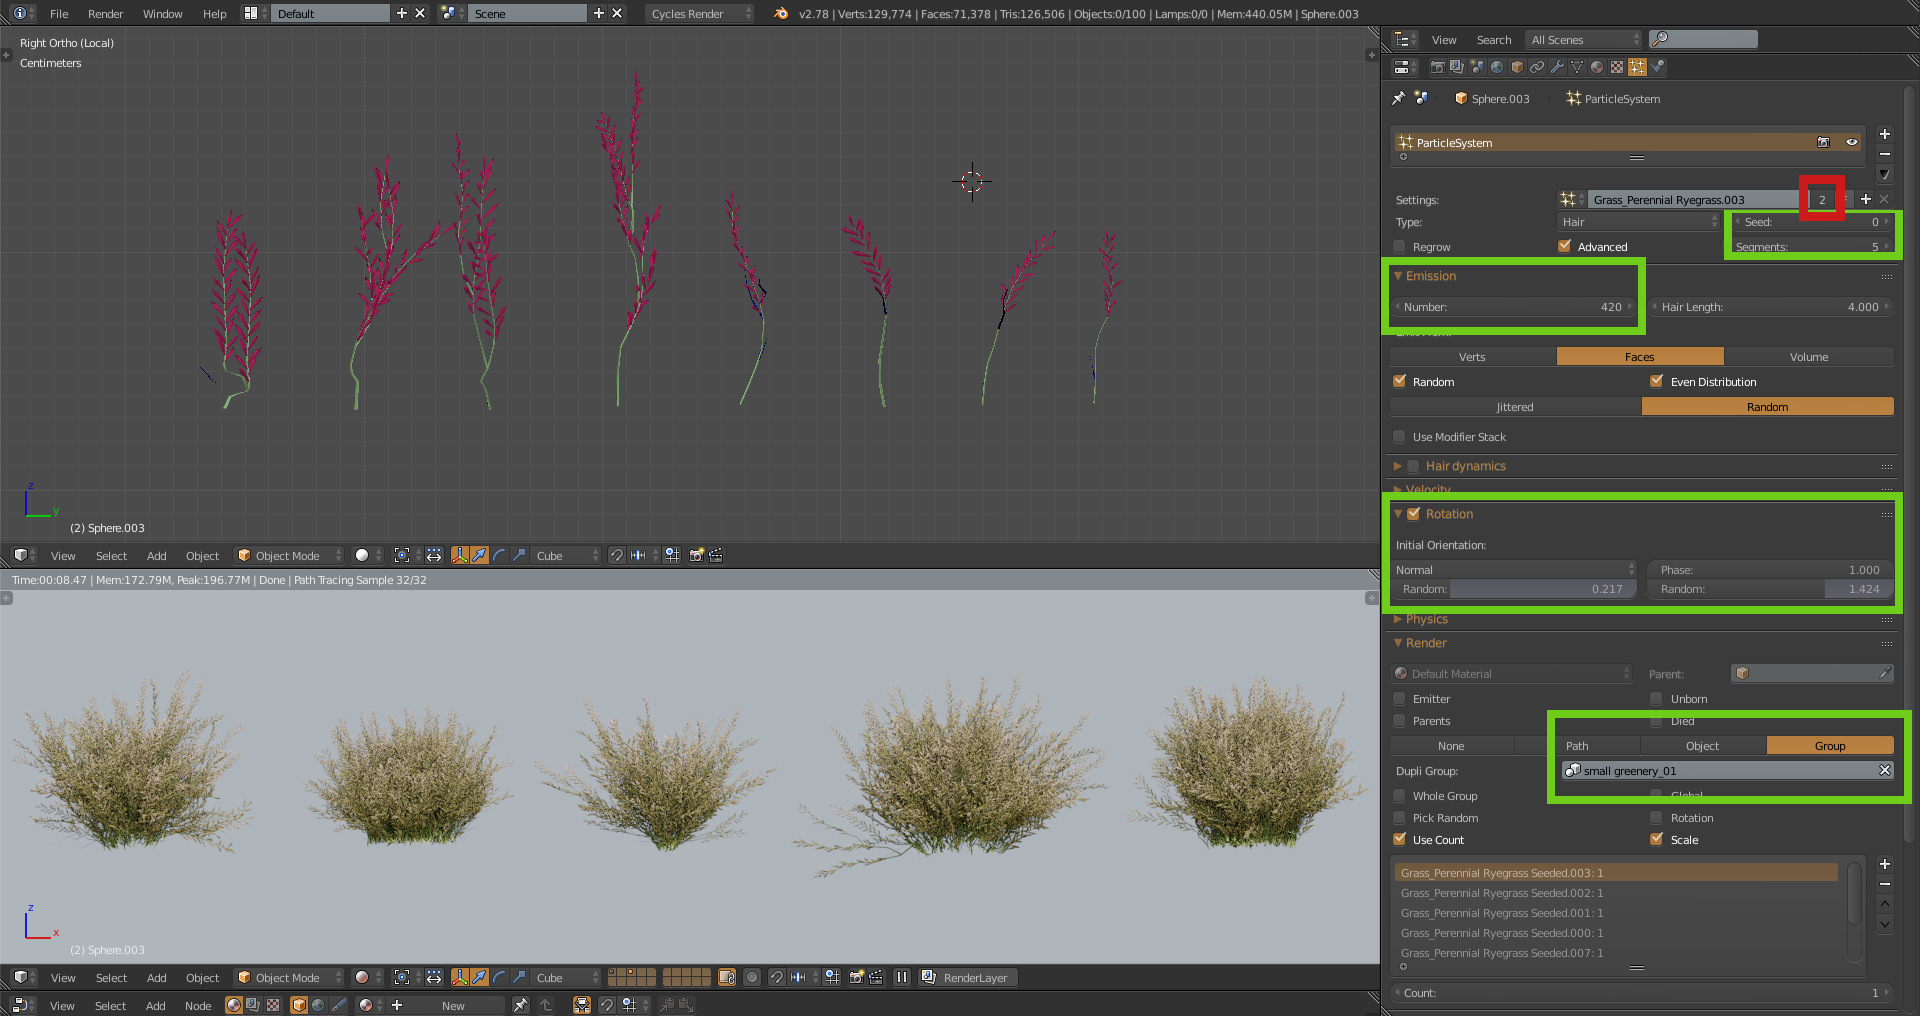
Make a single user
Trees
Whenever I’m working on my personal projects, I try to learn something new, experiment with a new technique and also to create new 3D models. Personal projects do not have any deadline, which means that I can focus on the details and enjoy the whole process.
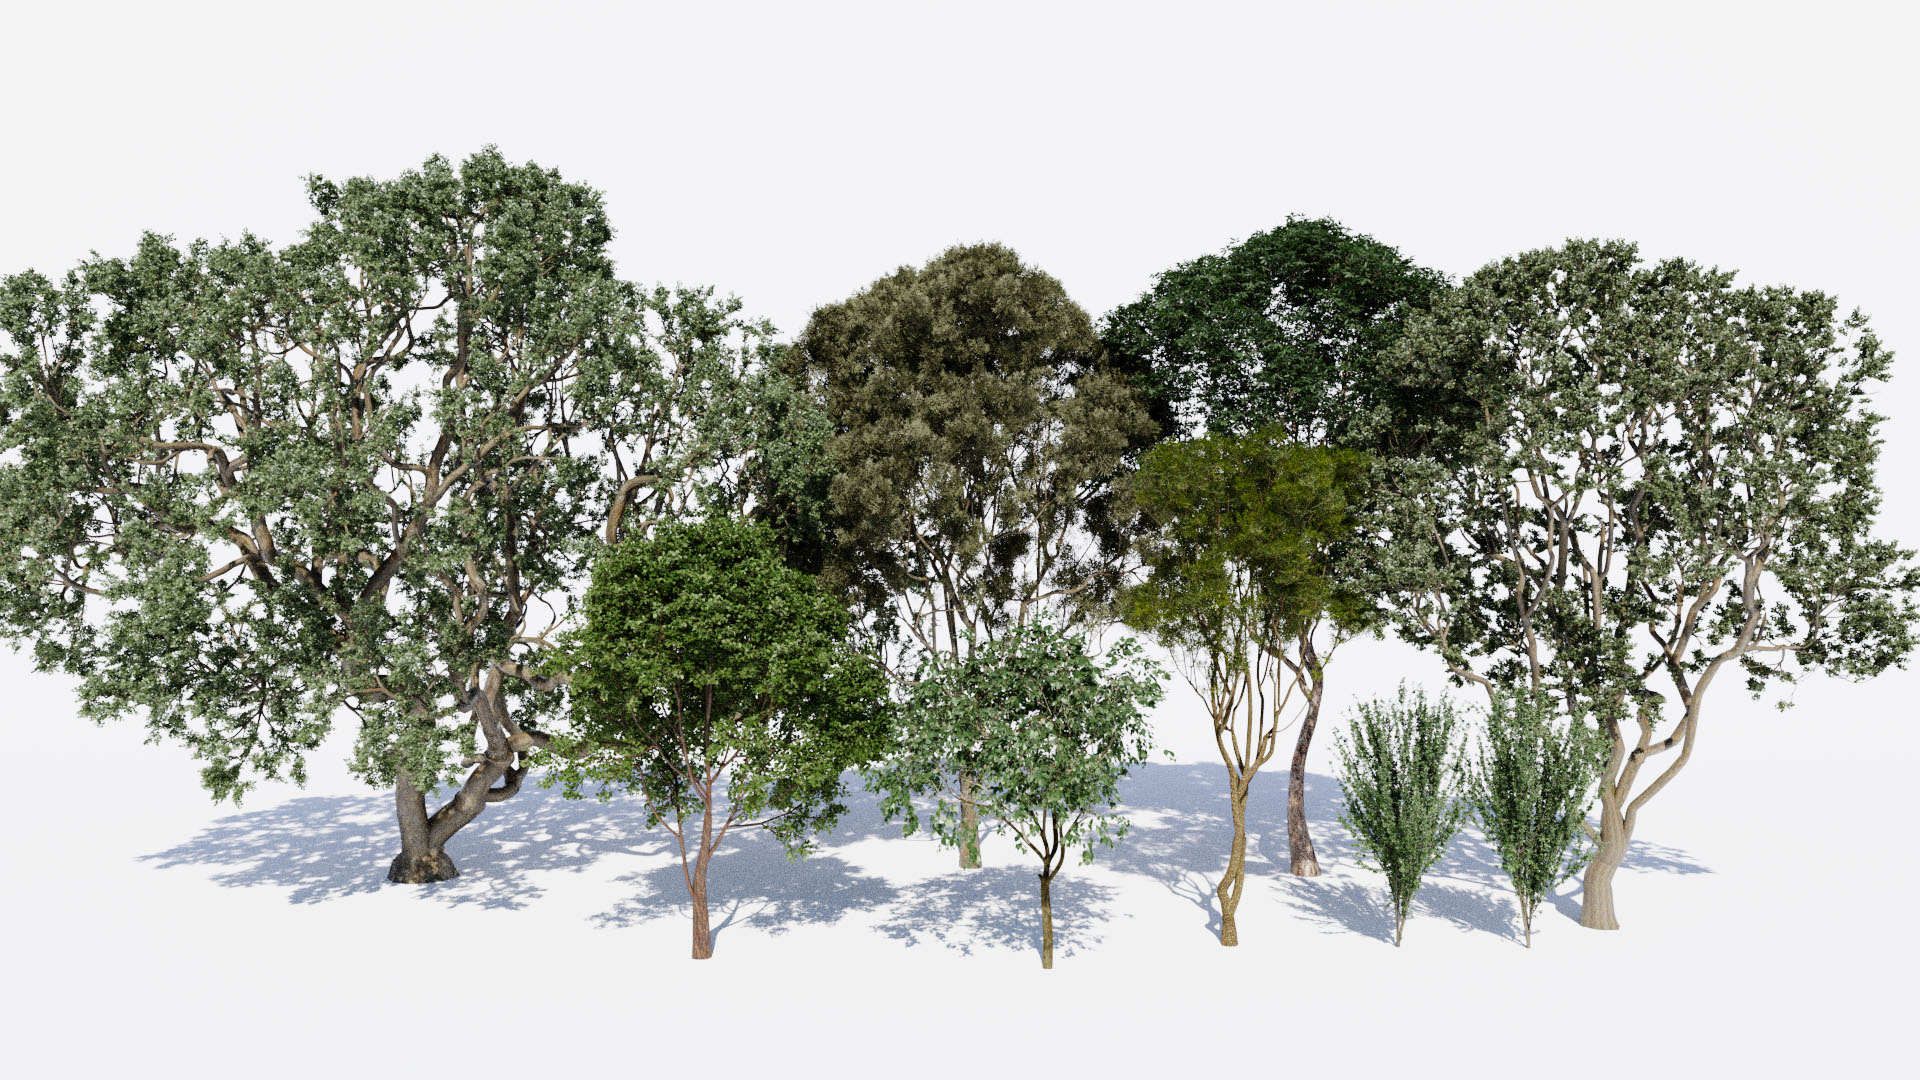
While working on this project, I learned how to use the Grove, an add-on that is perfect for generating trees. It allowed me to shape the trees and bushes, which I will be able to be utilized in the future for commercial projects.

The realistic tree is an essential part of almost every exterior scene. It can enrich the scene, or it can disclose that the picture is just a visualization. For long period of time, I was buying models of trees until I found The Grove.
If you did not try it yet, do so. You will not regret it.
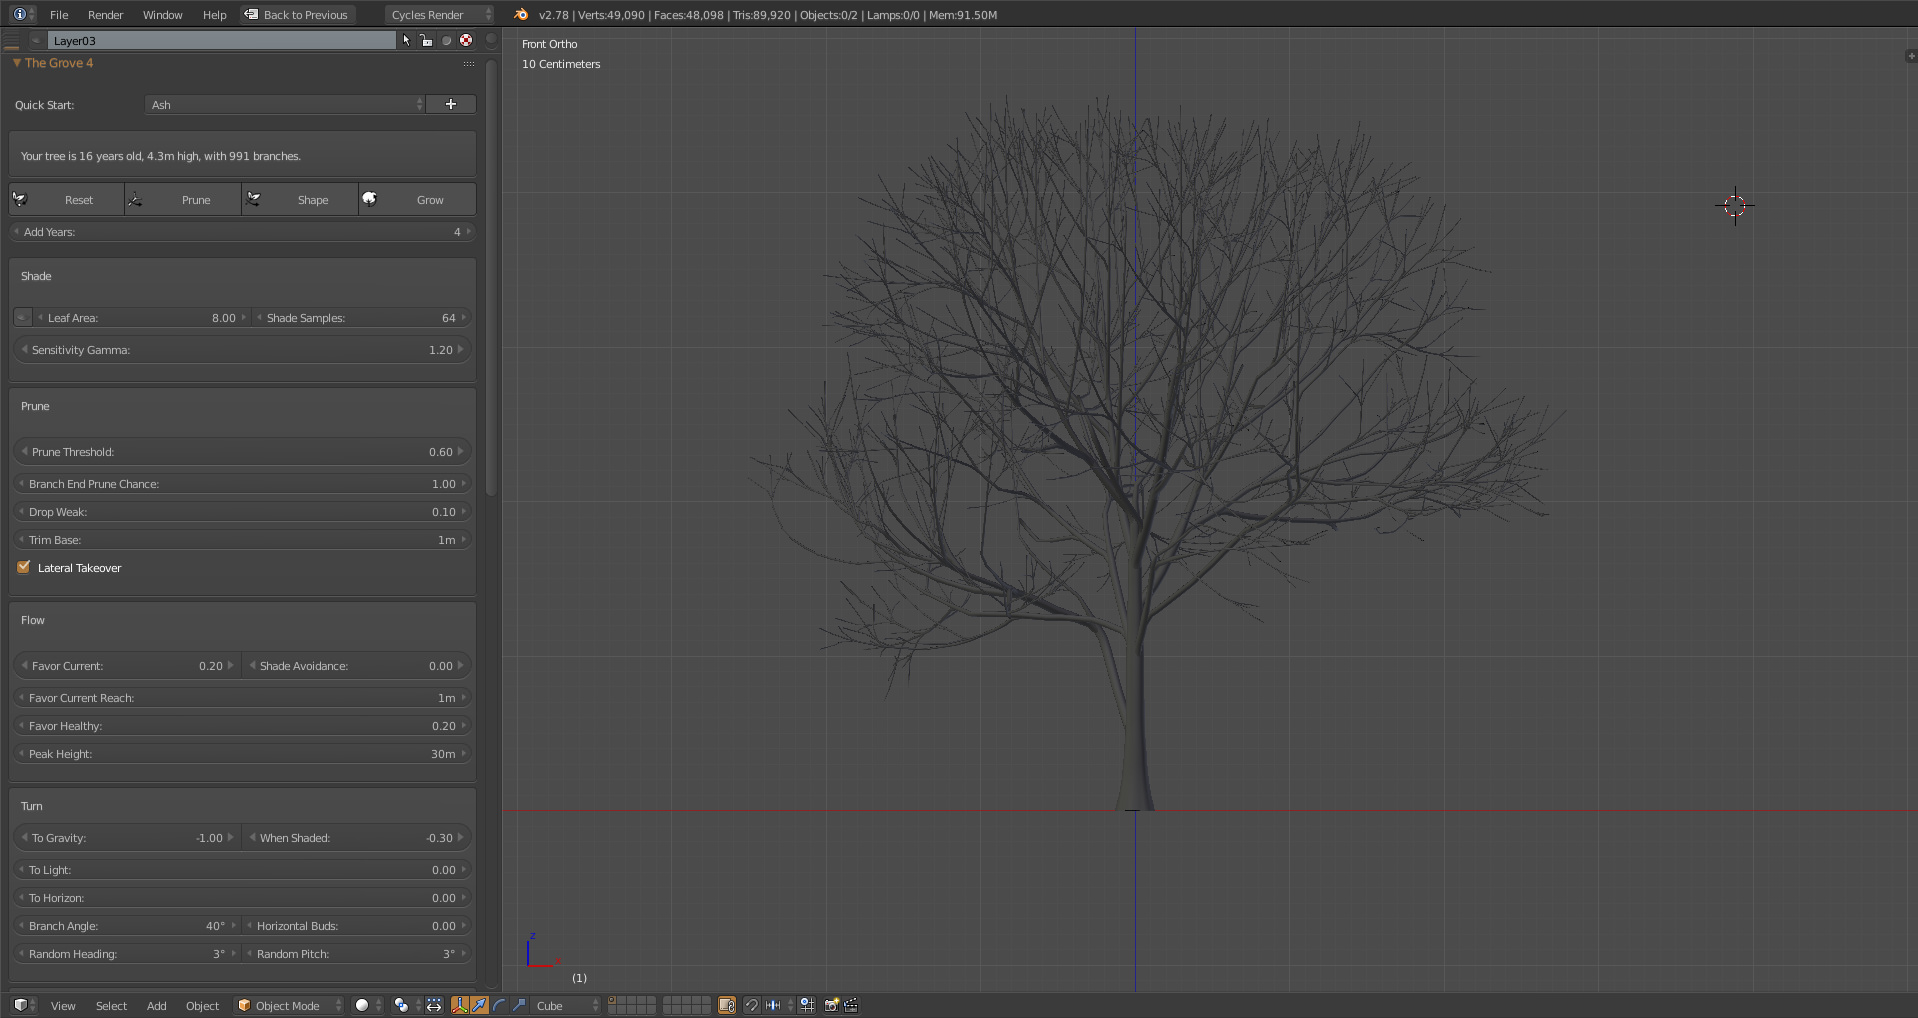
The Grove add-on in action
The main idea is that you choose the kind of tree you want, click a few times on the “grow” button and you have the result. Also, there is a huge amount of setting so you can adjust almost every part of the tree. The advantage of this tool is that the leaves are not a part of the geometry, but they are distributed as a particle system. Thanks to this system you can change the type of leaves, their number or size. From oak, you can make a chestnut just by changing the leaves and by turning the particle system off you create the chestnut in winter.
Using this add-on, I generated 8 types of trees, which I placed in the scene. The trees in the front were placed by hand, for the background I used the addon Random Object Array.
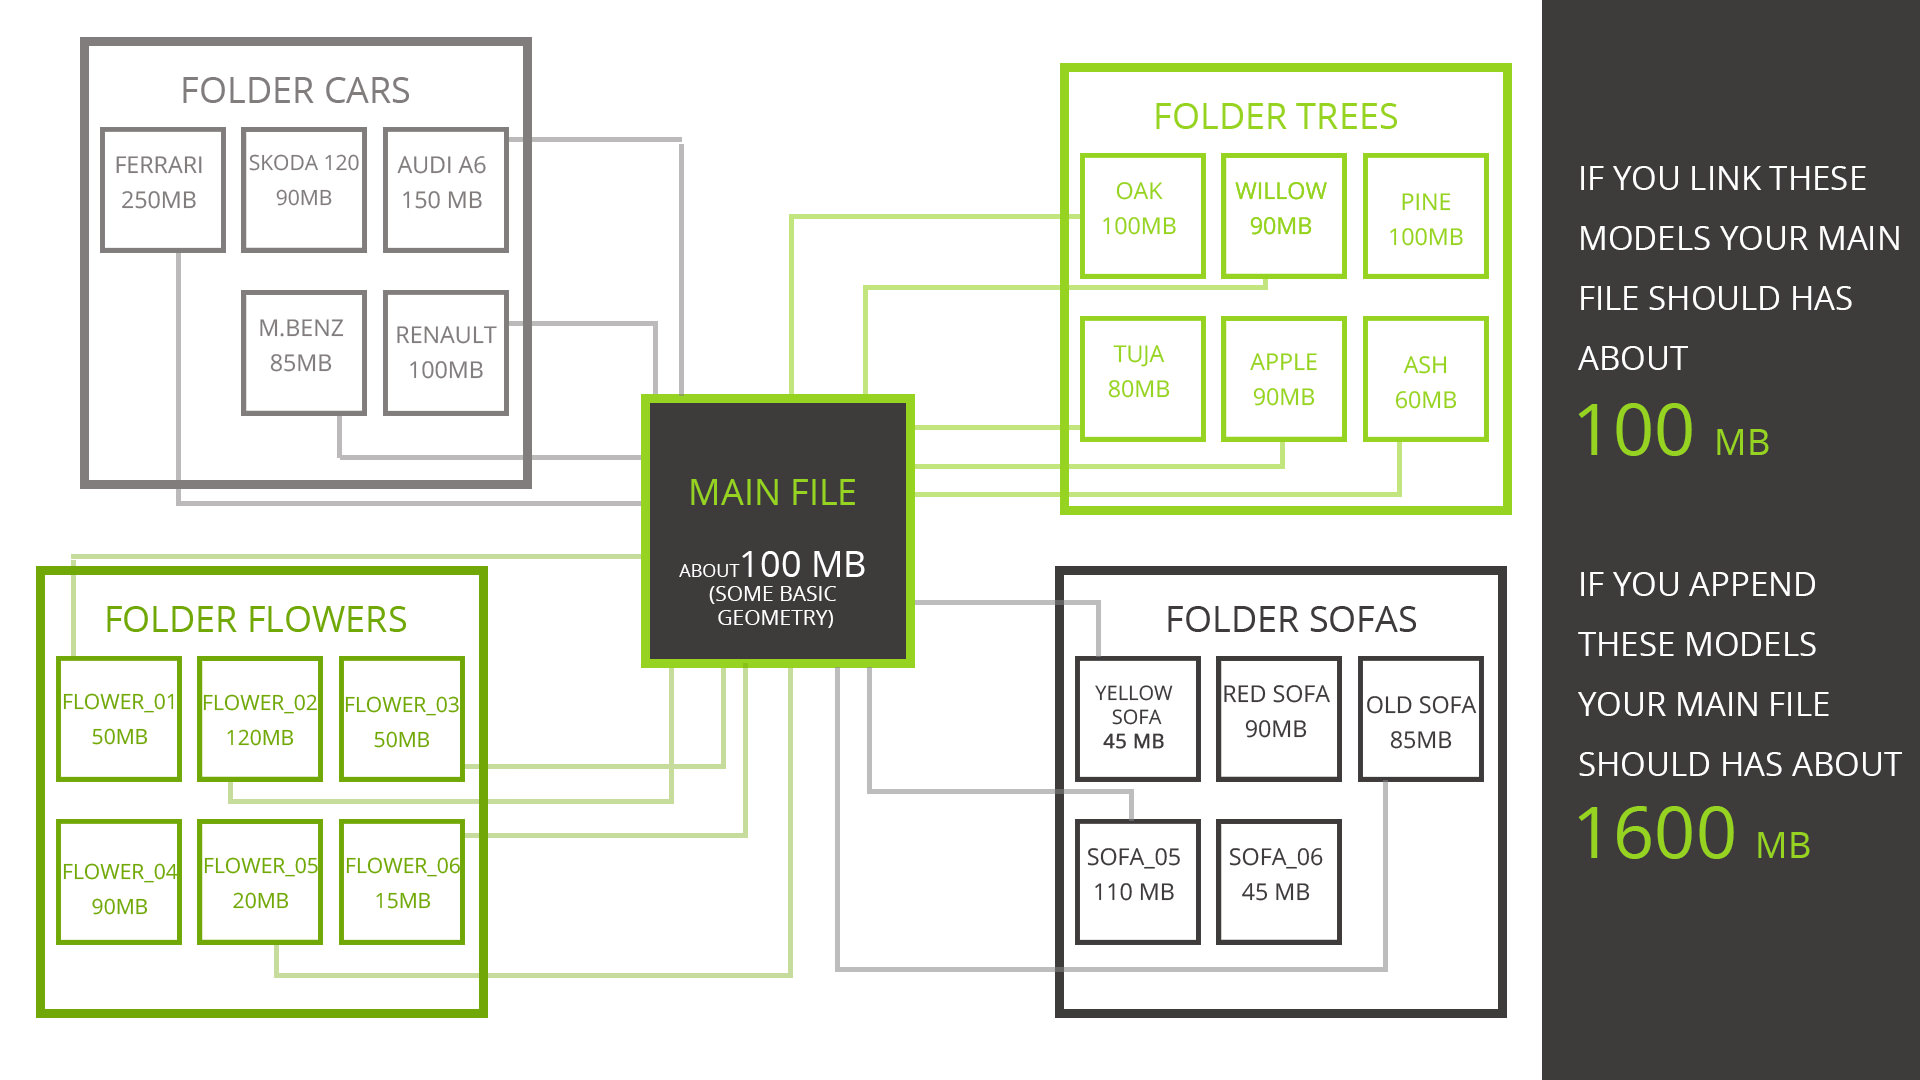
A TIP : When you are working on the scene full of high poly models, try to link them from other files instead of appending them to the scene. Your main file stays small this way. I am trying to keep my scenes up to 150 – 200MB. The scene this big is able to respond to my command very quickly. The .blend file bigger than 1GB is slow and you have to wait for processing every little change. Using linked object brings much more advantages, it´s great when you are working in team, or when you are working on big project which contains more scenes in separated blend files – instead of changing one object in every scene separately, you just can change it once.
More about that topic you can find here
Linking VS Appending
Lighting
Lighting is my favorite part of every project. It is satisfying to see how the light brightens and completes the scene. For this project, I used a very simple setup. The only light source in this render is HDRI map, from HDRIheaven.
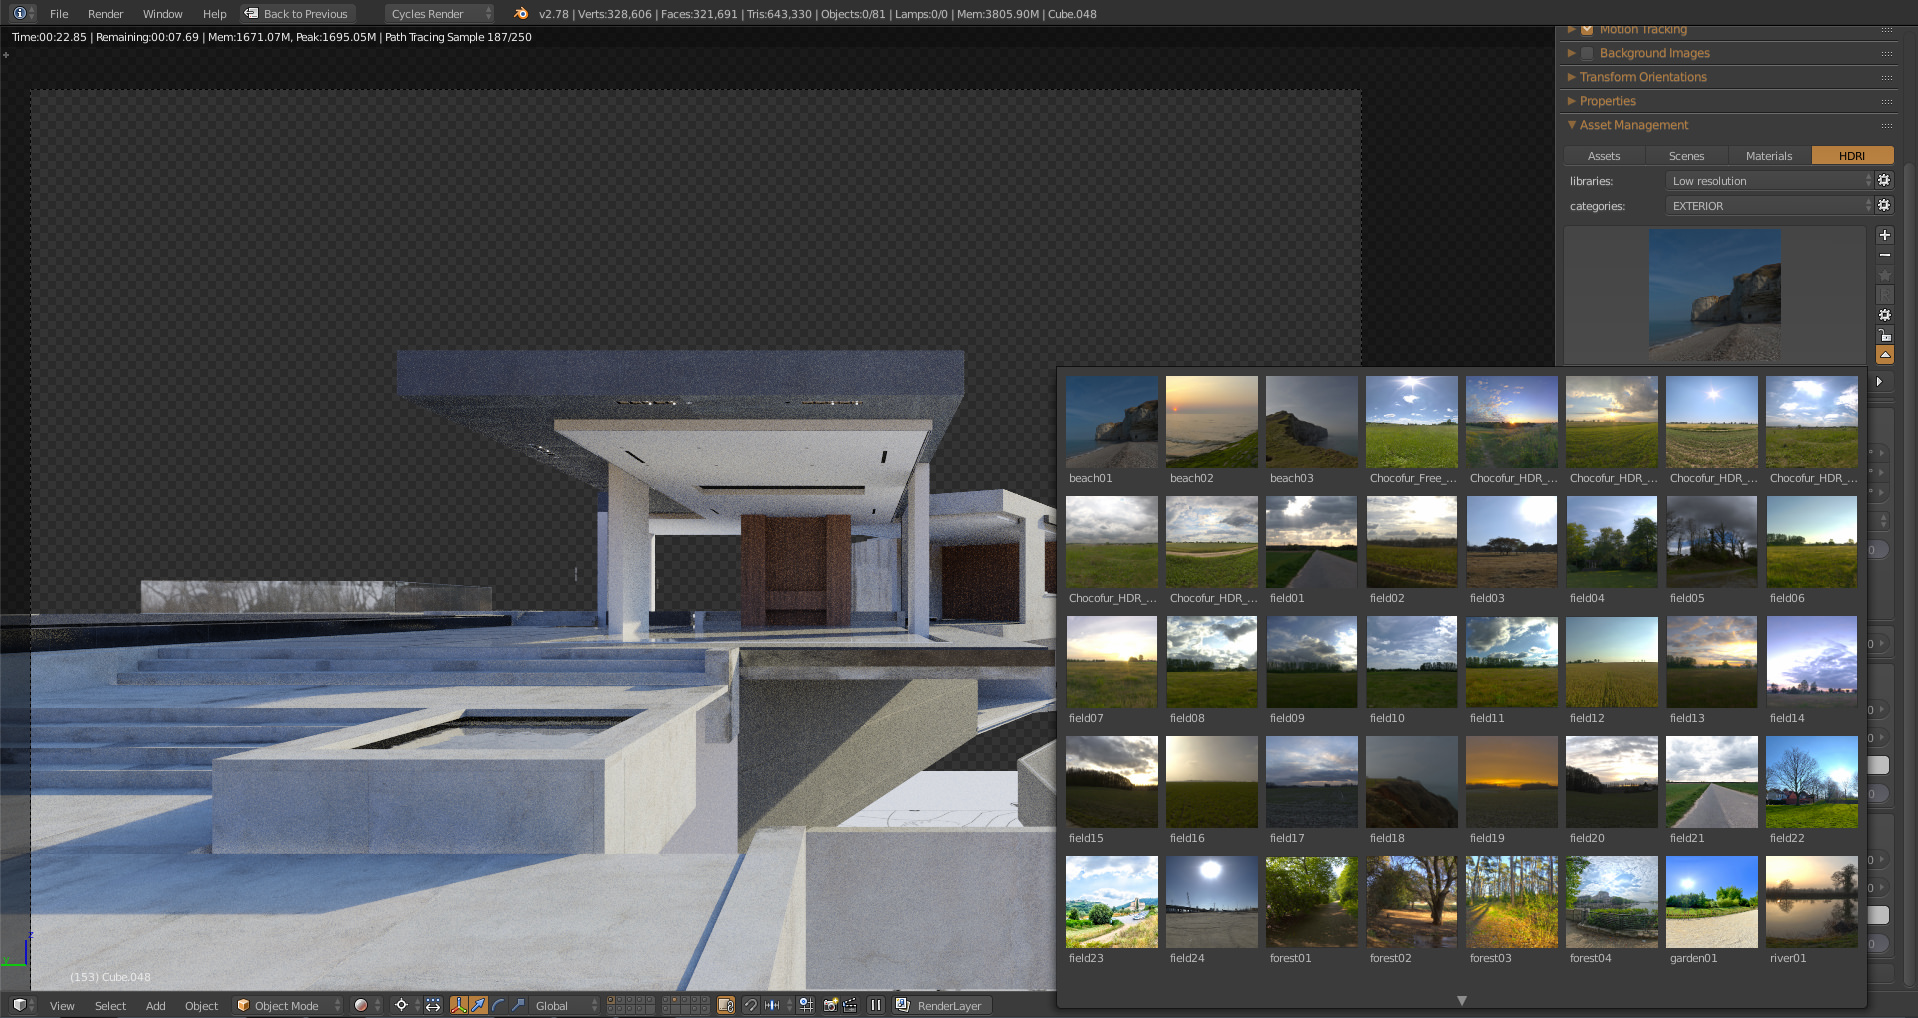
HDRI maps stored in Asset manager
I love to play with HDRI maps. I use an addon called Asset Manager which allows me to sort HDRI maps according to resolution and type (evening, day, night, city, etc.) Thanks to that I can quickly try various types of light and then change intensity, saturation, hue or other settings.
A TIP : When you are trying various HDRI maps use versions with a small resolution. Thanks to that your scene can be easily updated and rendered. Before final render remember to change it to a high resolution.
Rendering
The render engine I use for almost all of my projects is Cycles. Cycles is Blender’s ray-tracing production render engine.
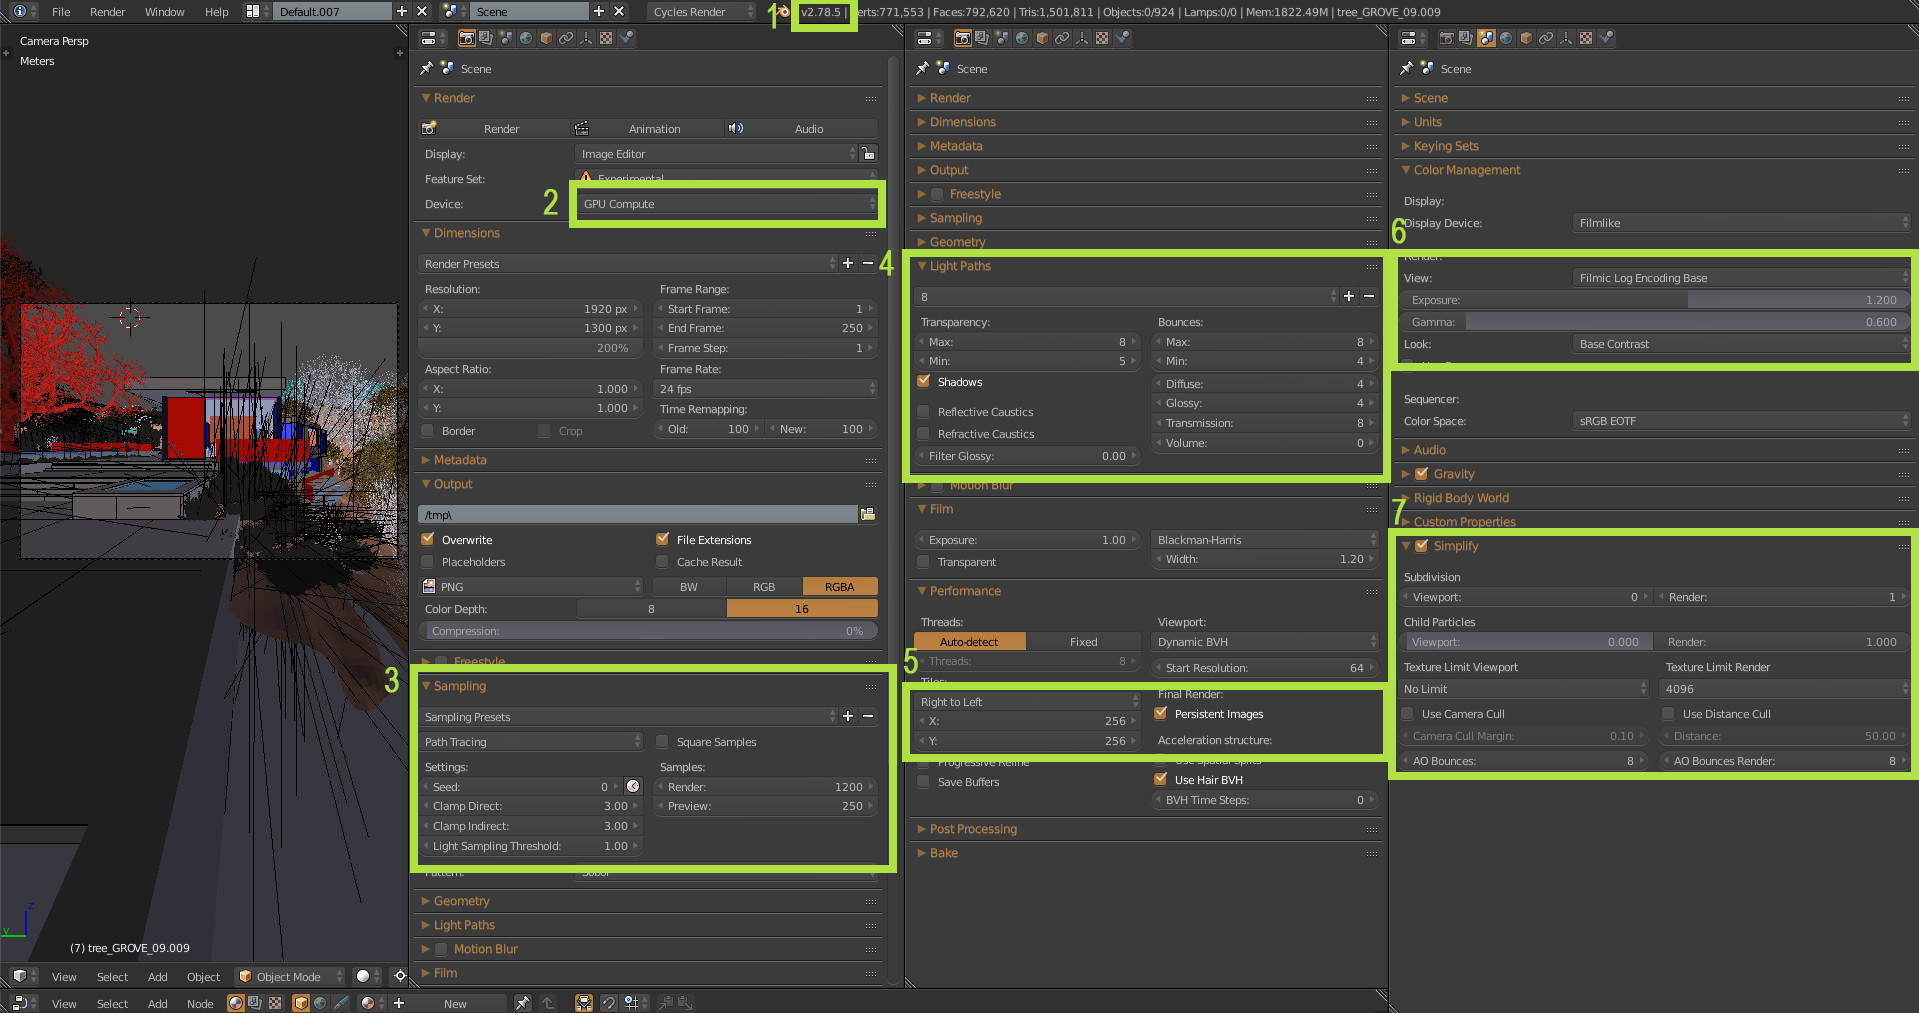
Render settings
- VERSION – A version of Blender which I used was 2.78.5.
- RENDER – I used GPU rendering. I have three graphic cards on my computer, but only Nvidia GeForce GTX 1080 has enough memory for rendering this scene (8GB).
- SAMPLING – I used Path Tracing, Clamp direct 3, Clamp indirect 3, Samples 1200.
- LIGHT PATHS – Light paths have a significant impact on the quality of your render and also on the rendering time. It´s worth to play with various values and compare the result.
- PERFORMANCE – Nothing special here, just one detail which could be interesting and that´s the way how rendering begins. You can choose one of the following… from the middle of the picture (Hilbert spiral), from Bottom to top, top to bottom, right to left and left to right. I used right to left method, which is better than Hilbert spiral because you can stop the render for any reason, save the image and then change the method to left to right. If you do not alter camera and lighting, you can put pieces together in photoshop and by that save time spent on rendering the whole image again.
- COLOR MANAGEMENT – I used a Filmic Log Encoding Base, which is essentially an OCIO configuration that enables you to see a photographic-like dynamic range. It´s a new feature in Blender and more about it, you can find here. github.com/sobotka/filmic-blender
- SIMPLIFY – The version of Blender I used (2.78.5) contains a new powerful feature in the Simplify section. You can set up a limit for subdivisions, child particles, it was also in previous versions, but now you can set up limit for texture size and limit for AO bounces.
Limit for texture size is good for your GPU memory management, and AO bounces are great for speeding up rendering.
Post Production
I’m that kind of 3D artist who tries to make everything in 3D and don’t rely on post production. In this case, it was just playing with contrast, saturation, color balance and thing like this.
Final Renders
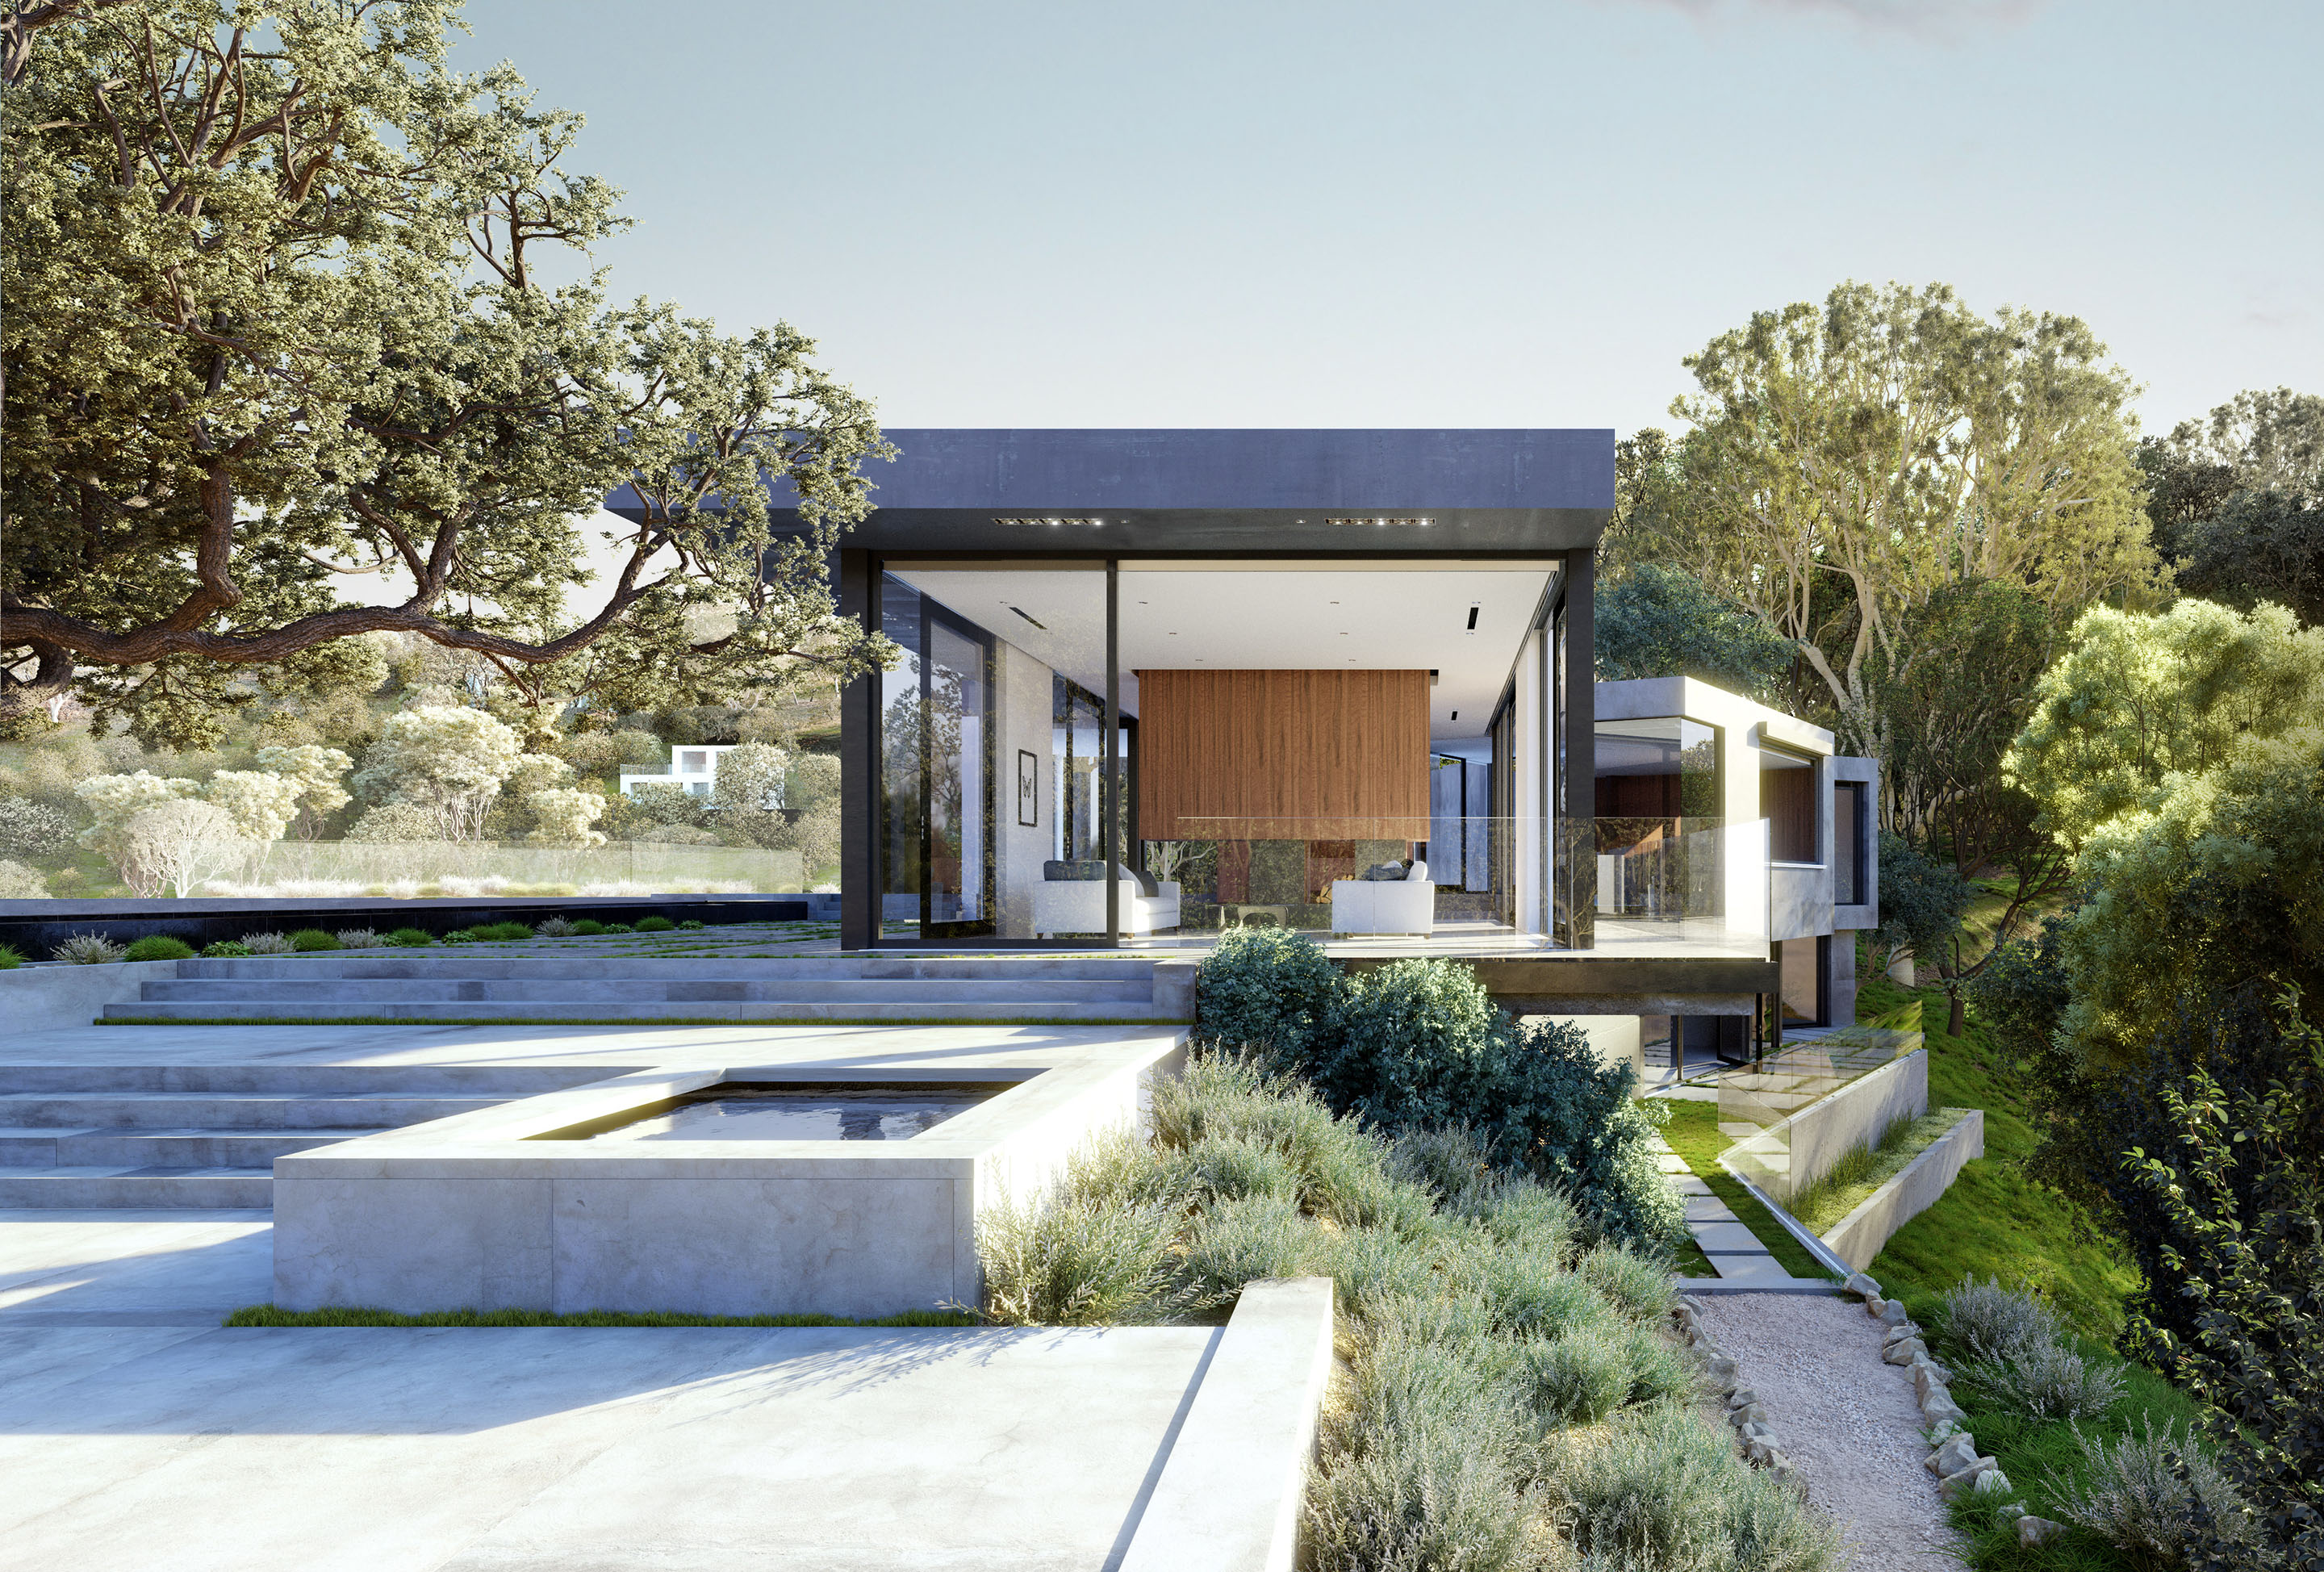

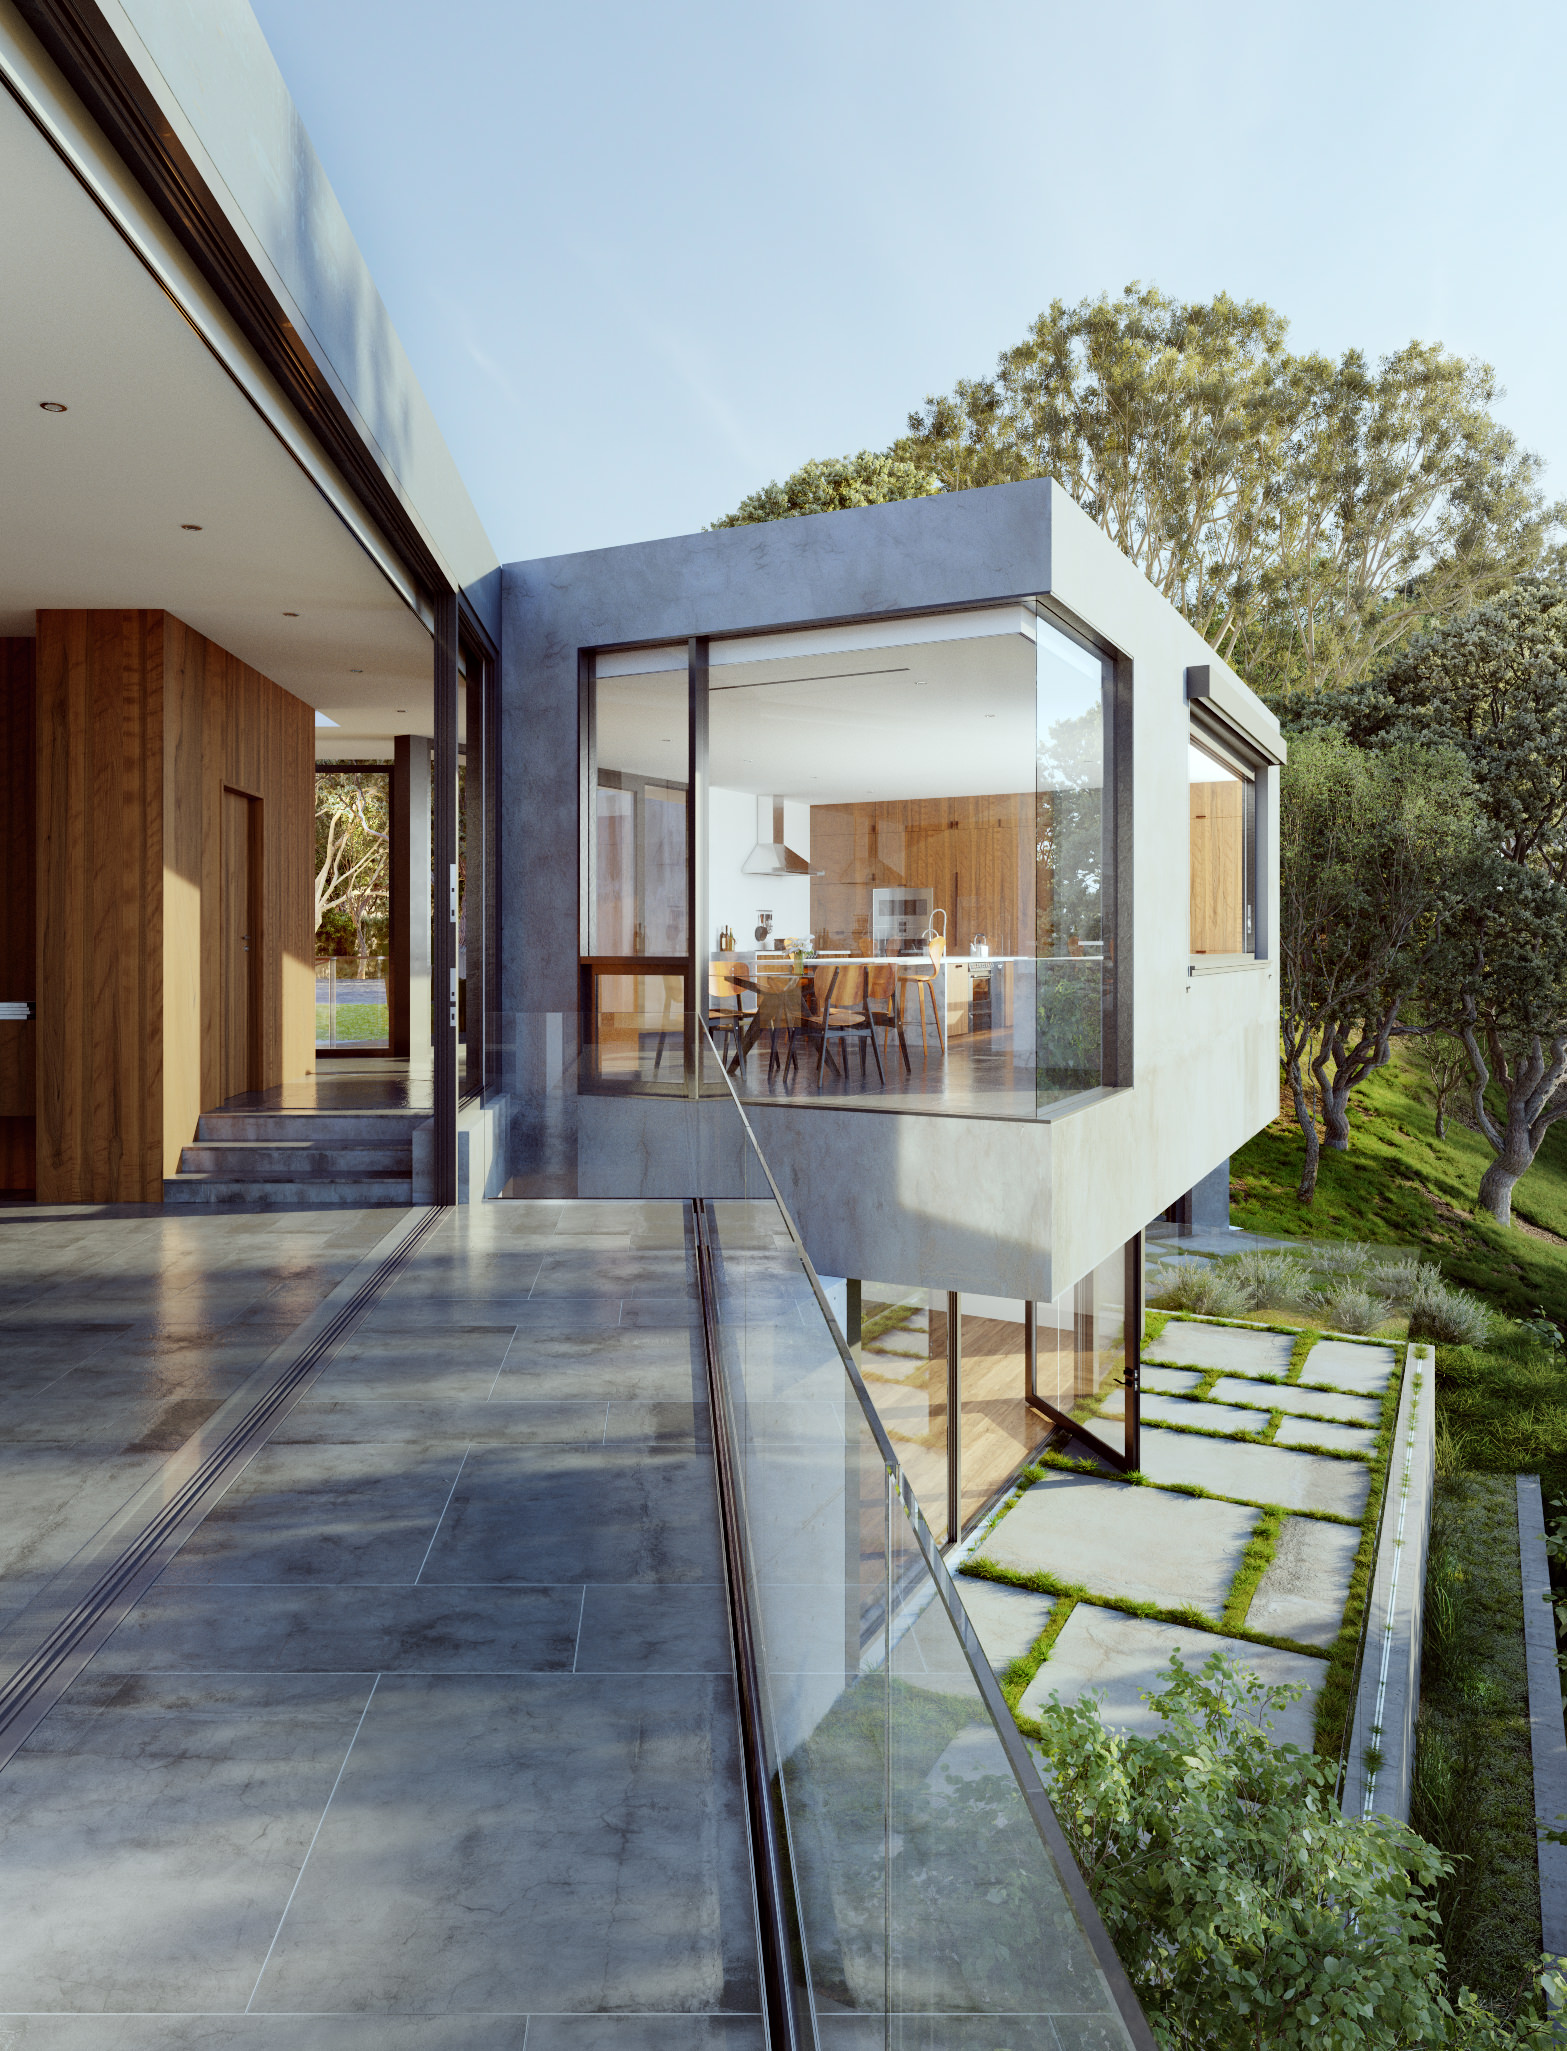
Thank you for reading this making of Oak Pass Main House by Walter Workshop architects.
I hope you enjoyed it and learned something new. I would like to thank my girlfriend, Janka, for helping with preparing this article.
Please comment on it below.


It’s time I start working with Blender. Your work on the plant is very good.
Stunning renders again! Well done and very nice explanation of the project as well, much appreciated!
Thanks. I enjoyed it, so I hope it helps. Also thanks for your tip. I usually set it to view only about 2% of particles.
I use Thearender as renderer. This only renders the partiles visible, thats why 🙂
PS one huge tip is setting the particles object to BOX in object tab. If you have 1000 of objects to render using particles it will slow down the viewport immensely. Viewing them as simple box models helps speedup the process
Hello ! I just wanted to ask you something… Who do you think is the best program to render ? Im actually focusing only on 3dsMax and looking forward to increase my skills. Is Blender better than 3dsMax if it comes to rendering ? I mean not just rendering, but the whole process, creating the scene, materials etc. Im finding things you do on this scene much easy to do with blender than 3dsmax, so this got me wondering, should I focus only on 3dsmax, or explore other programs aswell. As for 3dsmax Im trying to learn it online by watching tutorials…
3ds max can do this easy too.
then do it dummy..duh lol
cycles render is not for still rendering. its slow, also, its now really good in caustics, and in arch its almost the main thing. This sample of work is more exception, than a regular thing. use vray for arch rendering, dont bother with cycles.
That’s not true. This scene with a good gpu is gone in hours. 1200 samples, reduced ao bounces and everything it’s like standard. Also the denoiser is very good handling fireflies
That’s not proper info. Even now with the noise reduction tool its even faster. I never use it and only model in blender. Try Thea render. It’s a super faster CPU/GPU renderer
Hi Jan. Great renderings and I appreciate the break down. Very informatiive. I was wondering about your upgraded computer system, how much RAM do you need for this level of greenery/trees and what GPU did you end up with? I am looking to use similar level of greenery and my current pc can’t handle it.
Thanks
Perhaps one thing you forgot. To mention is the “edit linked” add-on. This automatically saves, opens linked models if you need to edit them quickly. Also amaranth tool for checking missing textures. Another one is super grouper which I prefer above layer management. Another one is group editor to quickly and properly the edit groups.
Ive written as add-on myself which does automattically export to uvlayout and return the object. It super useful
When I create trees and use the tree in a particle system, the leaves are not included. So I will have scattered a naked tree.. how can i go about the process including the leaves, same goes for the bushes i create. the grass will not be scattered with the object. an answer would be much appreciated!
Check out the particle instance modifier. By coincidence, ive have just been checking this out. You can use nested particle systems with this. There is not much info about it though, start checking this link https://www.youtube.com/watch?v=t0ZPoiza6bg
He has 3 vids about it
i had found that earlier, i was able to place the trees, but still the twigs remain unscattered!
worked for the shrubs, but the shrubs were not located on the plane in the end. the trees… no clue
fantastic