


Making of MS House at dusk, Part 2
I finally found the time to finish part 2 of Making of ‘MS House’ at dusk, Part 1. This time I’ll cover topics starting from the export of the SketchUP 3d model and up to the final render & post-production. Autodesk released the SketchUP Importer for 3D Studio Max 2010 which allows for a new and probably better importing of the SketchUP model then the 3DS format use described in this article. Next time I’ll keep post parts a week apart at most.
So, what is a ‘MAKING-OF’ all about?
More than a HOW-TO but not really qualifying as a fully-fledged tutorial, a MAKING-OF post is a collection of spotlights illuminating several different aspects involving in the creation of the subject scene. Hopefully, the information I’m sharing here will be useful for all of you 3d visualization artists, architects, designers and anyone else with an interest in 3d architectural visualization.
Exporting the SketchUP model to 3DS file format
We finished part 1 of this making-of with the view of the complete model ready for export as you can see in the image below.

Finished model before export
My preferred method of exporting the SketchUP model to 3D Studio Max is using the 3DS file format. In the 3DS Export Options Geometry tab you can choose the method of transport :

3DS Export Options Dialog
- Full hierarchy
- By layer
- By material
- Single object
Normally when first exporting the model I would use the by material option. This way I don’t get Multi/Sub-Object materials in 3dsmax and have better control in choosing and editing materials. You can still pick each element in the model regardless, the by material export method doesn’t fuse / weld all the same material geometry together.
For subsequent model updates I would check the Export only current selection after I make sure only the parts I need to re-export are selected. For this I would sometimes use the Single object option, just to make things simpler if the new addition only uses one material for example.
On the first export I also check Generate cameras from pages and I don’t mess with the material options really. Since I tend to model all things as they are in real life I wouldn’t get 2-sided material faces and wouldn’t have any edges to export too (sometimes it is real easy and fast to represent rails with just edges, but before export I add thickness to them).
I also do not use the Export texture maps option, I handle this part in 3D Studio Max, though the assignment and positioning of textures in SketchUP does transfer even without checking this option (after you apply the texture in max you will see the mapping is the same as it was in SketchUP if you use the same proportion image).
Importing the 3DS file into 3D Studio Max

View of the model in the 3dsmax viewport
I’ve created a new 3dsmax file and imported the 3DS file exported from SketchUP into it using the default settings. After that I usually run the VRay Scene Converter from the quad menu just to start with all materials set to V-Ray. I also take the time to pick materials and assign related geometry to layers such as window glass, pool water, house walls, etc. I don’t change the material names yet, since i know I’ll probably re-export some parts and would like them to keep the same material by using the use scene material option when merging them in. All future imports to the work file will start by importing the 3ds file into a clean new 3dsmax file first and then merged into the work file. I find this method is keeping me out of many troubles.
Initial ambient occlusion render
I’ve integrated this render method, as described in the post about Using VRayLightMtl + VRayDirt for Quick AO Render Checkup, into my work-flow after reading a tutorial by Gus Capote form Preconstruct in the 101 issue of 3D World Magazine. I love to use this method while I explore the scene for camera placements and blocking out additional geometry. This way i keep my focus and don’t bother myself with lighting and materials other then turning glass elements on / off to see how the scene look with and without it.

Initial AO render

AO render without glass and pool water
LWF settings
I use LWF for almost all my work. You can find a great explanation about this in the following links :
I’ll just show how I set it up hare and mention that I burn the 2.2 gamma into the image. While this is not considered the proper LWF method it works fine for most of what I do.

Preference Settings Gamma and LUT tab
Image Based Lighting (IBL)
For lighting this scene I use an image created by Valentijn Kint, you can find his great sky images here. I place this texture in the environment slot of the 3dsmax Environment and Effects options dialog

The background dusk image

Background image in viewport
I use the image as is, and just offset it so that the bright area will show on the right side of the image. behind the tree line. I enable view of the background image in the viewport so that it will be easy to set it up the best way. As a general rule i strive to achieve a wide range of colors and brightness levels in the background adding to the image impact. This kind of backlit situation plays rather well with interior lights and i prefer this over pure night shots.
V-Ray physical camera settings
I’m using a VRayPhysical camera to render this scene, with settings as listed below. I try to use real camera values since I can relate to that (The ones you can actually dial in on a camera). I normally start with pure white for the white balance and change as i need along the way – for this image i didn’t, all the tone mapping was done in post later.
- Focal Length = 20mm
- Shutter Speed = 1/60
- F-Number = 2.8
- Film Speed (ISO) = 200
- White Balance = 255, 255, 255
- Vertical Shift Correction = On
- Vignetting = Off
Before choosing the final settings for the background image and camera I rendered a set of 10 images, with an override material applied, offsetting the background by 0.1 each time. Today it’s possible to do with V-Ray RT without any test renders, just change it and see it on the fly!

10 Background options. Top Right was chosen for final image.
After setting the desired background offset I test the scene using slightly better render settings with and without the window glass and pool water, and also test it with them but apply a 100% reflecting materials to those elements to get a feel of how the maximum reflection looks. I f i need to tweak the background a little to show better reflection too this is the stage i do it in. After that I quickly tested the scene with glass and water elements turned on and excluded from the general scene material override.

Window glass and pool water off

Glass & Water with 100% reflections

Initial glass & water materials
Scene materials & textures
I’ll focus now on some of the more dominant materials in the scene, elaborating a little about the textures and settings i used for the windows glass, pool water, pool tiles, wood deck, wall plaster and grass.
Window glass Material

Glass
For the glass I’ve set the diffuse slot to pure black. Reflection assigned a falloff map set to Perpendicular / Parallel and edited the mix curve so that its not pure black and white at the edges, this way it will never fully reflect or refract. Retraction set to pure white with IOR set to 1.545 and a standard noise map for bump set to 1% to imitate real life glass distortion.
Pool water material

Water
The water material is tricky since it’s really a combination of the pool surface and water that creates the final effect. As the glass the diffuse here is also pure black. Reflection set to RGB 185,185,185 with Fresnel turned on, IOR set to 1.333. Refraction set to RGB 240,240,240 with Fog color of RGB 60,240,225 and a multiplier of 0.02. A a standard noise map assigned to the bump slot at 8% to recreate the water surface.
Pool tiles
The pool tile is a combination of maps i got from one of the evermotion packs. It uses 3 images for the diffuse, bump and reflection map slots.

Pool tile texture from Evermotion Archexteriors 05

Pool tile settings
Wood decking material
For the wood deck I’ve used Arroway’s boards+01 texture form their general texture pack.

Arroway's board+01 textures

Wood deck material settings
Grass material
I picked up this grass material from evermotion forum after a kind user shared it, I can’t remember who it was though (if you do, please mention this in a comment below). It is a mix of 3 grass diffuse texture and a grayscale texture for the V-Ray displacement.

Textures used in the grass material

Mix tree for the grass material
Bamboo like plant
I used the advanced painter script to paint grassStrands and assign this material on them to look more like a bamboo type plant. The effect is great from mid to far camera placement. Near shots may not look that great with this setup.

Advanced painter grass strands

Bamboo like plant material settings
V-Ray lights & standard spot lights settings
Inside the house i placed several VRayLights near the ceilings with a little bit of orange in the color slot. For the pool i decided to go with standard spot lights so i can have more control over the direction and spread of light inside and outside of the pool. Here are the settings for both the VRayLights and Spot Lights.

Top view of lights layout

Light settings
Trees and shrubs
The vegetation in this scene is a combination of Onyx, XFrog and Evermotion models placed either manually or scattered using VRayScatter. The background trees are made out of two VRayScatter objects, each with a different tree (An onyx custom broad leaf and XFrog conifer). Both materials were tweaked to use the VRayScatterMap to allow for leaf color variations between tree instances.

VRayScatter objects
The small areas of shrubs were define by drawing a line shape that was then converted to poly to become the distribution geometry for the VRayScatter object (the poly object was set to not render).

Small area defined to scatter shrubs
V-Ray rendering settings
Render settings are rather simple and actually weren’t optimized that much. You can see them all in the image below.

V-Ray render settings
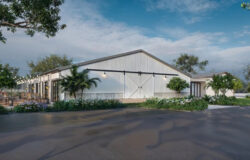
Final result after render & postwork
The initial render was not a good sight, but i was planning on doing most of the tuning in post. I’ve done some general color and level corrections and also specific tweaks to the pool area, window glow and trees in the background until i was feeling good about the atmosphere. below you can see the initial image, mid process image and final result.

Initial render

Middle of postwork process

Final image
End of part 2/2
So, this concludes the ‘MS House’ making of. In this post I described some aspects of my 3D Studio Max & V-Ray workflow. Starting with the export of the SketchUP model and up to the finished post worked image. I hope you find this information helpful and please feel free to comment below.


Great stuff! Thanks for sharing!
One quick and simple question… When you apply the sky map for the background, do you set the bitmap parameters to spherical environment? How are you offsetting the environment?
Thanks!
The background bitmap is set to spherical environment. Offsetting is done by setting the U value to something between 0 to 1
How do you get the map to show in your background? I can only use it as a background image but there is no way of deforming it to a spherical wrap, or offsetting it.
brilliant post yet again!
Might be worth pointing out what the RGlossiness map is doing to the wood decking material. Usually its not necessary but it will be helping the decking material in your scene.
And here are two further links on LWF by cgpov.vom that I really like:
http://cgpov.com/?p=103
http://cgpov.com/?p=128
Thanks Peter! Those vimeo links over at cgpov doesn’t seem to work anymore.
Great renders. And a very helpful tutorial. Some points really will help me for making a nice dusk render.
Great work… keep it up.
Amazingly, a very valuable material, very grateful,
indeed excellent blog 😉
greetings from Guatemala, Central America
excellent post! always wondered how you did that one, looks amazing!
Thanks Arthur!
Nice renderings and very well putting all together for us… for some people that still thinking that SketchUP is not a powerful tool like other applications… one can see here that it depends how you use it.
I have an observation, for the pool tile, the reflective map should be black between tiles.
You are correct, that map was inverted inside the output settings panel of the material editor, so the gaps are black.
Some render engines (Maxwell Render, Fryrender) consider the reflection part of the material as roughness amount and then white is totally rough and non reflective, so the same map inverted or not can be used depending on the way the render engine works.
Hey Ronen,
I’ve never gotten the texture for the exterior white walls of your houses right. I’m not thinking it’s plain white though; what material are you using?
Thanks!
Hello!
Great post! Excellent, detailed tut. Thanks so much!
Quick question: Any chance of sharing the materials you use for glass and water? The water looks AMAZING.
Quick comment: If I had to say that something doesn’t look natural, I’d say that there’s no light emitted from inside onto the outside. I do believe that’s a glass problem. I might be off on this one.
Again, GREAT POST! THANKS FOR SHARING!
Thanks Florin!
About the light emitting out, you can see the light rays due to the louvers on the side wall… so it does come out. It might not hit the deck too much if that’s what you were looking for, but this is probably due to the louvers again.
About sharing the materials… all i can say is you should subscribe to the newsletter if you didn’t yet. November issue will be out in a day with some cool stuff in it 🙂
Thank you Ronen,
All the information that you gave to us in this post is necessary for begginers.
Everyone is trying to keep knowledge for themselves, but you shared it with us unselfish. You are great man.
Good luck,
and I hope to see some new good posts from you
Hello,
I used the same background, but the quality is bad and has a little distortion.
All you work was done in max? or you needed to fix the the background in Photoshop?
Postwork was done to the image with all it’s elements in Photoshop – not just for the background. Did you check you use the spherical environment mapping type for the background, perhaps this is the reason of the distortion.
Yes, I checked the spherical environment mapping.
Today I tested the background again and everything is working fine.
Thank you.
Thank you for the fantastic posts and great blog, I am always impressed when CG artists are willing to share their “trade secrets” … keep up the good work.
Very Very Nice and easy to understand tutorial. Many Many Thanks for all your help.
Your work is awesome! Thank you & Best of luck.
Hello,
Thank you for your inspiring and, above all, great tutorial.
I am trying to follow your steps, assigning a background image to the render but I’m having problems with the “Affect Background” option not displaying the image correctly on the render (too dark) and also the reflective / refractive materials aren’t rendering correctly.
Could you please check what’s wrong?
http://img210.imageshack.us/img210/8416/problem.jpg
Many thanks in advance,
Cheers!
Hello (again),
In my previous comment I noted an issue with the background image appearing too dark, and not showing correctly on reflective / refractive materials in the scene.
By comparing your scene with mine and trying to isolate what was going wrong, turns out that I was using a camera with F-Stop 16 | Shutter Speed 125 | ISO 100
Although this configuration adjusted the correct exposure for the objects in the scene, the background image was completely underexposed. By adjusting it to your settings (2.8 | 60 | 200) the background now rendered normally.
Now what confuses me is the following – Keeping the VRay Sun and VRay Sky would now overexpose the objects so that the background image could be correctly exposed:
– Either I delete the VRay Sun & Sky, and only use the background image.
– Or I adjust the sun multiplier to something like 0.01.
So far the latest was the one that gave me the best result, keeping the VRay Sun & Sky and background image correctly exposed. But, is this the right way? Is it correct to keep both of them? Or should one just stick to one of lighting source solution? Because the background image already lights up the scene a bit, I’m afraid that adding the VRay Sun & Sky will create unreal results.
What is your procedure when you want to use a background image and keep a real sun/sky settings on exterior renders?
Once again, thanks for your attention
Cheers!
Hi Eduardo,
I appreciate the fact you find this tutorial of value to you.
In this scene i used only an image for the general lighting. No VRay Sun or Sky was used and I only added VRayLights for the interior and Spotlights for the pool. This isn’t the only way to go, just my way in this particular scene.
You can add a VRaySun or VRayLight to add additional direct light if you like but you will most probably have to compensate somewhere else for it to get the same exposure. Either in the VRayPhysicalCamera settings or the levels of the background image.
You must establish the starting point of your setup and adjust from it. I would never change the VRaySun intensity from the default 1 when I use it for example, since this is what I decide as a baseline and it fits with the Physically Correct Concept that was integrated into the new versions of VRay.
Ultimately what matters most is your own eyes, end even though I do my best to keep things “Physically Correct” as set by the render engine – It is really only a method to start with and get rather predicated results and I allow myself to adjust freely along the way as needed if my “eyes” says so.
Hope this helps. If you like to share your work, finished or in progress, you are invited to use the newly opened section of the forums that will allow in depth discussion of such things.
Thank you for immediate reply! It was of great help indeed.
I discovered your forum section, and there is a lot of information there which i plan to dig in the following days.
As you suggested, i chose to maintain the intensity = 1 to keep things ‘physically correct’ as you told. By adjusting the background image output levels and the VRayPhysicalCamera values, it now renders both objects and background correcly exposed to a Sun with intensity = 1
Thanks once again for your reply,
cheers!
Please, explain a little what’s the benefits of using sketchup and not importing cad files directly into 3dsMax?
From my experience working on both apps, and I do use both but for different things. SketchUP is so much more better for architecture modeling, especially if you model as you design – you really can get to model at the speed you think. I personally can never do that with 3dsmax, as I’m sure many others.
If you decide to learn 3dsmax and you get really good at it, you might model fast too as you design… but I do it along side the architects and it is much easier for them to understand the SketchUP model then the 3dsmax model and GUI.
Add to that the fact SketchUP is 1/8 of the price of 3dsmax and thus more popular with architects it makes much more sense to use it and ping pong SU files then 3dsmax file format.
Bottom line – 99% of my modeling is faster and much more fun in SketchUP… I need 3dsmax for rendering with VRay, Maxwell Render and such.
These days all the main render engines have plugins for SketchUP so I try to shift as much as I can towards SketchUP, but there are to many plugins and resources I have for 3dsmax that this is a problem still.
I’ve been checking out modo since it was out to replace both SketchUP and 3dsmax as one platform to do it all, But SketchUP is faster still for me with modeling.
Hello Ronen. Congratulations on posting (tutorial) and the blog.
Very good.
I would like to give a suggestion for you. You could submit this, or another making of, but addressing the V-ray for SketcUp.
For example:
CAD + SketchUp – Modeling & application of textures + V-Ray for SketchUP (textures, lighting, background, etc…)
I believe that many here do not work with V-Ray in 3DSMAX, only with V-Ray of the SU. It would be nice one Making Of these 3 combination’s. CAD + SU + VRay for SU
Cheers!
I will probably do one like you asked real soon!
Thanks for a great tutorial, it really cleared up some issues for me.
I have been using 3dsmax for some time but I am fairly new to vray, so I really appreciate people like you, who are willing to pass on information to us “new-commers” 🙂
Thank you soo much for this great tutorial, very very useful! Wonderful work by the way!
Hey Ronen,
Why not just render the mod with Vray for sketchup instead of first bringing it into 3DS?
Silly question maybe but im new to this? Im just begining to learn Vray for sketchup.
Thanks
Well… You could do that. But, I use 3dsmax for adding many more things and using plugins. It’s a workflow thing mostly, and you can have your own way about it.
Most of what I describe here can be done inside SketchUP using VRay for SketchUP
Dear Ronen,
Thank you so much for such a wonderful and easy to understand tutorial. People usually don’t share things with so much in it as you did and i really appreciate it :).
Your work is simply AWESOME and I am desperately waiting for your next blaster post.
I have a little problem using LWF and it would really be a great help if you can guide me through.
when I use linear multiply in color mapping the blending between the brighter and dark area is not soo smooth but in case of exponential color mapping its much better (I experimented it in a Interior scene with sun light coming inside from a window).
Please give your inputs and guide us the right direction.
Thanks
Sachin Nagpal
Hey Sachin,
Thank you for your great feedback!
To answer your question in the best way I recommend you post the image in the Work In Progress section of my forums.
That way I (and others) can help you further…
Cheers.
Thank you for the tutorial!
You are welcome 🙂
Nice work! One question though. How did you model the water surface in SketchUP? Can you share the water surface? This is the only thing in SU I can’t figure out.
Thanks 🙂
The water surface is actually a flat plane! the end result is all bump mapping related.
But… it is very easy to create a wavy water surface inside SketchUP and fast too. Just use the Sandbox tools for that.
I’ll capture a quick video and post it later so you can see it.
Mmmm sand box tools! But, I would want the water surface to be either really big and detailed or tile-able. Where did you find water surface bumpmaps?
I’m looking forward to the tutorial on that. Can you do a Tutorial on the miniature model style (all wood type and typical model look)
Keep posting! Great blog.
@VB : if u dont use the sandbox tools you can as well get artisian. just google the name and it’ll come up, much easier and flexible to use than sanbox. I do most of my modelling in sketchup but since water’s usually a flat plane displaced and rippled, i skip that and do it in max. 😀
Hi!
It’s the first time I’ve seen your work and I recognize that you have a great knowledgement about the workflow with vRay.
I personally prefer Fryrender or any other unbiased render engine but the expensive hardware needed limits the sizze of the scenes and projects I can execute with Fryrender.
By the other part exist people like you who reach great and amazing result (still) with vRay and this illusionates to me a lot…THANK YOU!..I still can work with vRay…
Let me start with the main question which has invited to me to write here:
“VRayScatterMap”…I’ve been searching about my VrayScatter plugin options and features and I have only found VRayScatterTexture…Or VRayScatterMask, but with any of these maps from VrayScatter I can have a control of the textures applied to two types of objects converted into proxies…For me, it’s a dream if I could change the appearance (temperature, for instance, or color as you said)of the texture of each proxy I have created with VrayScatter…So: Have you written correctly “VRayScatterMap”?…Believe me: I can’t find this feature and you know how important is for me…Does such a feature exist?, I can’t believe it! . Please, let me know where can I find it!.
Thank you very much in advance.
Great tutorial. Please, post more. Let us learn more. 😉
Hi,
Thanks for the tutorial.. I am wondering where to put Arroway Specular map in vray? I am not just talking about the wood material you have used..
For some images arroway have given s = 100% and g = 20%
I am kind of confused with it 🙁
Thanks…
Hi San,
The Specular map goes into the reflection slot and you can also use it in the glossiness slots too.
The % they state is a recommendation to get a similar looks as in the previews they show… you can do other things too as you like.
Thank you..
Gamma 2.2 is not working for me.. it shows all materials as they are in Vray RT.. but at the rendering everything washed out .. can you help me with it Ronen? Thanks..
Rendering normal and VRay RT are not in sync for some types of settings. How do you set your Gamma workflow?
Thanks for your reply.. I set my gamma as you recommended.. 2.2 and materials looks washed out in the materiel slot… final render also have washed out effects…
Here is the image with Gamma 2.2
http://img185.imageshack.us/img185/3005/44148711.jpg
Here is the image without Gamma 2.2
http://img52.imageshack.us/img52/852/14437445.jpg
Thanks for your time :))
It looks like. when i import a texture in material slot.. it is using images own gamma that is 1.0 … even though i selected input gamma/out put gamma to 2.2 in preferences.. it just wont load textures as gamma 2.2 textures.. I need to manually set it for every texture then it wont look washed away..
Any ideas?
Hi Ronen Bekerman,
thank you for sharing a lot of useful information. great work…
i’ve been searching for a complete video tutorial. modeling architecture from CAD file in sketchup. importing a CAD file into sketchup and modeling in all aspects. your efforts will be highly appreciated. it will be very useful for people like me…
thanks and regrds
Very exciting making of like a complete tutorial. A lot of details ! Thank you very much.
Excellent work I just wondering if you can share the Original Model in Sketchup I work entire in Sketchup and I want to replicate the same effects or close with Vray for Sketchup if you can email me the Sketchup model. I really appreciated. Excellent work.
Gonzalo Arteche.
I have some time to kill at work for a change so I’m playing with this oldie but goldie, do you mind sharing the material for your grass-setup? it would be much appreciated 😉
Cheers
Can you share the 3D model of Sketchup of this brilliant work? I talk to ASGVIS and they send me here to ask for the Model it would be much appreciated.
German Milente
Hello Ronen,
First of all, thanks for this stunning giveaway. I hope to learn many thing about V-Ray with this.
I started using V-Ray with version 2.0 But at this point, I am not able to find the background image. I am trying to learn about it. Could you give me a tip about this?
Thanks in advance.
Thanks Mehmet,
You can find the skies here – http://vknt.be/free/skies/
Hi, am I correct to say that your steps for IBL were adding the bitmap of the sky, then dragging it over to the material box to offset it? I can’t get the sky’s bluish ambience to reflect on the house at all. The house (with AO) renders white and it doesn’t seem to ‘receive’ the sky. Im sort of a newbie at this.
Your site here is the best on the web I think, pretty much a school for me now. Thanks in advance.
TL
I’m having trouble placing the boards specular map! I’m using arroway textures too… I click on bitmap and the directory browser opens , but I cant select the file!!! So frustrating… I think 3dmax may be lachking ram memory or something…. It happens randomly with other displacement maps… may it be that the map resolution or file is way too big? Is there a way to trick 3dsmax to let me use more ram memory? Or a way to expand it? I’ve got 4 gb ram… maybe I need way more lol.
Btw… congratulations for this great site! You are a big help for all of us trying to learn the misteries of 3d rendering! Thank you very much!!
@ jgarciachoms : u sure when the directory opens your file of type is set to jpeg? i think that should be the reason you’re not seeing it. its found in the lower right corner of the directory browser interface.
As for deceiving max to use more ram your best bet will be using a 64 bit version of max as the 32 bit never goes beyond 4Gb ram, you’ll also have to increase your ram for that to work. Cheerio.
NB : Trust me, the mysteries are just starting, and they’re quite big too… lol
thanks for giving such a valuable information
@kedharnathraju You are most welcome! I plan to revisit this scene at some point so if you or anyone else has any thing you like me to focus on this time – Let me know 😉
@kedharnathraju I’ll do several lighting looks using HDRi’s this time and also custom foliage using the great tool by exlevel GrowFX
You are a legend! Thank you for this beautifully written tute. 🙂 Cheers!
@Morph8 Thanks a million! I pleased you liked it… Expect more about it soon 😉
hi ronen,,thanks for great web site first of all,and i wanna ask you something? i want to change the reflection amount of glass material,as you showed on your tutorial ‘full reflection glass’ but i couldn’t find any settings that chages the reflection on glass material when i use texfallof? if you can help i will bi very glad..thanks anyway..
test comment
will delete
test 1 2 3
test 1 2 3
test 1 2 3
test comment, will delete
So thh only sources of ligh are inside the house an dunder water?
@plumber Yes, when I made this scene I was using only JPG as backgrounds in the environment slot… since then I moved to IBL (Image Based Lighting) and I use a VRay Light Dome with and HDRI assigned to it…
I describe this in this post – http://www.ronenbekerman.com/hdr-image-based-lighting-3d-scene-setup/
Hey Ronen! First of all, thanks a lot for the great tutorial!
I have a big problem do. I just cant apply vray matterials to my sketchup model! Materials work fine with the objects modelled in max, but when i try to apply them to objects modelled in sketchup, it just doesent work. its really frustrating, and i dont know how to fix it. Pleeeeease help me! Thank you in advance
Hi Ronen. Great job! I love visiting your blog. Could you please tell me why you prefer importing a .3ds file over .skp on 3ds Max? I mean, why you dont use the 3ds Max 2015 native exporter? Thanks in advance.
How long did it take to render the last scene..? I’m tring to render a night scene now, but
It’s taking way too long time. Even it’s a very tiny size, Idk what is the problem:(((