


Making of Minoco Wharf
Lukasz Gradzki from renderare breaks down the process of creating one of the images for the Minoco Wharf project they were involved in making visuals for. What I like the most about their process on this one, is how simple the basic model could be… and how they use textures instead of modeling and lights. I do find it funny how a SketchUP model is the “base” for further AutoCAD modeling… It seems almost sacrilege to me (more about the tools we use in an upcoming post).
Author: renderare
renderare studio makes illustrators of unbuilt spaces and architectural designs. It was co-founded in 2007 by Lukasz Gradzki & Kamila Gradzka, after working together in HKR Architects in Dublin.
Introduction
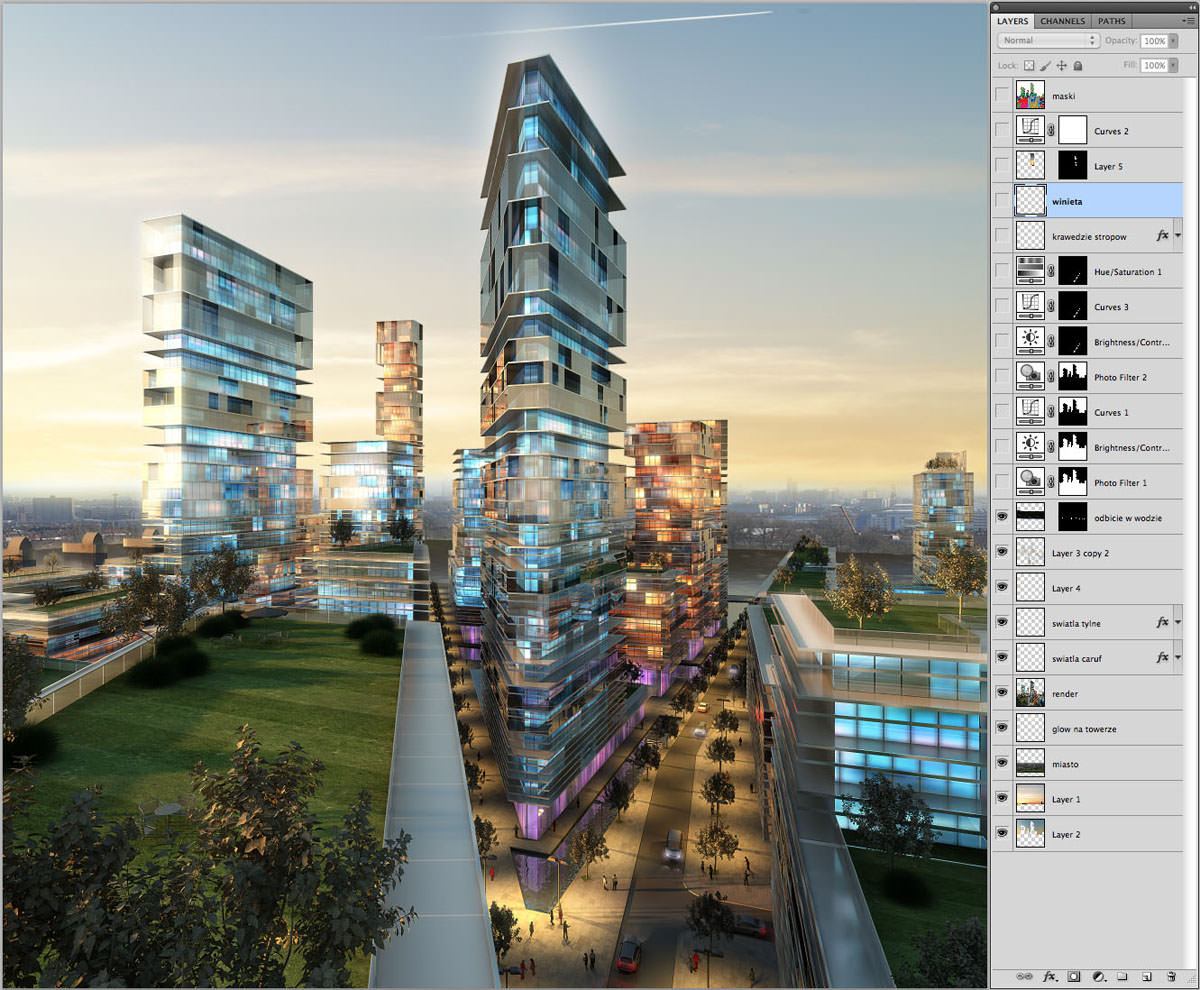
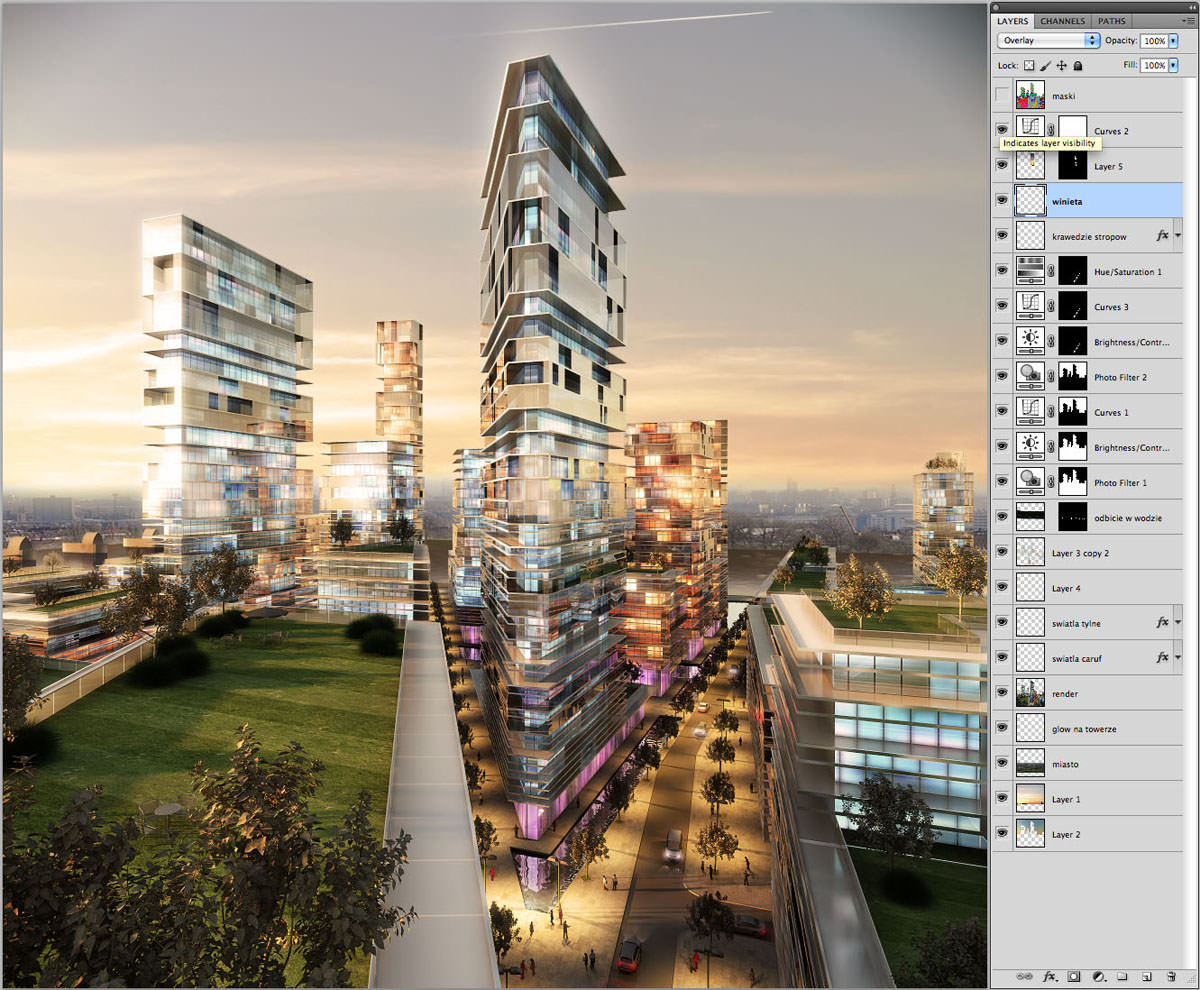
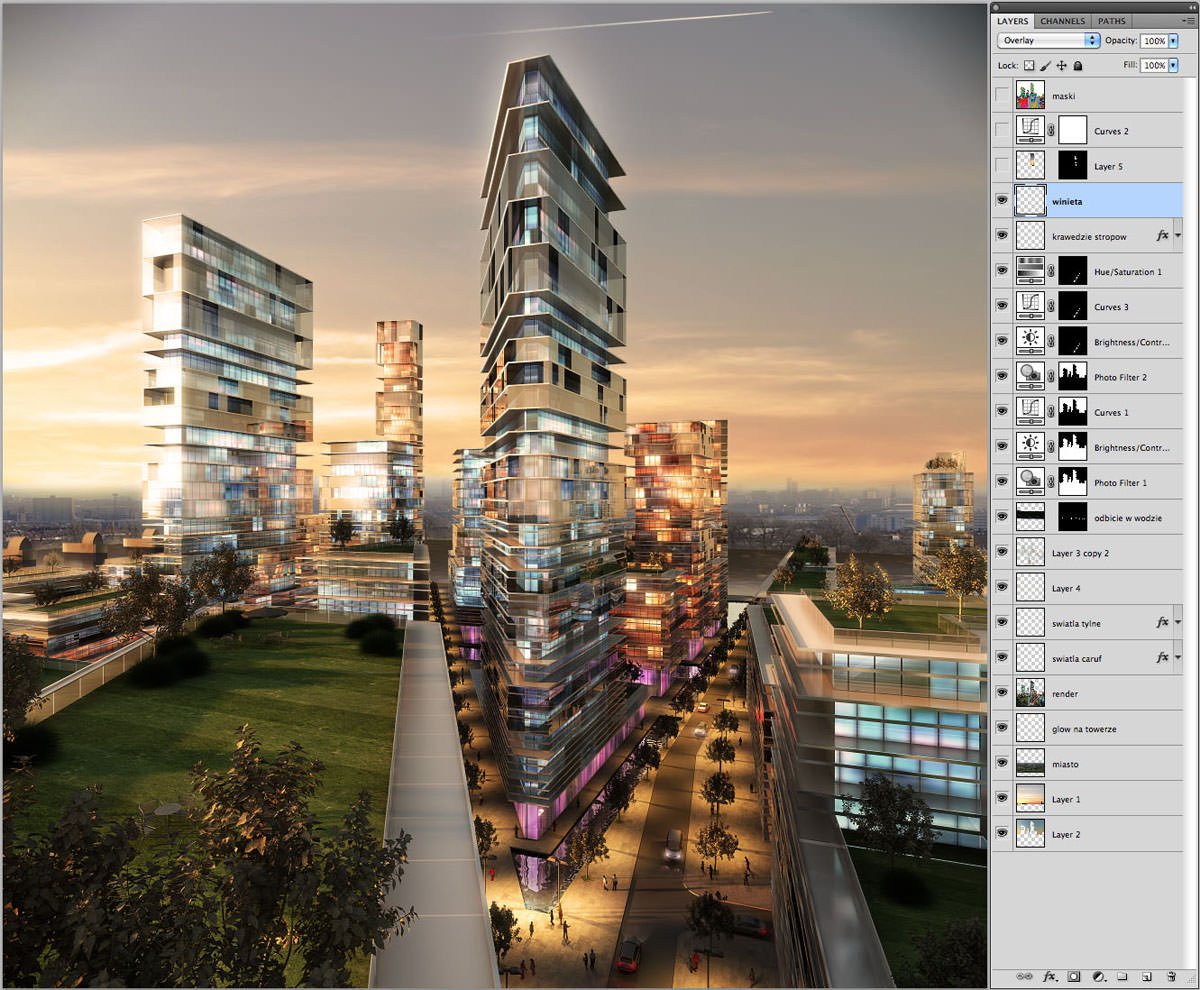
Ill start by showing one of the final results first, so youll know what we are aiming for with the process described below.

The entire brief was just one page of simple sketches and a very basic SketchUP block model of the site, to give us an idea about the massing and approximate viewpoints required.

We had very short time-frame to turn 5 views around so it was necessary to cut as many corners as possible especially when it came to modeling.
This is how the SketchUP model looked like


9 SketchUP Tips for better 3d modeling workflow
Follow these simple and easy to implement tips to make for a faster and smoother SketchUP modeling experience (A newer and updated version can be found on 3D World Magazine, March 2013 Issue, Pages 68-74 – “Pro SketchUP Workflow Tips for arch-viz”).
Basic Modeling
The 3d model of the site was built in AutoCAD (Yes AutoCAD). After importing the SketchUP massing we used it as a template to build the basic geometry.

All buildings had to be shown during different times of the day and there was no time to illuminate them with real light fixtures, and this is without even considering the increase in render times that it would cause so we’ve put surfaces set back slightly under the glazing to use them as self illuminating objects later.
They were split into 4 layers to allow some variation Surfaces for inner glaze skin of the buildings

All slabs don’t have thickness i.e. they are just flat regions.

Slab edges are represented by polylines. We are going to turn them to renderable splines in 3ds max and assign different material than the off white slabs.

Outer glazing is modeled again just as polylines, also to have renderable splines modifier applied to them. They are divided into five layers as we will be assigning five different patterns.

Just to show the offset distance between inner and outer glass.

Here is the camera viewport with some entourage from 3d libraries was added in 3ds max.

Instead of importing the DWG, it is linked to the scene to allow rapid changes and updates. Here you can see the inner glazing surfaces.

The slabs.

Slab edge as renderable splines.

Internal lights surfaces (inner glazing turned off).

Textures
We used textures to act as the lights inside the buildings in this scene. This is the texture for self luminance of the towers.

And a different texture for the glow in the ground floor areas.
![]()
This brings us to the complete linked model with the outer skin as renderable splines of various sizes and appropriate textures for opacity applied.

We used five different opacity patterns for outer glazing.

And a bump map for glazing to give an impression of some window divisions

Final Images Post Process
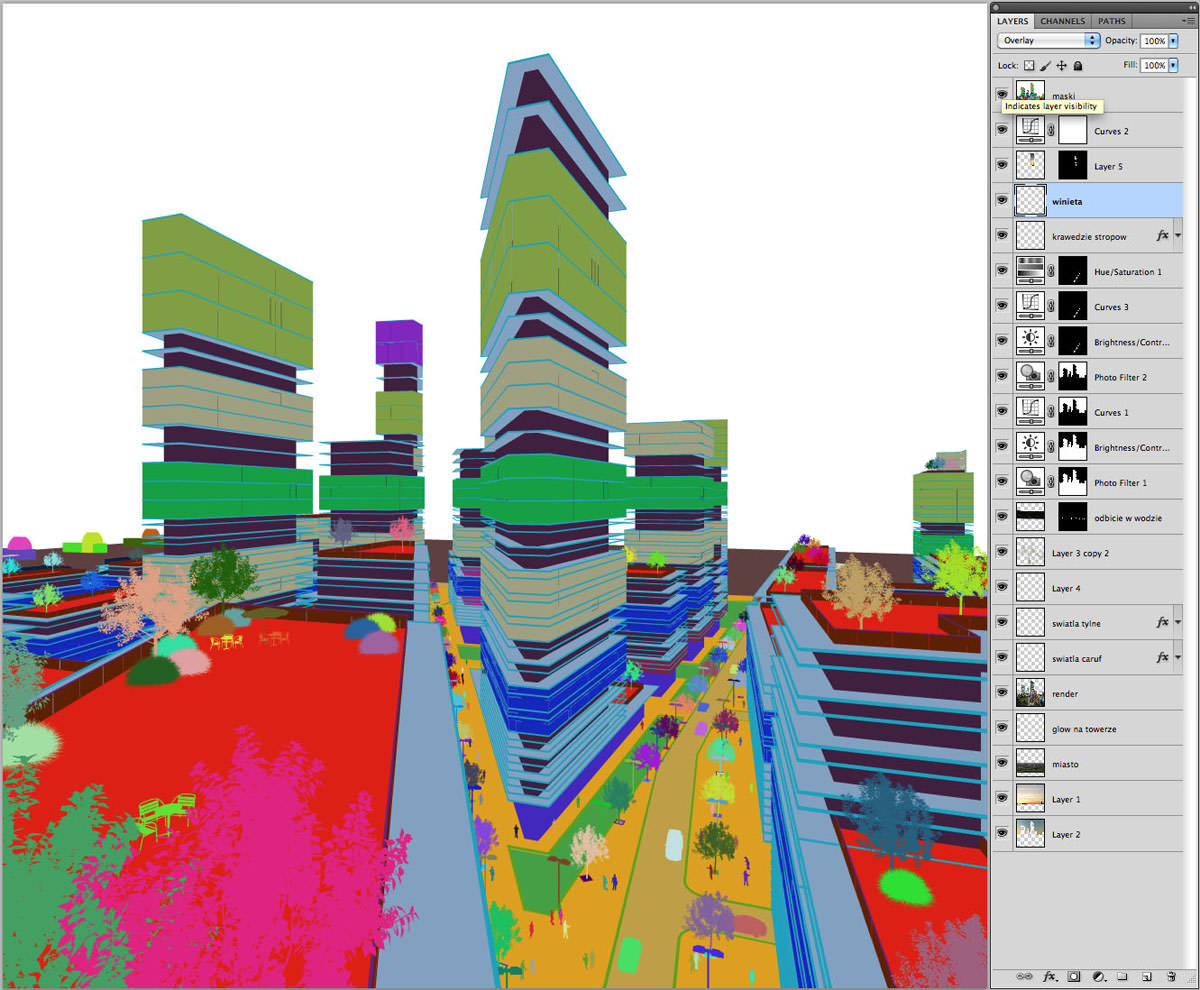
We render an ID mask for quick selections.

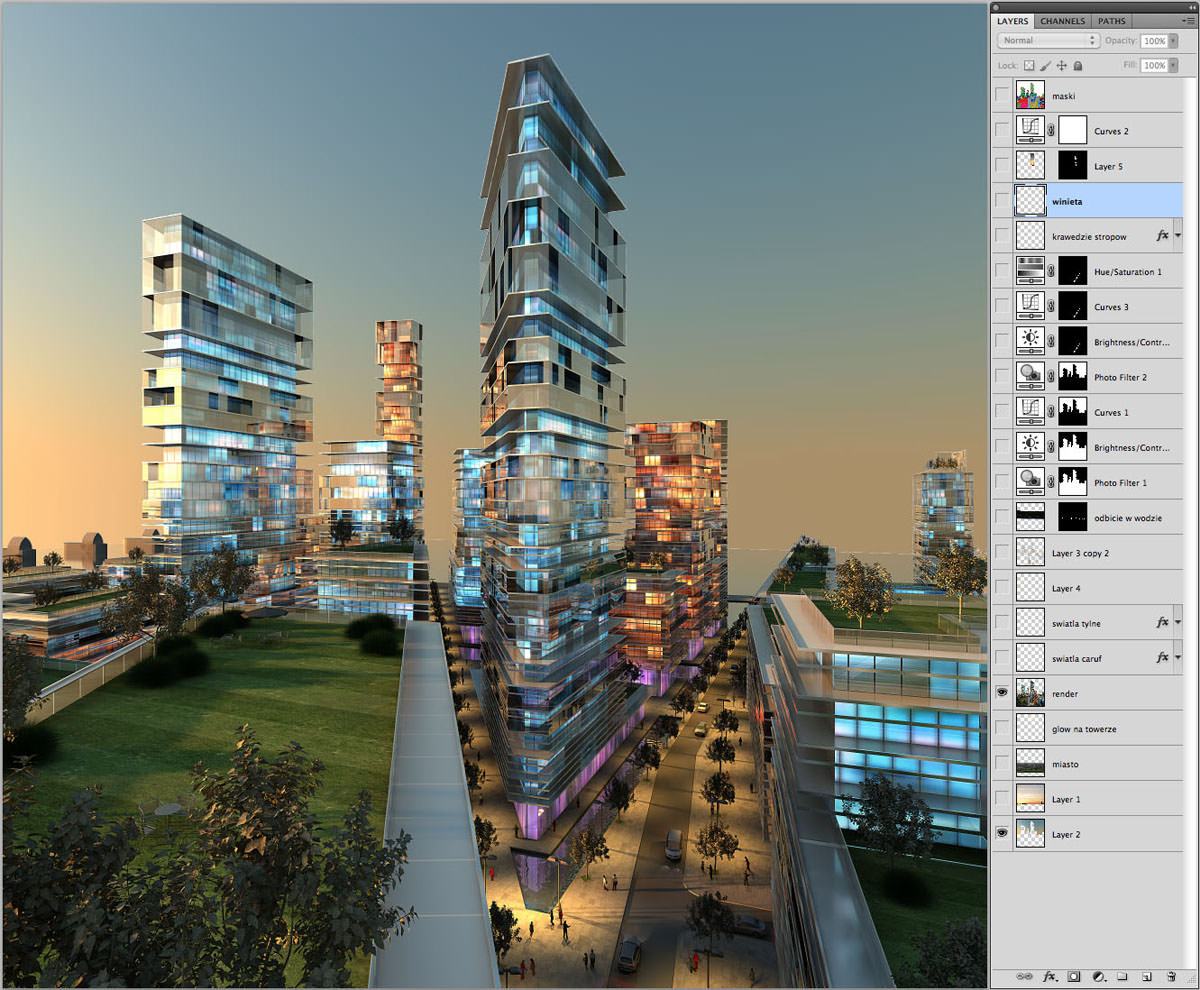
This is what came out straight from V-Ray.

Replaced the sky in the background.

Reflection of the sky in glazing, ground floor activity and a bit of lens blur in the foreground.

Color balance and contrast corrections.

Final image with cutout people and vignette added.

A similar approach was used for the other images in this set we made. Here’s the process set for one of the other viewpoints…
-

- Mask
-
- Raw Render
-
- Reflections
-
- Adding Sky
-
- Adjustments
-
- Final
I hope you find this useful in your own work, seeing that relatively simple modeling, without too much detail can still turn out very good when there is not much time and with smart use of textures to compensate for missing model bits and lights.
Cheers,
Lukasz Gradzki.

@ronenbekerman this was interesting to say at least. I would say, thats pretty..Efficient =p hyper eficient =)
@tomglimps It is, isn’t it? It’s great to see how simple you can go backstage, with a fancy facade to it all… When time is the issue.
@ronenbekerman i sometimes amazed of the possibilieties..of simple workflows.. =p it’s so amazing, that everytime You see smth like that..
@ronenbekerman ..makes You to reThink Your workflows..it’s amazing how far you can strech in terms of realism =)
I tend to heavily model, texture etc. with flexibility in camera angles and detail in mind but when you’re look for one great shot in a timely manner this basic 3D/heavy post workflow is great! There is a certain look that emerges as well. Not photoreal, not NPR. It feels more ethereal and emotional. I like it.
I find your work invaluable Ronen, this blog had dramatic effect on my work level.Great insight as usual, can’t wait for following tutorials, and esp. for the interview !Maybe unnecessary suggestion,…but I would like more background about artists of these tutorials, not interview but maybe 3 simple questions along with these articles ? Maybe like their stance on photoreal vs conceptional, or 3D vs Postwork…Thank you again ;- ) !
@JurajTalcik Thank you very much! You idea is a good one and might be placed in the “Author’s Card” at the top of each article as it shows now… I’ll work on that 😉
@JurajTalcik Fire away, ask me anything 🙂
great work, as always!
Very informative.. Thank you 🙂
Great work. Love the traffic light – someone tell the car drivers to take the right lane please 🙂
@DanielSchmidt Good point Daniel! It’s in London so the cars are actually on good side of the road, but the traffic light shouldn’t be there. What can I say? Rush job 🙂
I think this is a great example of smoke and mirrors. It just goes to show that sometimes the devil is not in the detail but in the overall impression of the whole image. With some simple autocad techniques ( I’m guilty of taking sketch up into acad) and effective use of maps, awesome results in short time frame. Thanks for sharing workflows that help get the job done!
Hi Guys, Thanks for all the positive feedback! I’m glad you liked it. If it would be of any use, we might upload the .psd to have a closer look.
@renderare
Hi Lukasz, that would be great, because I have a mess with all those layers!
thanks for this very useful tutorial:)
@jao @renderare wish granted 🙂 http://renderare.com/extranet/ronenbekerman/minoco_01.zip
With examples from Pixel Flakes and Making of.. like this, i get more and more ways to get nice final image. Thank’s!
Thanks a lot for sharing renderare,
great images and realy nice workflow
“We render an ID mask for quick selections.”
How do you apply the id to geometry?are you apply id on groups?
@max3dvi This is just a standard RenderID pass from VRay, the edges are jagged as there is no antialiasing, but you don’t have to assign anything in the scene, just feather the selection in Ps a little bit.
@renderare@max3dvi in the ID mask image i can see that there are groups of 3 or 4 floor, did you assigned to them different id?
@max3dvi no, each section of outer glazing (there are 5 of them according to 5 opacity maps) was a separate layer in CAD resulting in a separate object in 3dsmax, hence they appear in different colors in RenderID automatically
Thank you for a great article.
Does anyone know where you can find similar textures as used here to mimic the interior?
@EasternGraph_RU
@Cadlink Yes? 🙂
Great Idea~! Thanks a lot
Hi Lukasz,
Very clever workflow and very cool images, as always!
hahahhaha i feel so bad it looks amazing even from just the v-ray, i can´t do that D:
save my life
Nice!