


Making of HOVER ‘Before the Storm’ by Julio Cayetano
The 5th runner-up winning entry of the HOVER architectural visualization challenge by Julio Cayetano introduced hovering in space and time. Julio went for a Freeze Motion Photography style and stopped the storm rain drops in mid-air. Follow along as he describes his process using Maya, RealFlow, Mudbox and VRay. I hope you’ll enjoy this article, learn from it and share your thoughts by commenting at the bottom of this tutorial page.
Julio participated in the HOVER Challenge, winning 5th Runner Up Award for his entry using Maya, RealFlow & VRay for the final rendering. Check out Julio’s HOVER Challenge thread.
Concept
All my work process began with three ideas in mind – HOVERING, PRE-FAB CONCRETE, and STOPPING THE TIME. So I decided to investigate a bit in these three areas before trying to create the unique concept.
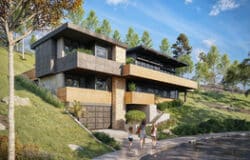
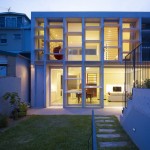
When I thought about a Hovering house, immediately, the most obvious example came into my mind The Falling Water house by Frank Lloyd Wright. I decided to create a simpler and clearer hovering volume, a box opened towards the sea, as I remembered a great project built-in Galicia (in the north of Spain), the Cemetery of Finisterre by César Portela.

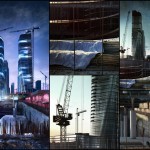
As an example of Pre-Fab Concrete building, I found an interesting project in an architecture details magazine The School of Economics at the Reus University in Catalonia (Spain) by Pau Pérez, Antón M. Pamies and Antón Banús. I think it´s important to know how this kind of construction elements works before trying to design your own building.

I also wanted to represent the feeling of a high-speed photograph, Stopping the Time to catch every object hovering in the air. So I decided to place my project in a summer stormy day to stop the falling water drops. The first thing I did was to call a photographer friend to discuss about technical issues that I would have to recreate in 3D like as speed, light, etc He sent me some examples of real water hovering in the air.

Finally, with all these information together, I designed the unique concept that I followed through the rest of the process. A house hovering on the top of a cliff, looking at the sea. But I decided to give an extra concept to it, as I tried to tell a story in a single image – A person, or couple, is running away from the first rain drops of a sudden storm, when they were trying to have a nice picnic in their private garden near to their hovering house.
This is the main draft image of my concept

Modeling
In the first steps I began with two separate 3D scenes, the first one to investigate the rain drops falling and wetting the picnic table, and the other one to start modeling the pre-fab concrete elements and play with them to build the house.
For the picnic table scene I used Maya and Real Flow, so I was able to get a real splashing water effect. I dropped some water into glasses and dishes filled with liquid, and stopped the animation, as if I was taking a picture, in the most interesting frame.

For the house I modeled the concrete blocks in Maya (basic polygon modeling), and a few details too. The most interesting details or the most tricky ones to model are, in my opinion, the railings of the stairs and the clothes of the awnings. Both of them are made of polygons in Maya, the railings are a loft through a path, and the clothes are made by displacing polygons with soft selection (very fast way).


After that I started to model the area around the house, the road, the terrain, etc. The house was supposed to be in a high altitude zone with low vegetation and a rocky granite terrain. All the elements were modeled with polygons, but the rocky terrain was exported to Mudbox for getting it into a more realistic shape. I made a rough volume in Maya and then sculpt it in Mudbox. Then I exported a low poly model and a displacement map, to be used in the final stage. You can see a similar and more detailed method explained by Benjamin Brosdau in his great Making of HOVER Lake House.


For the vegetation elements, I followed a great method from explained by the master, Peter Guthrie, in his awesome tutorial about grass. I modeled a few different stripes of grass and then repeated them randomly all over an area of approx. 1m – 2m to create a bunch of grass. Then I converted the bunch into a VRay proxy object and applied it over the areas that needed to be covered with vegetation.

Texturing
I arranged all my models and elements together in one 3ds max scene to be rendered with VRay. For the main textures I used simple VRay materials, with specific maps for diffuse, reflection, glossiness, and bump or displacement. As they are very similar, here is an example of the material assigned to the fabric on the table. I´m showing the reference photo from internet, the VRay parameters with maps painted by me in PS, and a detail of the final image.


For the grass and for the clothes of the awnings, I used a VRay 2 Sided material to simulate the proper behavior of the light.

Lighting
The scene was illuminated with a VRay Dome Light and HDRI maps for the environment and reflection. For the outdoor lamps in the foreground I used VRay Sphere Lights with a yellow/orange color and high intensity multiplayer, with decay.
Rendering & Postwork
The rendering process is quite simple, I used this parameters and it took around four hours to render in a quad-core and 6gb of ram machine.

I normally render out at least 4 or 5 render passes (alpha, ZDepth, reflection, etc ) to get more control in the postwork stage, but in this particular case, due to the deadline lack of time, I rendered just the beauty pass and the alpha. I saved the output images as 16bit tiffs.
Here is the raw image I got

Then, in Photoshop, I worked with levels, color-correction, more vignetting effect, and lens flare effect for the outdoor lights.
Ive put a real photograph of a man running away and decided to situate him just beginning to go upstairs. As he is getting shelter, he remembers of the lost picnic and looks back to the table.
For the background I placed a real photograph of the Cliffs of Moher (Ireland), as I needed to focus attention into that area of the Image to close the triangle composition I decided to use in this square format image.

Finally, I added some sharpening effect for the global image, and I had the final image ready to be saved in 8bit jpeg format.

Julio’s HOVER Challenge thread
You are welcome to comment on this article and ask questions using the comment box below!

super thank you.
Excellent render a nice making of! Congratz Julio!
Is the image 5 a render or a photo instead? That detail looks amazing.
Thank you very much for your comments!
It´s my first time making a “tutorial” or “making of” thing, and it´s very nice to get some feedback from you.
The pic nic shot (Image 5) is entirely CG. I’ll try to make a mini “making of” of this shot.
Image looks nice but background is so bad.. it actually killed the image.. but everything else is great..
Hi San, thank you for your comment.
But I´m not sure, do you mean that you don´t like the sky?
or what do you mean with background? the cliffs maybe?
I was talking about the sky.. Its looking CG like hand painted rather then real sky.. 🙂 Thanks..
Great render and very informative ‘making of’, thanks Julio!
very nice making of, one thing that bothers me.If you have a dome light with a hdri on it, you can no longer overwrite the envoirment or the reflection envoirment with other hdris.correct me if i am wrong
Great image. I can see that most of quality is involved by postproduction in PS, don’t you think? Anyway is amazing!
Hello everyone and thank you again for your comments.
eraser: I thing you´re wrong, since you can make the dome light invisible and use other hdr images for mapping the enviroment and the reflection of your scene.
Fabio: I don´t totally agree. I think postproduction is very important (and fun 🙂 ), but you need to have a good raw image first. I mean that you need high quality raw before you play in PS, because when you have errors in the raw image, they often get more visible after postproduction.
I hope i helped you with my answers.
Hello Julio,
Simple love the picnic shot.
Ive recently started to work with RealFlow and i would be grateful if you could tell a bit how you created the drops inside real flow. Deamons, and particle values etc.
Great work!
Jacinto
MetroCúbicoDigital
Hey Jacinto,
Thank you very much for your comment.
It was my first time with Realflow, so I had to follow a “try/mistake” process in order to get the final results I wanted.
I´m making a short tutorial about this shot. So you´ll be able to see how I worked inside Realflow.
Cheers,
Julio
nice work julio…can you tell me how you set up your vray camera for the 3 point perspective? its a nice composition!
Cheers!