


Making of Taliesin Mod.Fab
Architectural visualization artist Matt Guetta shares his process of making Taliesin Mod.Fab – A project designed and built by students of the Frank Lloyd Wright School of Architecture. Matt was motivated in exploring Taliesin Mod.Fab as a personal 3d project, being fascinated by the well designed and sustainable project made by students, focusing mostly on lighting and materials. He also took the liberty to create a different environment for the house then the Arizona desert it was originally situated in.
Author: Matt GuettaMatt Guetta is a CG and 3D Architecture Visualization artist based in France. Starting 3D as a hobby, he quickly became fascinated by the subject, and in 2009 decided to direct his career path towards 3D CG. Matt also has a blog in french about the subject which provides free VRay tutorials at mattguetta.com
Introduction
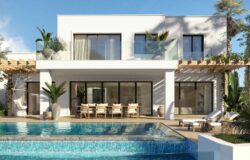
In this article, I will review the essential steps for the establishment of an architectural rendering. It took me three weeks on my free time to complete the work on Taliesin Mod.Fab. This was a personal project so I was totally free to do what I wanted. The goal was not just being realistic, but also, and most importantly, to express the architectural design.
The choice of field of view is essential to achieve this. Here I am more interested in the technical aspects of implementation. The Taliesin Mod.Fab is a model of sustainable architecture created by the prestigious Frank Lloyd Wright Foundation (www.taliesin.edu) conducted by the architect Michael P Johnson.

I loved working on an existing project and at the same time with the freedom to interpret it the way I wanted. I Did not find any plans on the web and I mostly eyeballed it focusing a great deal on the environment, which I made up for this project.

To start, this project has a history. Never being full of the exciting Arizona desert location (see map), I started looking at the side projects of great architects to express myself freely on a subject. So I searched on the side of Frank Lloyd Wright on the Internet and found the Taliesin Mod.Fab. I loved it at first glance!

The photos were taken by – Bill Timmerman.
Creating a realistic environment.
1. The Ground Plane
In order to highlight the architecture of the project, I chose to create an environment that has nothing to do with the existing (Arizona desert), so I immediately start working in the field. First step, a low-poly terrain that gives the general form.

2. The Ground Texture
Second, is the beautiful piece of land the house will perch on, and unfolding of UV texturing in Photoshop. I started with the diffuse map, which is around 10k pixels. Then, I’ve created the bump maps, reflection, and finally displace maps.

Diffuse

Displacement & Reflections

In order to get maximum details for displacement, Ive worked with 16-bit Tiff. In order to add details and more randomness, I always add a little noise modifier after the displace.

3. The Ground Material
The shader is pretty simple, all work was done in Photoshop. The only little trick is to lower the IOR (Index of Refraction) to 1.4 in order not to have a highly reflective floor. Basically the earth is not light but with the ground (under the posts of the house) that can add some glossy reflections and give the feeling of a mixture of material (soil and gravel)


4. Scattering the Foliage
The foliage was scattered with the MultiScatter plugin, and this way I was able to multiply at random a few models of plants. The placement was controlled with a texture mask that I painted in Photoshop. For better, and added, control I also redraw areas with curves to include or exclude objects in them.
The MultiScatter Blend Mask

The general scattering

Here is the viewport with the various spline that control which type of plants goes where

5. The Rocks
For the rocks I used a free script – Rock Generator, to model a first base. I then applied a FFD modifier to add variations and get to the shapes I wanted. In order to place them accurately, I preferred to do place them “by hand” so that each stone has at a specific place and in correlation to the site composition I was after.

The Mod.Fab Model
1. Modeling
The modeling part was quite simple, the architecture does not have any complex shapes, so this is a polygonal modeling from flat surfaces or boxes. The only details added to the model were chamfer edges to minimize the hardness of sharp angles.

2. Interior
The interior has been dressed with some models that I transferred from other scenes I have (books, vases, etc.). Some models come directly from banks of professional design studios. The models that were too low poly, were reworked to refine the details of the modeling. Some objects are not visible in the final images, however I like to have a complete 3d model so any view can be considered at any time so it is worth the effort of making it all work all round.


3. Metal Parts
To add a lot of detail in modeling, UV unwrapping and maps are essential. For example for the base metal, I unfold the UV and added some traces of dirt, dust etc. It is such details that give richness to your compositions. We have to give a worn look, even slightly, to each object so that it feels natural. Nothing is completely brand new and clean.
Close-up on metal part

Metal Reflection & Bump

The Metal Material Slate View

View of how the Metal Holes are Modeled

4. Concrete
For the step, rough concrete, I used Arroway Textures. Again, to add details I combined diffuse and reflection maps with a Composite Node. This makes details even more marked and consistend with the bump map. This helps even more in cases there is no direct light falling on the surfaces.


Lighting & Rendering
1. Lighting Overview
Lighting/Shading is by far the part I like best! I (always) start with a basic lighting using a HDRI (made by Peter Guthrie). To balance quickly and effectively lighting, I start by putting an override (VRayMtl Neutral Grey) on anything except windows. This allows me to quickly notice if the lighting is consistent with the volumes of the project.

2. Interior Lighting
Once the general lighting is done, I started to choose my field of views and add interior lights.
There are little spots on the floor. They were all modeled and textured with a VRayLightMtl shader. I don’t want it to be a real part of the lighting job, so I keep it to 1. Its here for reflection and it helps me to do the glow job with a VRaySelfIllumination passes on post-production.
Finaly there are:
- HDRI
- VRayPlane in Skylight portal mode
- For spots, 34 very little VRayPlane (not visible in reflection and directional set to 0.5) for more accurate shadows. Spots are a lot but with low values. This gives the feeling of a diffuse lighting.
- 3 VRaySphereLight for model+model lights.

3. Light Balancing
To balance quickly and effectively lighting, I start by putting an override (VRayMtl Neutral Gray) on anything but windows. This allows you to quickly notice if the lighting is consistent with the volumes of the project. Once this is done, I go often on the shaders and refined lighting.
4. Rendering
I use the method “Universal Settings” to neutralize the grain. Simply put it is the antialiasing that neutralizes the grain, but since V-Ray 2.0 this method shows its limits and explodes the time rendered. It was my first scene with V-ray 2.0, I did not know it yet … ForGlobal Illumination, a basic Irradiance Map / Light Cache including the “Retrace Treshold” one of the new VRay 2.0 that eliminates the artifacts generated by the parameter “Use Light Cache for glossy rays”. On top of that I always go out a lot of layers to have a maximum of elements for post-production. Use pass is for me an indispensable element for success to improve my reviews.


Compositing & Color Corrections
1. Channels
One advantage of Linear Workflow is to maintain maximum flexibility in post-production. So even if a camera is on or underexposed, it will be possible to fix it in Photoshop without losing quality. The first step is to set up the layers. Ambient Occlusion, Reflection, Refraction, Z-Depth, etc..
But all that doesn’t mean that you dont want what an image which is well exposed in the first place! When Im not using DOF, Im always using the f/16 rule Its really simple and can really helps to add stills without checking render again.

2. Compositing
The compositing is clearly the most important step of architectural image, this is where the atmosphere is worked. In 3D, it is sometimes difficult to get certain effects, especially because they “too expensive” (working time, rendering etc …) so it is best to have them in Photoshop (or any other compositing software ). For example, rather than using the VRay Fog to create a light mist in the background of the image, I use my Z-Depth pass. I begin with the reverse, then put in overlay mode, then add a color saturation (with clipping path) to the slightly blue tint. Guaranteed results! If I were to give advice, it would be of learn to use all the layers one by one.
![ProEXR File Description =Attributes= cameraAperture (float): 20.120001 cameraFarClip (float): 1000.000000 cameraFarRange (float): 1000.000000 cameraFov (float): 96.692078 cameraNearClip (float): 0.000000 cameraNearRange (float): 0.000000 cameraProjection (int): 0 cameraTargetDistance (float): 200.000000 cameraTransform (m44f) channels (chlist) compression (compression): Zip16 dataWindow (box2i): [0, 0, 2999, 1687] displayWindow (box2i): [0, 0, 2999, 1687] gamma (float): 1.000000 lineOrder (lineOrder): Increasing Y pixelAspectRatio (float): 1.000000 screenWindowCenter (v2f): [0.000000, 0.000000] screenWindowWidth (float): 1.000000 tiles (tiledesc): [64, 64] =Channels= A (half) B (half) G (half) R (half) VRayExtraTex_Map #2012.A (half) VRayExtraTex_Map #2012.B (half) VRayExtraTex_Map #2012.G (half) VRayExtraTex_Map #2012.R (half) VRayReflection.A (half) VRayReflection.B (half) VRayReflection.G (half) VRayReflection.R (half) VRayRefraction.A (half) VRayRefraction.B (half) VRayRefraction.G (half) VRayRefraction.R (half) VRayRenderID.A (half) VRayRenderID.B (half) VRayRenderID.G (half) VRayRenderID.R (half) VRaySelfIllumination.A (half) VRaySelfIllumination.B (half) VRaySelfIllumination.G (half) VRaySelfIllumination.R (half) VRaySpecular.A (half) VRaySpecular.B (half) VRaySpecular.G (half) VRaySpecular.R (half) VRayTotalLighting.A (half) VRayTotalLighting.B (half) VRayTotalLighting.G (half) VRayTotalLighting.R (half) VRayZDepth.A (half) VRayZDepth.B (half) VRayZDepth.G (half) VRayZDepth.R (half)](http://www.ronenbekerman.com/wp-content/uploads/2011/11/23.jpg "ProEXR File Description =Attributes= cameraAperture (float): 20.120001 cameraFarClip (float): 1000.000000 cameraFarRange (float): 1000.000000 cameraFov (float): 96.692078 cameraNearClip (float): 0.000000 cameraNearRange (float): 0.000000 cameraProjection (int): 0 cameraTargetDistance (float): 200.000000 cameraTransform (m44f) channels (chlist) compression (compression): Zip16 dataWindow (box2i): [0, 0, 2999, 1687] displayWindow (box2i): [0, 0, 2999, 1687] gamma (float): 1.000000 lineOrder (lineOrder): Increasing Y pixelAspectRatio (float): 1.000000 screenWindowCenter (v2f): [0.000000, 0.000000] screenWindowWidth (float): 1.000000 tiles (tiledesc): [64, 64] =Channels= A (half) B (half) G (half) R (half) VRayExtraTex_Map #2012.A (half) VRayExtraTex_Map #2012.B (half) VRayExtraTex_Map #2012.G (half) VRayExtraTex_Map #2012.R (half) VRayReflection.A (half) VRayReflection.B (half) VRayReflection.G (half) VRayReflection.R (half) VRayRefraction.A (half) VRayRefraction.B (half) VRayRefraction.G (half) VRayRefraction.R (half) VRayRenderID.A (half) VRayRenderID.B (half) VRayRenderID.G (half) VRayRenderID.R (half) VRaySelfIllumination.A (half) VRaySelfIllumination.B (half) VRaySelfIllumination.G (half) VRaySelfIllumination.R (half) VRaySpecular.A (half) VRaySpecular.B (half) VRaySpecular.G (half) VRaySpecular.R (half) VRayTotalLighting.A (half) VRayTotalLighting.B (half) VRayTotalLighting.G (half) VRayTotalLighting.R (half) VRayZDepth.A (half) VRayZDepth.B (half) VRayZDepth.G (half) VRayZDepth.R (half)")
![ProEXR File Description =Attributes= cameraAperture (float): 20.120001 cameraFarClip (float): 1000.000000 cameraFarRange (float): 1000.000000 cameraFov (float): 96.692078 cameraNearClip (float): 0.000000 cameraNearRange (float): 0.000000 cameraProjection (int): 0 cameraTargetDistance (float): 200.000000 cameraTransform (m44f) channels (chlist) compression (compression): Zip16 dataWindow (box2i): [0, 0, 2999, 1687] displayWindow (box2i): [0, 0, 2999, 1687] gamma (float): 1.000000 lineOrder (lineOrder): Increasing Y pixelAspectRatio (float): 1.000000 screenWindowCenter (v2f): [0.000000, 0.000000] screenWindowWidth (float): 1.000000 tiles (tiledesc): [64, 64] =Channels= A (half) B (half) G (half) R (half) VRayExtraTex_Map #2012.A (half) VRayExtraTex_Map #2012.B (half) VRayExtraTex_Map #2012.G (half) VRayExtraTex_Map #2012.R (half) VRayReflection.A (half) VRayReflection.B (half) VRayReflection.G (half) VRayReflection.R (half) VRayRefraction.A (half) VRayRefraction.B (half) VRayRefraction.G (half) VRayRefraction.R (half) VRayRenderID.A (half) VRayRenderID.B (half) VRayRenderID.G (half) VRayRenderID.R (half) VRaySelfIllumination.A (half) VRaySelfIllumination.B (half) VRaySelfIllumination.G (half) VRaySelfIllumination.R (half) VRaySpecular.A (half) VRaySpecular.B (half) VRaySpecular.G (half) VRaySpecular.R (half) VRayTotalLighting.A (half) VRayTotalLighting.B (half) VRayTotalLighting.G (half) VRayTotalLighting.R (half) VRayZDepth.A (half) VRayZDepth.B (half) VRayZDepth.G (half) VRayZDepth.R (half)](http://www.ronenbekerman.com/wp-content/uploads/2011/11/24.jpg "ProEXR File Description =Attributes= cameraAperture (float): 20.120001 cameraFarClip (float): 1000.000000 cameraFarRange (float): 1000.000000 cameraFov (float): 96.692078 cameraNearClip (float): 0.000000 cameraNearRange (float): 0.000000 cameraProjection (int): 0 cameraTargetDistance (float): 200.000000 cameraTransform (m44f) channels (chlist) compression (compression): Zip16 dataWindow (box2i): [0, 0, 2999, 1687] displayWindow (box2i): [0, 0, 2999, 1687] gamma (float): 1.000000 lineOrder (lineOrder): Increasing Y pixelAspectRatio (float): 1.000000 screenWindowCenter (v2f): [0.000000, 0.000000] screenWindowWidth (float): 1.000000 tiles (tiledesc): [64, 64] =Channels= A (half) B (half) G (half) R (half) VRayExtraTex_Map #2012.A (half) VRayExtraTex_Map #2012.B (half) VRayExtraTex_Map #2012.G (half) VRayExtraTex_Map #2012.R (half) VRayReflection.A (half) VRayReflection.B (half) VRayReflection.G (half) VRayReflection.R (half) VRayRefraction.A (half) VRayRefraction.B (half) VRayRefraction.G (half) VRayRefraction.R (half) VRayRenderID.A (half) VRayRenderID.B (half) VRayRenderID.G (half) VRayRenderID.R (half) VRaySelfIllumination.A (half) VRaySelfIllumination.B (half) VRaySelfIllumination.G (half) VRaySelfIllumination.R (half) VRaySpecular.A (half) VRaySpecular.B (half) VRaySpecular.G (half) VRaySpecular.R (half) VRayTotalLighting.A (half) VRayTotalLighting.B (half) VRayTotalLighting.G (half) VRayTotalLighting.R (half) VRayZDepth.A (half) VRayZDepth.B (half) VRayZDepth.G (half) VRayZDepth.R (half)")
3. Spots in After Effects
Once this is complete, I go on After Effects to add effects, especially depth of field, chromatic aberration, and grain lens flare. Then I finish with some pretty basic color corrections: Levels, Curves, Color Balance and Channel Mixer.

4. Final Result
Just a quick look at how two POVs look in the viewport

Here are the final images made in this set (originaly at 6000px size, but reduced to 1200px to be friendly online).


I hope you enjoyed this article, and that it helped you in some way. Please feel free to ask anything you like in the comment section below.
Cheers,
Matt.
Thanks Matt, its really great stuff for me.
Thanks for sharing Matt, very interesting stuff 🙂
@NicolasRichelet@jetkey Thanks 🙂
Thanks for sharing Matt, really nice stuff indeed 😉
Thanks for sharing your tips with us Matt 😀
@Pixela@TiagoAlexandrino Thank you both!
Thank you very much for posting this 🙂
Thanks for “Making of” Matt, very good!
Say @mattguetta since you did use both multiscatter and forest pack later on 😉 how do you compare them – pros & cons of each?
@toni fresnedo@ShuvrodeepDutta Thanks 🙂
@ronenbekermanI was thinking that MS was easier… But after some times with MS and FPP I would say i really prefer FPP. Such a better RAM managment (most of the time needless to use proxy) and also unique features (Clusters, Camera visibility etc.). There is also two big reason: there are always new features (they listen users) and the support program is really great. If you’ve got an issue, guys from Itoo always answer fast! Just for notes, last updates with new Multiple Areas by objects! http://bit.ly/rMmdzU
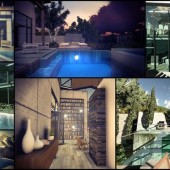
This is great Matt. The modfab3 pic is amazing! Thanks for sharing.
Thanks for sharing your knowledge and skills, Matt.
It’s a good job but I think there’s a lot more to do with the image – the trees for example could be more realistic, in most of the images the skies doesn’t match the overall sunset (or dawn?) mood, etc. Also I, as reader would be very interested to read about your vray settings, rendering time, your workstation configuration. This is what I’d call the learning stuff. And, btw, to create a realistic visual that match the photo is not a great achievement, it’s just a matter of right setup of materials and lightings – this is the least that every visualiser must should know.
Excellent! 🙂 Cheers!
As a relative newbie, I find this kind of example of workflow is so enlightening, and it is real gold-dust for those of us that are hungery to understand how to create professional arch-viz work. I’ll probably keep popping back to this blog to refer to and try out some of your techniques.
Merci beaucoup Matt!
Very nice!
@ck_1138@Tomas_Esperanza@artmaknev Thanks for comment!
@RBAlex I agree, trees are low-poly and there is only one model, which is for me the biggest problem. Realism is not the point, I know it’s not and that’s not what I was trying to do. I think that materials must be believable in archviz, which doesn’t mean realistic 😉 I also believe that the most important is the mood, we’re illustrator not photograph and matching original picture was really not what I want to do! You can screenshots for V-ray settings. Render times was smth like 6/7 hours by frame on a single i7 870k with 8Gb Ram.
Thanks for sharing Matt, the ground i every good
Thanks a lot, Matt, for a beautiful tutorial, I am sure it is very
Thanks a lot, Matt for this beautiful tutorial, sure is very useful for most Vray and max users. I d like to mention that I was very curios in a compositing part how you have done all of those layers? Which blending modes, etc… and that is really what most of us are interested in. Wouldn be nice to share this chapter to us?
Matt, can you make a tutorial with mental ray render? It would be very nice to see diference between renders !!! and of course i would appreciate make this tutorial with my own Prefab i´m creating using mental ray tha i´m use to deal.
thks and congratulations with final art you´ve created!
NTrajano
dcoworkers@gmail.com