


Making of House Roces
I’ve seen a lot of great 3d visuals being made with Cinema4D + VRayForC4D lately and this set by Mouton Burger is not an exception to that. Picking a great house design such as the Roces House by Govaert & Vanhoutte architectuurburo and doing that using ArchiCAD, Cinema4D and VRayForC4D – all of which I never used… Made it a prime subject for a blog article which Mouton was happy to take on and share a bit of his workflow with us all. Enjoy!

Author : Mouton Burger
Mouton Burger is a freelance 3D artist living on a farm at the foothills of the picturesque Kammanassie Mountains in the Western Cape, South Africa. Self taught and started with 3D rendering at the age of 16. He’s been doing visualization work for MCP Architecture for the last 5 years and have a solid background knowledge of architecture too.
Introduction
Hey all, I’d like to start and thank Ronen for having me here, sharing my knowledge of VRayForC4D in creating House Roces.
SOFTWARE USED
- ArchiCAD 14
- Cinema4D
- VrayForC4D 1.2.6
- OnyxTree
- Photoshop
- Lightroom
The Roces House
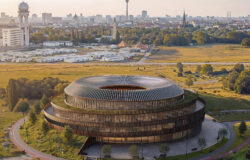
Lets start with seeing the final renders I made in this project before we get started


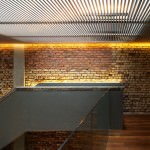
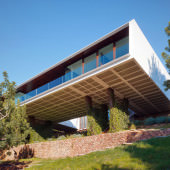
You can see more of this house on Archdaily – House Roces / Govaert & Vanhoutte architectuurburo but here are some photos I used as reference here too


Modeling
Getting good references and study your subject is vital in getting the results you look for your renders. I found a couple of photos of the actual built house as well as sections, elevations and floor plans on Archdaily as shown above.
I used ArchiCAD 14 to create the base mesh that was further detailed later in Cinema4D where I softened the model by beveling sharp edges, etc.
Why ArchiCAD you ask?
It is very user-friendly and has ready-made elements such as walls, windows, doors. etc. which are editable using pre-defined parameters instead of modeling them from scratch. The wall tool for example is very fast to use and allows full control over the geometry.

The window tool allowed me to create custom widths and heights and I took care of all the extra details needed later inside Cinema4D.

Below is the model inside ArchiCAD viewport

And after export, inside Cinema4D

First thing I did before starting further work was to turn off C4D LWF and set the input color profile to sRGB.
Vegetation
The conifer trees were modeled using Onyx TREE CONIFER 7. Pretty straight forward basic Onyx workflow. I wont go into the specifics of it at this stage.
I obtained the yellow dandelions from the high quality grass selection by 3dmentors HQ Plants and Grass, and all the vegetation was scattered using a plugin called SurfaceSpread made by C4D-Jack, I couldnt do this scene without it. It helped with the natural scattering of vegetation around the scene.
First step was to create a SurfaceSpread tag via the plugins tab in C4D. Then, make a child for the grass scatter in it. Then, starting to assign it to a plane / surface object. Once done, I made sure the editor weight was set to 10% in the general tab.

After this I went to the effects tab, where I set a random scale and rotate for the scattered elements.

Thats it for SurfaceSpread very simple!
The rest of the shrubs were created by the user-friendly Onyx Grass application.
Below you can see and overview of the model with all the scattered elements displayed as boxes for saving on-screen update resources.

Texture & Materials
I got most of my textures from the great Arroway Textures collection.
Concrete Material
They have great concrete textures. You can see a setup for it below
The Diffuse

The Bump

The Specular

Steel Material
The steel material was very simple nothing special about it. See below the material set up for it.
The Diffuse

The Specular

Glass Material
I just used IOR values in the Specular Channel.
The Specular

The Refraction

Grass Material
I used a texture I found online for the grass blades. After Creating the material I inserted it into a 2 Sided material. And that goes for the rest of the vegetation materials.
The Diffuse

The Specular

The Refraction

The Bump

Lighting & Camera
You can see an overview of the lights in the scene below

I find lighting setup to be most important to the scene. I mostly use HDRI for general lighting because it gives me sharper shadows and a much nicer atmosphere.
Camera settings

A lot of people asked me about my lighting so I made a short making of it for Peter Guthries blog, but Ill go over it here too
I used Peters HDRI 1941 dusk blue for this scene.
First step in creating the light is to make a VRayDome Light. The steps I used are :
- Create cinema 4d Area light.
2. Add VRayLight tag to it. - Set the intensity to 1.6.

- Go to Area Light tab and set the Area type to Dome.

- Add your HDRI in the texture slot and set the color profile to sRGB.

- Insert the HDRI in a Filter shader and set the gamma to 0.75 or 0.8 (This is for getting sharp shadows. See Bertrand Benoits explanation for that).

For all the interior lighting I used IES files as it gives me the quality of light distribution I look for.

Rendering
Nothing special about the rendering settings for this scene. I used Brute Force (BF) and Light Cache (LC) for Global Illumination (GI) calculation. I rendered the images at 3200 pixels wide. I don´t have a big machine, so optimization is what I do most. rendering times went around 4 to 5 hours.
Here are my render settings

Post Production
For postwork I used Adobe Lightroom. First some basic color correction and gradient filter to bring out the blue sky some more. I also took down the gamma and gave it more contrast.


I added a mist layer and used screen mode to overlay it, setting opacity to 25%.

After that I added some Chromatic Abbreviation in Lens Corrections.

And that is it for post production! Nothing special really, considering the depth others went into in past making-of articles.
I hope you enjoyed reading this article and find something new or interesting to add to your workflow Feel free to ask away using the comment section below about anything you like or something I might have missed.
Regards,
Mouton.


Mouton Hi Mouton. I use the same process with ArchiCad. I’m wondering how you “champfer” the corners, or what specific you change in C4d to look it more realistic? Can you give me some hints?
Thanks! Jan
Hello!
First up, such beautiful work! Thank you so much for sharing this. I have been using Archicad, Cinema 4d, & Vray ( basically your exact workflow) for over 2 years now, but I’ve never been able to produce results like these! A few questions if you don’t mind:
1. How exactly do you soften the edges once you export the 3ds model from Archicad in C4d?
2. How do you create double sided glass? Is this within Archicad or C4d?