


Making of House K by Toni Fresnedo
Toni created the House K images, that were posted on the forums not long ago, as part of his final project during his studies at FX ANIMATION school in Barcelona, Spain. Toni selected a great house design by 3LHD Architects, Architects that were previously visited by Javier Pintor in his Bathroom at House N tutorial. Follow along as Toni describes his process in making his renders using AutoCAD, 3D Studio Max, VRay, Photoshop and the Magic Bullet Photo Looks plugin.
Toni is a 3D Artist and has recently completed a 3D Architectural Visualization Master with 3D Studio Max, VRay and Maxwell Render at the FX ANIMATION BARCELONA 3D SCHOOL. He is currently working on some projects and expanding his portfolio.
Introduction
The visualization of House K was my final project made during Master studies at the FX Animation school in Barcelona, Spain. The training school is specializing in 3D animation, visual effects, game design creation, architectural visualization, virtual interior design and post production.

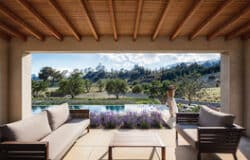
I selected House K, as seen in a photo above, for many reasons such as the geometrical complexity of the house, the wood facade cladding, the central courtyard acting as a light shaft and because I like the style of 3LHD architects very much.
Here is one of the interior images I made showing this shaft of light.

You can see the original house at the archdaily post House K / 3LHD
Software used in the creation of my renders are – AutoCAD 2011, 3d Studio Max 2011, V-Ray 1.50 SP5 and Photoshop CS5. I also used several plugins along the way.
Modeling
All major modeling tasks of the house were made inside AutoCAD 2011. I used AutoCAD because it is the program that I have used since I started with 3D. It is not a case of AutoCAD having benefits over 3D Studio Max, I just got used to it and they both offer similar modeling tools as far as architecture and this specific house needs.
Things like the garden, interior wood floors and other small details were made inside 3dsmax. For the wood floor I used the Floor Generator script.
The process started with the insertion of plan images of the house that I found on the archdaily post a linked before. I had to set the scale of the reference images and then began to model the walls, open windows, add stairs, etc.
Here his how it looks inside AutoCAD.


And the 3D Model.

The AutoCAD 3d model was imported into 3dsmax using the file link manager feature. I use the File Link Manager because the file can be updated without losing the 3dsmax properties that were applied to it, for example if we have already given material, setup lights, cameras, etc.
In case if the client wants us to change anything from the house such as a ladder, or some measure of windows, rooms, just click Reload to update. When no longer have to change anything more, click Blind and the file is inserted into the 3dstMax unable to return to update it.
The next step was to tweak the model were needed, like adding the facade wood panels, interior wood floors, and the site / garden for the house.

The Floor Generator script was used for creating the interior wood floors as well as the outer wood clad facade, but since this script can’t work on vertical faces I had to lay out all the facade faces horizontally to apply the wood planks to them. After I did that I had to put them back in place.

Visit Bertrand Benoits great tutorial about using the Floor Generator script for more information about it.
The grass & forest were scattered using the MultiScatter plugin. The grass was created by scattering a small patch of pre-modeled grass blades and for the forest I used 4 different tree models. The Ivy was created with the help of the Guruware Ivy Generator plugin.
Lighting and Cameras
I used a VRayLight Dome with an EXR texture as the light source linked to a VRaySun for boosting the key light as Peter Guthrie describes in his HDRi workflow tutorial. In the evening images I also added IES lights.
Here are the VRayLight Dome and VRaySun configurations.


And here are the configurations of the VRayPhysical Cameras.

Materials
Nothing too special about the materials in this scene other than the complexity of the shader in the exterior wood material as you can see below. It was made with a VRayBlendMtl to get different areas with different colors and brightness using a wood texture from CG Source as the base.

And here is the concrete material breakdown.

Rendering
In the following screen capture you can see the parameters of the day render. The Night render settings are all the same other then changing the color mapping from Reinhard to Linear and burn value from 0.4 to 1.0.

Render times were 6-8 hours with two Intel Xeon E5620 packing 12GB of RAM.
Post Production
I did the usual post production stuff as levels, contrast and color balance in Photoshop. After a tweaked the render to get the look I wanted for the wood, sky and vegetation I opened up Magic Bullet Photo looks and applied vignette effect and saturation tweaks.


And some more before / after shots.


All files were saved in 16 bits with ZDepth pass to make the DOF (Depth of Field) with programs like Photoshop or DoF Pro.
And here is the result.

For the lens effects I used Knoll Light Factory, because it has many types of lens effects and it is easy and fast to use.
Id like to thank to Ronen Bekerman for giving me the opportunity to write this article about my House k project in this great website and I hope you enjoyed it.
You are welcome to comment on this article and ask questions using the comment box below!
Fantastic… Thanks!
Thank you for this tutorial!
I really like your glass material, can you talk about it 🙂
Thanks again.
Thank you… Great work…
Really nice job and complete tutorial, yep would be appreciated some glass tips 😉
Thanks!!
How did you get vraysun into the mental ray light shader?
Really nice tutorial. quite specified in the process and seems like you put up an effort on making it Toni. good job cause the result is astonishing. and thank you Ronen.
Hi, thanks for comments, about glass is a basic material glass with a small noise map in bump slot.
I put the screenshot in House K Forum Therad.
great shots and a very good to follow making of…nice!!!
Good job Toni.
Great job, looking nice!
Thanks for the informative making-of!
Thanks for comments!
Wonderful.. One question… How time did U dedicate your work (hours and days)?? I know what everyone have different way but your comment will be referent.. I want your Xeon machine, jejeje
“I used a VRayLight Dome with an EXR texture as the light source linked to a VRaySun for boosting the key light”
linked to a Vray sun ? sorry dont get it….would you explain…is there any Light-linking ? Or do all lights just coexist ?
Nice work and nice content 🙂
Armando : mmm… is difficult to say
i did when he had time. I can not say something precise. maybe about 2/3 months to 4 hours daily.
My Xeon machine is Great ! XD
Thanks for your coment.
Fried1111 : yes linked to vraysun, is a VrayDomelight linked with a vraysun,
Watch the tutorial Peter Guthrie on his website, is very well explained.
Thanks for your comment.