


Making of Frozen in Time
I’m super happy to share with you today the MAKING OF “Frozen in Time” by Marcin Jastrzebski. This was picked as Best of Week 05/2018 and was his entry for an Evermotion Challenge in which he tried 3d Rendering with Photography Approach… focused on slow shutter speeds and how that can turn out in a render. Enjoy!
Introduction
For this year’s Evermotion Challenge I decided to make a far north landscape view with two small wooden cabins. This time I also decided to make the entire design myself without any existing project. The challenge was to make long-time exposure mood in 3d technique.
I was thinking about it more or less for a year before the challenge started. It was an excellent opportunity to check if it’s possible as a 3d render. So this was my primary goal for this rendering. I used Cinema R18 Studio and Octane Render for the final rendering. I also used a few plugins which I mentioned in the next parts of this making-of.
I would like to say huge thanks to Ronen for the possibility to share this Making Of on his excellent architectural visualization blog!
The Beginning
Before I start my projects, I always try to come up with a project idea in my mind, so when I start work seriously, the central concept is ready.
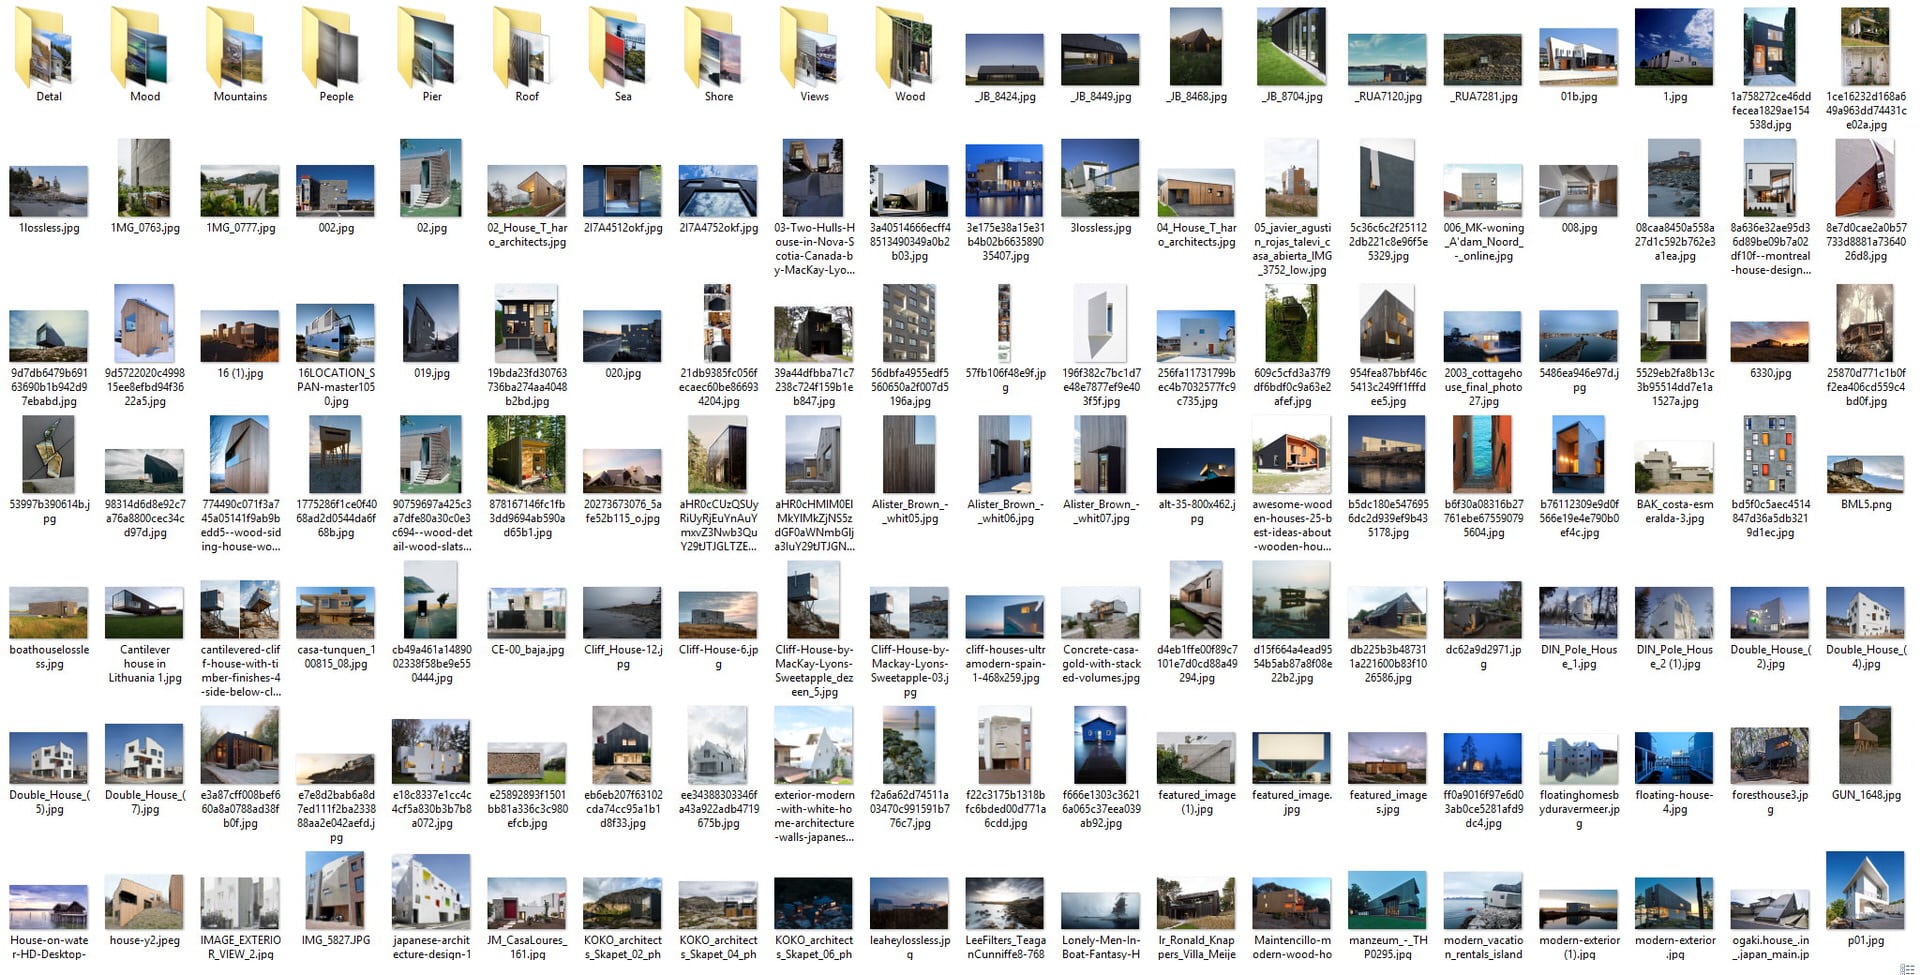
During the initial stage of work, I always gather many reference images to look how necessary things look like in real, how they work with light. I also check different ideas if they are possible or not. Here is a screen from my reference folder.
I gathered images and grouped them into theme folders.
Describing the Strong Points
In my opinion, every image has limited visual capacity. This is one of my primary rules. What is that mean? It means that “less is more” accurately. We can add exciting visual elements to our images to build a beautiful composition, good story, and beautiful effects. All parts could impressive, but if we add too much cherries to our cake, nobody could eat it.
One of the most critical decisions of the creation process is the point when we should say STOP! Then finish the general composition and carry about essential elements to not overload the entire picture. For all my images I always try to describe a few main strong sides and keep in mind them during work. Just a few because of no more capacity in one image for all great ideas. Just a few but make them as best as possible. In this case, my initial list for this view was as below:
1. show simple wooden cabins
2. show the sea/ocean and the smooth connection between water and shore (stones)
3. emphasize far distant by mountains in the background
all goals work to create a vast landscape of the raw nature space
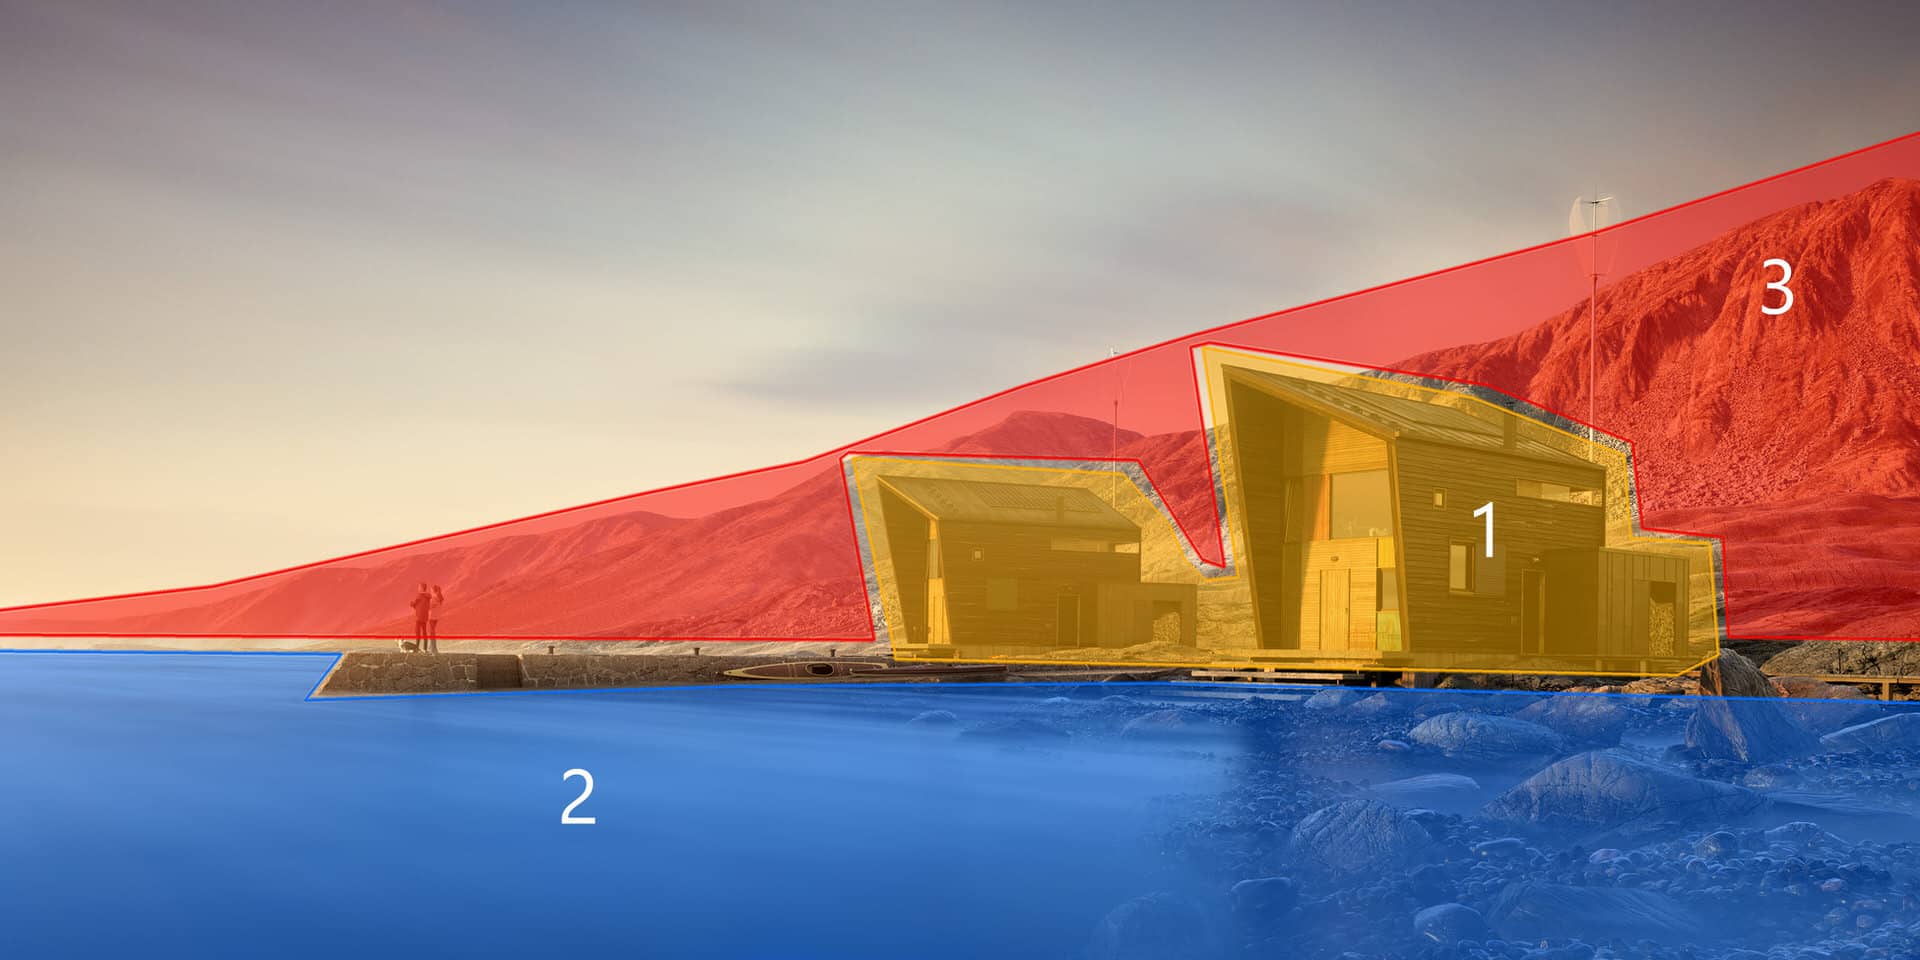
That’s enough!
There were three primary goals to complete the entire image composition, plus some small details consistent with my central assumption.
The Cabins
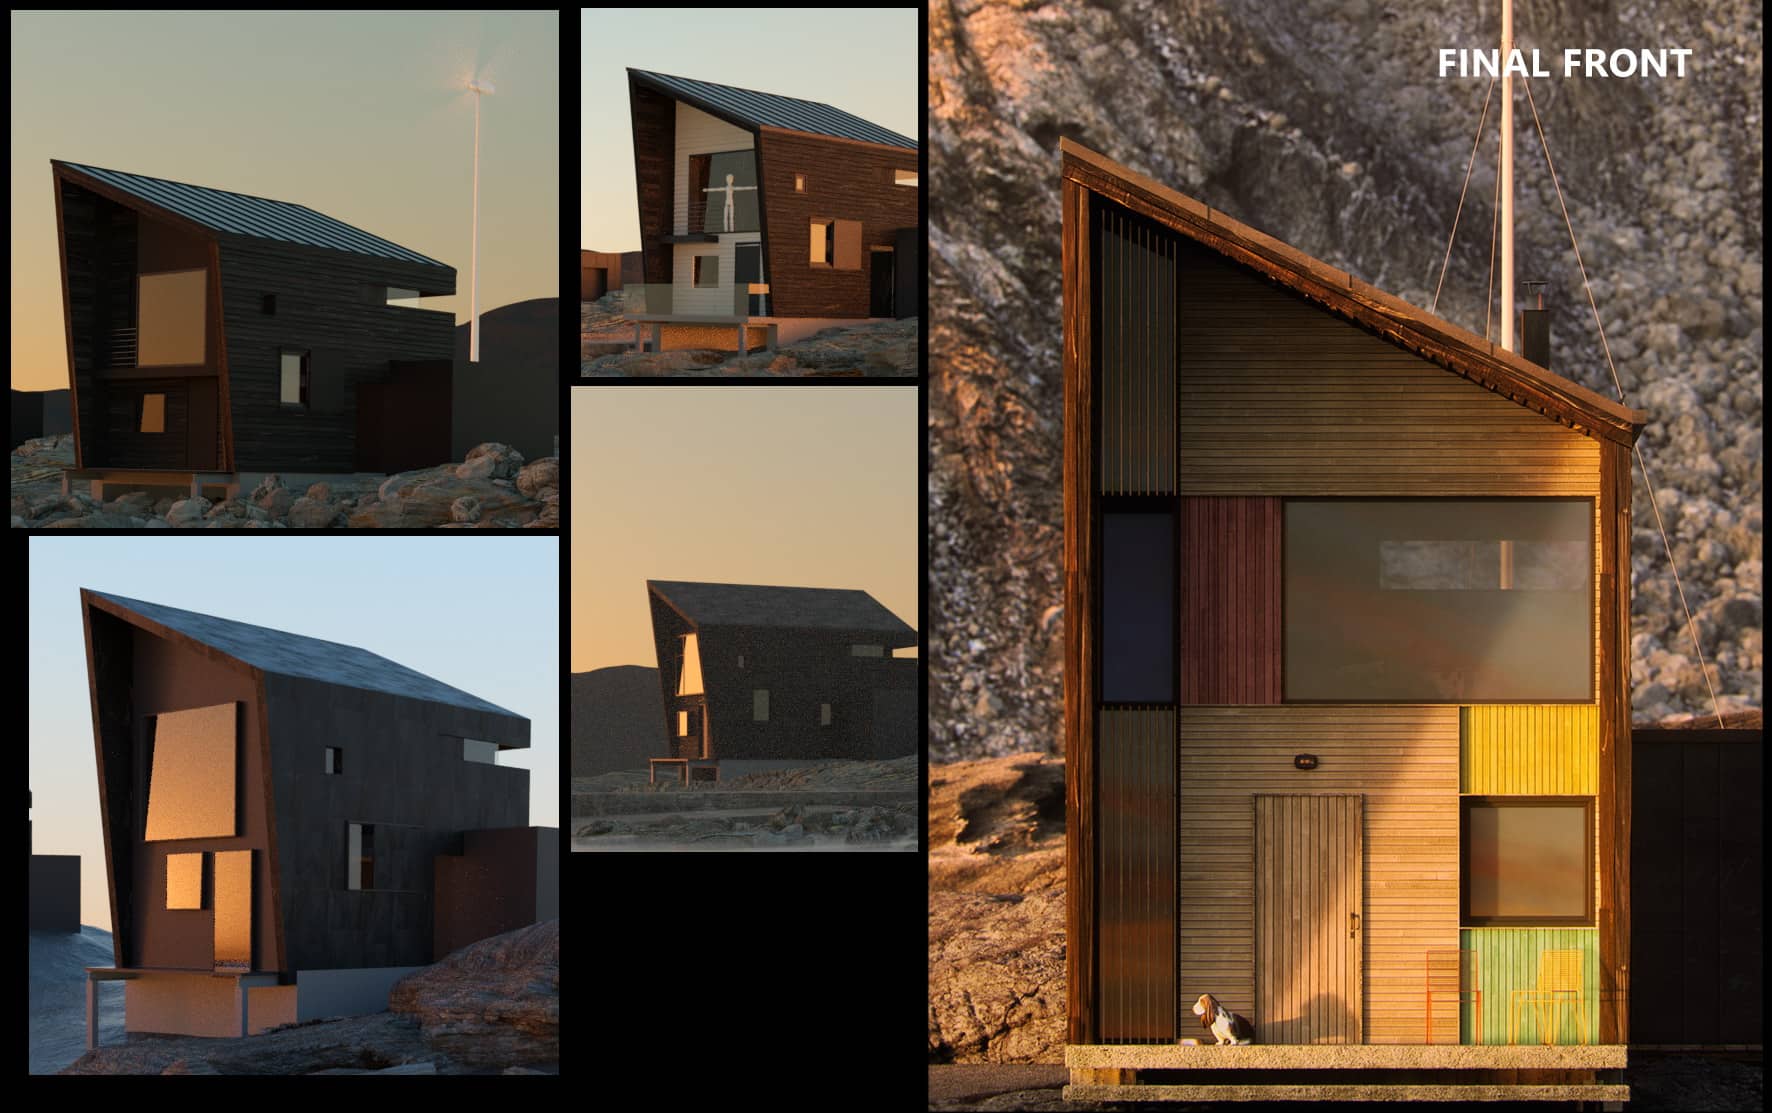
To show the landscape view, I was aware that the main building wouldn’t be prominent in the original composition. So I decided to make the primary material of the project – wood – in the best way with excellent material.
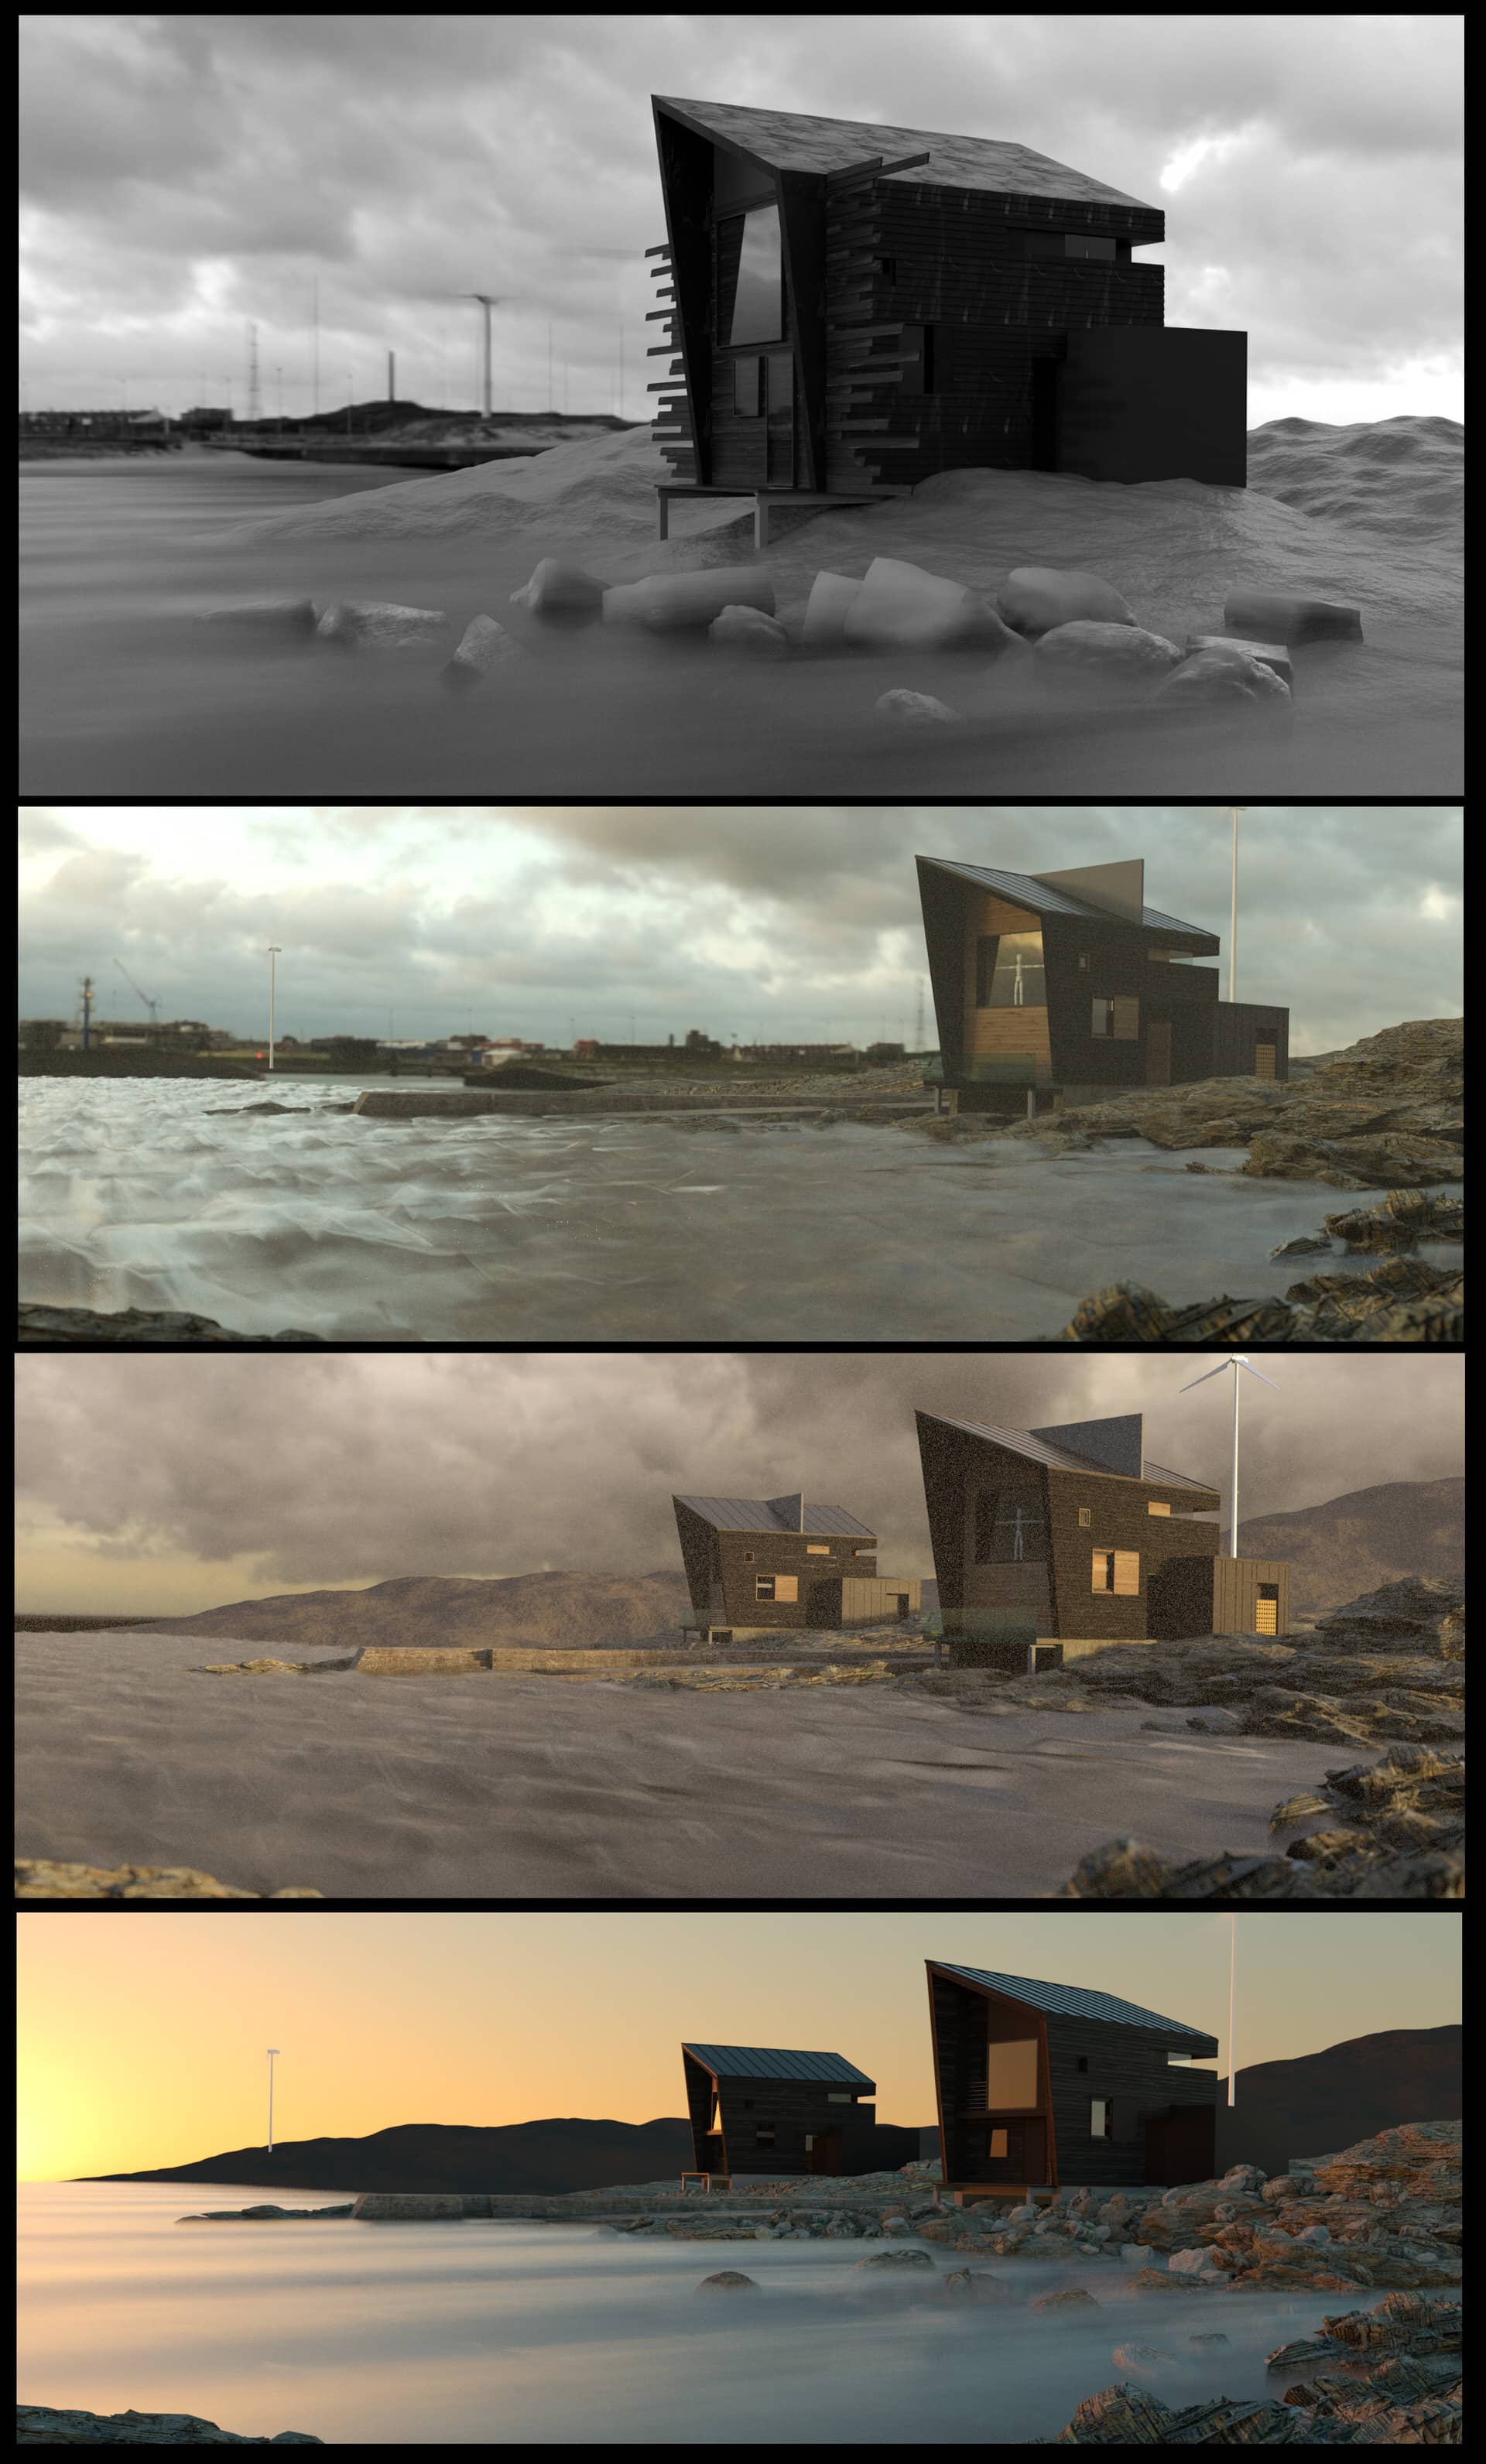
This is the main strong factor of the project. I made black wood to create a contrast between the buildings and bright sundown light surroundings. As usual, I had the plan to create additional views beside of the main one. I prepared a detailed wood model on the modeling and texturing stage. I was aware that not all details would be visible in the main view, but all things were also prepared for primary and additional close views. One effort offers many possibilities. I made a full big wall of wooden planks.

I cut planks to walls shapes by the boolean tool to cover all wooden parts by planks objects. I added a lot of small details to the building like rooftop solar panels, steps, detailed windows, entrance lights, etc.
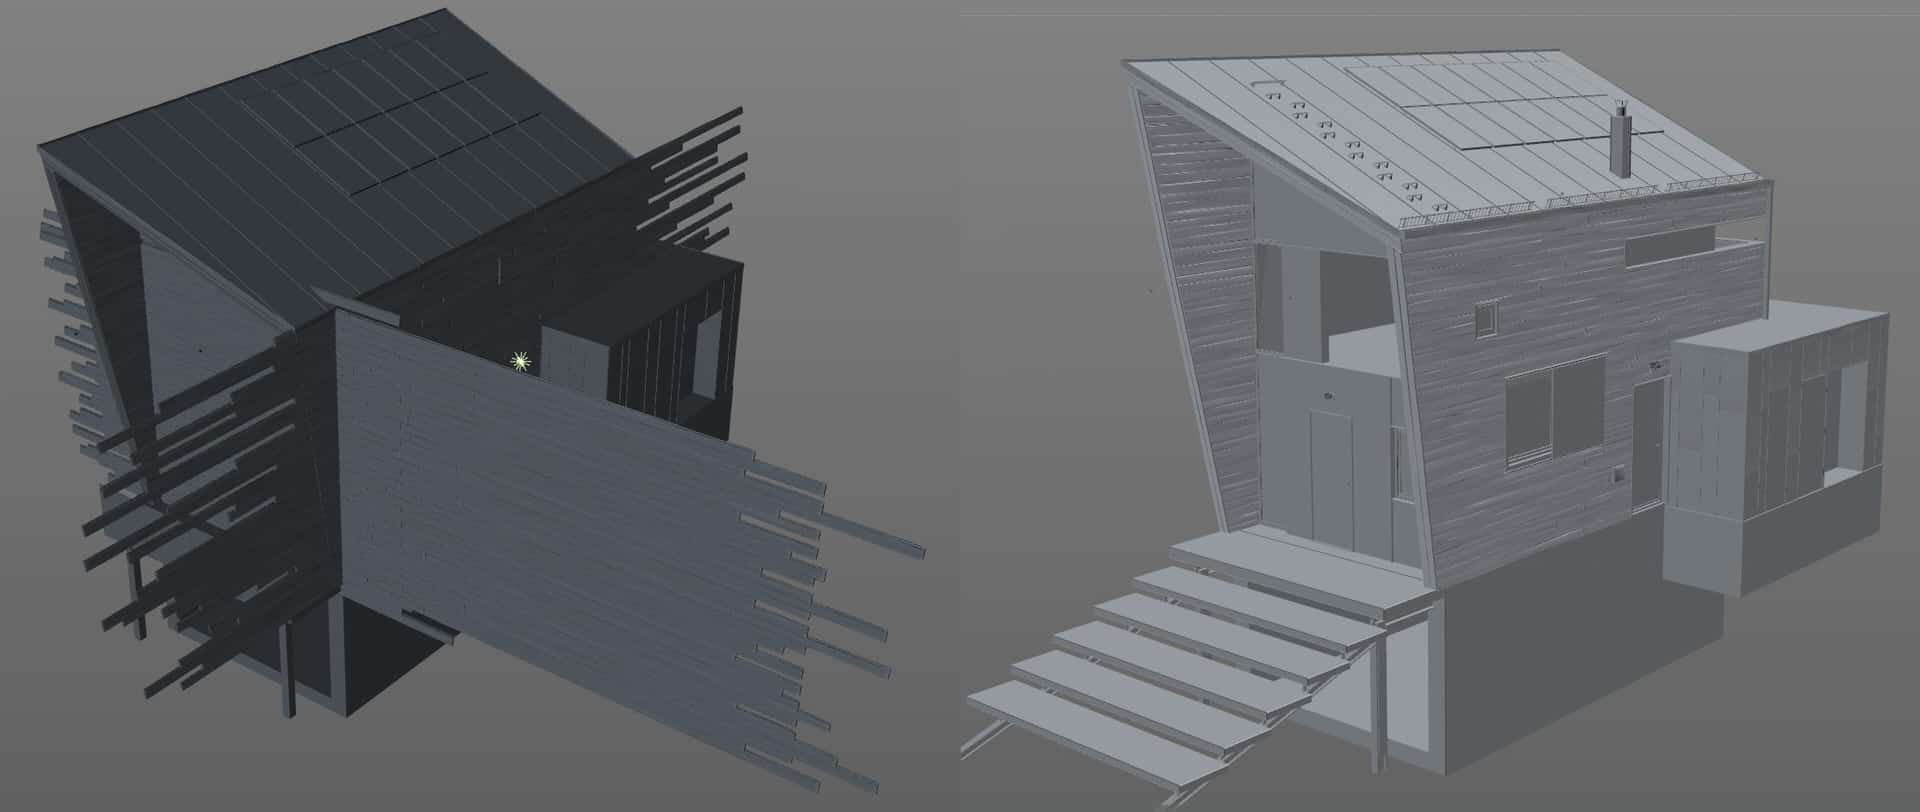
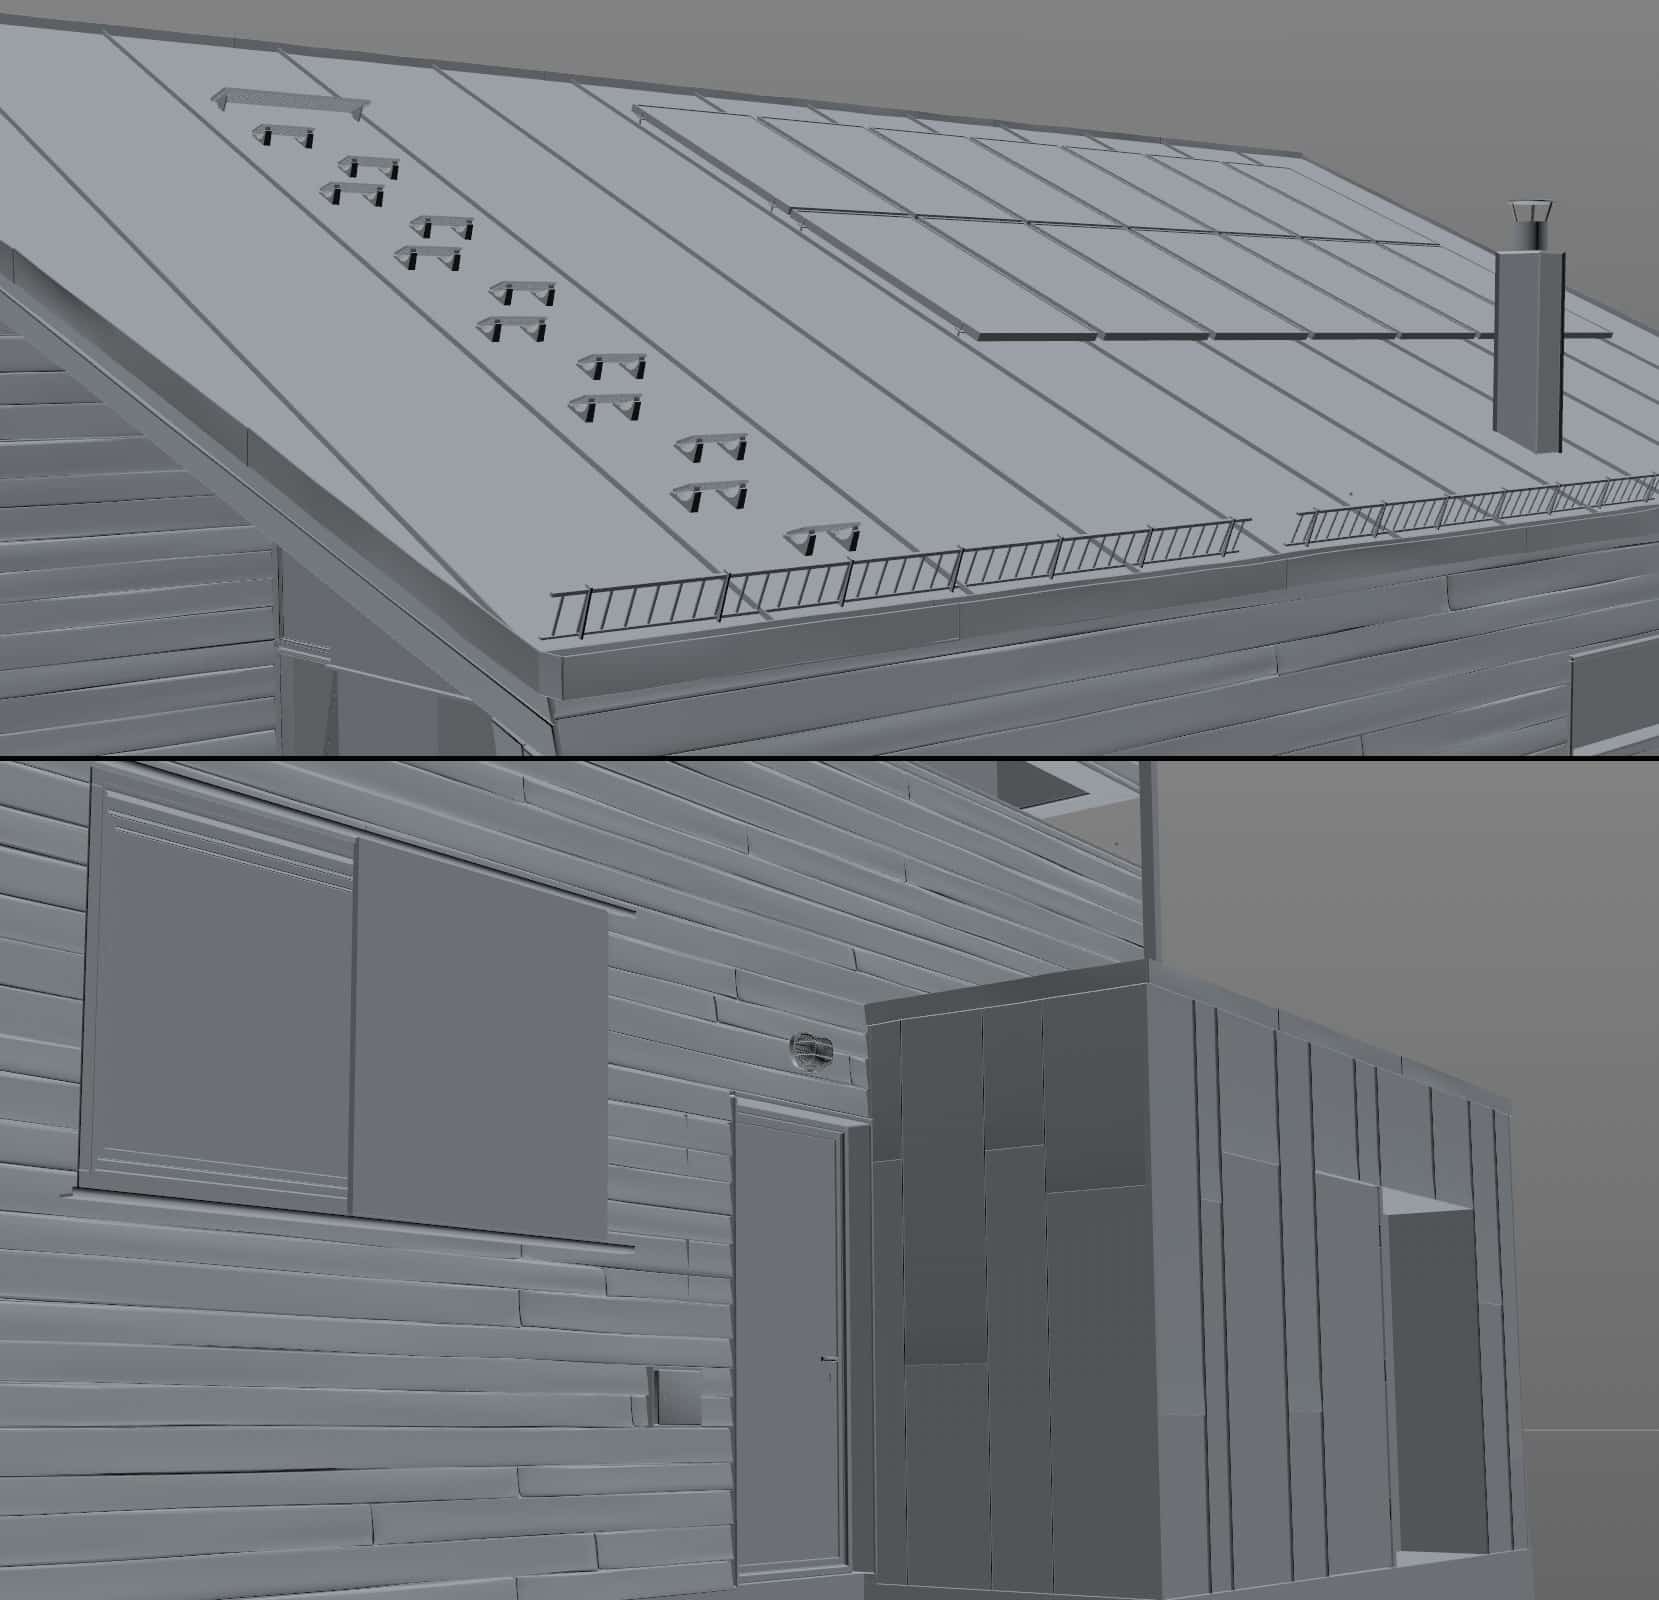
I always try to set the camera angle (final or almost final version) at an early stage of work. It is an excellent way to be focused on elements which are visible and skip useless part of modeling (and everyone knows that CG artists are the laziest persons over the world). That is the reason why I modeled only two walls. Rest of the building shape is not visible.
Wood material
I decided to make wood as black but with the original wood color slightly visible. In that cases (when I use hi-resolution textures) I always try to avoid unnecessary textures multiplications. I used Arroway wood textures to create 3 different hi resolution sets of plank textures. So, in this case, I used reflection black and white bitmap also as an alpha map (bump too) to blend two diffuse color textures. I tweaked it by octane bitmap modification and increase contrast to achieve the right balance between black and pure wood texture. I described the main rule in the scheme below. It works the same way in all rendering software.
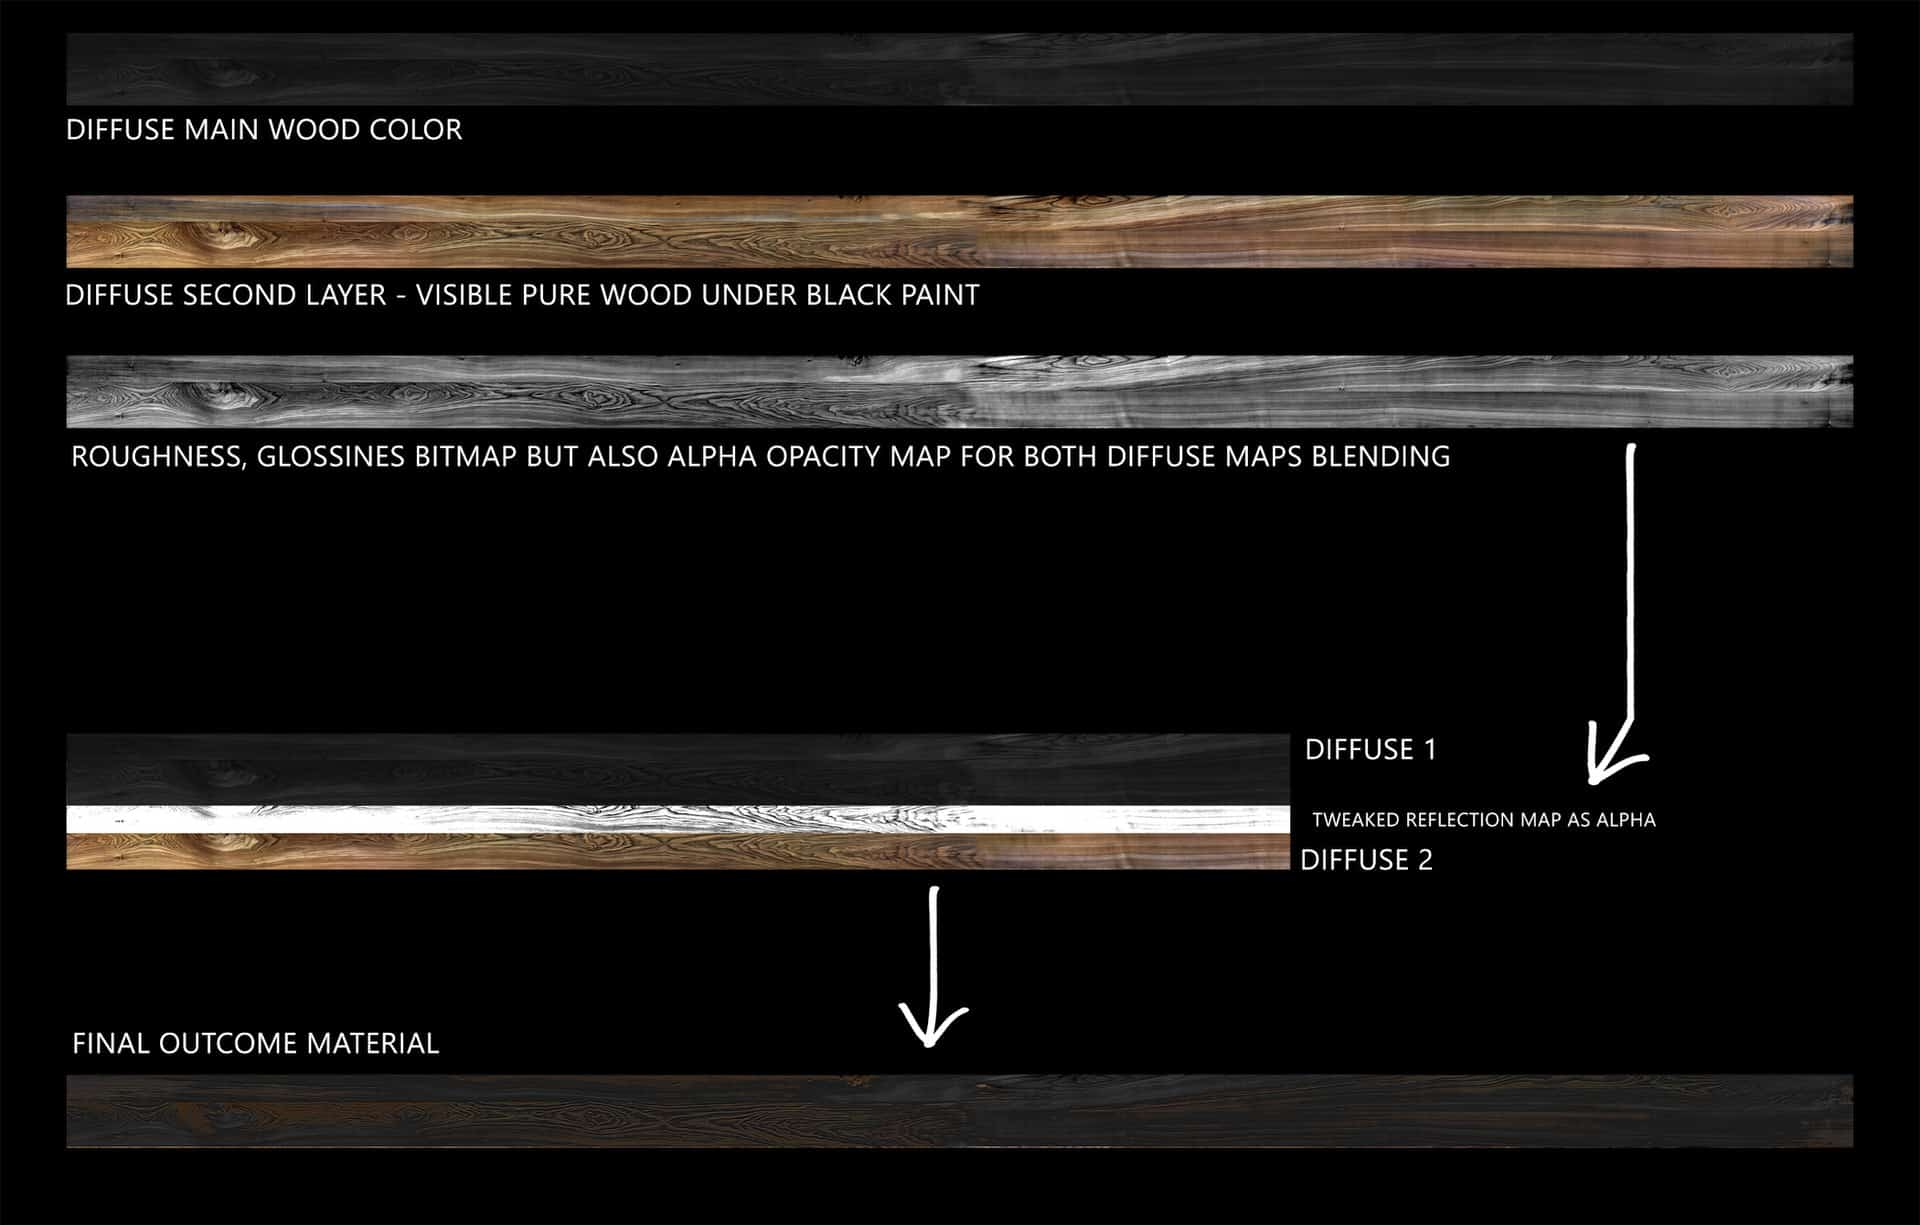
So finally after a lot of tests of wooden planks materials with a little bump, reflections I was pretty happy with the final result. Due to the hi-resolution of the textures, I could render cabins by the full range of camera distance – from far to quite close views. Bird’s “pollution signs” on the facade were added in photoshop post-production.
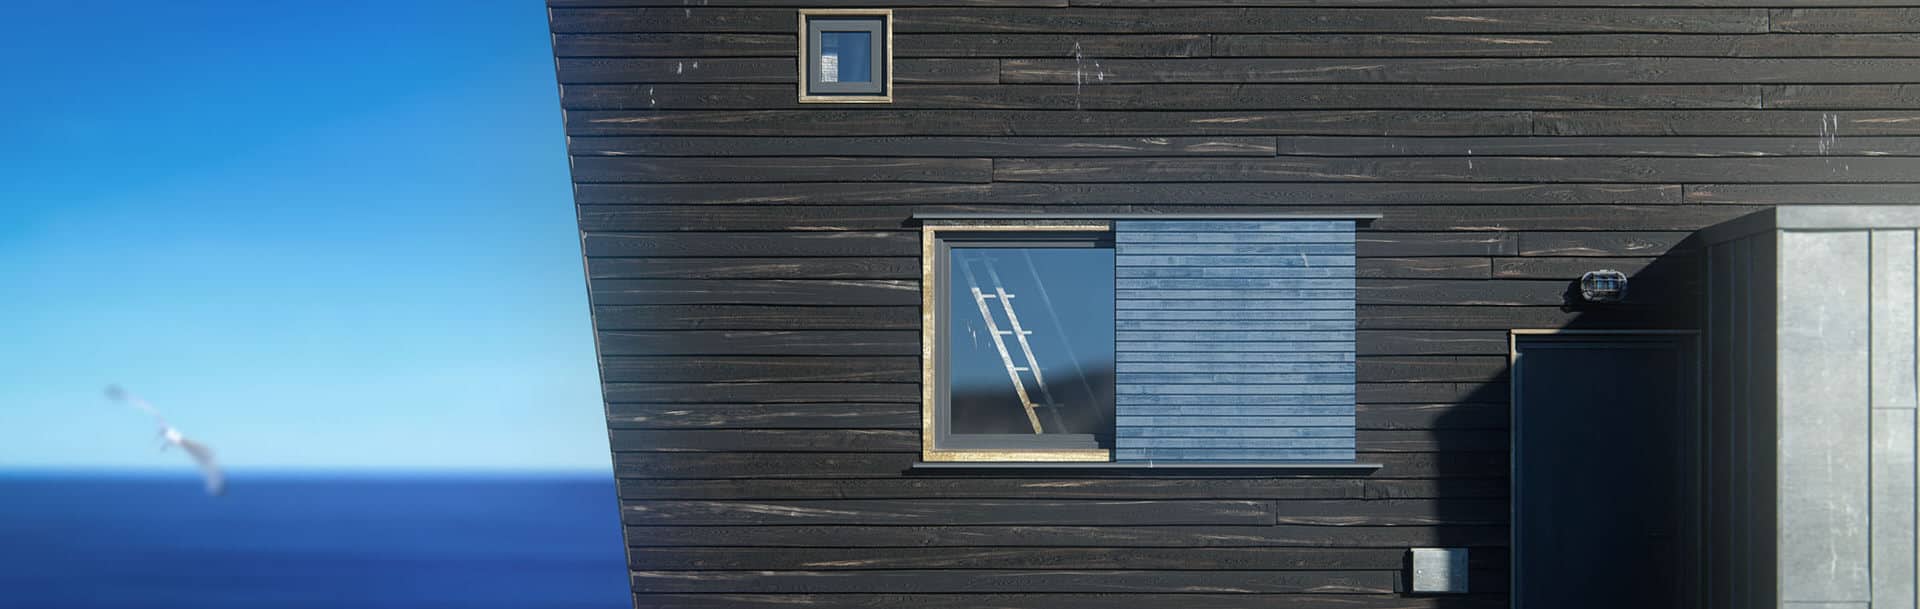
The shape of buildings was ready quite fast. I try basic irregular shape, and it works fine in perspective. I had more problems with the front wall. I made several variations, and finally, I decided to add some color wooden panels and made it rather flat but cut as lovely and consistent geometrical shapes.
The Frozen Water
As I mentioned at the beginning, the primary goal and challenge was a long time exposure effect. In real I use to take photos quite old analog cameras 6×6 or even 4×5” format. I love to play with a dozen or so minutes aperture time to even one hour for one picture. This technique makes a significant effect. Nowadays rendering software can simulate typical motion blur effect, so I was curious what will happen when I try to reproduce long time photography in full 3d scene.
Here my person in action and one of my photo example which I made in Norway. For this one, I used an analog large format Linhof camera.

I made many tests on Octane, and it wasn’t easy to create the right effect.
The first test shows the water more as an irregular fog. I added reflection to the water material, and it helped to show water shapes in the right way.
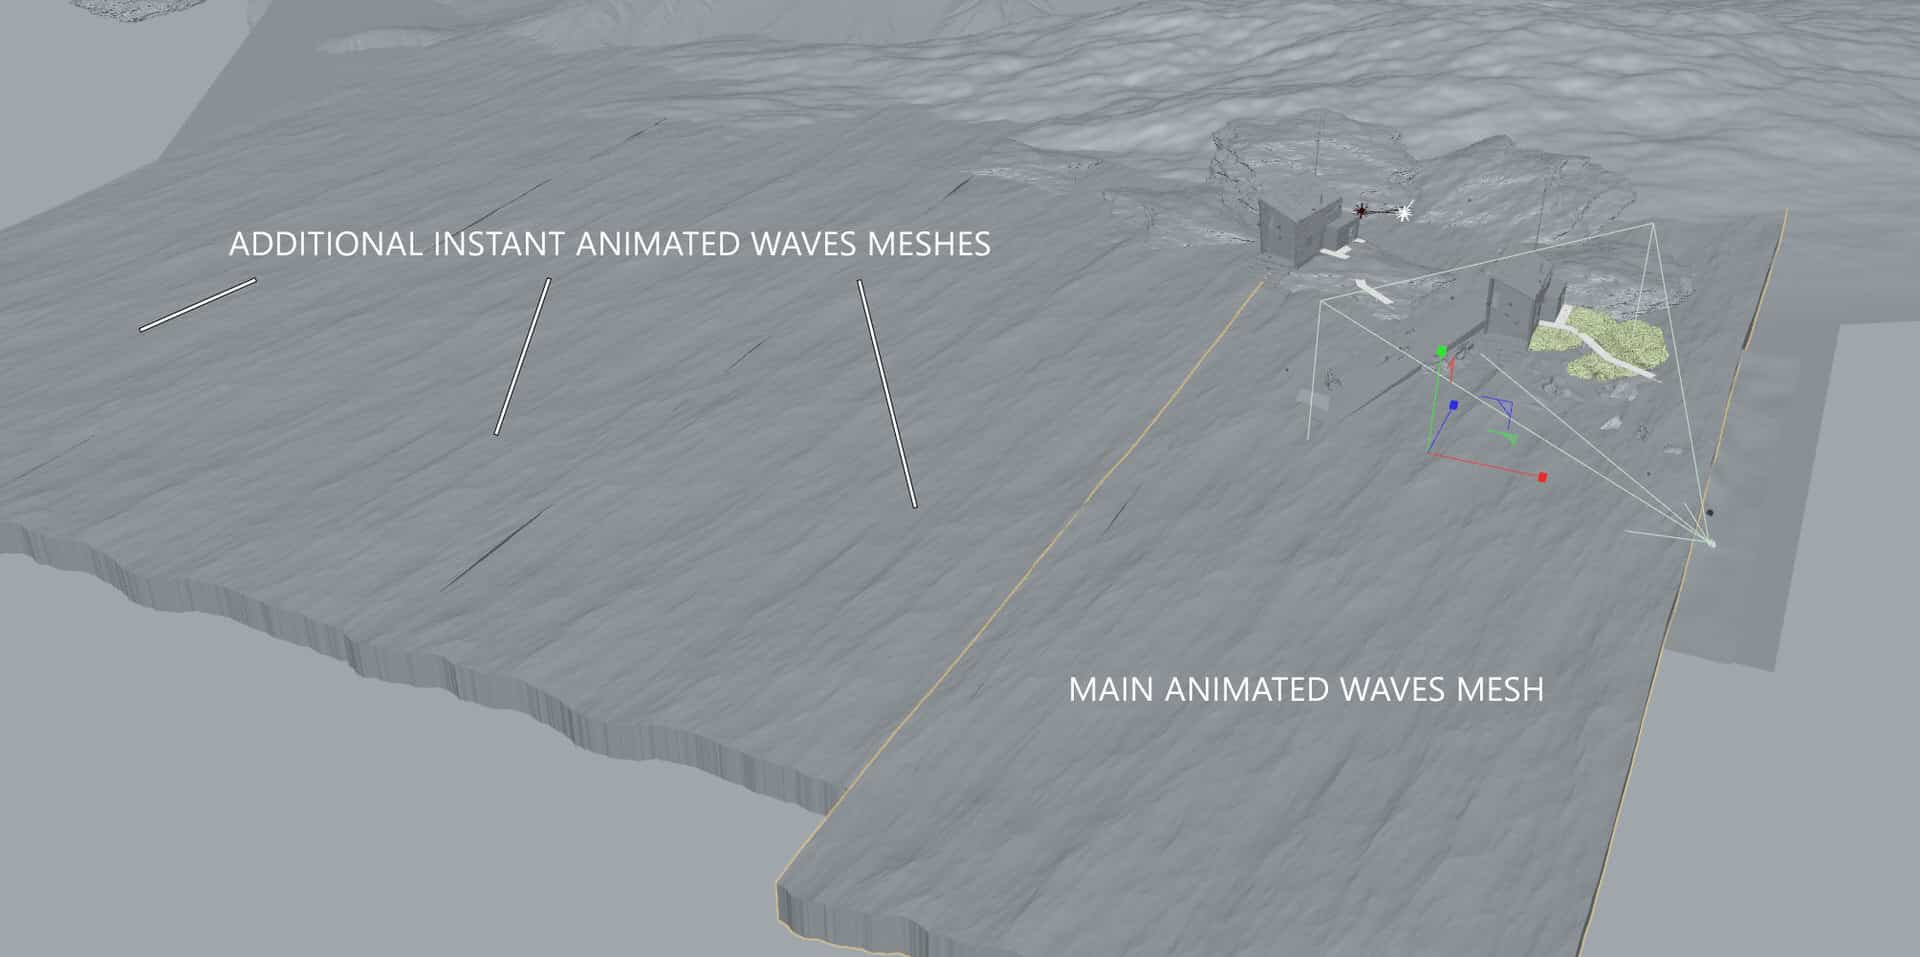
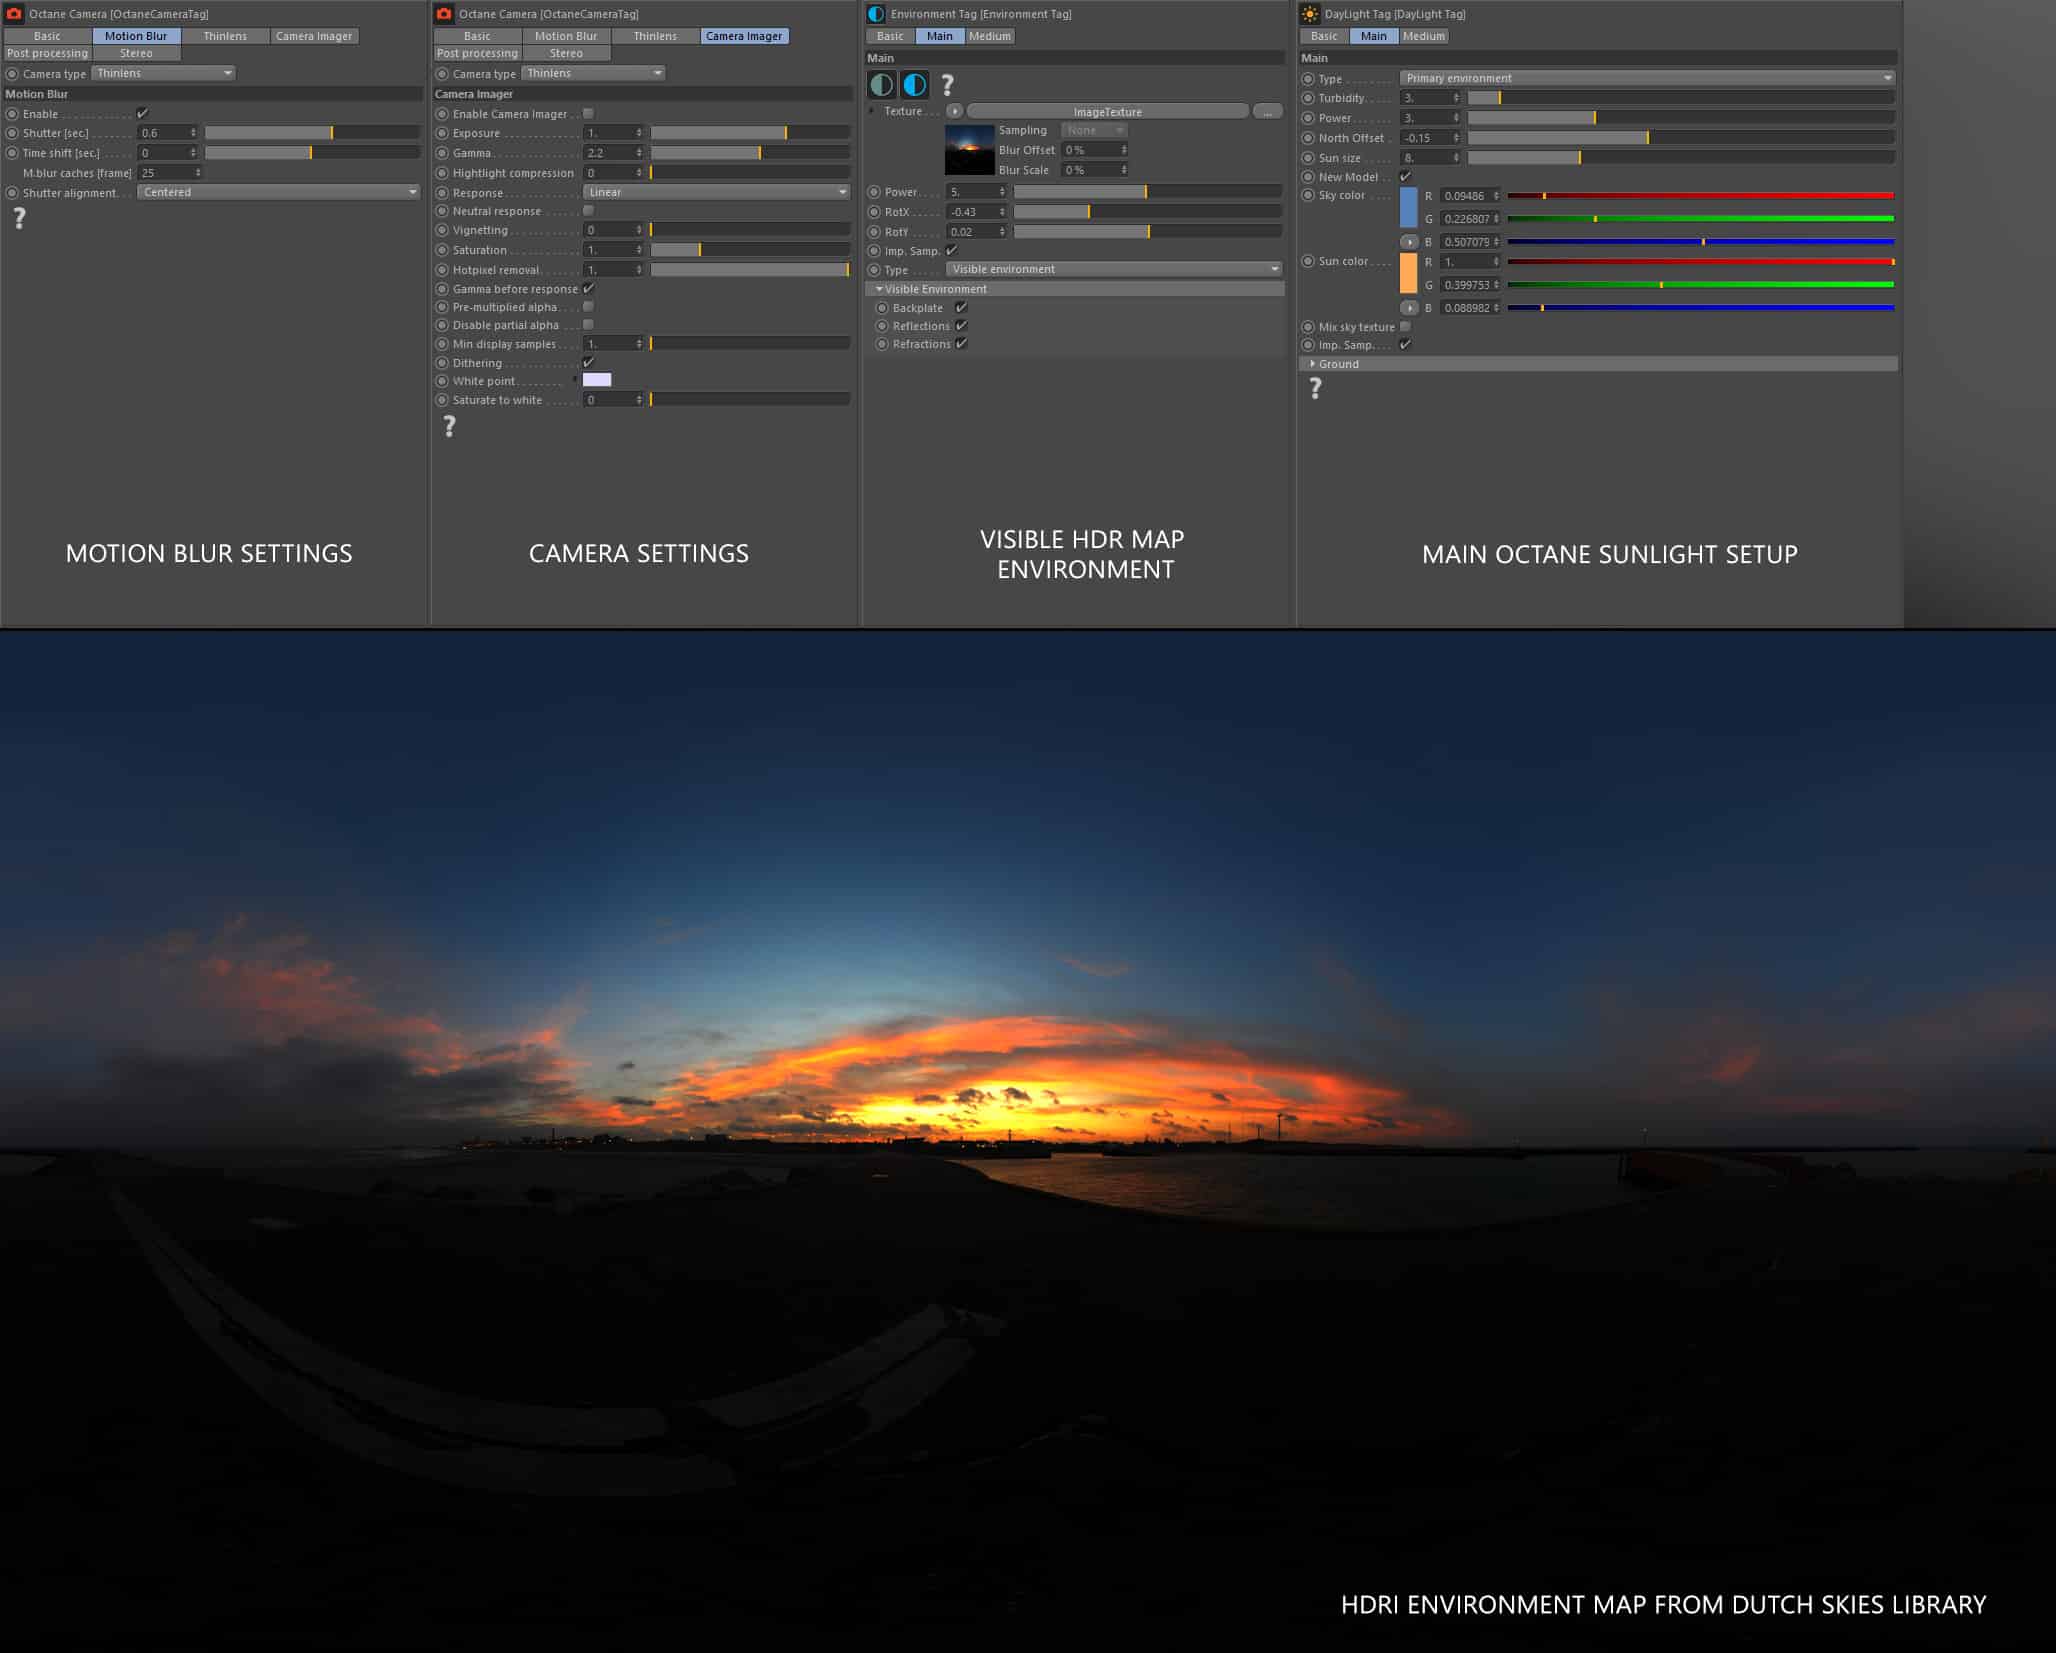
Finally, I discovered that my virtual camera shouldn’t exceed 1 second time exposure and the best effect is between 0.1 sec to 1 sec. So I had to set my camera to about 0.6 sec shutter speed value and control the final effect by the speed of waves animation. It isn’t still as real world but how many people need 30 minutes shutter speed in 3d programs rendering? I used one principal animated water object and three instant copies to cover the entire visible sea part of the image. Cache motion blur data before rendering is quite RAM consumption operation.
For light, I use octane sun system and mix it with HDR map from Dutch Skies. The HDR map was tagged as the visible environment for backplate, reflections, and refractions. This mix gave me good control over the entire mood. I spent the time to make the right waves animation, and finally, I achieve a pleasant and rewarding effect. Here is my octane camera setup and by the way light setup.
From this point, I didn’t touch the waves I left this part of my scene not to destroy anything. From this stage, I was focus on the entire final scene look.
The Mountains
Very often background is just a background, essential but somewhat less complicated than rest of 3d scene. This time I imagined very rough and old mountains. It turned out quite demanding. I was sure that I needed a few mountains to achieve good space and objects located in that space to make volumetric fog effect sharp visible. If you need an excellent fog effect, then you need much space in your scene. Just like in the real world. So I knew that I need good and big mountains.
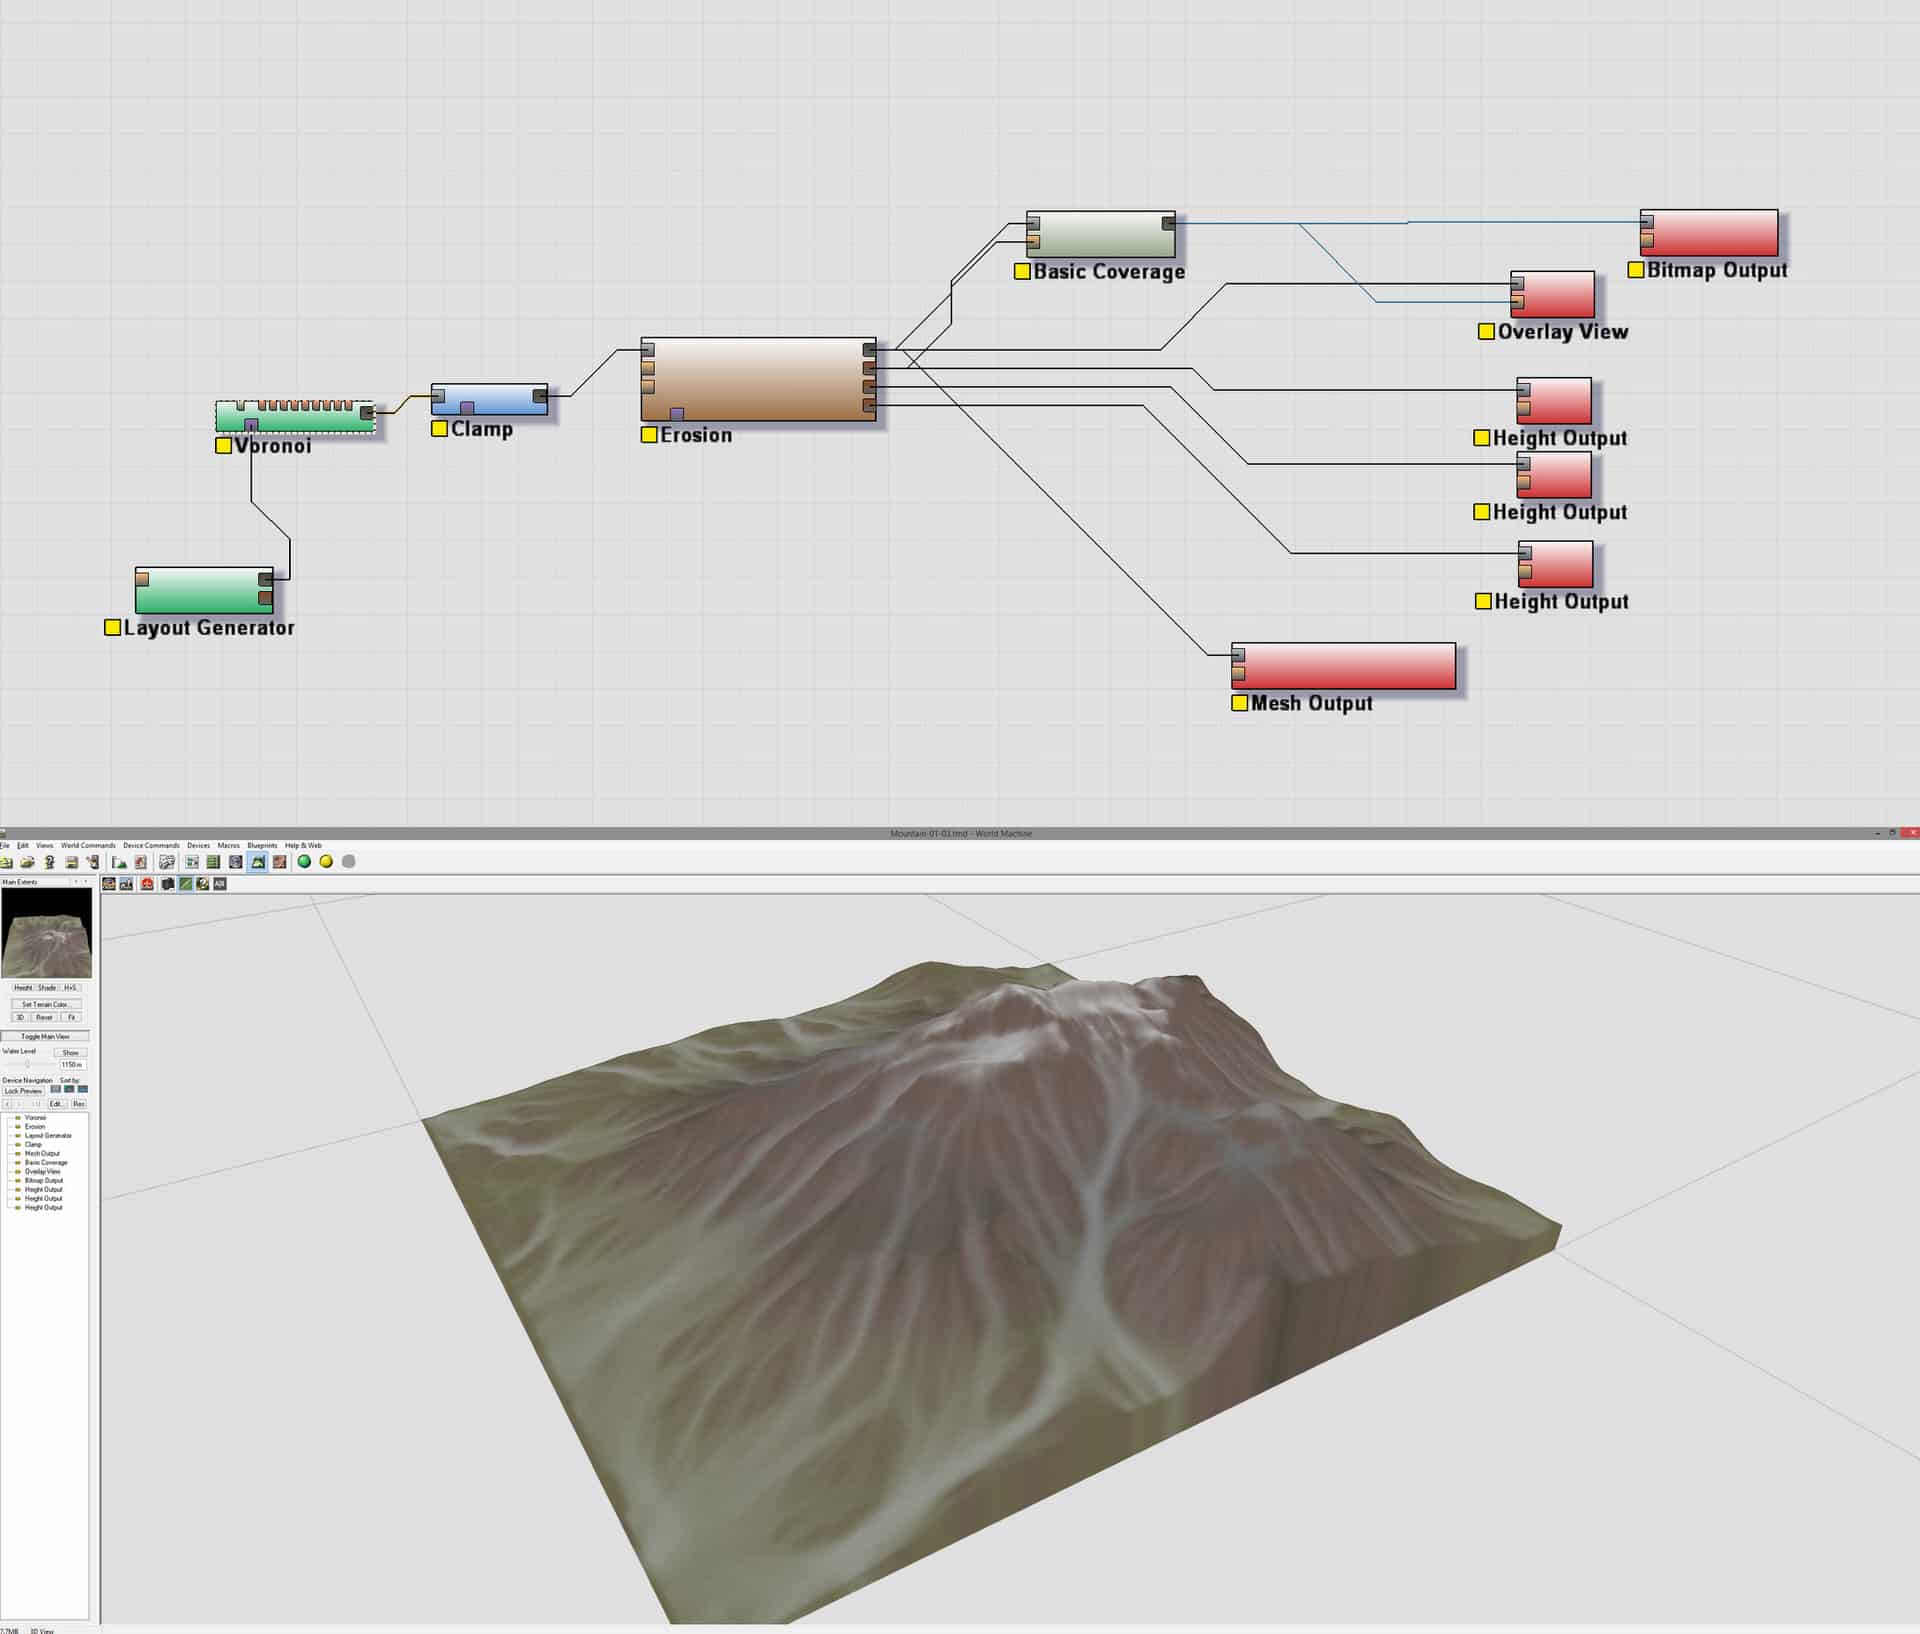
I started playing with C4D mountain standard object. It looks good usually, but I needed more. I never gave up, so I looked at the internet to see which landscape generators are currently on the market. Finally, I bought the World Machine basic version and after three days of learning (it was challenging) I made beautiful mountains with erosion effect. I needed erosion due to the main topic of this image. Frozen in time – the time is vital so during the entire process I was thinking how to emphasize the “time” factor.
One of the ideas was showing old mountains that are equal to erosion effect. World Machine works excellently as a landscape generator. I was delighted with textures and their quality and variety of use. So very quickly I figured out that World Machine textures I could use to help spread objects directly in Cinema 4D and controlled by textures their places.
World Machine mountain setup and low res preview.
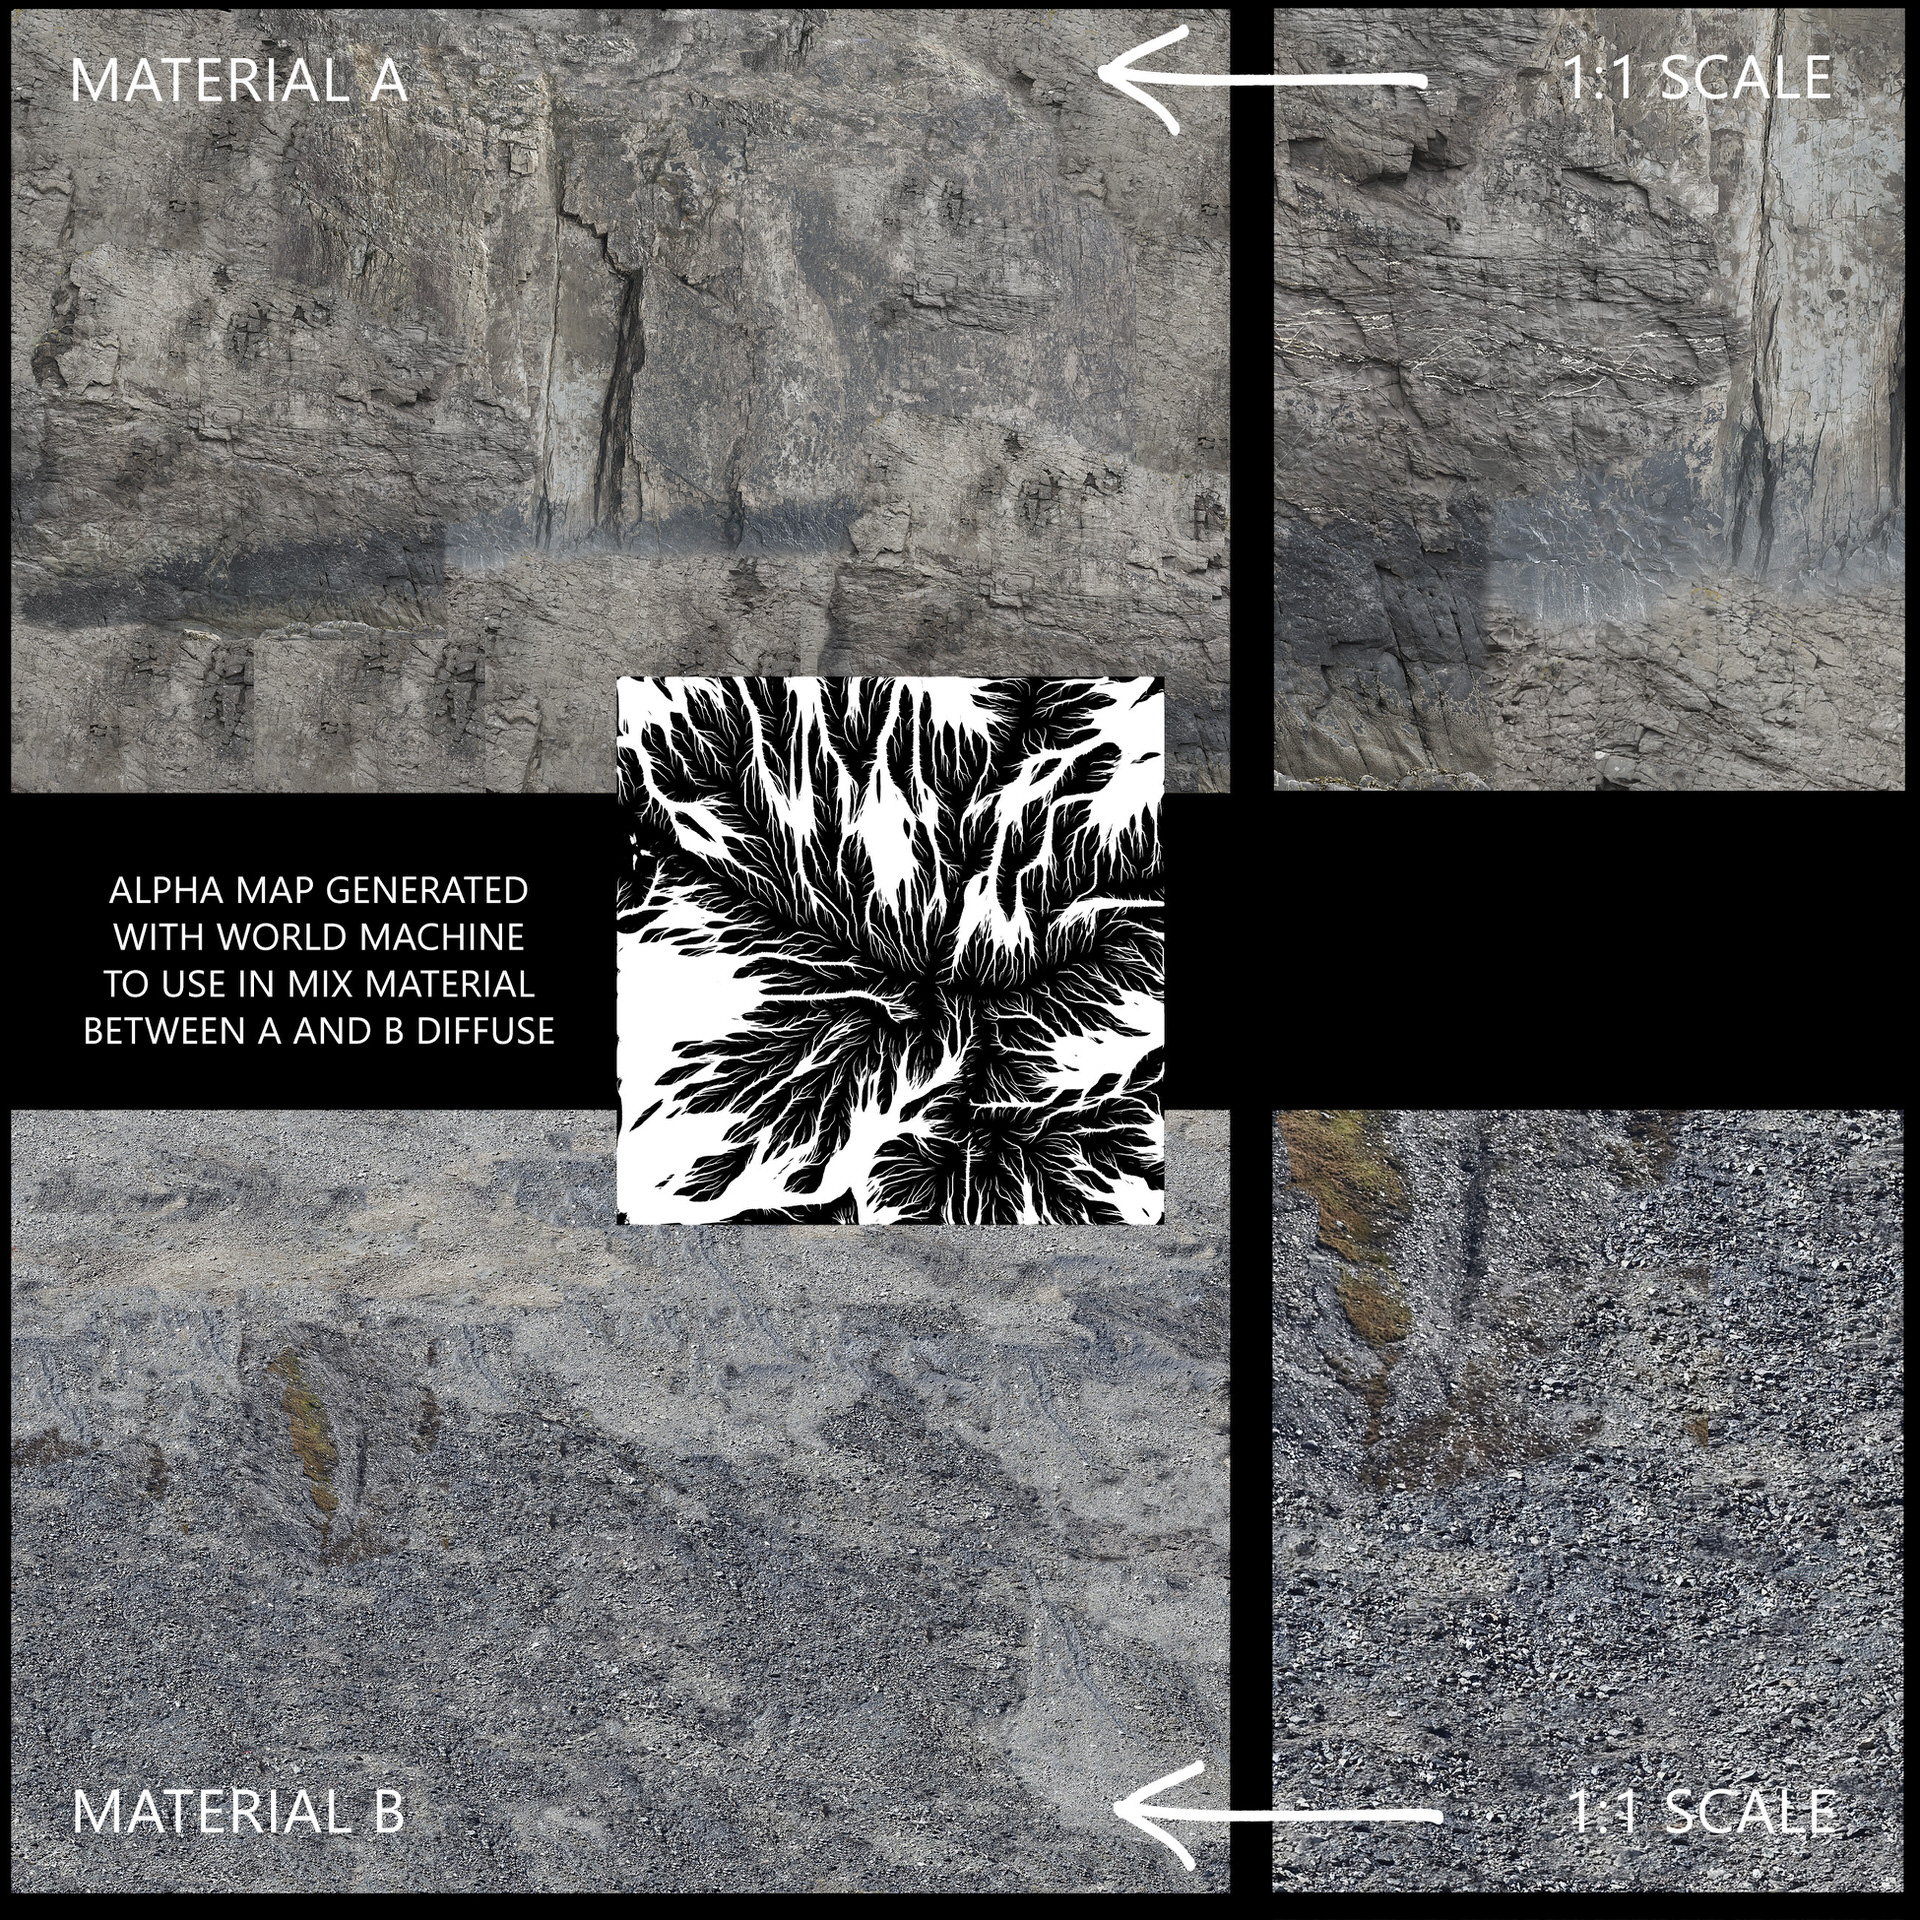
Main mountain material was octane mix material and blended two materials, one material for the main rock surface and the second material for erosion rocks valley. I blend those materials by alpha texture generated with World Machine.
For additional details, I added for the closest mountain displace map. It was the first time when my graphics cards began to be scared due to lack of RAM resources.
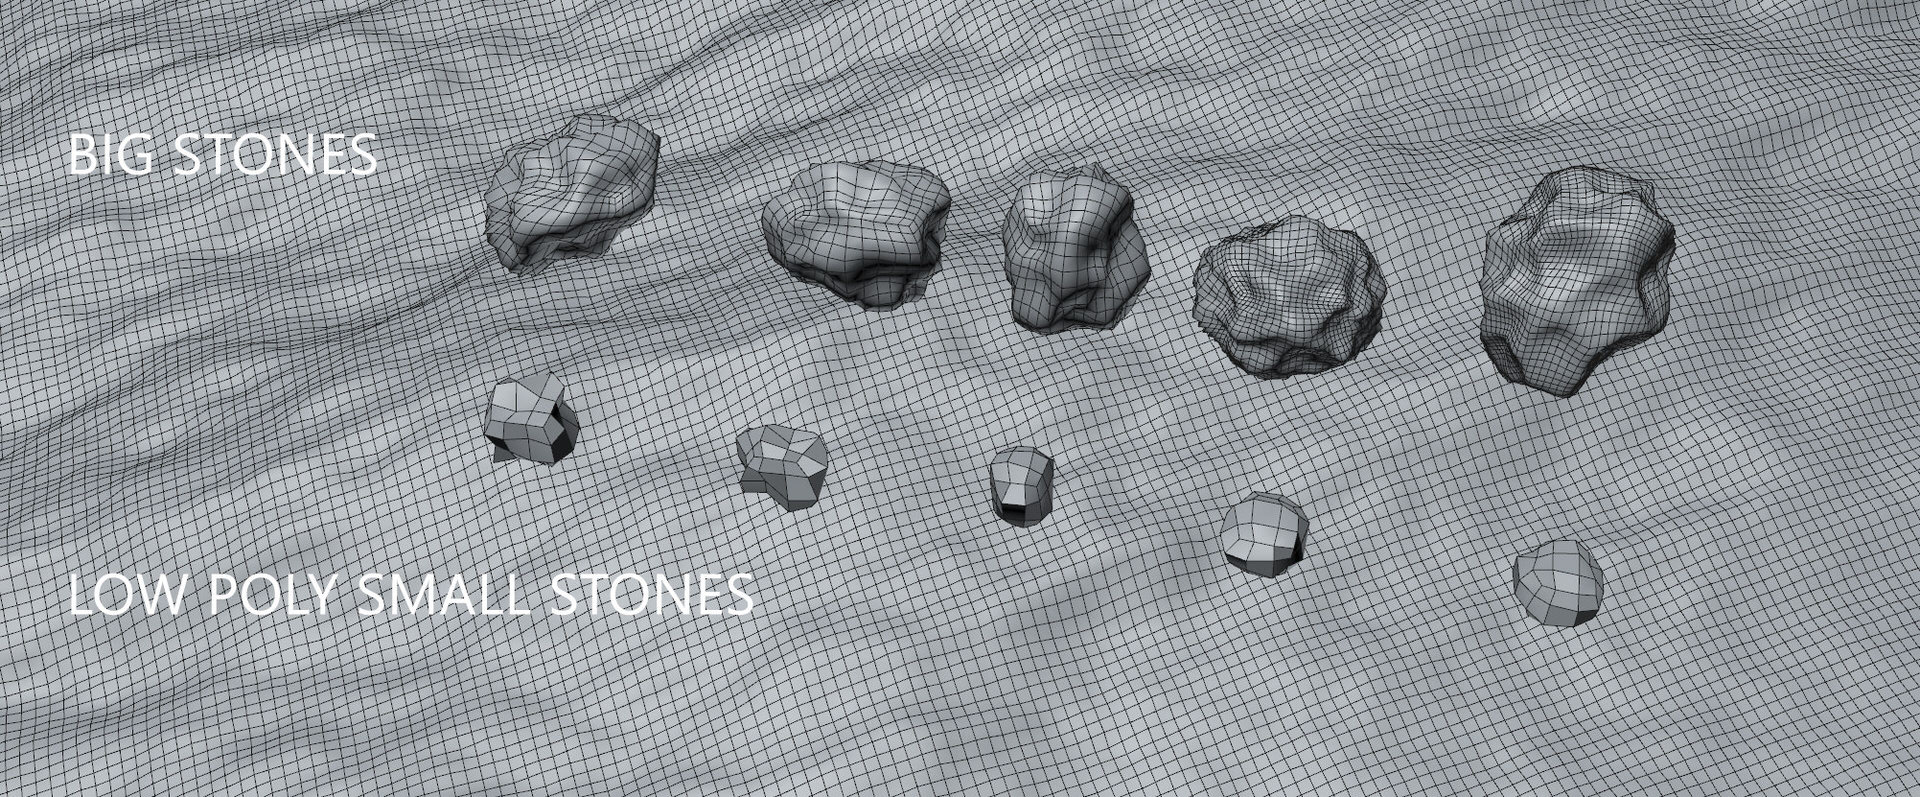
Native 3d WM mountain shape was great, but I needed more. I created rough stones to spread them on the mountains hills. I gathered a lot of mountains images. The stones rolling down and they are arranged as the primary rule – biggest stones on the bottom part of the hill, next medium on a higher level and smallest on top. To recreate this behavior I used a few SurfaceSpread modules with a different setup. Each one was filtered by a b&w image taken from World Machine and also by height and slope factor. That was a great connection!
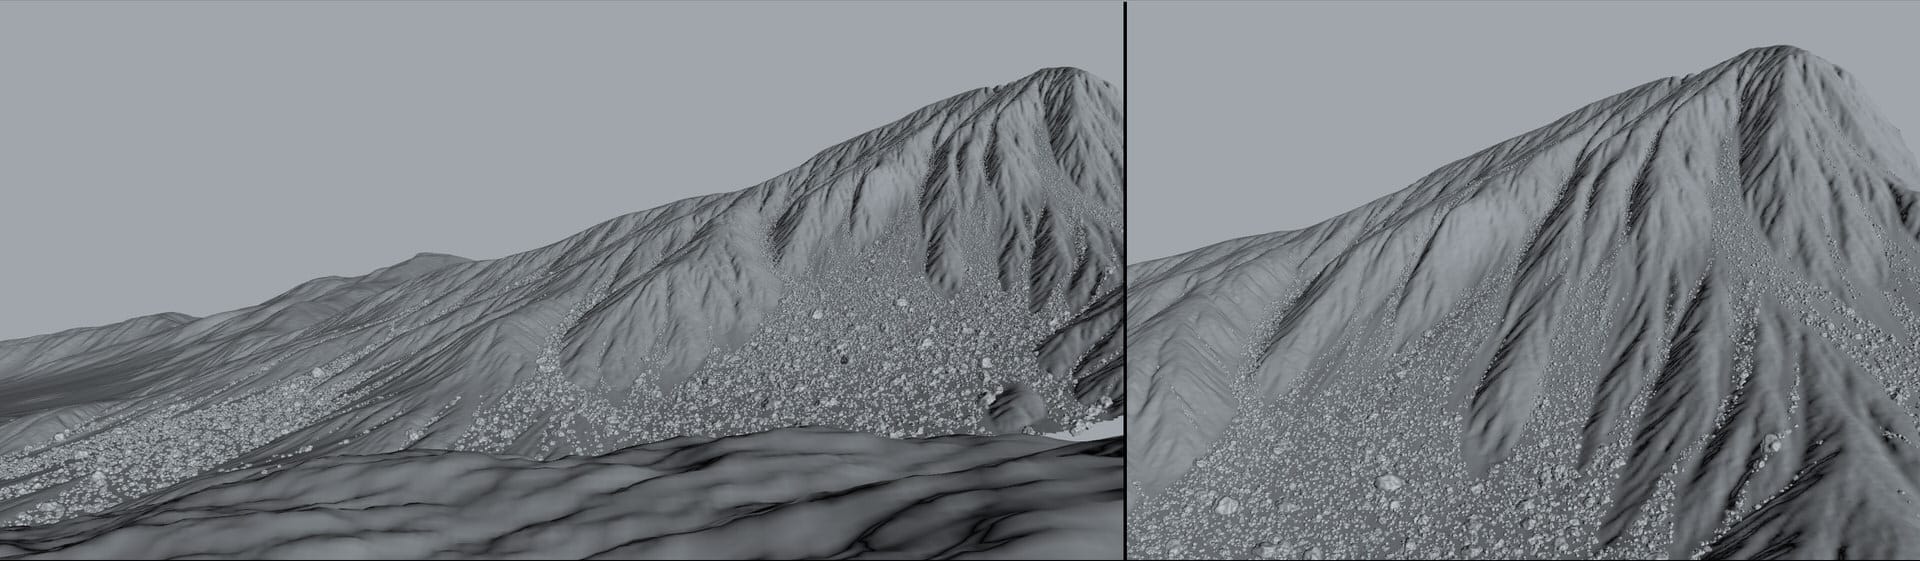
Just one word about the stones. I knew that they should look different than round sea stones. Those were a part of the rough mountain. I made them as a quite low poly. Thay are quite far from the camera, so the low poly shape with little bump makes them excellent and right visible as a different “species” of sharp stones related to smooth water stones.
For the mountains material, I added massive texture from textures.com site. It works very well with a normal map which I created in photoshop.
Due to GPU rendering limits (I work now on two gtx1080 8 Gb cards) I watched over my scene ram consumption. The mountains are quite heavy and detailed objects. I checked the camera angle cone and deleted invisible parts of massive objects.
Wet Stones
The seashore stones were a different story. They are essential elements which cover quite a big part of the image, but I was aware that they should not distract attention from the primary goal of wooden cabins. So finally I made them as round shapes not rough stones with sharp edges with many details.
I divided the stones into four main groups:
- Huge – they are almost like a part of the mountain,
- Big – just huge rocks on shore,
- Medium & Small – those rocks cover the bottom and seashore. All stones I made with Forester C4D plugin. It allows me to achieve different shapes of the stones.
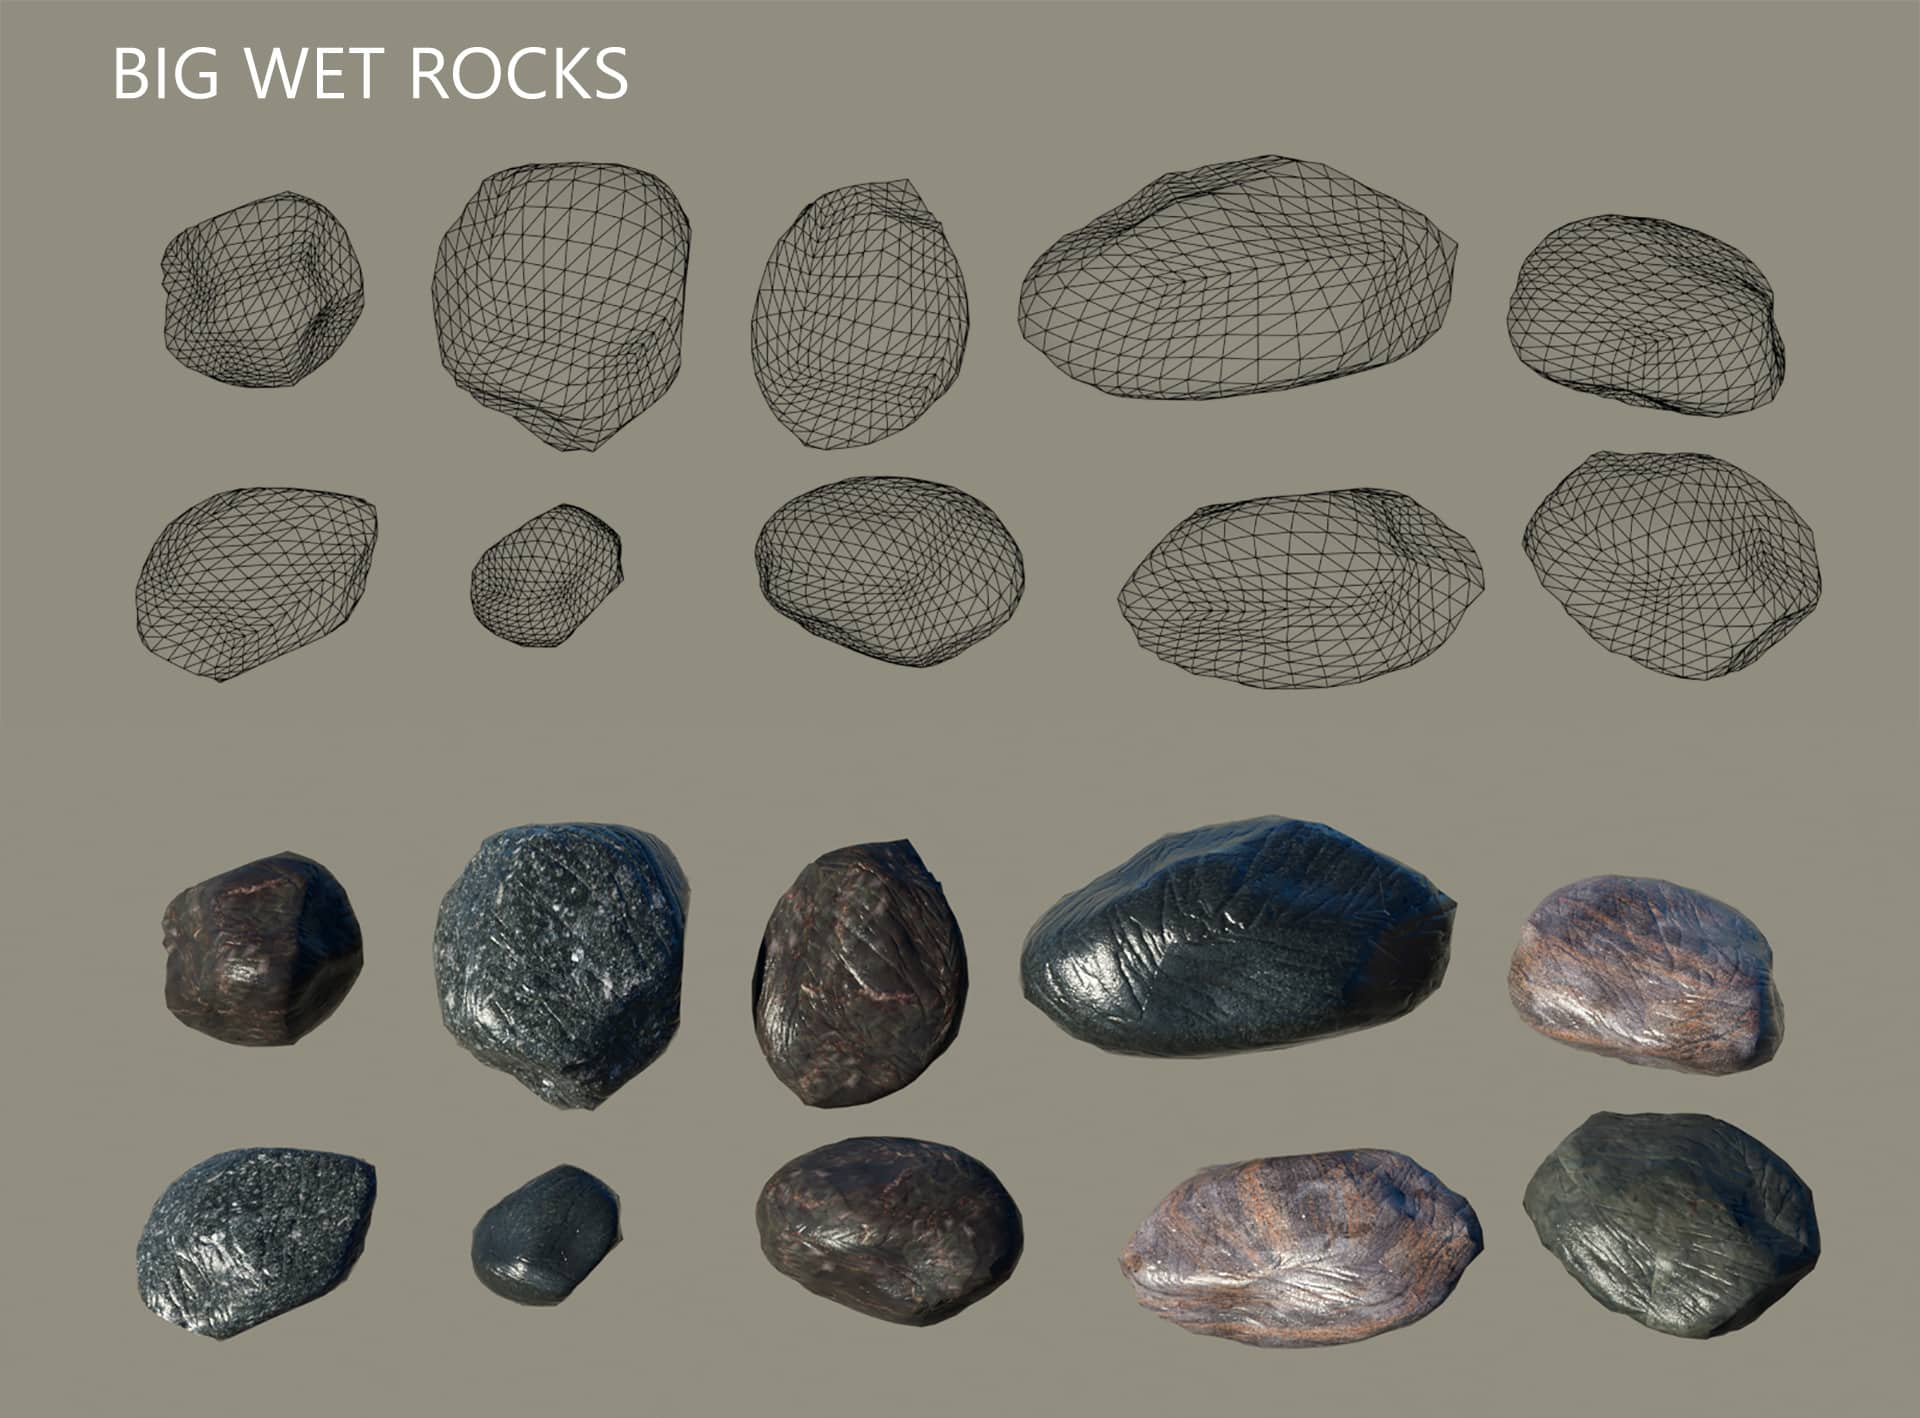
Small and medium stones are just wet glossy not dense mesh objects with correct and variety of stone material.

To the big ones. I added to the right material normal maps to achieve more details which are visible due to the bigger scale.
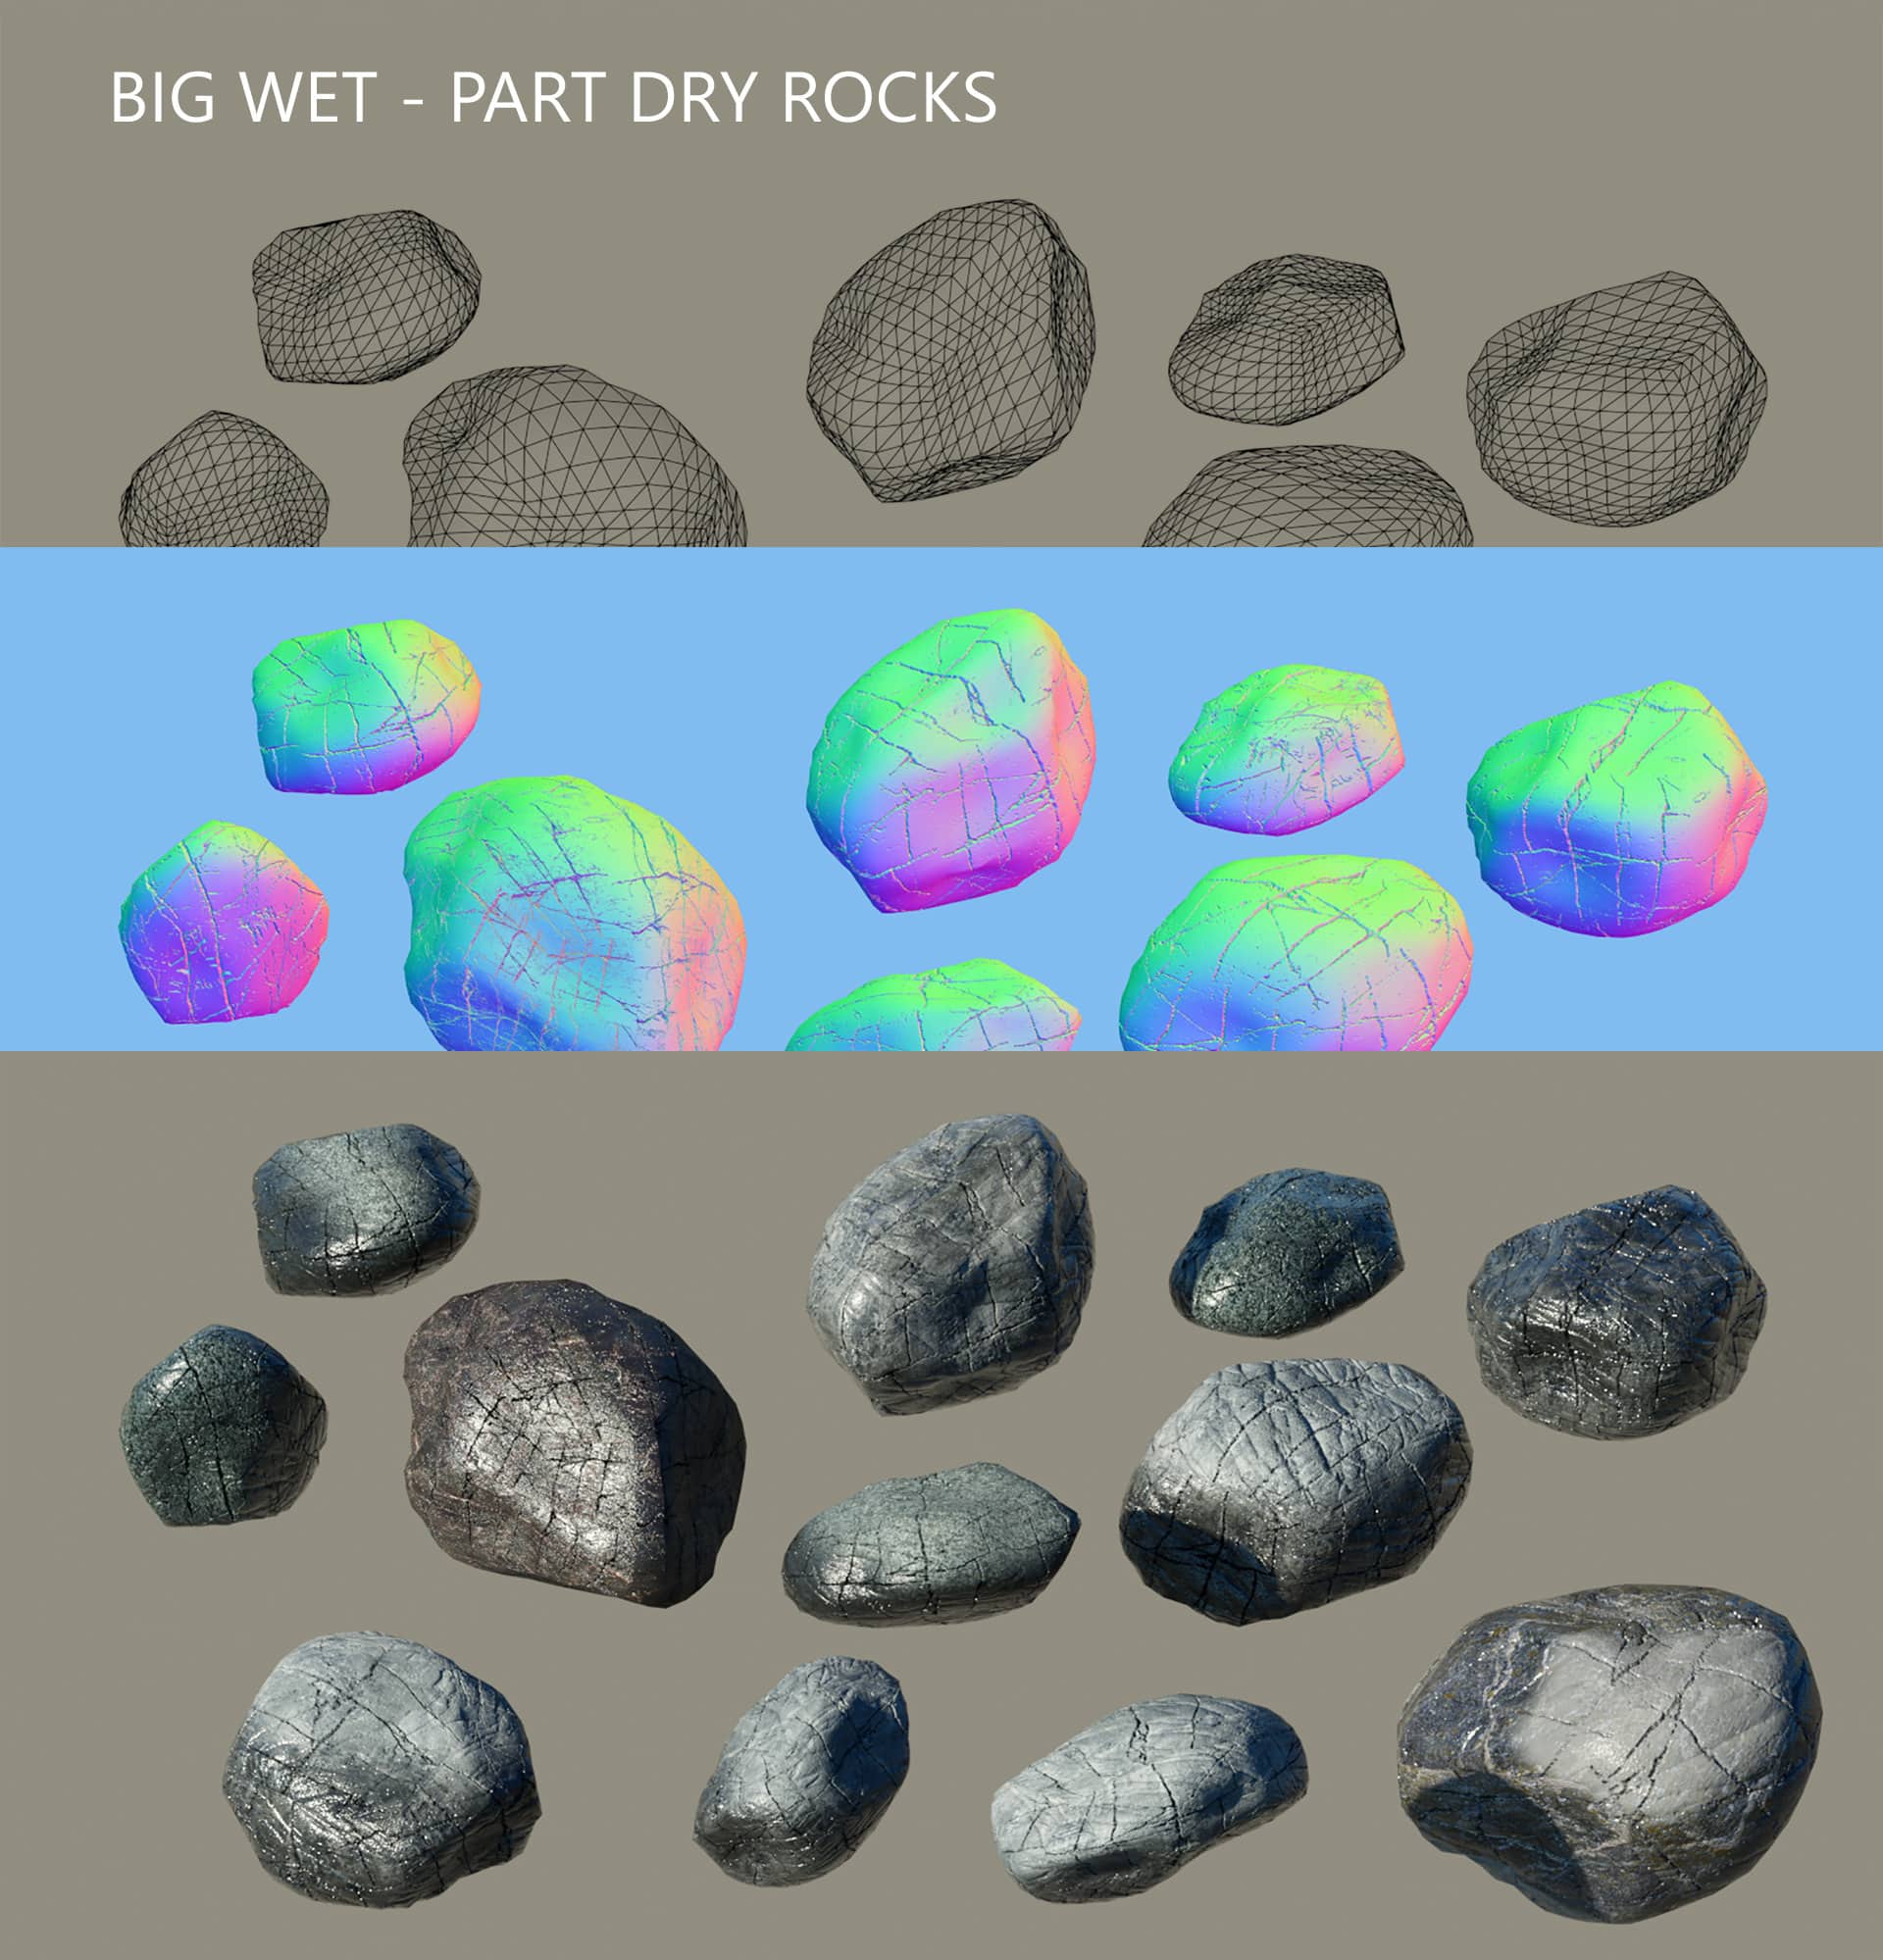
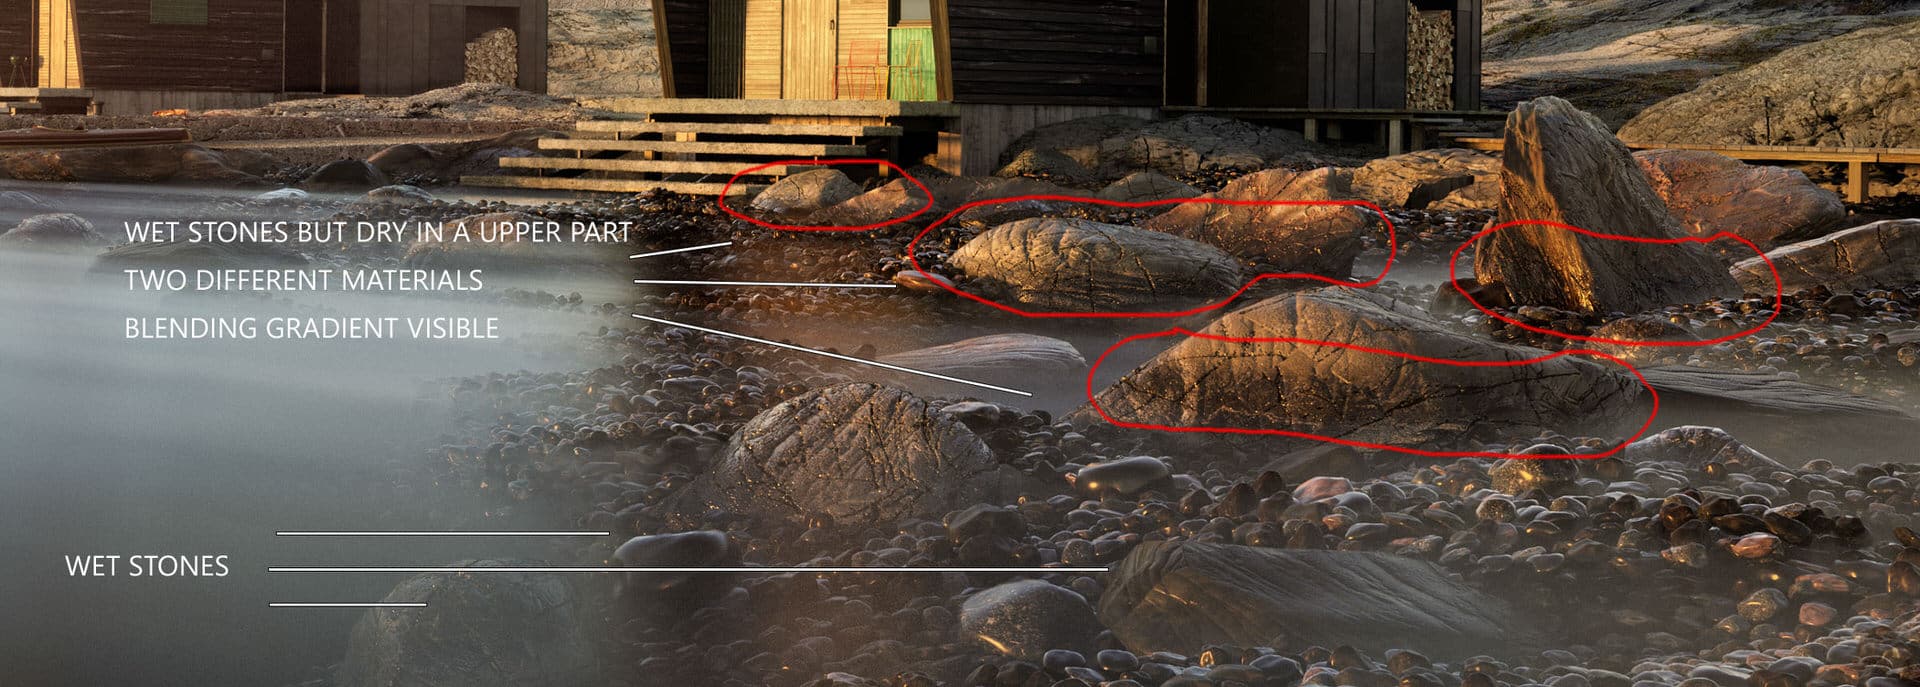
I planned to add some large rocks which will come in half or less above the water. So they should dry in part. I added to those stones a displacement maps to achieve excellent details. They are the main actors in the main scene among others.
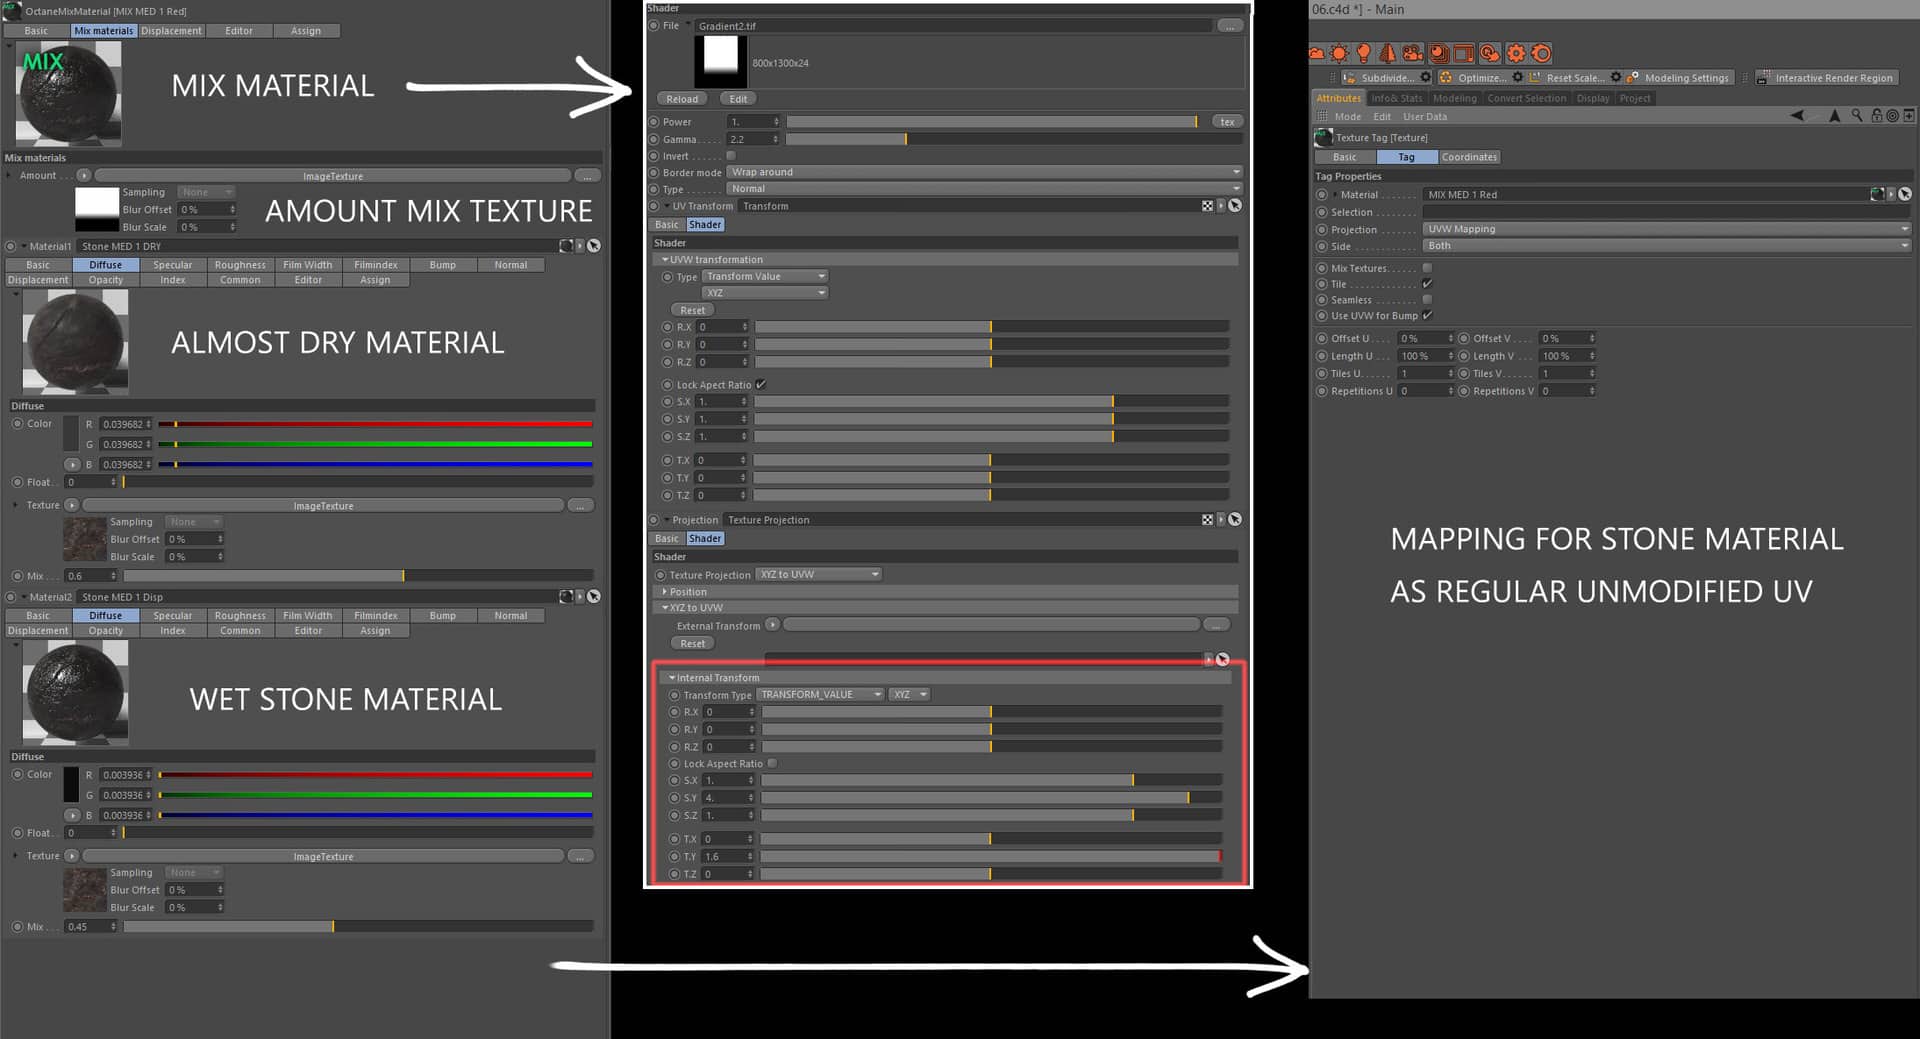
They should dry in a part as I mentioned above. It was little challenge to figure out the mapping of two materials with different mapping setup of the position, rotation and scale setup. Finally, I used the Octane MIX material. I mix two version of the same stone material – almost dry and wet. The tip is on the mix amount texture. I changed the mapping of this black and white blending horizontal gradient texture by Octane individual texture projection feature. I just changed the mapping of this texture to set mix gradient in the right place independently off main regular UV mapping of the stone textures. It allows me to move up and down the gradient on each stone to set the blend area in right position related to water level.
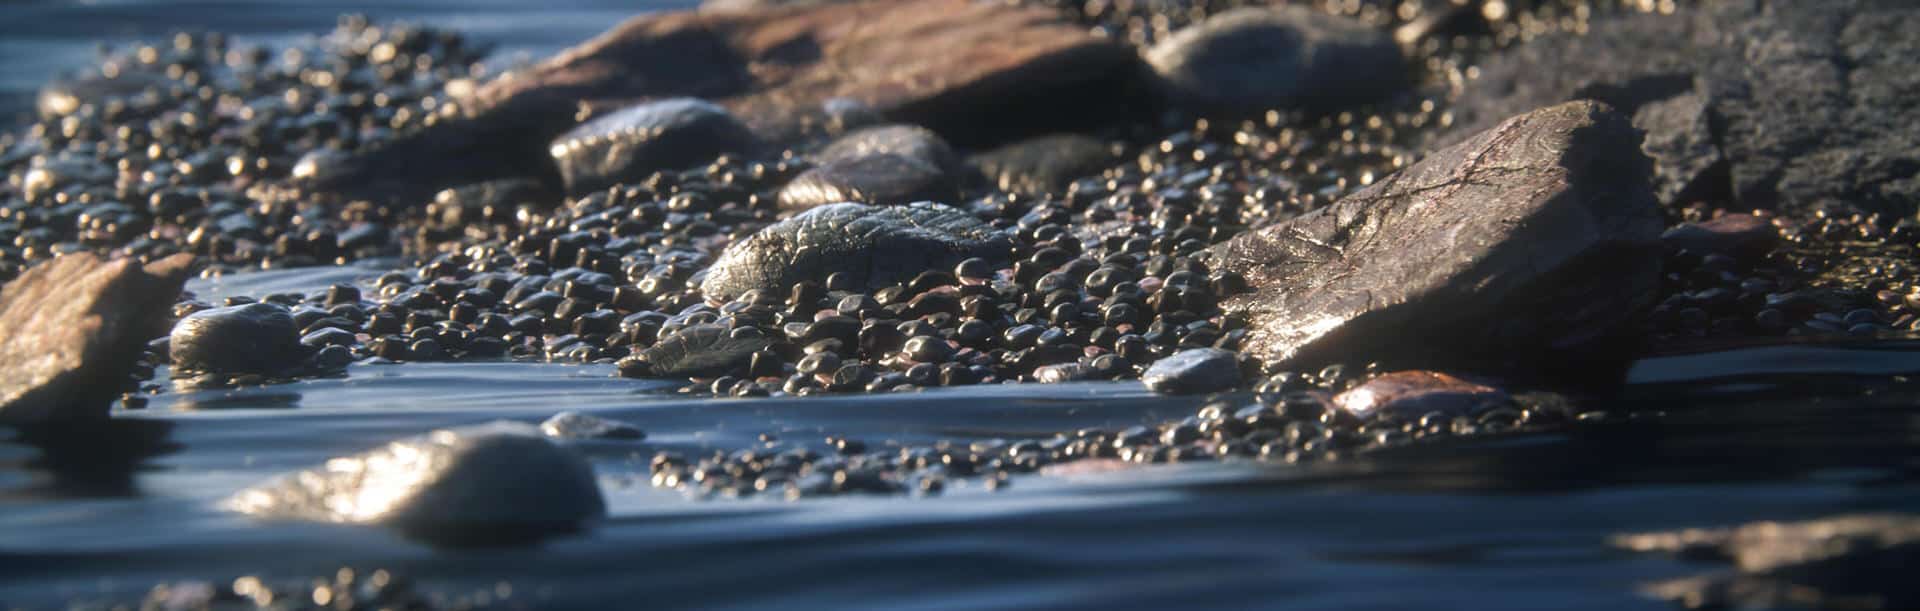
Here is a cropped part of the main image where the blending of two material is visible. Water is calm, and the waves are small, the stones are dry on the upper part!
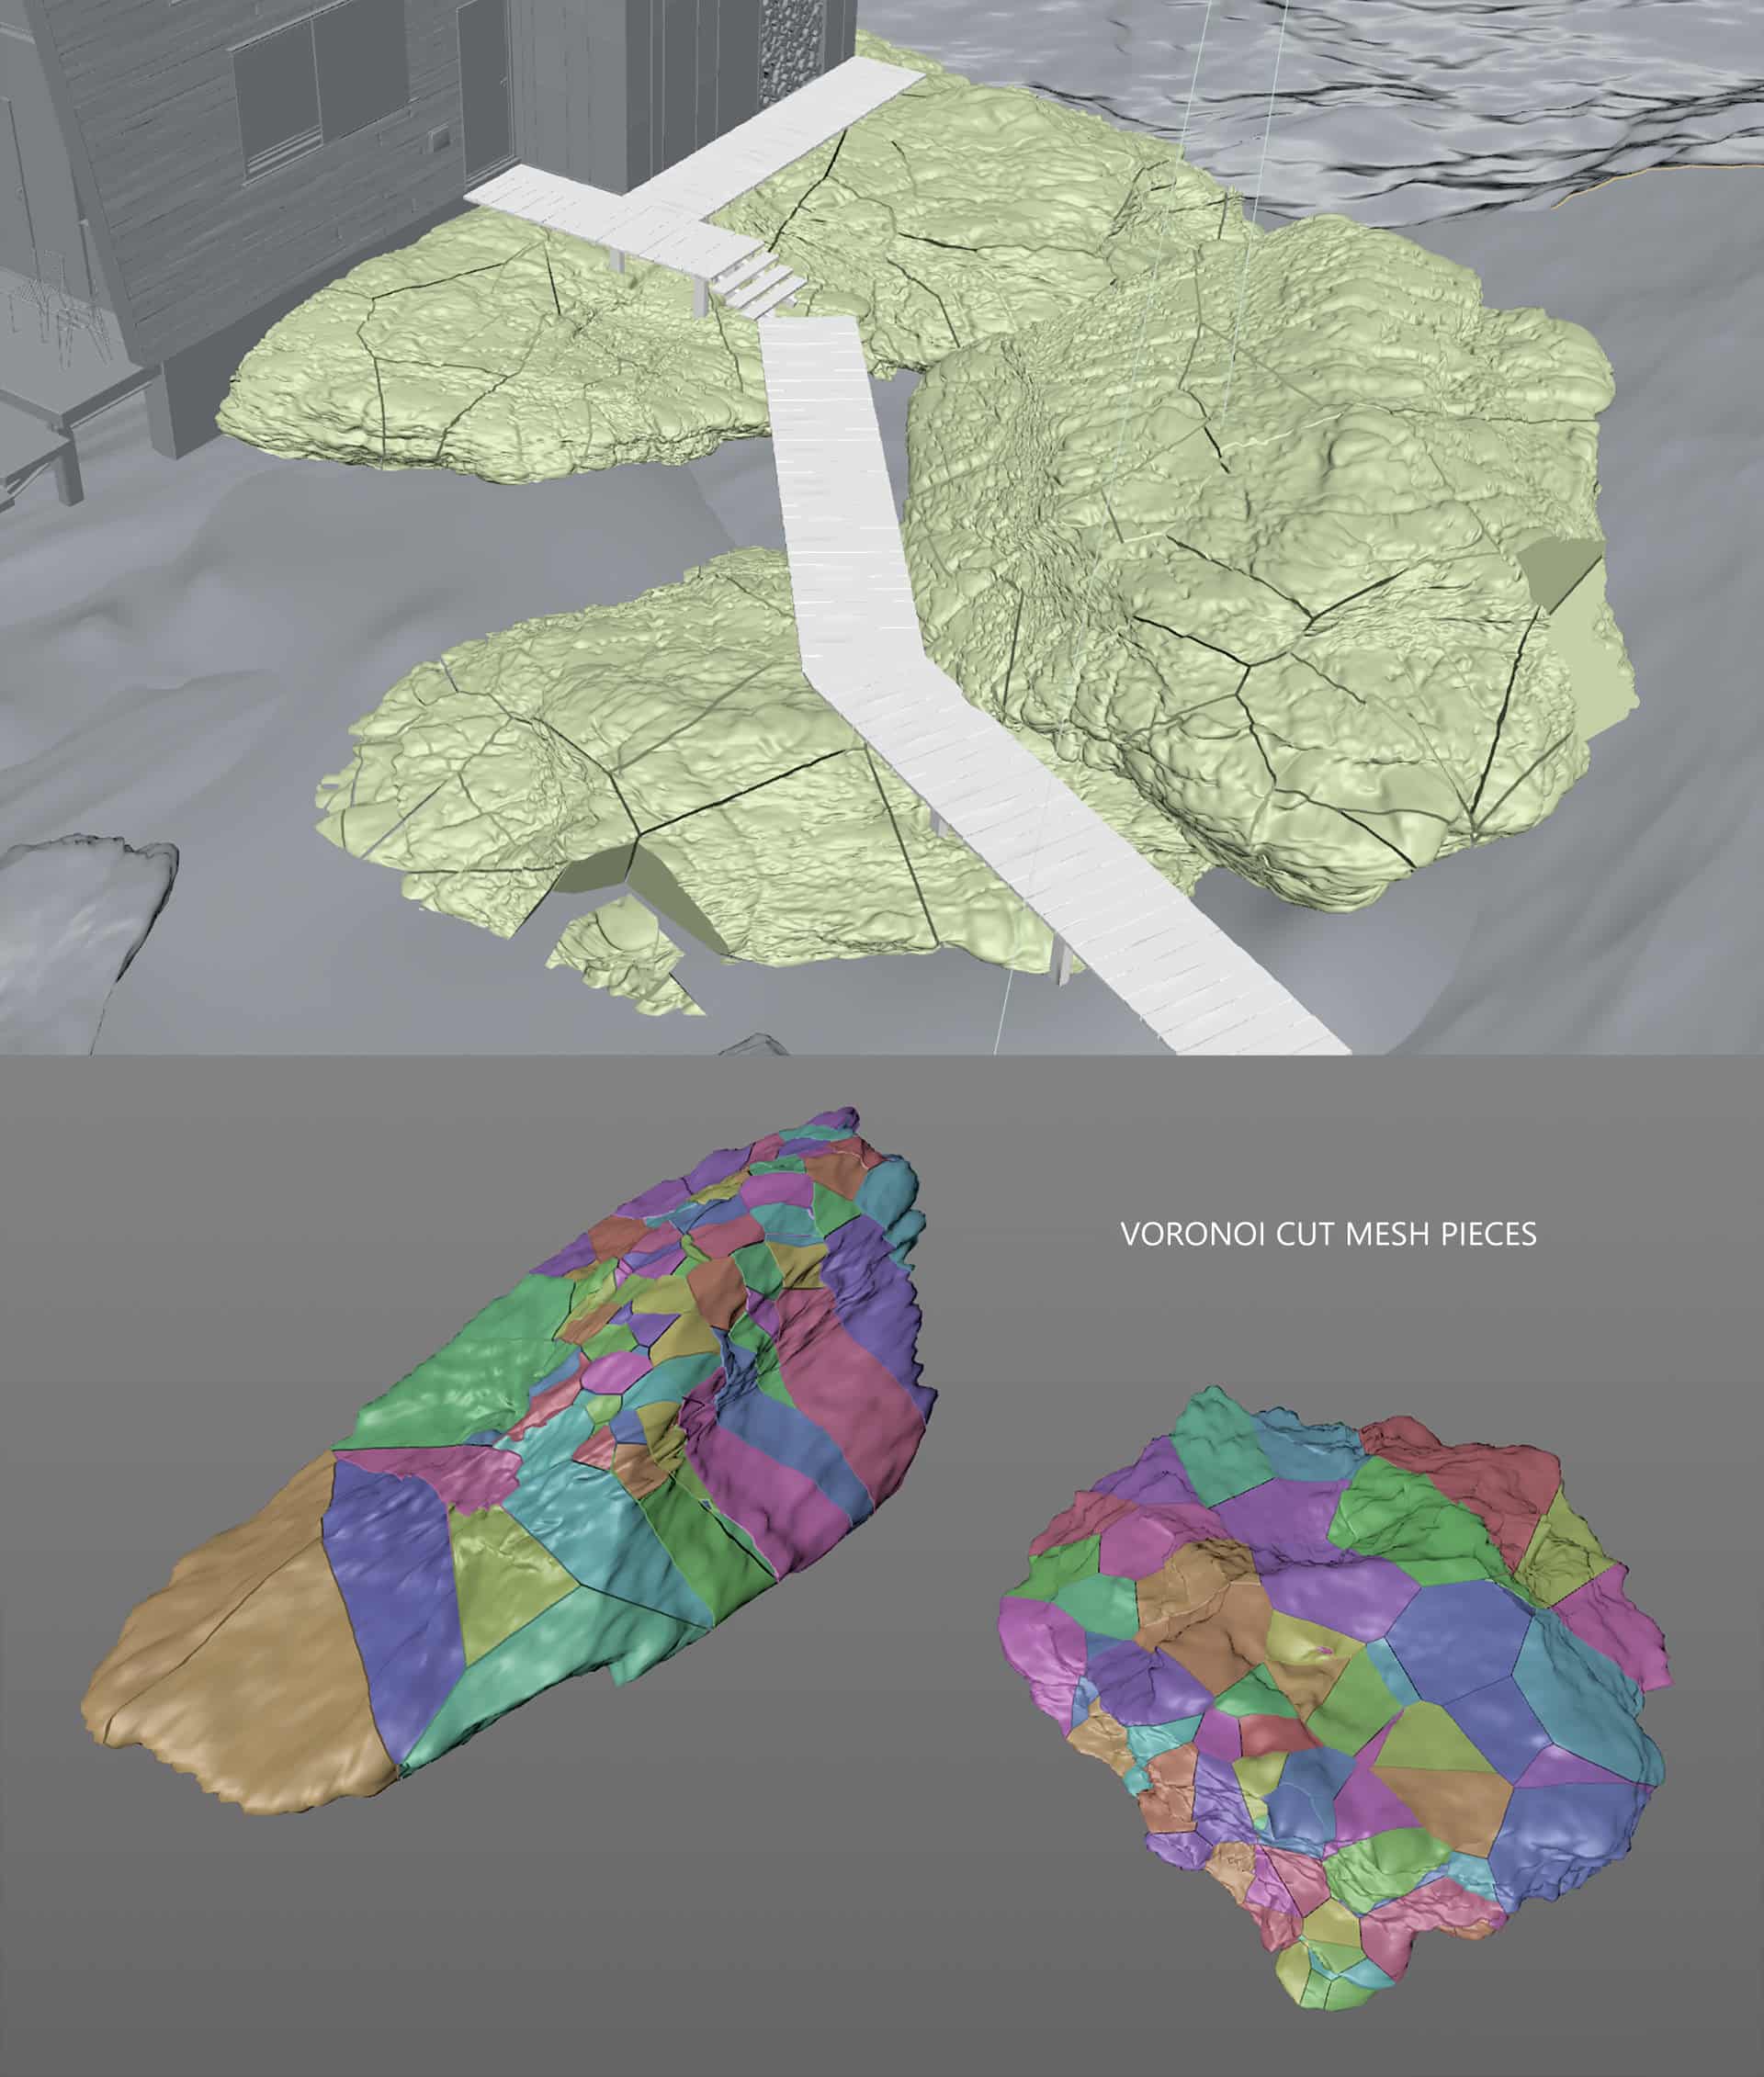
For really huge rocks I made the big part of rock piece by Forester plugin with quite a lot of details and used Cinema 4D excellent cut mesh feature – Voronoi cut. I achieve a nice erosion cuts for huge rocks. Additionally, after displacement in Octane rock material, those cuts became irregular in the render. As you can see below, I even brake away rock part as a separate piece of mesh. That was the cool part of my work.
Render and Post-Production
Due to lack of resources finally, I divided my scene into two separate C4D files and rendered the upper part of the image and bottom part as two separate renders. I could use Octane Out of Memory feature to fix 8Gb RAM deficiency (I tested it, and it works fine) but I rendered the entire image as two parts. In this case, it was easy. I just for upper part render deleted bottom stones, and invisible objects and similar to the bottom image part render.
The People
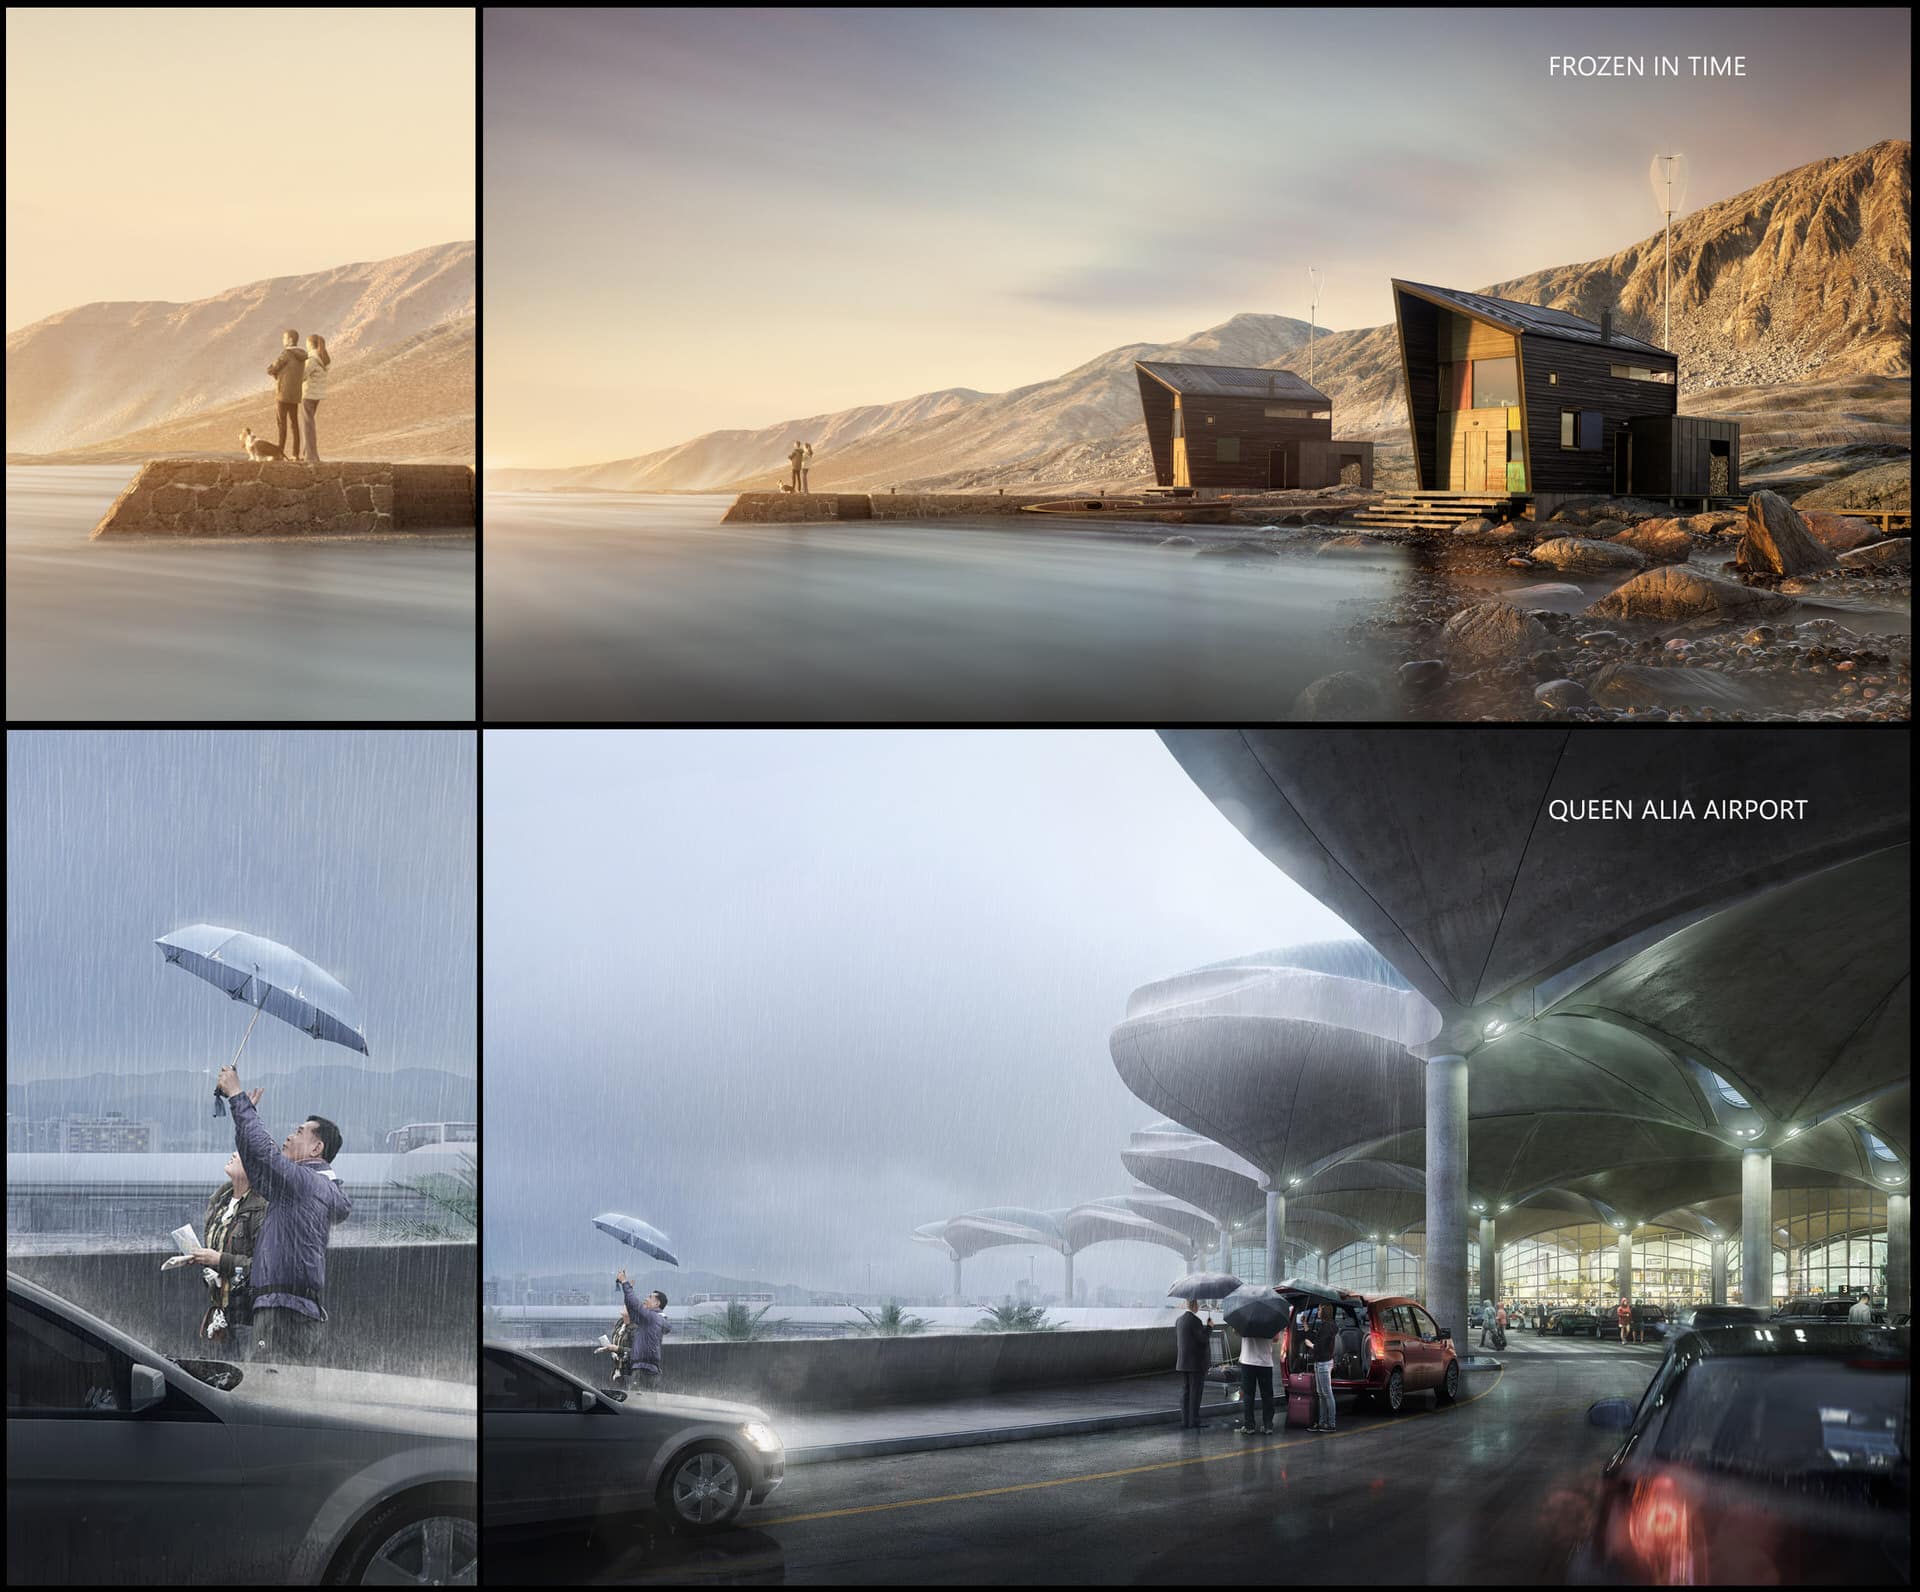
I needed someone in my scene. Finally, I put into the image couple and small dog. They are looking far away in the sundown direction. It allows us to imagine that something interesting happening beyond the visible image area. I like this trick to increase image area beyond the physical pixels space. I used that solution also for Queen Alia Airport image (it was introduced as a making of by Ronen two years ago and was Best of Week 15/2016). For Queen Alia image to avoided unnecessary details on the sky like airplanes, I added a couple on the left part of the image which point the sky outside the image space like watching flying airplane. Alternatively, UFO 🙂
Let’s take a look into a comparison of these both images details as described.
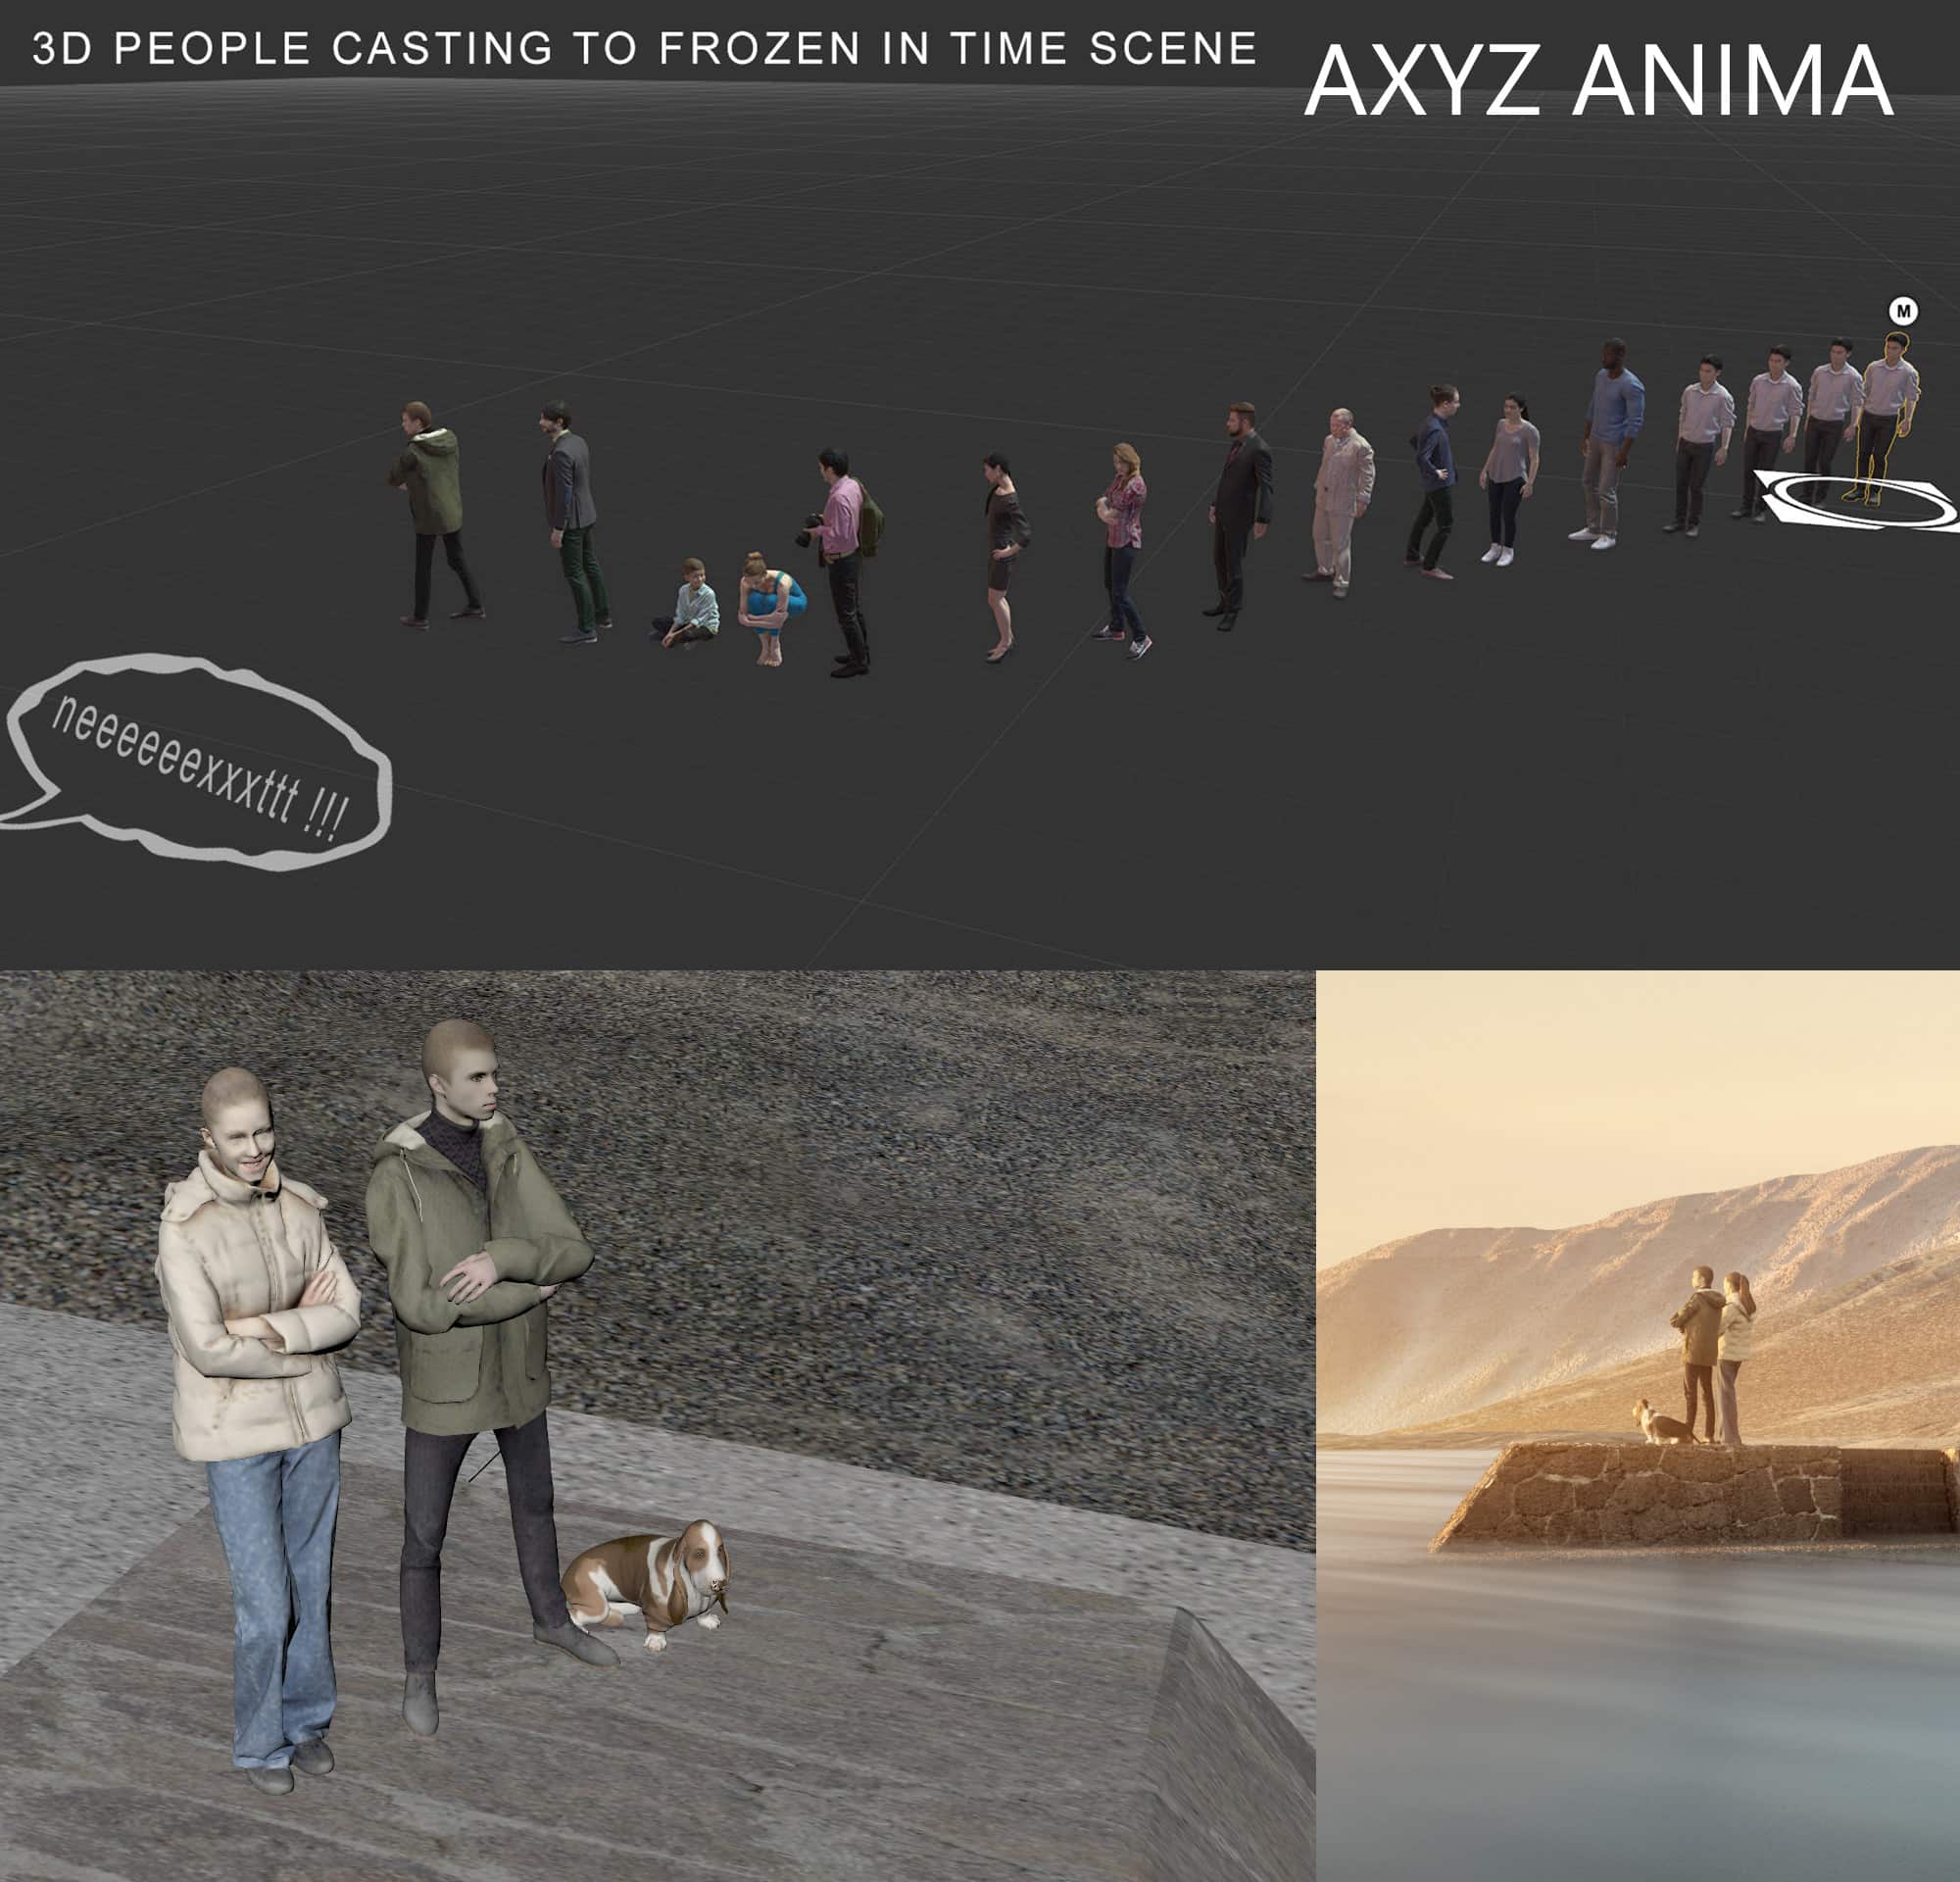
For women character, I found right ready posed model in AXYZ Design shop. She has appropriate clothing related to far north cold mood. I also looked for a guy in a similar pose and clothing too. I found a good one in a khaki color jacket (the guy in survival mode) but the pose wasn’t what I needed. I bought them too, but instead of ready to use mesh I loaded this guy to AXYZ Anima software and added right motion clip to him (it was like original casting). I watched on his movement and export one frame from entire animation when the guy was in right pose too. I imported FBX frozen mesh to C4D created material and couple were ready. Finally, I bought an excellent dog model on 3dsky. Due to the long distance to the camera, I didn’t create fur on the dog. Just original color texture little bump and little falloff map to good look.
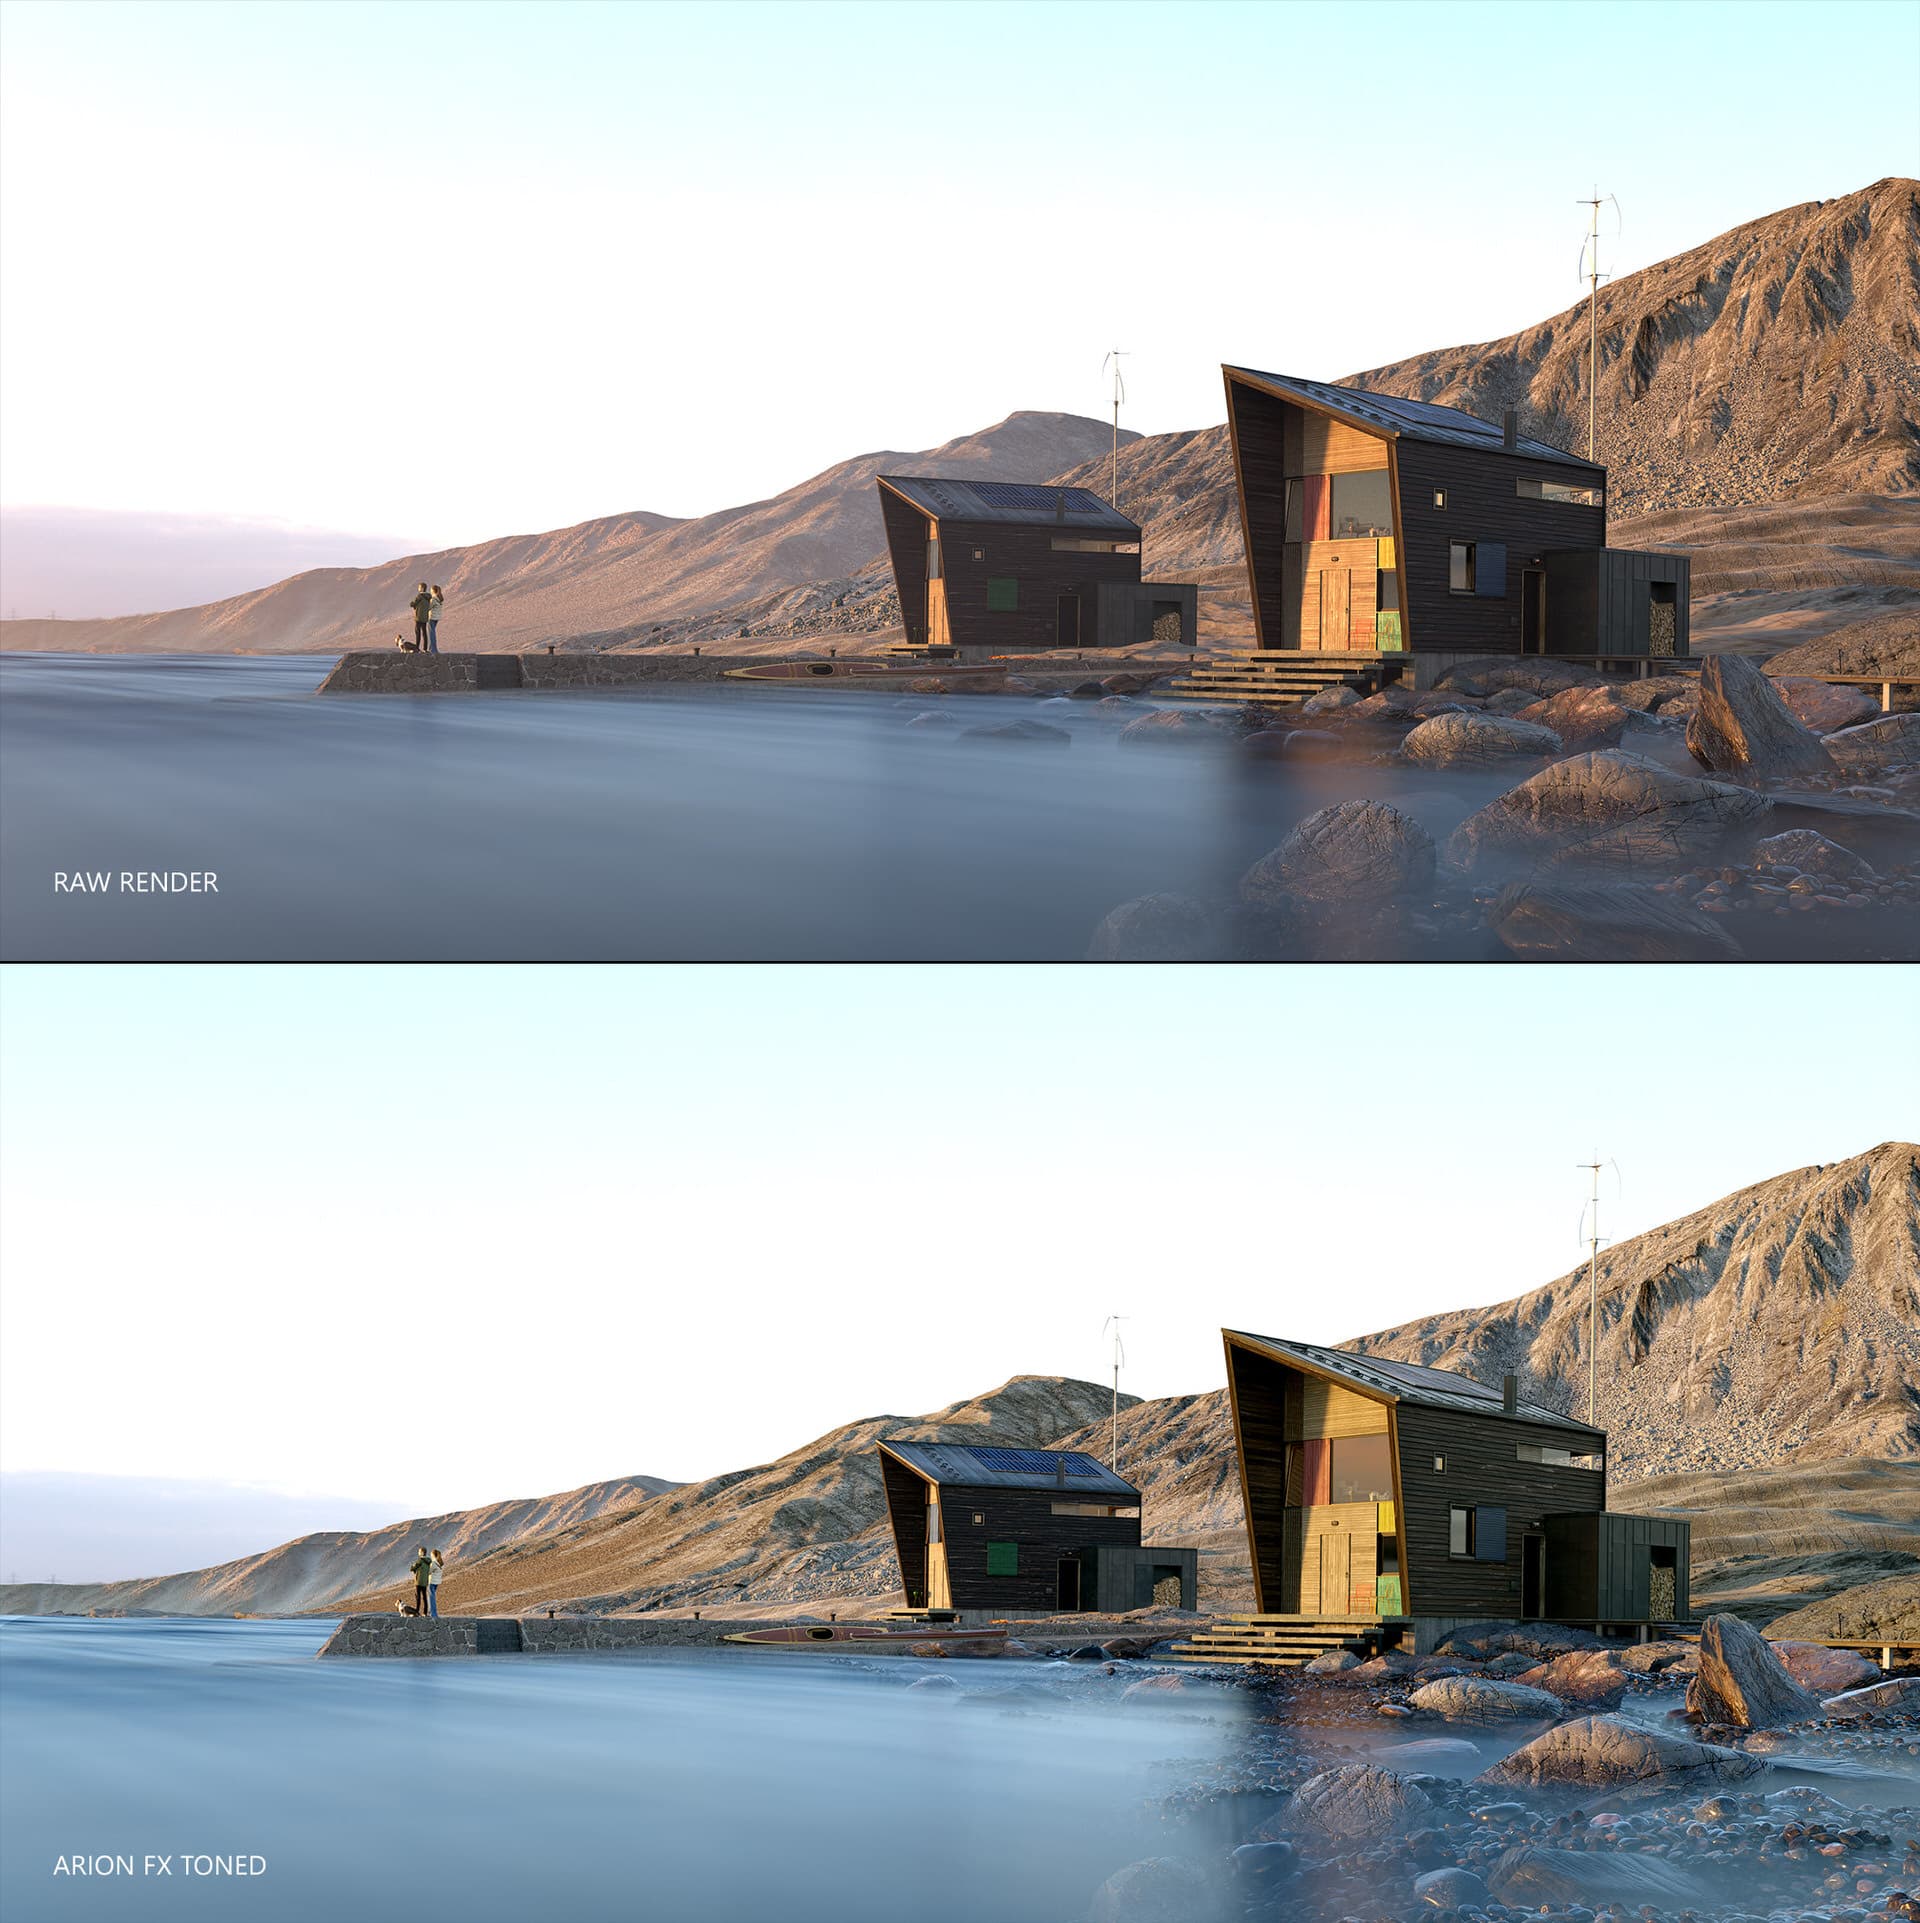
Post-production was nothing special. I used Octane linear workflow and saved render as 32bit EXR image. It looks dull, but the tone power was slumbering inside. For tone mapping, I use Arion FX usually. Here is a comparison of the raw render with initial Arion post-production. After the tone mapping image is a sharp and wide range of tones become visible.
One more important tip here. If you use a volumetric fog in your scene, the fog effect disappears less more during toning operation. Independently of kind of fog effect (volumetric or post-production bloom like Corona Renderer feature for example) image will more clear and sharp after tone mapping. I fix that very simple. I always render or make in Corona post pro tools two my render variations. One the right expected to render and the second render version with much more fog effect visible than I needs. After tone mapping both images I achieve: to a much clear main image (right in close distant but not foggy enough far ) and the second to foggy at all but with correct and desirable fog amount at far distant. Finally, I mix them on layers by using a depth channel in postproduction. It allows me full control over how the fog will look after tone mapping. It allows me to restore the right fog effect.
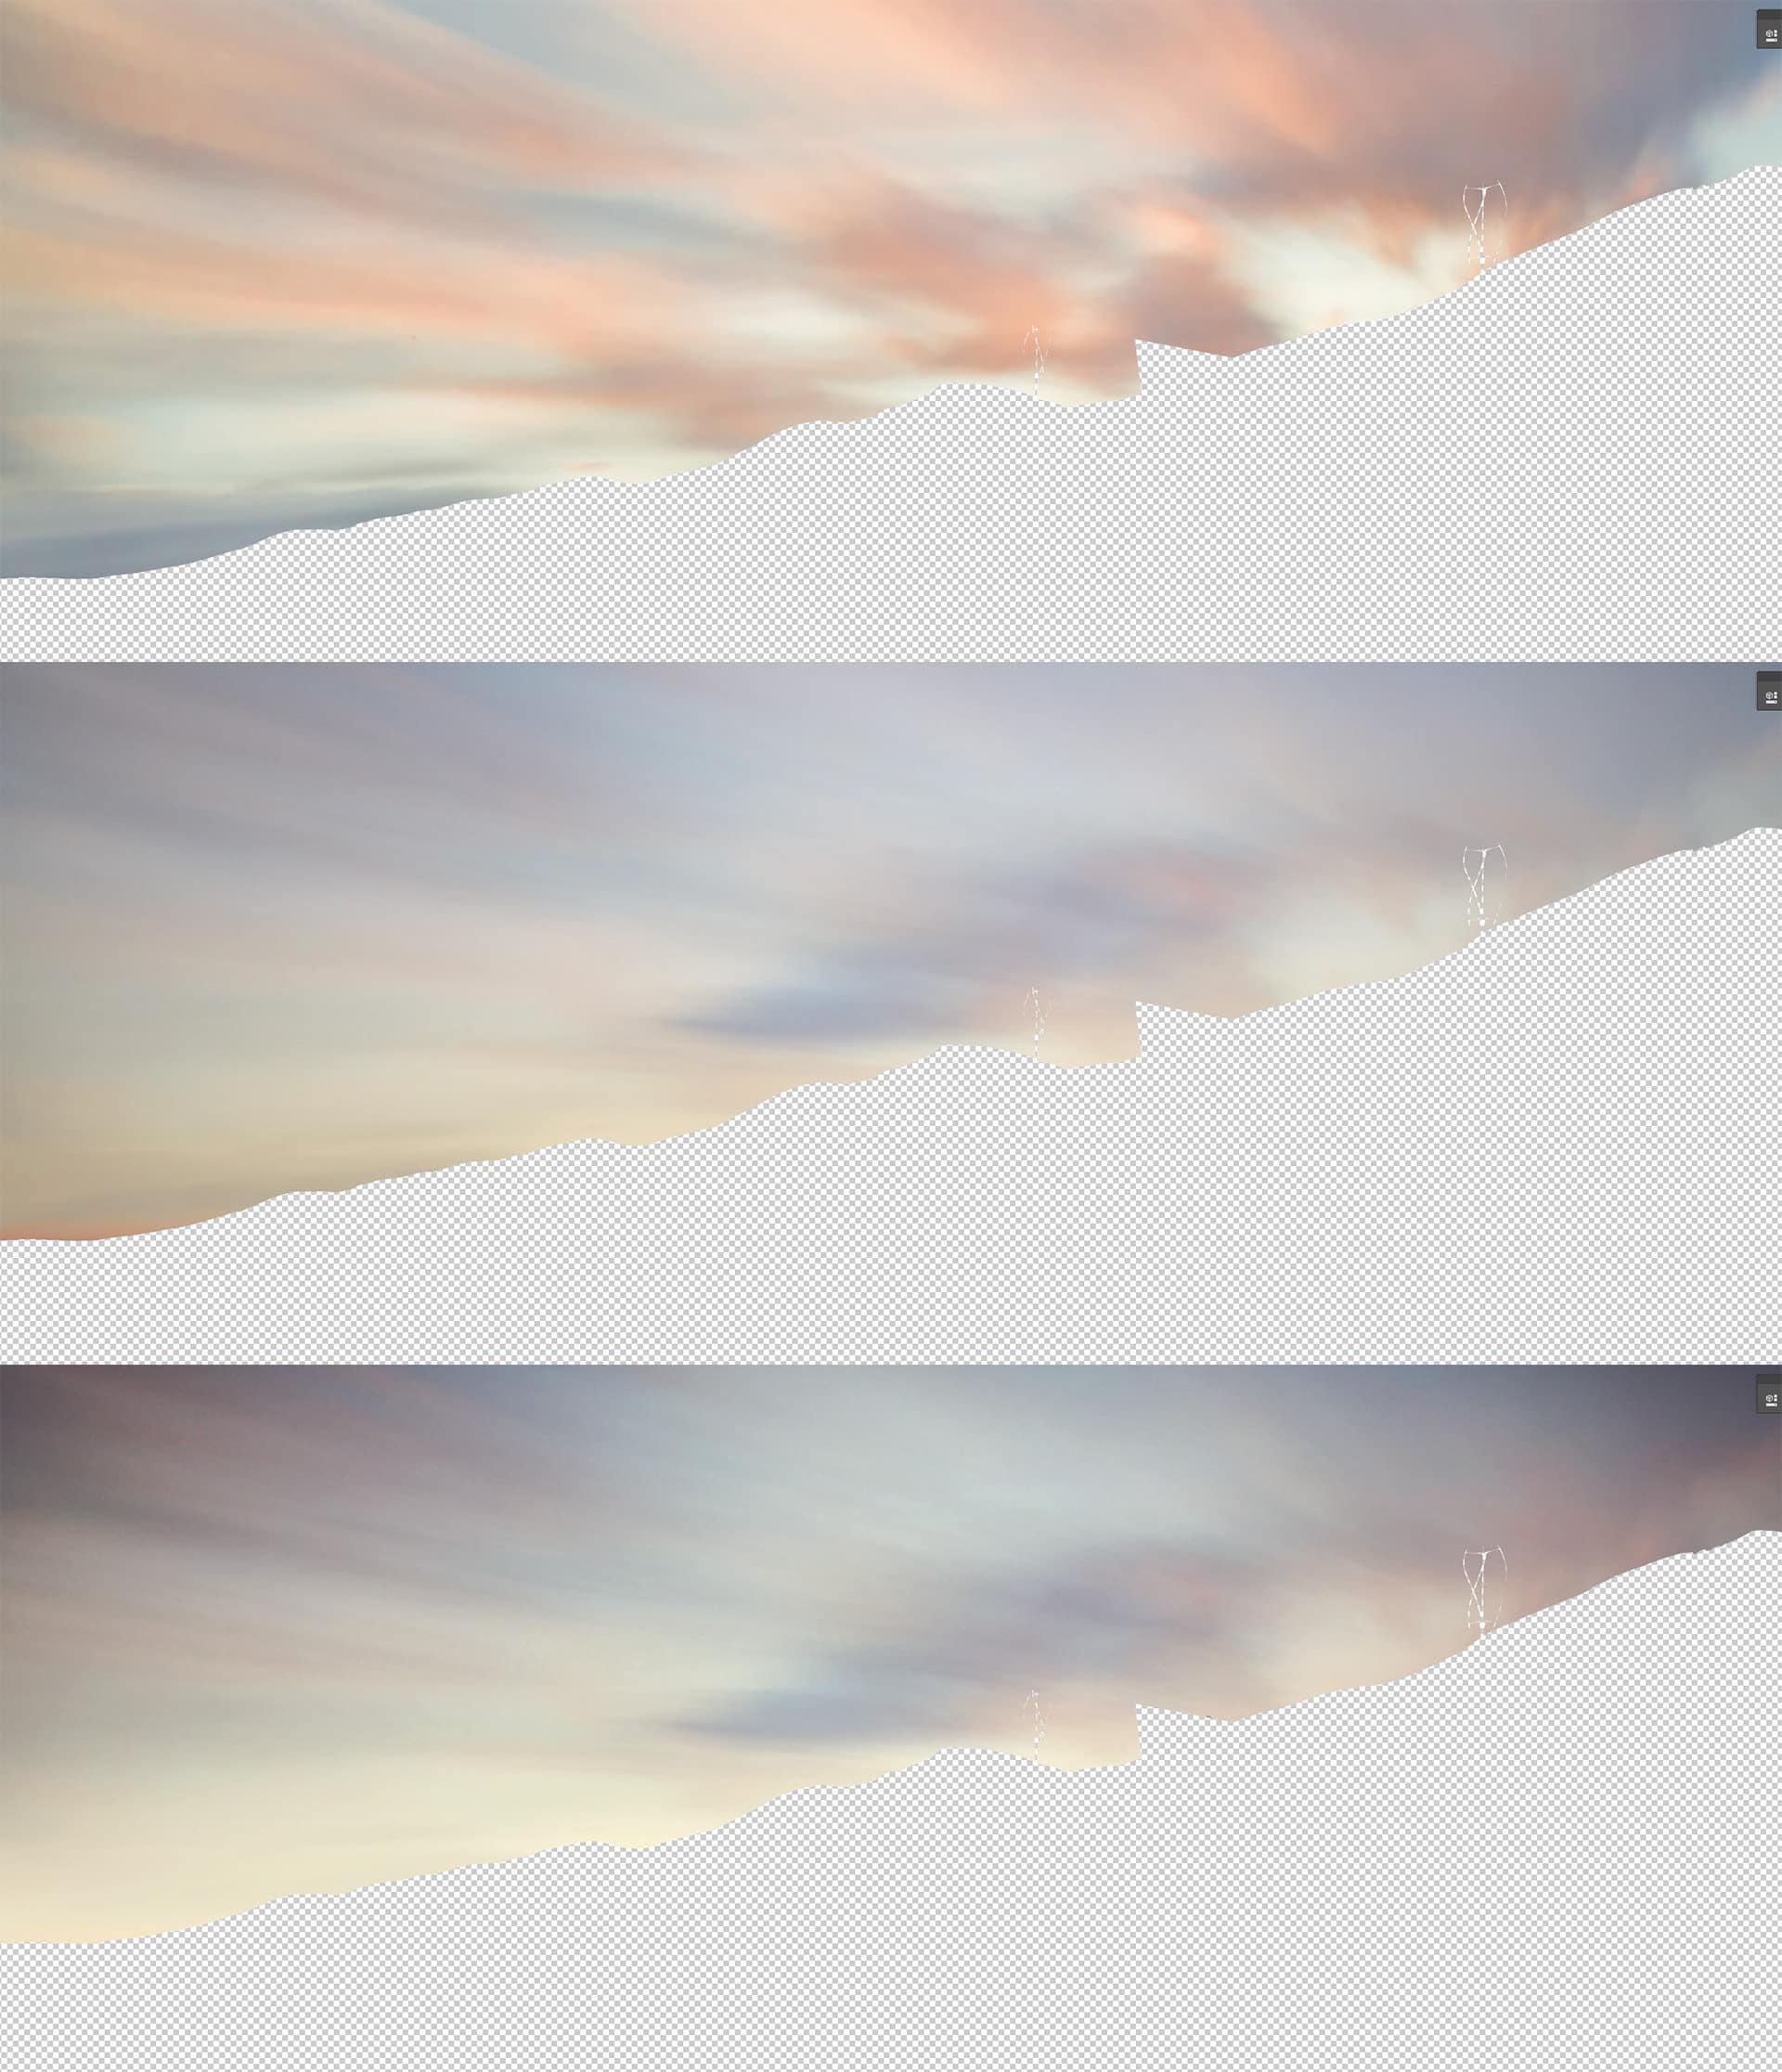
I made the sky background from a photo. I mix two different, and consistent sky images then treat them a little bit by motion blur and finally add some light improvements like the darker upper area and more light from sundown left side.
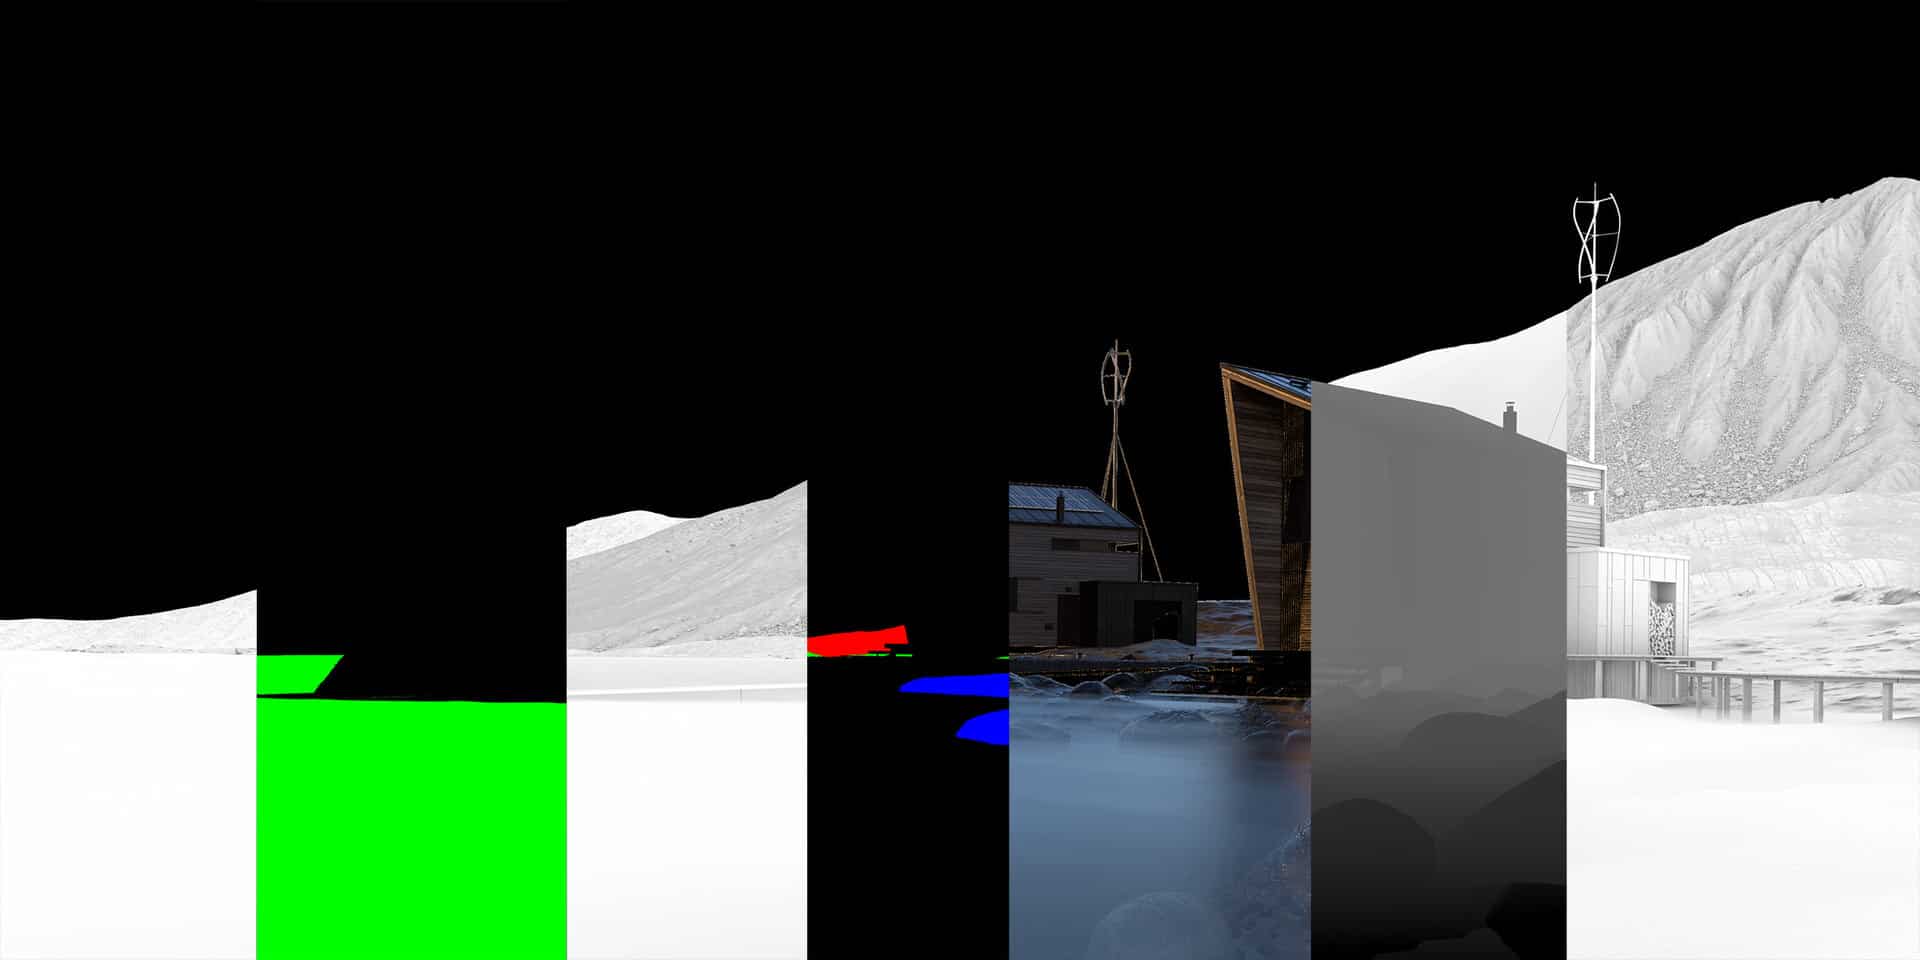
Generally, I used a lot of additional pass images to control any element which I would like to edit. So I rendered separate mask channels for different stones, mountains, buildings parts, etc. Additionally Z-Depth channel, reflections and refraction pass. In postproduction, I modeled light on separate parts but in the right way to achieve overall consistent light and color mood.
This is in the middle post pro stage image. It’s colder as the final version.
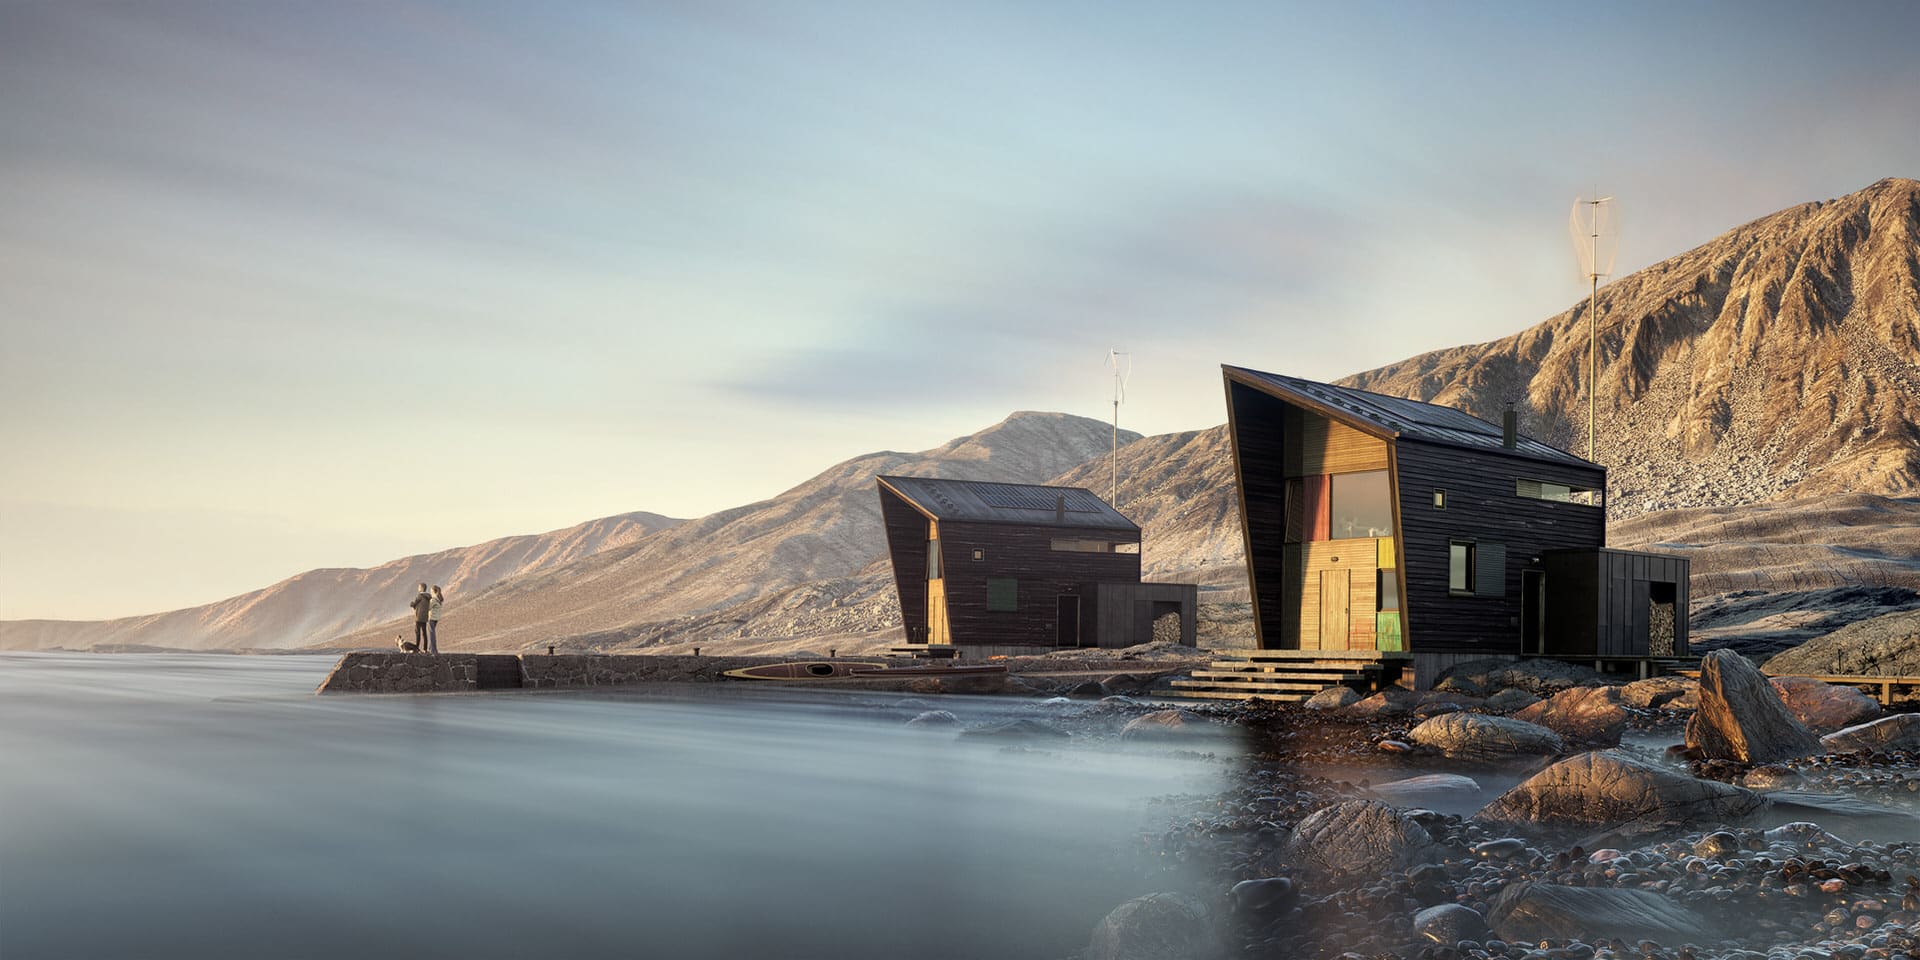
Also, the final version an entire set of the images which I made for this project!


It was a pleasure to share my workflow here. I hope that it was unusual for you in part at least. Very often I feel like a photographer during work in current 3d software, and that is very promising for our CG future!
My Best!
Marcin Jastrzebski
www.realpolygons.com
@realpolygons


Such an amazing project! My admiration for your work!