


Making of EARTH-SHELTERED VILLA
David Males takes us behind the scenes of the EARTH-SHELTERED Villa, diving deep into his process and thoughts from start to finish as he uses SketchUp, 3dsmax and Corona Renderer as his main tools of choice. Enjoy!
Introduction
Hello Everyone,
My name is David Males, and I am working as an ArchViz “artist” currently based in Slovakia, trying to walk my line in this fast-paced 3D world we almost breathe-in nowadays. For most of you who do not know me, I thought I would start a little bit with my background.
I first came to the contact with architectural imagery and 3d in general back in 2013 during my studies called “Architectural Technology and Construction Management” in Denmark, where we used SketchUp and Revit as our main 3d tools, trying to do some completely basic visuals for our design proposals.
The programme was primarily focused on the technical side of the buildings, but in the process, I somehow became much more interested in the architecture itself, its visual side and the way how a properly designed building can affect not only its surroundings but often also how people (and even nature) interact with it.
Later, during my exchange semester in Melbourne we learned basics of 3dsmax, and there I began to look a little deeper into more advanced architectural visualizations and the magic behind.
It was also around that time when I found out about Juraj Talcik and his Icelandic House project, whose work inspired me to the level that I decided to follow this path which fluently combined my growing passion for architecture with artistic freedom of a photographer.
As I’ve dug deeper into various articles, websites, and forums, I gradually discovered other industry luminaries like Alex Roman and Bertrand Benoit and was astonished even more.
So after completion of my bachelor’s degree in 2016, I spent about a year studying the basics of CGI on my own and tried to learn as much as possible to be able to work as an ArchViz Freelance Artist.
At this point I would like to thank Ronen who showed interest in my work, asking me to share more information about the earth-sheltered modernist villa I did about a year ago.
You can find the original project here.
I thought about this as an opportunity for a “new guy in the business” like me to promote myself, so I promised to do a remake with a new workflow I’ve improved bit by bit over the time. Unfortunately, as you all know it is sometimes difficult to find time for this kind of work and being busy with commercial projects resulted in few months delay. Anyway, even after this long delay, I hope you’ll enjoy this article and find it valuable for you.
Do not expect a deep level of technical insight. As a guy without a long CGI milage, I cannot offer that yet, but I will do my best to share as much as I can and hopefully someone will find it useful. I’m using and focus mostly on SketchUp, 3dsmax and Corona Renderer.
Enjoy your reading!
The Idea Behind the Scenes
To start off on the right foot, I’d like to go back to the origin of this project.
The idea behind was to make something more interesting than most of the commercial work I’ve done so far in that time, which would act as a lead project for my future portfolio.
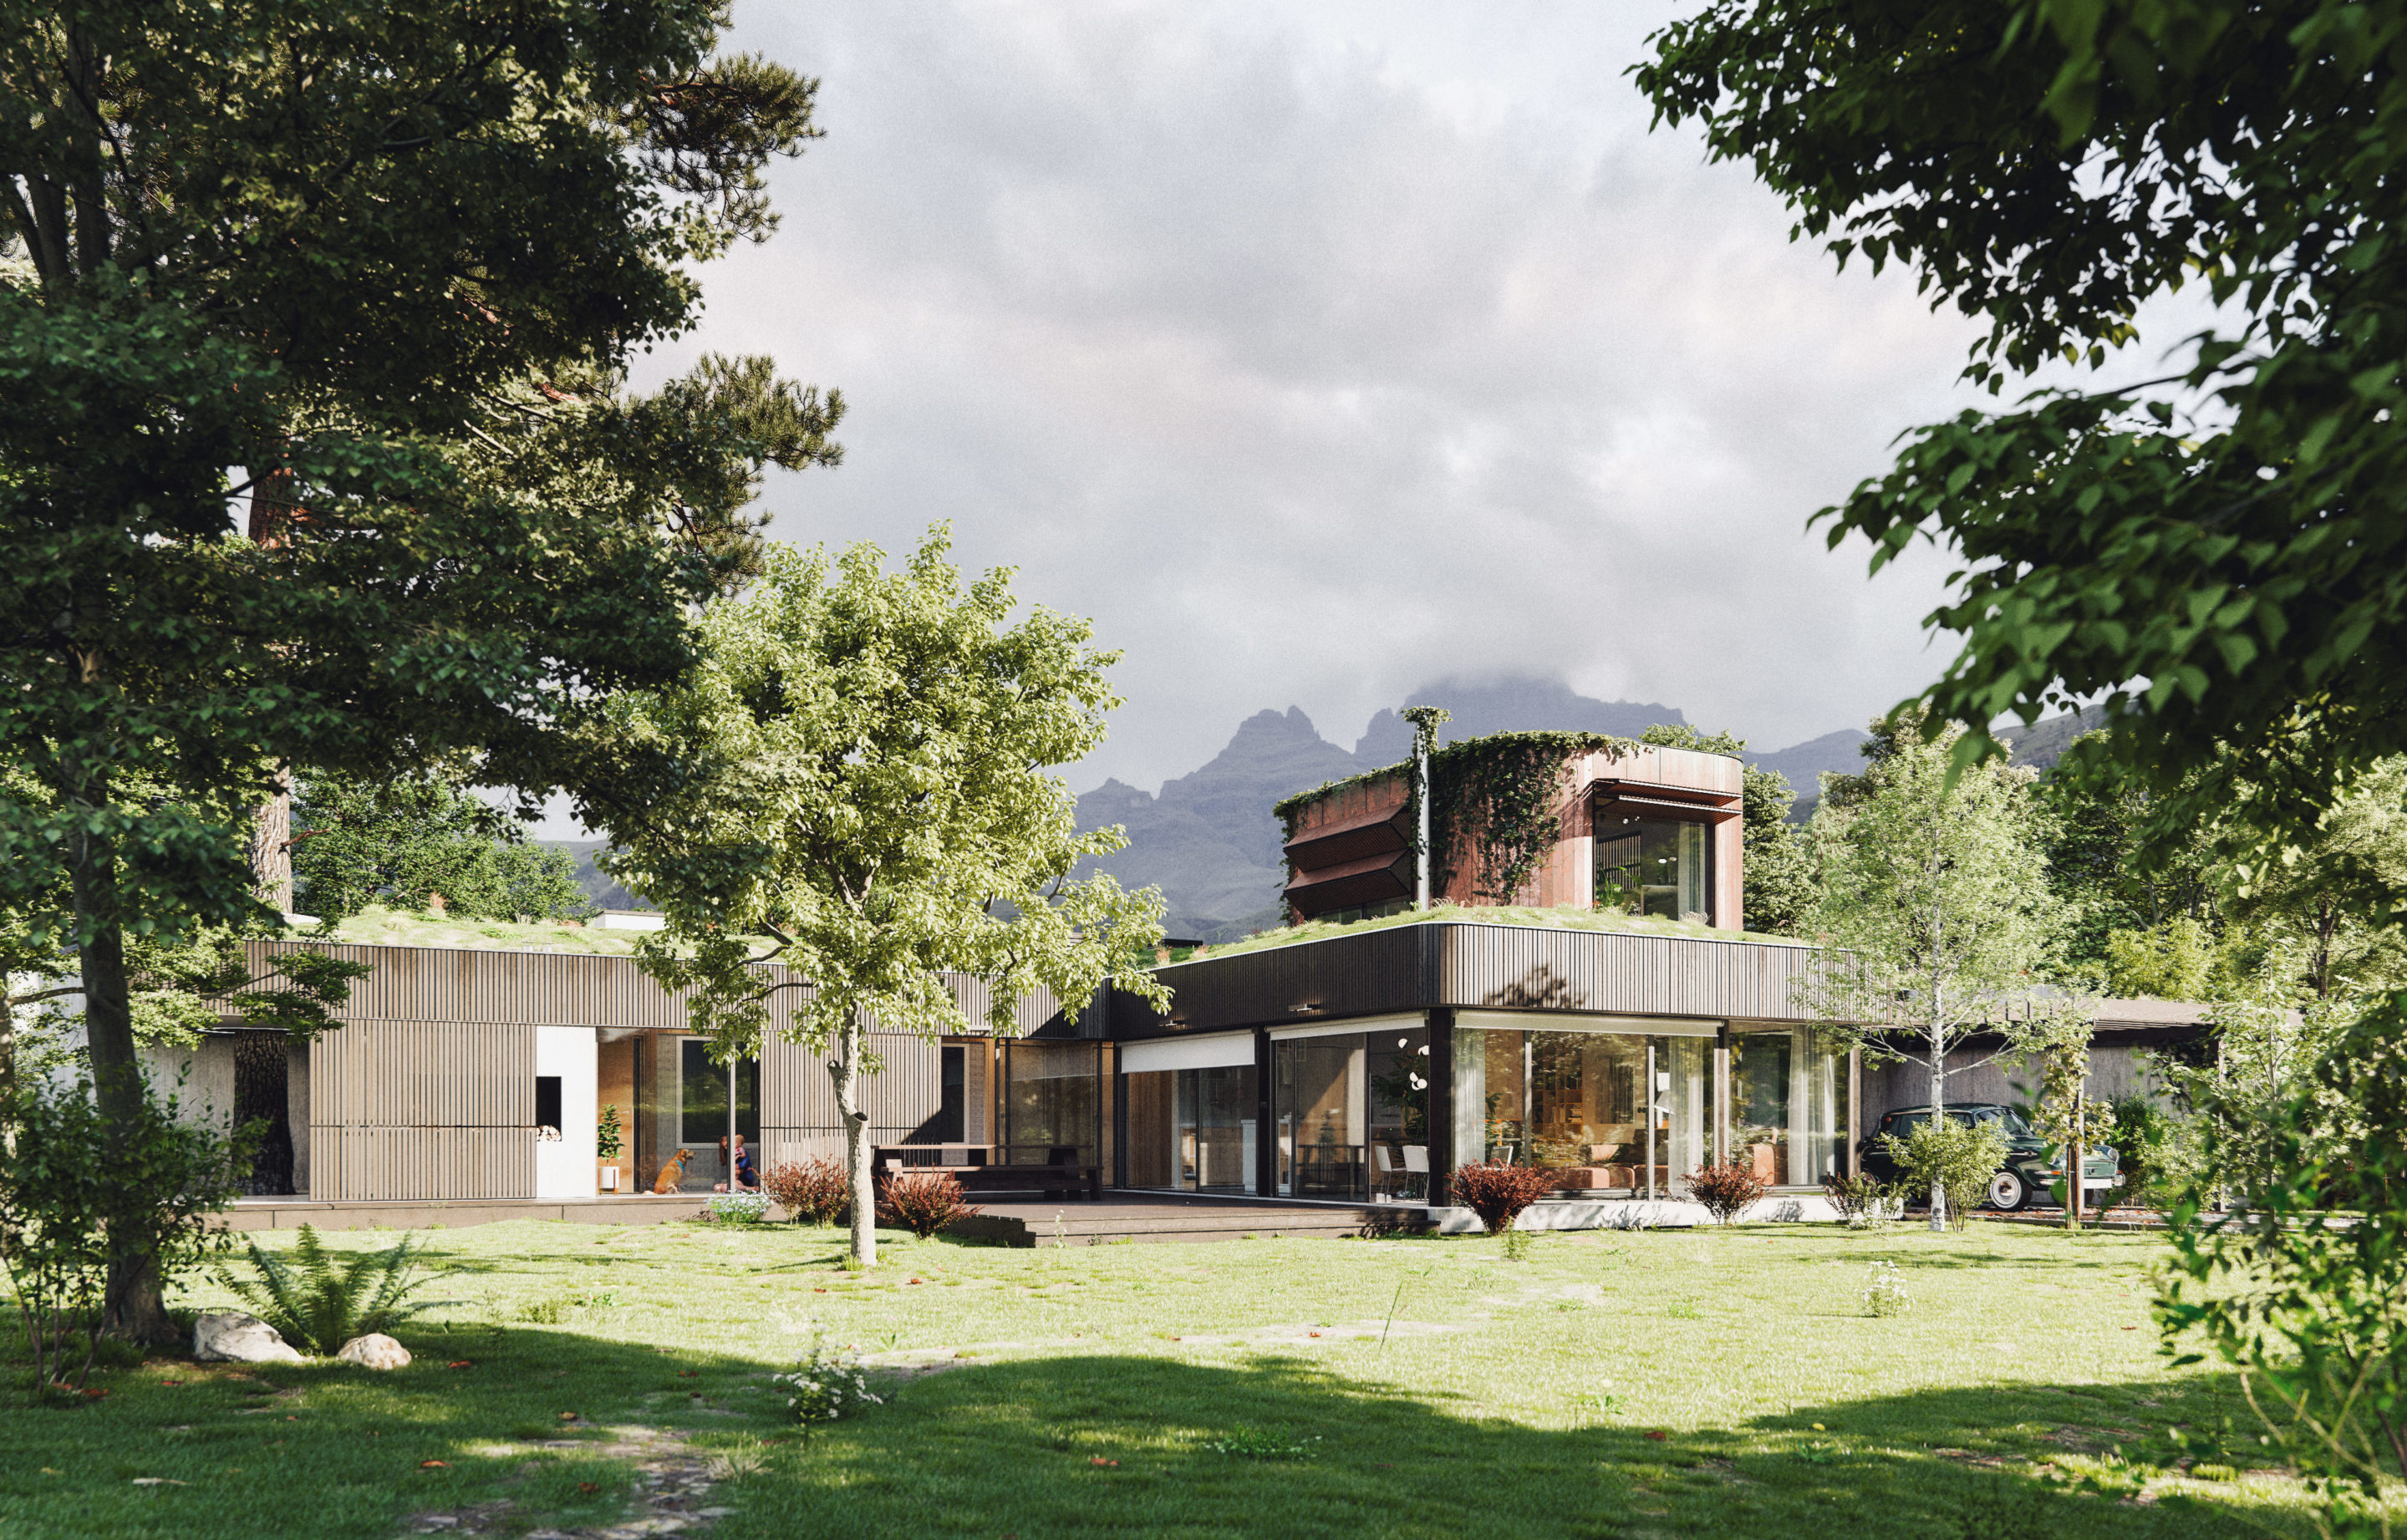
As I do not like the concept of recreating already existing projects or images, I’ve decided to design a house to my liking, putting to use the knowledge and skills I’ve obtained during my studies. The concept of the earth-sheltered home was not a very well-known and popular idea of sustainable housing, making it more unique and relevant for this purpose.


In simple words, earth-sheltering means that either one (north) or more facades of the building and usually also the roof are covered with soil, which then acts as a thermal mass that absorbs heat during the summer and releases it during the winter, making the indoor climate very stable and thus reducing the needs for heating and/or cooling.
On the contrary, you have to put much more effort into proper design and construction regarding orientation, light situation and most importantly air ventilation and moisture insulation, so the inhabitants do not feel like they live in a damp basement.
Fortunately, in this particular project, I do not have to deal with those technical aspects or budget, which offered me a little bit more freedom during the design proposal.
Architectural Draft
The concept of a house itself started as usual, with a pencil and a piece of paper… then SketchUp. I won’t go deep into the design process, just show a little bit how the shape of a house came to be.


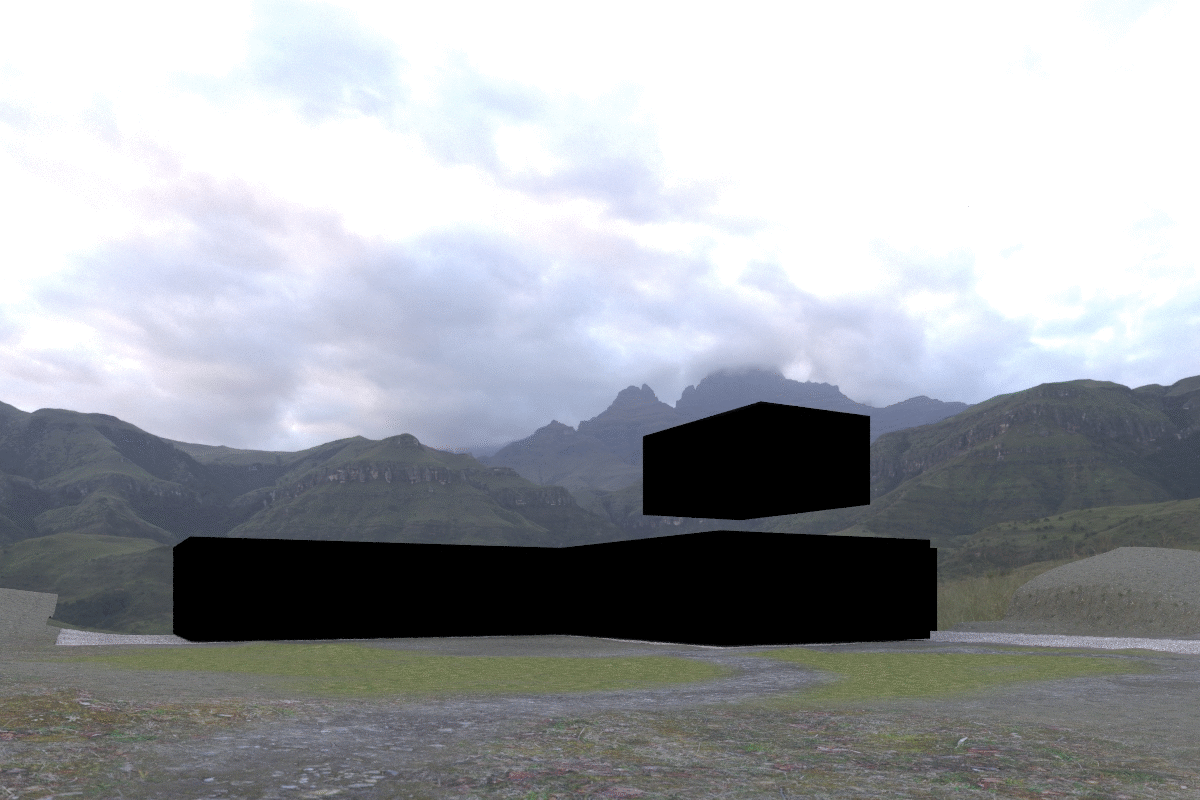
The most essential idea of the design was to separate the living area (red) from the private one (yellow), but at the same time make both accessible without the need to cross each other. Also, I wanted to have a separate area for the guests (green), which would offer a little bit of their own private space.
That’s why the living area volume was pushed out of the building, making the necessary space for the corridor directly to the private area and nicely separating the two. This also improved the lighting and view the situation for the main living space and made more room for the outdoor terrace.
Next thing was to add some obscure volume on the top, which would then serve as a separate office/workspace with beautiful panoramic views… Giving that extra feel of solitude in the arms of the mother nature this contemporary sustainable villa was supposed to be located in.
The last touch was to add some rounded corner details where possible, making the building look a bit more natural and organic, so it blends better with the local surroundings.
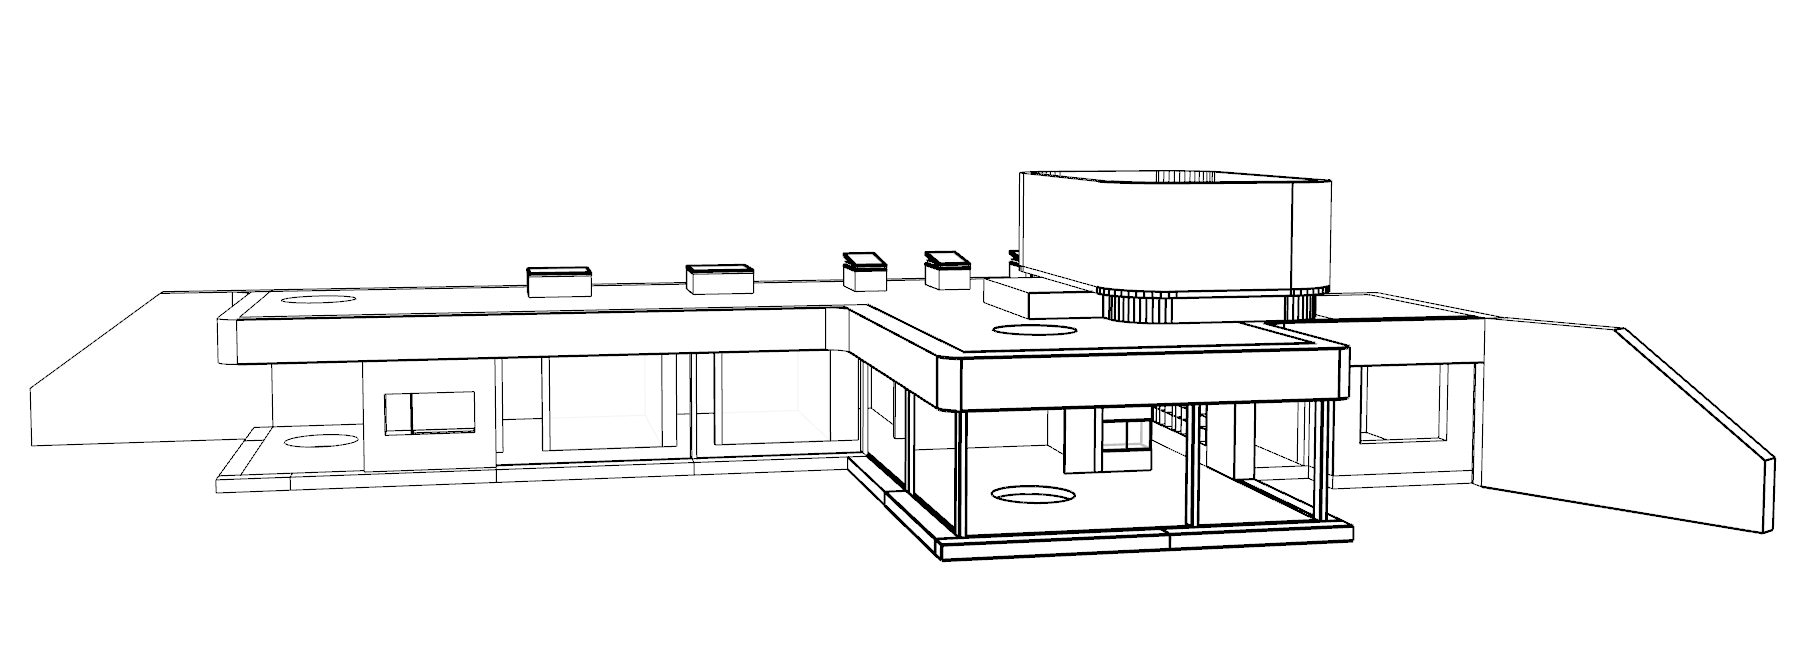
Simple preview of the shape using Sketchup, before import to 3dsmax.
THE BASIC 3D MODEL and Project Management
When I want to transfer my ideas and sketches into a 3d object, 99% of the time I use SketchUp. Mainly for the basic outline of the house and simple geometry such as walls and floors.
I think SketchUp is the best and fastest software for this purpose, at least in the projects with not so advanced and sophisticated shapes.
Generally, modeling in SketchUp is so straightforward, not sure if I have any special tips to share with you here. Just make sure you use groups/components and layers all the time so your project won’t get too messy. Next one is to use plugins to save some time. There is a ton of useful ones.
As I use SketchUp only for the simple shapes and geometry, I regularly use only one plugin called 1001 bit tools, mostly when I need some wooden or metal framing. One more tip would be to use purging (window → model info → statistics) to clean the file, as deleting of the objects does not necessarily eliminate all of it from the application cache.
After I finish with the basic SketchUp model, I import it into 3dsmax for further detailing.
Jumping in-between 3dsmax and SketchUp works perfectly as the imported objects always align to their position (as long as you do not move it around of course), which makes it very handy when you want to add some details like windows/door or any other more detailed geometry later on.
Another thing I really enjoy on SketchUp/3dsmax workflow is that it also imports the layers, which is one of the most crucial parts for my project management. I always spend hours literally to properly layer my projects, which makes it much easier to navigate through when needed, most of the time for hiding elements I do not work on at the moment. This can also significantly improve interactive rendering performance, considering my exterior scenes can be easily a few GB’s large.
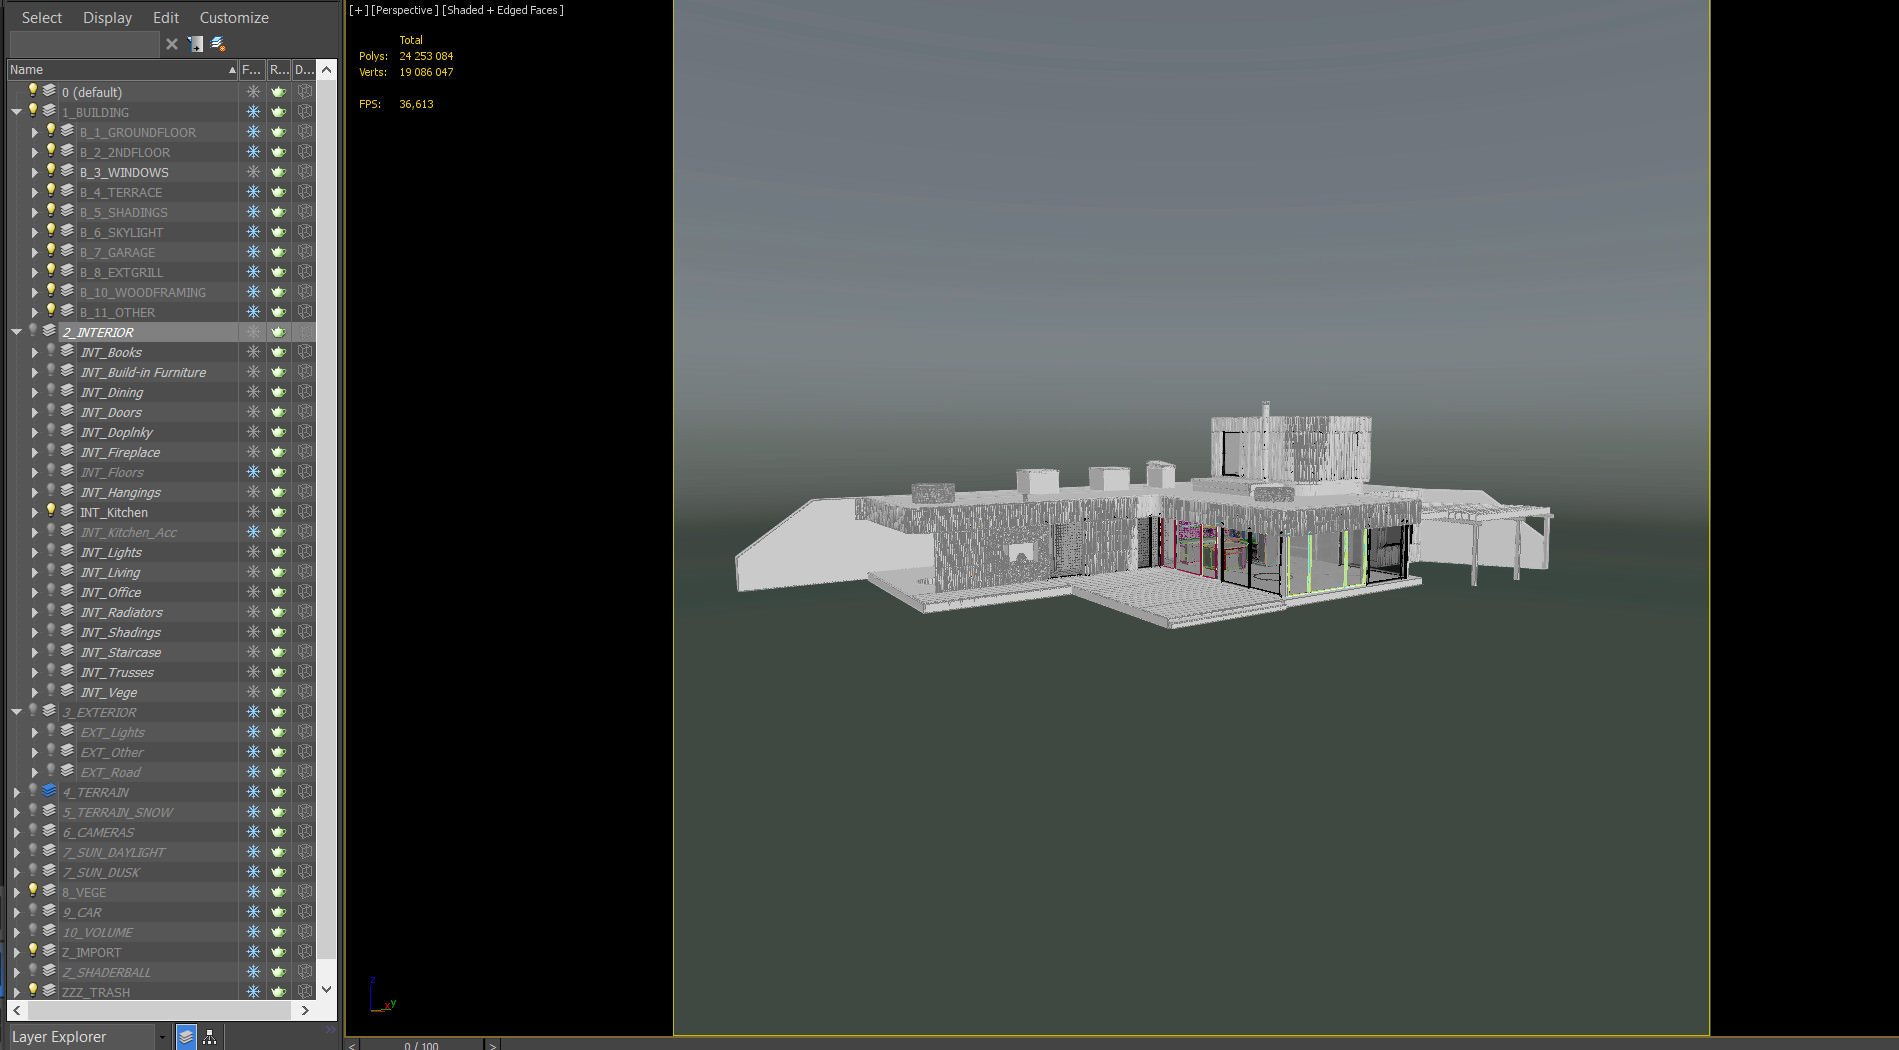
Example of my layer management, which of course vary from project to project.
Once I have my basic model imported in 3dsmax, ready and organized, I start with the common adjustments and cleaning of the imported messy geometry from SketchUp.
Here I use a very basic and simple trick: convert everything to editable poly → edit poly modifier → select all vertices → weld 0,1mm.
This is often necessary as SketchUp usually exports more advanced geometry with a lot of duplicate vertices, that can cause problems later in the detailing process.
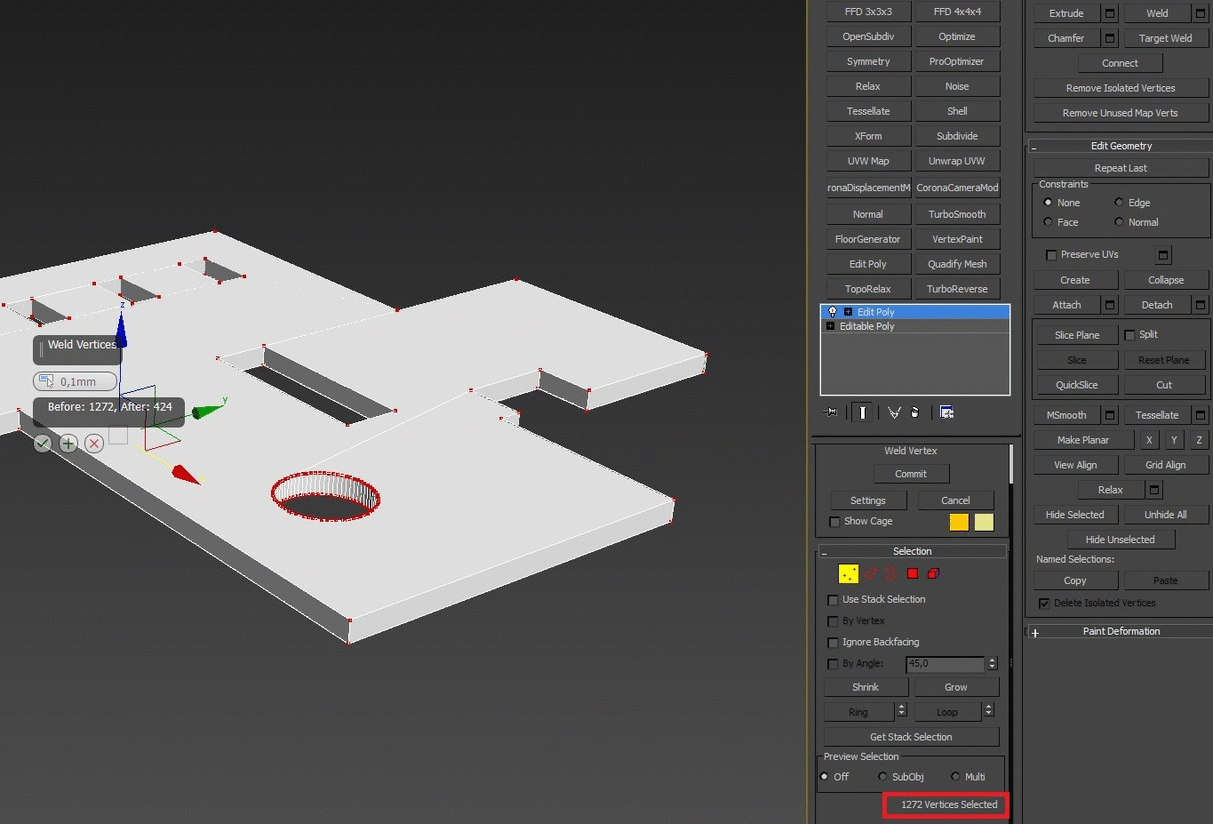
Welding I’ve described above, showing the number of vertices before and after.
If any geometry gets destroyed by this procedure, I remove the modifier and weld it manually. Then I usually tend to chamfer edges on most of the elements, either as an edit poly or as a quad chamfer modifier so I can adjust it later on in the process without ruining the original geometry. I repeat these 2 steps for every SketchUp element I import to the 3dsmax till I have completed model to work with.
MATERIALS and More Details
As the next step, I would usually do materials for these main elements I’ve imported and optimized, which leaves the project a bit more flexible regarding the view and light setup.
Of course, in a commercial project it depends on how much time you can focus on the environment and every little detail on the building itself – but when there is enough time I like to have everything ready – following real-life scenario as a photographer, where you can just walk around the site and pick the view that suits you the best.
For basic materials, I just set up some nice general views with CoronaSky with CoronaSun, which I then usually replace with HDRI before the final stage and match the sun accordingly.
You can also use small local light sources to check reflection and bump where needed.
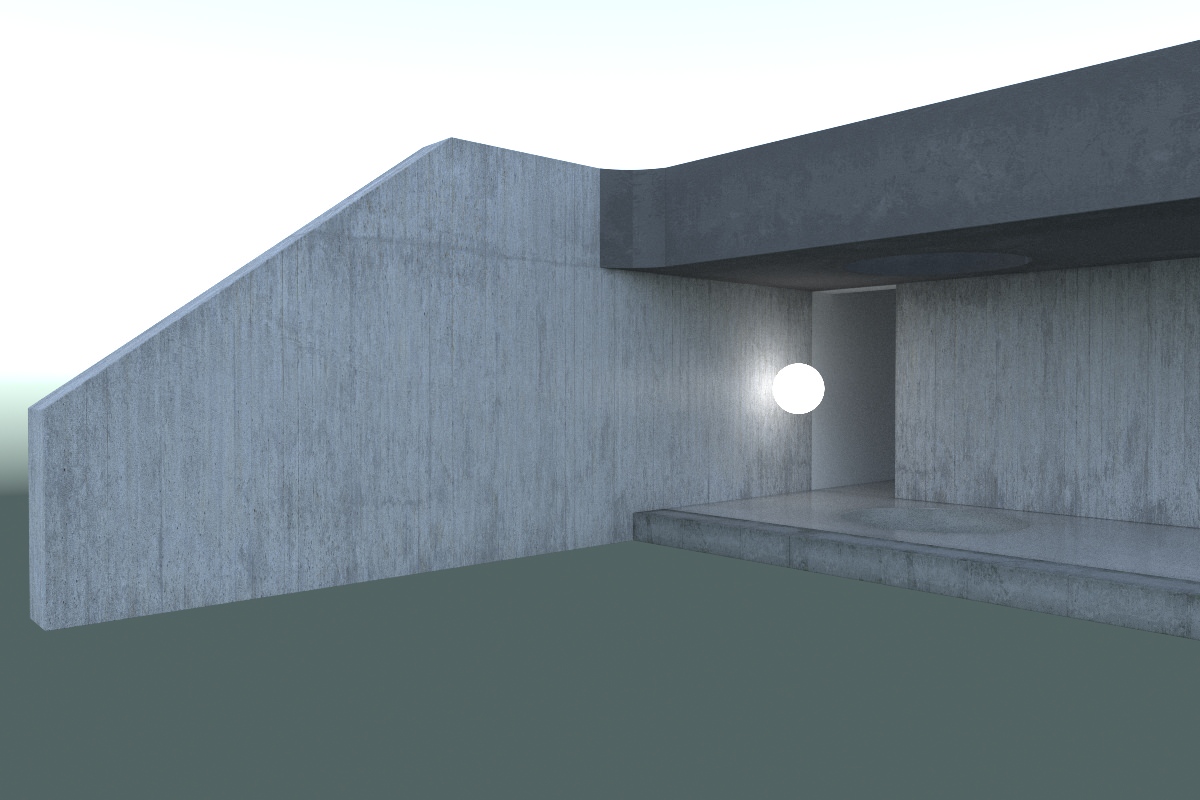
Use of a local light source to check reflections. Of course, works better under more steep angles.
For more detailed materials you can also use specific HDRI that can nicely imitate real lighting and reflections – for example well balanced interior one with right light intensity for the setup of a isolated interior furniture and/or details.
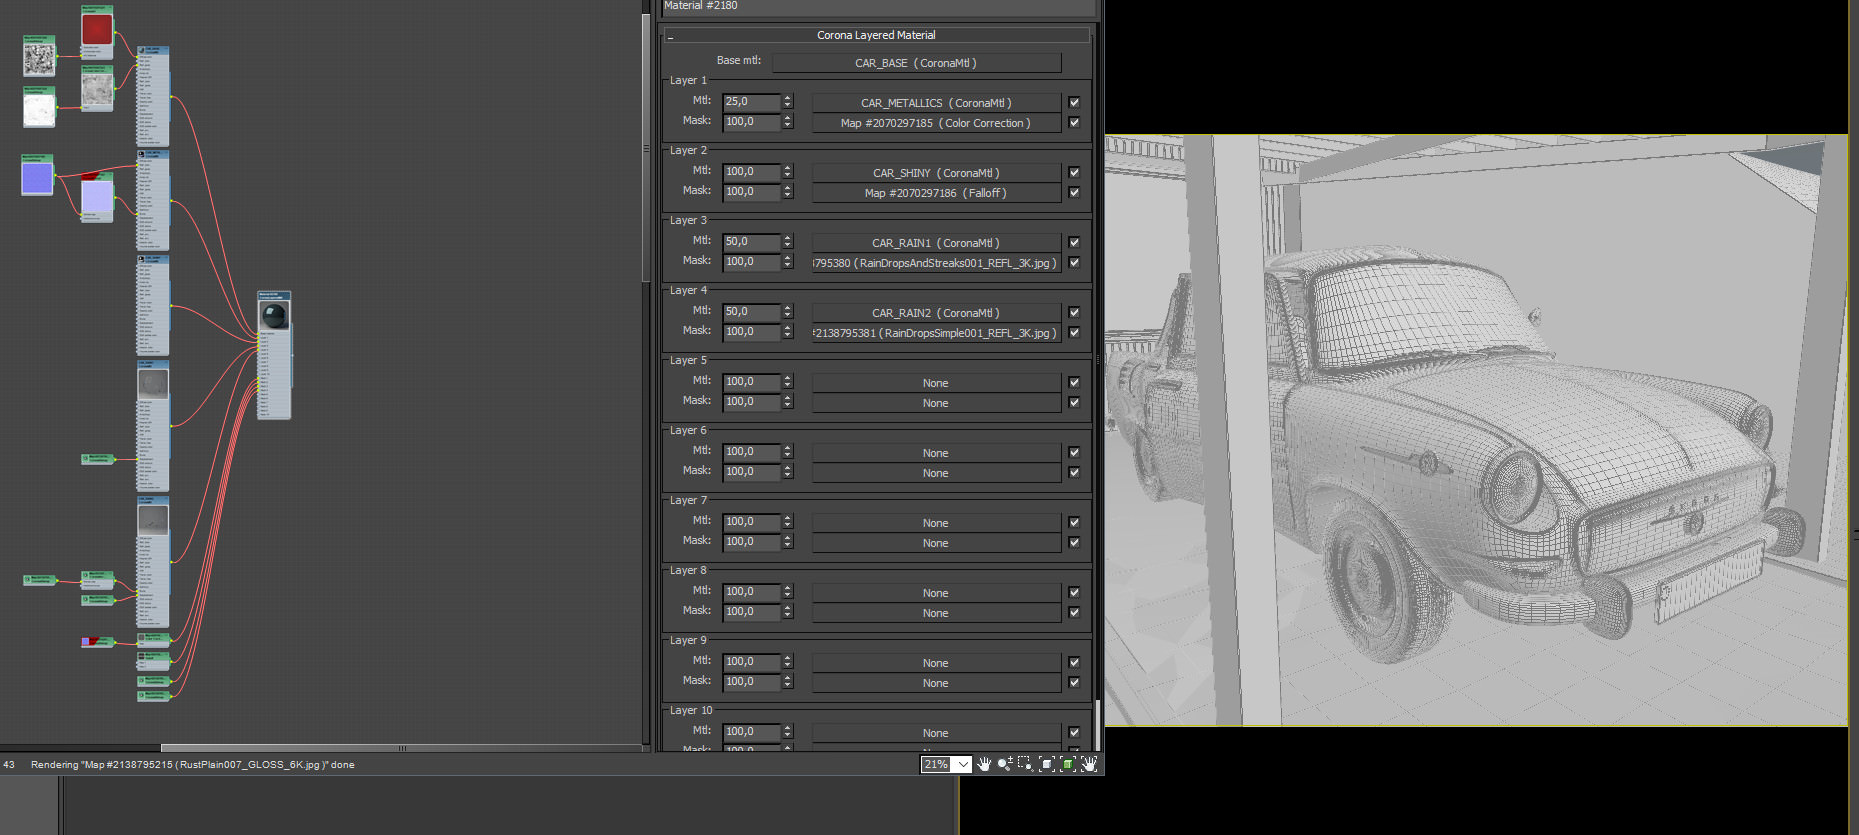
Most of the time when I create new material I start from the scratch, but when there is not enough space I use sample materials from the Corona Renderer Library, which are very useful and work great as a baseline – with some tweaks and dirt/scratch maps can be rapidly turned into very nice shaders.
Using of dummy red material/map in CoronaAO/ CoronaLayeredMtl to easier distinguish dirt layers.
I usually try to keep my materials as simple as possible, but almost always add a little bit of variation via Corona AO map either with CoronaLayeredMtl or straight into a diffuse slot.
The basic materials in this project include some concrete walls and stone floors, stucco, plaster and metal columns. Nothing too fancy.
As you can see, when I work with Layered or AO diffuse materials, I use red color as a dummy, which is quite aggressive and nicely visible when I play around with the dirt variations.

08_MO_ESV_CONCRETE1

09_MO_ESV_STUCCO

10_MO_ESV_PLASTER
11_MO_ESV_METAL

12_MO_ESV_CONCRETE2

13_MO_ESV_CONCRETE3
Generally, I follow a PBR workflow as much as possible – but often when I have trouble to make something look correct in the most basic way – I follow Juraj Talcik’s advice and “eyeball” things!
Anyway, if you want to learn more about the material setup I really advise you check out the Corona Renderer training videos on their youtube channel and also Juraj Talcik’s, Jakub Cech’s and many other’s threads on Corona Renderer Forum – where a lot of knowledge is being shared for free.
But nonetheless, I am sure everyone mentioned above would always recommend you to experiment as much as possible and see for yourself what works the best for you. Don’t try to copy everything you see on the internet and forge your own workflow with time and experience.
After I finish the base materials I move on to play with the rest of the building and add details for more realism. Remember, the more details you spend time on, the better and more realistic your image will look at the end.
In this case – wooden cladding, terrace, and car park framing was done back in SketchUp and imported to 3dsmax as a single element. Windows and rest of the details were then mostly added in 3dsmax from the libraries I have on my HDD.

14_MO_ESV_SHUTTER1

15_MO_ESV_CORTEN

16_MO_ESV_PLANKS1

17_MO_ESV_PLANKS2

18_MO_ESV_GW

19_MO_ESV_GW2

20_MO_ESV_WOOD1

21_MO_ESV_WOOD2

22_MO_ESV_DETAIL1

23_MO_ESV_WOOD3

24_MO_ESV_SHUTTER2

25_MO_ESV_EXTERIOR1
INTERIOR, details, and lighting
After I finish with all of the exterior features, details, and materials I move indoors. Even when you do exterior only images – I think it is vital to add some interior furniture to make the image look realistic. Going away with only windows with strong reflections and textile drapery is a bit naive, at least for me.
The only area I really had to focus on was the main living space i.e. kitchen, dining and living room plus corridor. The process here is to find proper 3d models of furniture that fit your concept.
My most used sources for interior props are:
If you can’t find anything suitable or you have something specific in mind, the next option, of course, is to model it yourself. In this case, kitchen base was modeled from scratch in SketchUp mixed with some downloaded appliances. It is basically re-used older kitchen design I’ve done some time ago, which perfectly fit into designated space.
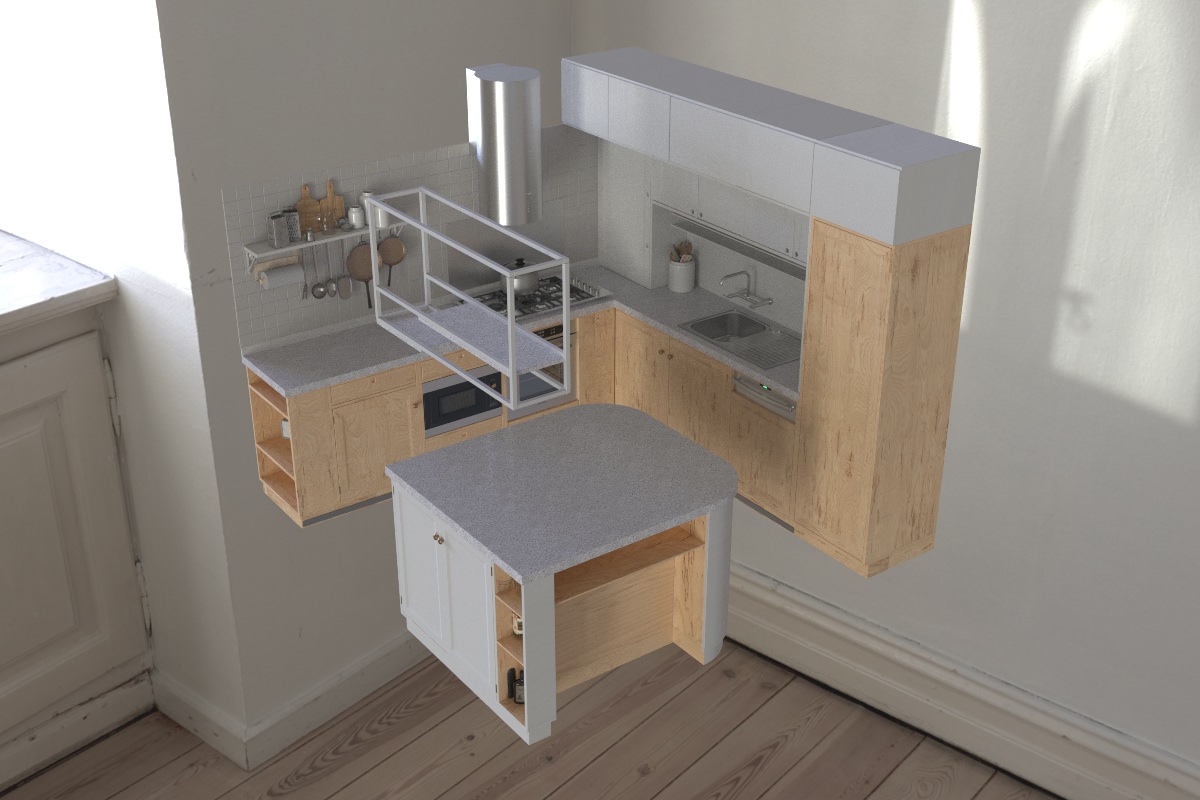
Preview of the finished kitchen model.
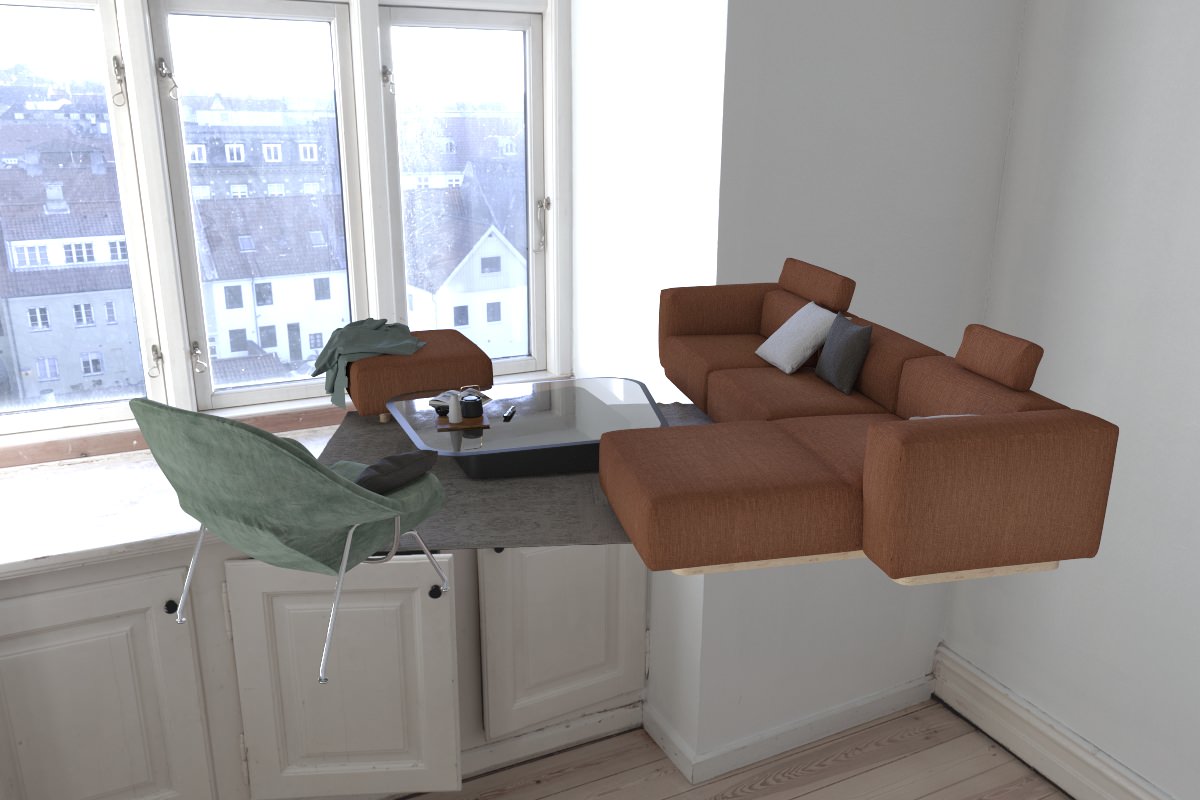
Preview of an almost finished interior model.
For the interior lighting, I used simple arrays of 3d models with Corona lights as a light source. I went for a very subtle warm light atmosphere to slightly enhance comfy mood. Then there is a small fire in the fireplace and few spotlights to get some weak, soft shadows.
During the interior light setup, I often disable or lower environment light so I do not set too high values which would look unnaturally strong.
I rarely use fake lights and when I do they are usually very subtle to compensate poorly lit scene or to direct something into focus.
Sometimes I also use Corona Renderer LightMix which is perfect for the lighting setup process, but in this case, I did not find it necessary as it might be a memory consuming considering the large and complicated scene.


CAMERA, lighting, and Environment
At this point, I’d like to fix my camera position, environment and composition.
For some, it may seem too late, but this is also the point where I brainstorm the most over the overall atmosphere and the way how I want my image to look like in the end.
Composition, as one of the most crucial steps in the image making, is something I try to improve with experience and I think it is alright to get some inspiration from renowned photographers or people from the industry. This is that kind of a creative process anyone can spend hours on and still not be entirely sure if it is THE one.
For me what works the best is to take multiple low-res shots from different angles, compare them and pick the one that fits the most with my overall concept and shows the things I would like to be shown. In this case, I followed the previous version and just changed the camera angle very slightly. I wanted to have my main focus on both living area and the workspace and at the same time needed enough space for the grass in the foreground and nice sky with the mountains behind it.
For a little help with composition and general rules, I used a script called imagecomphelper.
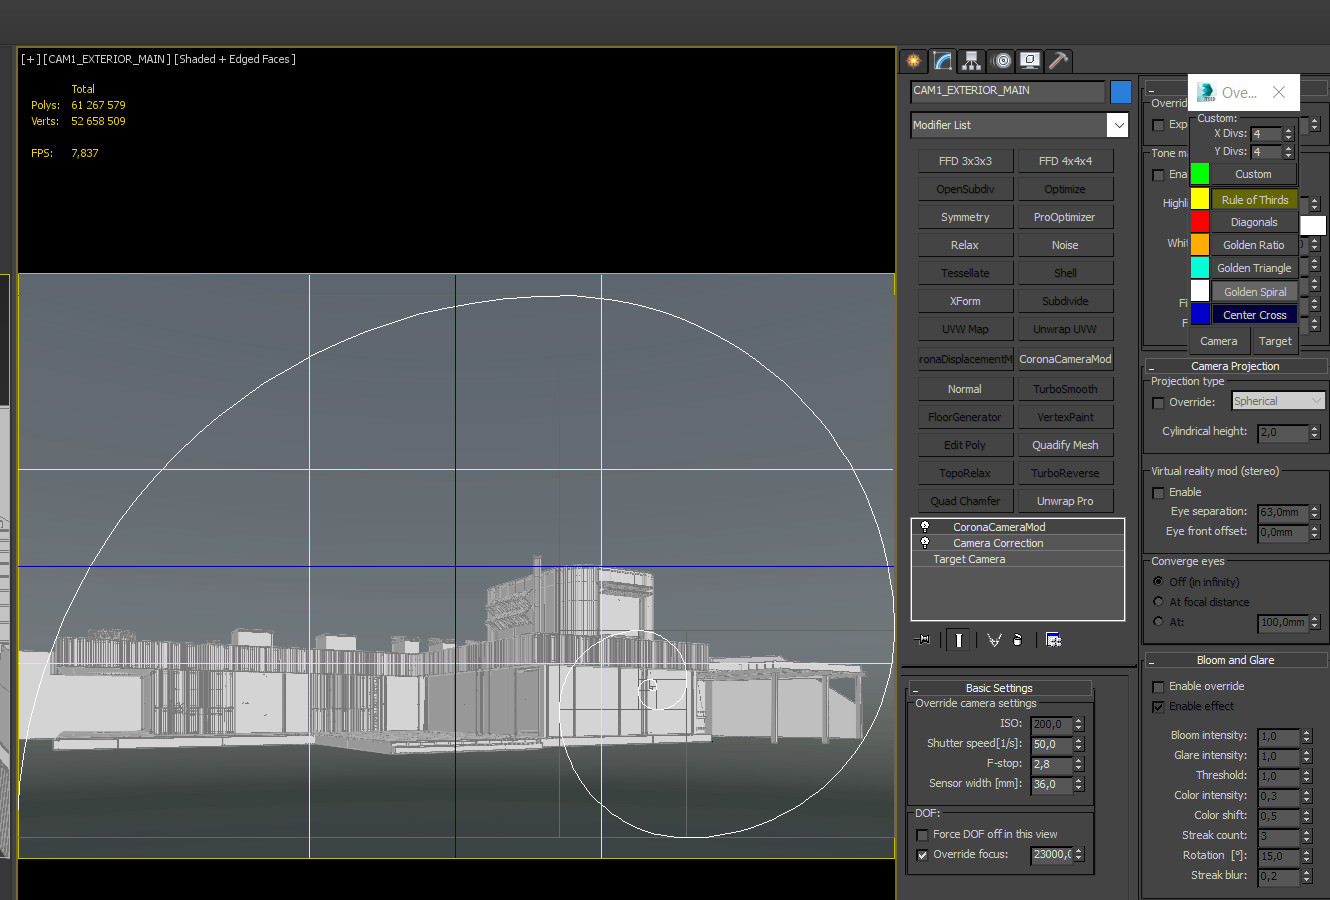
Final camera setup. Camera Correction for the verticals and CoronaCameraMod for a little dof effect, which can be increased by lowering the F-stop value and/or increasing sensor width.
After the camera is fixed and ready to go I start my search for some nice HDRI to light up my scene and contribute to overall reflections, atmosphere and the mood of the image.
As this building was supposed to be in a remote location among nature with some mountains and forest around it – I had quite specific demand for an HDRI which might be hard to find.
Not necessarily because of the lighting it provides but I mainly needed the HDRI to act as the main environment, thus saving me a lot of time doing the surroundings in full 3d.
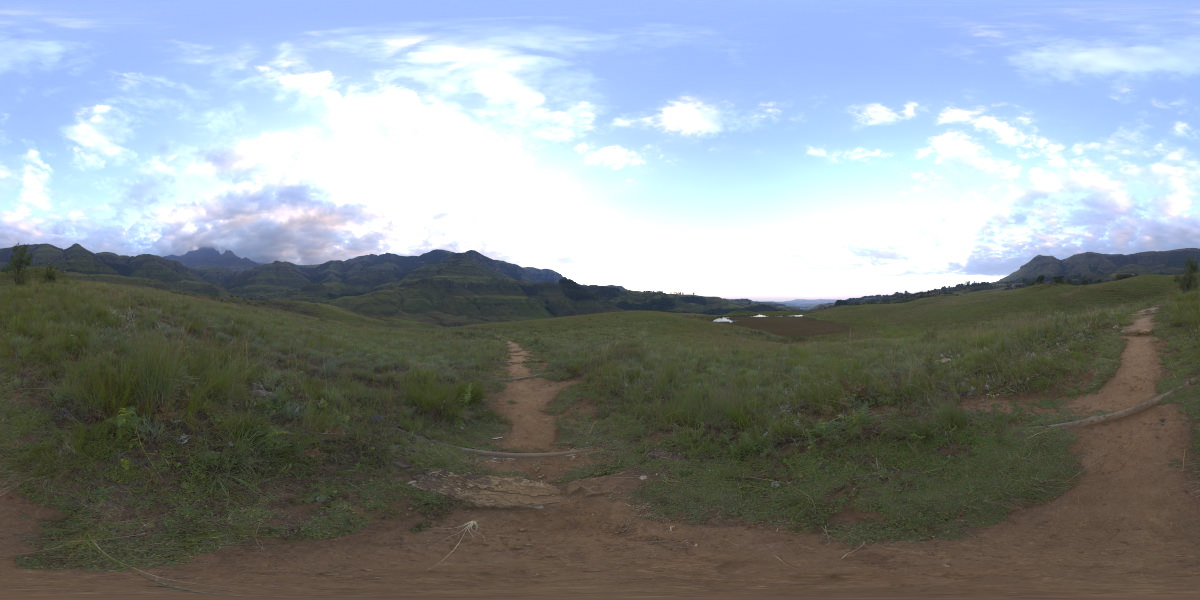
Great HDRI for my purpose found on https://hdrihaven.com/
Preview of HDRI applied to the file with slight color tweaks and desaturation.
I selected this HDRI also because it does not have any kind of strong shadows, which makes it more flexible if I intended to use some softer sun. I had basically three light situations in mind from which I had to pick. This decision was postponed after I was finished with my next step.
SITE, Vegetation, and Surroundings
Bit by bit we move into the latest stage of the model preparation before the actual rendering and post-production take place.
The terrain here was modeled in SketchUp and then re-topologized in 3dsmax. It was a bit tricky as there had to be 2 volumes – one serving as a basic ground and second one as a soil that covers the northern facade and the roof.
For a bit of variation, I always add some noise, so it does not appear unnaturally flat.


For the ground materials, I’ve used several Megascans and RD-Textures to make a complex material. Single layers were drawn onto the geometry using vertex color channels. The little rocky road was done simply using Editable Shape and Corona Distance Map.
Unfortunately, there is a little drawback with this workflow – displacement doesn’t work well when you use layered materials. I guess there would be trouble to calculate displacement correctly on the transitions of the single layers. If anyone knows some workaround feel free to let me know about it.
Anyway, after I have my terrain ready, the next step is to import the vegetation into the file and populate the surroundings. Most of the vegetation models are from the websites like Evermotion, VIZPARK, Maxtree, CGAxis and then also few great models from the darkstellungsart pack.
The higher the variation – the more realistic the result – which of course depends on your RAM.
In this case, I’ve overdone the imported vegetation a lot – making my file so laggy and huge it was really uncomfortable to work on even with full usage of proxies, so the next logical step was to isolate the geometry and reduce the number of vertices or delete the oversized objects entirely.
For this purpose, I simply use Select by Name tab and find the geometry with the most faces to fix.


For the grass, clovers and other simple plants, I’ve used several models combined into several CoronaScatters, scattered using various masks, vertex color channels, and CoronaDistanceMaps.


For the bush and hedge placement, I just drag and drop single models around the file into desired positions. Sometimes I also place scatter in the background to fill in the reflections of the windows, but in this case that was not necessary as the area of the model was not as huge.


Trees were also placed manually into desired positions. For the ones closer to the camera I’ve tried to use the most detailed ones. Also, I’ve manually modified and pushed up the terrain geometry by freeform after tree placement so it copies the subtle soil movement over the roots.


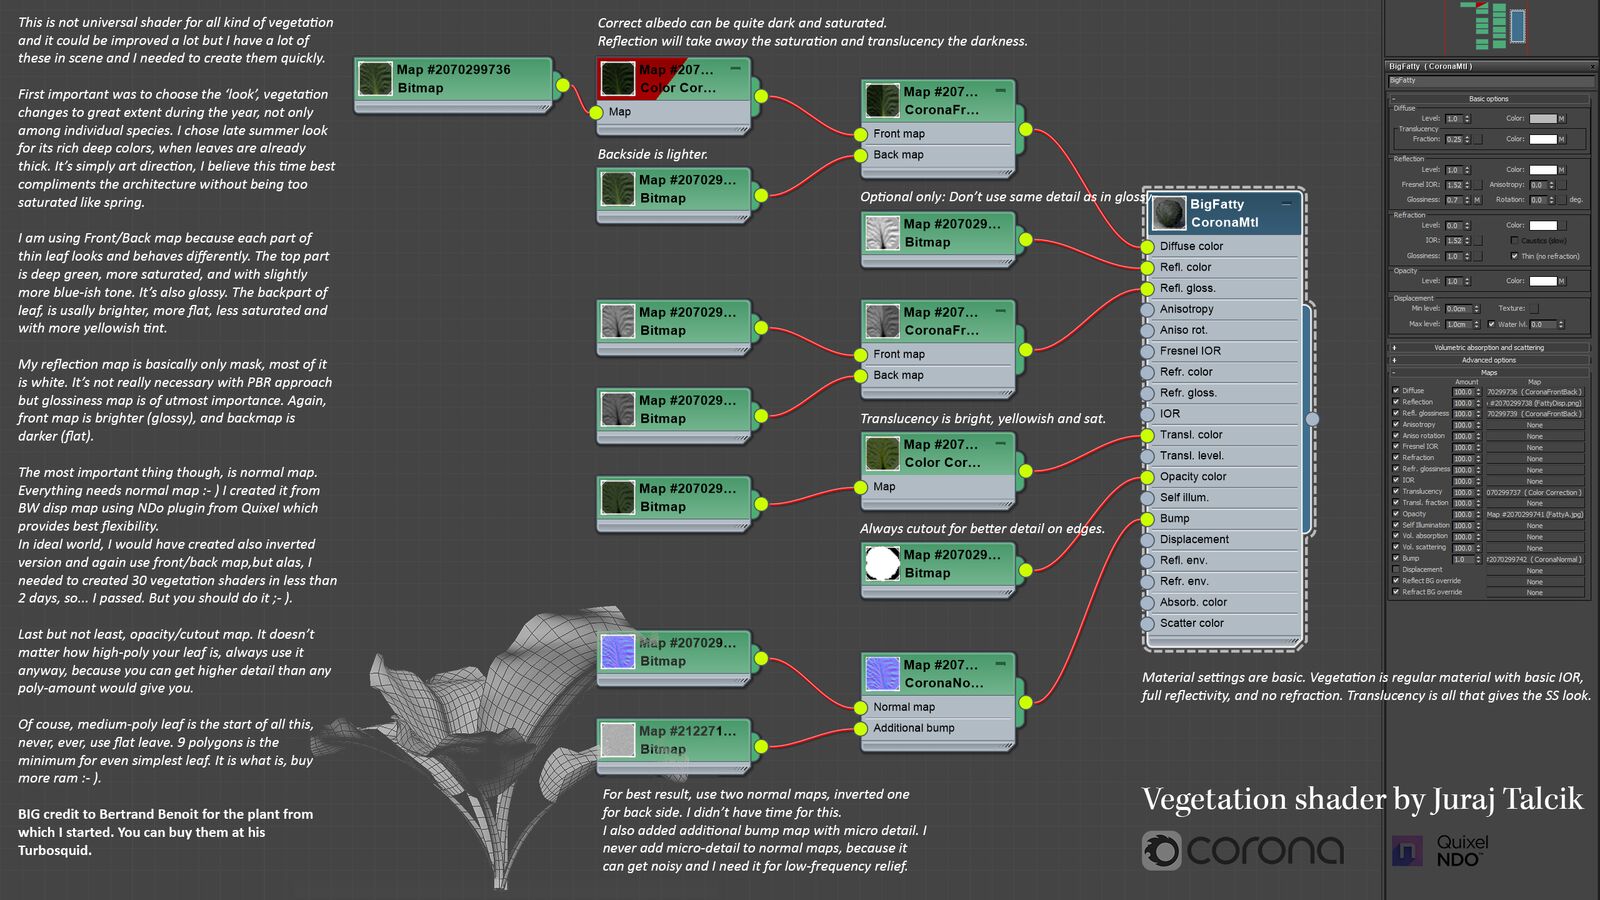
For the foliage, I usually use textures that come with the models and then play with the material itself a little bit to make it to my liking. For quite some time I have been using Juraj Talcik’s model for foliage from about 2 years ago – basically using double-sided maps to copy leafs appearance with a bit of translucency. Of course, I’ve adapted it over the time to my liking and needs.
For the vegetation visible in reflections, one tip here is to use some unreflective black volume and fill the interior with it in order to position vegetation correctly also in the windows.
I think that the right reflections with real geometry help a lot with achieving photorealistic results. You can also notice that my glass material has a very weak mask in glossiness slot and a little bump using simple noise map, which helps to make reflections a bit distorted, thus less striking.
Example of the usage of non-reflective black volume to enhance reflections.
What would a modernist villa like this one do without some shiny classic car next to it, right?
Here I’ve picked local legend from Skoda – model 1000MB and applied a little bit of metallic effect together with wet rainy layers to enhance its reflections.
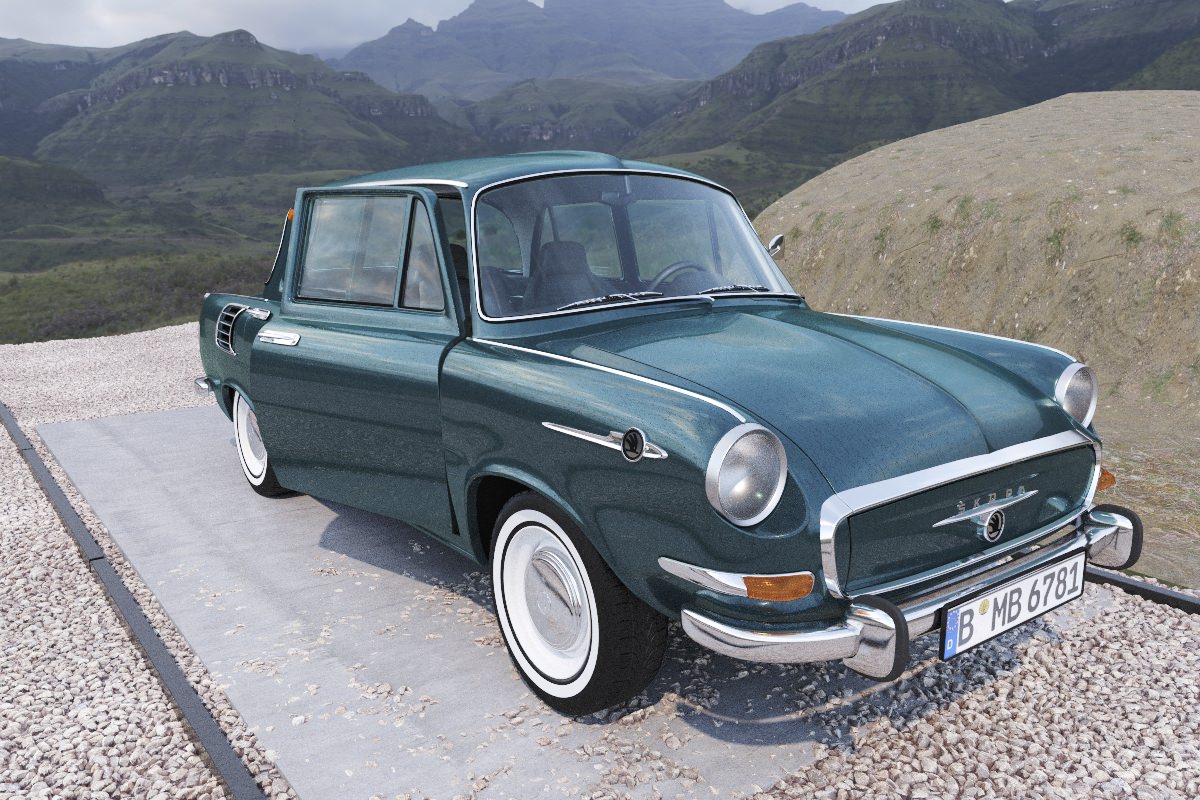
Preview of skoda 1000MB.
Preview of car paint material.
FINAL RENDER and post-production
So here we are in the final stage of the project. One last step was to decide and fix my sun position and strength.
As I mentioned above, here are the three possibilities I had in mind.
Possible sun setups
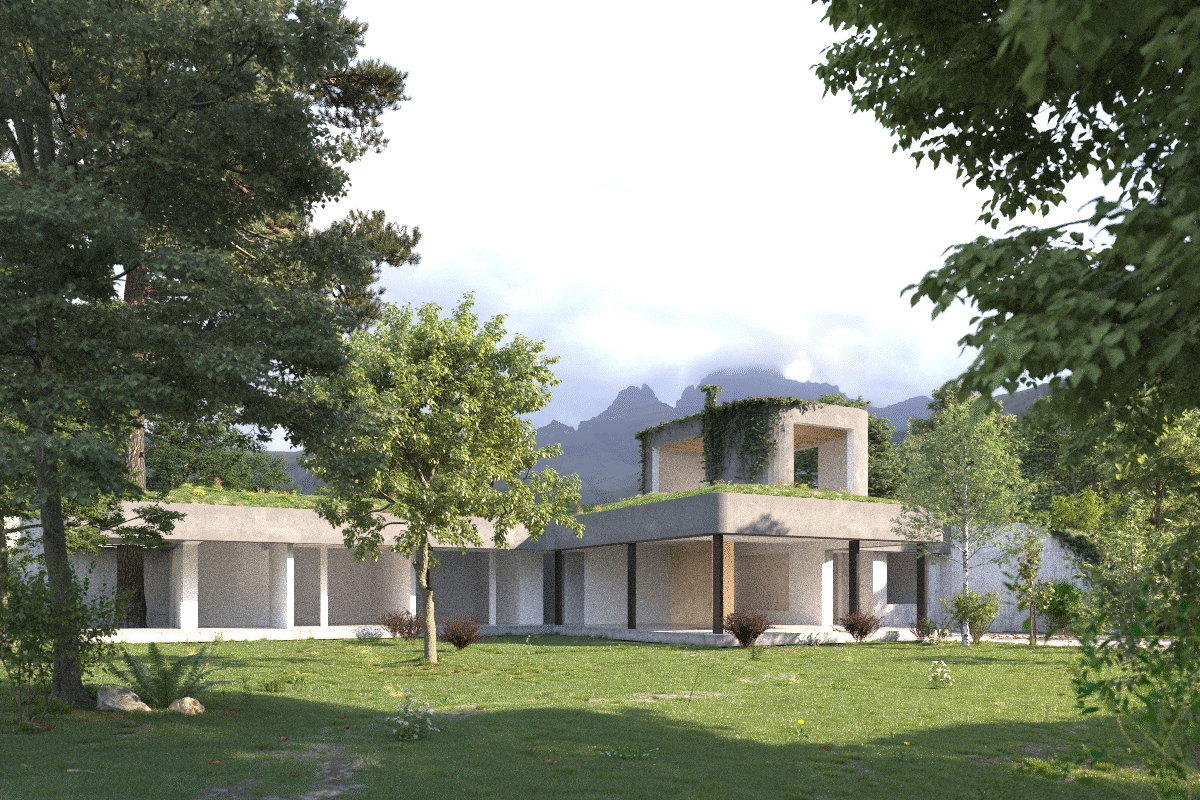
After some thought and comparing I went for the last one – nice warm and soft morning sun which was the closest to the original and made the villa stand out in contrast to eerie mountains behind, thus made the final image more welcoming.
Now it is just about enabling all the layers of the file and hope that my computer can handle it. This is often not the case and I have to go back and try to optimize the file – reduce the number of vertices again for the most memory consuming geometry and delete/replace the biggest textures.
Unfortunately, in projects like this one, my PC often reminds me where the borders of my CG possibilities are (buy new computer David!).
For the render settings I went basically with Corona’s defaults:
- Displacement on with 2px radius
- Path tracing on both primary and secondary solvers with 16 samples and 2 lsm
- Image filter as tent with 1px width and 8 highlights clamping
- Denoise on 0,2 – I try to keep it as low as possible to avoid clamped pixels
- Noise limit set on 3% – my usual value for exteriors would be between 3-6%
I rarely use tone-mapping tools directly in the framebuffer as everything can be adjusted later in color grading software more properly. I save my renders as exr’s either in 16 or 32-bit color space, which in my case usually depends on the number of renders as they might get quite heavy.
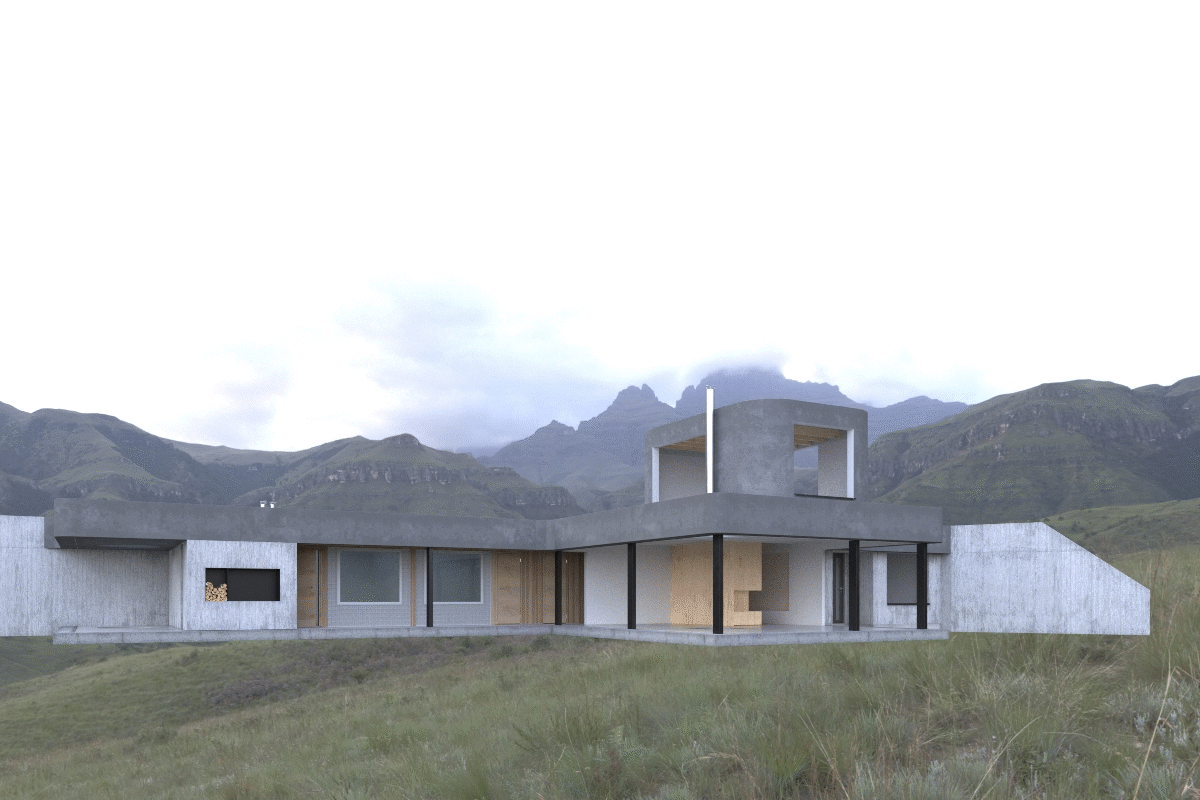
Raw render/final image
I won’t go any deep into my post-production procedure as it is usually embarrassingly simple.
Most of the time the only thing I use is PS and Camera Raw to enhance and/or tweak colors and contrast. In this case I’v,e also added some grain which often helps the images to look less generic. Then I apply some very slight adjustments where necessary and add LUT’s for the desired overall mood and the image is practically done.


CONCLUSION
Freedom of choice is usually something we can dream about in the hands of developers and/or architects, who often think they can do this job better than us.
That’s why we enjoy creating imagery for personal projects so much.
For me, this project has something more to it than the other ones I’ve finished over that quite short period of time I move my feet around this industry and work in the silence of my dark little space. Here I could do things exactly like I wanted them to be and focus on parts I wanted to focus on. I am very glad Ronen asked me for this piece specifically, as I’ve felt I was not quite done here yet.
Even though there is a lot of small things that could be done better and/or with more care, I really enjoyed working on it and sacrificed countless hours to push it forward from the older version.
I guess people often tend to turn back to their rusty favorite works and have the need for the newer upgrade as this industry moves so fast last few years you basically never feel fully satisfied.
But to be honest – I do now a little bit.
There is a long long way till I achieve the overall quality of the guys mentioned at the beginning, but I am sure that if I take it project by project, with time and experience I can get there someday.
Thank you for your attention.
—
You will be able to find a few more images from this project also on my Behance.
I hope you enjoyed your time reading the article and maybe also got a trick or two. For those who lack something in it, I am sorry I didn’t go any deeper on some parts. Maybe next time, after I feel a bit more confident with my artistic and technical side of the view. Who knows. 🙂
If you are interested, you can find more of me here:
https://www.facebook.com/davidmales.imagery/
https://www.behance.net/davidmales
https://www.instagram.com/davidmales.imagery/
Good luck with your own little special projects!
Cheers,
David.


Stunning image! You did well i see during that self study, the outcome is looking marvelous!