


Making of Chimneys House
I’m happy to bring you a new making-of article by Diego Munhoz Ferreira from Neohaus. In this article he will describe the creation of his great re-creation of Marcio Kogan’s Studio MK27 ‘Chimneys House’ design, created as a personal study. I hope you’ll enjoy this article, learn from it and share your thoughts by commenting at the bottom of this article’s page.
Use the green retweet button above to share it with your twitter followers too!
Diego M.F. is an architect, freelance 3D artist and director of NeoHaus, studio specializing in architectural visualizations.
Check out his website at – www.neohaus.com.br
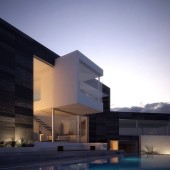
The Scene
I have chosen to render the ‘Chimneys House’ as a personal work, as I always think that technically we benefit ourselves when we choose a good project and it has pictures as references. We can understand better how light, reflections, and materials work this way and reflect that in our daily work.
The project came from Studio MK27, lead by Marcio Kogan, who is a renowned contemporary architect. Their architecture is clean and volumetric, and uses a lot of textured materials. These elements go with what I like to represent in 3D… Looking at their website www.marciokogan.com.br I found this project, that I really enjoyed, called ‘Chimneys House’.
Everything started with this picture

You may notice that the photo was taken while the work was clean, brand new… But looking at other pictures of this project I saw that they had planted Ivies in order to grow and cover the walls as time passes by. The mass rustic wall would keep signs of rain, on autumn or winter the leaves will fall, etc.
Modeling
There are several ways to model a scene from scratch using only photos as reference, but the main idea is to keep your feet on the ground. Do not use crazy measures. Knowing that a doorway is around 2.20 meters, or that the wooden planks are between 5 and 12 cm. Or that the ceiling height is between 2.60 and 3.00 meters. With that in mind I was doing boxes with the measures I thought that the elements of the picture could have. Always starting from largest to smallest.
Although it’s impossible to hit the exact size of things in photos, it is very important to work in real scale!
Other photos of the same project helped me to understand the proportion of the elements and also understand the elements that are in the immediate surroundings and how they would affect the scene.


For wood flooring I used the Floor Generator plug in, it is very useful in these cases because it also works very well with Multi Texture, as it generates random ID’s for their elements.
To use it you just need a shape outlining the area you want the pieces to be generated, run the script with the shape selected, activate the Interactive Update, in order to see changes as it goes on the viewport, and play with the fields until you get it the way you want. But beware, if you deselect the shape, the mesh will be created and the floor changes you make in the Properties of Floor Generator will no longer affect the mesh.

Floor Generator Settings
The dried leaves are simple planes with twist and bend modifiers. Multi Texture distributes five variations of bitmaps randomly among them. These meshes were distributed with the Advanced Painter script, where you choose the elements that you want to distribute (in this case the leaves) and in which areas you want to distribute, and you actually “paint” in those areas and items are distributed with variation in rotation and scale of your choice. It is important not to make a very homogeneous distribution, try to imagine how these leaves would go to the corners, because of the wind for example.

Advanced Painter Settings
To create the falling leaves I used the Particle Flow system in order to generate more real randomness and so that each leaf has its own properties of rotational and speed, as this will give greater realism when rendering using the Motion Blur.

Particle Flow
The Ivies were done with the Guruware´s Ivy Generator plugin.
The trees were made with Onyx Tree, textured and then converted into VRay Proxies to save (much) RAM.
Here is a general scene overview:


Texturing
For texturing a wood floor, we must understand that each piece has it owns characteristics of diffuse, reflection, bump… To get this result I used Multi Texture, an amazing plugin that assigns random bitmaps and/or variations of Hue, Saturation and Gamma between ID’s or objects.
The texture of the wood is from CGTextures website, edited in Photoshop to create seven different boards


For gravel, I thought of using Particle Flow or Reactor to distribute a lot of spheres… But as it will not appear that much, I did it with 2D Displacement.
Gravel:

Leaves:

Camera and Lighting
Before lighting, I usually leave all the elements of the scene already textured, even if they will require several adjustments later, and if you are using Global Illumination this step is very important.
When light up a scene, I always lit the more” important light first, in this scene I think that is the sky light, and then I lit and adjusted the “less” important lights…
Lights:


Camera:

Render and Post-Production
For the falling leaves I decided to do a separate render and then composing it in Photoshop… So I would have more flexibility in choosing the position and color of these leaves.
To render something that will be composed later it is important to consider how the alpha channel will relate to the Anti-Aliasing… In this scene the colors of the leaves shift towards brown, if I render the scene with a white background, the Anti-Aliasing will mix the color of that white background with the colors of the leaves and will leave an undesirable bright edge on objects, which can be difficult to remove in post. The ideal is to choose a color for the background that is very similar to the object of rendering or at least medium gray, to minimize this defect. In rendering where the Motion Blur is on this decision was essential to have a correct clipping of alpha channel, and consequently a correct fitting when composing the scene.

Motion Blur

Render Settings

Render Output
For Post-Production I always render some render elements so I have more flexibility to create effects, reflections or specular highlights.

Render Elements

Wire render

Render Output
In the photos the fire pit was not lit, but I had to light it! So I made another angle for this, where the fire could be in foreground. Many people asked me how I did this fire, but it was actually the easiest of all! It is simply a bitmap from CGTextures and in the PS layer as Linear Dodge (Add).

Fire Bitmap

Wire render

Render output after post
Animation
I have little experience with Particle Flow, and the fact that it can be animated excited me to do a little animation of this scene, where the leaves fell and collide with the wooden floor. I researched a bit and could set up the Particle Flow for that.

Particle Flow settings for animation
And for the animated fire I used the incredible FumeFX plugin. After some adjusting, I’ve rendered a separate sequence of the fire and composed in After Effects CS4.
The animation can be seen here
Thank you all!
Diego’s original Chimneys House 3d render thread
You are welcome to comment on this article and ask questions using the comment box below!


amazing… light, texture, it’s all perfect!
I am not an expert and I have a question – in the wire render the deck is subdivided according what seems the right wood pattern? is this right? did you modeled it?
Hi, Diego mentioned this in the article – it is actual geometry automatically created with the help of the Floor Generator Script from CG-Source.
I will post Bertrand’s article soon were he addresses the script in great detail
Stay tuned!
Hi Diego, Hi Ronen,
I just want to thank you for the great job you’re doing.
Diego the tutorial is cooool and Ronen you’re developing the best VRay resources website available on the net!
Keep on like that!
Giacomo
Thank you very much Giacomo, It’s important for me to read such feedback!
Couldn’t agree more!
Thanks !
The wood planks were modelled with Floor Generator. You can find the configuration in the making of.
Great stuff Diego, I like the mood and overall composition. Thanks for sharing! One small question – I was wondering, what was the camera sensitivity (ISO) in this case? was it 200? 400?
Cheers,
Ivo
I echo the sentiments of Giacomo. I only just discovered this website the other day through a link to the competition but I have already discovered a number of useful tutorials and new articles are appearing all the time. Thanks a lot Ronen, and of course to Diego for this making of.
Thank you all! I´m very happy to get such feedback !
And I echo (again!) Giacomo an MA, Ronen is doing a great work on this website.
Ivo Sucur, the camera ISO is 100.
Hey Diego, above you mention that if you deselect the shape you will no longer be able to edit the mesh – fortunately that isn’t the case. Just thought I’d let you know that if you reselect the floor it created, and click on ‘fetch settings’ you are then able to adjust the floor again. Hope that helps.
great work and an very good explain, to do this.
It´s perfect.
Hi. Great work.
Where I can find the texture you used for plaster?
Thxs
Very nice the work with the Particle flow, I wish to learn something more about it. The tutorial is very well eplained.
Thank You.
J.Pintor
how do you install the scripts from CG SOURCE? where do I pleace the files I downloaded??
anyone knows?
Thanks
If it’s a script stick it in the scripts folder and if its a .dlm, .dlu or .dlt… then in the plugins folder unless the instructions state otherwise.
Thank you so much for the tutorial.
Boa Diego Munhoz Ferreira!!
Wow… Thanks !
Its amazing. Music has a great influence in architecture and your animation proved it.
great job
I Remember this project well. Excellent!
But this Making of was posted in ur site b4, r8 ??