


Making of GH House by Anton Cherenko
As mentioned it the March 2010 newsletter, April is the month for the GH House articles to be posted and I’m very happy to bring you the first article by the challenge’s Honorable Mention Award winner, Anton Cherenko. I really loved the fact Anton showed the back side of the GH House, a side not so explored during the challenge. I hope you’ll enjoy this article, learn from it and share your thoughts by commenting at the bottom of this article’s page.
Use the green retweet button above to share it with your twitter followers too!
![]() Author: Anton Cherenko
Author: Anton Cherenko
Anton participated in the GH House Challenge, winning an Honorable Mention Award for his entry. In this article, He describe the process of working on his images. Check out his blog at – http://cherenkoart.blogspot.com/
I’m very happy to share with you the process of creating my entry for the GH House Challenge. This 3d scene was made with 3D Studio Max 2009, VRay render engine, OnyxTREE, Adobe After Effects and Photoshop.
Introduction.
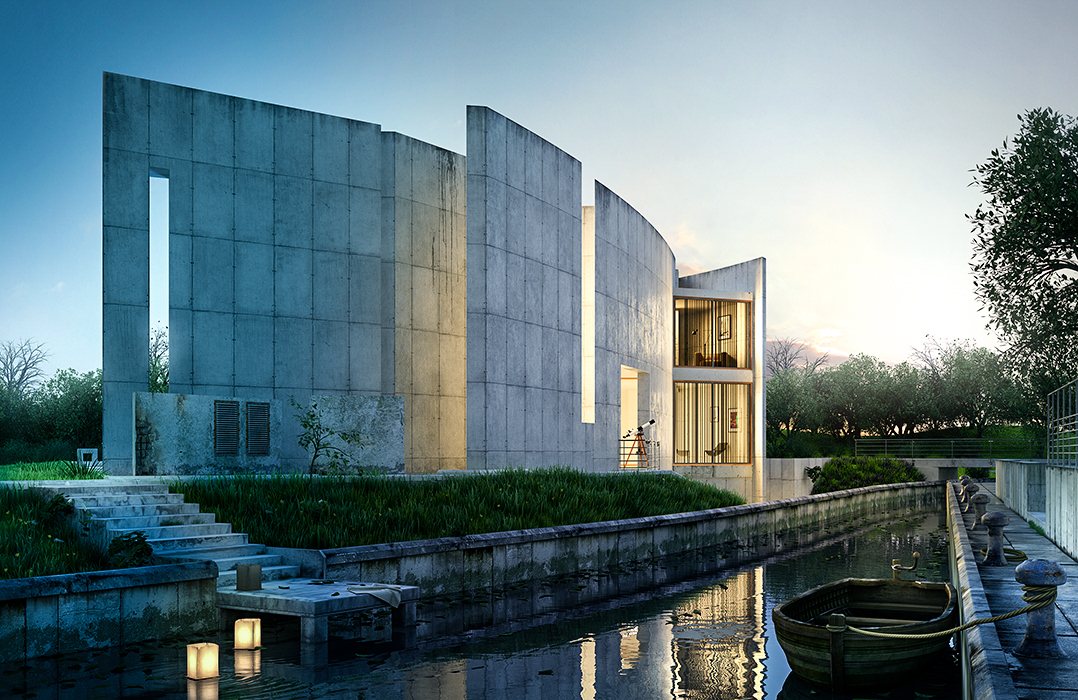
The first step, after I downloaded the model, was to find an interesting POV. The GH House architecture design was very great in that there were many good views to explore and chose from, but I wanted to find a really unique POV… One that will distinguish my image from the others. I went for the rear, and rather closed, side of the house that eventually was only showcased by me (among the finalists)

Scene overview

Exterior POV’s
The process of looking for interior POV‘s was the same, at first I wanted to show the second floor of building , but then I changed my direction to the main room because it reproduced the general mood of this house in best way.

Interior POV
General Modeling.
There weren’t too many complicated objects to 3d model, and not too many parts of the structure that I’ve changed. I removed the walls along the perimeter, added a river canal (A most important element in my scene, adding that dramatic mood I was looking for) and a bridge across it.

Detailing the selected POV
In order to achieve a more realistic view for the water surface I created little waves originating from the boat and lamps. First I made a plane, converted it to an editable poly and changed the vertexes locations for my canal form, then I raised the polycount in places where I needed it and used the ripple modifier on them.

Final wave effect

Creating the water & ripples
Interior Floor Creation
For the floor I used a very useful script called FloorGenerator from CG-Source – A great parquet flooring creator, all you need to do is choose the plane where you want to create it. You can see my settings in the image below…

FloorGenerator Script Settings
Creating Trees & Plants
Trees and bushes were generated using OnyxTREE’s Treestorm plugin for 3dsmax, which were converted to VRay proxies to make my work with the scene and image render possible as far as memory resources were concerned.

Trees & Plants
Grass creation.
First step was creating a few single grass blades. Second step was to distribute them on small area and then attaching all of the blades into one editable poly object that was converted to a VRayProxy. Next I distributed that VRayProxy object on surfaces where I wanted to place the grass on.

Creating single grass blades
Then I add some single plants for some variation in the grass surface and make it seem more natural

Adding single plants
For the distribution of all the vegetation in the scene I used Gtools_Jar_Planter script made by Guillermo M Leal Llaguno. big thanks for Guillermo for that script!

Distributing the vegetation
Texturing.
The main wall material
First I mixed two layers in Photoshop to get a kind of texture I like.

Concrete texture
I added some dirt using a composite map in the diffuse slot.

Concrete dirt composite

Concrete material structure

Concrete material end result
Metal material

Metal material settings

Metal material structure

Metal material end result
Lightning.
For both exterior and interior scene I used VRaySky with a VRayCamera. For the interior building lights I used VRayLights (plane).

Interior scene lights

Exterior scene lights

VRay camera settings
Rendering.
I used the same render settings for both Interior & Exterior.

Render settings 1/2

Render settings 2/2
Original render outputs

Original exterior render

Original interior render
Post Production.
First I changed the background of the exterior render.

Editing the background
Then I tweaked the color balance and levels.

Color balance & levels settings

Color balance & levels output
For the final touch, some fog effect was added using a simple brush in photoshop with 0% hardness.

Adding the fog effect
And with some more postwork, here’s the final result 😉
Anton’s GH House Challenge thread
You are welcome to comment on this article and ask questions using the comment box below!


amazing man, thank you for taking the time to show us your technique… 2 thumbs up!
Awesome work!!! Thank you Anton!!
Thanks Anton, very informative. I love how you chose such a unique vantage point and ran with it.
Looks amazing, thanks for sharing your method!
Excellent making of, very nice techniques and thanks for the tools links, will sure give them a try. Congratulations on your honorable mention.
Hey Anton, I’ve seen you got an Evermotion front-page! well deserved… Congratulations.
and that is actually the 6th GH House entry to get a front-page at evermotion 🙂
Great Work!
Nice work !
I am really amazed by how u work your material maps…
How did you do it? Photoshop? Or you took a picture of the actual object?
what I can say… superb!
I really like your job, by the way can I ask for the tutorial data.
Awesome man congratz and thx for posting!
PERFECT !
Well done. You kept it simple, which I like, and you impressed us with it.