


Making of GH House Between the Rocks by Anninos Konstantinos
I’m happy to bring you the third GH House related making of article by First Runner Up – Anninos Konstantinos. Nestled between rocks, facing a lake, Anninos has created a unique looking image and atmosphere for this house design. I hope you’ll enjoy this article, learn from it and share your thoughts by commenting at the bottom of this article’s page.
Anninos participated in the GH House Challenge, Awarded as First Runner Up for his entry. In this article, He describe the process of working on his images.
First of all I want to thank Ronen Bekerman for arranging this great challenge!
It was a joy 🙂 So Now Lets start!
The story
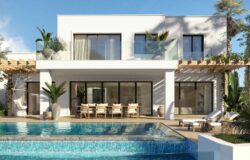
The first thing that came into my mind when first seeing the GH House design was a luxury house nestled in a forest environment with tall trees surrounding it, nice grass and all this stuff that is being used in our days, but in the next second I thought “…another forest house? Not for me in this competition!” So I started searching for a good idea to surround the house and after a couple of days I finally found it… Based on a real house called Castel Meur or the house between rocks that is located in France.

Castel Meur Photo from Panoramio by maloo81
Exterior

3D Modeling
This project was done using 3ds max, Onyxtree, VRay & Photoshop. The first thing that I started to model was the basic ground created with edit poly (vertex-soft selection) from a single plane giving it a shape to resemble a small island. The next model, and most important, was the rocks because it was the first time doing it for me and I wasn’t sure if I will be able to make them look realistic! So I followed this ‘Creating Realistic Rock’ tutorial to help me out along the way.
But I used my own shapes and texture and I was satisfied with the result you see below:

3D Vegetation
Next step was the vegetation, created with basic tools such as Onyxtree & Object Painter. After my research I found that it would be nice to use conifers for my trees and 4-5 kinds of bushes and grass. I turned all this vegetation (trees, bushes & grass) to VRay proxies and with Object Painters help I distributed them on my basic plane. Because of the huge amount of Ram used for this project in the final render (about 13GB) it was my decision to not use very high detailed vegetation but instead of that a smart use of DOF and post production.

Texturing
I am reading almost everyday in cg forums that artists ask other artists about lighting… “how did you did that”, “tell me the secret of your lighting”, etc. In my opinion the big deal to catch as much realism as you can is the texturing part instead of lighting. So, my advise is to spend more time on textures. I should mention that almost all the textures I use are from CGTextures.
Here are some materials I made for this scene:


Lighting
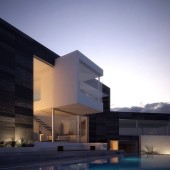
For my exterior lighting setup I use an HDRI for the environment and reflections, VRaySun as my direct light and VRayLights inside the house, my camera is 3ds max’s standard camera.


Render settings
My render settings are pretty low because, as i already told you , the amount of Ram used was huge!

Post processing
Before I start talking particularly on the exterior, I should say that I use some standard process for all my renders such as, levels, brightness & contrast, chromatic aberration & vignetting. For chromatic aberration & vignetting, go (in photoshop) to Filter – Distort – Lens Correction.

Three more things that I use for the exterior was the selective colors tool (its great!), a simple gradient for the foggy day effect and adding DOF with the help of a ZDepth channel.

Selective colors is a powerful tool that gives you great control of the colors, you can control your vegetation color and shadows. Fog is really simple because the target wasn’t a heavy fog but the foggy effect that you can see on a very sunny day… more like haze. After I created a new layer, I added a white gradient, change to screen blend mode and control layers opacity.


DOF effect is a standard procedure for me because it brings in more of a real life photography into your render. So duplicate your main layer, create a new mask, paste your ZDepth channel in and then use (in photoshop) Filter – Blur – Lens blur to control your DOF.

Interior

3d Modeling
When I was thinking about my interior approach, the target I set to myself was a retro style with more artificial lighting like in a magazine. Some models used from providers such as all3dmodels.com and evermotion.org collections.
Here are two items i made…
For the carpet I used 3ds Max’s hair & fur modifier to create the strands, you can see the settings in the picture below.

The fun part was creating the curtain and the fabric with the simcloth plugin.


Texturing
Here are some of the materials used in the interior.


Lighting
The lighting process was a little bit hard and finally I count 39 light sources! Generally I use VRaySky and VRaySun (afternoon setup), VRayLights, Photometric IES lights and a lot of tests to balance the natural and artificial lighting.


Render settings
Simple render settings yet again…

Post processing
As I already mentioned, my standard procedure is levels, brightness and contrast, chromatic aberration and vignetting. For chromatic aberration and vignetting, go to (in photoshop) Filter – Distort – Lens Correction. I use DOF with ZDepth channel as well and a heavy use of selective color tool, to give an artificial style.
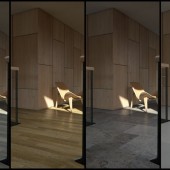
Here is the before and after to demonstrate the edits done to the original render…

That’s it! I want to thank all my friends for supporting me all this time and help me improve my skills 🙂
Cheers, Anninos Kostantinos.
Kostas’s GH House Challenge thread
You are welcome to comment on this article and ask questions using the comment box below!


Great work… is there any chance you could do a tutorial on post-production?
again, awesome work.
Great work, I espcially love the interior image. Can you explain what accounted for the large RAM usage ~ 13GB, this seems very high. I’d be interested to know what was responsible for this since you proxied your foliage?
Thanks Miguel! I’ll try to make a tutorial asap!
Thanks MA! Even if you make your vegetation proxies, still the memory can be huge if you use a lot of trees and bushes, other that theres a lot of displacment in the scene.
Very nice tutorial, the interior postproduciton looks great…
Have you seen the “Creating Rocks” tutorial by Daniel J. Hatton? It’s very good aswell.
Thanks!
Javi
Thanks JaviPintor! I have seen the tutorial, its great!
nice making of and I look forward to the tutorial mate.
Thanks a lot patrick!
Great making of Annoks, really like your interior lighting setup. Would love to see your post production work… as it’s really amazing to see that difference between the pure and after post images!!!
Thanks again for sharing.
Thanks rakan!! The tutorial is almost ready and it will be published soon from by Ronen.
Yep, very soon 🙂
Postwork screen cast posted – http://www.ronenbekerman.com/interior-3d-render-postwork-by-anninos-konstantinos/
No audio, but easy to follow… Have fun! Thanks @annkos
Its my pleasure Ronen!!
I love how you made that fog, and so much detail in everything, excellent work!
Great job… and thanx for making of… No LWF?
Thanks my friends!!!
Mrbig: No lwf.
Mpravo annkos, very good job and general aesthetic, materials, post and point of views. You have a fast and quality development. I also be very happy that you are a Greek designer!
Thanks a lot Vasillis!!
Hi ronen..could u help me to solve this problem? im still new in 3ds max now im just using vray HDRI, i just follow on your youtube tutorial vray hdri, but the result is not better. I dont know where is the mistake..can you give some idea? thanks ronen
let’s get this one over to the forums… and pick this up there