


3D Water Drops by Bertrand Benoit
In this how-to article Bertrand describes in detail the way he created the 3d water drops effect in his GH House Challenge winning interior image. Check out Bertrand’s full GH House making of article for more information about his work.
I’ve had some questions about how I did the rain drops on the glass in my interior image. The effect is obtained with a humble bump map, and is therefore fast to render. But what makes the map realistic is that it is extracted from an actual 3d geometry. In order to get the bump map, we are going to model an entire rain-splashed plane from scratch. This may sound like a lot of work, but it’ll give you a versatile map you can use over and over again.
Before you start, get yourself a few nice photo references. This is an important step. Everyone has seen rain-splattered windows before and they will instantly notice if the effect is not realistic. I cannot post my reference images here for copyright reasons, but one thing I noticed looking at them is that they all show not just round drops sticking to the glass, but also vertical streaks of more elongated drops, which is what is left behind when the heavier drops drip down the glass. I also noticed all drop kind of hang downwards due to gravity.
The first step is to model a few drops

These are low-poly spheres I’ve squeeze and generally mistreated using 3ds Max free form tools. As you can see, the drops are all hanging towards the ground to mimic the effect of gravity. You’ll also notice that I have two sorts of drops – roundish ones and elongated ones for the streaks. It is also important that the pivots of these drops remain at the centre of the spheres.
Next, create a plane approximately the size of your window pane. We will use this as support to paint our drop objects. For the painting, I use the SuperRandomizer function of the AdvancedPainter script. You can find my settings here:

I paint in two passes, starting by selecting only the elongated drops and painting the vertical streaks. Make sure you have no random rotation selected as all the drops need to point downwards. However, you can add a little scale variation for more realism.
Then select all the round drops and paint around the streaks. Note that no round drop should cross the streaks as the falling drops would have removed all of the water in their path. Instead of painting at random, I tried to distribute the drops in a logical way. My references showed they were all pretty much equidistant from each other. Also, you do not want two drops overlapping. I also added a third pass, with the round drops at a smaller scale to paint at the periphery of the map. This can all take quite a long time but it will ensure maximum realism.

The image above shows the finished scene with all drops painted. Of course, you can vary the density for a more-or-less wet effect. Here, I wanted my drops to collect at the bottom of the windows, as though the rain had sprayed on the windows when smashing on the deck.
Now we need to render our map by calculating a ZDepth pass of the scene using an orthographic camera. This will create an image with only depth information in it, which can be plugged straight into the bump slot of any material.

The image above shows how to set up the camera and the ZDepth render element. The range is used only to tell us what kind of depth information we need. In this example, we are not interested in anything outside the range of the camera, so we can input these values into the ZDepth element parameters.

The image above shows a close-up of the ZDepth pass.
All you need to do at this stage is to make the map tileable in your 2D application. In this example, I only needed the map to be horizontally tileable. I also added a lot of blank space above to accommodate for the upper part of the window, which is not wet. Black means no bump while white means maximum bump.
You can download the rain-drop texture map here
Now you can apply this map to any window pane object and its material. Bear in mind that the bump map should only be projected onto one side of the glass (there shouldn’t be drops inside the home). You can do this by selecting all the dry parts of the windows in your UV editor and make sure they are all mapped to the black part of the bump map (black = no bump).

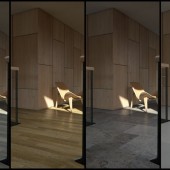
The image above shows how the glass material looks like when the bump map is applied. As you can see, the drops act very much like real drops, distorting the image behind them, even though the glass plane is just a thin box with no additional geometry. The map also plays well with in-camera DOF (I used the Vray Physical Camera), and generate nice bokehs where they are supposed to. Note that you cannot do post-production DOF on this kind of image.
You can find my glass material settings below:

As you can see, it is very simple.


Nice one, I have to try it. Thanks for sharing the map.
J.Pintor
Great attention to detail. This is an interesting technique, and probably much faster than rendering the water drops as geometry or applying an additional water plane. Thanks for sharing.
Hi Bretrand,
Its a great tutorial! thank you so much.
the glass material image is really small that i can read. would you mind send me a bigger image?
Also, i dont have Vray, do you think the material, camera and lighting will work with mental ray as well?
Thank you millions!
Mengli
Clever technique, thanks a lot. I use Maya and mental ray, but the idea is very nice and will work for me.
Thanks! 🙂
Thanks 🙂
can not find the map. it seems it’ been deleted . please upload it again
isn’t there anybody to respond about dead link? and share https://www.ronenbekerman.com/files/rain-drops-window-by-bertrand-benoit.jpgagain ?
MeHdeeYaghoubee The one shown here as an image is the one you can download… I’ll ask Bertrand for the larger one as the one I had here was lost in transit of servers.
this should be the link