


The Making of Island House with Blender
Pawel Pecherzewski showcased his Island House with Blender visuals not long ago and today he dives into the waters (pun intended) and shows us what you can do with Blender as your main tool of the trade. Also using Cycles, MAXTREE, and more.
Introduction to The Island House with Blender
First of all, I want to thank Ronen for inviting me to write about this project. It’s been a real test of skill for me, a summary of my Blender experience, and I’m excited to share some of the things I learned with the 3D community.
Another great thing about this is the opportunity to prove that Blender is a capable tool that can compete with the software that’s currently considered an industry-standard in terms of quality and workflow.
About me
Hello! My name is Paweł Pęcherzewski, I was born in 1997, and I live in Poland.
What am I doing here, you may ask?
My first contact with 3D software happened by the end of 2013 when I stumbled upon Blender when I was looking for fluid simulation results on YouTube (for reasons unknown even to myself) and wanted to try it out.
I quickly started to realize that it’s capable of much more and started learning the basics from dozens of YT tutorials.
Around 2015 I noticed the trend of arch-viz in the Blender community. Since there was an ongoing house renovation at my place, I decided to help my parents out with some basic visualizations of the wall paint colors and patterns. And that was probably the turning point for me: Something I’ve always liked about 3D – the ability to take an idea that’s only been in your head and bring it to life, to show your thoughts without describing them.
I currently work as a freelance artist doing mostly arch-viz, but I also enjoy product visualization and environment design. My goal is to either work in a professional visualization studio or game-dev.
The Island House with Blender Scene Setup
When it comes to working with large projects, Blender doesn’t like working with large projects. There’s nothing a user can do about it apart from getting better hardware (I noticed a significant improvement when I doubled my RAM to 16 GB).
To circumvent that, I split the scene into smaller chunks. In this case, I have one file for the house, another for the garden, and the final, biggest one for the whole island. It looks like a Russian doll when I link the files together but works well and allows for edits without waiting for astronomical amounts of time for basic operations.
A general rule of thumb is to keep every file’s size below 1 GB or ideally 500 MB. The size doesn’t increase when the files are linked, but that also means you can’t edit linked objects within another file and have to jump between them when there’s something to tweak. It’s usually not a problem because I often focus on one thing at a time.
I highly recommend organizing all the objects using the collections system. Not only does it speed up the work when we want to find an object, but it also lets me disable entire groups of objects from view or renders in one click—the more specific your collections, the better. I also like to make one collection for all the objects that I want to delete but might want to use later. It’s always disabled from all the views but is a great backup option.
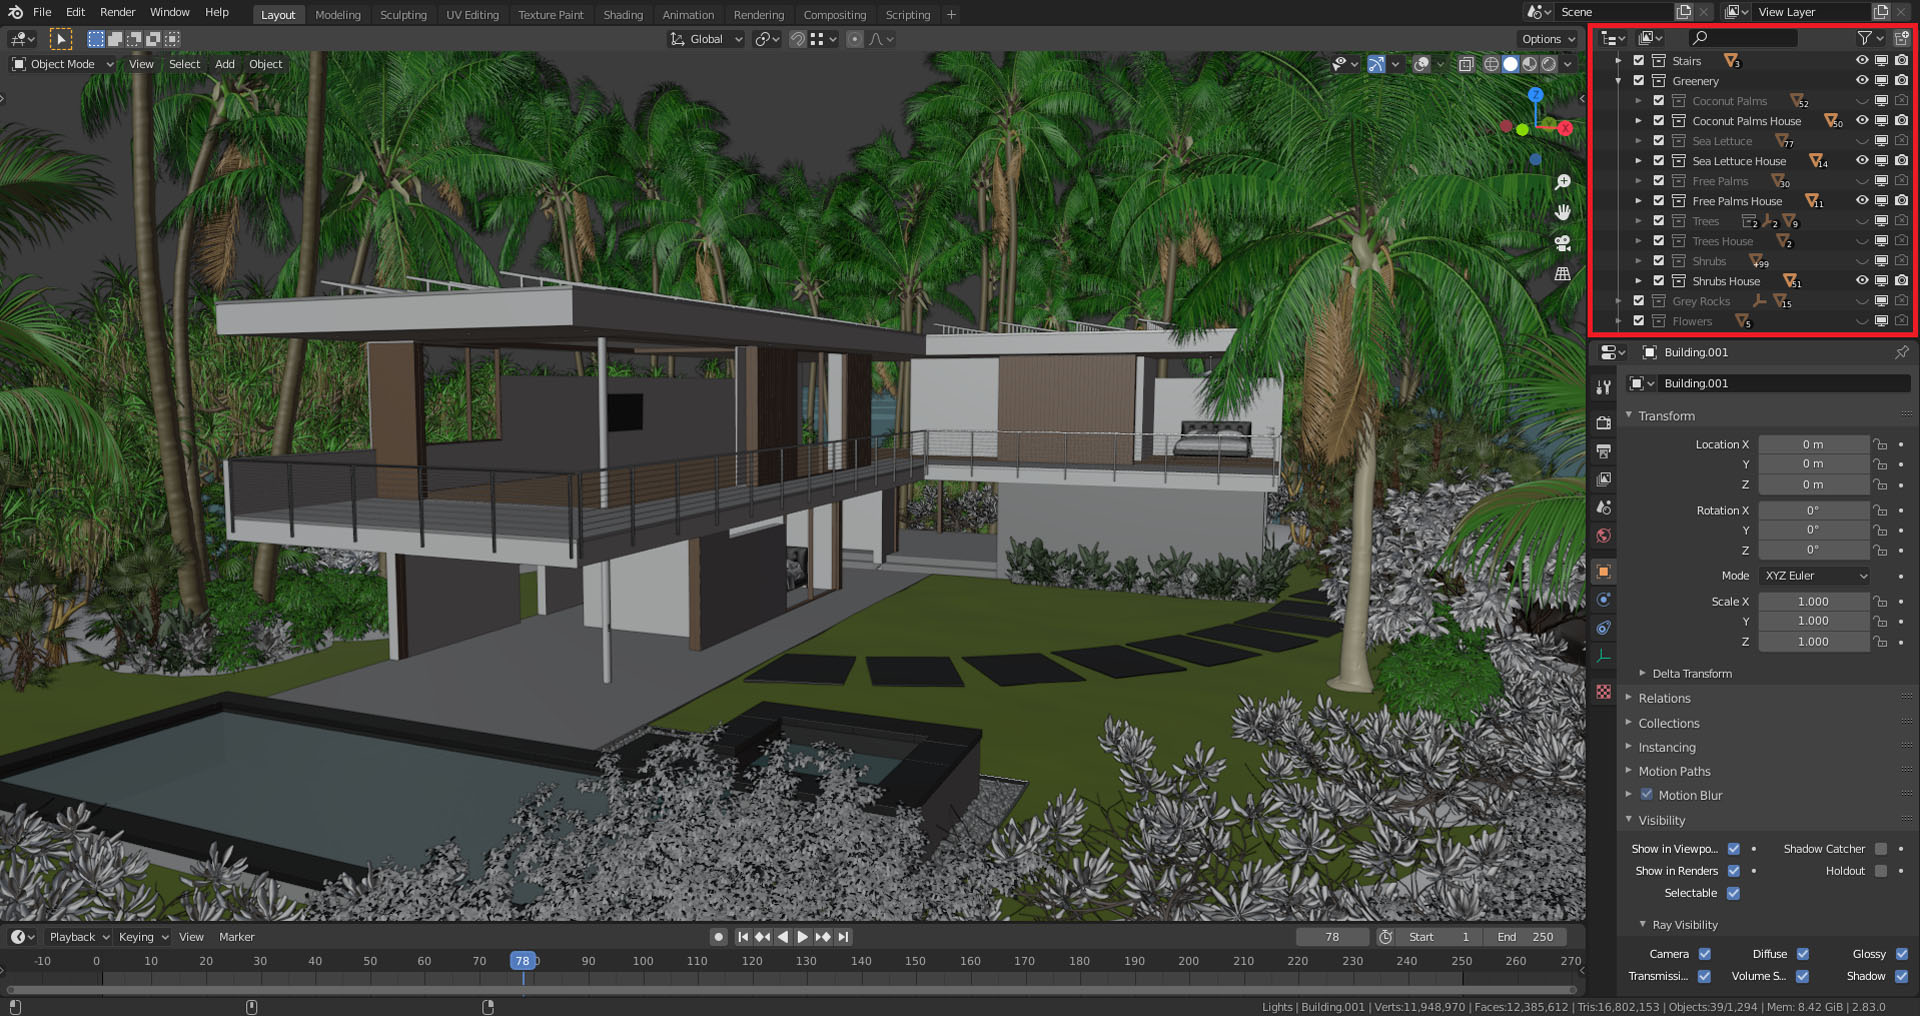
I organized my foliage based on the type and proximity to the house for faster switching between the different camera angles
References
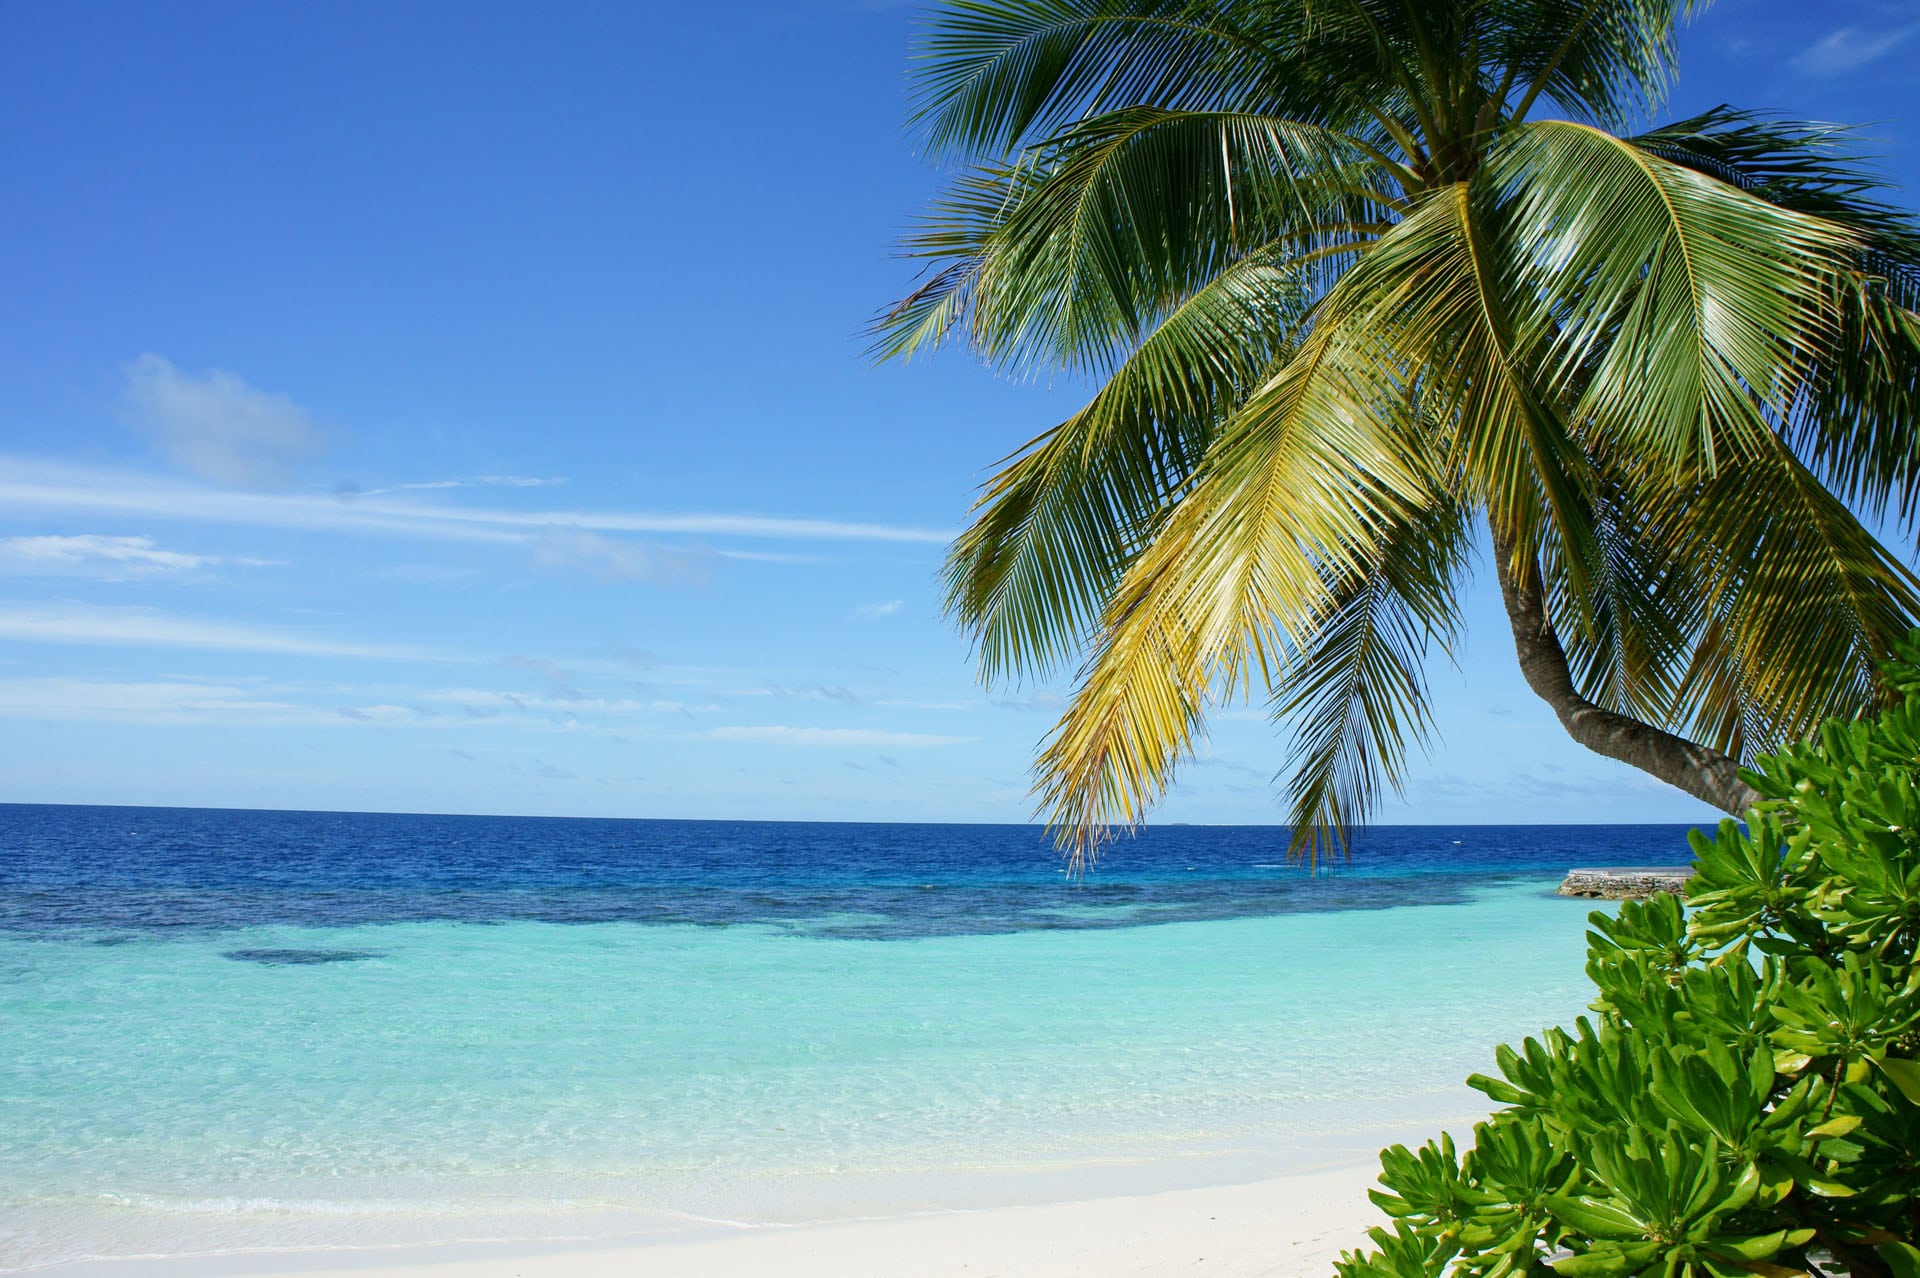
The topic of a tropical island is something I’ve wanted to explore for a long time. There’s nothing that could compare to the crystal clear, blue waters, white sand, and palm trees leaning towards the ocean.
I want to capture that beauty and share my vision of a place in paradise. And as with every project, it’s crucial to gather enough references both for inspiration and to have something to base your models and materials on.
I was looking for tropical beaches (mainly in Seychelles, Maldives, and Polynesia) and rocky islands from all around the world (though I wanted to stick to those in tropical areas). Another important thing was the reef that had to surround my island, and for that, I’ve been using both photos and satellite images from Google Maps.
And I can’t forget about the house itself. All the photos & plans can be found on ArchDaily, so there’s plenty of information to work with.
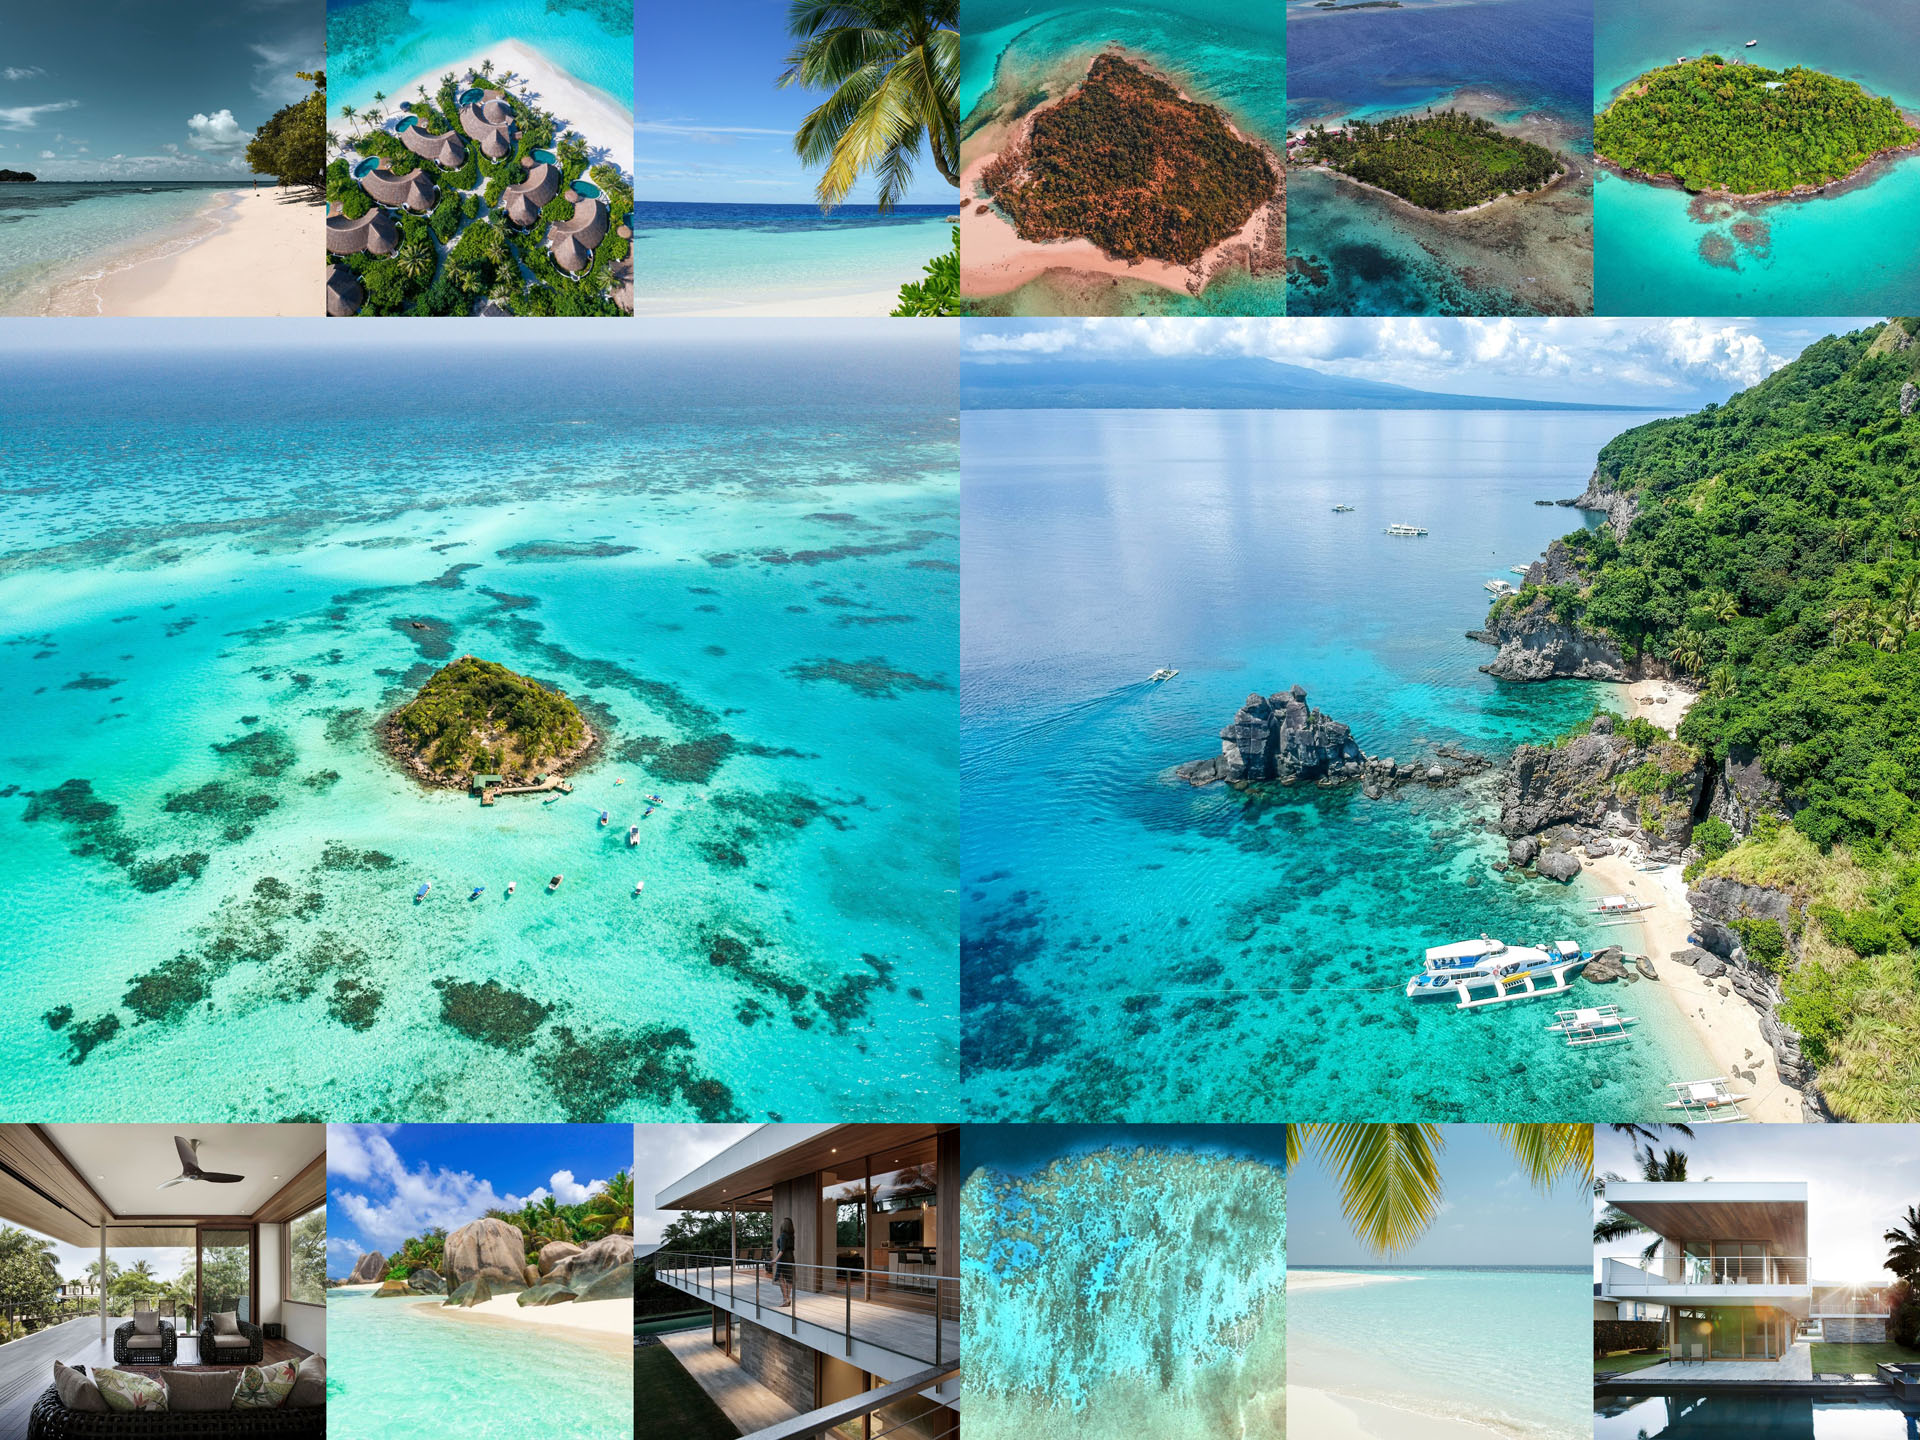
Some of the key references for this project
Building the Island House with Blender Scene in 3D
3D House Modelling
For complex projects, it can sometimes be challenging to start, and the best solution is, to begin with the simplest thing. For me, that was the house itself. However, I wanted to note that I’ve done some basic modeling a couple of months before starting the entire project as a simple practice, not even planning to use it in this project – more so because it didn’t even exist in my head at that time.
Making architecture, especially contemporary and modern, is rather simple in Blender. And since the architect shared the floor plans and elevation of the Island House, there was no guesswork. I started by importing the floor plans as a background image and extruding a single plane to match the walls. Then I extruded them up and so on until there’s something that resembled my reference.

House’s base mesh with visible edge loops
But that was months ago, now we jump back to today, and it’s finally time to give this bad boy some details. I used Blender’s Archipack add-on to generate a floor that I used as the wooden ceiling and cut to shape using a boolean modifier. Then I used parts of that ceiling to make wooden walls. Remember, it’s always good to reuse things in your projects to save some time.
The part I hate the most when it comes to modeling is windows. I just dislike something about them, but there’s no way around it since add-ons weren’t capable of generating the right type of fenestration. Fortunately, there were only two window models that I had to make to more or less match the reference: regular windows and railing windows. Luckily, what I found in the original photos was a huge relief as there were no complex shapes, and I could resort to some elementary geometry with bevel and a glass panel in the middle. Then it’s just a matter of duplicating one model and editing it to match its place in the wall.
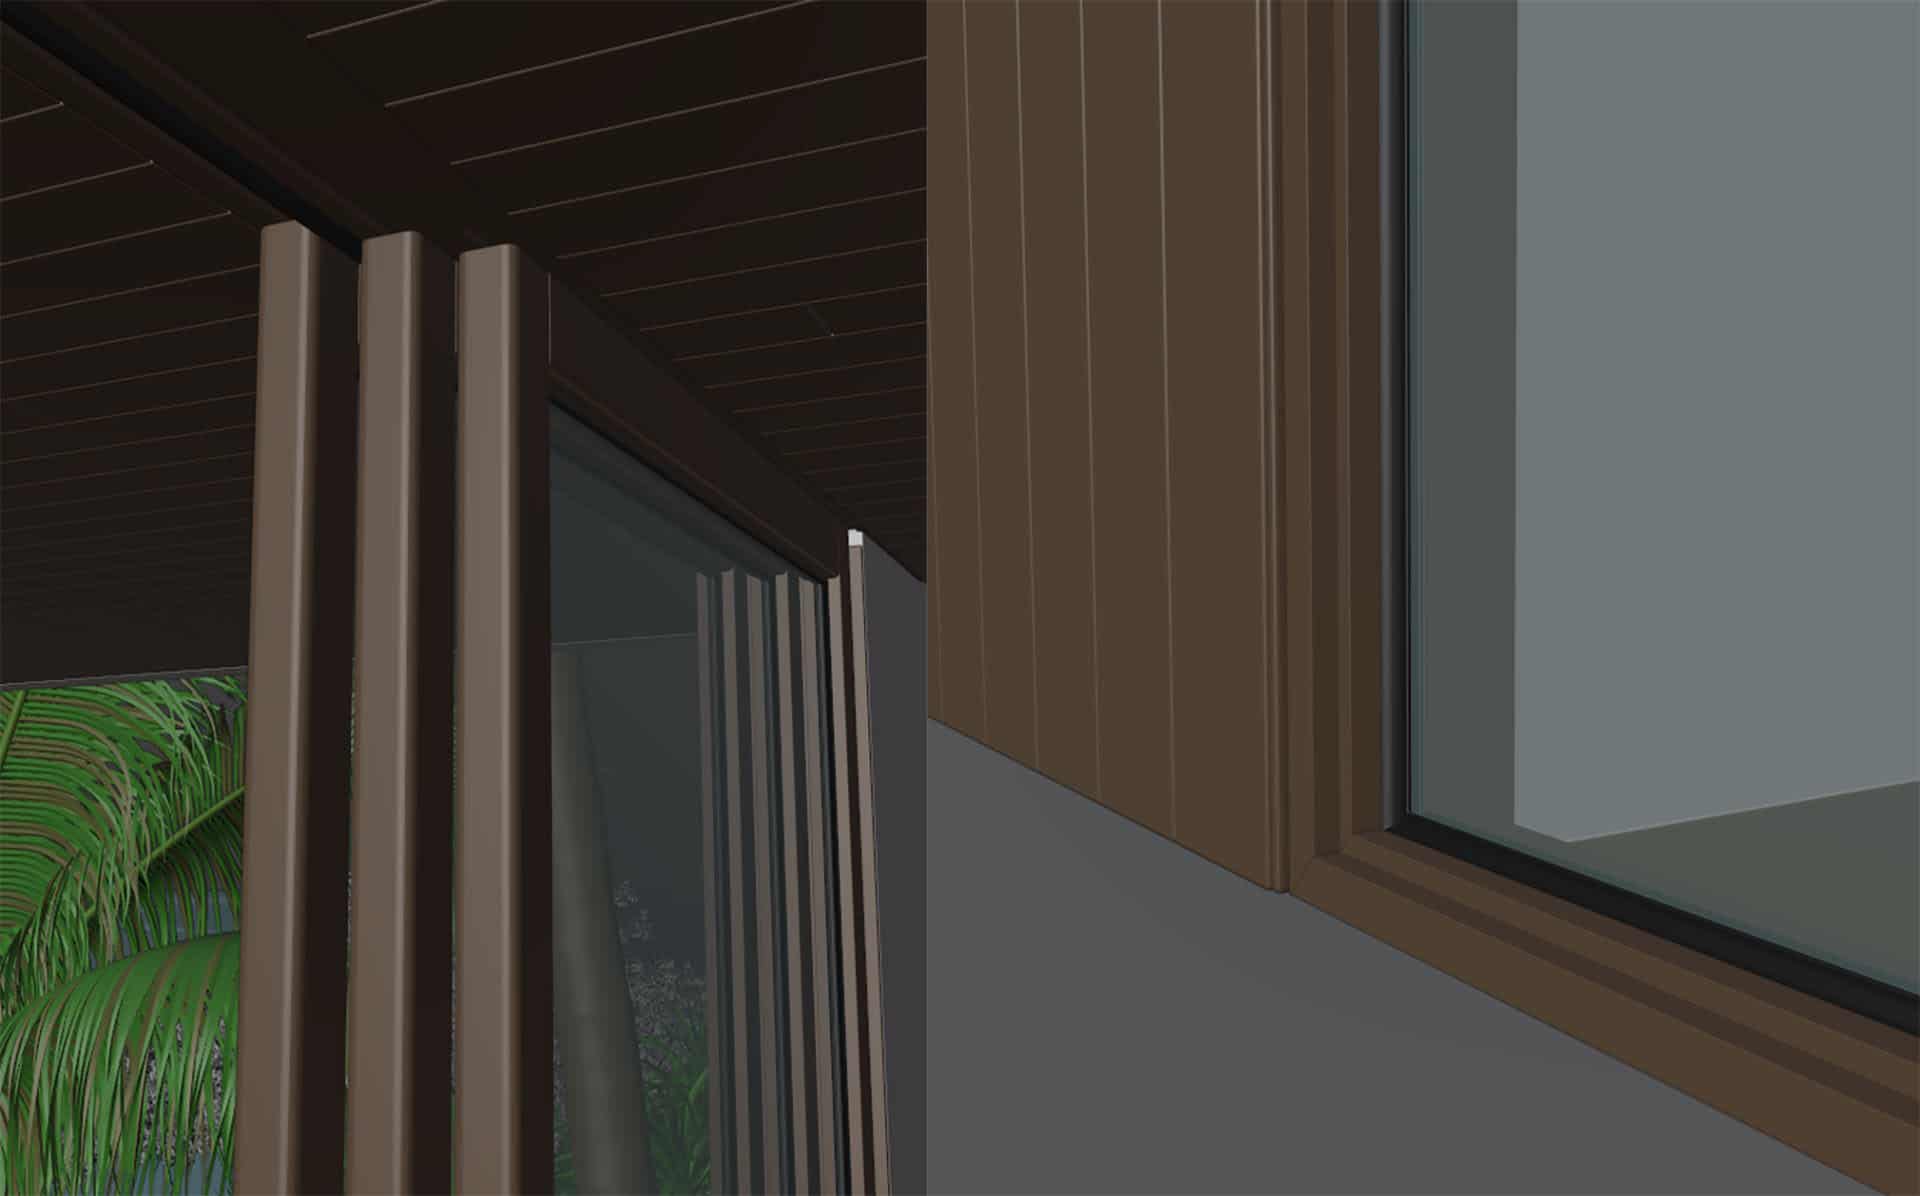
The last step is to add details. These are usually the things that we don’t notice in real life, but they have to be in a render, or else, something is going to feel wrong. I often get carried away when working on those small things. I like to add thin metal sheets if I see something shiny in a reference, shadow gaps, seals in my windows, etc. If there’s something that you can see and identify in a photo, you should probably add it to your scene.
Pool Water
There are lots of tutorials on how to make realistic pool water in Blender. You can achieve water ripples and small waves using procedural noise in the shader editor. However, there’s a more realistic approach that considers the shape of your pool and whatever objects you might want to throw into the water. That is Dynamic Paint.
You need two objects—a flat plane, the shape of your pool, and an object that will move the water. In my case, that was the cube that acts as a waterfall, creating ripples from the pool corner. You set your water plane to canvas and the other object to brush. Then, you can animate the brush object moving up and down, and when you’re happy with the result, just apply the modifier to save it.
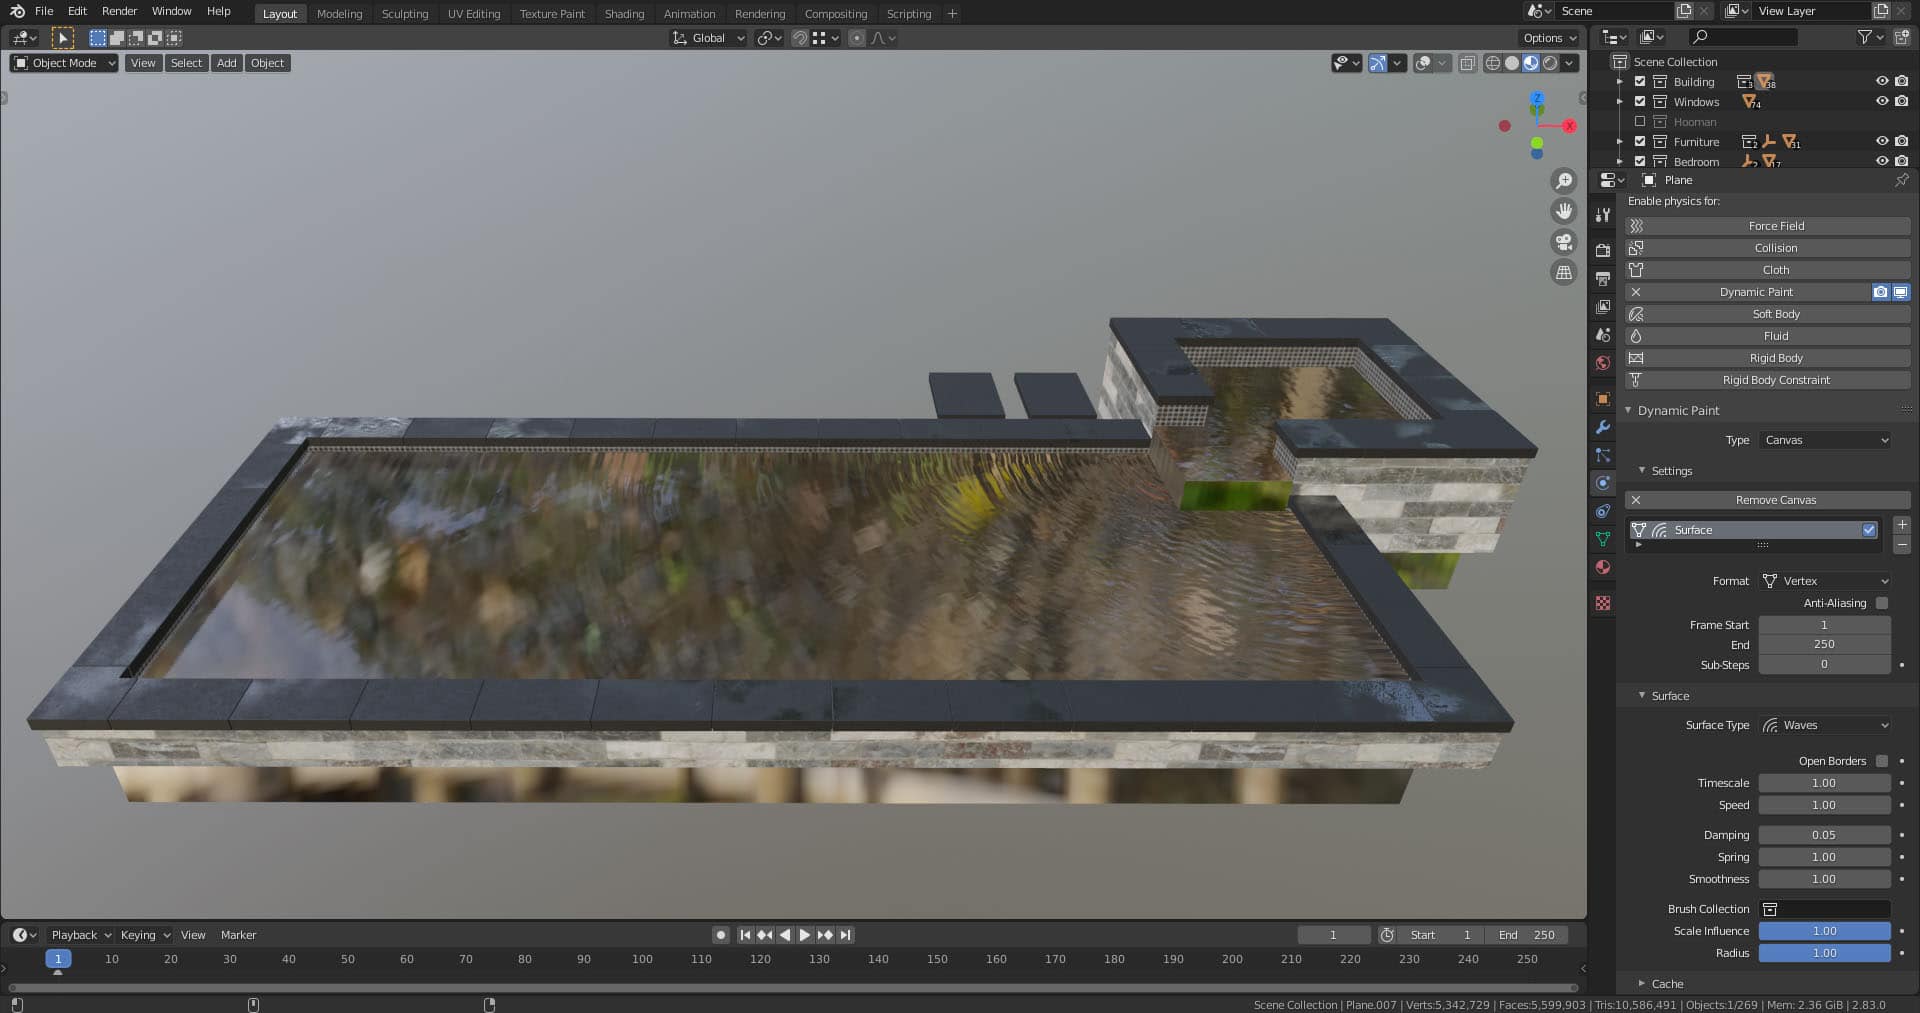
The finished result along with the canvas settings that should work well. But it’s good to play with it anyways to get the result you’ll like. The default settings for the brush will work just fine.
3d Island Formation Modelling
Making an island might feel overwhelming, and so it did to me at first. However, it turned out to be an enjoyable process. It felt more like it was already there, and my job was to discover it. I can tell you it’s the right mindset to have if you want to enjoy your work.
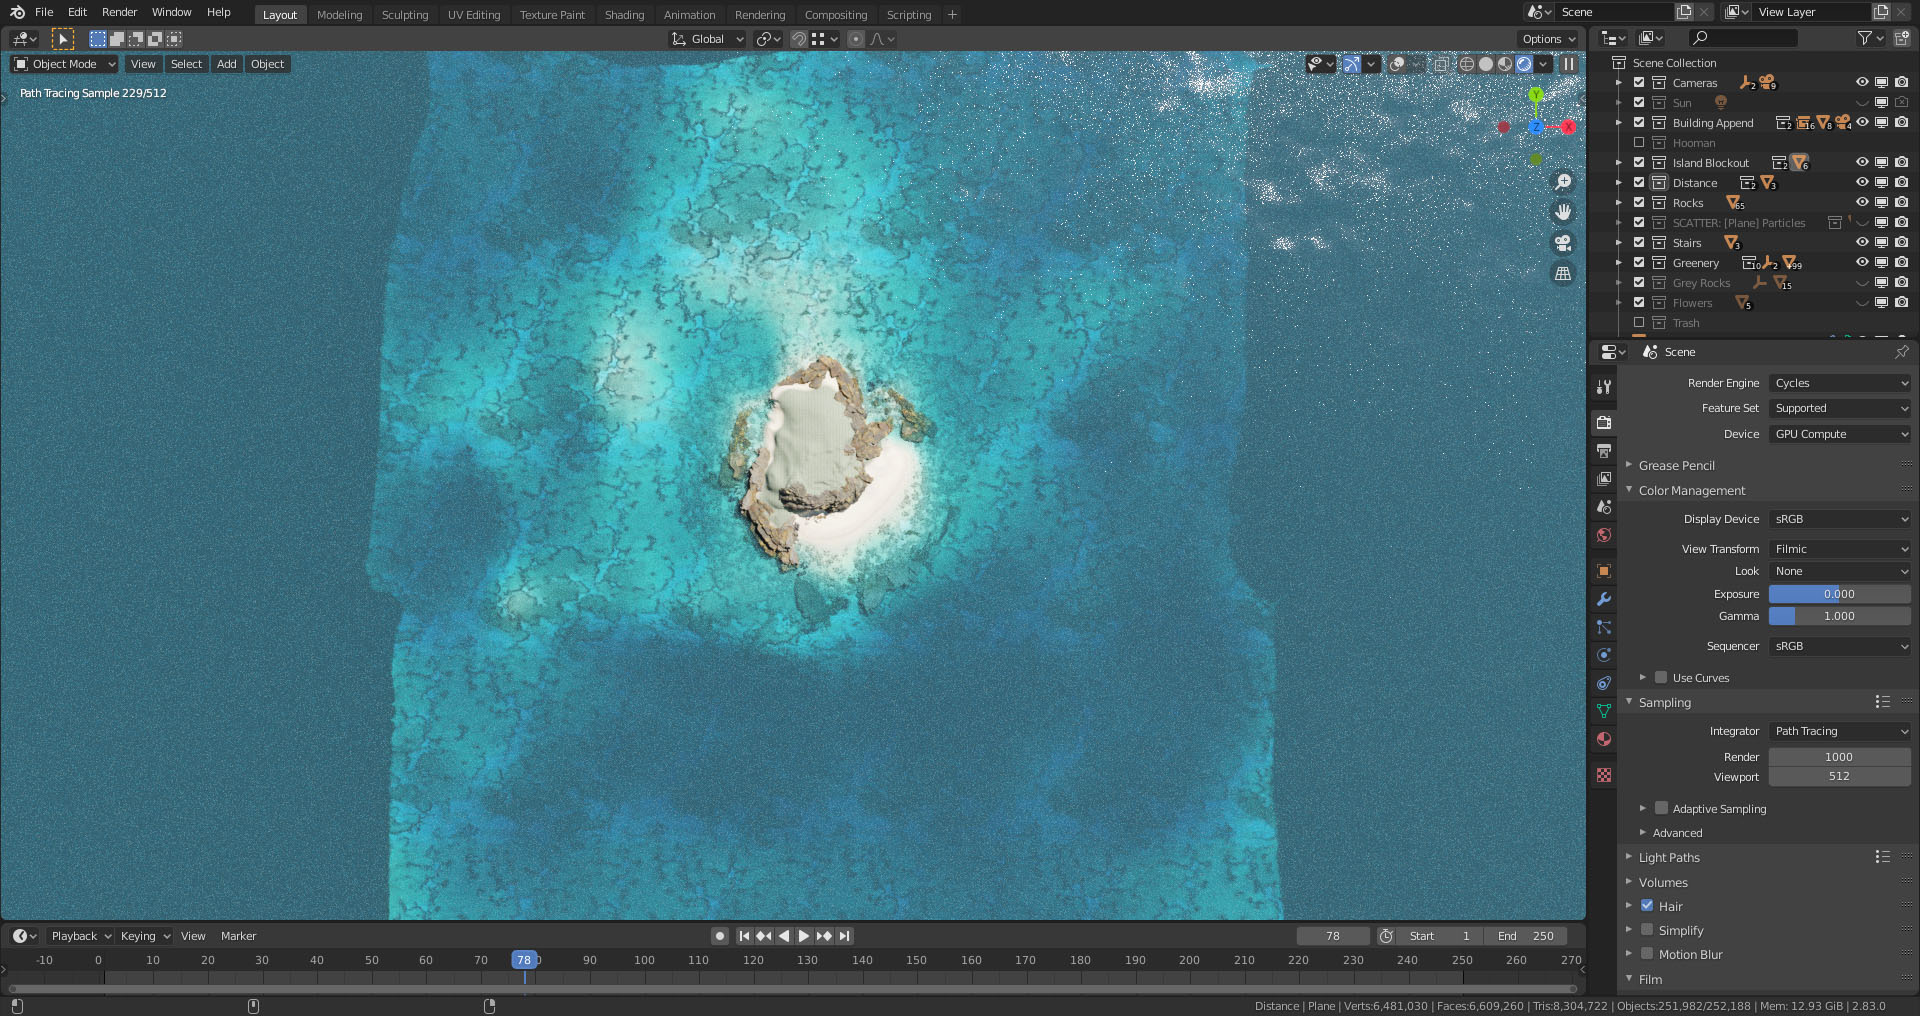
I started with two basic models. One plane will be my ocean and another one to become the seabed and the island. At this stage, I also gave my ocean a glass shader and volume absorption to better understand the depth.
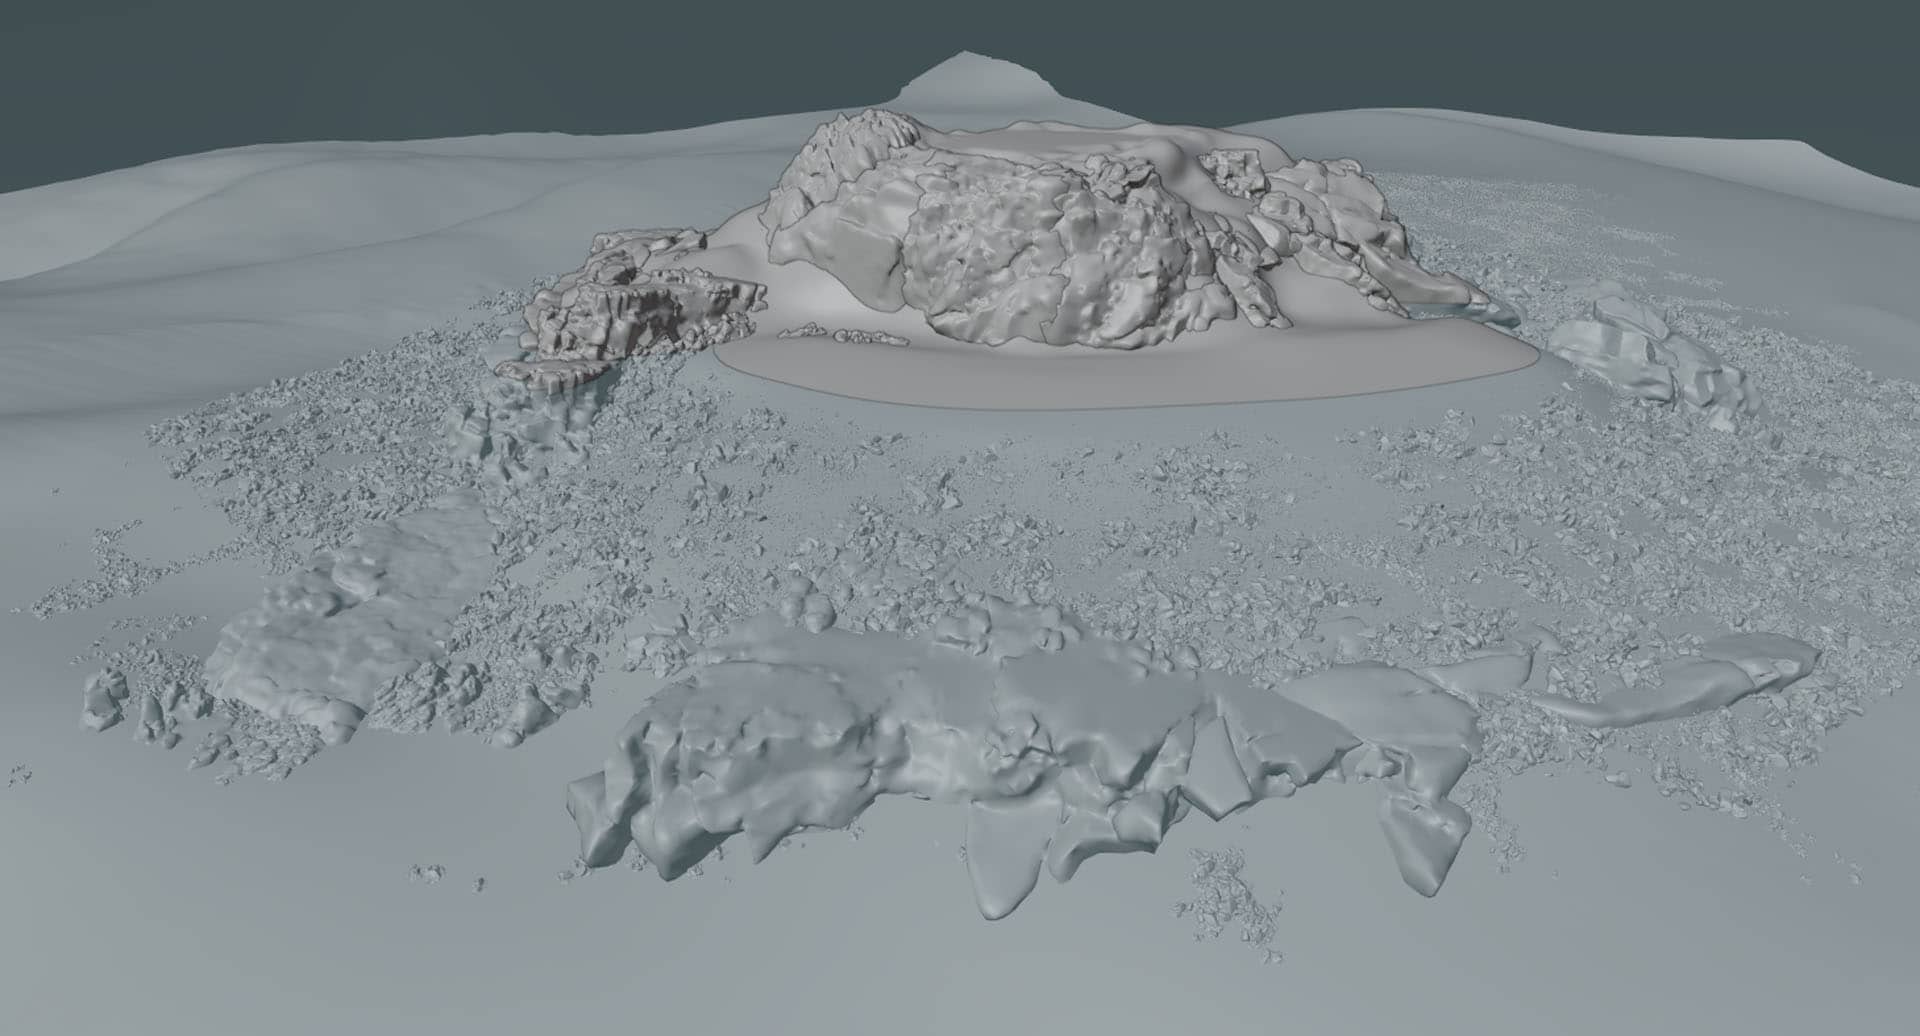
For my modeling, I used Blender’s sculpting tools. I enabled dynamic topology as I didn’t know where to put more detail and where it won’t be that important and started sculpting. At first, there had to be some land in the middle. Then I made a cliff and a piece of flat area on the top. Then I added some random shapes here and there to break up the regularity and imported my house model to see how it looks on top of its new place. I also sculpted the seabed a little to make sure that there are variations in the water’s color. Lastly, I got rid of any hard shapes using the smooth brush, set my first camera angle, and gave it a test render.
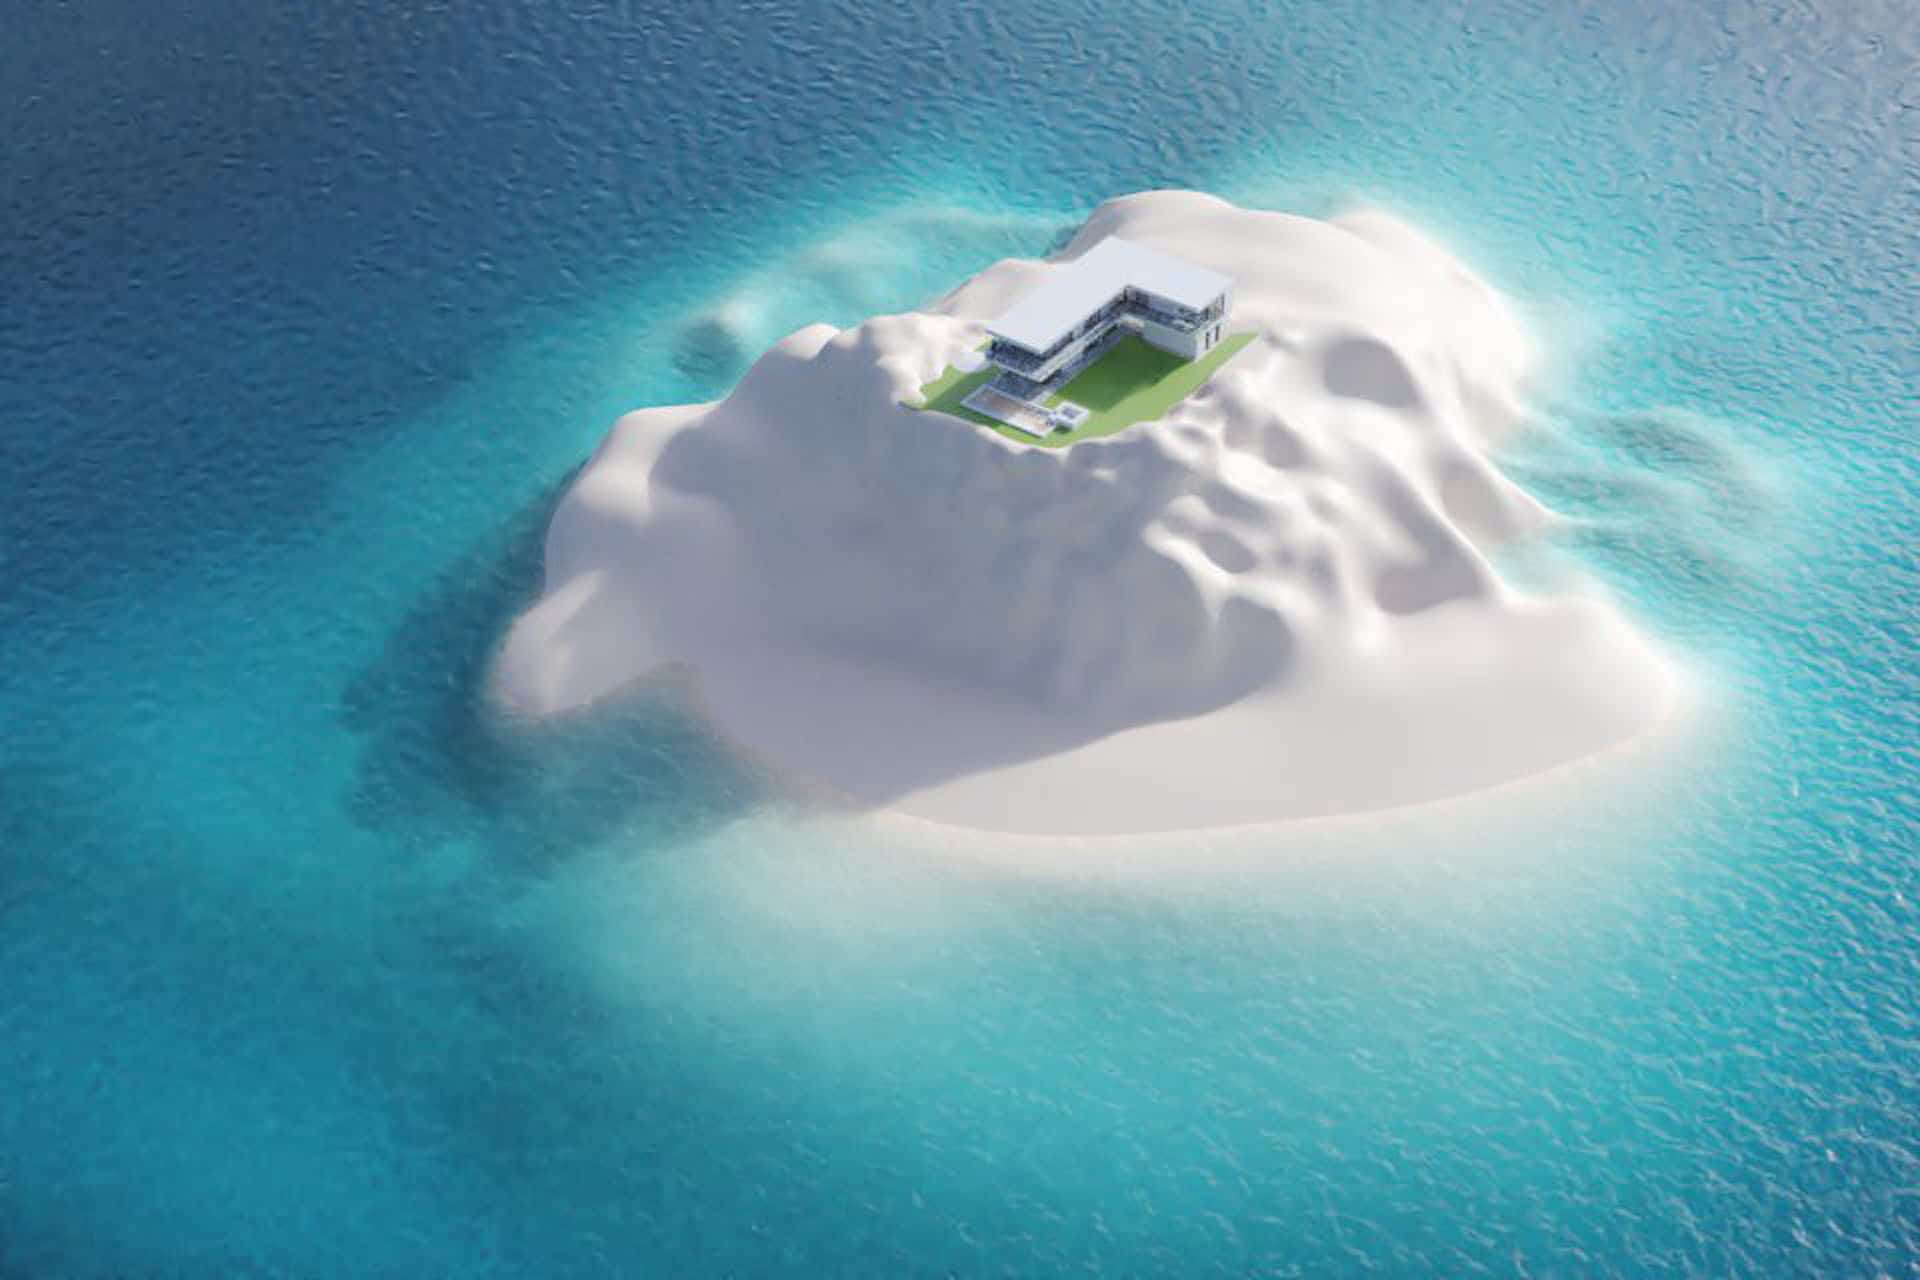
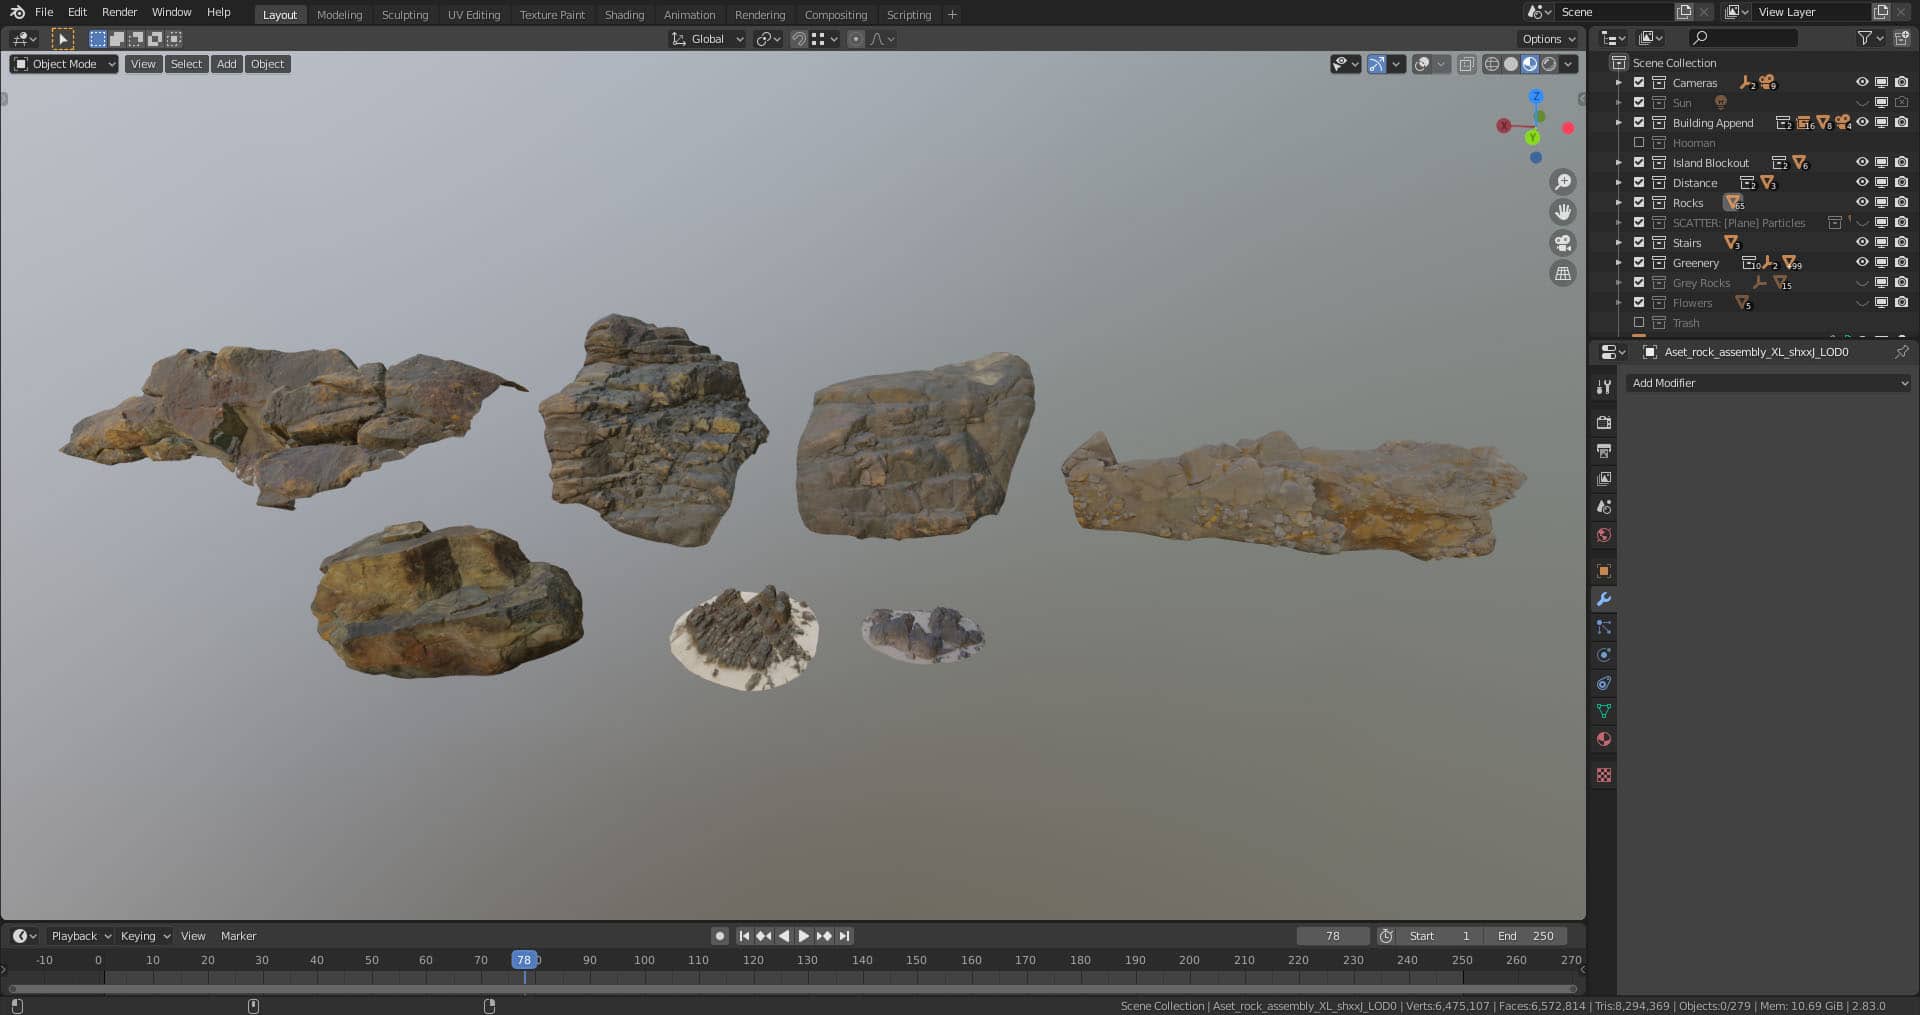
With the island above the sea level, it was time to add some rocks, and since the original house is located in Hawaii, I wanted to give this area the look of a volcanic islet. For that, I used a couple of models from Megascans that I duplicated and scaled to fit the right places. They often required some minor modifications, for which I used a proportional editing tool that allowed me to grab and shape the rocks into all the shapes I needed.
But what are those places, you may ask. Well, I thought where the sand would need support to hold its shape. Rocks have to be in steep areas mainly. Hence the rocky cliff in the front. I also wanted them to submerge, creating something more of a subtle height gradient.
I also placed some rocks underwater because we can’t forget that since it’s an island of volcanic origin, sea bottom will also feature many rock formations. But that wasn’t enough for a realistic seabed. I needed some smaller rocks scattered across the sand to look like a reef, and for that, I used some smaller Megascans assets and Scatter add-on that quickly creates particle systems along with density and size maps to control the look of the system.
The 3d Reef
Rocks are great when you need more realism in your scene, but when you’re making a reef, you need to go further. I’ve already had high definition details near the island, but I can’t stretch a particle system far enough without making my PC sad about its processing power. Therefore, I used a reef satellite image, made it seamless using Photoshop, and extracted height data from it using a blue filter. In a regular reef image, the depth of the blue goes along with the water depth, which can be used to make a reasonably accurate displacement map. I used it to create height variation below the sea level, along with the color map (I had to adjust the colors and take the blue away because my water shader provides that anyway), perfectly faked a real-life reef.
3d Foliage
When working on an exterior, there’s no escape from greenery. The easiest way to deal with it is to use pre-made assets, and that was my primary approach for this project.
I got most of the models from MAXTREE, but since they’re not (yet) providing models for Blender, I had to do the materials myself, using the maps that come with the packs. It also allows for more control over the look of the Foliage. For instance, I wanted to make sure my coconut palms look freshly green and a bit scorched by the sun. To do that, I used the vertex color layer that models came with and used it to make some of the leaves and stalks more yellow, which I’ve commonly seen in all the references. Also, when working with pre-made assets, it’s good to spend some time making variations. I made all the coconut palms from the three default models (one was a group of 3 palms that I separated). Real-world is too random, and the human eye will always notice repetition, and the bigger your scene is, the more varied your assets should be.

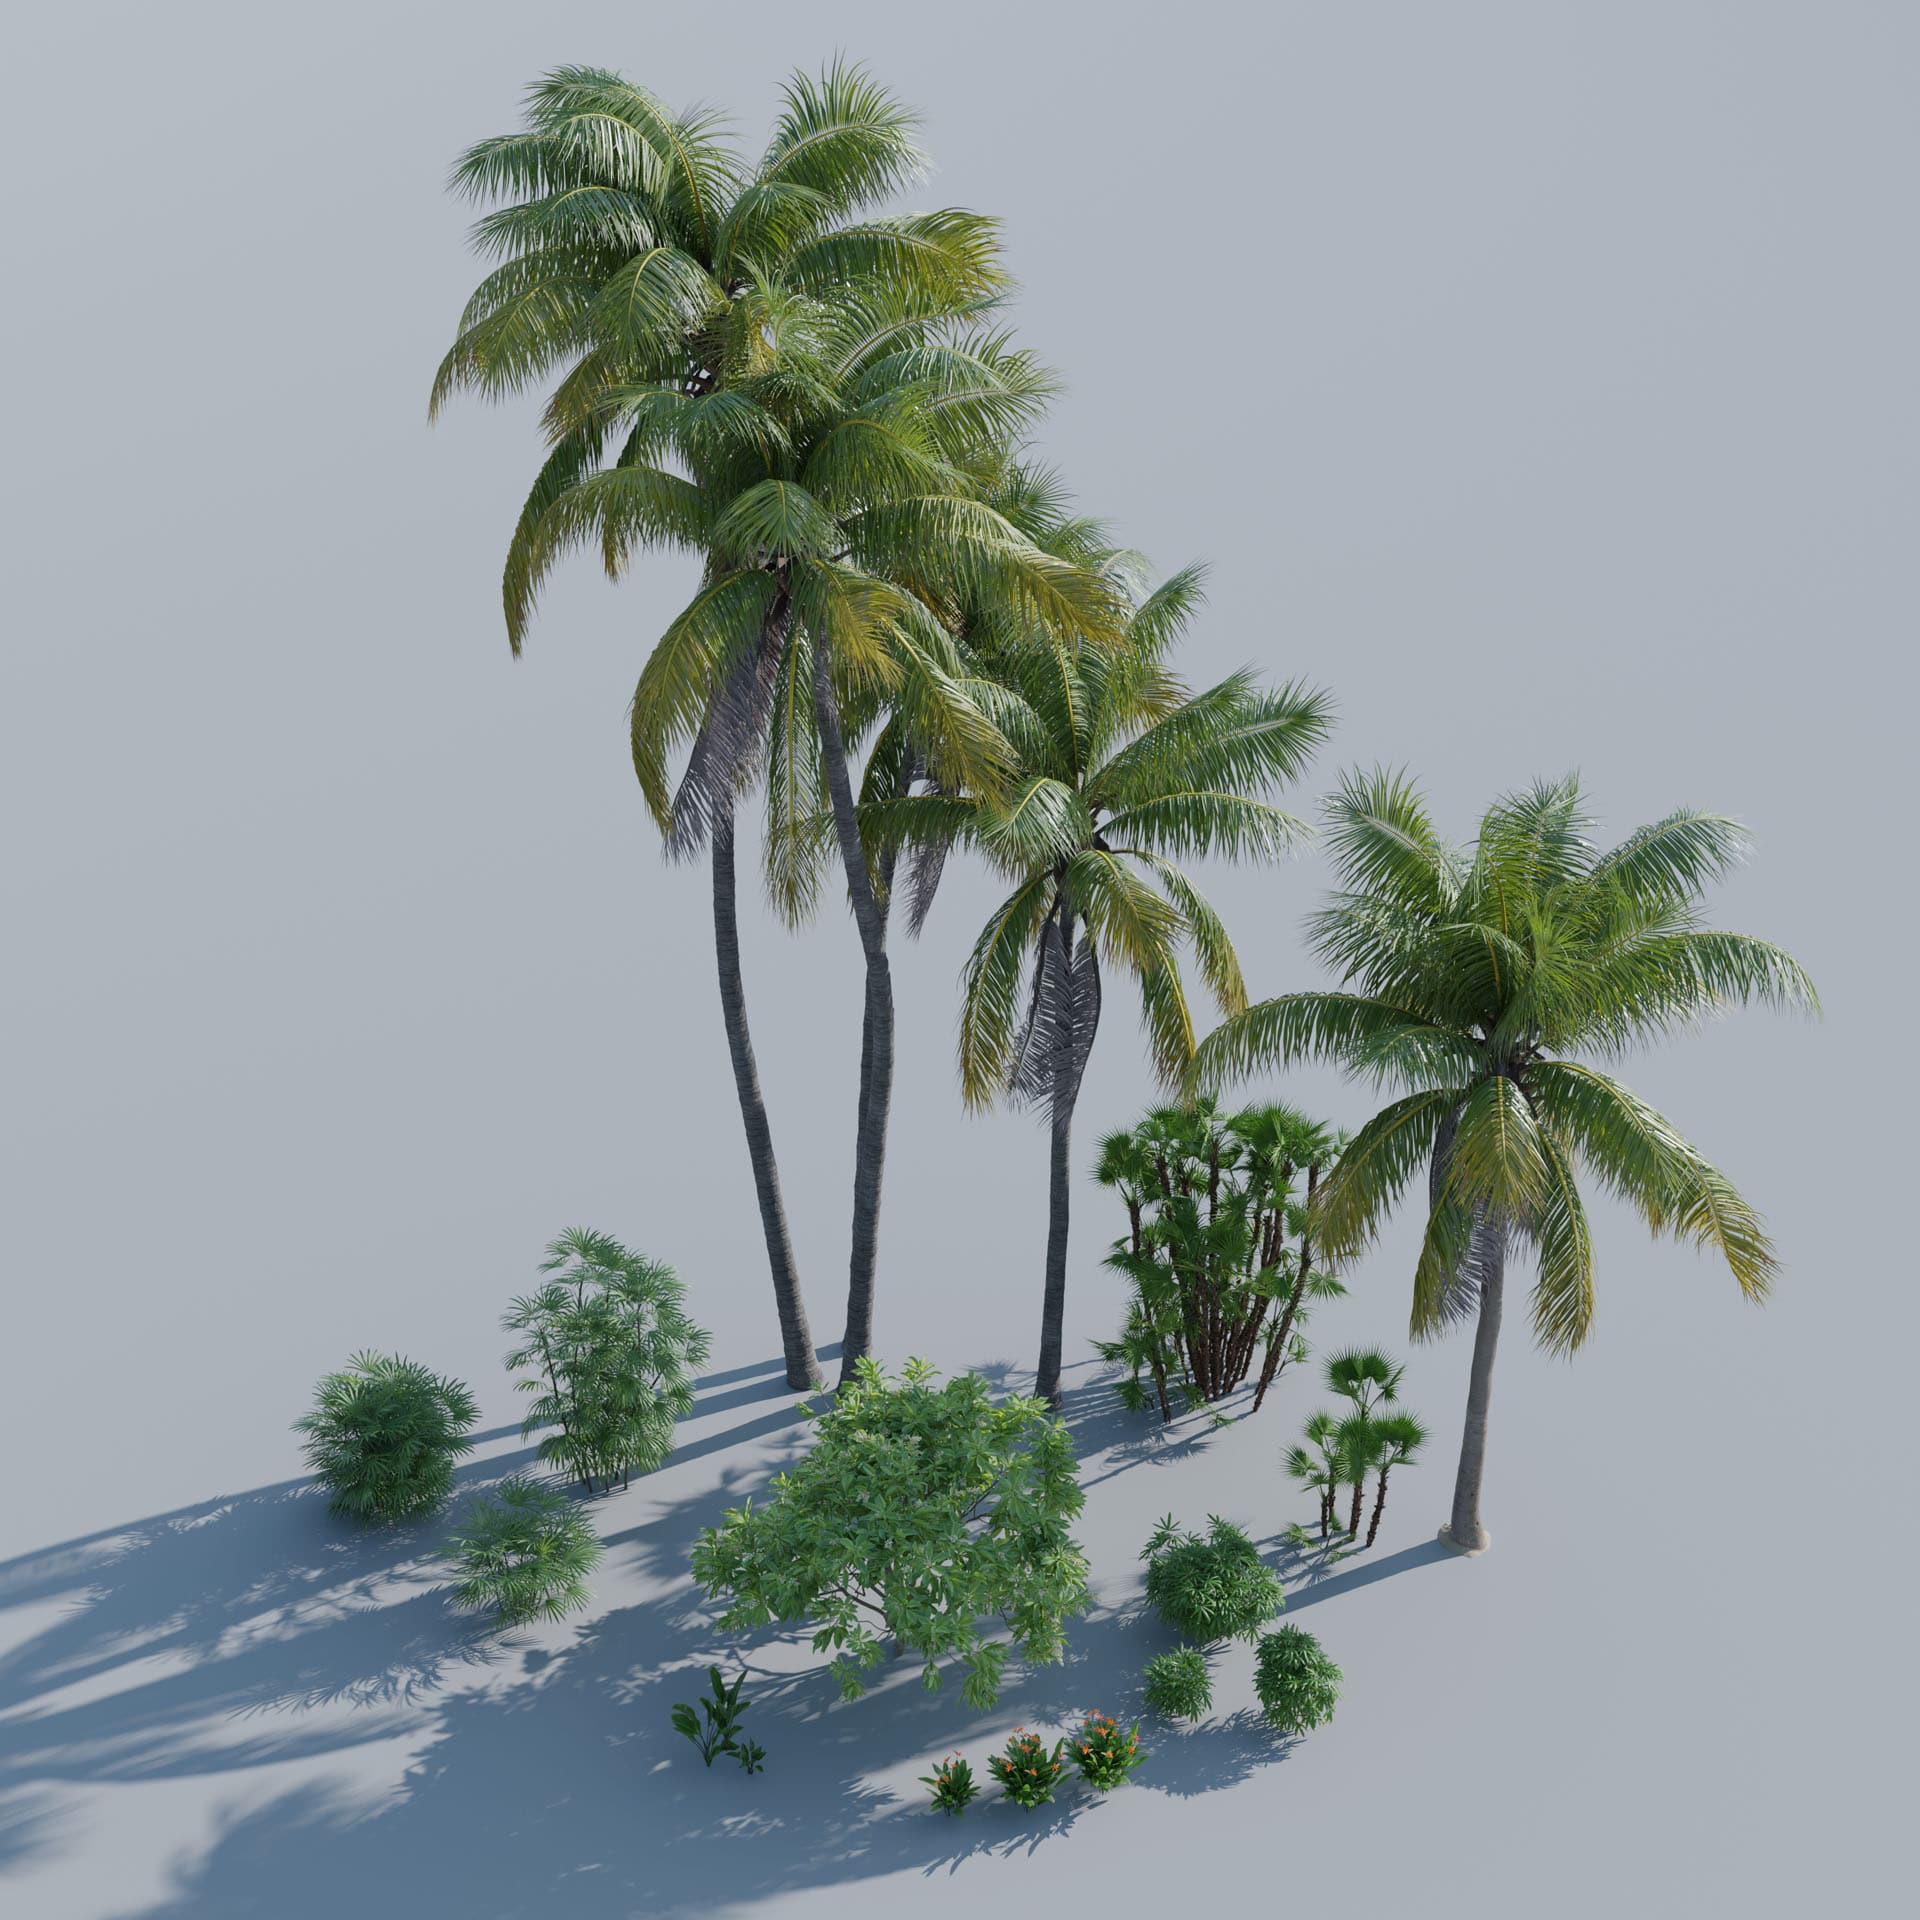
Some of the models I used in the “wild” parts of the island
Other models, like trees and shrubs, were made using The Grove 3D add-on. The one plant that’s been particularly challenging, however, was beach naupaka (Scaevola Taccada) that you can see in the middle of the above picture. It’s one of the most common plants growing on almost every tropical beach, and yet, there are no models of it. At first, I wanted to use some tweaked twigs of Ficus Lyrata, but that’s just lazy. I needed that plant, and if it wasn’t going to come to me, I had to make the first step myself.
Reference image for Scaevola Taccada
I’ve found a great shrub model on Evermotion (I used it near the house by the way), and since the leaves on it were arranged in a way similar to my target plant, I decided to use it as a base. I cut off two twigs from it using edit mode to later use them in The Grove add-on that will distribute them on any tree or bush it generates. The texture wasn’t right though, and since as I’ve said, there’s no naupaka leaf texture out there, I took first, the most similar material I could find on Megascans.

Original shrub from Evermotion and albedo map from Megascans
I then entered the edit mode and adjusted the twigs (probably beyond recognition) to bring them even closer to the look I’m after. I cut off tips of some leaves and extruded the edges since the naupaka leaves are usually a bit curled. I also adjusted the hue and saturation of the original texture and increased glossiness as the original map made it look too rough, which didn’t match the real-life counterpart.
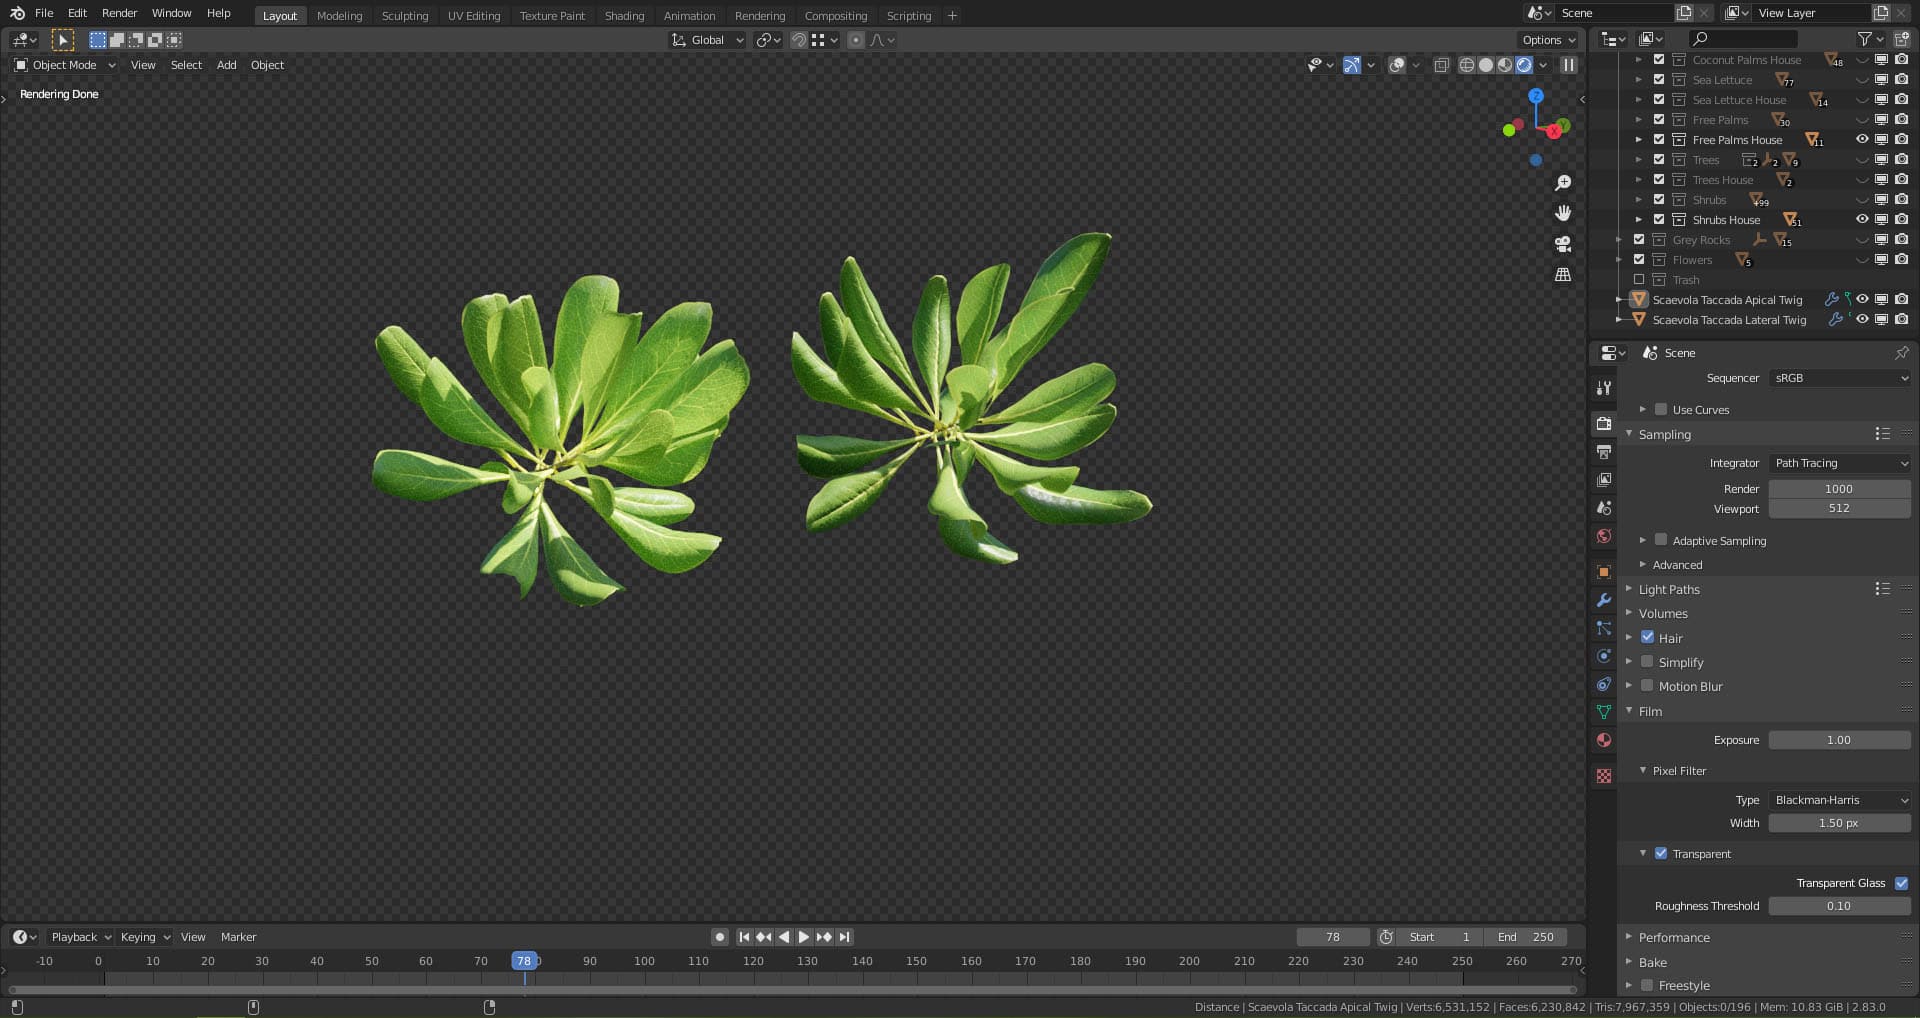
Finished twigs
To make the shrubs, I used the Japanese Cherry preset and used a box to act as a blocker to restrict my naupaka to a more reasonable height. I let it grow as four separate models that interacted with each other, simulating real-life plants that compete for light and don’t intersect. It gave me four models that could be used as puzzle pieces that will always fit regardless of their rotation, allowing for infinite tiling.
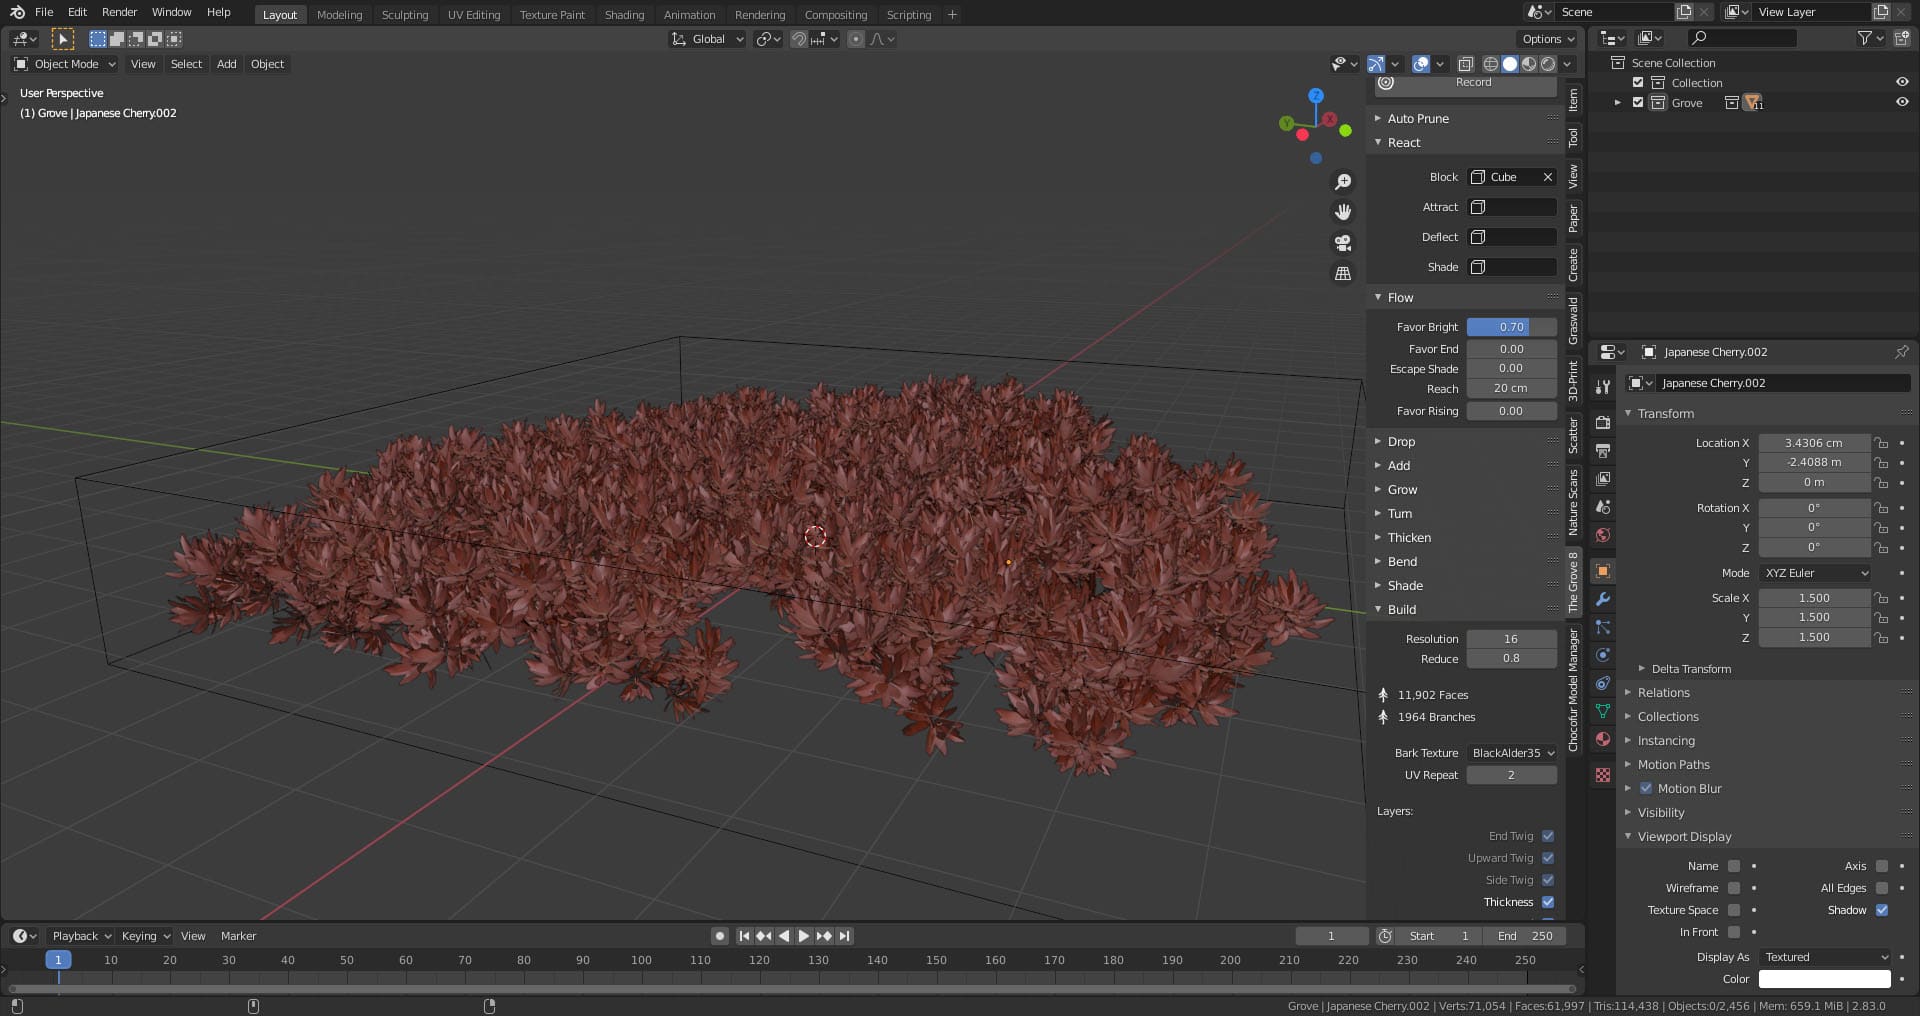
Finished simulation result
With all the building blocks ready, I could finally populate my scene with those gorgeous oxygen generators. I wanted to control the look of everything, so I distributed the coconut palms using the Scatter add-on and converted the particle system into objects. What’s great about that operation is that it doesn’t just duplicate the objects but makes them share the same data, creating instances that reduce memory usage during rendering. I then removed palms that were intersecting each other etc.
Other models were hand placed at the spots where I thought they’d grow in nature. That is flat spots, moderately steep walls, and big crevices in the cliffs. It was probably the most time-consuming part of the project (aside from rendering) but allowed maximum customization that’s not usually possible with particle systems.
The House Area
For the garden, I decided to use models with higher polycounts. I wanted to make sure everything looks smooth, considering closer camera angles. I also used some different plant models that would fit the garden setting more than the wild Foliage that’s scattered around the island. To avoid repetition of the same palm trunk, I decided to use some of the Megascans’ trunks that I extruded and combined with my bark texture (from Poliigon).
Most of these assets come from Maxtree
When it comes to lawns, I like to save time, and thus I didn’t bother creating a new set of particle systems and decided to use one that has already worked in my past project that’s also in a tropical setting. It’s using Graswald models, which I think are one of the best in terms of realism that you can get. I used two cut grass species, one smaller grass type in clumps, some plantains, dandelion leaves, clovers, and dead tree leaves on top to create variation. All that is distributed using a cloud texture with different coordinates for every system.
The geometry generating grass is a subdivided plane with a boolean modifier to cut away the path blocks. On top of that, I always add displacement to make the ground slightly uneven since there are no lawns with the perfectly ironed surface below the grass. The last level of imperfections is within the grass shader that simulates slight color variations across the lawn due to the different amounts of water and light: weaker grass gets more yellow/brownish.
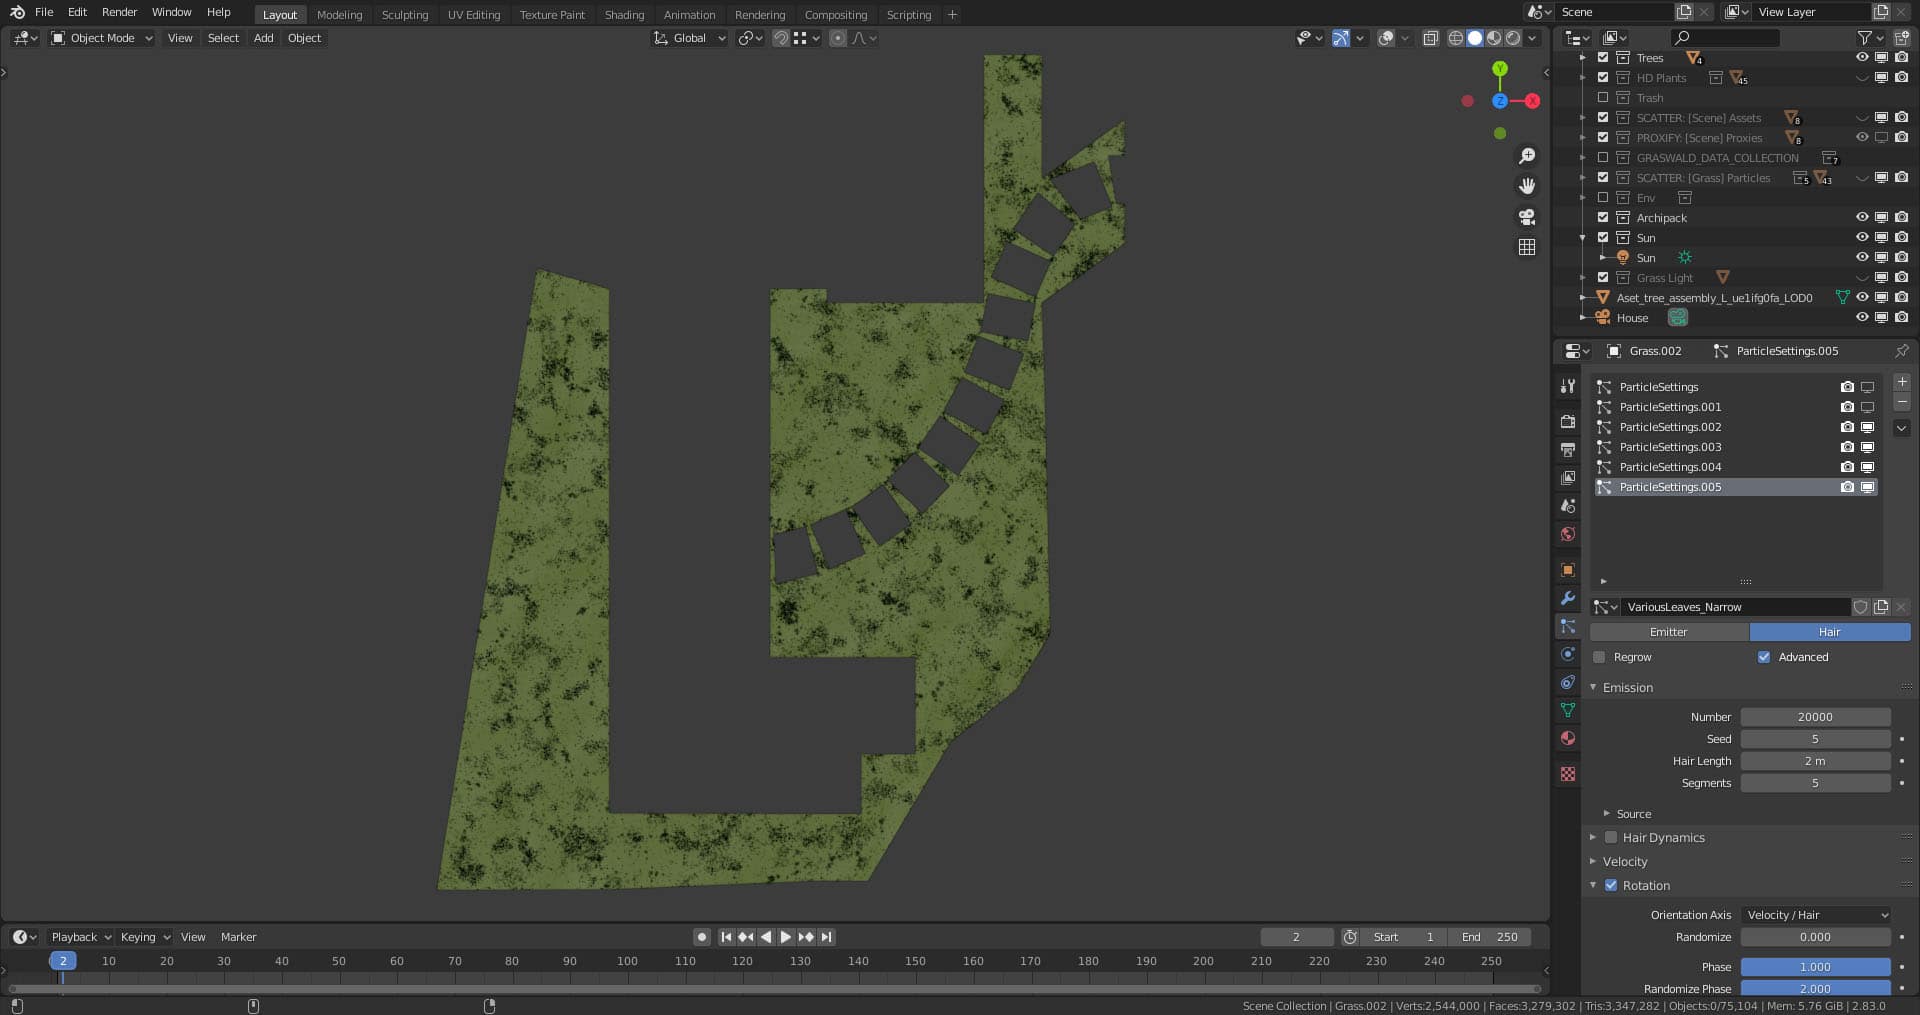
Preview of the grass plane
Materials
Making shaders is one of my favorite aspects of every project in Blender. Connecting nodes and seeing how everything comes together just feels great and is hard to explain.
For this project, I had to resist the urge for using high-resolution maps because that can quickly eat all the memory needed for rendering, and with big scenes, it should be enough to handle 2048 px or even 1024 px maps.
I base most of my materials on the Principled BSDF node and try to keep things simple with just the maps for color, roughness, and normal. But sometimes it just doesn’t work. At all. Below are some graphic node images and viewers discretion is advised. I’ll try to break down some of that spaghetti mess into a more digestible description, though.
The Island Material
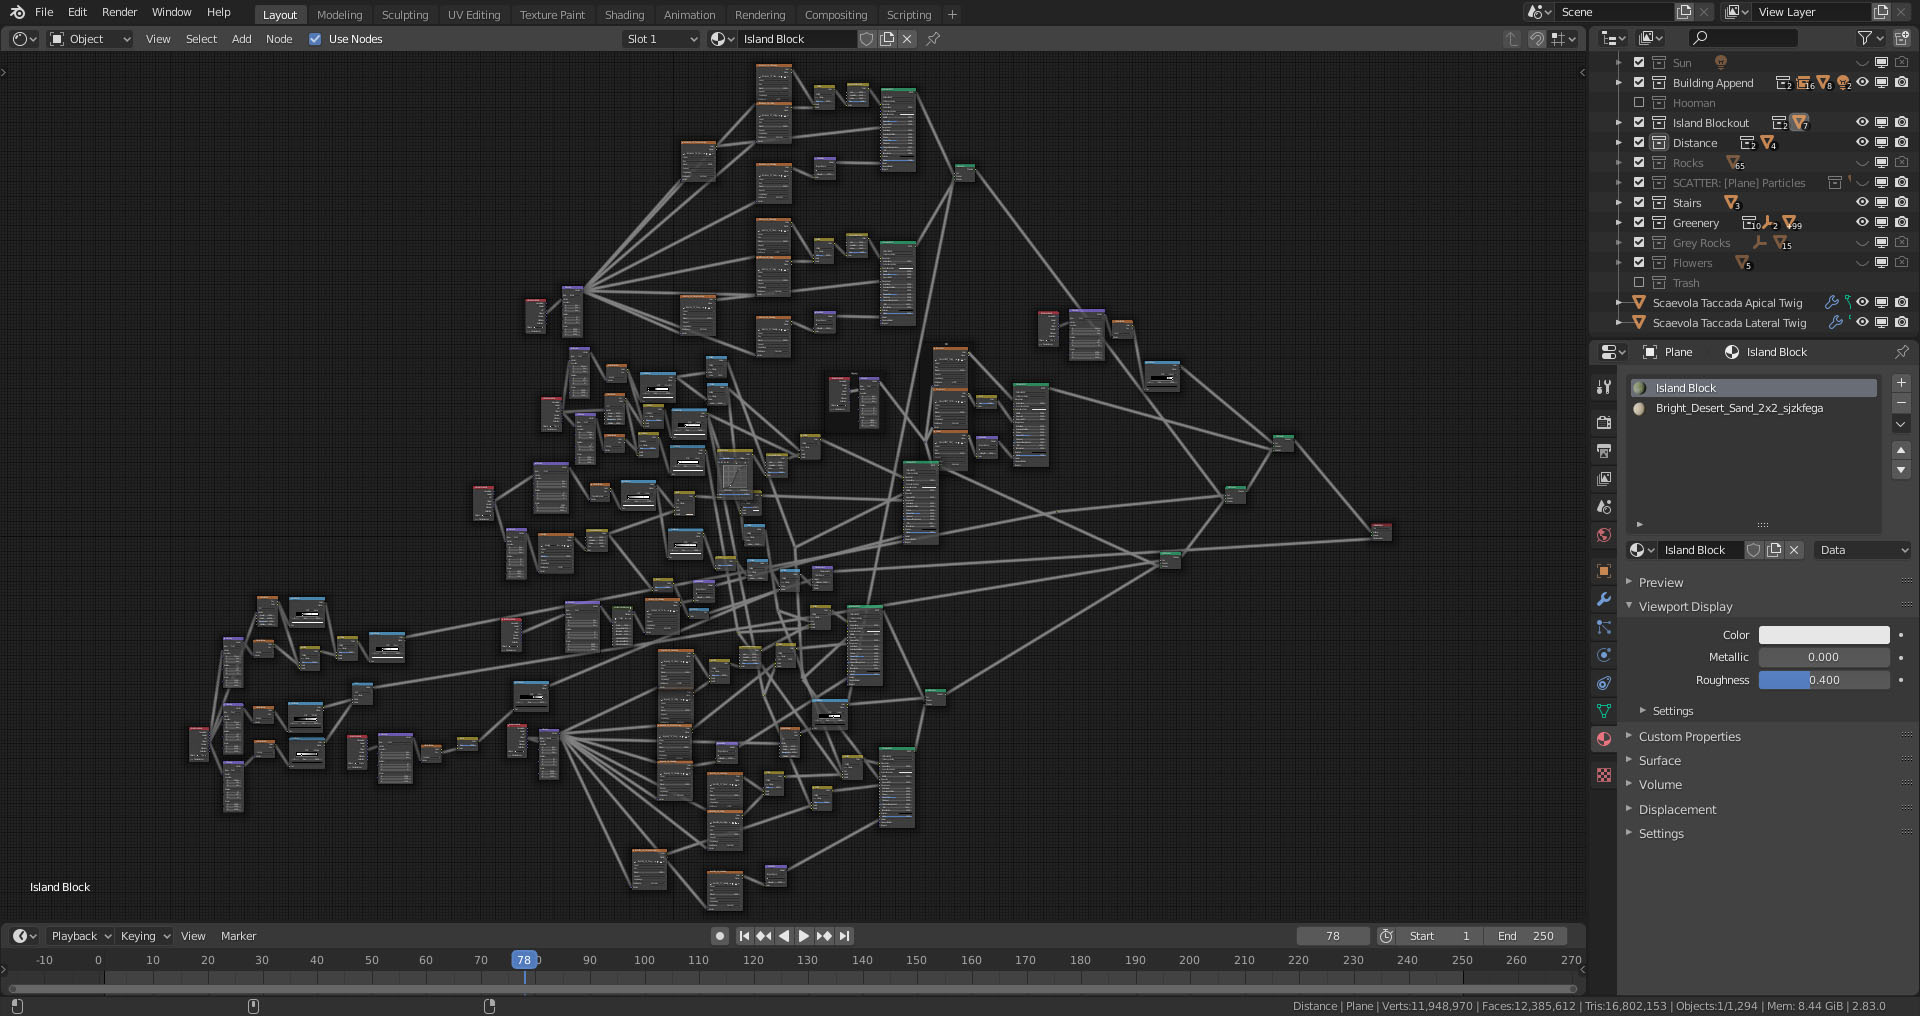
This abomination is my material setup for the entire island and the seabed
It’s a mix of different sand textures using procedural noise controlled by color ramps, displacement for the reef I mentioned before, and of course, wet sand map. Most of the layers are created using gradient textures mixed via Mix RGB nodes. What’s important is that I’m not mixing textures directly but rather material trees with each other (using Mix Shader node). To create some variation, I’m using the Noise Texture that I mix with the gradient using Mix RGB in color burn mode, which I also use to affect my sand’s roughness, making it almost mirror-like where it’s closest to the water.
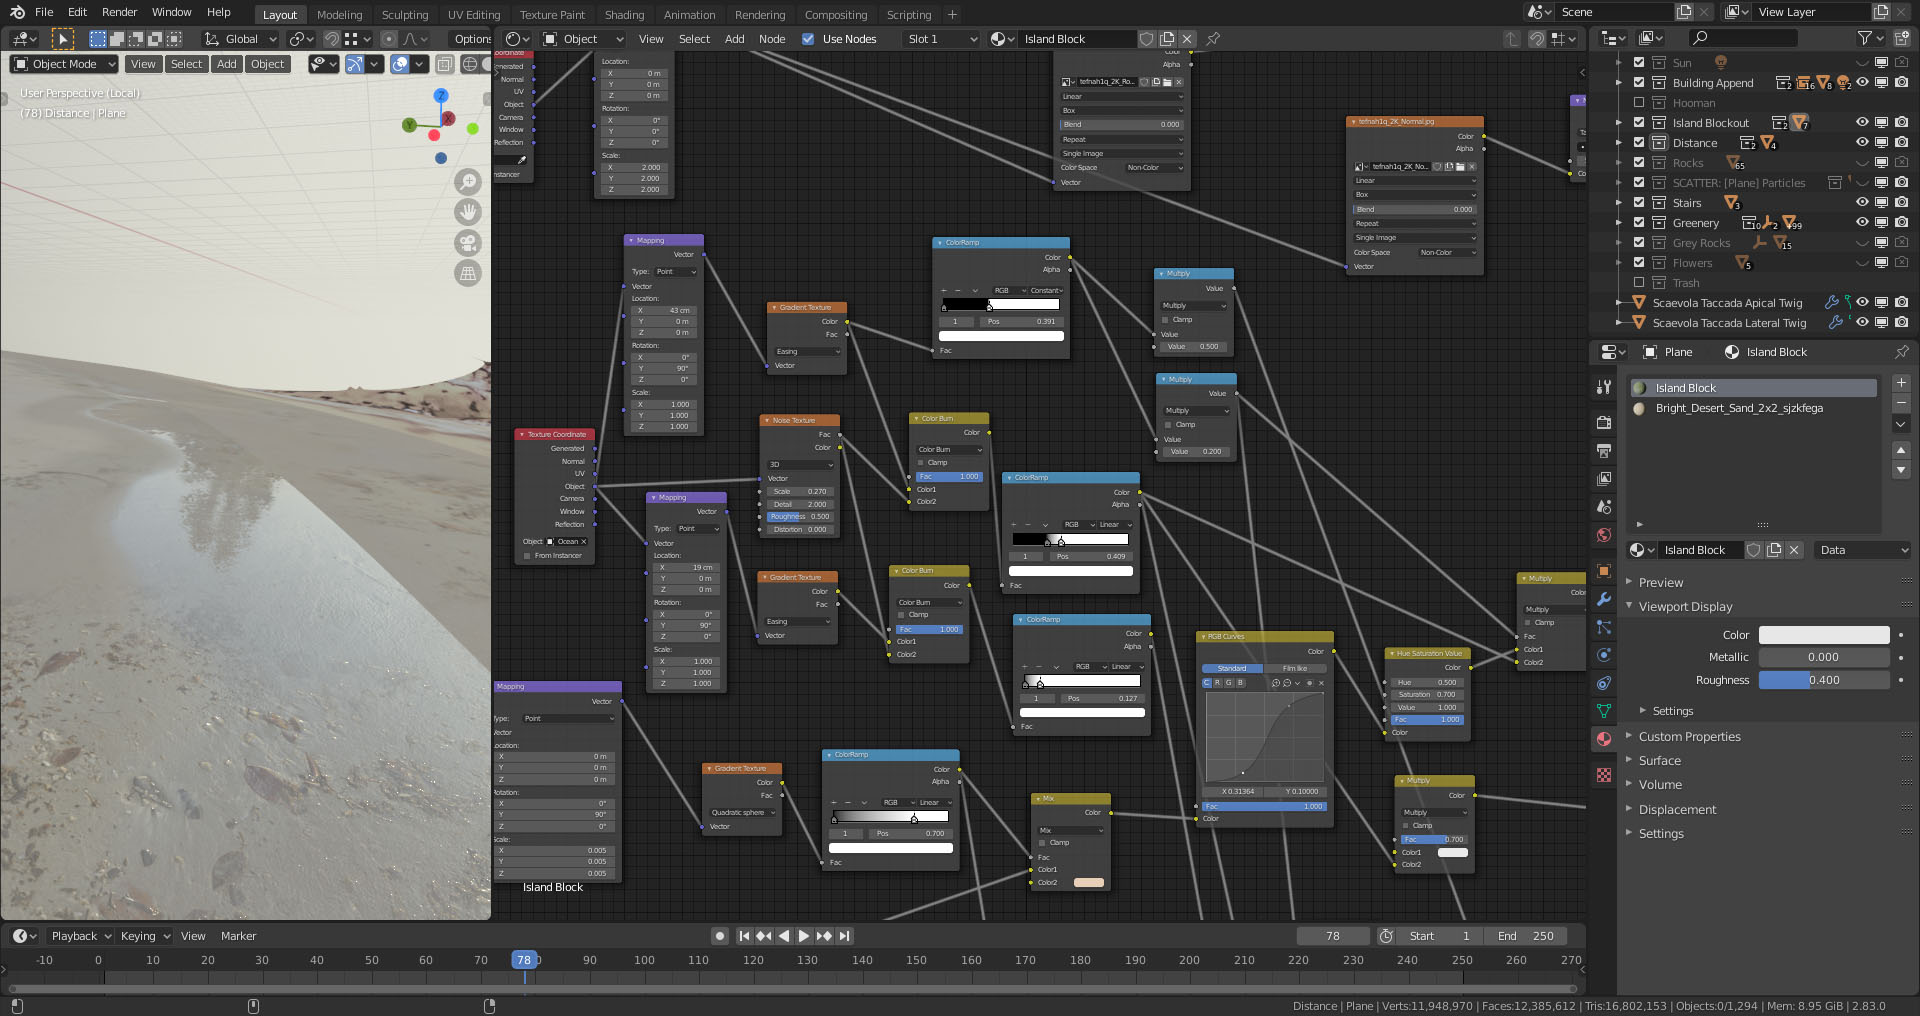
Close-up on the wetmap and the main nodes that create it
All my gradients use the ocean plane as the object coordinate, so if I ever had to move the water level, everything would follow naturally. I also tried to model my island with a distinct height variation so that a gradient could clearly define all the layers. I even knew that most of the time, it would all be viewed from a distance, so there’s no need for extreme attention to detail. I’ve noticed that sometimes sand is entirely flat when a beach is not crowded with tourists (which is the case here), so there was no need to implement a displacement for the sand.
The Water Material
A tropical island without water doesn’t exist, so I knew it has to look good since it’s going to be one of the essential features of almost every image. I needed to make sure it stretches far enough to the horizon for my ocean, which is why I made it a huge, 80 km wide circle. Unfortunately for me, Blender is unable to generate realistic ocean textures via nodes to use in the shader editor (so far). However, it has an exceptional ocean simulation modifier that displaces a plane and can be used to extract maps. I used it to bake a couple of normal maps that I made seamless in Photoshop and then combined them using Mix RGB nodes with noise texture (I adjusted black and white levels to avoid smooth transitions) to break up the repetition. I also used a procedural noise to create variations in normal map strength that create very characteristic patterns that can often be seen in reference photos to randomize it further.
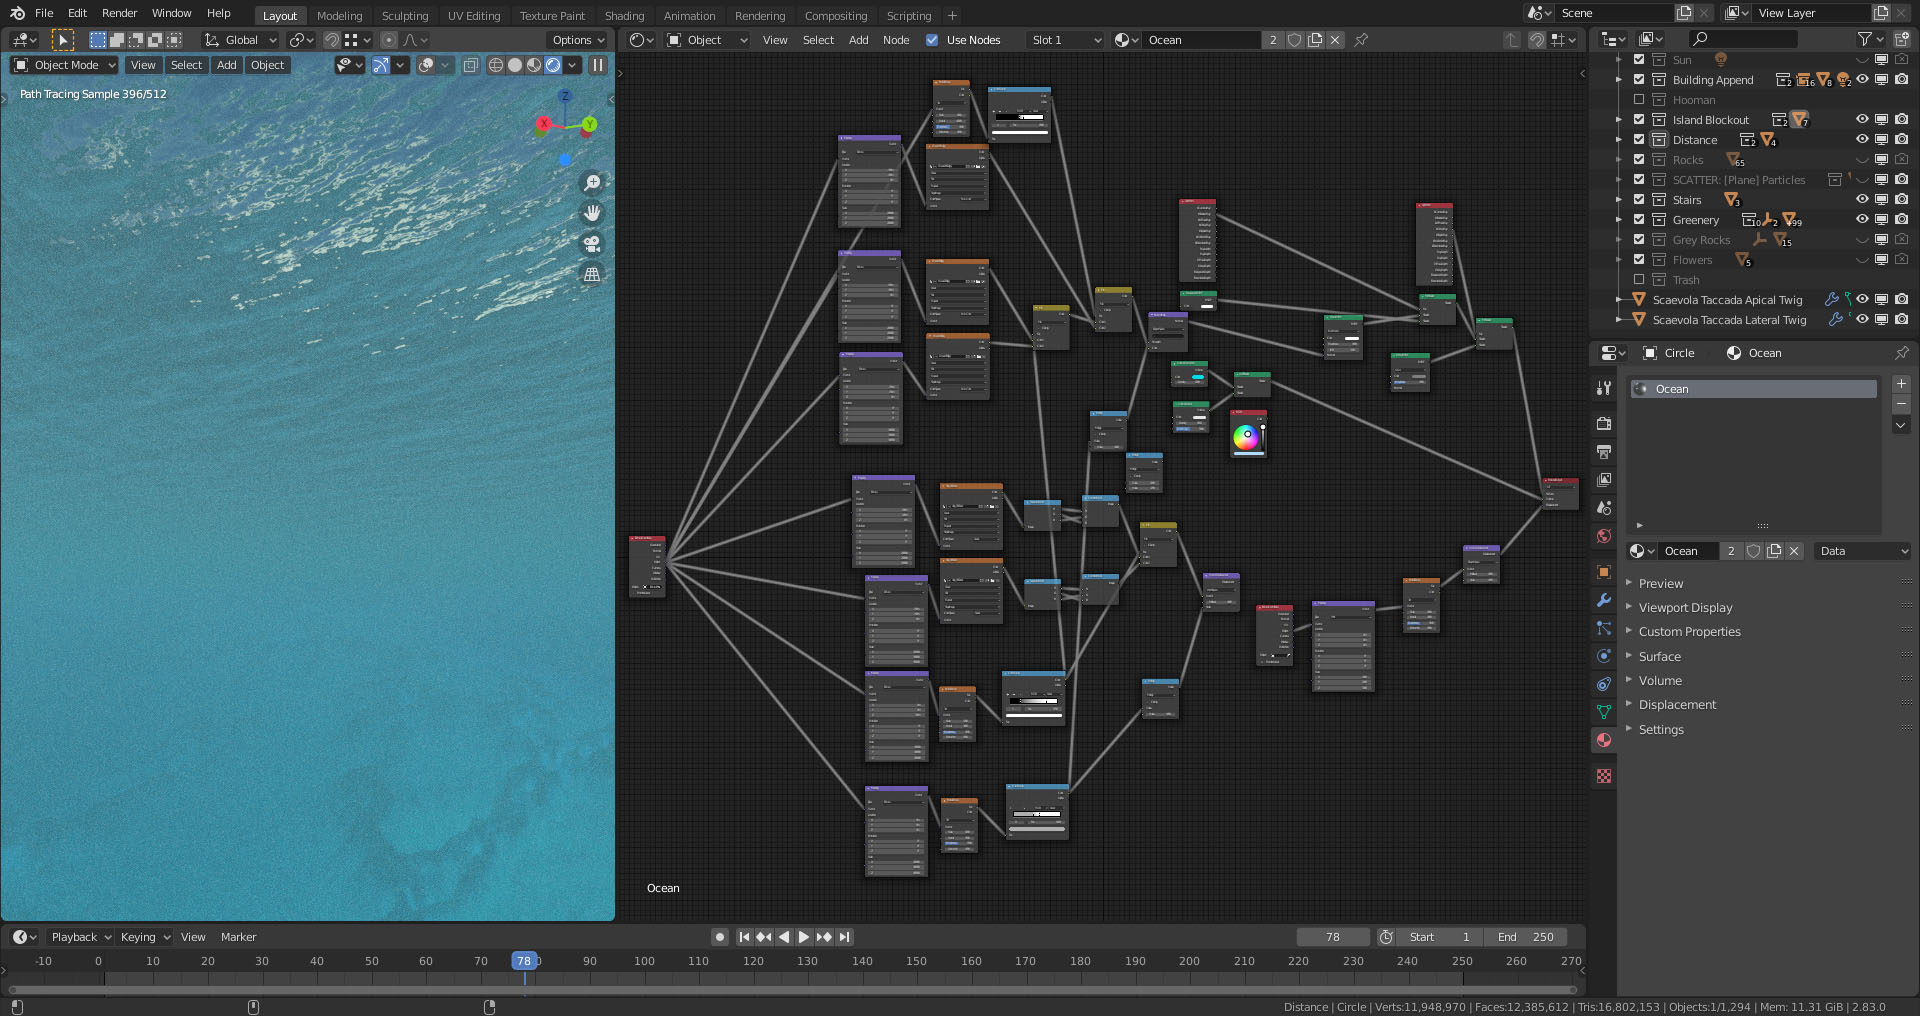
Ocean node tree with a view from underwater
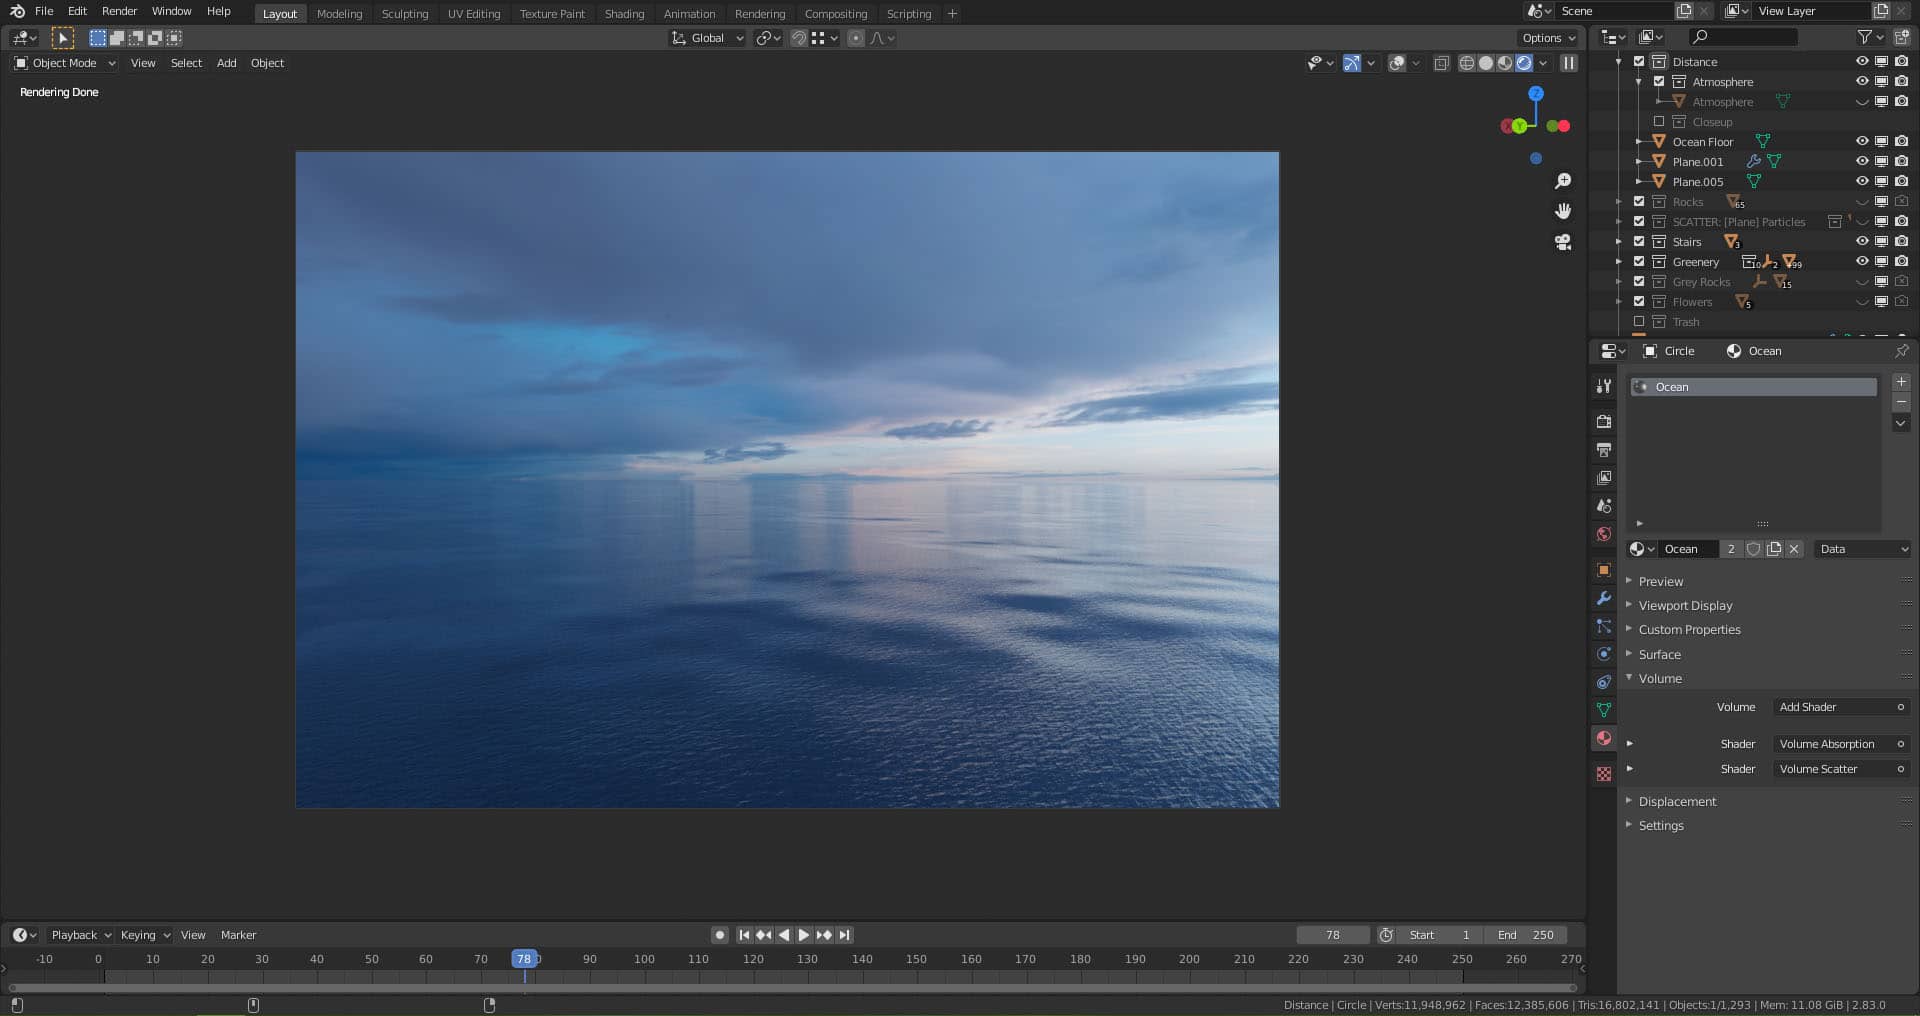
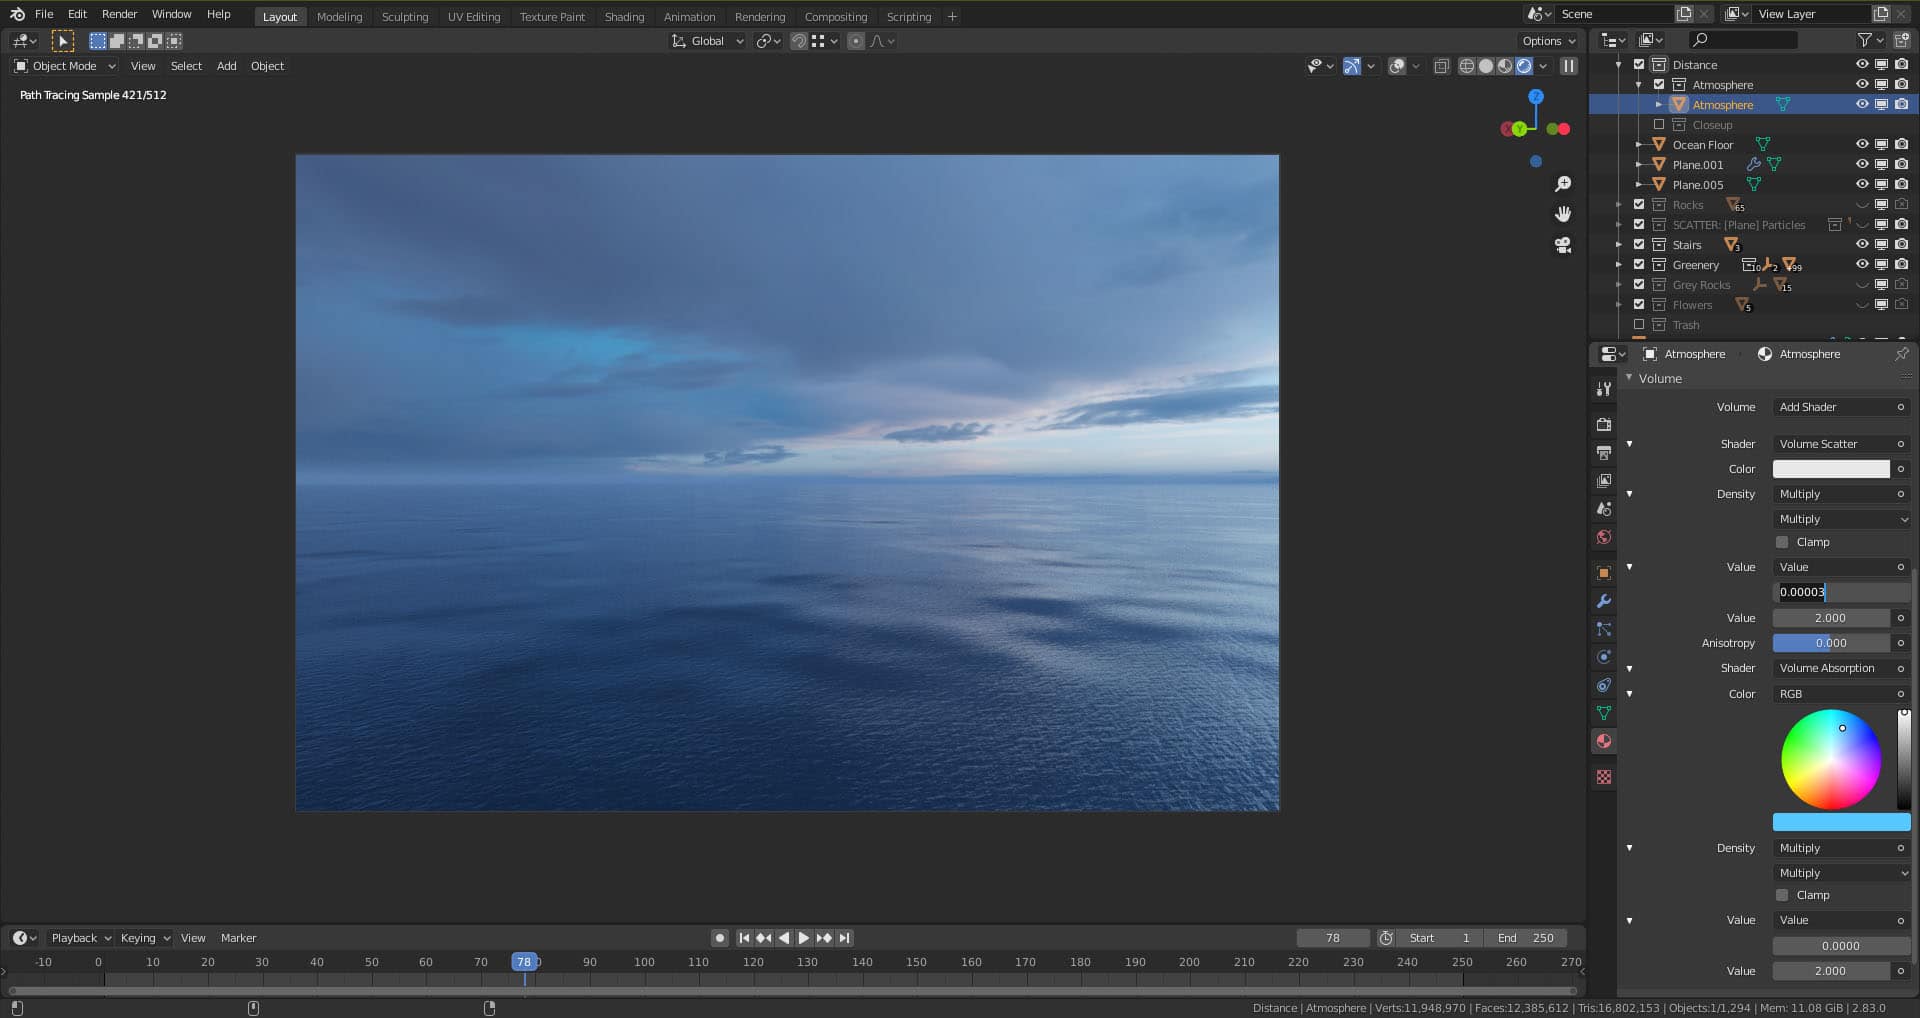
Another crucial aspect of water is the volumetric effects. The liquid is not colorless, but it has a slight blue tint to it (you can even see it in a white, full bucket), and couple hundred meters below the surface, it’s almost entirely dark. Because reefs are relatively shallow and water is usually clear around them, the water has this beautiful turquoise color attracting tourists to Seychelles, Maldives, French Polynesia, Hawaii, and so on. This can be easily replicated in 3D software using volume absorption. The density should be rather low since we’re dealing with a large scale body of water. But we’re not quite there yet.
Looking at some reference photos, when you’re underwater, you’re usually not able to see too far away, and when it’s sunny, there are visible god rays. It’s most likely caused by the plankton and other organic matter floating around in the seas. This effect can’t be replicated using volume absorption alone, so I needed to add a volume scatter node that I mixed with the former using the Add Shader node. Such volume setup should also work fine in any other body of water like pools where I copy-pasted it.
Lastly, suppose you’re working with volumetrics in Blender. It’s essential to give the object actual volume (using solidify modifier, for instance), or else it won’t display correctly (see the image below).
The pool had a volumetric material assigned but no geometry for the volume to be contained at that stage. The camera was looking slightly from below the water level and despite the objects covering the water plane, it’s still visible.
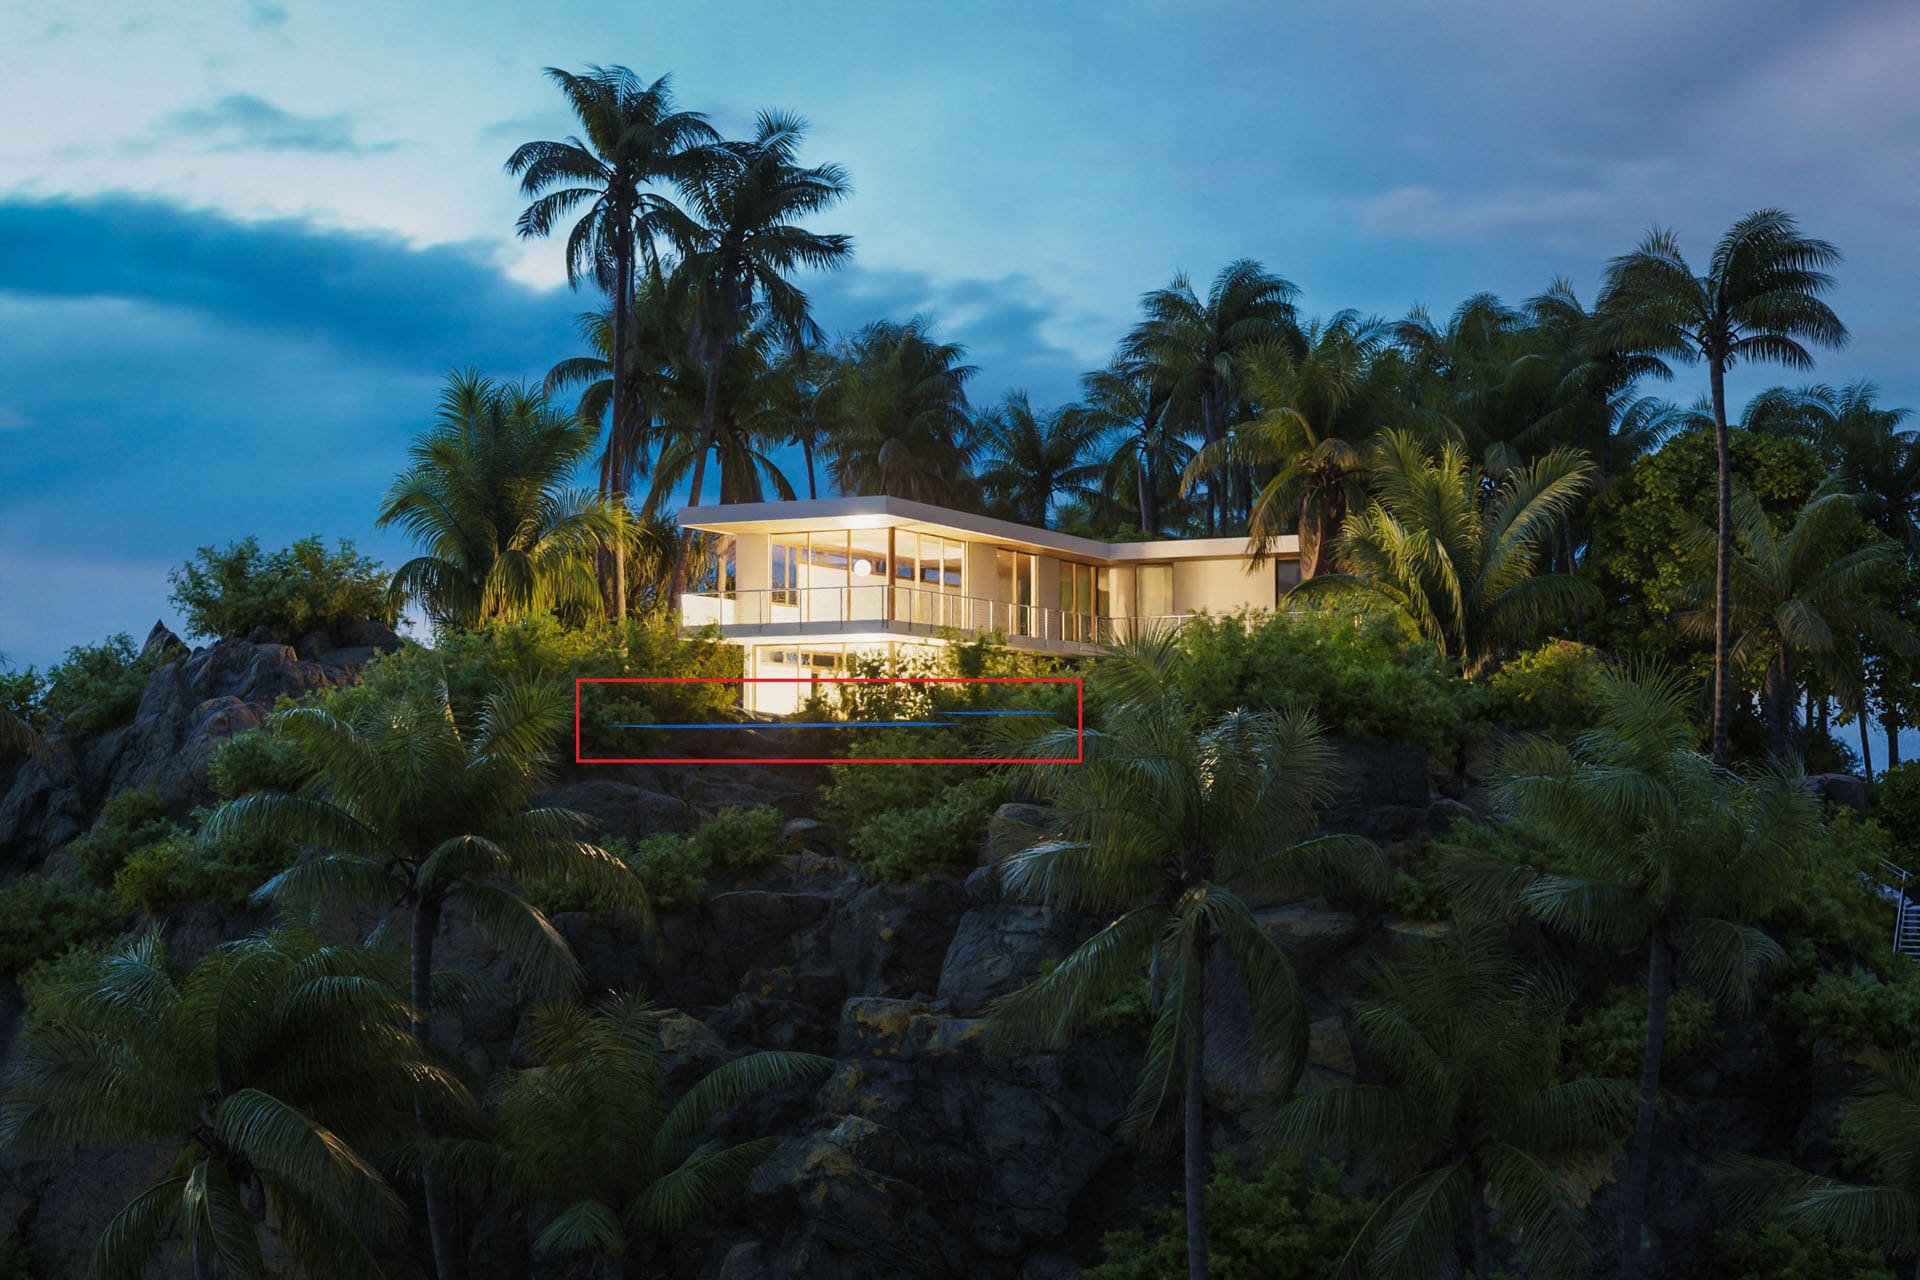
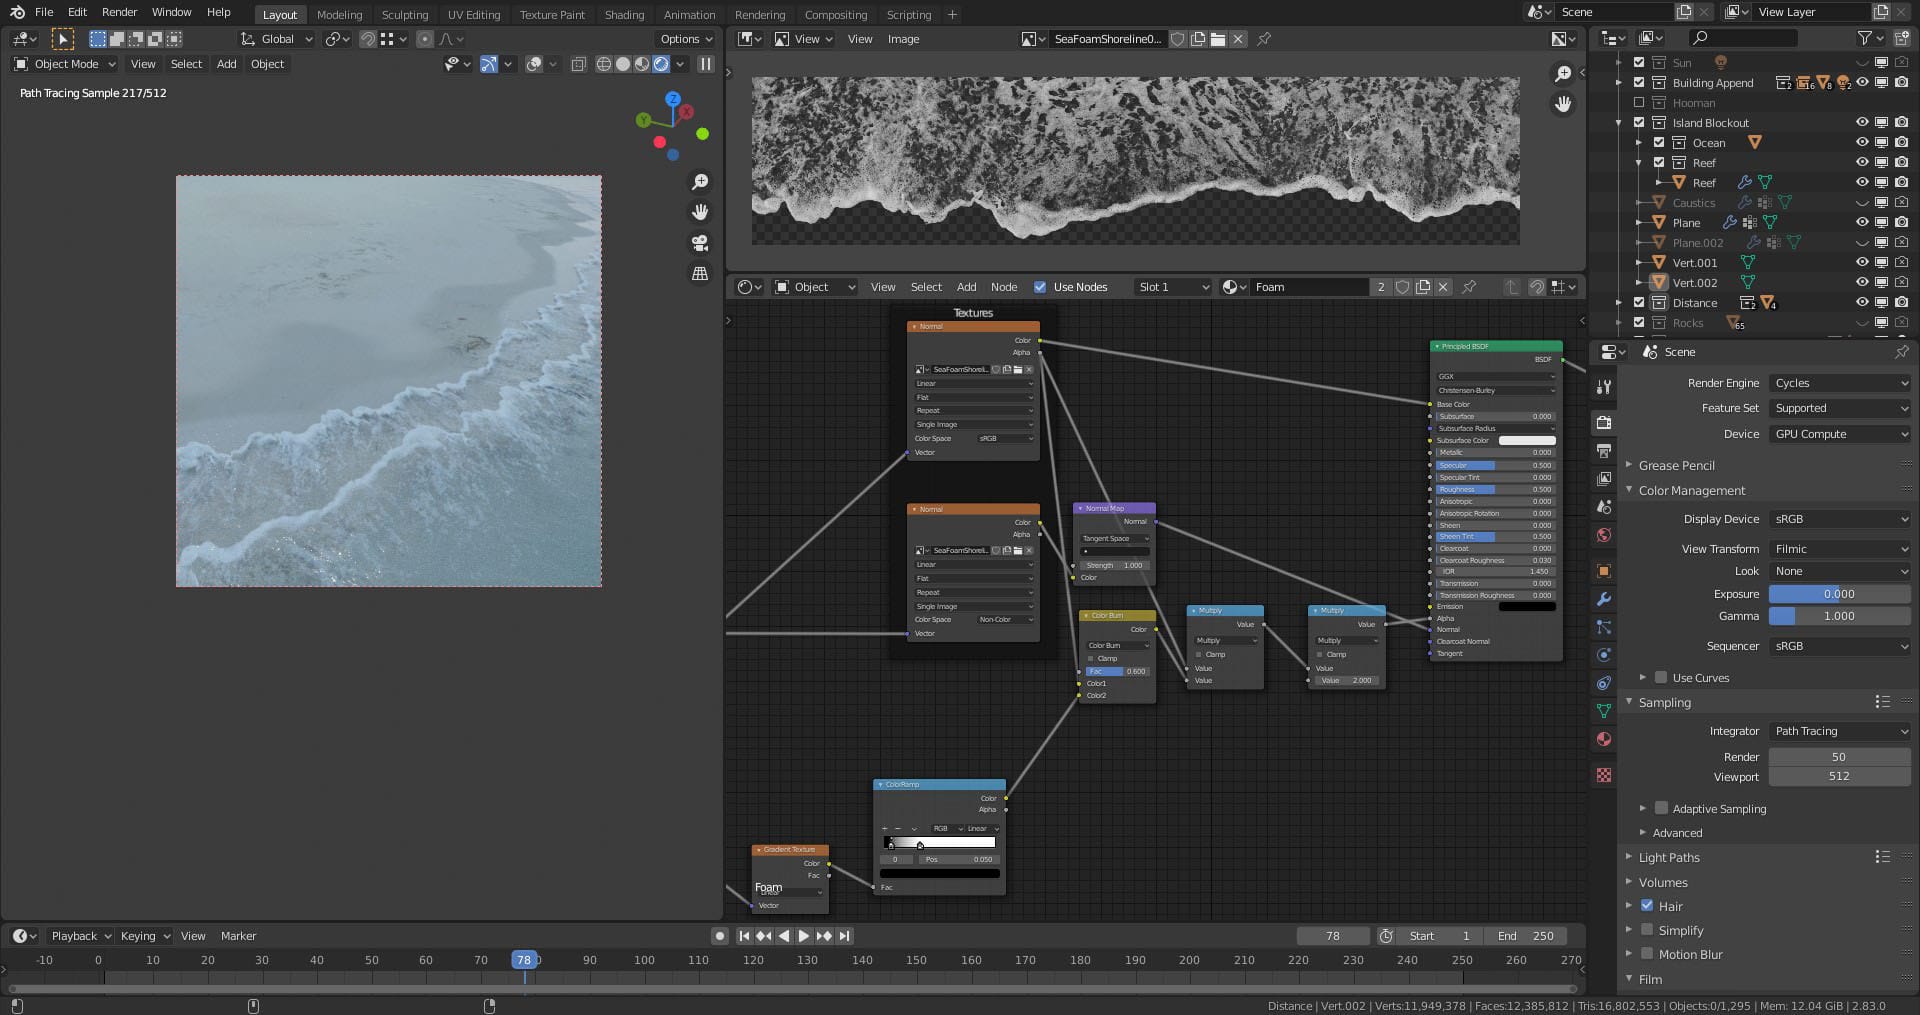
The Foam Material
Foam is a rather complex topic in most cases. It can be simulated, have real volume, and interact with the shore, making a realistic wet map. But why should someone do all that when there’s an excellent old method still used in many AAA games. If it looks good there, it should most definitely work here. I used a texture from Poliigon mainly because it also had a normal map, but that’s also something that anyone can generate with a bit of effort.
I applied the map to a plane that I extruded a couple of times to match my shore’s shape and raised it slightly off the ground to cast some shadow on the sand. I duplicated it, moved it back, and offset the texture to create a second layer because a single one didn’t do the trick for some reason.
To create a more natural falloff, I used a gradient texture mixed with the image map via Mix RGB set to color burn for a more organic effect.
My simple shader setup with a close-up preview
A Volumetric Atmosphere
I’ve had some trouble with the horizon line where the sky meets the sea for particular camera views. Something just wouldn’t feel right about it, and I quickly realized that in real life, there’s usually some atmospheric fog visible in the distance.
My atmosphere shader is a similar mix to the underwater volume, but it’s using microscopic values due to it’s gigantic, over 50 km size. It also does not extend to the sky but rather a couple of dozen meters over the sea level to create a smoother transition and not cover the entire sky. “But you could’ve used mist pass and save time,” some of you may say. Well, not really because mist pass doesn’t interact with the surface of the sea, and I still would have visible reflections in the water, but the point was to get rid of them. Obviously, at some angles, they were needed, and for those, I disabled the atmosphere. You can see the comparison below and decide what you like best.
Atmosphere off
Atmosphere on
Architectural Materials
I think most of my shaders are too simple to write more about them, so I’d instead share my approach to them when it comes to architecture. For the house, I used materials from both Poliigon and Megascans. I try to give a specific shader to every object even when it appears to be clean in the reference just to give it that extra detail. Sometimes a simple roughness or normal map can make a big difference and allows for more realistic close-ups.
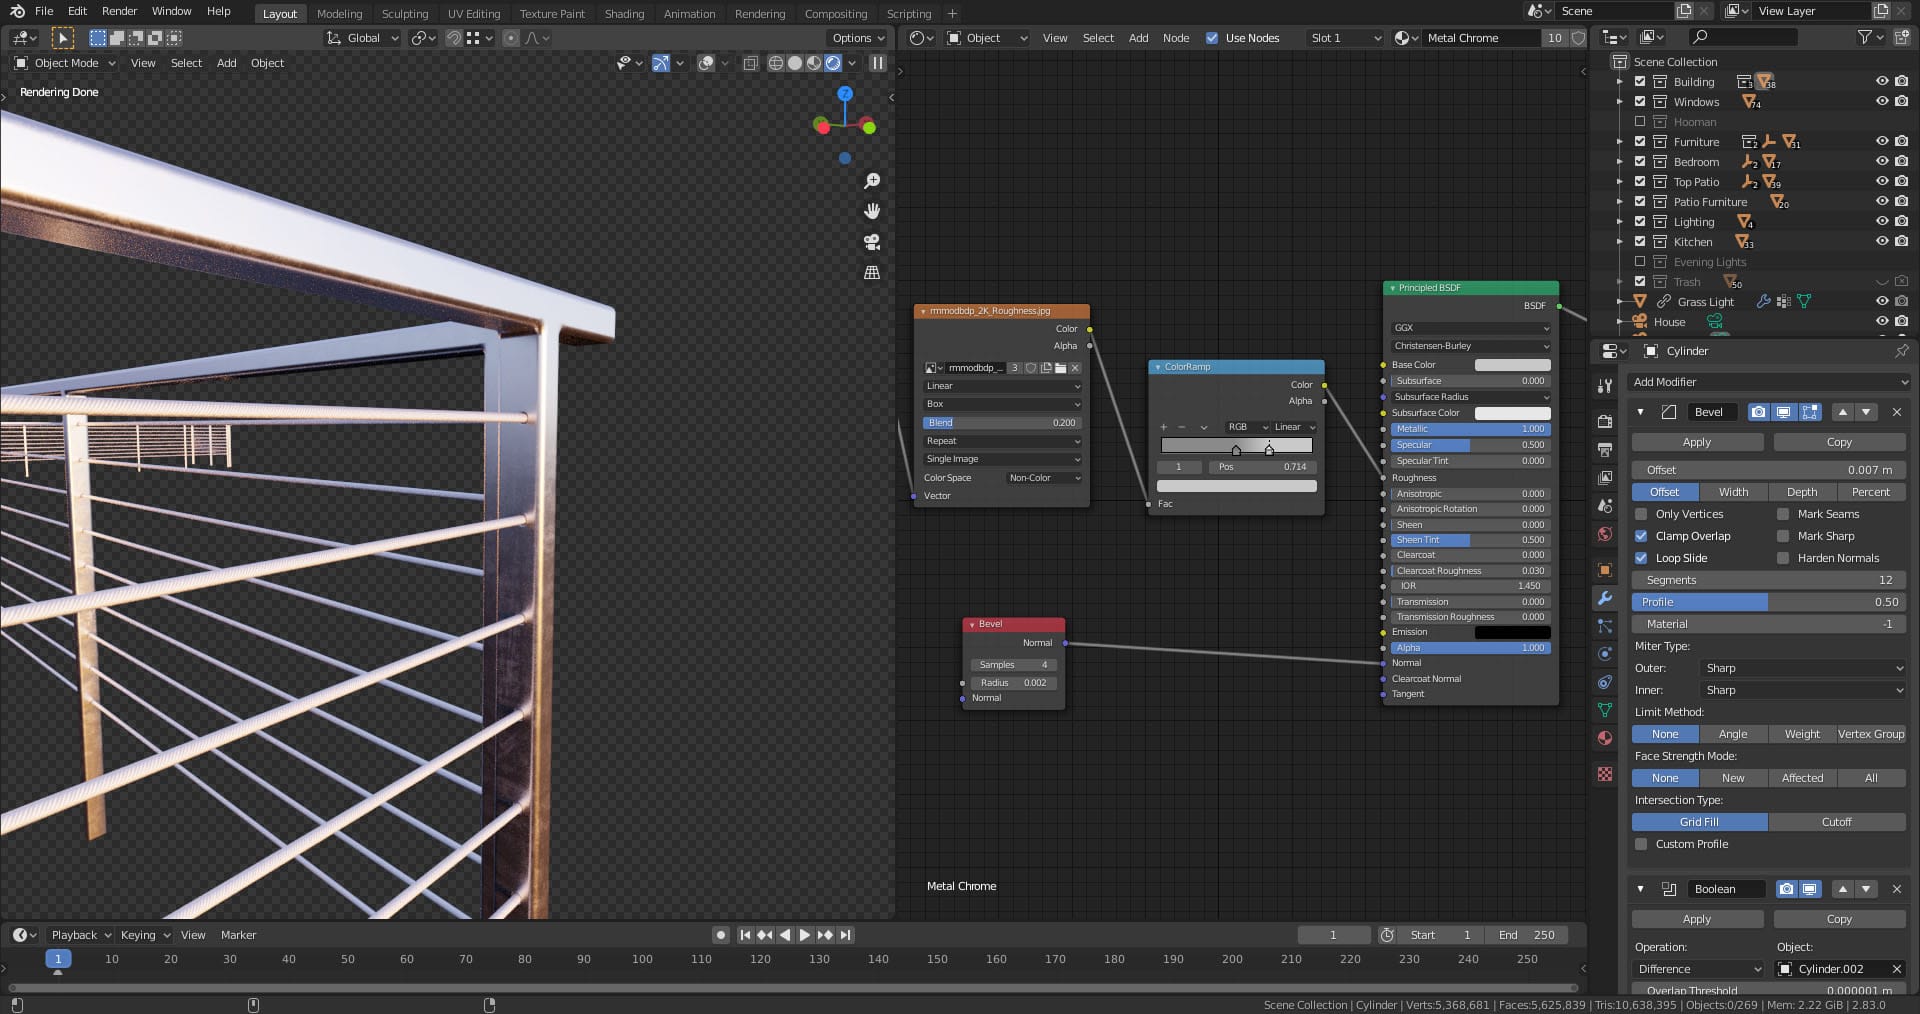
Simple metal railing shader
Using decals is another thing that artists often forget about (sometimes clients don’t want that), but adding them to the exterior walls is surprisingly easy in Blender. To do that, I created an additional UV map (to switch between them, just select the one you want to work with). The camera icon defines which coordinates should be used as default.
Then, it’s good to make a loop cut to define how far the leaks should stretch and unwrap the faces that will be in the view (just have one seam somewhere where the camera can’t see to have it unwrapped in a straight line).
The next step is to adjust the UV map to match the texture and invert the selection in edit mode to prevent other faces from using the decal map (just scale their UV map down to 0 and move somewhere where the texture is black).
Lastly, we can finally combine the decal with our shader. I used two decal maps that I mixed to get rid of the repetition.
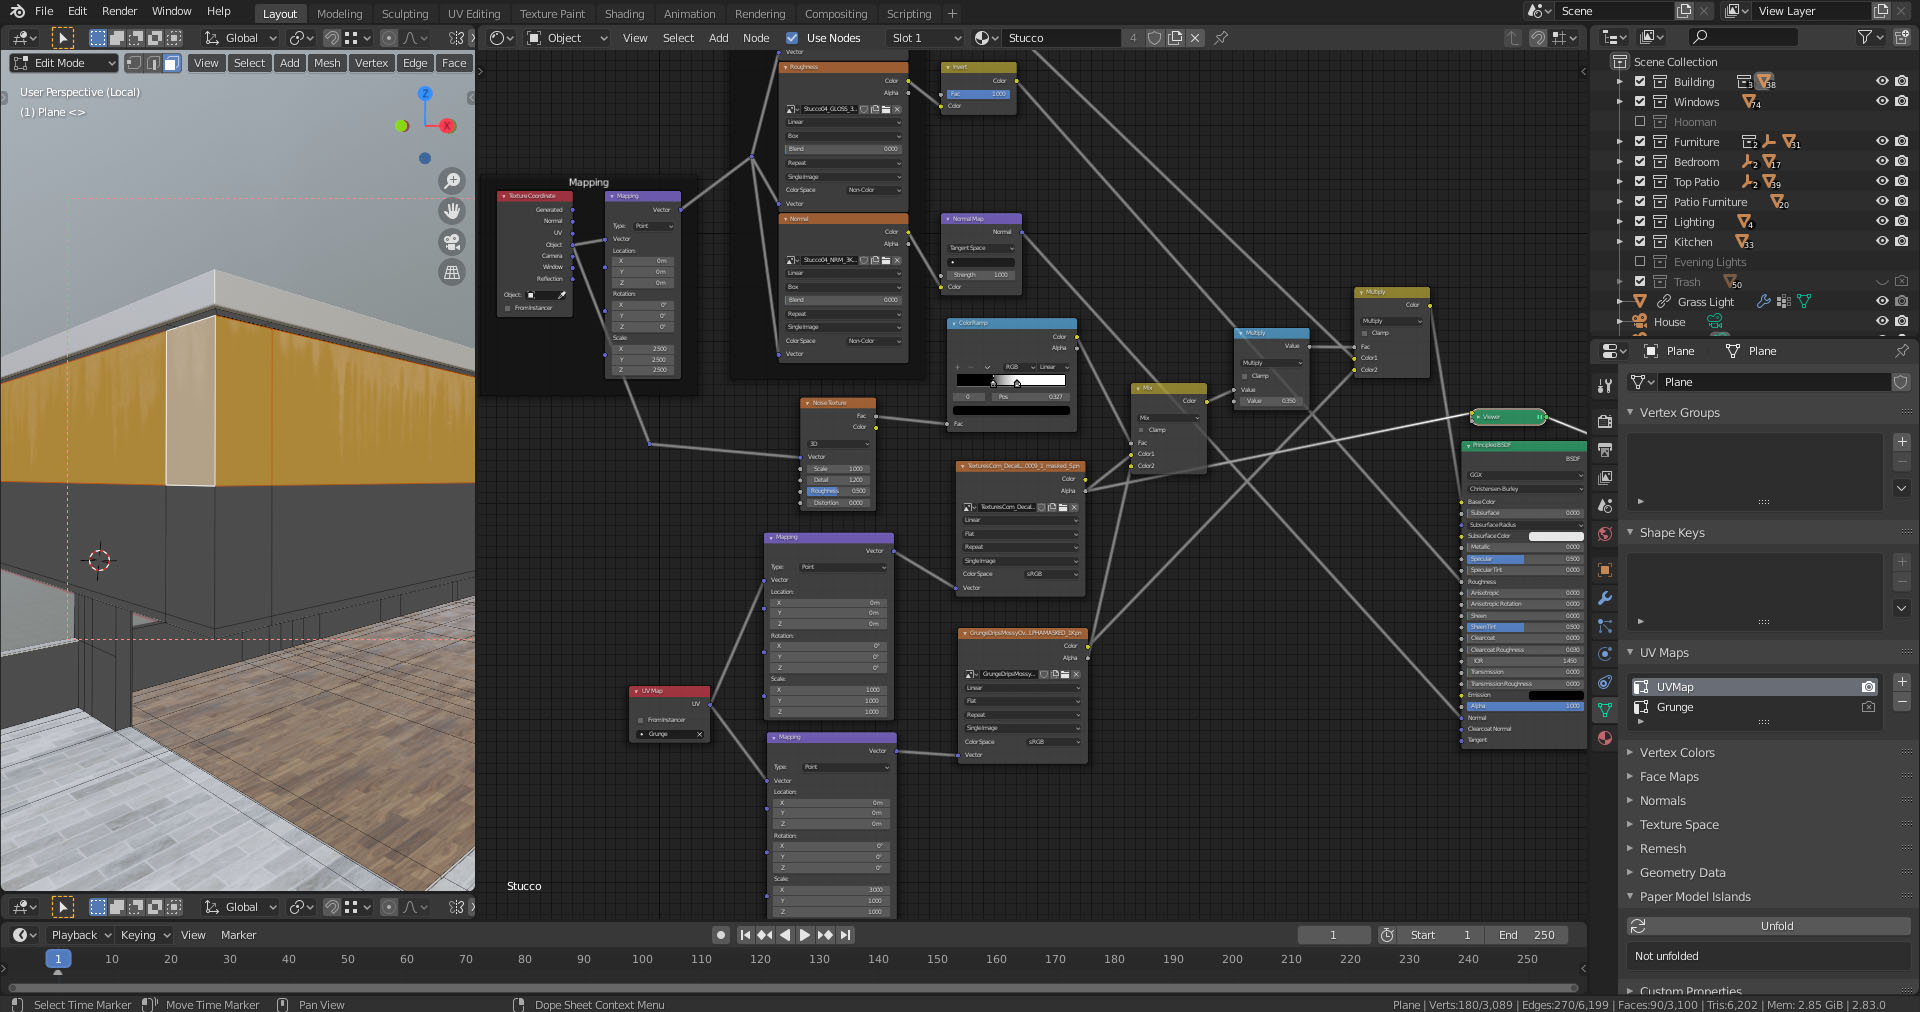
Final shader setup and decal map preview
Lighting
The step that’s causing trouble for many artists is something that I like to keep as simple as possible. Usually, I use HDRI images and swap the sky in Photoshop when needed. To do that, I just enable transparency in the render settings. It also allows me to use low-resolution versions of the sky and render the detailed one separately since those can take up to a couple of GB of video memory.
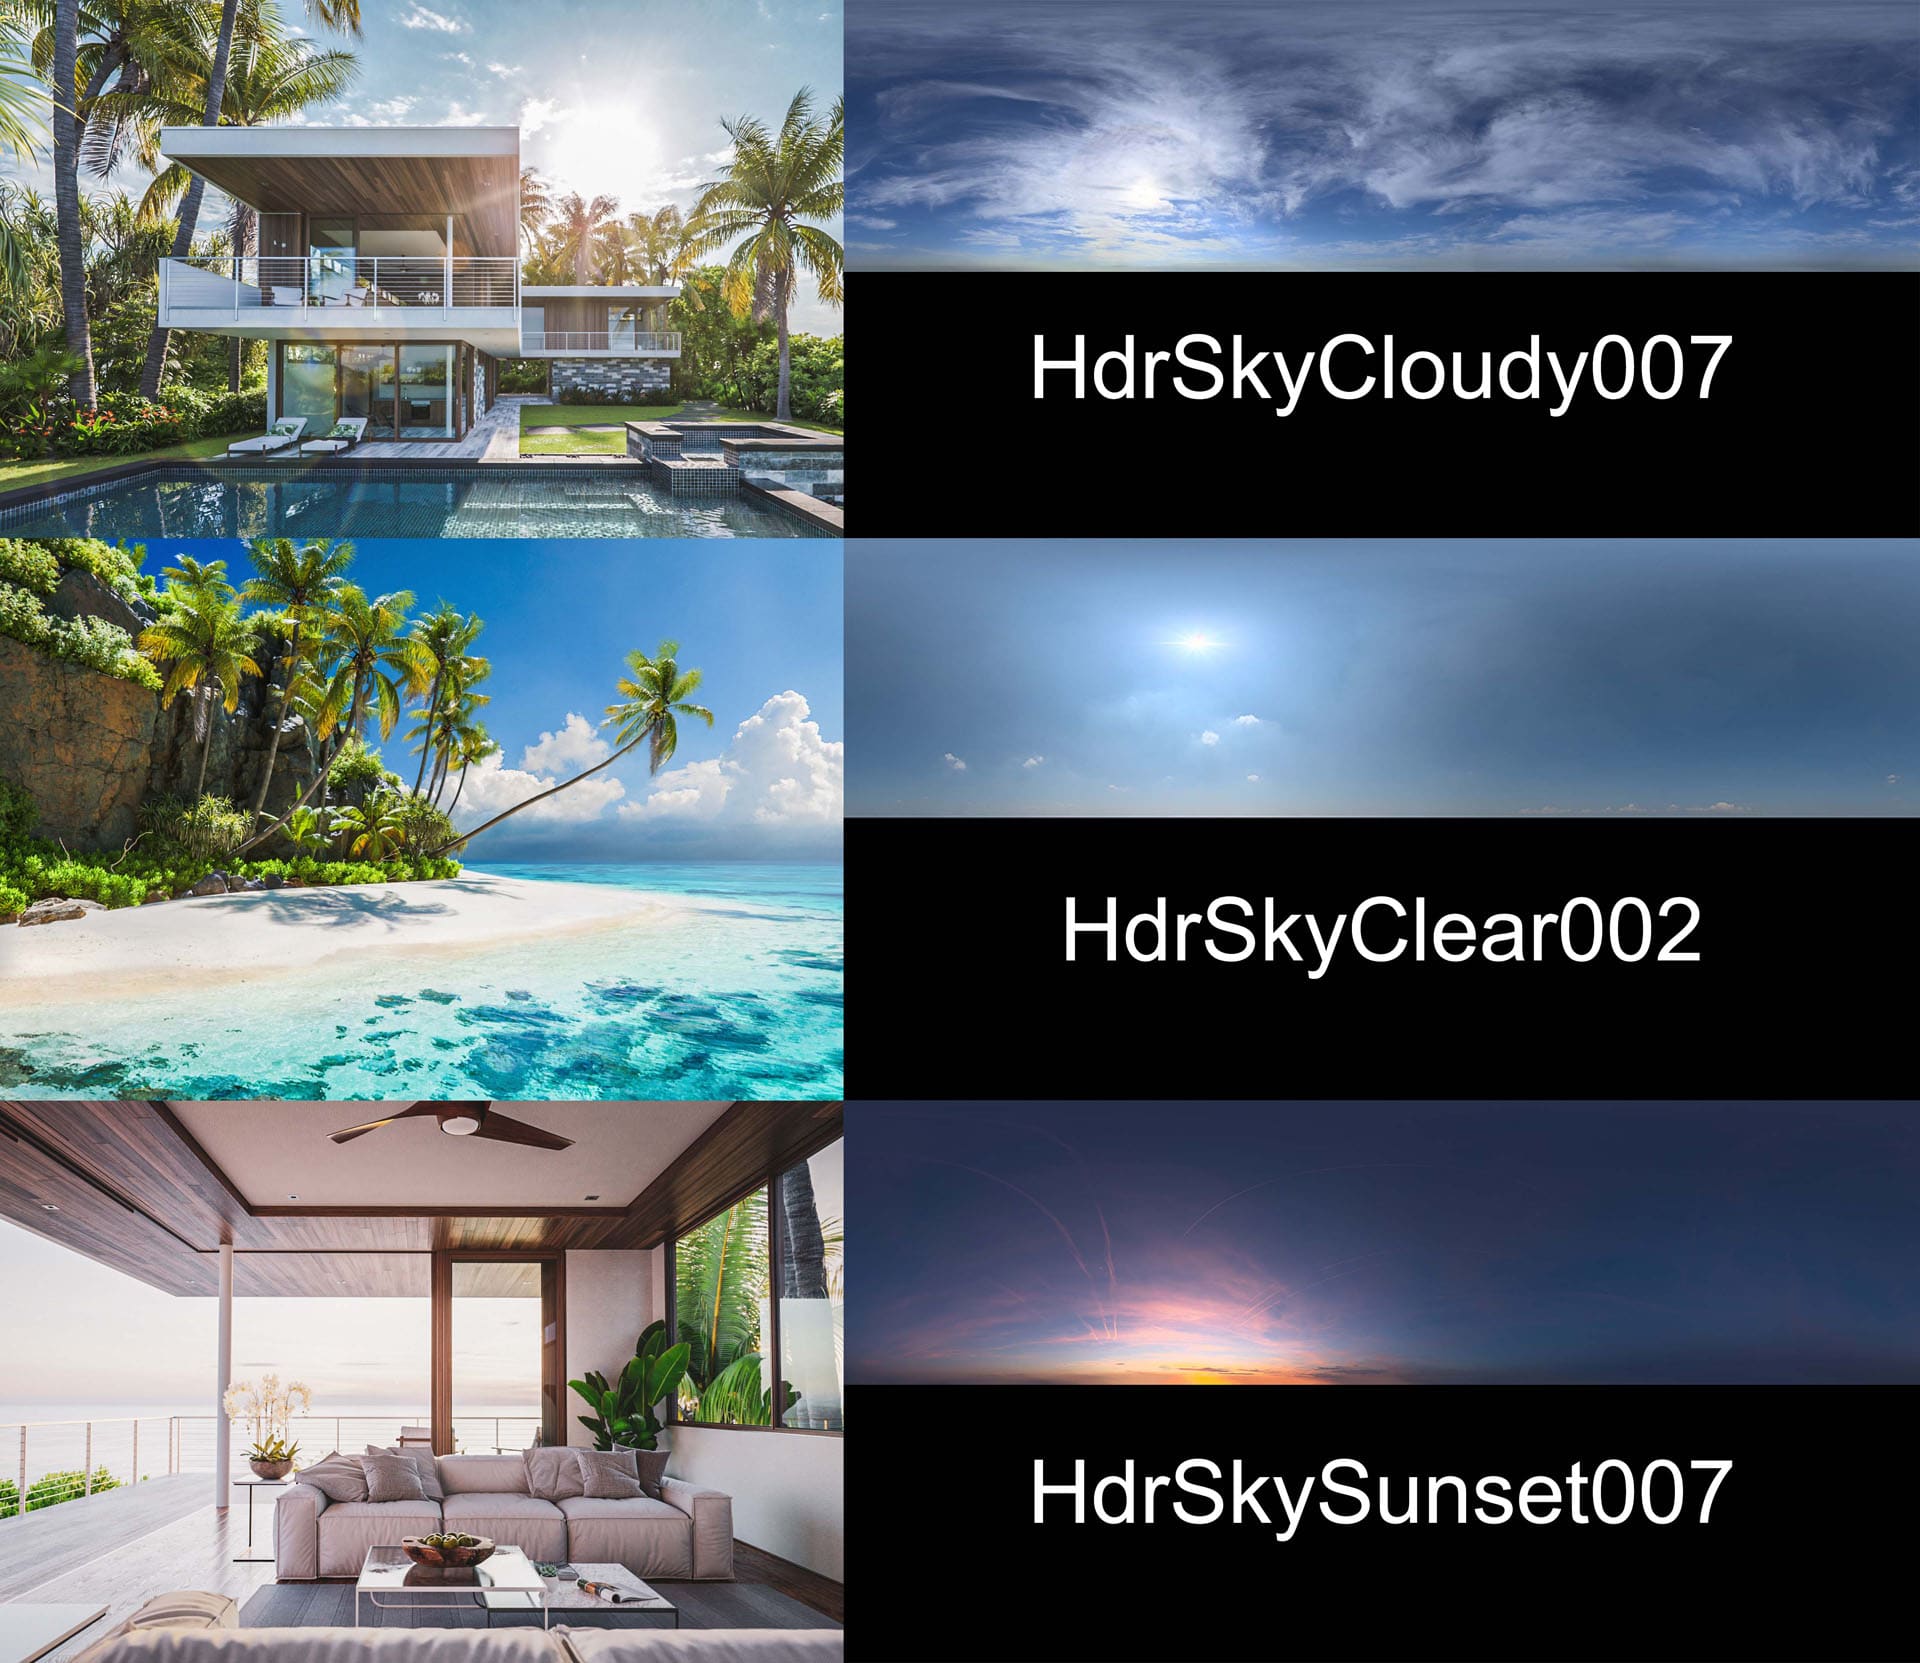
Main HDRI maps from Poliigon I used for multiple camera angles
There’s one problem with sky textures, though. I wasn’t able to control the brightness of the sun and sky separately right away. There are add-ons to help with that, but I wanted to try out something else. There’s a built-in tool in Blender that allowed me to bind a sun lamp to my sky image. But since there’s a sun already in the HDRI, I needed to get rid of it and decided to use a JPG instead since I will be rendering my image with transparency to add the sky in post (just drag and drop in Photoshop but both image have to be saved as EXR with 32-bit depth). The tool is called Sun Position and has a very self-explanatory interface. The only thing to keep in mind is not to apply any rotations to the sky using a Mapping node in the shader editor because the tool uses default coordinates and lets me rotate the sky on its own.
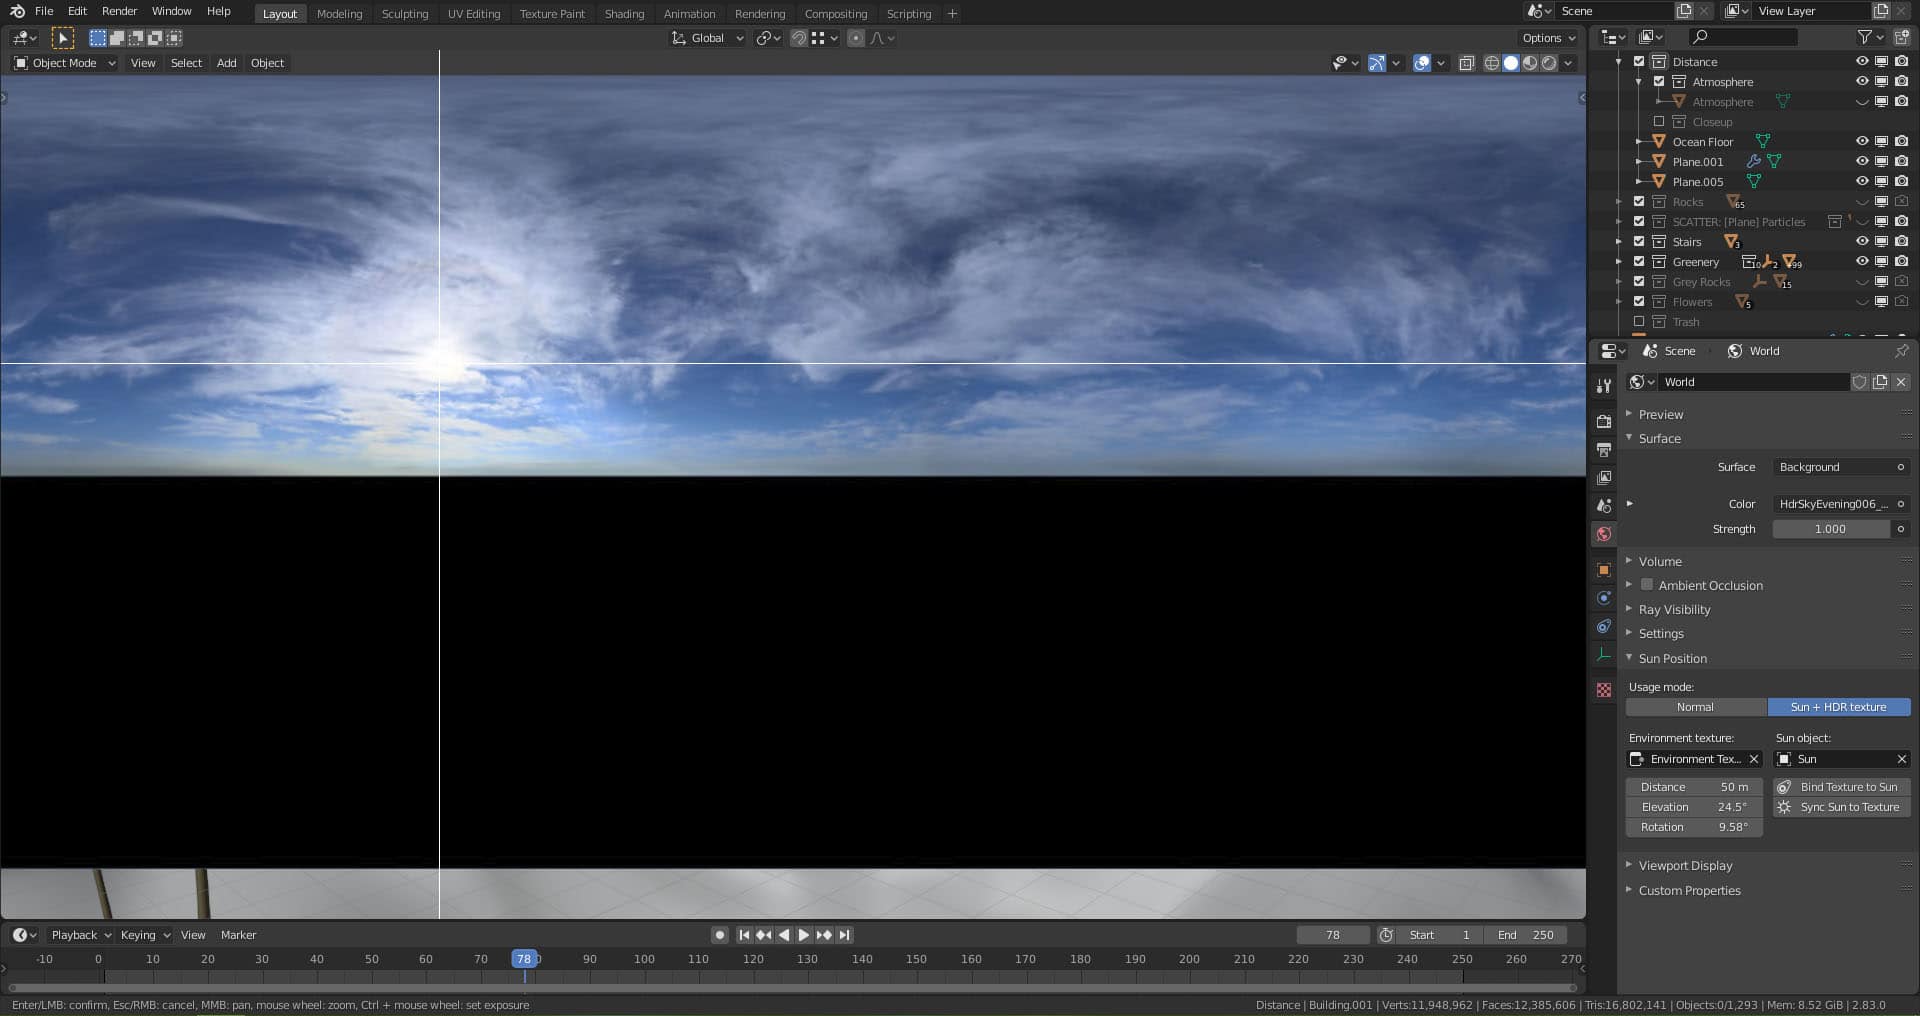
You set the sun position by simply clicking on the brightest spot in your HDRI
Rendering
To render all the images, I used Blender’s path tracing engine – Cycles. For exterior images, I decided to go for a sample count around 2000 and 4000 for the interior. I also enabled denoising and used the alternative Intel AI denoiser that’s recently been added to Blender to possibly combine the results in Photoshop since both solutions offer slightly different results. AI is better at dealing with dark areas, but the default one preserves more texture details.
Post Production
The last step in every project is to make the images look even better than they already do. When done wrong, it can ruin even the best lighting and materials, so it’s crucial to do it moderately… or until it looks good.
I don’t use any post-production tools in Blender. I don’t like the compositor, so I just take all the renders fresh from the oven to other software. Here’s a breakdown of my process for one of my favorite images from this project.
Raw image
Step 1
With lots of high poly objects that have to all fit into a single image, it’s usually best to render the image in fragments to combine in Photoshop and just paint out any visible seams.
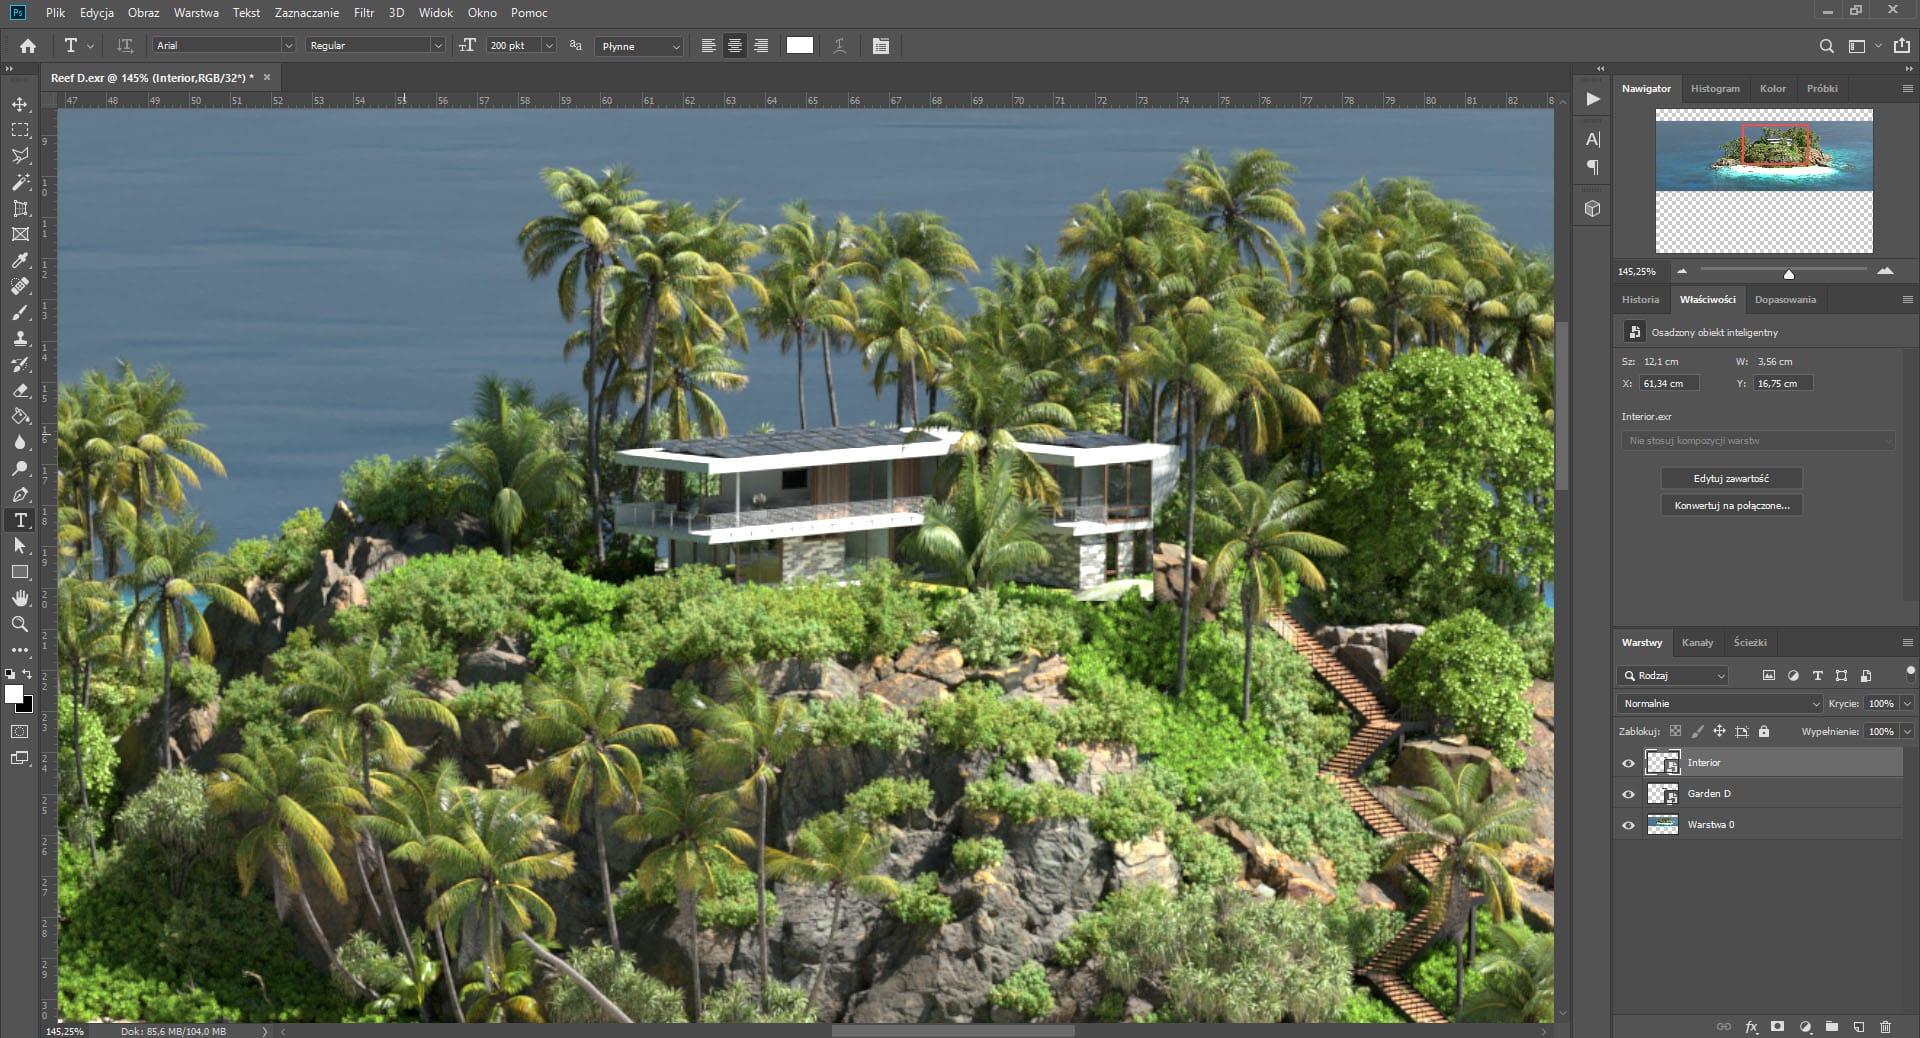
I was unable to render the whole island with high poly plants from the garden and furniture so I rendered them as fragments. You can see where some of those fragments end
Step 2
Save your image as EXR and use Corona Image Editor. It’s not a typo; I’m using it because it allows me to manage my shadows and lights compression freely. On top of that, it has the best glare and bloom effects that I just fell in love with. It’s also free with the standalone release that you can use with older versions of Blender. Adjust the settings until it looks good. Increasing highlight compression is always a good idea, and I always like to find a LUT that works well for my image.
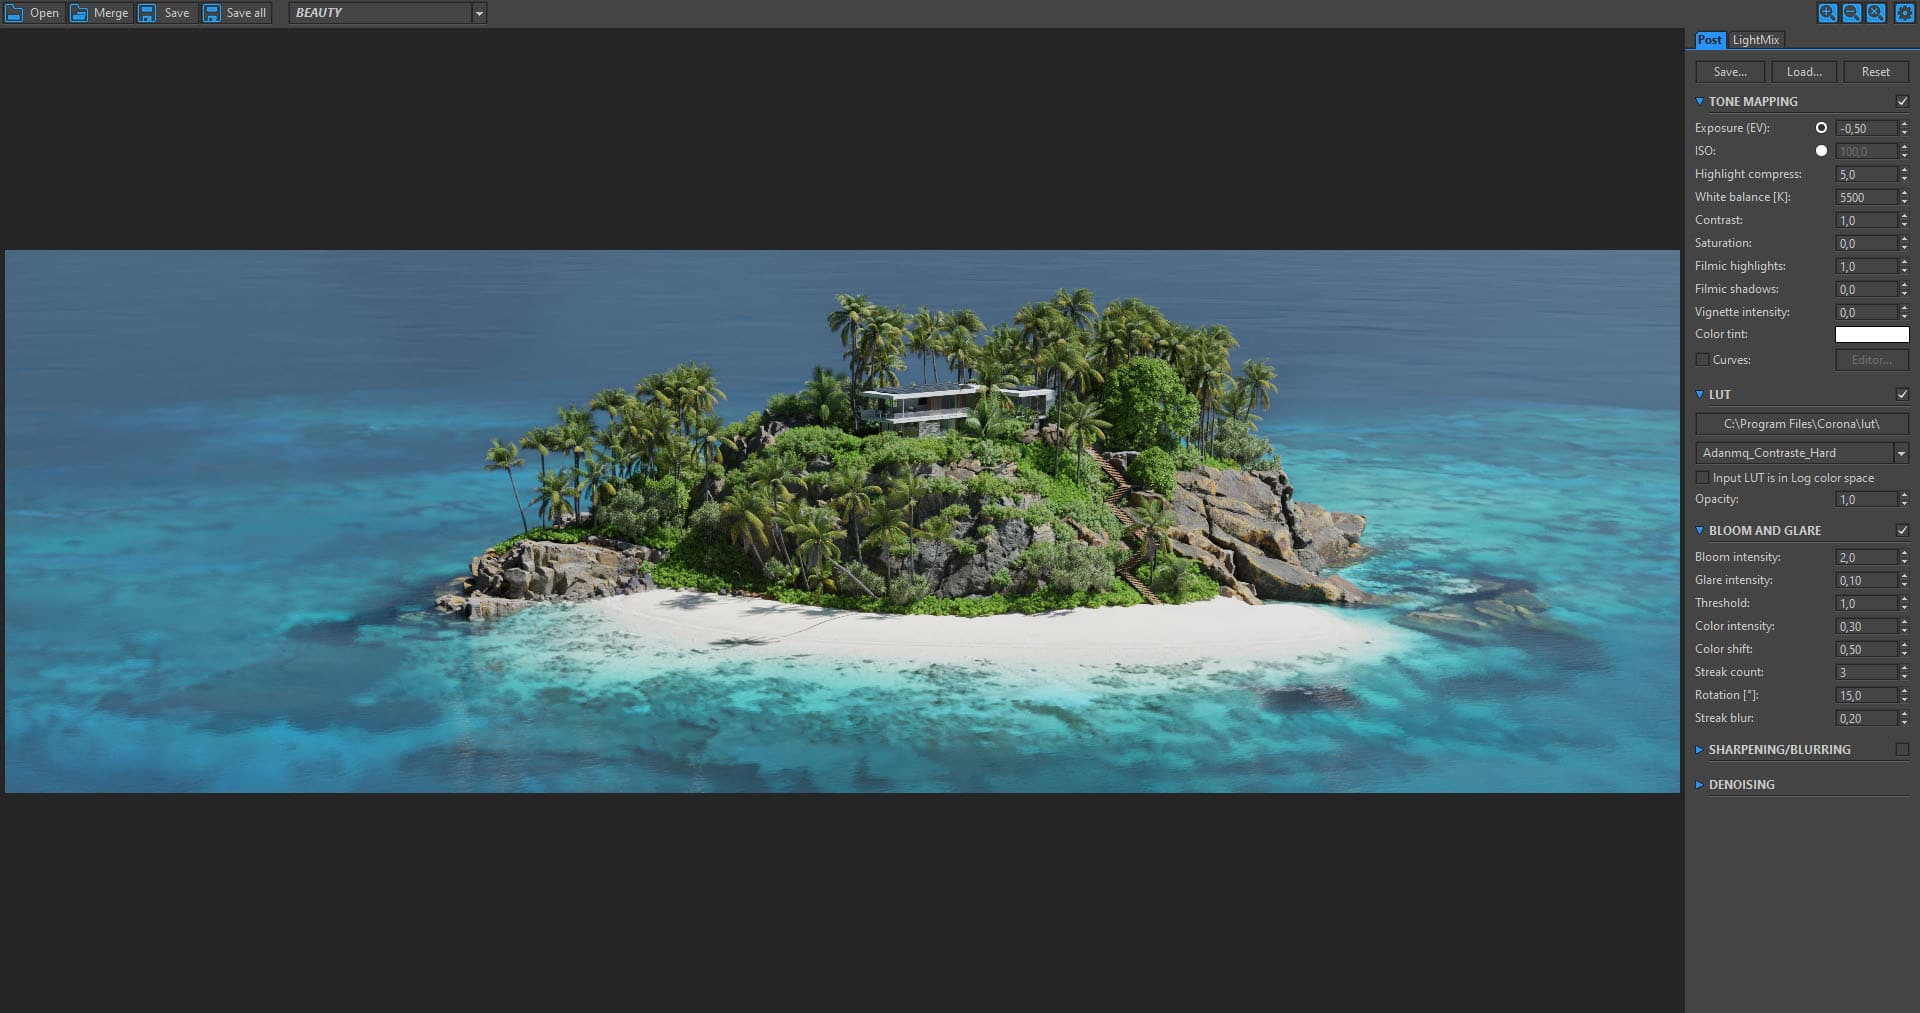
Here’s how my image looked like after basic post-production
Step 3
Now it’s time to take our PNG or JPG (whatever you like though I prefer PNG at this stage because it better preserves small details) back to Photoshop. For some images, I want to add some chromatic aberration using the Lens Correction tool – it’s crucial to be very subtle with it. It also softens the image a bit, removing that artificial sharpness bringing the render a little closer to a photographic, imperfect look.
I always say that if a render is supposed to look like a photo, it should be treated like one. Thus, my next step is to use the Camera Raw filter. And this is where the fun begins. I brightened the shadows slightly and significantly increased color vibrancy. Then, I applied the changes.
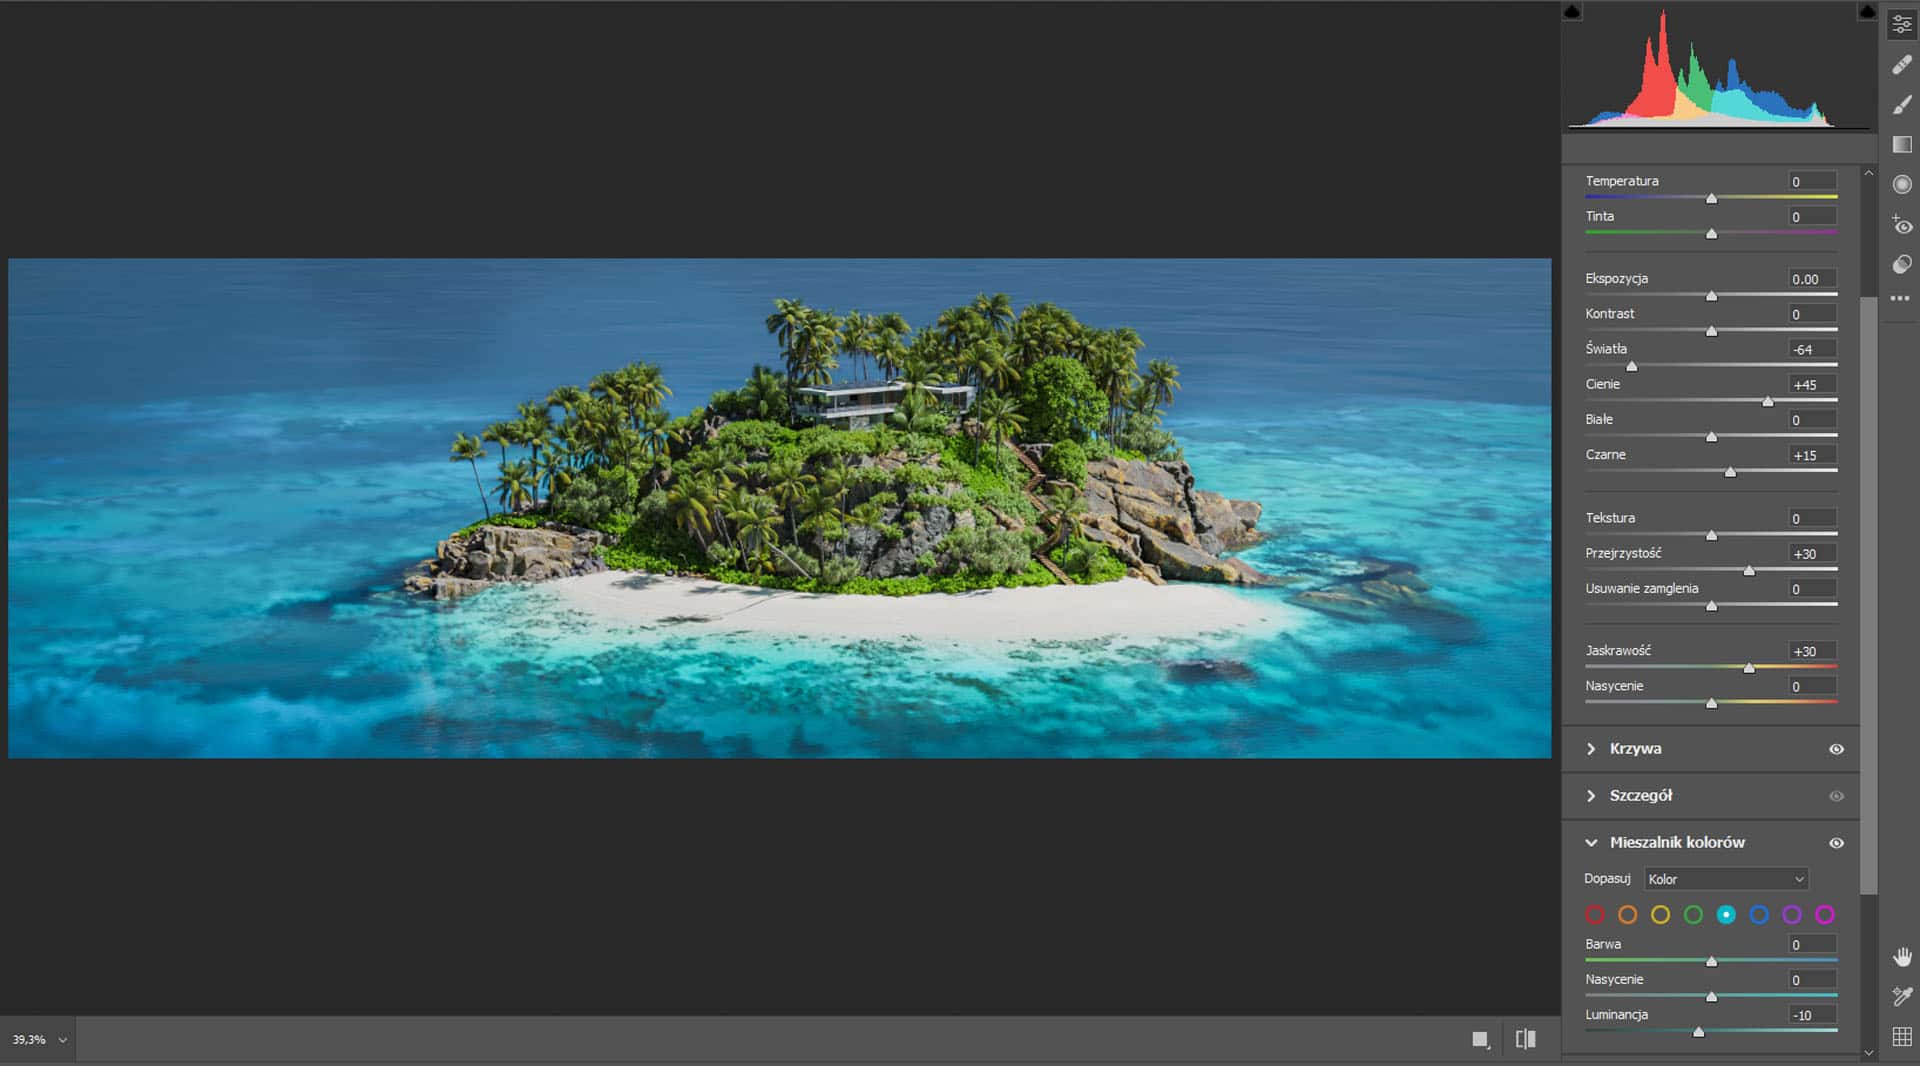
Looks good but that’s not it
We enter the Camera Raw filter once again for some final tweaks. I add some film grain because the image was initially denoised it in Blender because there’s a considerable difference between render noise and film noise. The latter might be simple, but it’s a powerful effect that fools eyes into thinking that they’re looking at a photo. For other settings, I go extreme with the blue to give the water that holiday look and do a similar thing to the Foliage, making the yellow parts brighter, slightly more saturated, and shifting their hue more towards orange. I also compressed the lights and increased exposure since we’re on a sunny tropical island. It has to be bright.
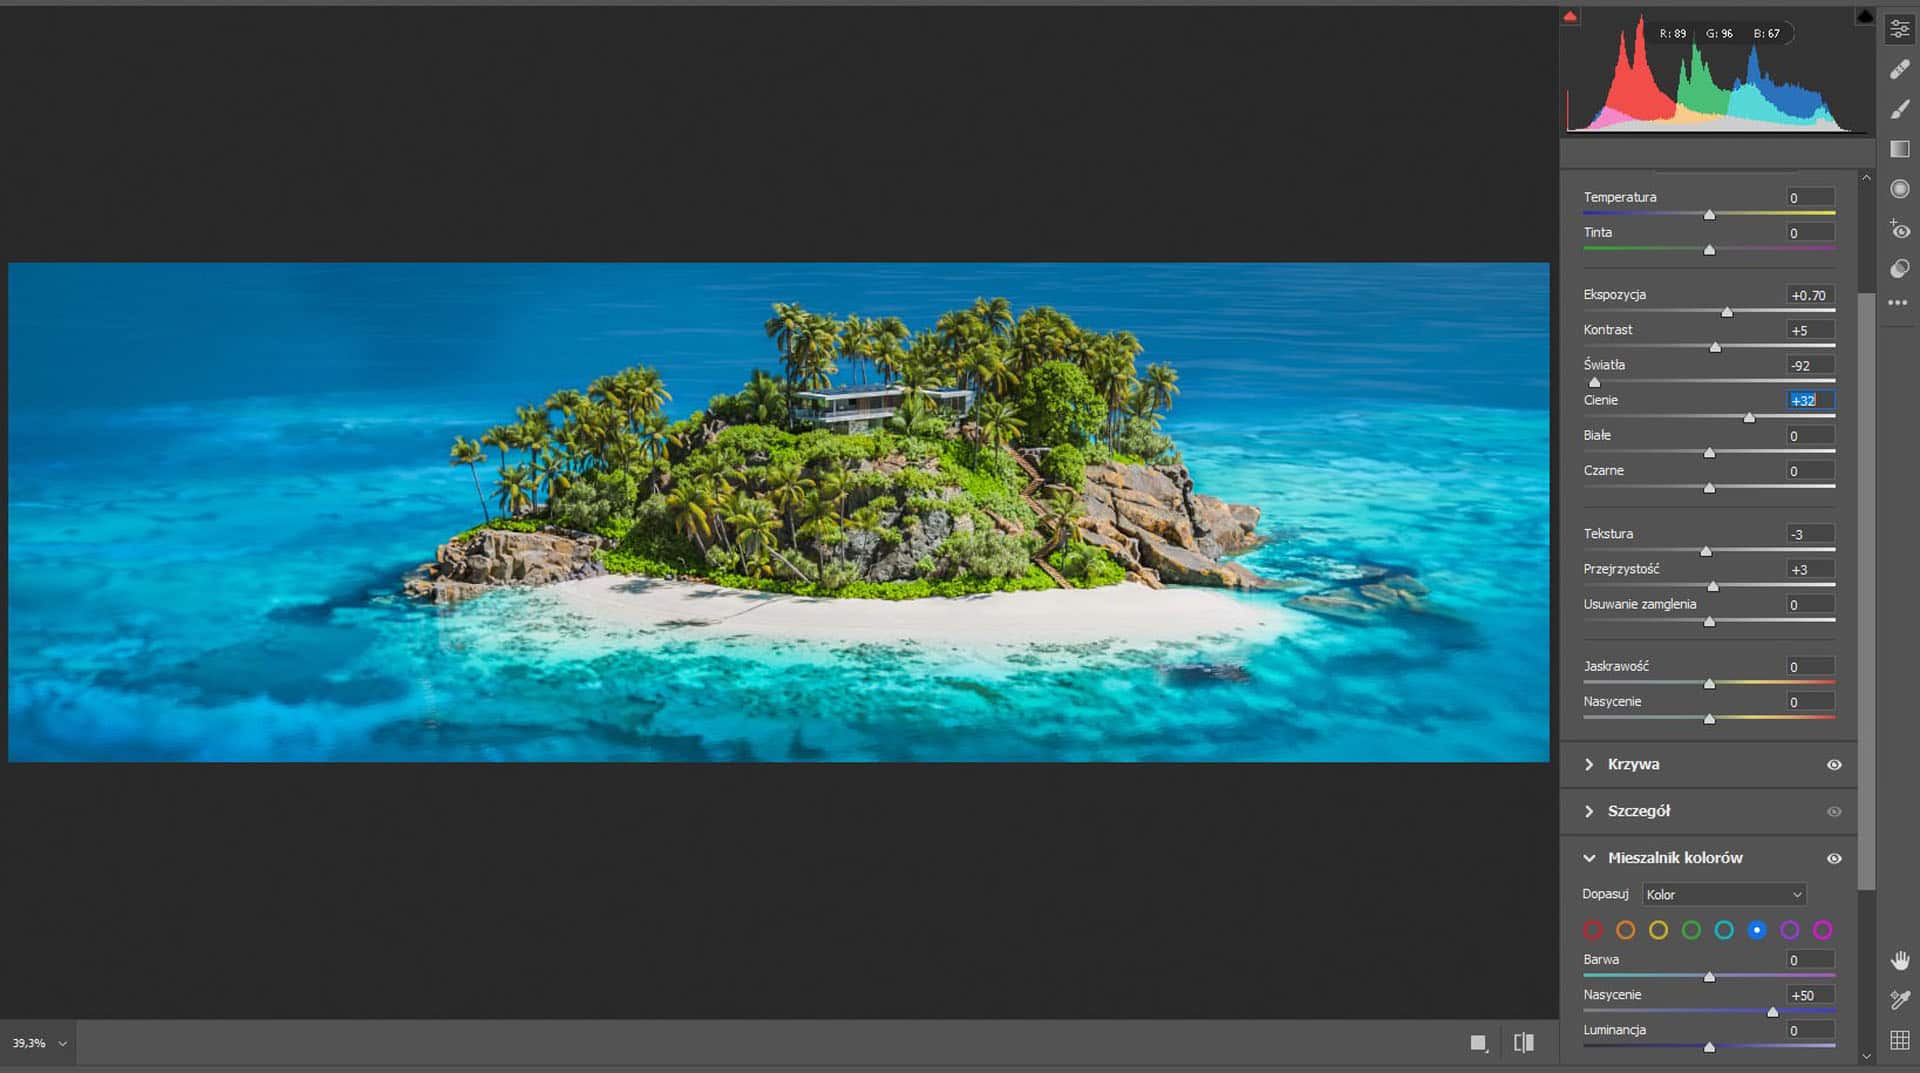
Almost there…
Step 4
Finally, it’s time for the details that are too difficult to get in the 3D software. For this image, I wanted to extend the reef a bit further and add some more information to it in the back of the island. As mentioned before, I couldn’t possibly create a big enough particle system without making my PC hate me.
First, I wanted to blur the line where the reef ends, and the deep sea begins, so I did that using content-aware fill in Photoshop around the areas that I felt had an unnatural transition. After that, it was time for some basic overpaint. However, that’s another thing that must be subtle. How to know when it does? I usually get away from the image for a couple of hours, and when I get back to it and can’t tell where I painted something, it should be good. I’ve found a beautiful photo with a similar angle as my render and just use a brush with low opacity to blend it in areas that needed something extra.
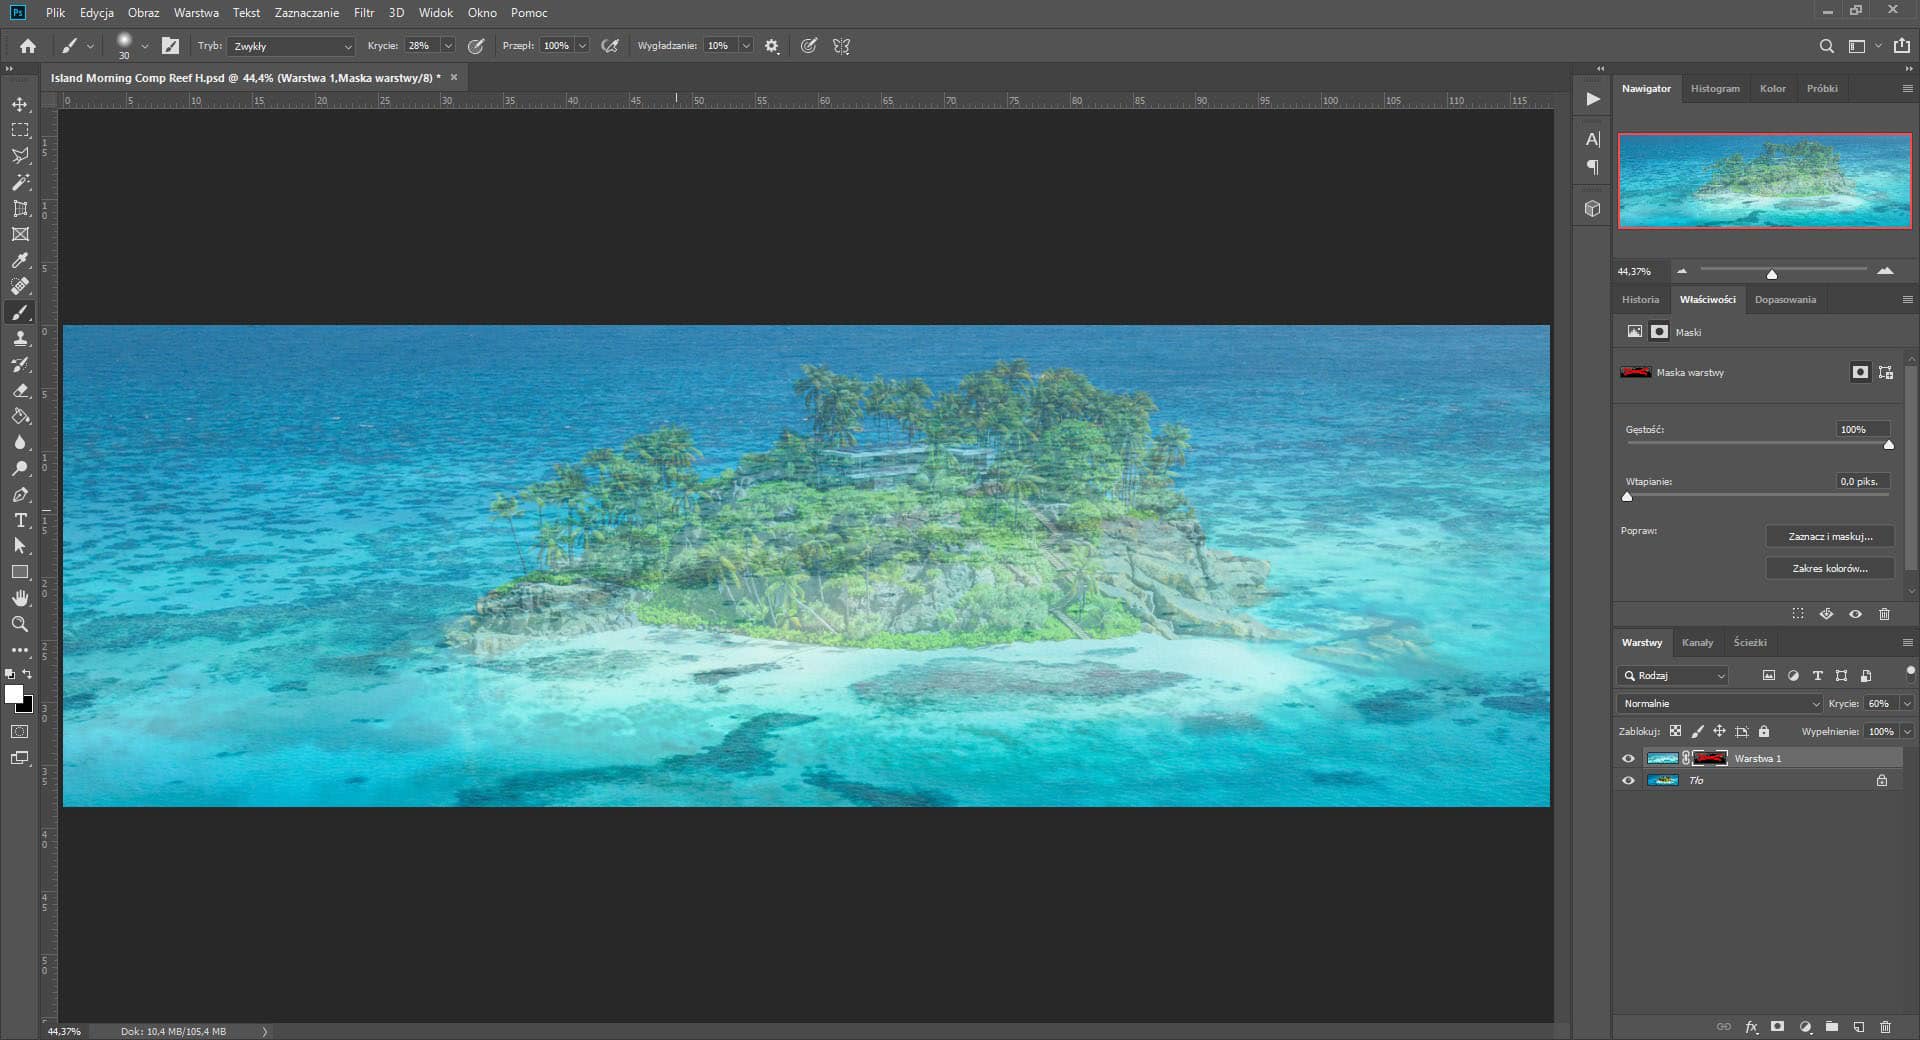
Here’s the image at 60% opacity with the mask disabled
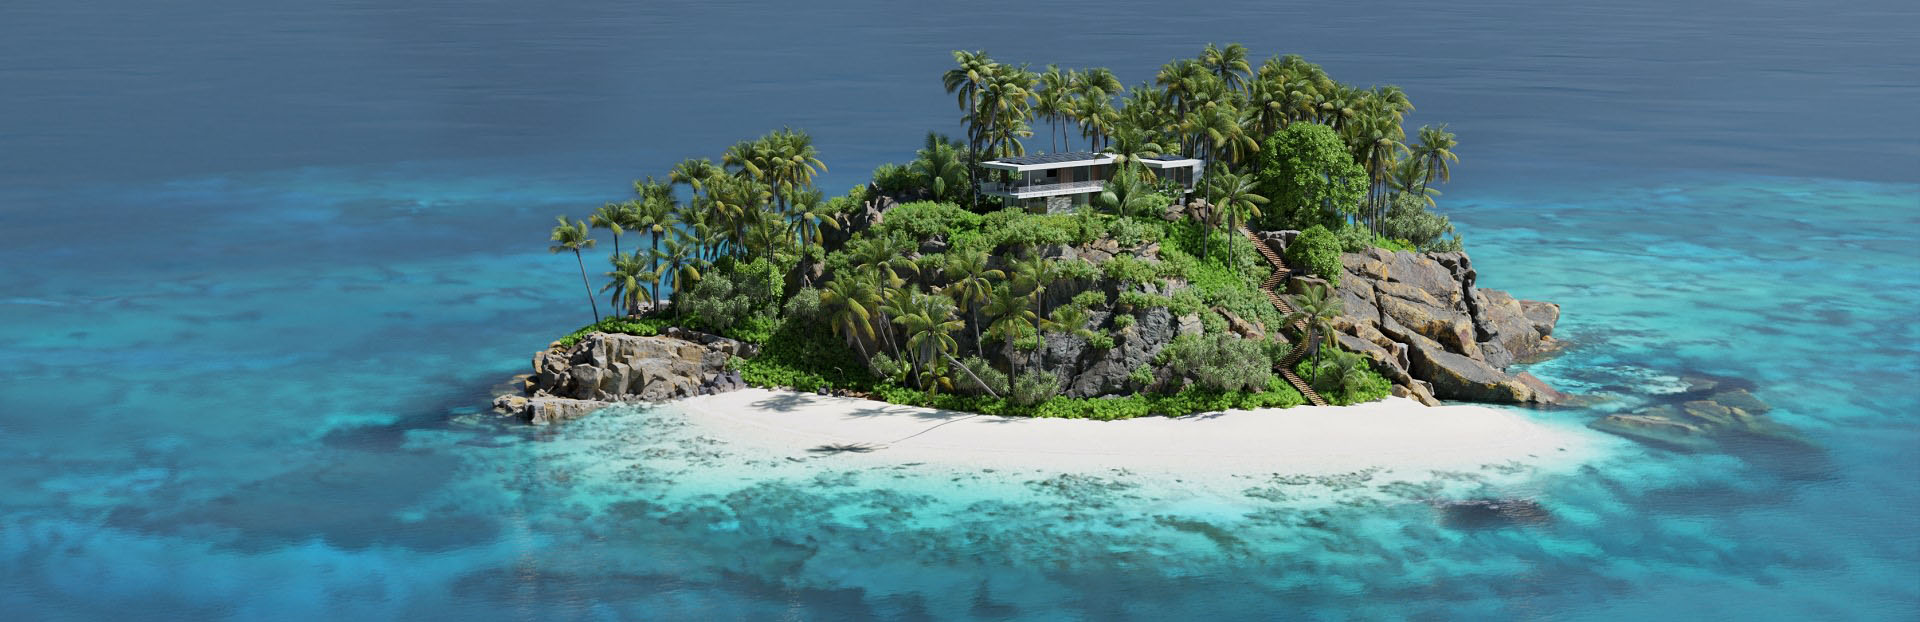
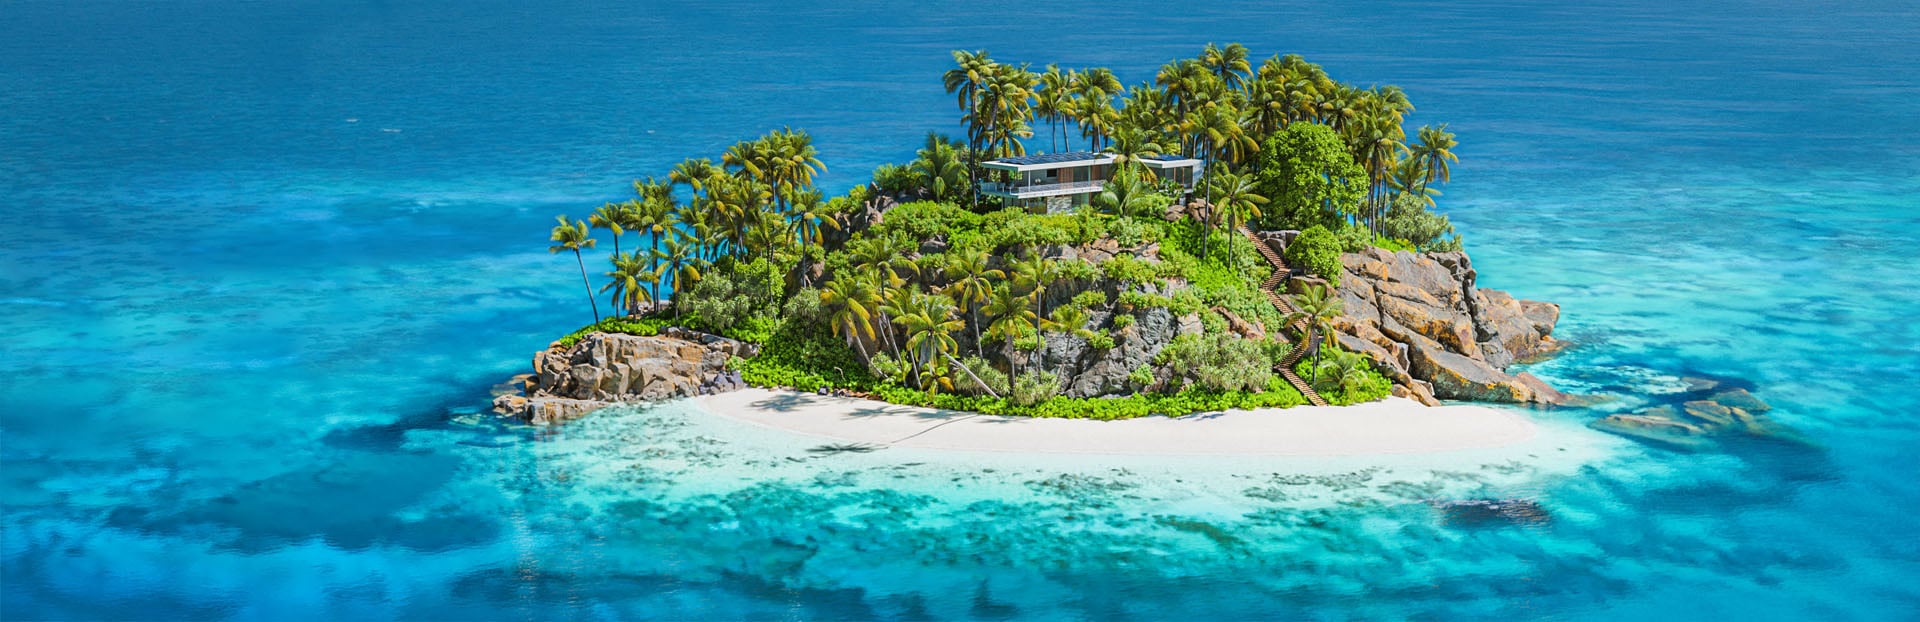
Final Result
Conclusion
As you can see, you don’t need much to own a tropical island. Sometimes, effort and Hawaiian music to get in the right mood is a good starter pack. Thank you for reading, and I hope you learned something. If you’re using other 3D software, maybe you’ll give Blender a try? As you can see, it can do… stuff.
Blender has changed a lot over the last couple of years, and many of the things that kept people from using it are now gone or fixed.


Links
https://www.behance.net/pawel-pecherzewski
https://www.artstation.com/pawelpecherzewski
