


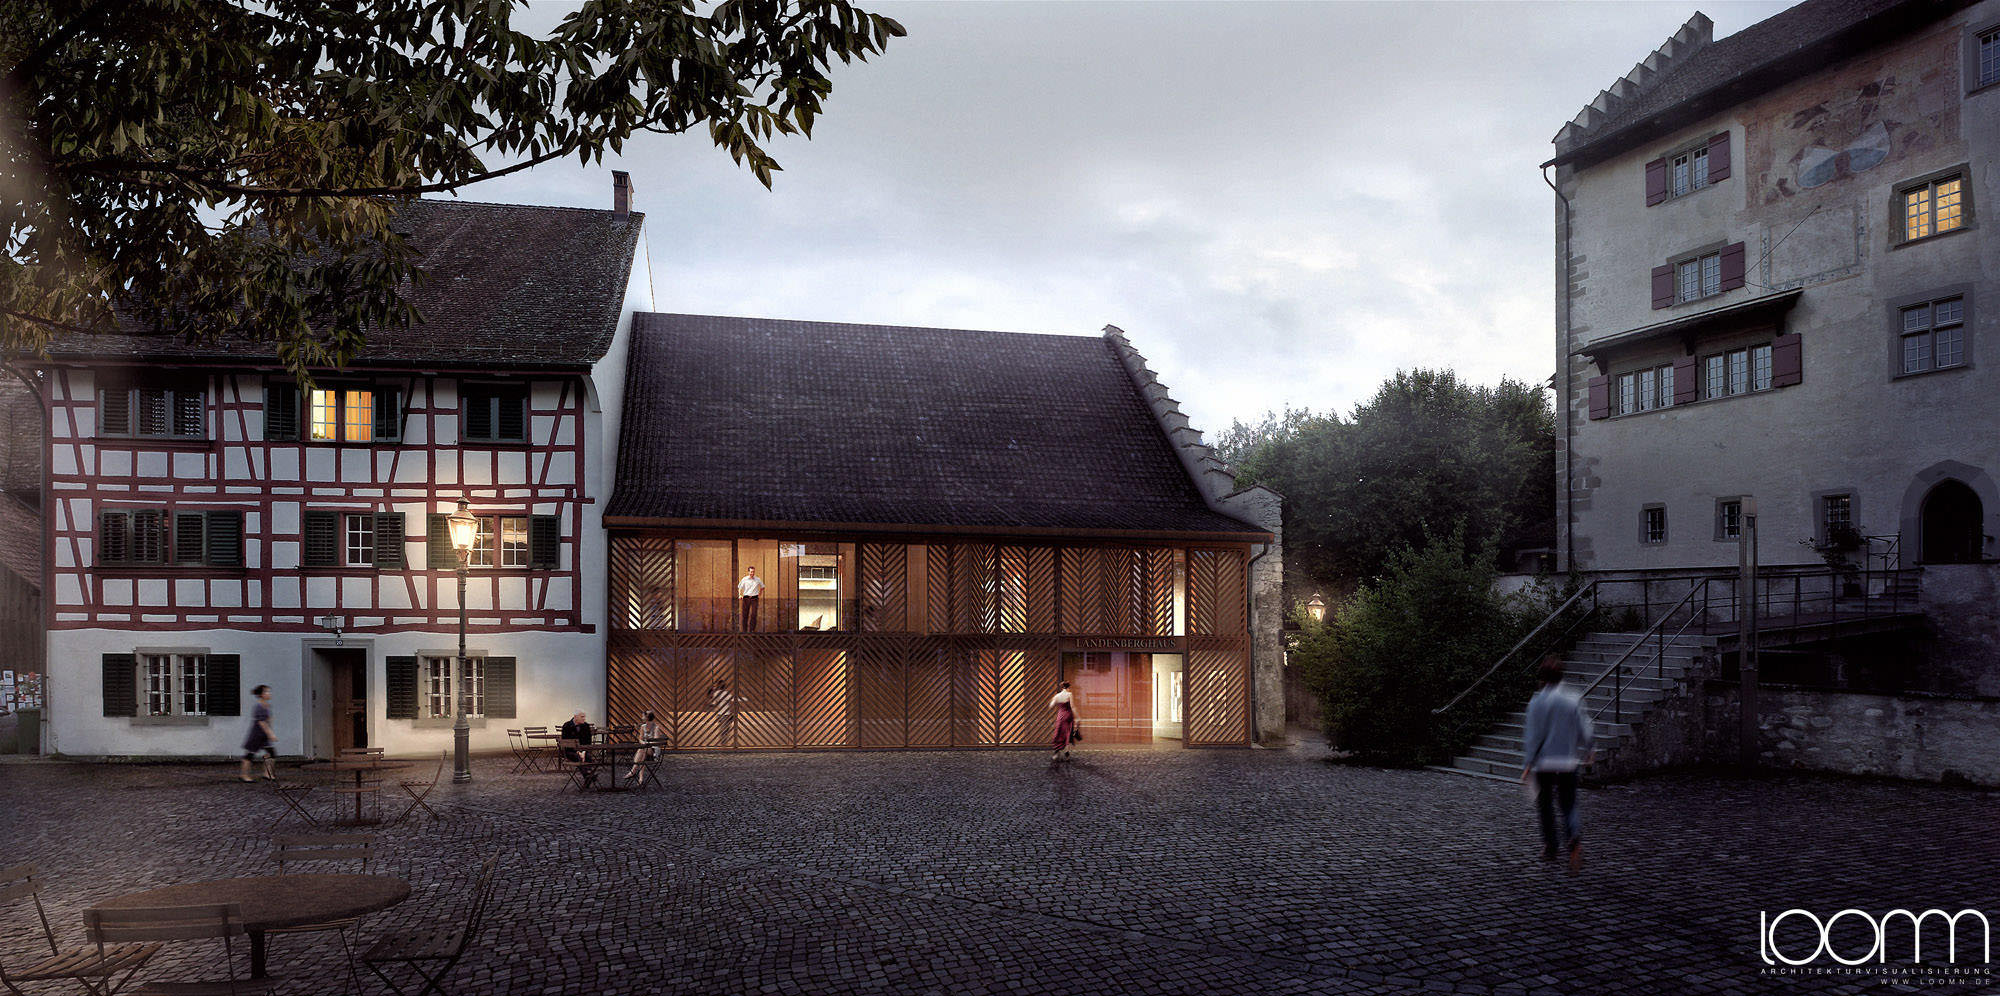
Making of Landenberghaus by loomn
Loomn‘s moody scene of a Multi-Functional Building with Café and Theatre competition entry for Karamuk-Kuo Architects awarded them Best Visualization of the Week NO. 41 using mainly ArchiCAD, Cinema4D + V-Ray and Photoshop as the software combination for fast turnaround fitting the competition production time-frames. Check out loomn’s process as Jost Hauer describes it in great detail below. Enjoy!
![]()

Author: loomn
loomn is a German based studio founded by architect and 3d artist Jost Hauer. Before starting his own office in January 2013, he worked as a leading 3d artist and manager for Maaars and Total-Real in Zuerich.
Introduction
First of all : Thanks, Ronen!!! You are doing a terrific job!
I greatly appreciate the opportunity to showcase my workflow on your platform and I am already very much looking forward to reading your comments and recommendations.
In most cases, Loomn is doing images for architectural competitions.
That’s because of three reasons :
1. We are Architects
and we are always interested in new ideas and in how we can communicate these together with our clients.
2. There is a definite deadline in competitions
so the focus is on the overall statement of the architecture and its feeling and not on minor details.
3. We love the competitions
and we also like to win them too!
To handle tight deadlines and work-in-progress designs, we have elaborated a workflow which enables us to adapt an image in a very fast way.
We are using three applications :
1. ArchiCAD (20%)
This BIM modeling application is great for all things related to architecture.
2. Cinema4D + V-Ray (30%)
For extended modeling work and base platform for V-Ray usage for us.
3. Photoshop (50%)
Main application we use and where all the GOOD STUFF is done.
Since Photoshop is what we all have in common and since it’s the software we do most things in, I am going to focus on it in this article. I am going to describe the modelling and rendering part in a rather basic way and won’t be too specific about the software. All the things I am writing about in this respect can be done in any other modelling or rendering software as well, there are nearly no differences. The only difference is in how you use it, so just pick the software you feel most comfortable with… and stop telling me that 3ds Max is better!
Starting The Project
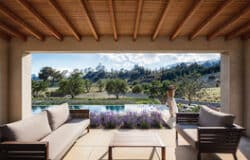
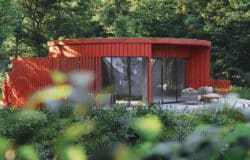
At the start of a project, I usually ask my client to send me as much reference material as possible. It does not really matter what it shows as long as the client feels it matches his idea. This might be the photo of some material, a visualization by somebody else, a photo, a painting, a furniture ad, a still from a 60’s movie or something completely different… like a painting by the client’s 3-year-old daughter maybe?
It is most crucial to figure out what the client has in mind and by collecting and putting all his inputs together I create a road-map or mood-board. After that I spend an hour or two in Flickr or Google to gather as much matching material as possible. This way I establish a unique library for each particular project always ready for use – consisting of materials, textures, light, people and so on. The idea is that by scrolling through these images – even at 3 o’clock in the morning with your brain completely blank – you instantly get fresh ideas or discover things you didn’t think of before.
This particular piece was done for Karamuk Kuo Architects in Zürich. I really enjoy working with them because they spend a lot of energy on providing me with plenty of material and on explaining their idea. In practice, this procedure has proven extremely rewarding and much more efficient than it looks at first glance because the more I can see through their eyes the faster the image will be precisely what they have in mind.
The idea of this project was to implement a multi-functional building with café and theatre into an existing situation. Karamuk Kuo decided to maintain the old surrounding walls of the former building and integrate their new design into this space, thus allowing them to preserve the context of the situation. The materials were also chosen in a way that reflects the existing situation.
I like playing with this contrast of old and new. So the image had to show a building that was new, innovative and raised the quality of the location but at the same time looked natural in the composition of the original context.
Modeling
As pointed out before, I use ArchiCAD for modelling basic structures. If it gets more complex, I switch to Cinema4D, but in most cases ArchiCAD is fine for architectural geometry.
There are two fine things about ArchiCAD :
1. Architecture BIM
You can adjust architectural elements with a few clicks. If a client wants you to move or open up a window, shut a sun-blind or anything similar like that, this is done in no time.
2. Link with Cinema4D
You can just refresh the changed ArchiCAD model in Cinema4D without assigning textures or worrying about anything else. Just hit render and it’s done. For this I am using a plugin called Din3d.
But now back to the project…
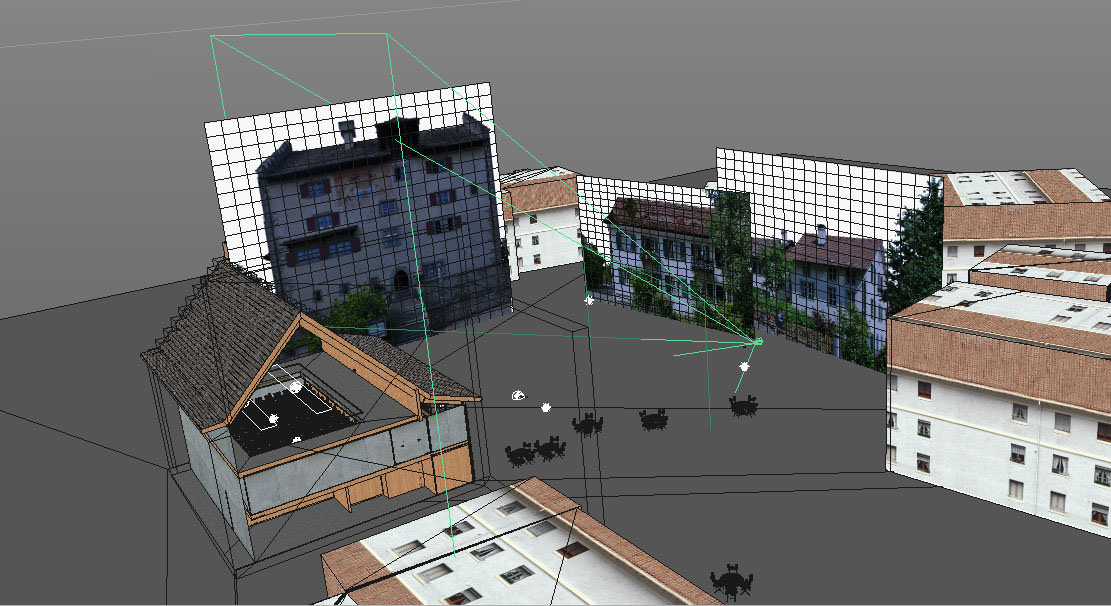
This is a screenshot of the model :
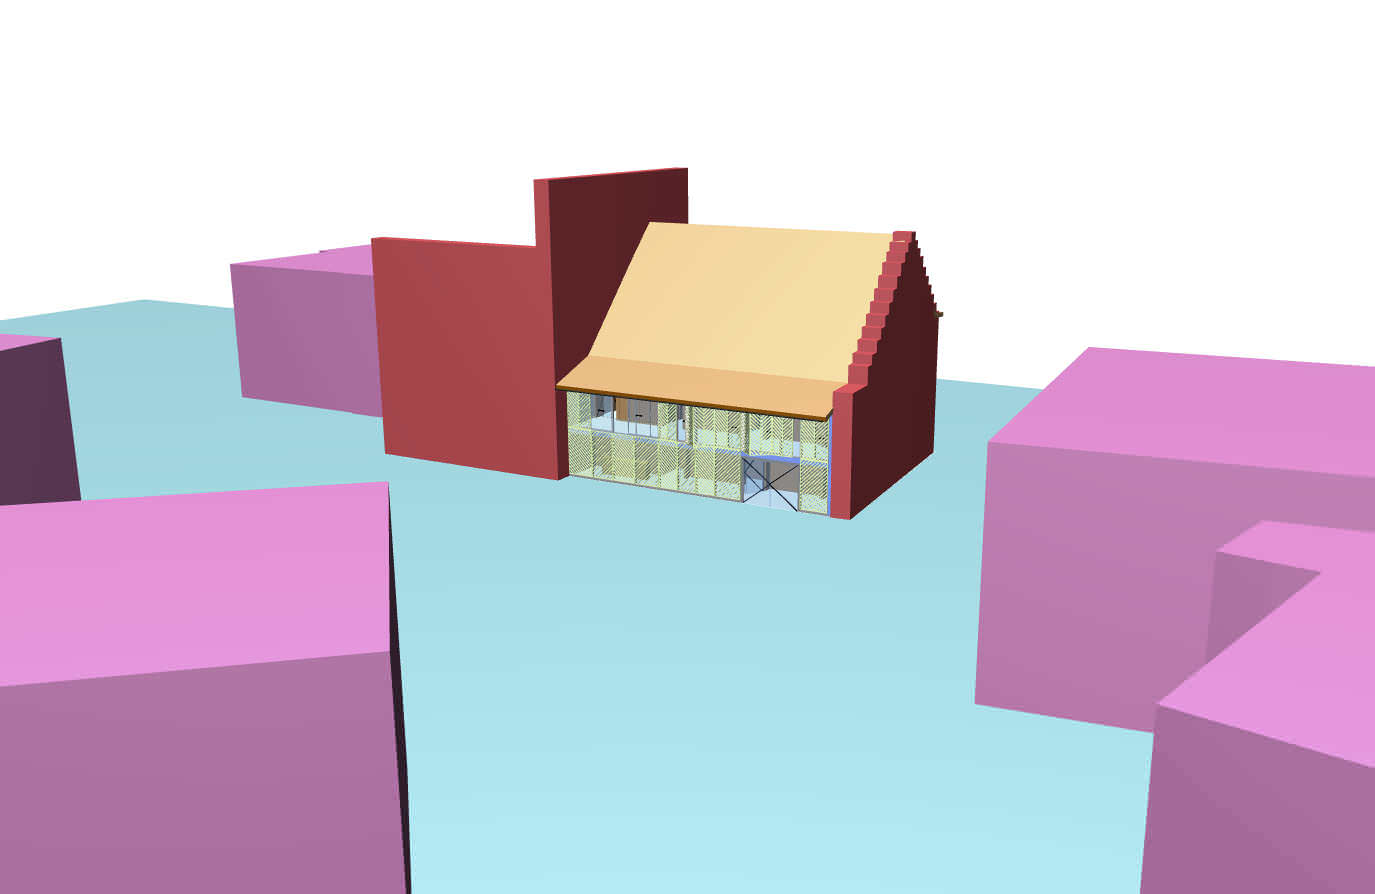
Thrilling, isn’t it?
The red walls are not being rendered, they are just there to block the light and as guidelines for the integration of the photos.
Well, there isn’t really much more to say about this… so let’s switch to Cinema4D.
Viewpoint / Camera
The very first step after importing the model in Cinema4D focuses on the setting up of cameras. Usually, I put up a bunch of different cameras based on a rough viewpoint idea favored by the client.
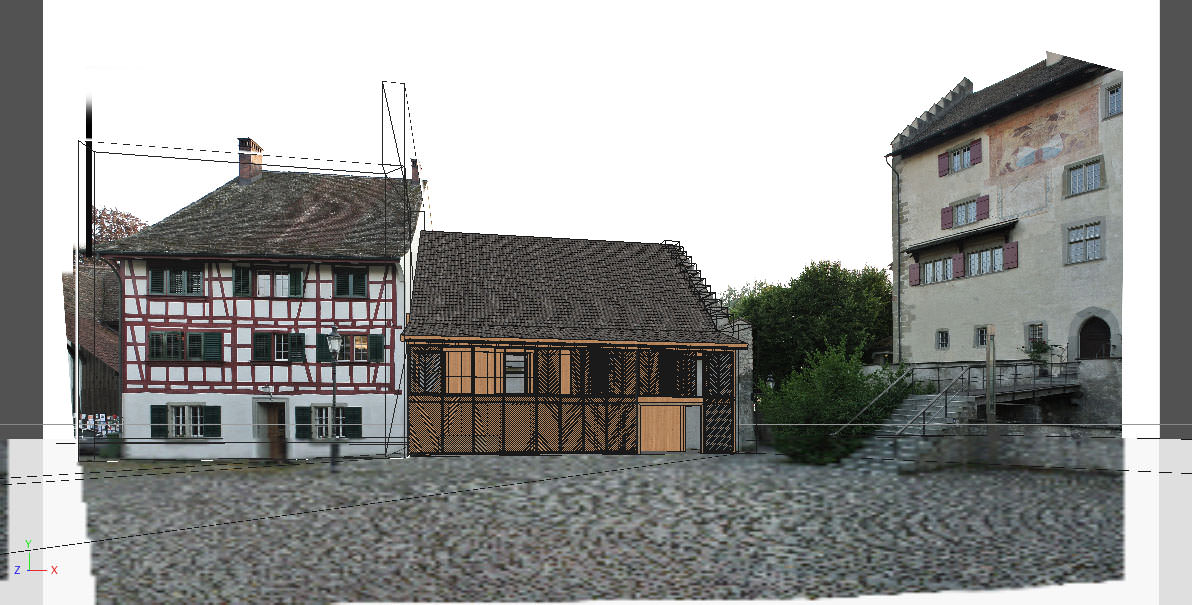
This time though, we agreed to use a photo montage as the basis for this image. My client took a few photos of different locations. Since he preferred a wide-angle shot of the whole courtyard, I stitched these images together and roughly adapted the viewpoint in Cinema4D, thus giving him 3 different views to choose from.
This one was his favorite :
Texturing
For me texturing is like rocket-science, especially in V-Ray. I am deeply impressed by what some of you guys can do with a texture, but if you do competitions, you’d better watch out! Too often I’ve heard the sentence :
…oh, sorry, didn’t I tell you? … we changed the facade from plaster to bricks last night…
just one day before deadline and then, apart from time pressure of this sort, it’s also about saving rendering time in general of course. So, keep it simple!
Nearly all of my textures just consist of a diffuse, bump and one reflection/specular channel quickly put together in no more than 2 minutes.
If I sense that one material might be problematic, I hardly do any texturing at all. In this case I just use a diffuse color and a glossy reflection instead. Using Multi-Passes in Photoshop you can get away with pretty good results by adding the texture in post.

Setting up the Render
I added some furniture and some area lights. The main light source is a dusky HDRI light-dome. To achieve an authentic reflection in my glass, I set up some Alpha-Sprites with photos of the surrounding buildings.
To create these I use the blue channel in Photoshop to do a sky replacement. Just click Cmd (Mac) or Ctrl (Win) on blue in the channel tab to select the color.
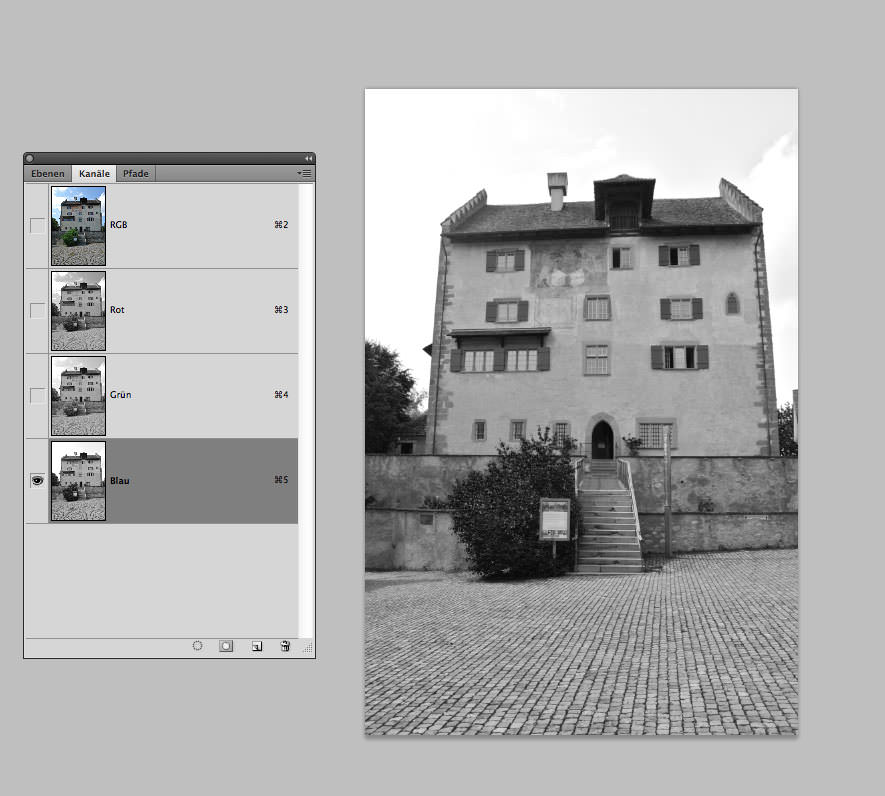
Then use this selection to mask the image layer. After that use curve on that mask and adjust it until you have got a good selection.
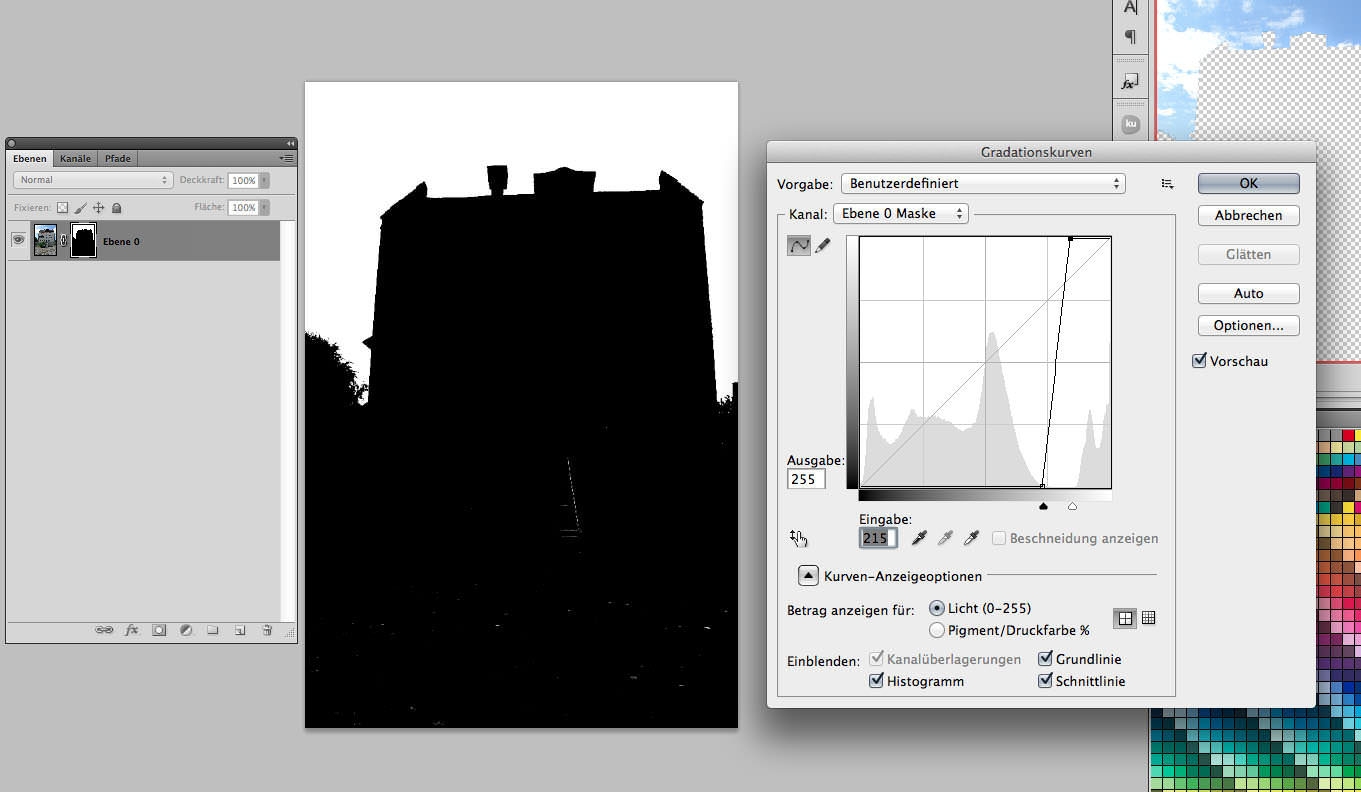
Now just paint out the obvious white parts that you want to keep in the image and invert the mask.
As a next step, I use the perspective-crop-tool to straighten the image.
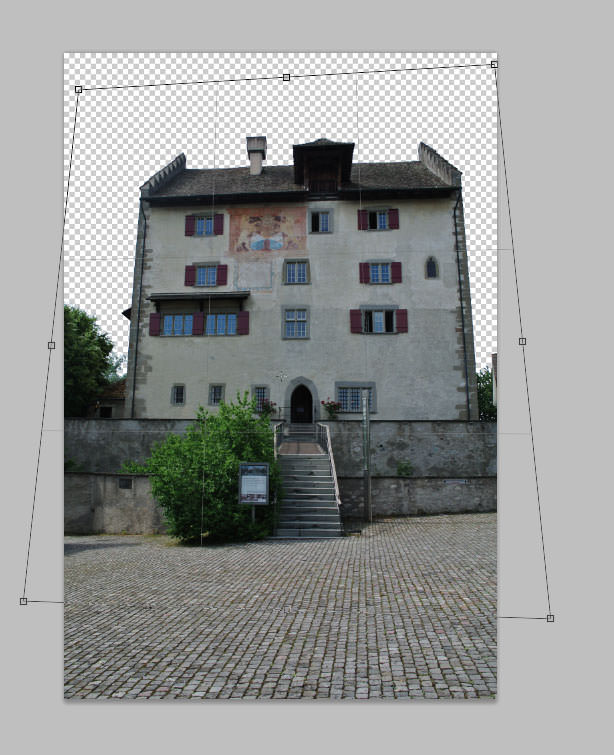
As I am aiming for a night scene, I multiply a blueish color onto this layer.
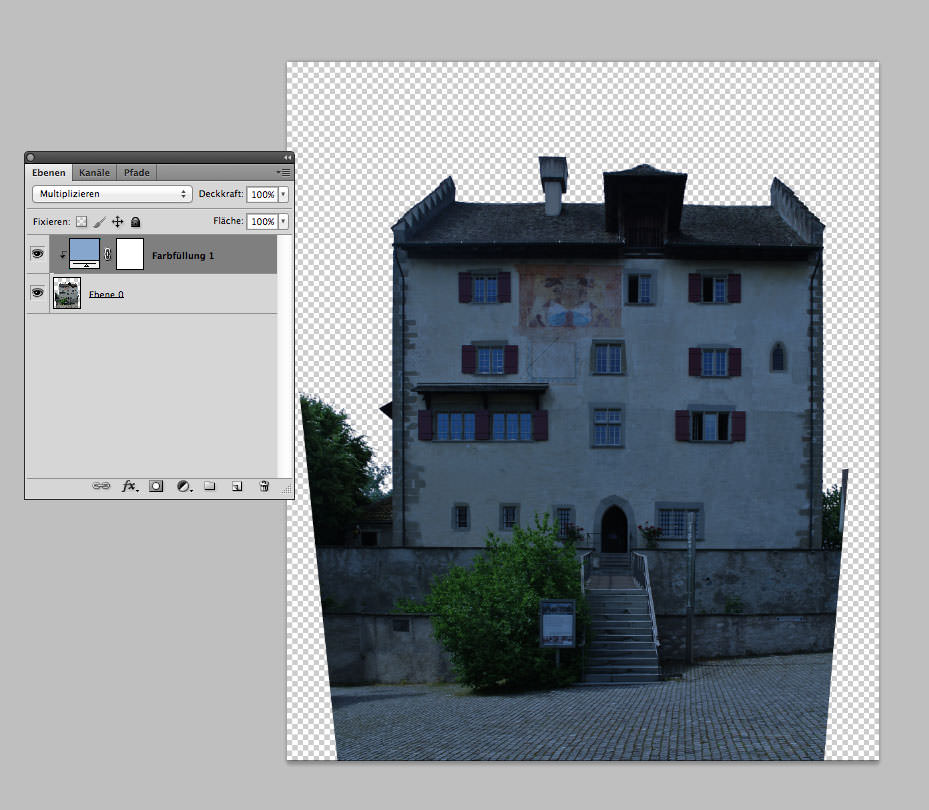
And that’s it. As simple as that. Took me 20 times longer to write about this than doing it.
And finally, the most important part in Cinema4D is to activate the Multi-Pass Rendering. Using the Multi-Layers in Post-Production allows me to do dramatic changes to the image within a few seconds.
But before I get too deep into this, let’s hit render :
Bamm! That was fast… as I told you. But I guess you are not quite impressed by my render output. So let’s see what Photoshop (+Me) is capable of.
BTW : I actually frontal-mapped the background plate on to the courtyard in the front. Saved me a lot of time and looks really authentic.
Post-Production (or Actual-Production)
Starting with the actual job now…
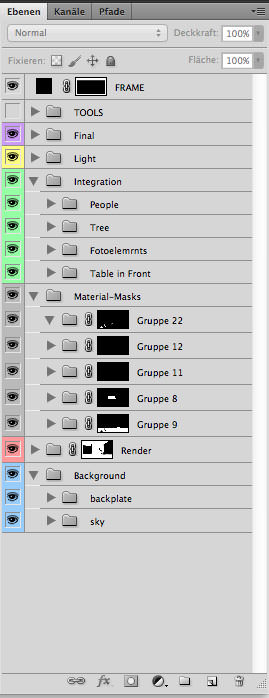
I use a very linear structure when I work with Photoshop. If you work in a team and you have to make changes to a Photoshop file done by your colleague, a good and transparent structure can be worth a lot (I guess the person I am referring to here, knows that the credit for this part belongs to him; thanks again, buddy! 😉 ). My structure is pretty straightforward and nearly works the same each time. And it looks like this :
Put into a fancy breakdown, it might look somewhat like this (I reduced the layers dramatically) :
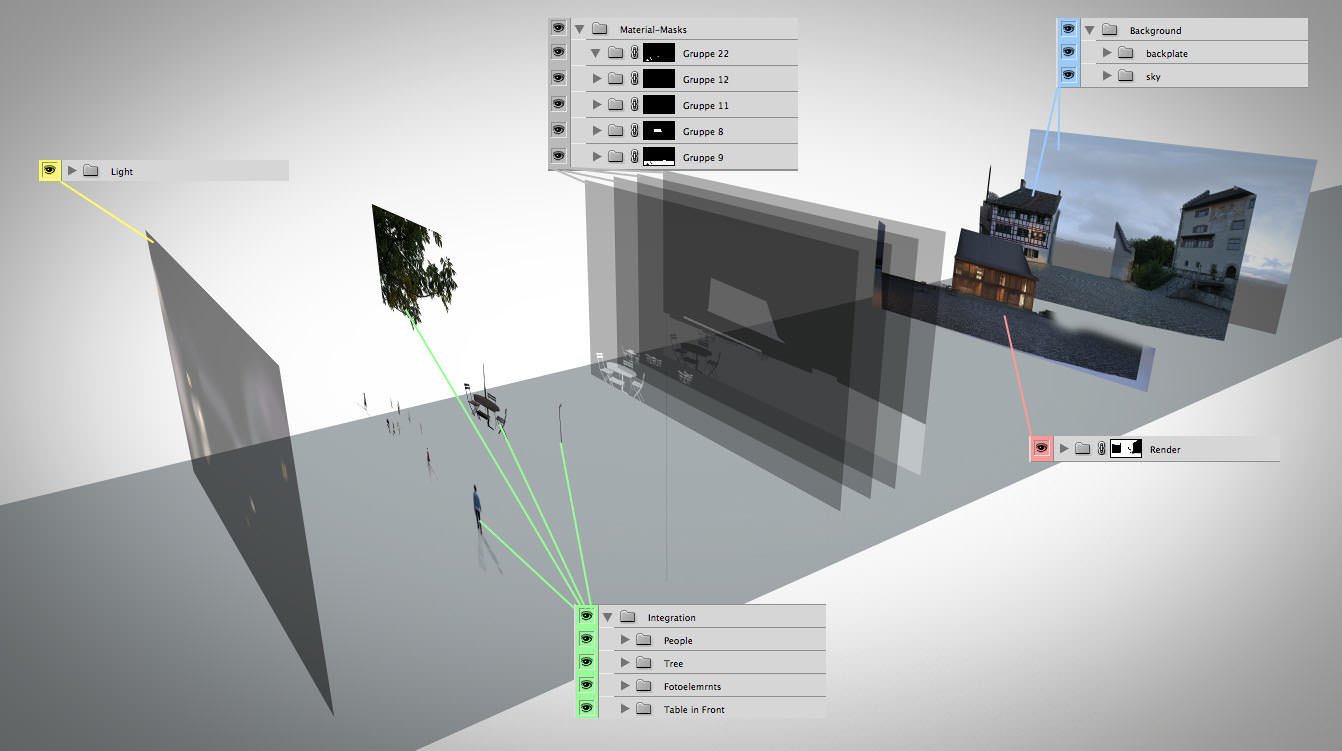
Ok, let’s start…
Background
Sky : Self-explanatory, the sky has an enormous impact on an image. Take your time and choose it wisely. You will be influenced by it in the complete following process. It is also a very critical part, clients love to criticize skies a lot.
Back-plate : This is my original photo montage. It has been altered, stretched and stamped to fit my needs. I also painted in some shadows or Ambient-Occlusion where the new building will be.
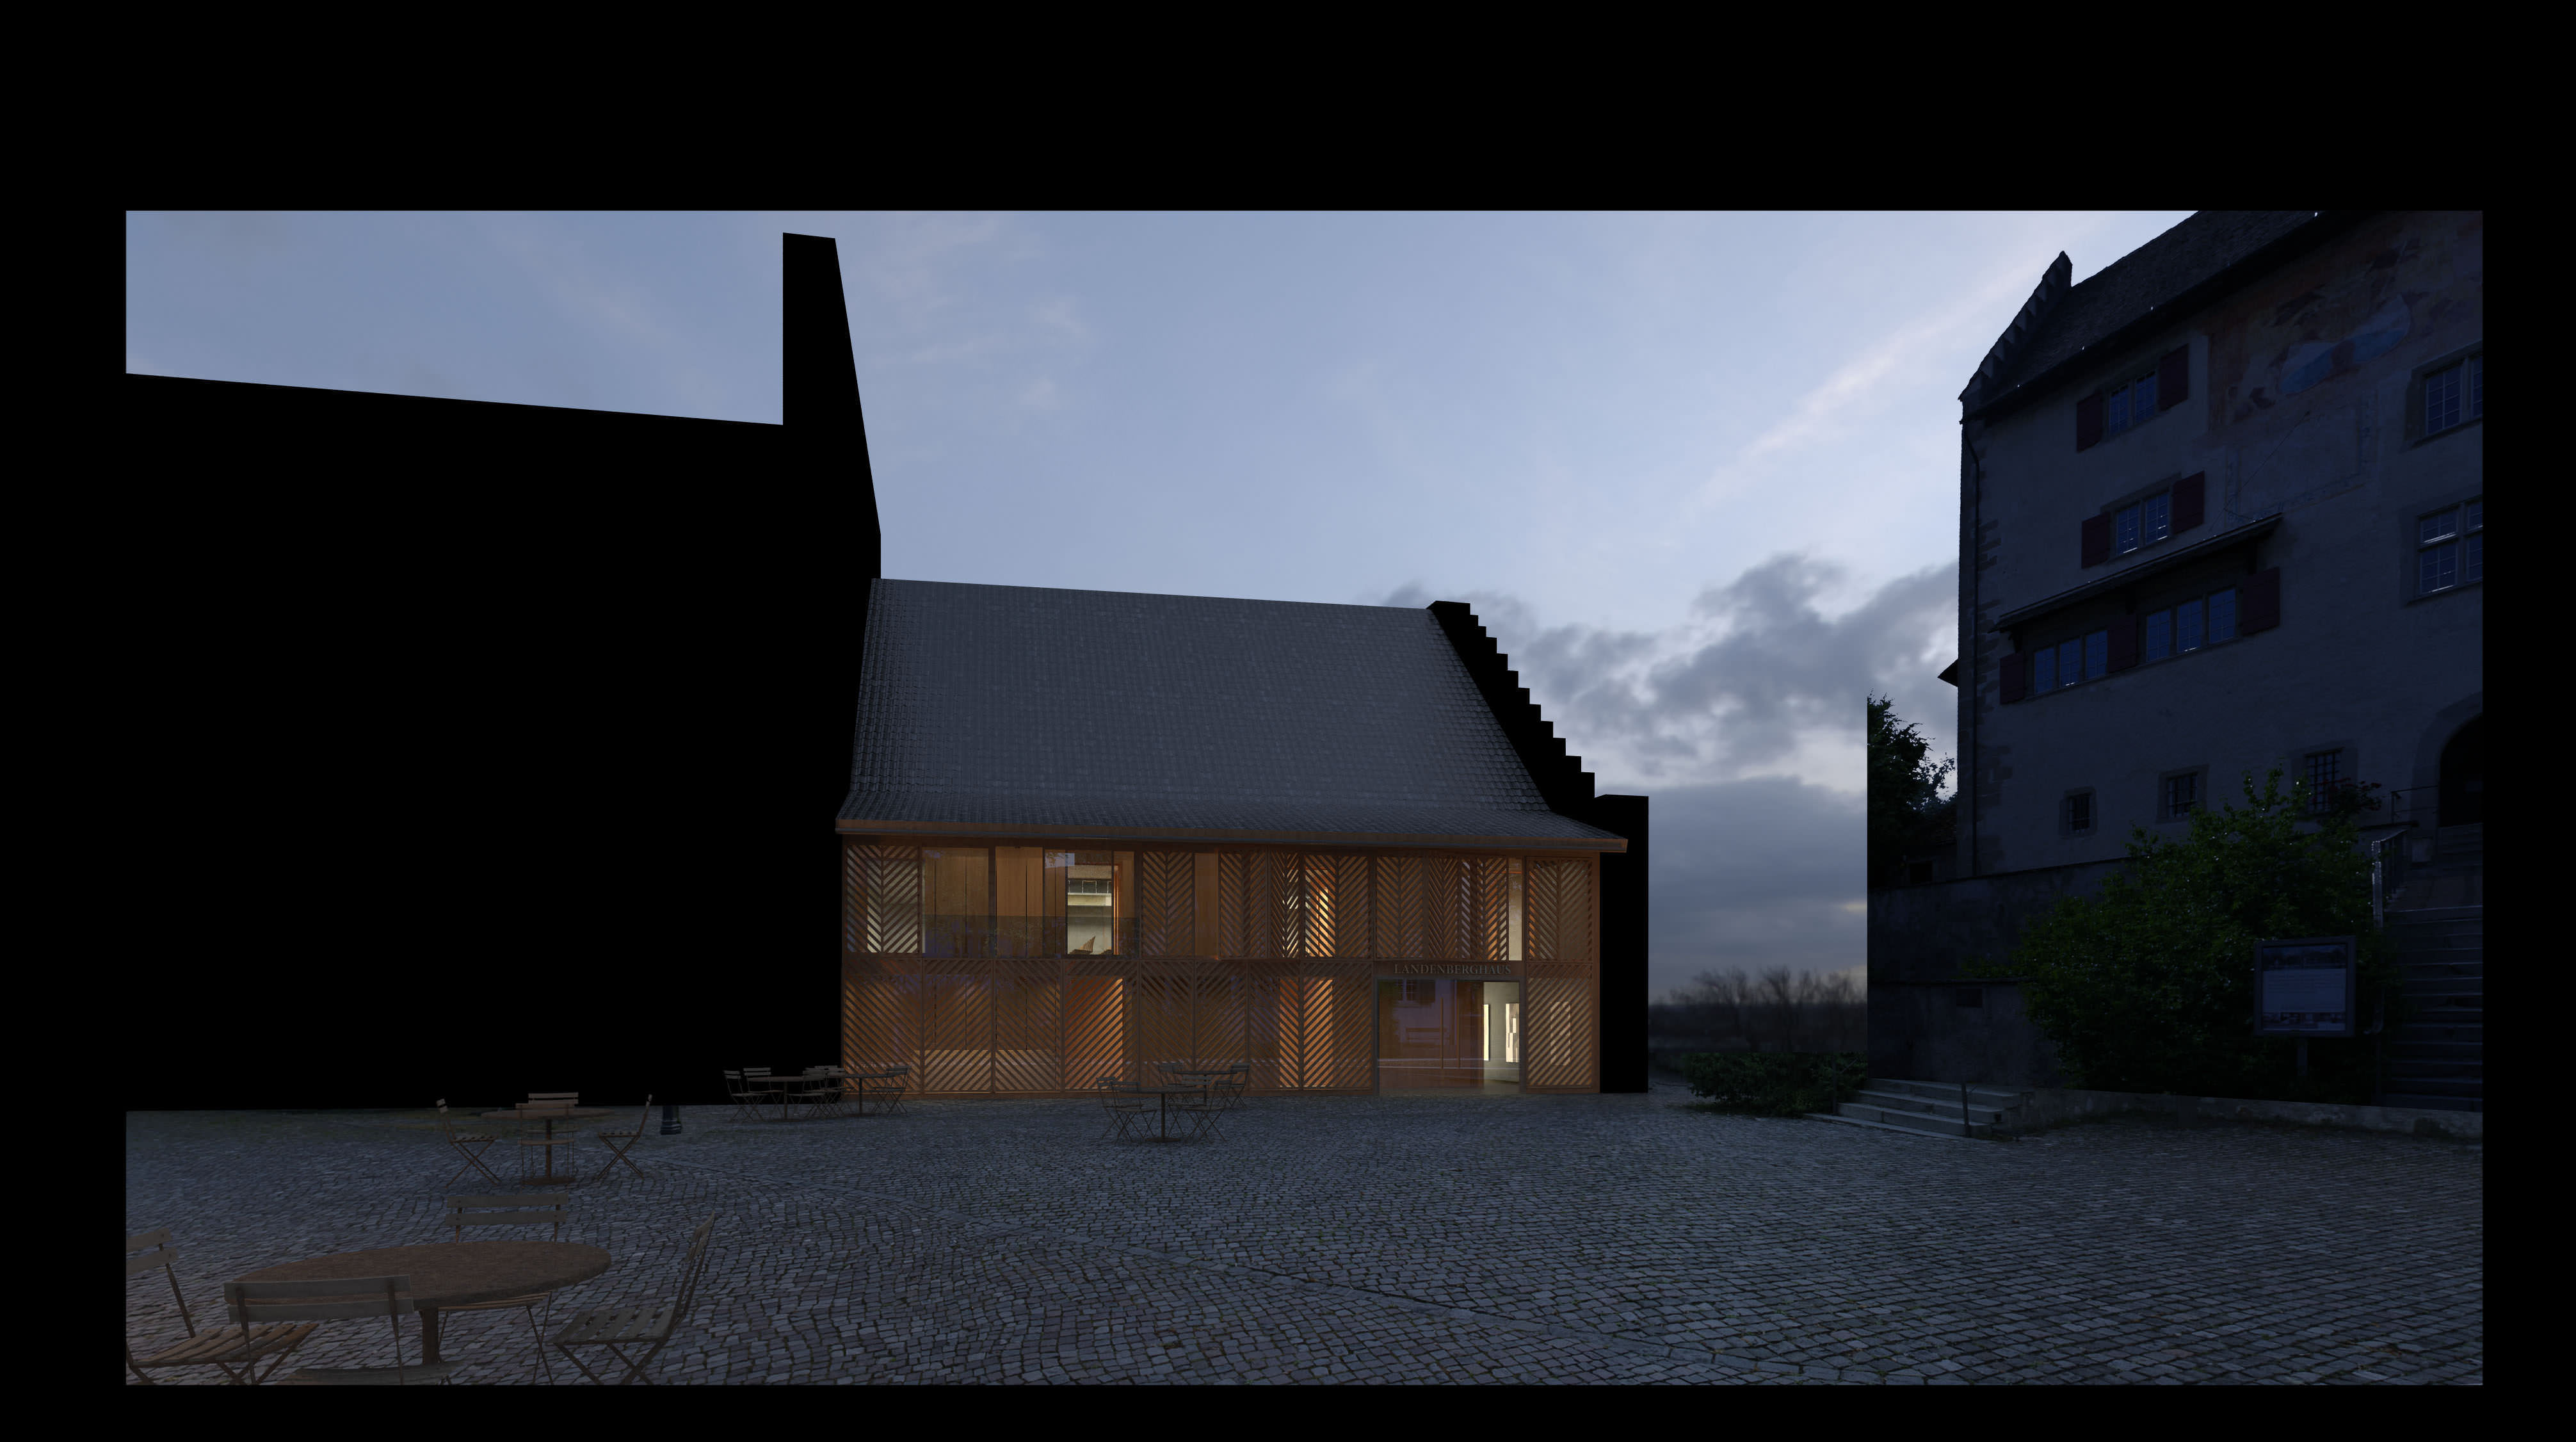
Render
Here is my Beauty-Pass. But also there are Passes for Reflection, GI, Lightning, Ambient-Occlusion and Shadows. These give me more control over my image and I can add or reduce certain effects where it is needed. You can also use these passes to add light and/or shadows to parts that you are going to compose over the actual render. Which will be explained in the next part…
Material Masks
I am using Multi-Pass-Render not just for the passes mentioned before, I also use it to render Material Masks. You can use the Compositing Tag to define objects that should be on one mask. In my case these are all materials and objects in the Cinema4D-File (furniture, vehicles, etc.)
Using these passes, I can quickly adjust the color of the wood, make a mask for people that are behind the facade or even change a texture.
For example : If the client wants me to put grass onto the roof (haven’t heard this in a long time… but anyway), I can use the roof mask and put in an image of a nice grass field.
Next I will take the Shadow-Pass from the Render-Section, mentioned before, and multiply the shadow over the grass. Some color adjustment and some mask painting with a grass brush and voila :

Doesn’t that look nice?
Integration
Here are all the photo elements like trees, people, vehicles, animals, you name it. In this particular case there are some parts I cut out from the original photo such as the gutter to the right of the building and the streetlamp to the left. Combined with the layer masks, you can put these elements wherever you like without doing masks by hand.
I could write a complete tutorial on how to integrate people into a scene, but for now let me just give you one little piece of advice, because it drives me mad to see bad people shadows in visualizations…
First duplicate your person, then make this layer a smart-object and add a mask. Deform this layer as if the shadow fell into your scene. After that do a Gaussian blur on this layer (maybe 7px or so) and set the blending mode to multiply. Now you have two masks – One for the shadow opacity and one for the blurriness of the shadow. This also works great for Fresnel-like reflections on floors (use overlay as blending mode in that case).

Light
Ok, this is were the magic happens!
In this part I am adding light, haze, fog, flares, distance fog (using the rendered Z-Depth-Pass, of course) and a vignette, just to name a few.
I also use color adjustments here. This section is always different and in no way easy to describe. In this particular project I used 24 different layers with different blending modes and purposes.
The easiest way to experiment with this is to download a random image from Google and blur it. Then try cycling through the different blending modes and see what happens. Also try using soft light as a blending mode and paint with a combination of dark and light beige tones with a low opacity over your image. You will see there is a lot of potential, and it is also lots of fun.
Final
My final folder is where I start to finalize the image. Which means I do a ‘copy merged’ and adjust this image with smart filters. All the other folders before are flexible and just adjust the render folder on the bottom. Which means, if I have to re-render because the plans have been changed, I can just switch to the render folder and adjust the masks and my image is correct again. Very quick and clean.
In the final folder I am adding noise and sharpness. I am also using NIK-Collection to add some effects.
Tools
This is kind of my workbench. Here I keep some layers like Material-Id-Render, a Normal-Map-Render or textures, colors and references. Older versions of my image are also stored here.
This folder is always hidden, just in case I need anything I open it up.
Conclusion
I hope this was helpful for some of you, although a lot of the aspects mentioned could only be dealt with rather rudimentarily. However, for most parts and especially for the questions left unanswered you will find very detailed YouTube tutorials.
If you have any questions on this workflow, I will be happy to answer them in the comments.
Here you can find a Photoshop Structure Time-Lapse on how the image is stacked up :

Very pleasant image. Could you tell more about lighting techniques you use? Because it’s just mentioned in most tutorials, but not explained properly
AlexandrKladov thanks! As said I am using an HDRI and Area- or IES-Lights… Do not use Omnilights, please, these are fake. For the HDRI you can find a very nice and short Tutorial by Mounton Burger on Pete Guthries Blog:
http://www.peterguthrie.net/blog/2012/07/mot-renders-and-a-mini-c4d-tutorial
Well, it is based on vray4c4d 1.2 … but works similar in 1.8, you just have to use the Hdri in a VrayShader and select the VrayAdvBitmap. Sometimes you have to tweak the gamma a bit (depending on your Hdri), but in vray1.8 you get an direct preview of the hdri.
There are a lot of tutorials how to set up Area- or IESlights in Vray4c4d… so I advise you to do a little research on that by yourself…. I guess it will be explained much better than I could do that.
One thing I would recommend is that you test each light seperatley. Turn of all other lights and check what your light is doing. Sometimes you miss a setting and every thing goes wild. So tweak every light for its own until it does what you want. So you get a good basis of all lights. And just push them a little further when you render the full harmony of all lights together.
Hope that was helpfull 4 you?!