


A Lumion Review – Visualize at the Speed of Mind
This one was a long time coming. After giving the new Lumion version a good go and now that I completed teaching my first class about it I found time to write this review which will shed light on the good, bad and all else related to Lumion 8.
Introduction
When you land on the Lumion homepage the first line you’ll read is “Beautiful Renders Within Reach.” I think this line is spot on, but the second line promising to do so without ANY prior training might be a little bit of a stretch. All architects and interior designers get some relevant training these days anyway, and some basic general visualization principals make a big difference in the result you can expect.
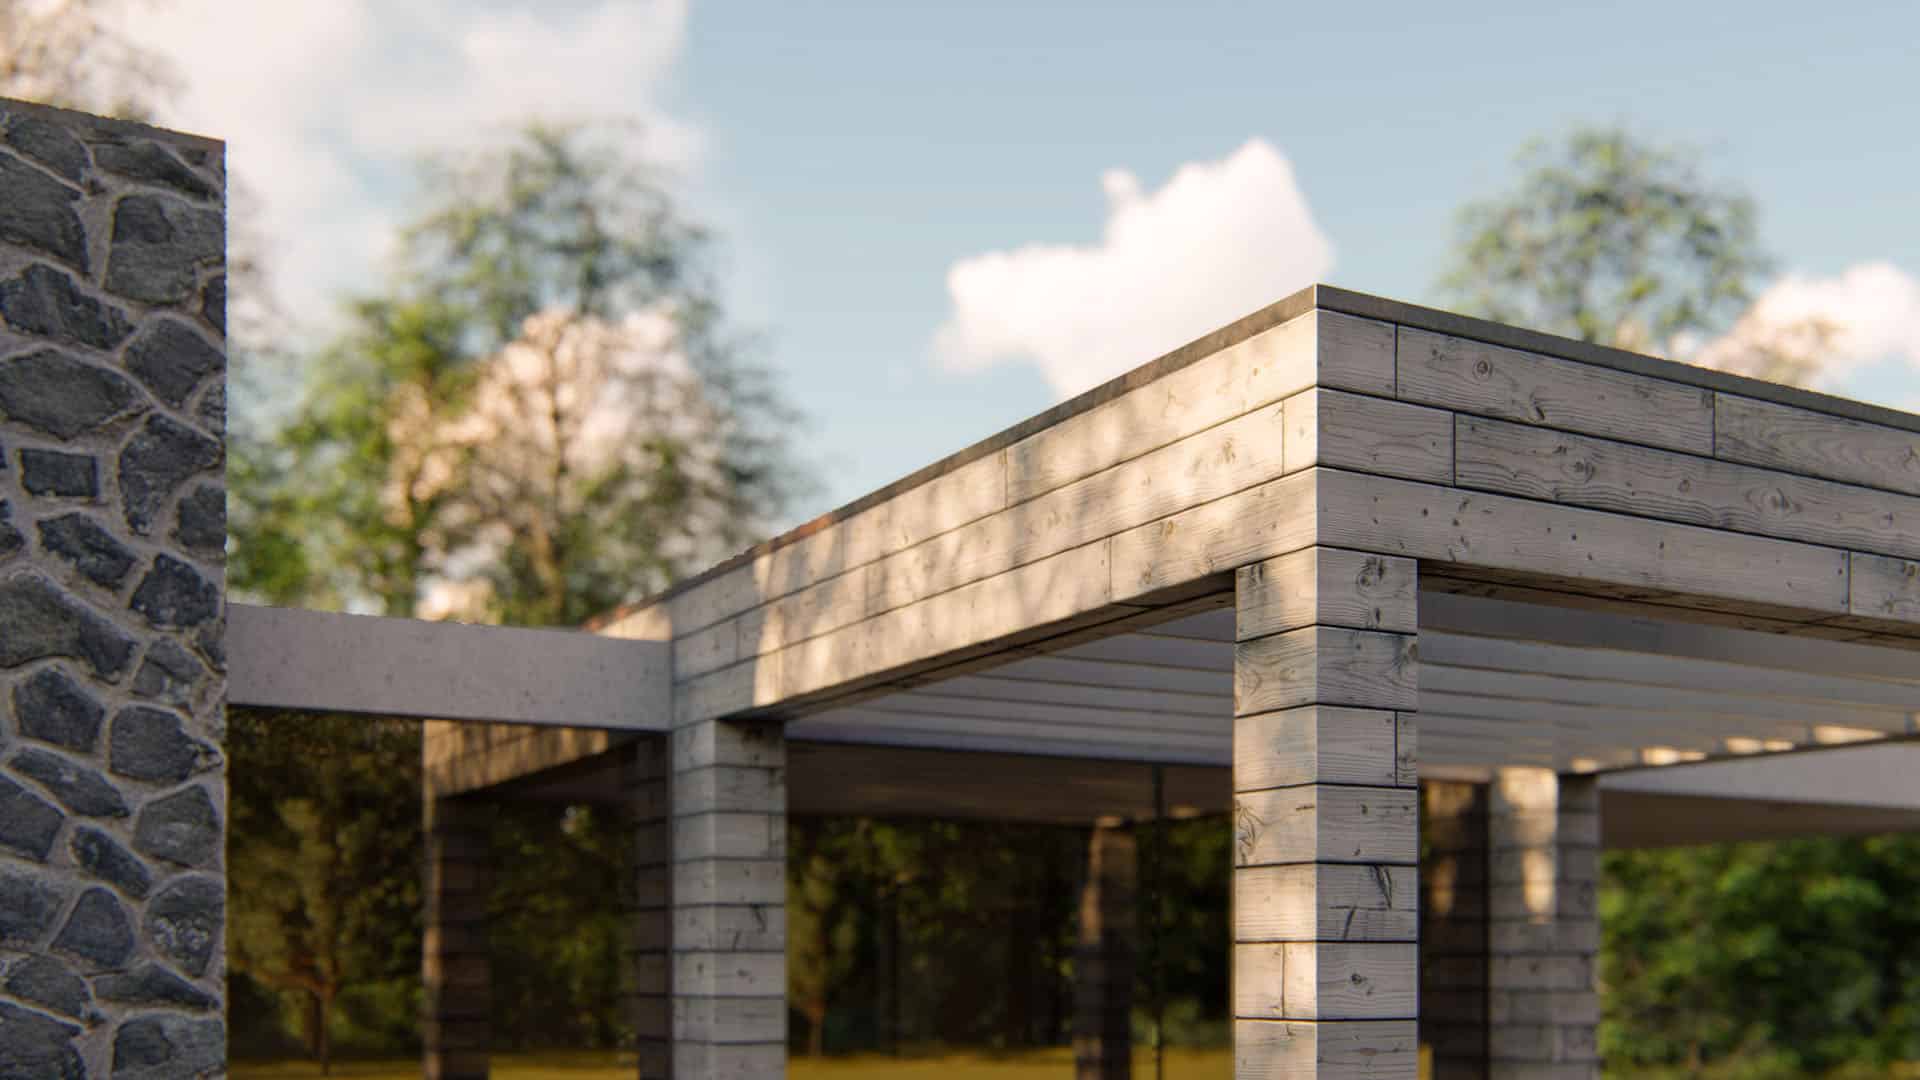
The first image you’ll see is that of the Mies Van Der Rohe’s iconic Farnsworth House which connects very nicely later on.
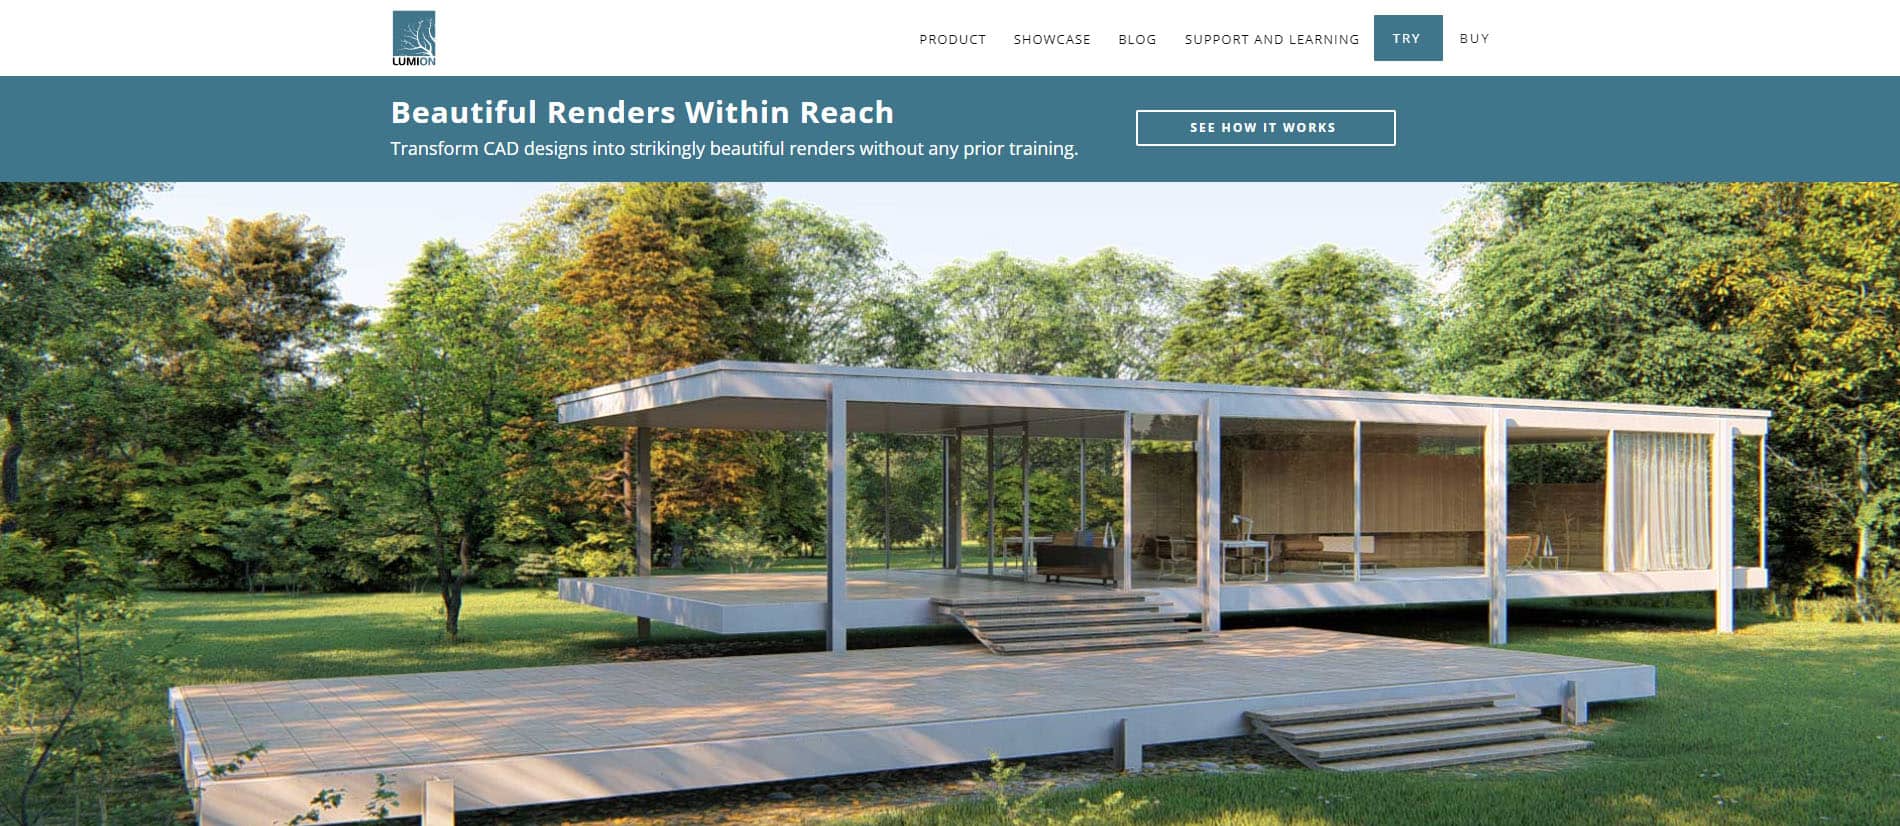
Lumion Homepage promising “Beautiful Renders Within Reach”.
I’ll use a SketchUp analogy that most architects and interior designers will connect to right away.
Lumion is to Rendering like SketchUp is to Architectural Design & Modeling.
I base this on my own experience, but I’m sure the SketchUp part hits a chord for many of you as well. SketchUp allowed me to design architecture at the speed of thought for the first time in 3d space like I used to with pen and paper.
I was thinking it and doing it at the same time.
With the introduction of Lumion 8, photorealism became something you can aim for too. I first explored this by revisiting the MMF House with Lumion 8.3 aiming at crafting both stills and short animation for a project previously rendered with Corona Renderer (I’ve also started that one with the Farnsworth House scene).
The Lumion Review
I’m not aiming to cover all that Lumion 8 has to offer. I’m doing so from my own vantage point, focusing on the pros and cons form a 3d artist’s perspective. And while I’m not looking at this as an architect or an interior designer, there is a lot for you to learn from this as well. Lumion was designed for you after all.
I’ll address the various aspects of Lumion based on projects like the MMF House, CABINS Challenge Concept, KH Pool House and the KK House which I developed for a Lumion course I’m teaching.


Topics Covered in this Review
Covered in this review :
- What is Lumion and what GPU based rendering is.
- Lumion Licensing.
- Lumion Interface.
- Lumion Sunlight & Weather System.
- Lumion Terrain System.
- Lumion Materials.
- Lumion Artifical Lighting.
- Lumion Materials.
- Lumion Artifical Lighting.
- Lumion’s Approach to Stills & Animation Production.
- Lumion and VR.
- My Conclusions.
- Answering Questions from Talk.
Disclosure
Before I continue, I’ll put here a full disclosure and set aside any notion I write this with any other reason than diving deep into what Lumion has to offer us 3d artists doing architectural visualization for a living. Finding out what it can and can’t do with version 8.5, which is the latest one.
I fell in love with Lumion since version 1 was released. I presented it at SOA Academy Day #2 and for a short time I was also the reseller of Lumion in Israel via Polytown Media LTD. It might have been too soon for my local market, but I kept using it and versions 2, 3, 4, 5, 6, 7 and now 8 all this time for design followup work, delivering stills and animation to help clients convey their designs to clients, donors and city officials.
Photorealism wasn’t the main focus in these projects. It was about turnaround and scope. But, as I mentioned earlier here, photorealism is indeed something you can aim for now. Lumion (Act-3D B.V.) was also the sponsor of “The Museum” and “CABINS” challenges, for which I used Lumion to create the concept art. Currently, I’m teaching Lumion in Israel.
All the above goes to show that I’m very familiar with Lumion from day one, and I always had a critical approach about it alongside the many things I like about it.
What is Lumion?
If, for some inexplicable reason, you hear about Lumion for the first time… here’s a short brief.
Lumion is a GPU based rendering & visualization software designed for architects with minimal technical skills in 3d visualization, allowing them to produce still images but mostly animations showcasing their designs. It brings the benefits of the computer gaming world into the architectural visualization and design world that always demands faster turnaround. Lumion does offer fast rendering for architects, interior designers, landscapers and more.
To my understanding, Act-3D developed Lumion on Quest3D. It was their flagship (and complicated to use. think how unreal engine wasn’t so trivial for us to implement) platform at the time, and Lumion might have been an attempt at showing what is possible with it. It is evident that Lumion took a life of its own and surpassed Quest3D many times over.
The KISS Approach
So, with the KISS approach in mind (and if we recall the Farnsworth House then Less is More works here too), Act-3D’s goal was to create a simpler tool, leveraging GPU technology aimed at Architects with animation as primary output in mind!
This KISS approach is the main reason for things I find lacking in Lumion as a Professional Architectural Visualization Artist, but try to remember this is a tool for Architects first.
All this is not new for those of you already familiar with Lumion, but version 8.# brings with it fresh and exciting possibilities. I would say the main thing is the added level of realism you can get out of it by leveraging new and improved effects combined with the smooth and latency free workflow introduced with LiveSync.
Wishlist: With recent news from NVidia about their new RTX GPU cards and Lumion 9 not too far away, I am super excited about what is coming.
What GPU is Best for Lumion?
The first thing you’ll see running Lumion for the first time is this benchmark result. I’m using an NVIDIA GeForce GTX 980 Ti and wouldn’t recommend anything less. You want the highest frame per second rate to allow for the highest quality display during work and faster stills and animation rendering.
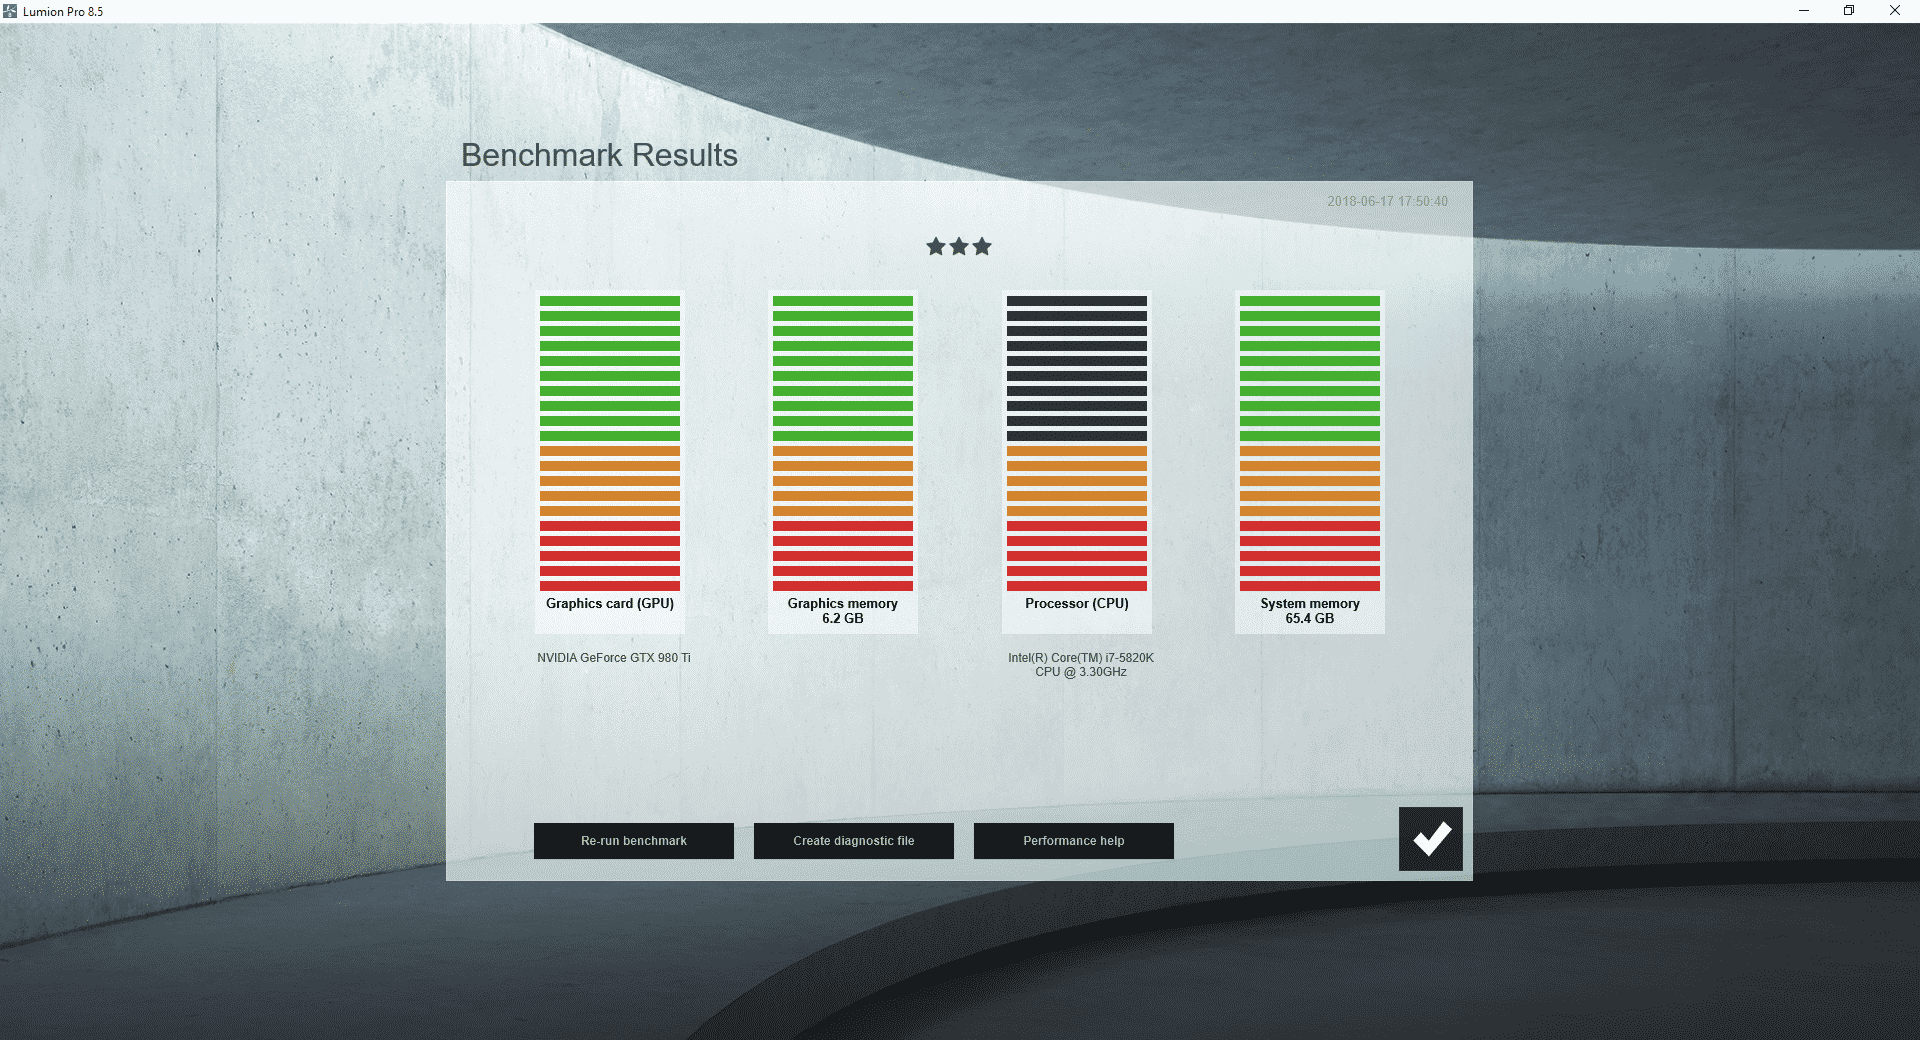
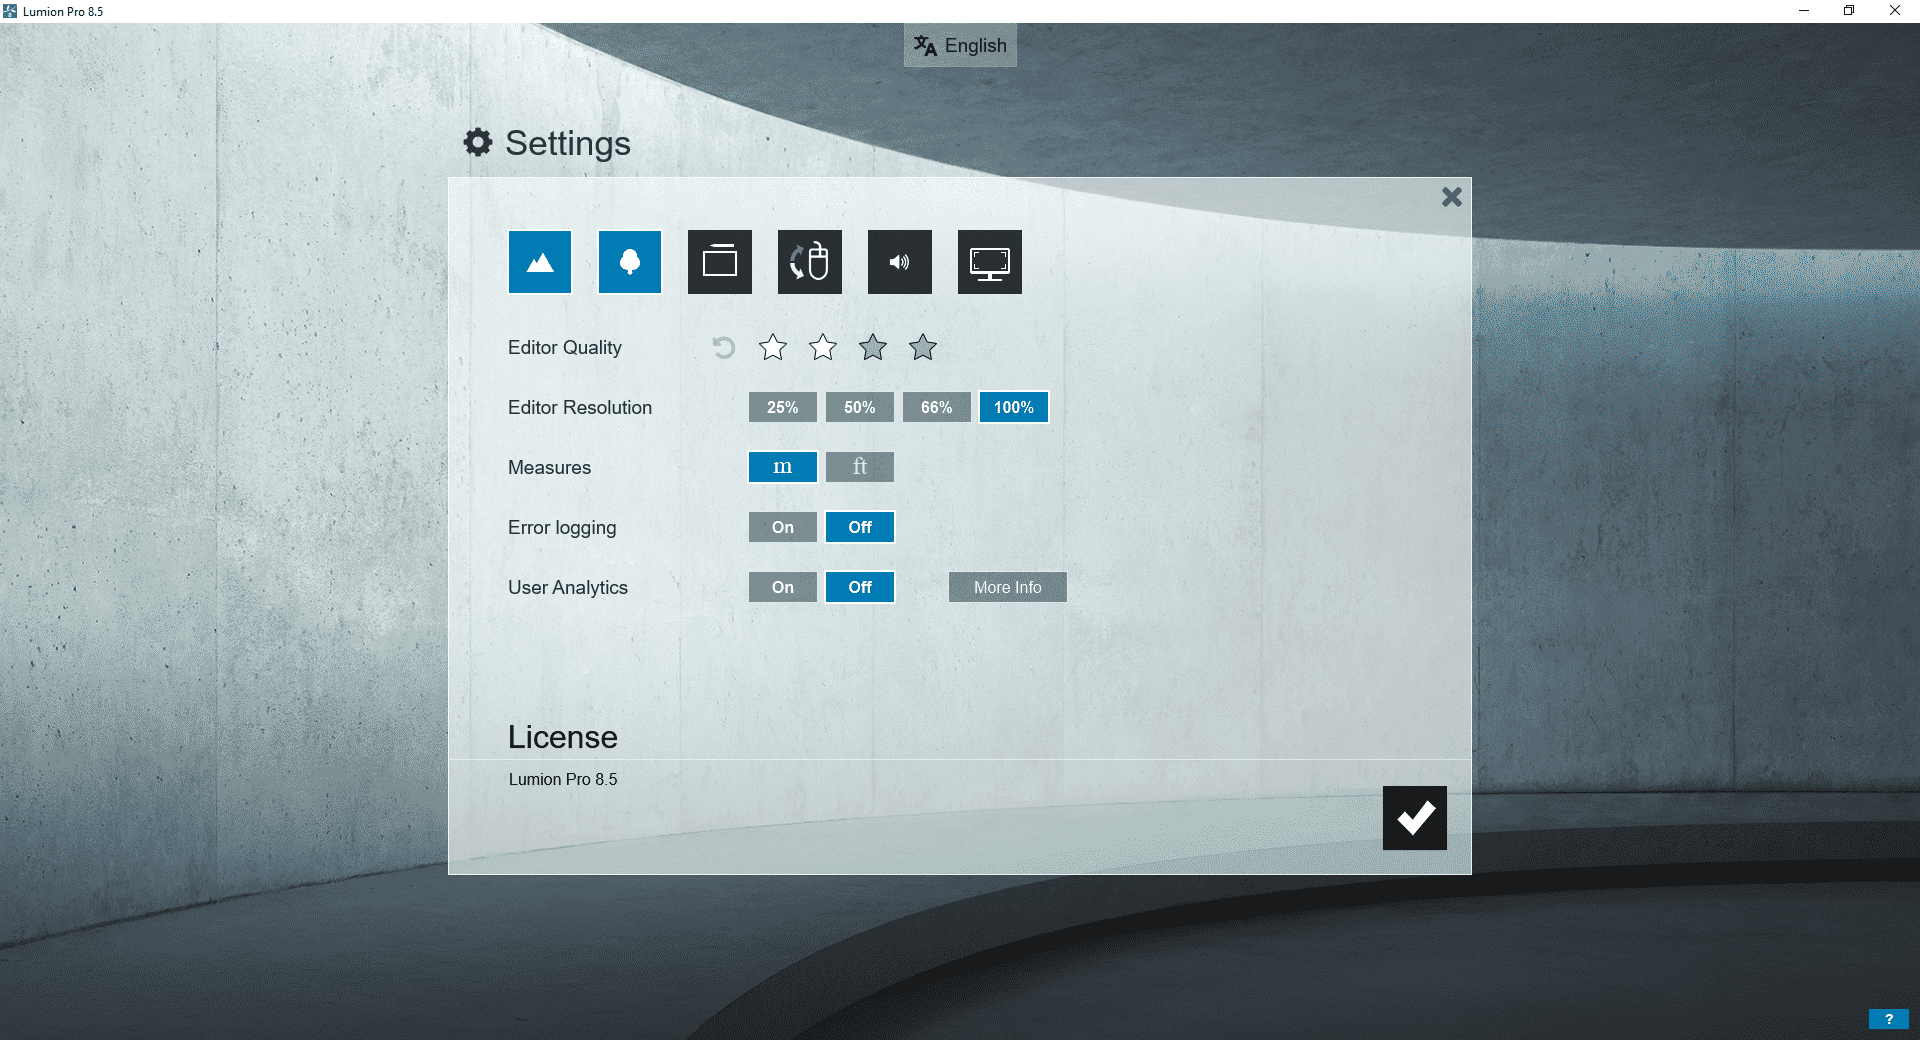
The display settings will allow degrading performance so that the frame rate per second stays at a comfortable range. You can degrade Terrain and Vegetation representation, Editor Quality and Resolution. I find this valuable when the scenes became big and packed with lots of vegetation and effects applied.
Lumion Licensing
A point to take notice, as it works pretty well I think. You can install Lumion on any computer you like. As you run it, it pulls the license and when you close it releases it. This means you can use your Lumion license at work, home, clients office, mobile workstation and so on. You do need an internet connection for this to work though, which might be an issue for some. I find it to be very convenient.
Preparing 3d Models for Work in Lumion
KH Pool House – SketchUp Viewport
Apply a specific material on all surfaces.
I use SketchUp which has a default material assigned to everything, and I know all of you SketchUpHeads leave it!
So, don’t!!!
Use descriptive material names that will be easy and clear to continue working with inside Lumion. The model passes as a single block, and the ability to separate and edit is based on the material settings. Try to group elements in the model just as they are in the real world.
Use LiveSync!
This feature is impressive and allows you to run Lumion side-by-side with SketchUp or Revit and to mirror your model changes and camera movement in Lumion with no evident latency.
Thin glass panels with a special Lumion material assigned to them, including bump.
Closeup shot on the K Pool House edge detail – using Lumion’s Weathering and Round Edges feature.
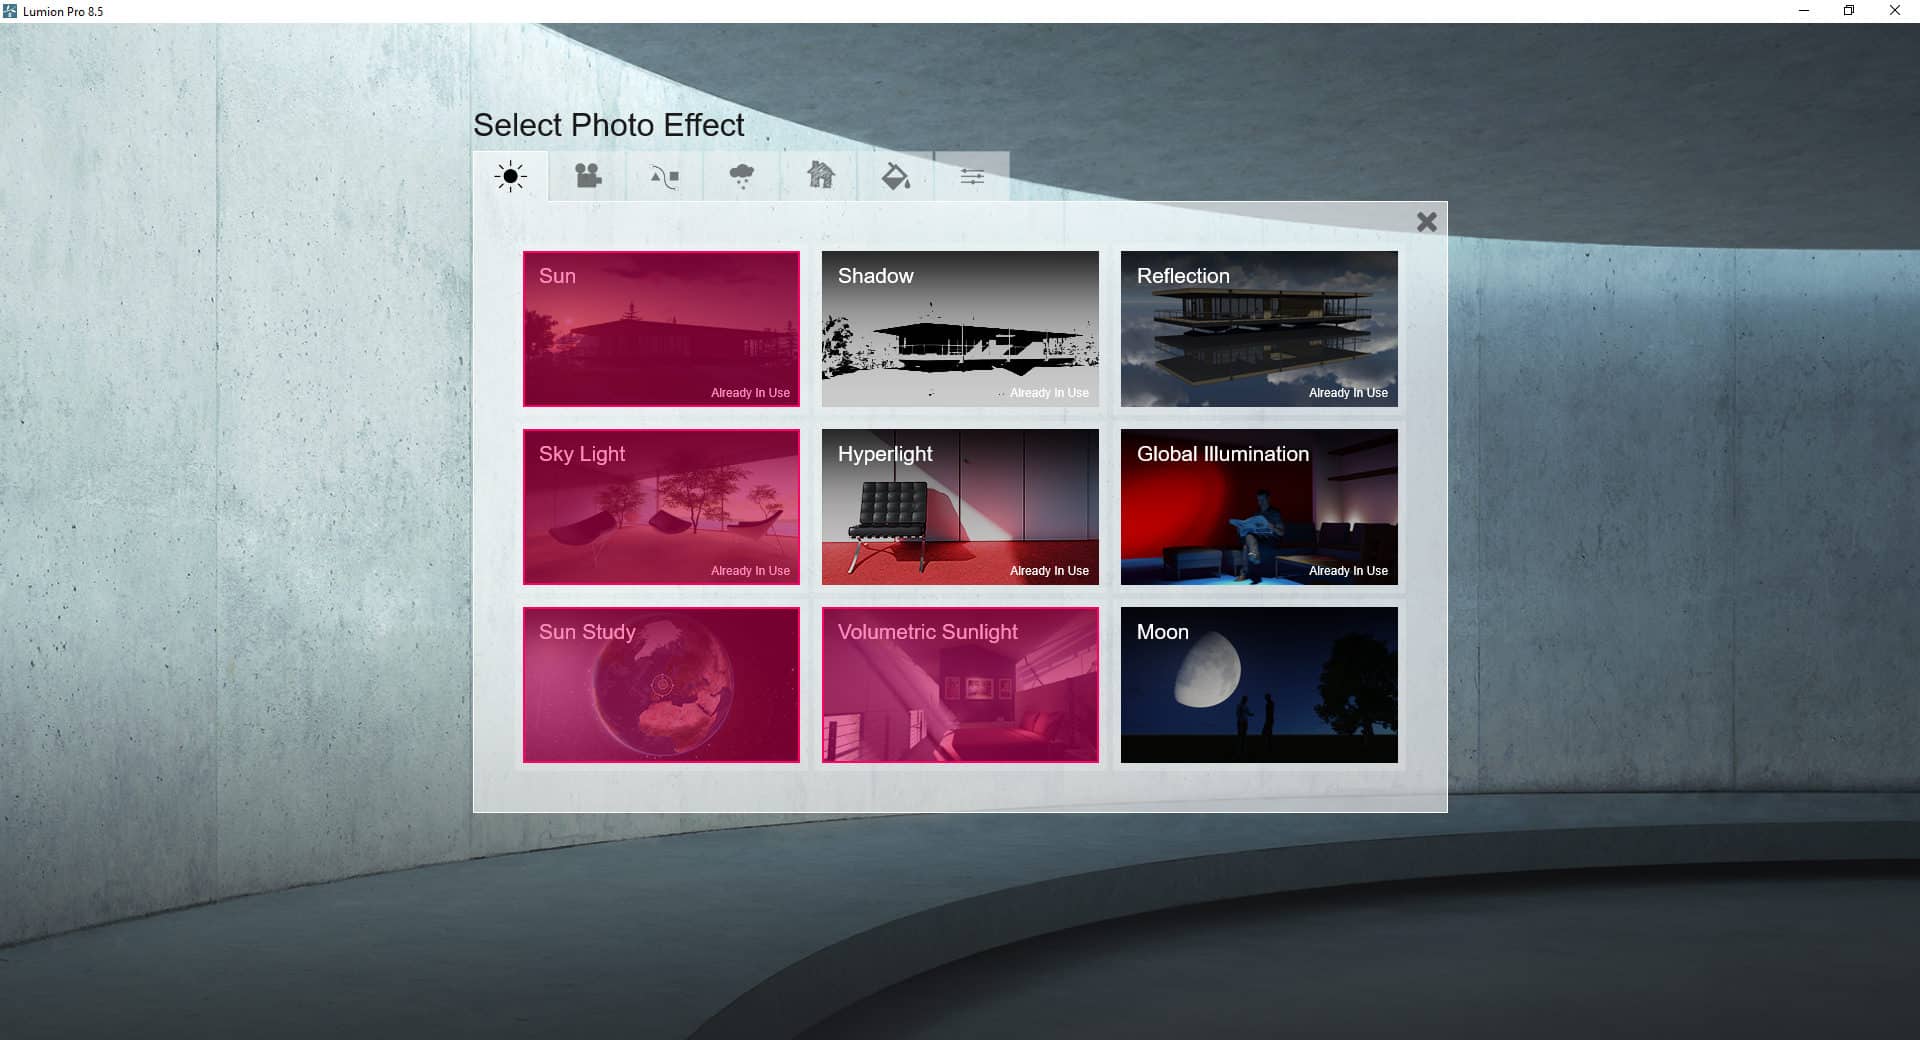
The Lumion Interface
I prefer the sunset preset when I get started on a project 😉
There are various option to start from, but I prefer the sunset preset which puts me in an inspirational mood right away. You can quickly set your environment to anything you like so this is not something to pause on. You save and load project files from this screen too.

Lumion Home Screen
Lumion’s interface language can be changed, and they support many of these. I never gave this a thought being so English oriented, but teaching Lumion to my students here in Israel I realized how important local language support could be. Works very well and I found only one error in the translation of “Normal Map” to Hebrew 😉
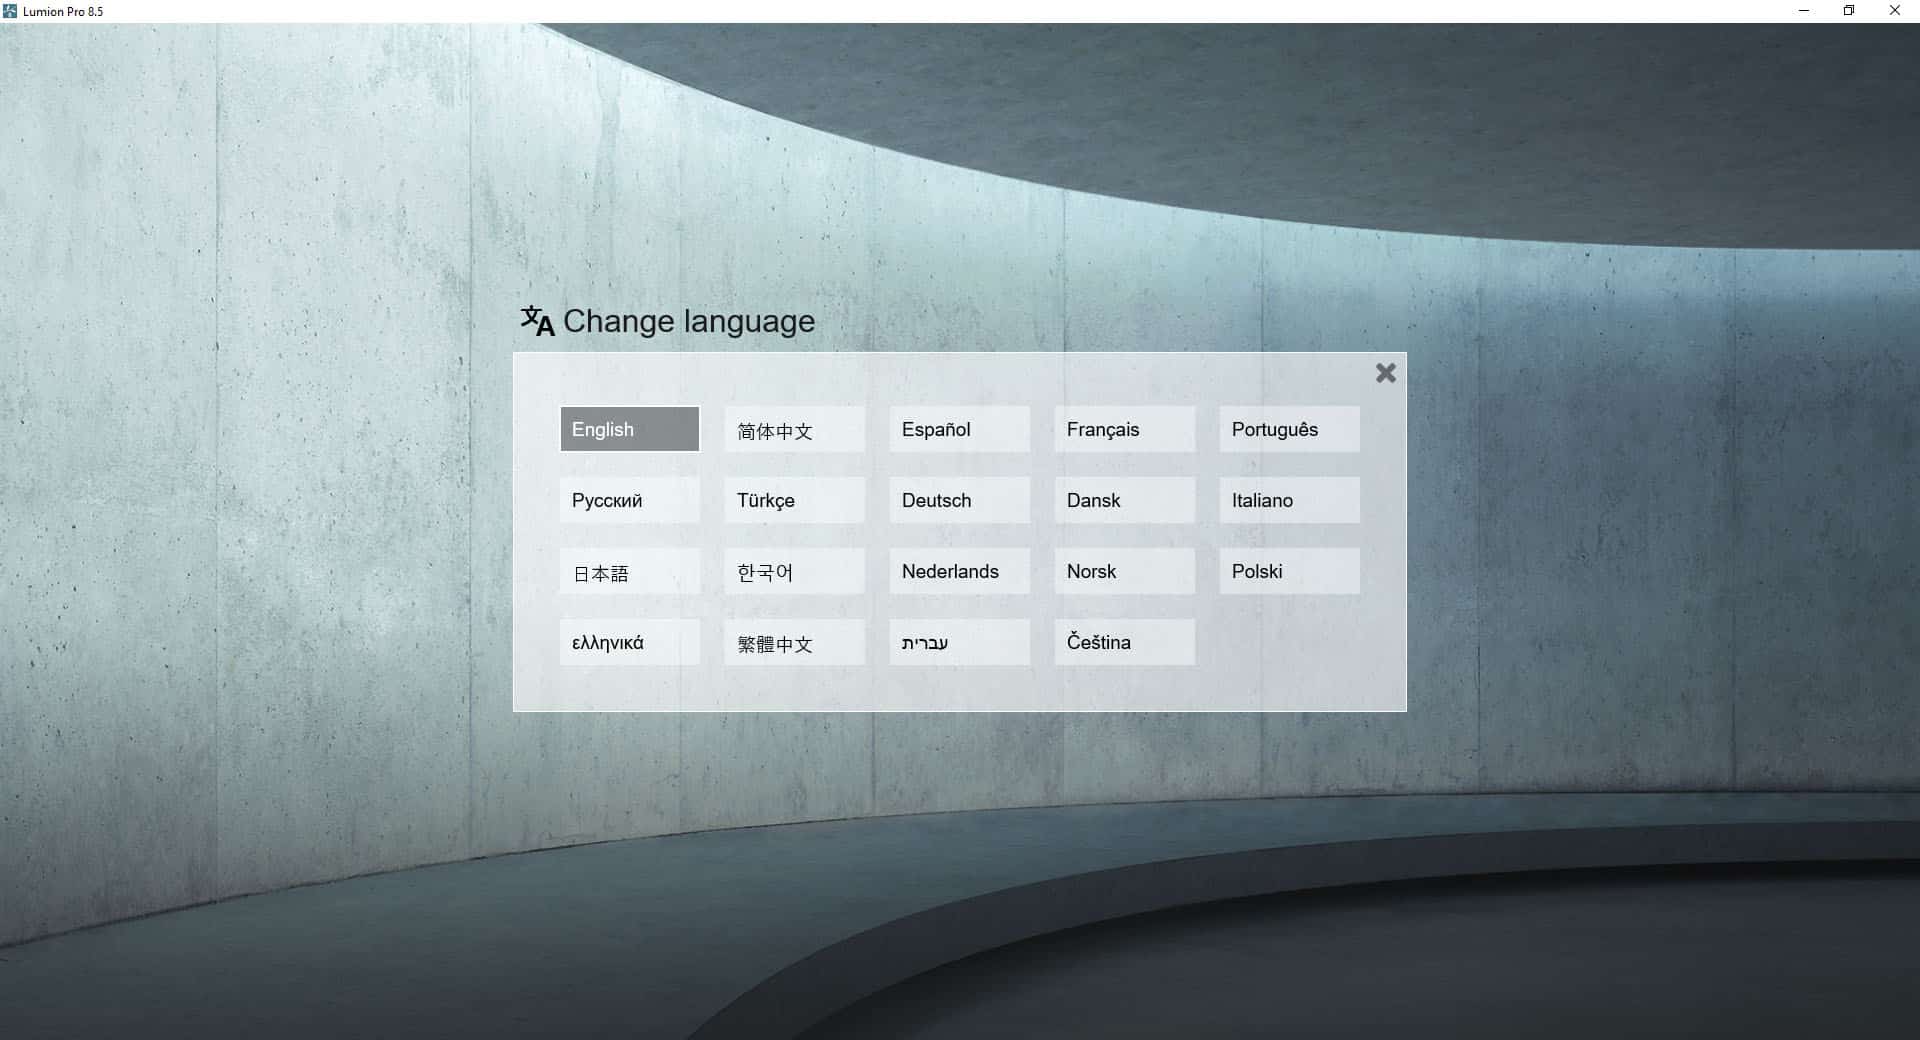
Lumion Language Selection Screen
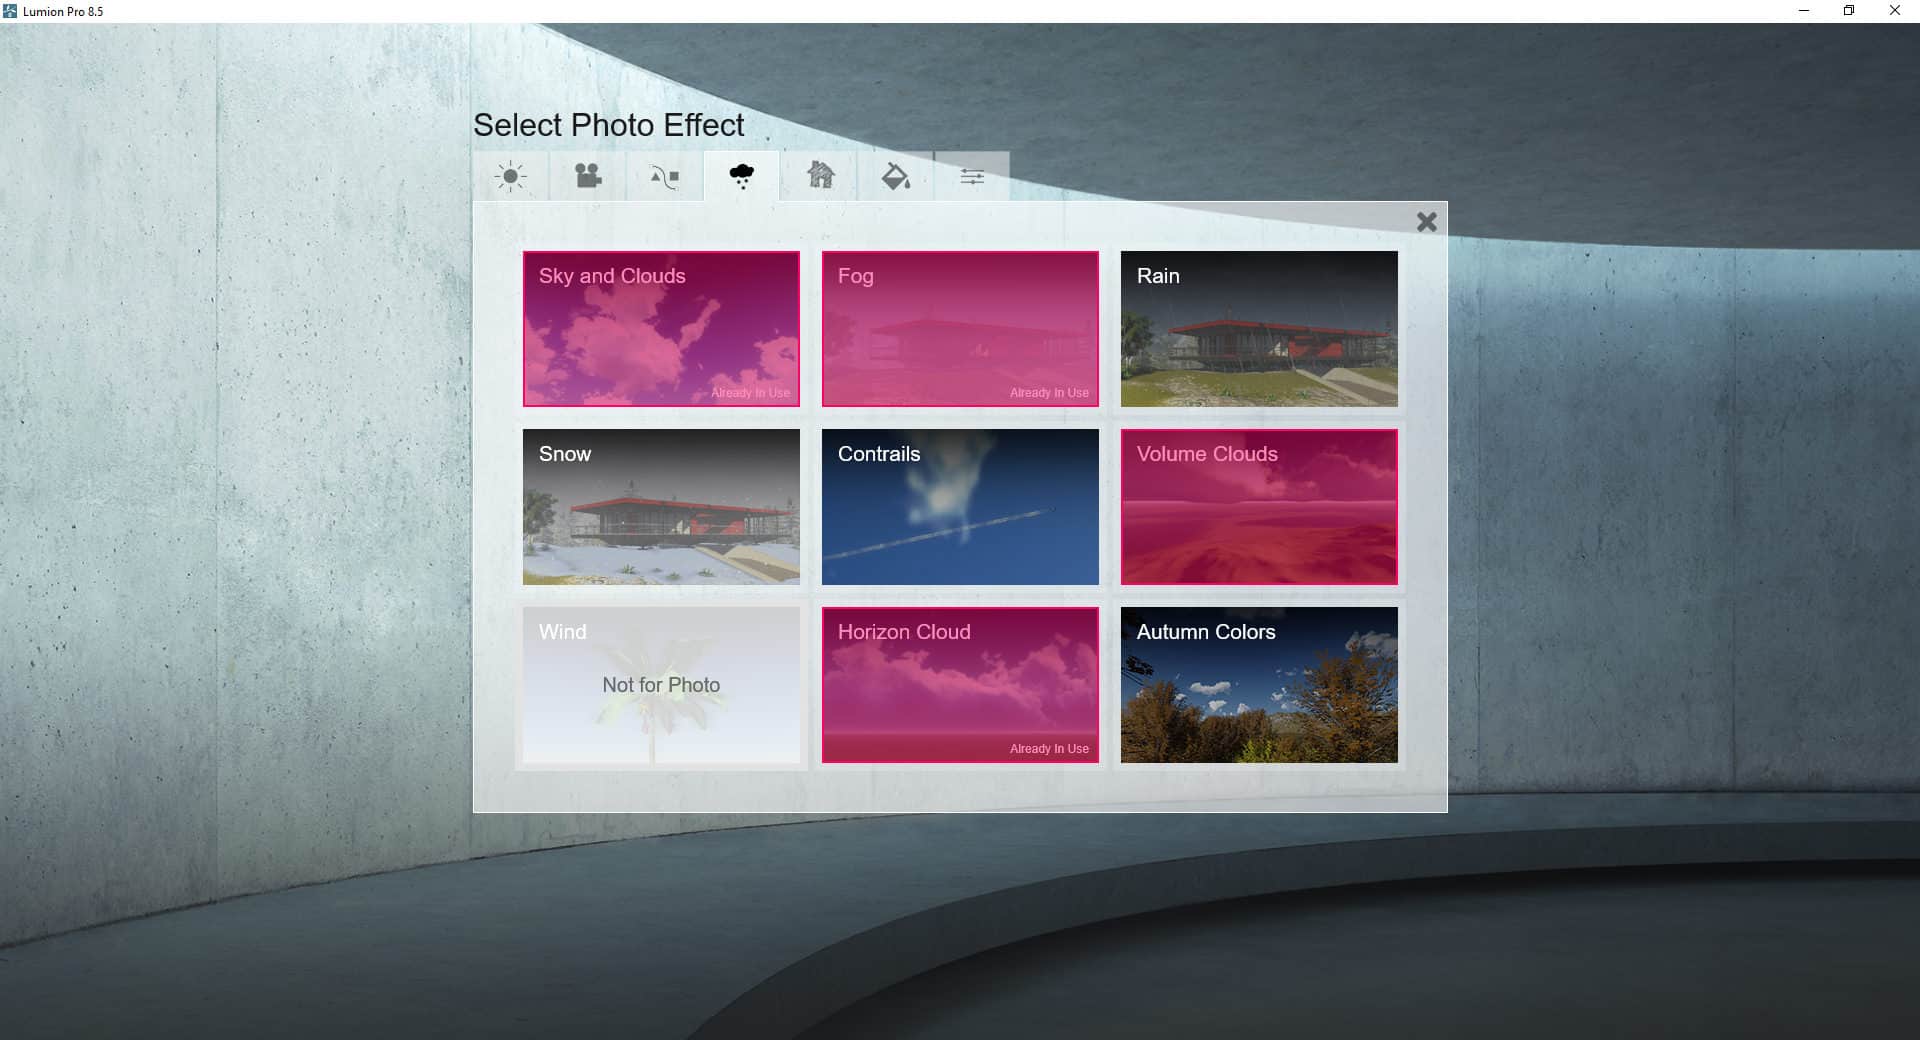
Lumion Sunlight & Weather System
You can pretty much recreate any sky and natural lighting condition with this system, and it looks excellent. Think about it as a never-ending source of HDRI skies. I’m sure this analogy will get you excited about the possibilities.
CABINS 7 Concept Image – “The Sun”
The Weather screen is the first one you can access using the icons on the left side of the Lumion’s build mode interface (build mode indicated by a person with a shovel icon on the right side of the screen). The others, which I’ll touch later, are Terrain, Materials, and Objects. Clicking on either one replaces the bottom part of the UI with relevant buttons.
Lumion’s Weather Mode Screen
Inside the Weather screen, you’ll find very clear icons to control sun direction, elevation, strength, cloud presets and coverage. This is great for when you build your scene, but I like to use the Weather-related effects inside the stills and animation modes (indicated with the camera and film icons left of build mode which I’ll cover more in Part B).
Using effects tied to specific still image or animation clip is the preferred way to go I think. I’ll get to that later, but for now, I’ll show the relevant effects for Weather control. The Sky Light effect is one of the big improvements introduced with Lumion 8.
Lumion Effects Sun Tab
I marked the relevant ones for setting the sun and skylight influence. The Sun Study differs from the Sun effect in that it offers a geo-located and time-based approach to define the sun vs. just placing it freely.
Here’s a before and after views showcasing how Volumetric Sunlight can come into play. I use this instead of fog or combined with fog as it helps introduce more depth in the final image. You’ll need to be gentle with this effect since it can blow up pretty fast. The live screen preview is good, but saving an image is recommended so you can see all the subtle effects (it takes just 5 seconds with a GTX 980 Ti).
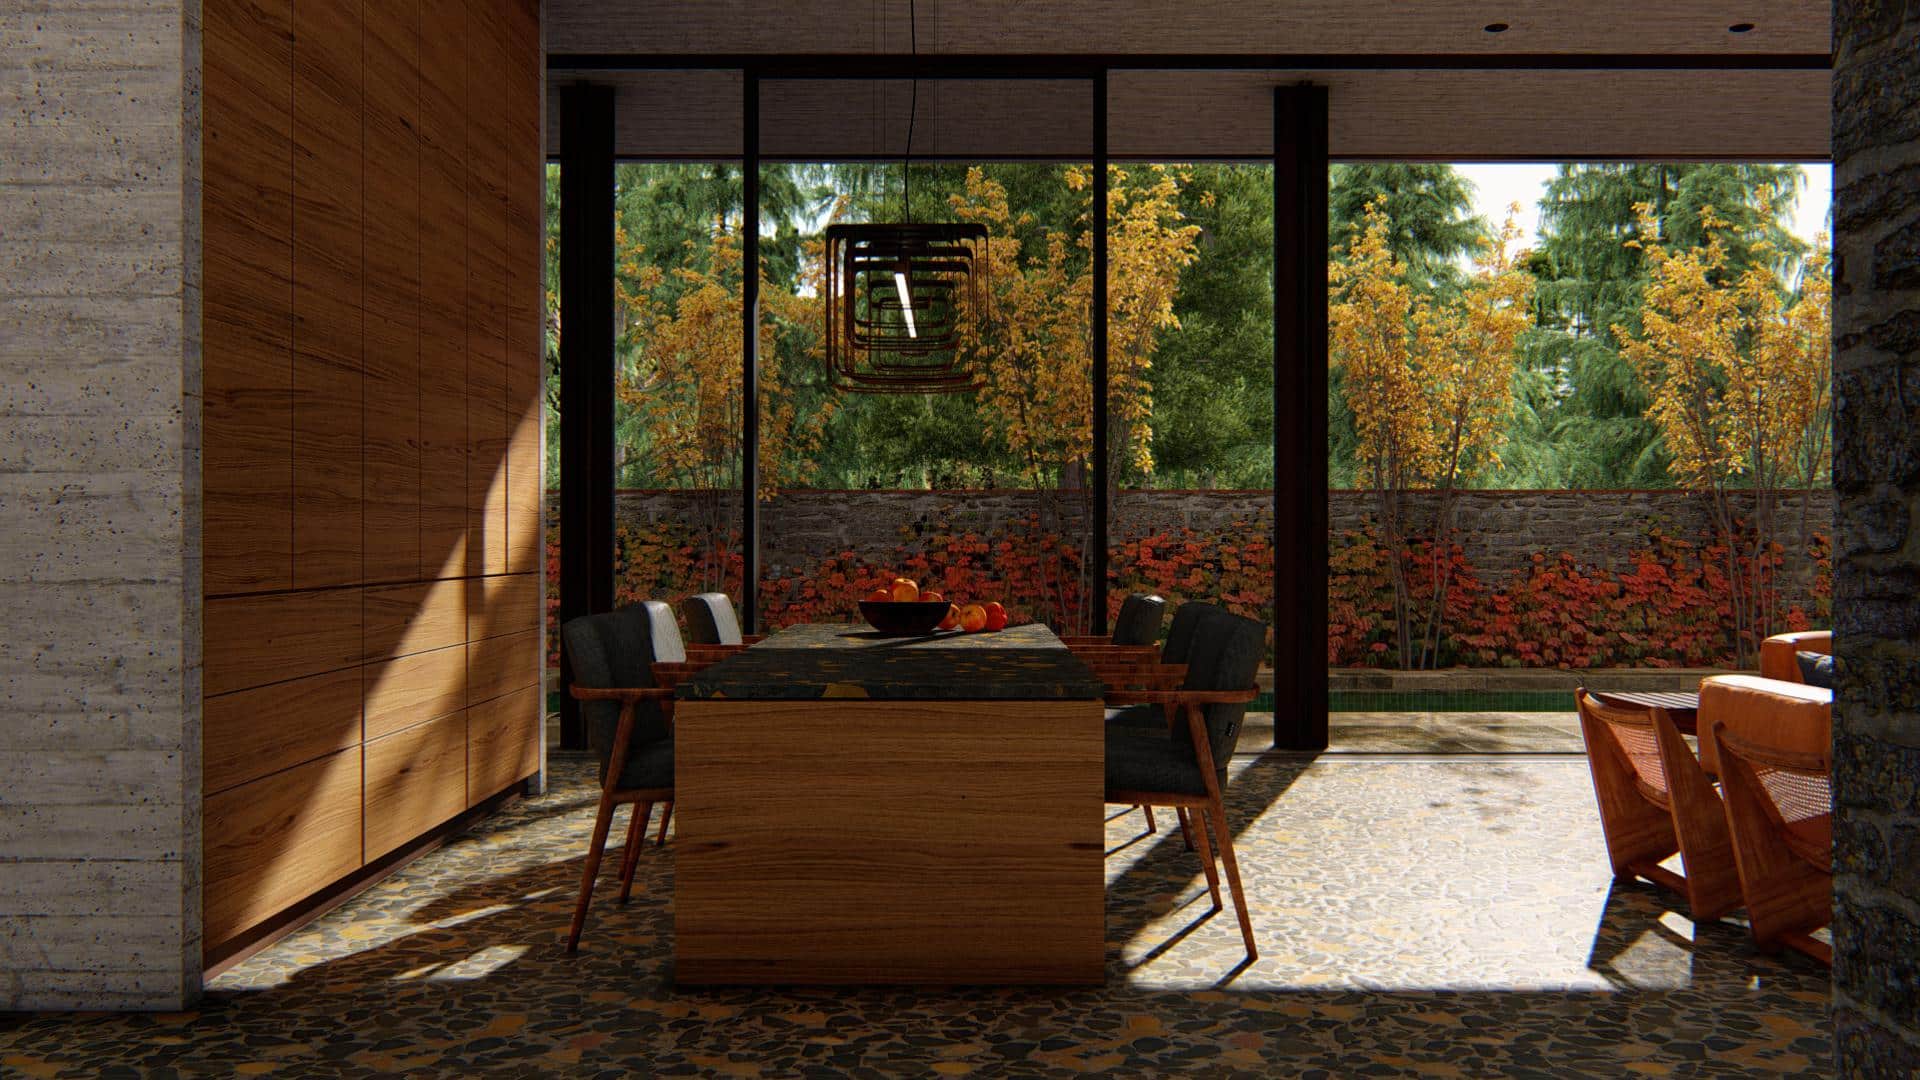
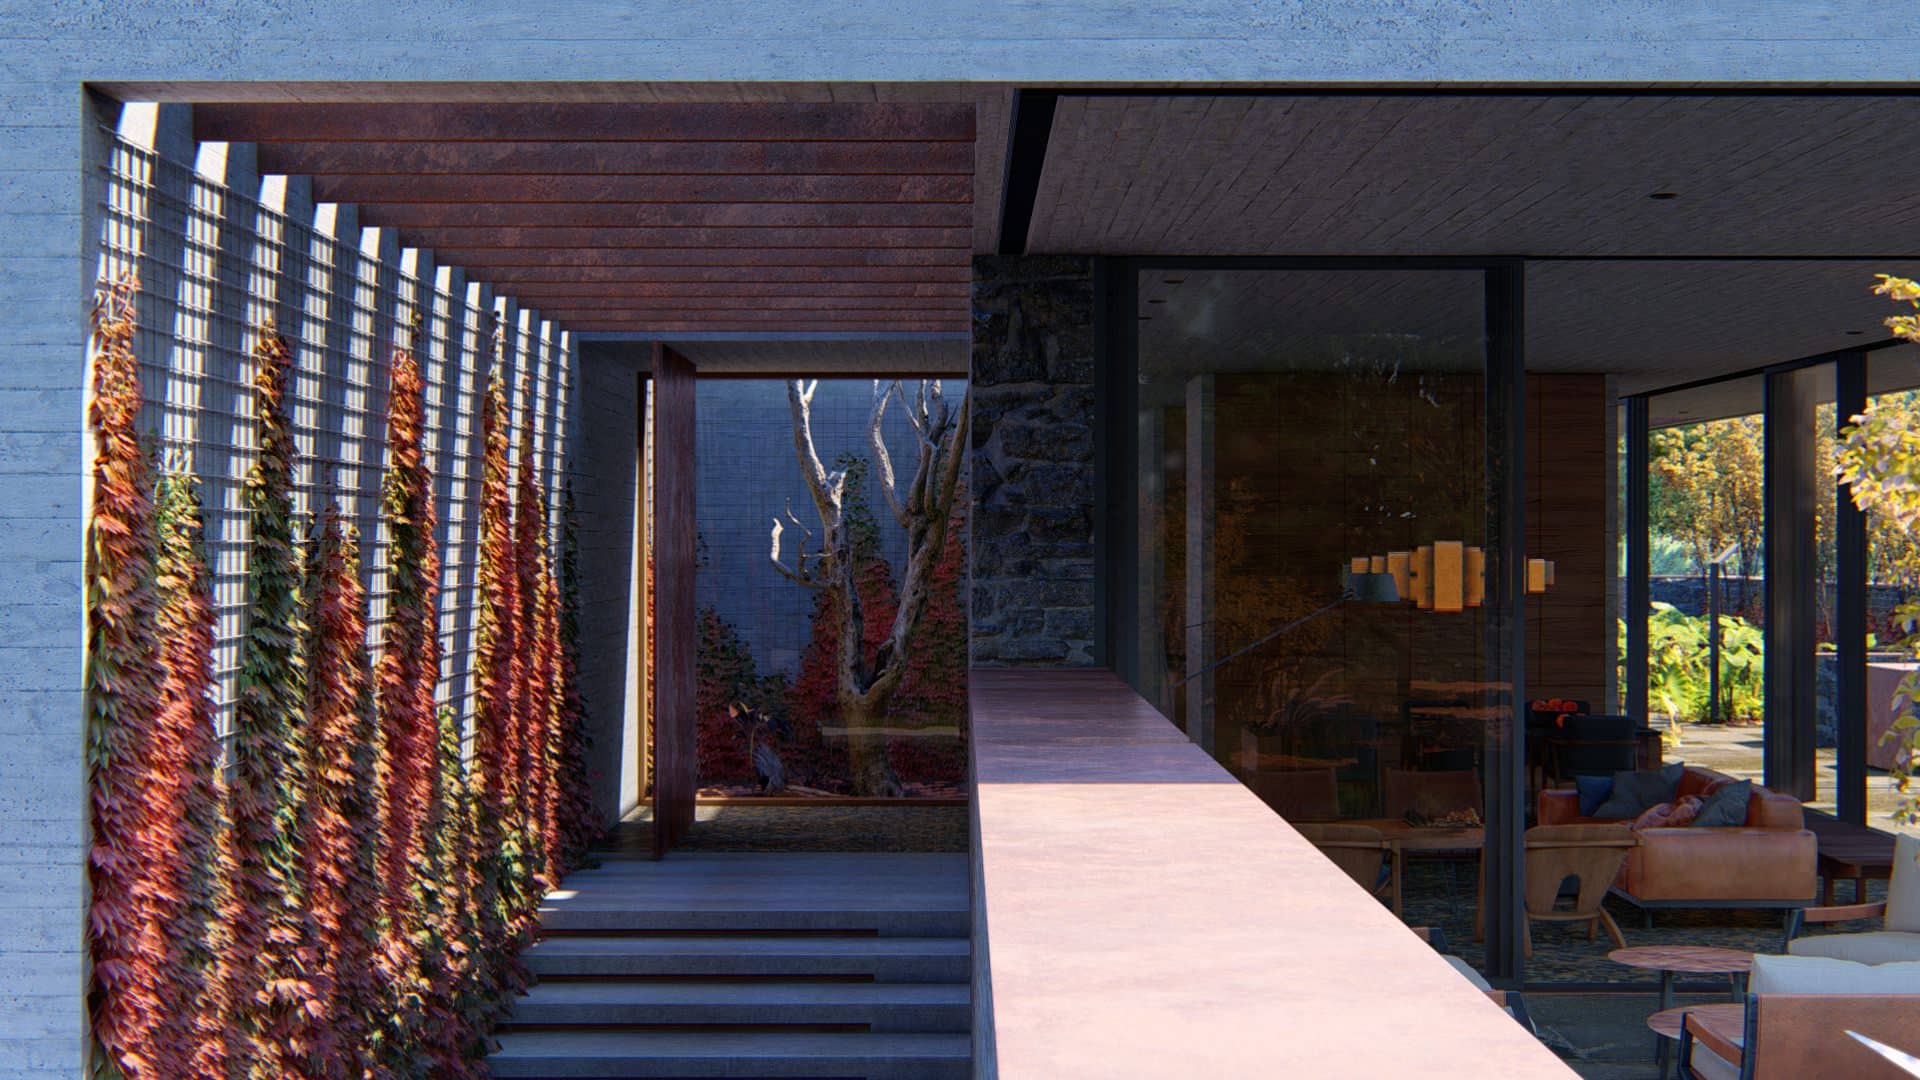
KK House Lumion Dining View – No Volume Clouds
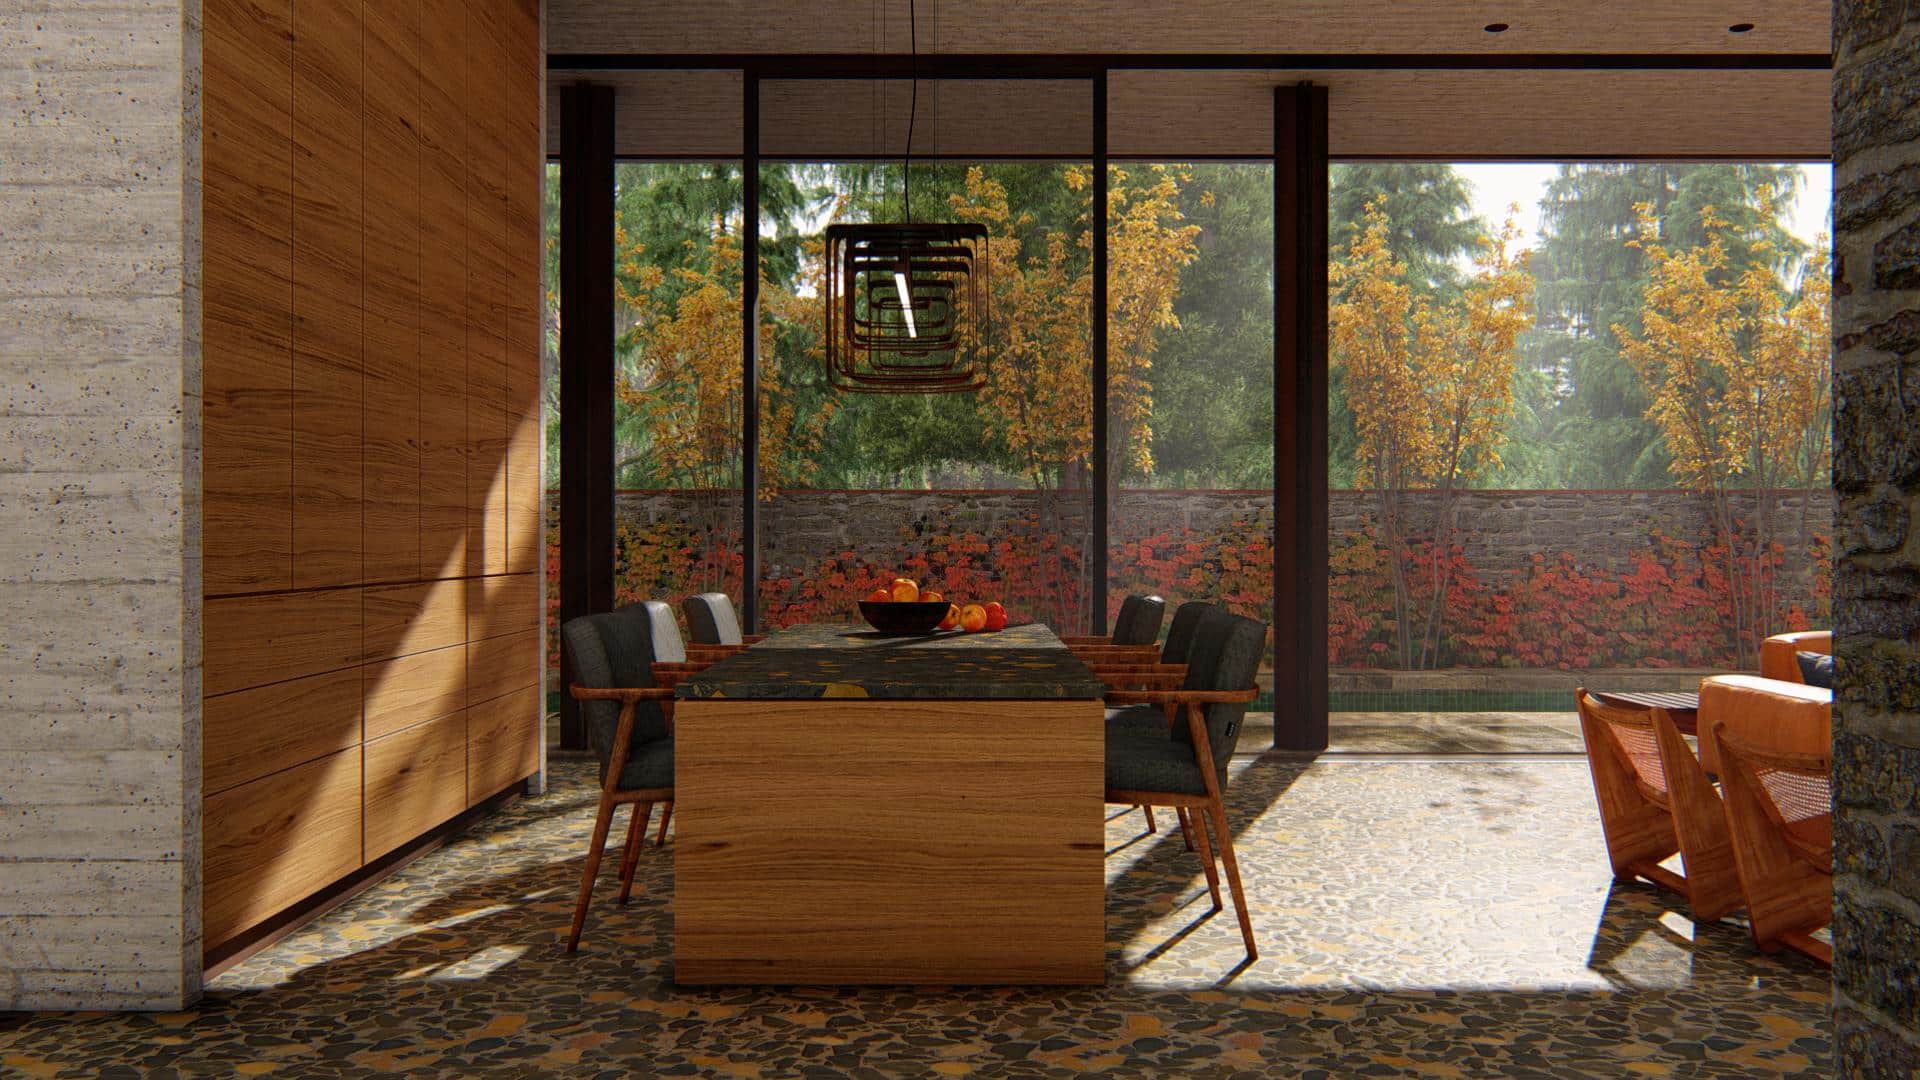
KK House Lumion Dining View – Volume Clouds
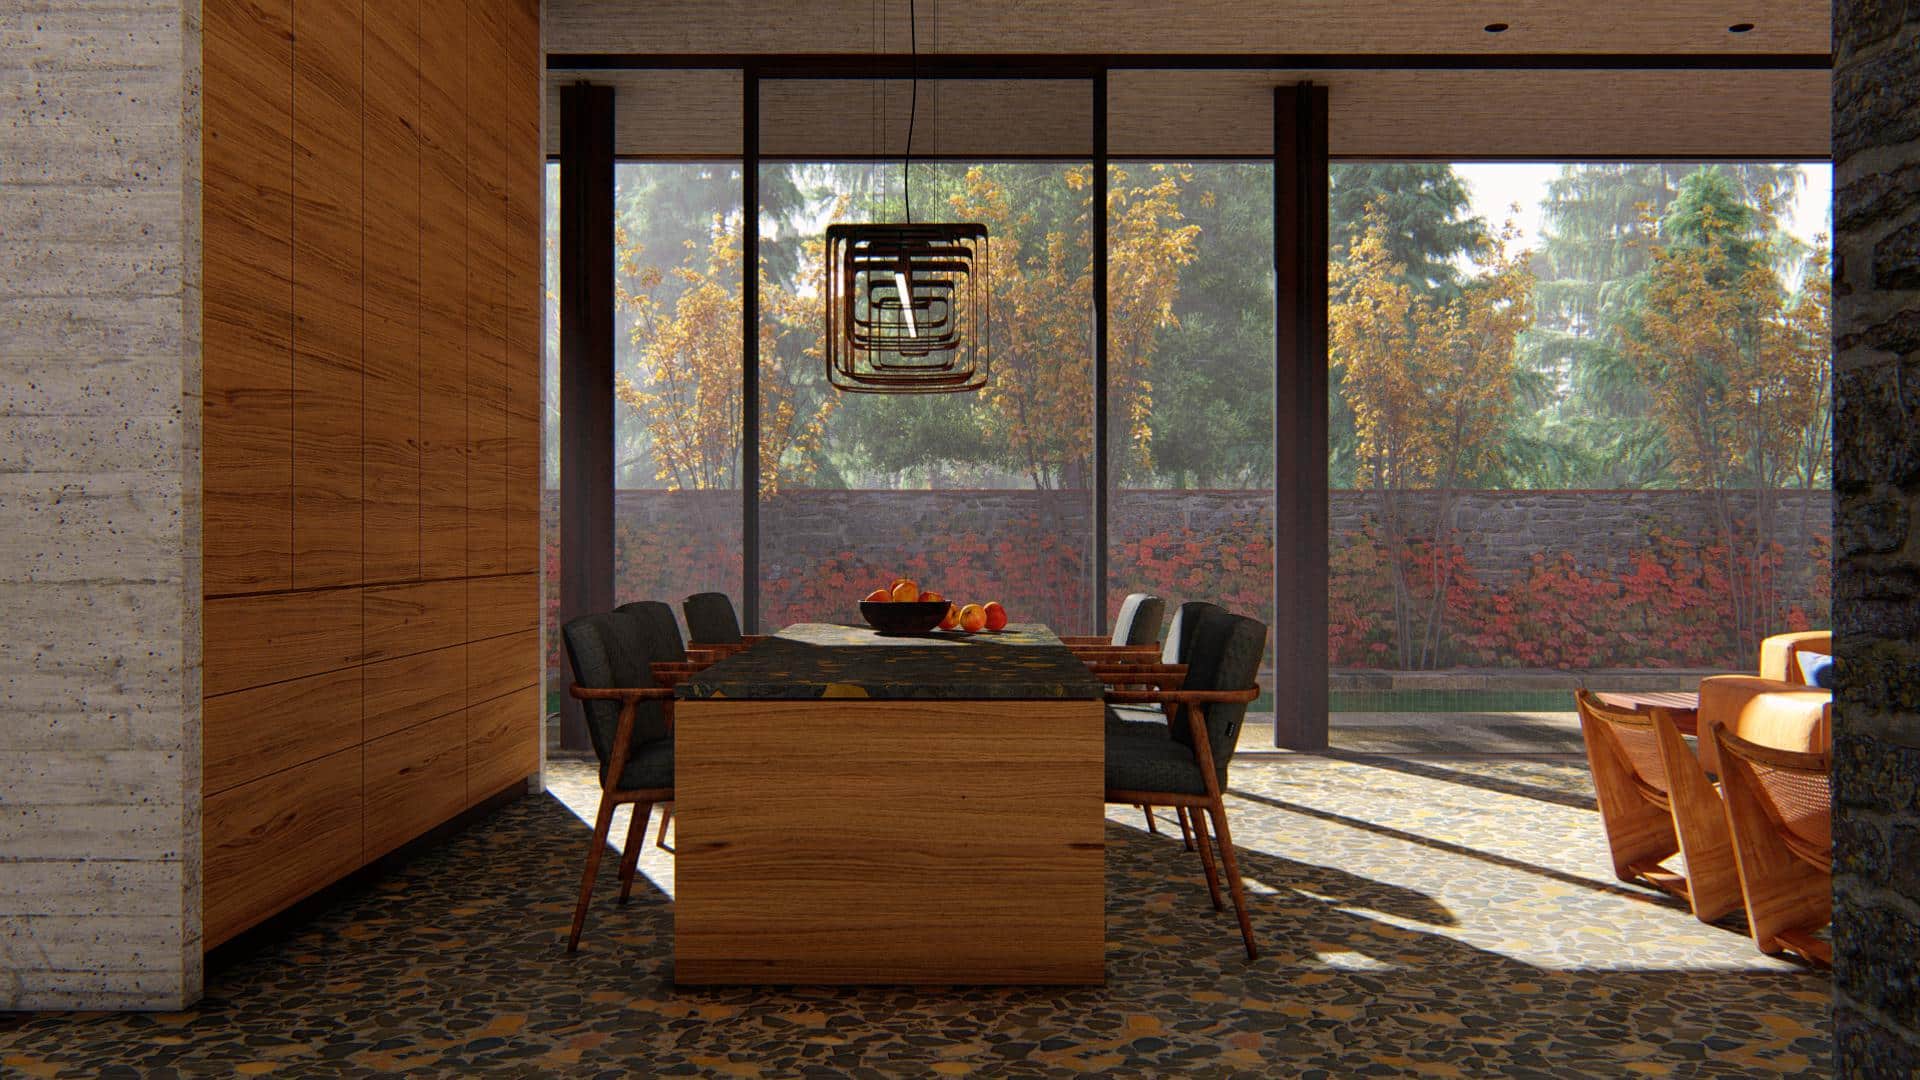
KK House Lumion Dining View – Sun Direction Change and Volume Clouds
All of the effects in the Sky (Cloud) Tab are relevant for Weather control, but I marked the ones I found myself use the most. The wind comes into play for animations only.
Lumion’s Effects Sky (Cloud) Tab
Volume Clouds are interesting in that they cast shadows and can be used for more exciting and dynamic fog!
CABINS 7 Concept Image – “In the Mist”
Lumion Built-In Terrain System
Lumion comes with a set of tools for topography sculpting and painting, including the addition of water, ocean, 3d grass and urban 3d maps. You can start from scratch, one of the preset templates or import a height map to work with further (or not).
The Terrain mode UI is also very minimal in and simple to understand right away. You’ll find all the relevant commands in the lower left side of the screen with the six leftmost icons being the ones you choose the topic to work on with the other controls to the right of these.
Lumion Topography Mode Screen
The icons from left to right on the first row :
- Terrain Editing – Push up, down, flatten, jitter and smoothing tools, each with strength and radios controls.
- Water Surface Editing – Allowing for dedicated planes of water to be inserted to the scene with water presets only possible (no further water editing).
- Ocean Editing – Activates a global ocean inside the scene with various controls like the height of the water plane, wind direction and speed, wave intensity as well as color controls.
And on the 2nd row :
- Terrain Painting – Coloring the terrain surface using a preset selection of materials.
- Urban Map Editing – OpenStreetMap based support for loading a map based on geo-location which creates a 3d Map inside your scene for fast project insertion into Urban Context.
- 3D Grass Editing – Allows for ONE of the terrain materials to show 3d grass blades on it. This is a GLOBAL effect.
Each of these has a pretty straightforward set of commands which I’ll not get into in this article.
Know this : The editable part of the Lumion Terrain is a 2k x 2k square centered at 0,0,0. It is not possible to change the height or paint the landscape outside this area. The height of the terrain fades to 0m over the last 50m of the edges in order to blend in with the flat terrain outside the editable area.
Lumion Heightmap Based Terrain
I found the Heightmap based approach to be very interesting and used that during the CABINS Challenge Concept creation.
Know this : The resolution of the Heightmap texture should be 1024×1024 pixels. The innermost 1000×1000 pixels are used for the 2k x 2k editable part of the terrain. The outermost 12 pixels along the edges are not used. Each pixel of the Heightmap texture corresponds to 2m x 2m on the editable part of the Lumion Terrain. The color black is equal to a terrain height of 0m and the color white is equal to a terrain height of 200m. Each greyscale step (from RGB = 0 to RGB = 255) is equal to a terrain height of 0.78125m.
The Location
I searched for a place with specific terrain features and Salt Lake City, Utah, USA was the perfect fit for what I needed. Creating a terrain to match specific project needs can be time-consuming. There is no need to build it from scratch, and there are many benefits if you rely on real-world data.
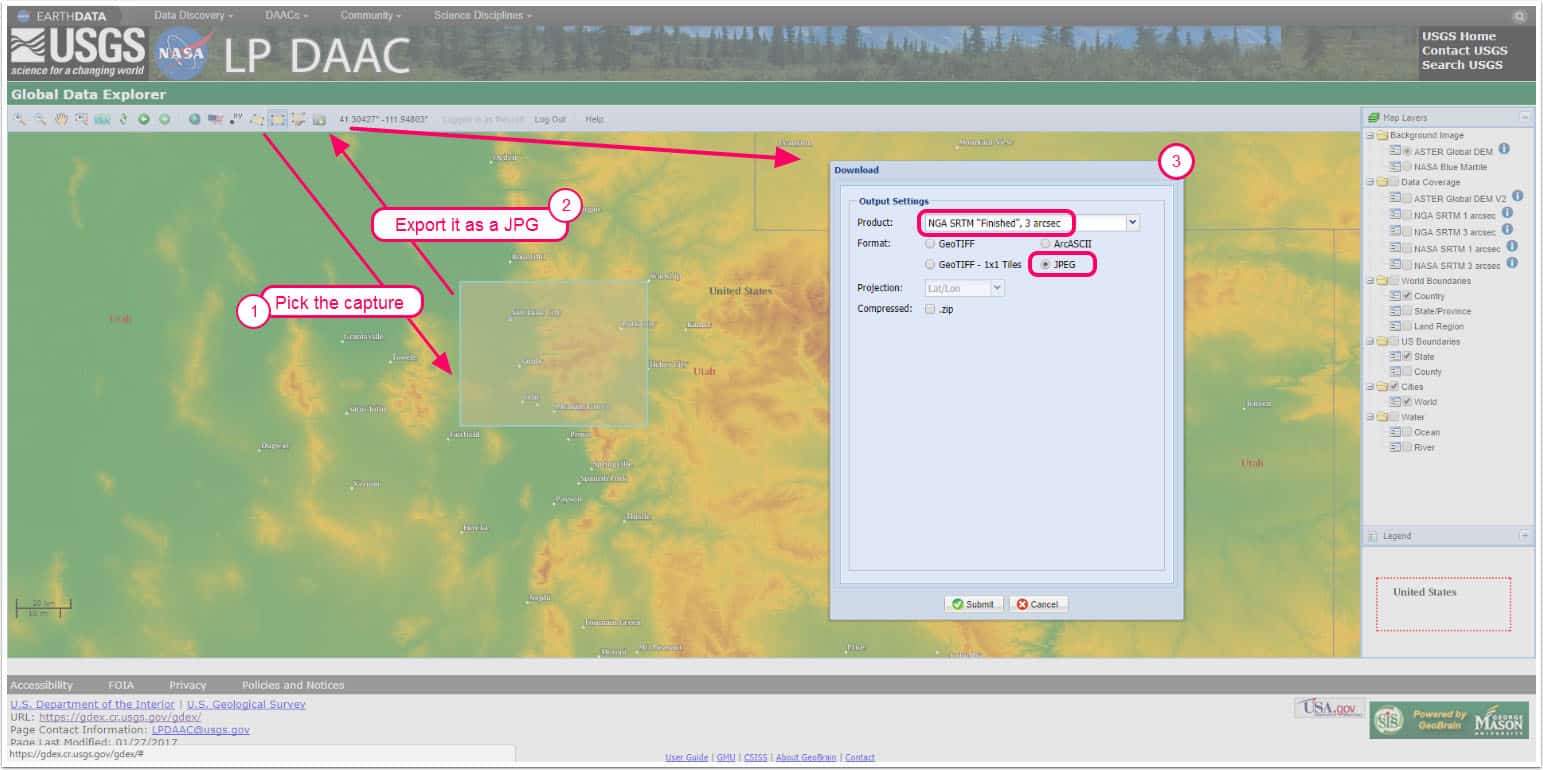
The Global Data Explorer and how to save out a Heightmap JPEG. Obtained via USGS
With the help of USGS and NASA, you can download height-maps from all over the world and import these into Lumion. The screenshot above is all you need to know for getting your jpeg out. You’ll need to register for the service before you can save anything out though.
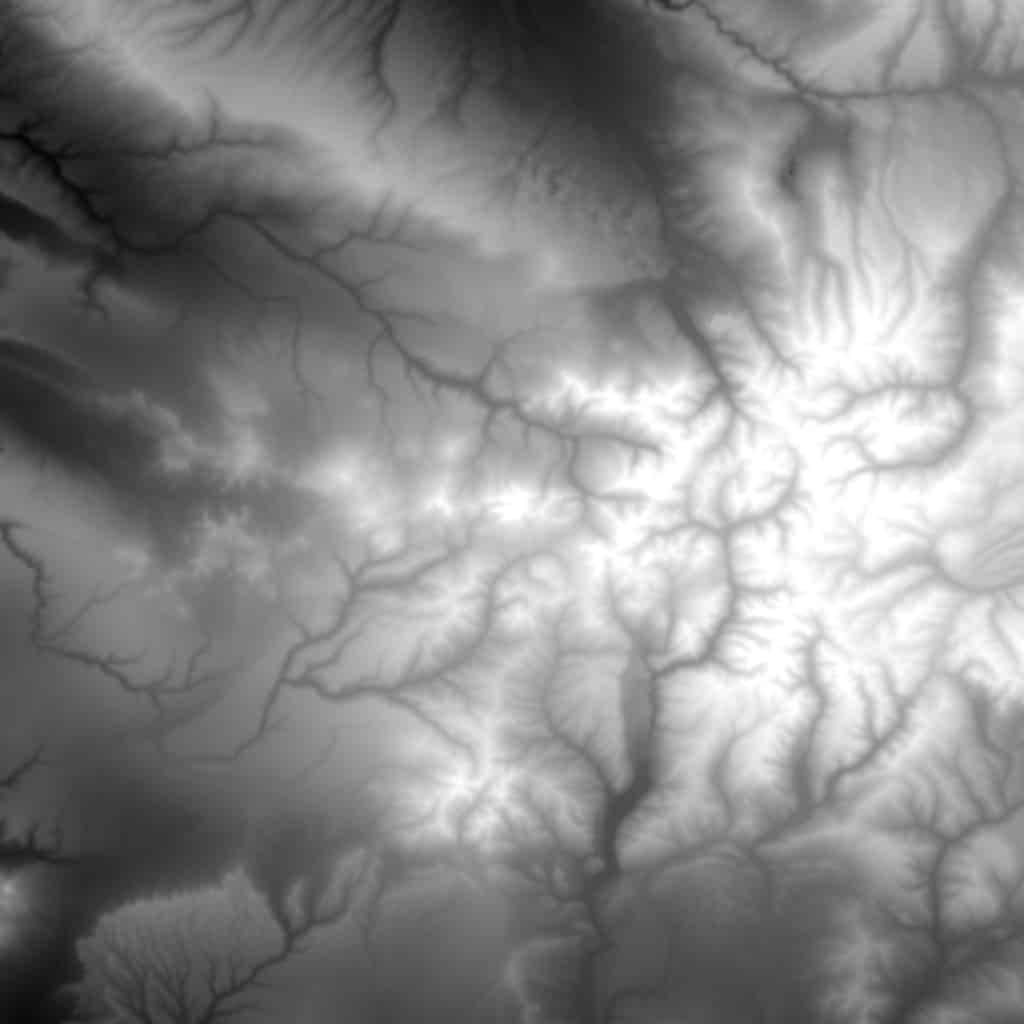
Salt Lake City, Utah, USA – Area Heightmap. Obtained via USGS
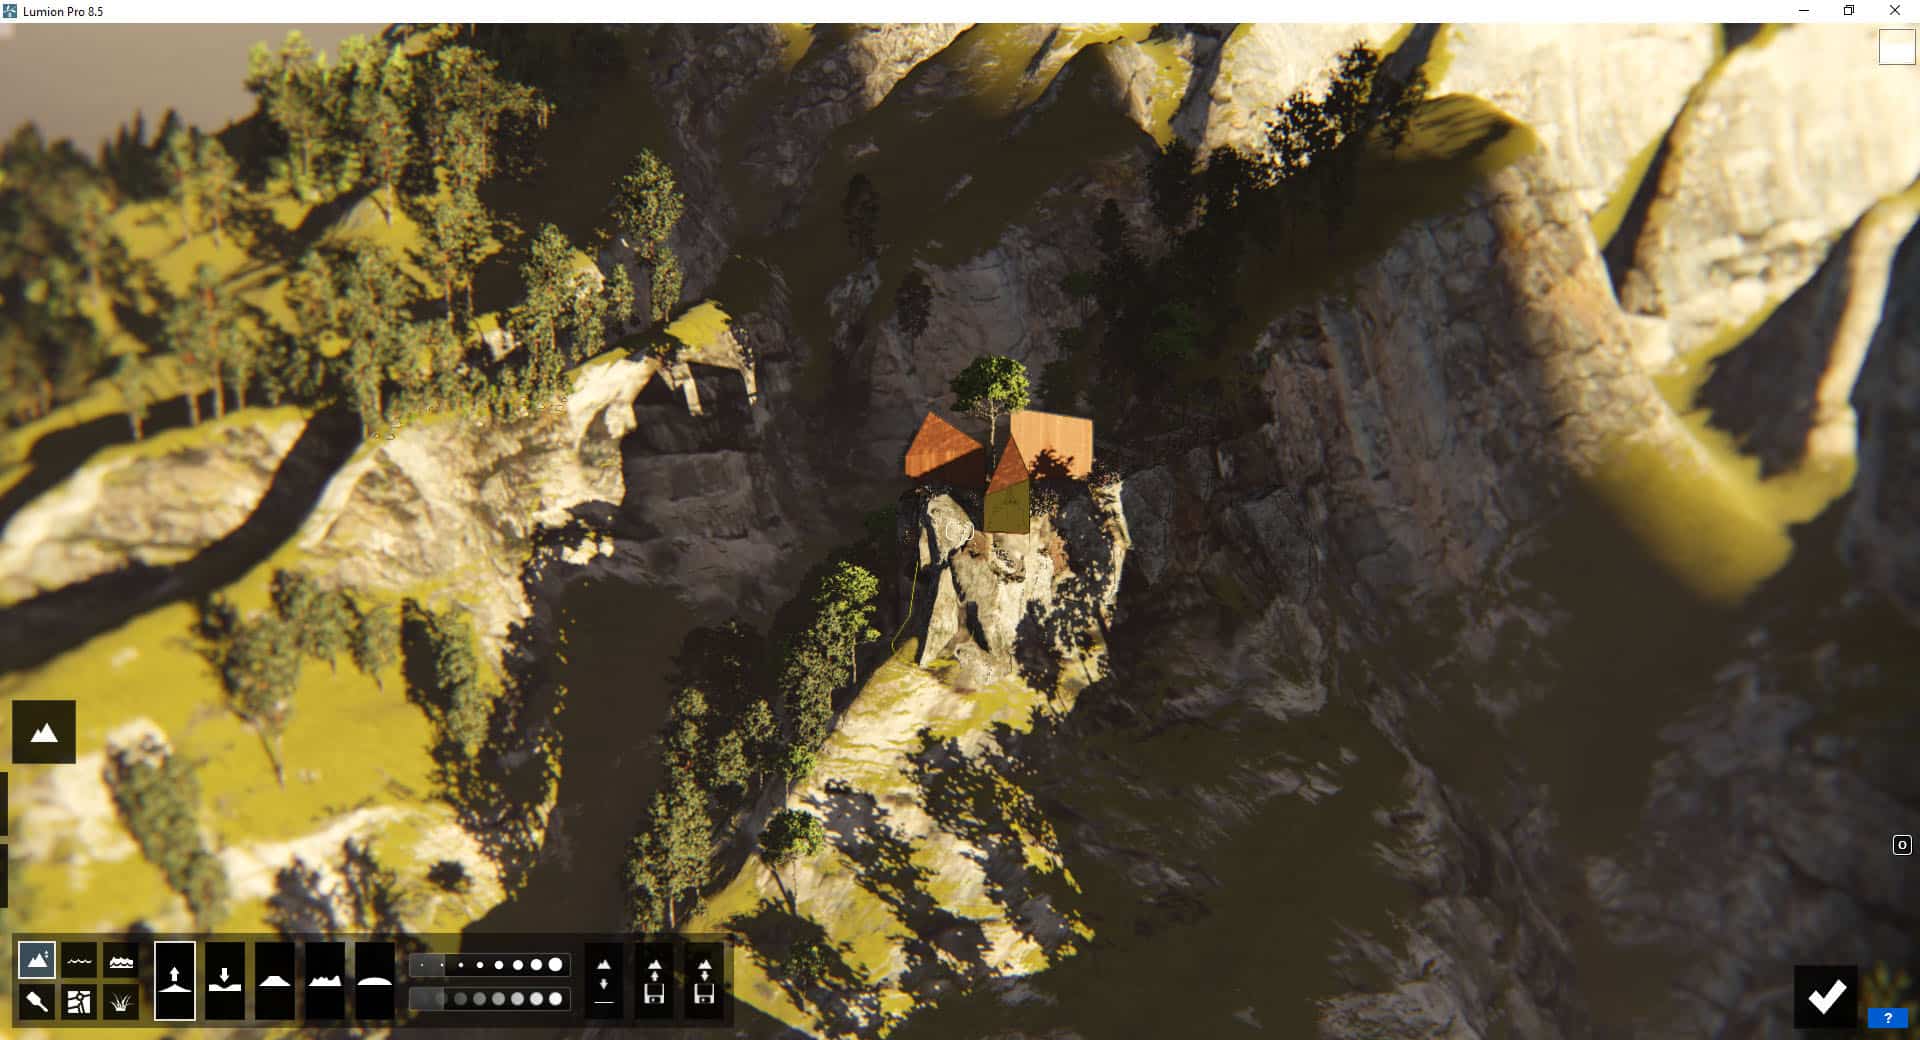
Once I had the terrain in Lumion, it was a matter of exploring it and finding the areas that fit with my initial concept sketch.
I have identified two areas with an excellent looking cliff and enough space for water to wrap around it at a lower level. I’ve marked these spots in the diagram below, which represents the terrain data before I tweaked it to accommodate the cabins and added more rock-formations to it.
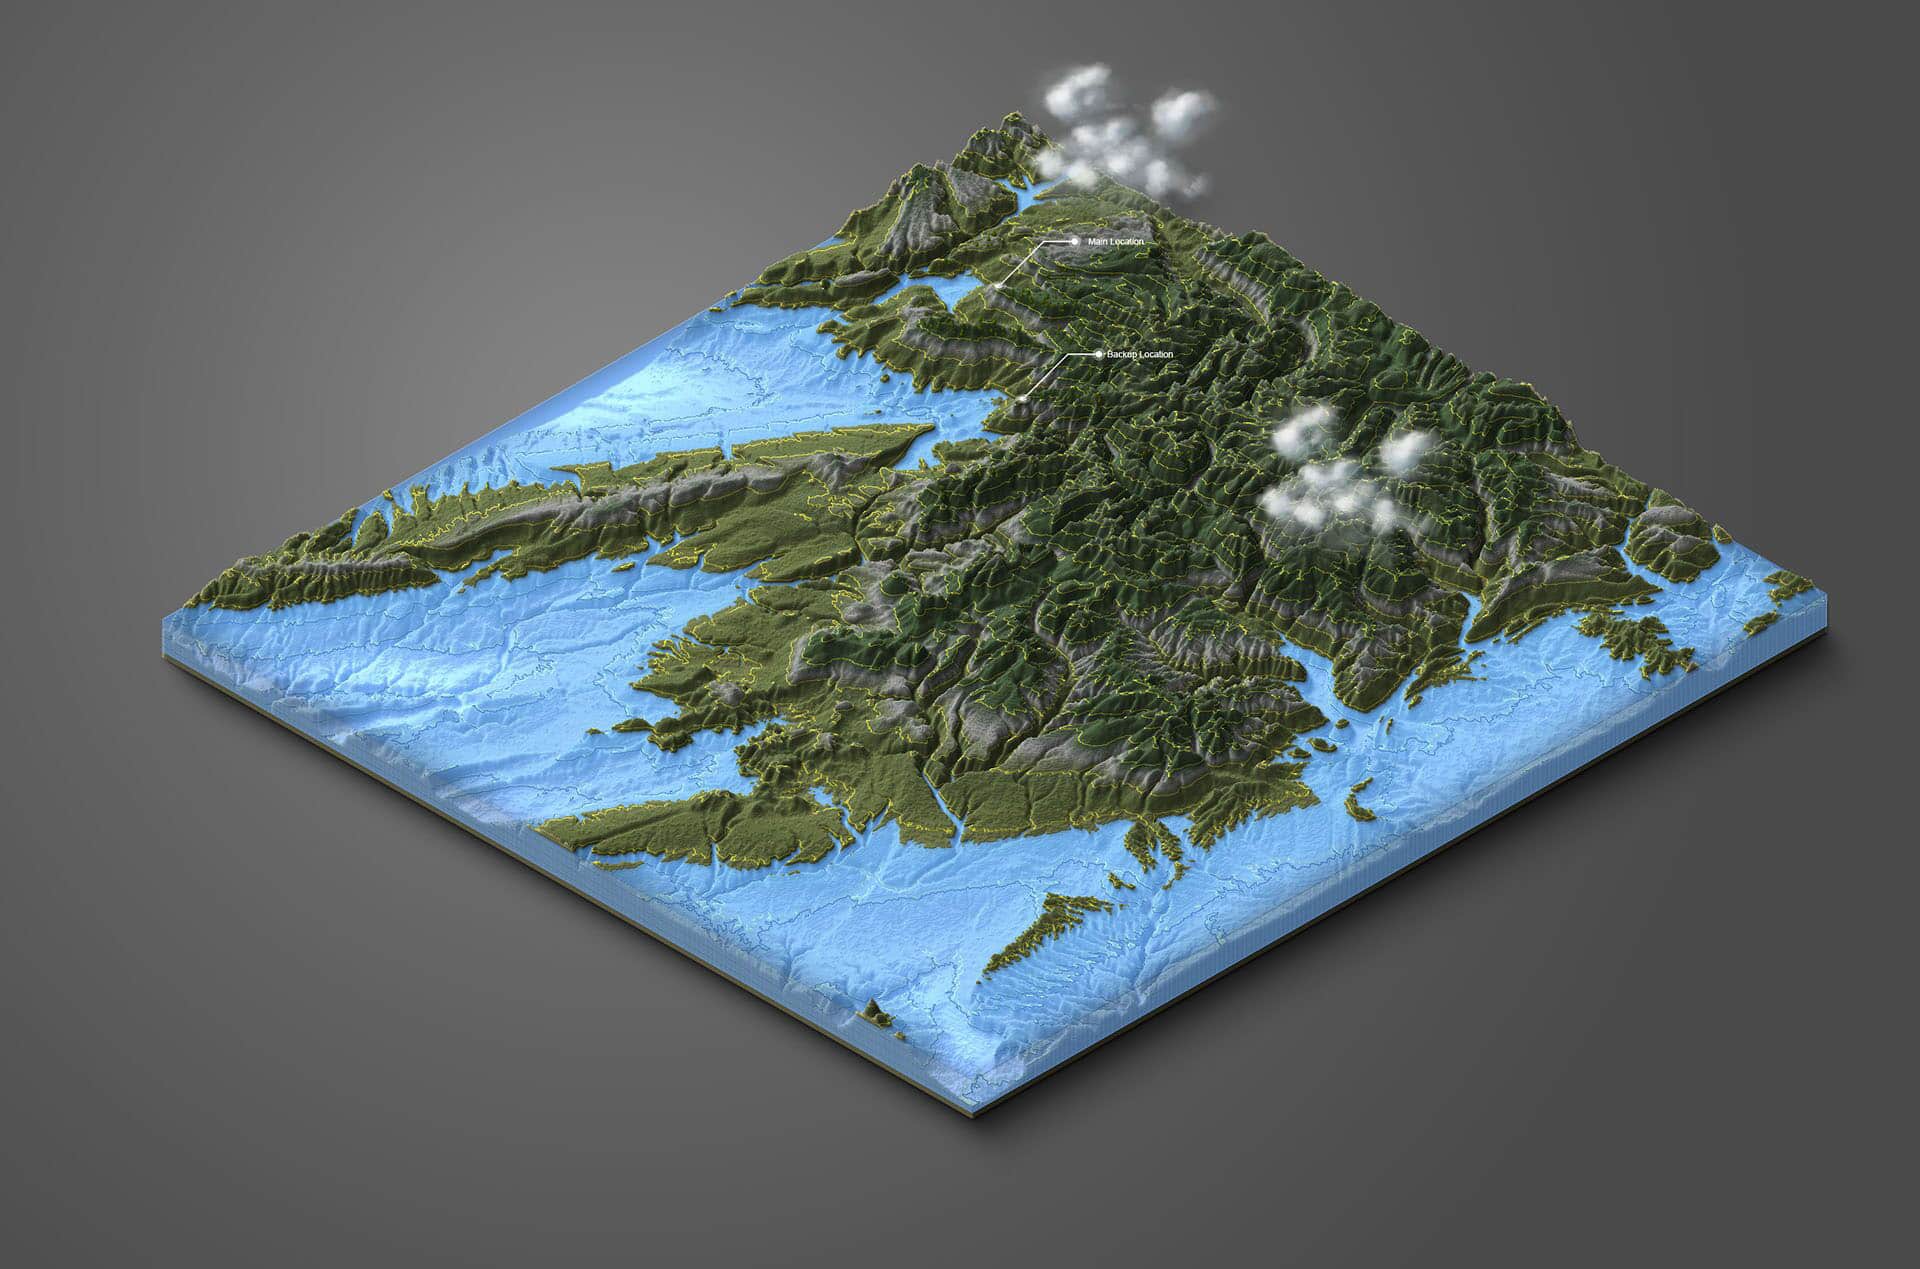
Topography Illustrated Scheme
Below you’ll see the terrain inside Lumion after importing the height-map and activating the ocean feature and setting the water level height so that it all fits with my concept.
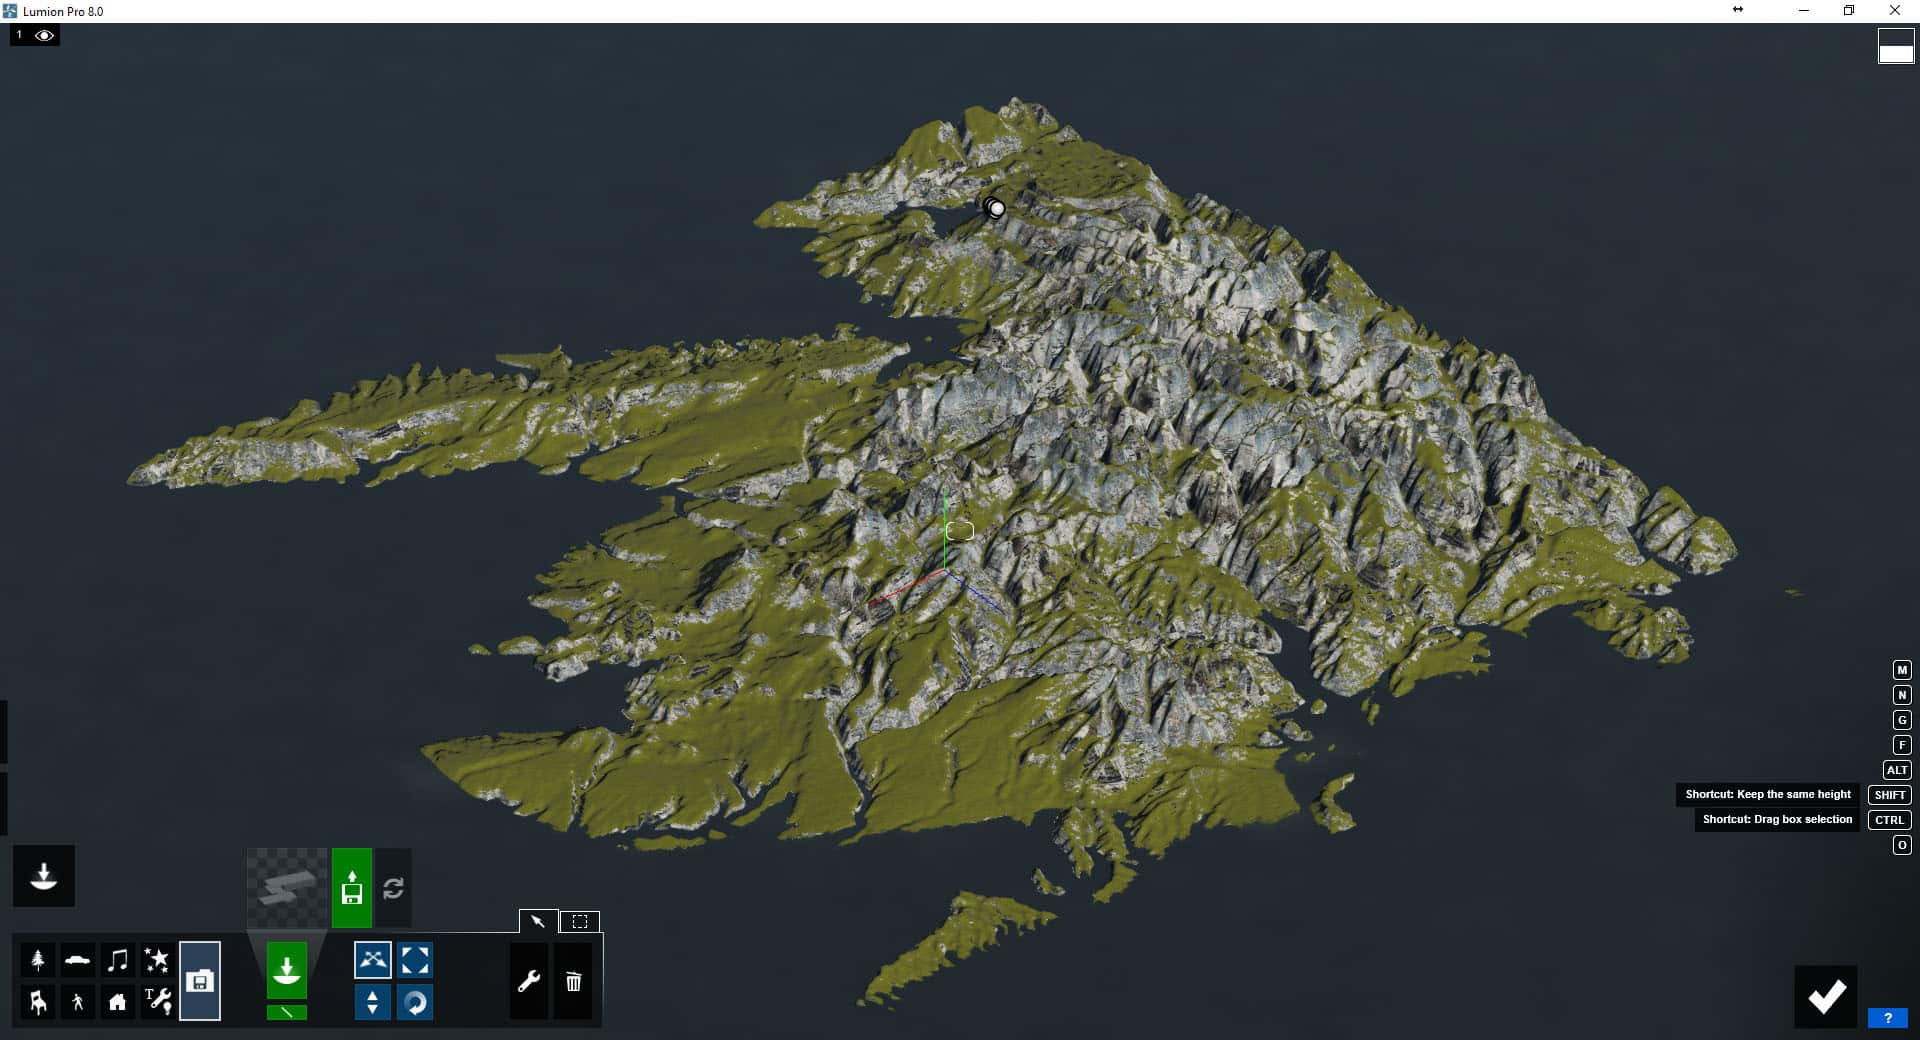
Terrain Inside Lumion with Ocean on and water level set
It is pretty cool seeing it all take shape on screen as you edit it. The height-map, in this case, was the starting point, after which I used the terrain sculpting tools to create the specific location for my cabin.
This tool works as you would expect and similar to the way this works in an application such as SketchUp, 3dsmax and others too.
I used mostly flatten and smooth to create the ridge line which ends with the spot for my cabin. This process was very easy, and the terrain material adds the vertical rock material automatically, so it helped a lot to define the ridge (the special vertical material is an on/off feature).
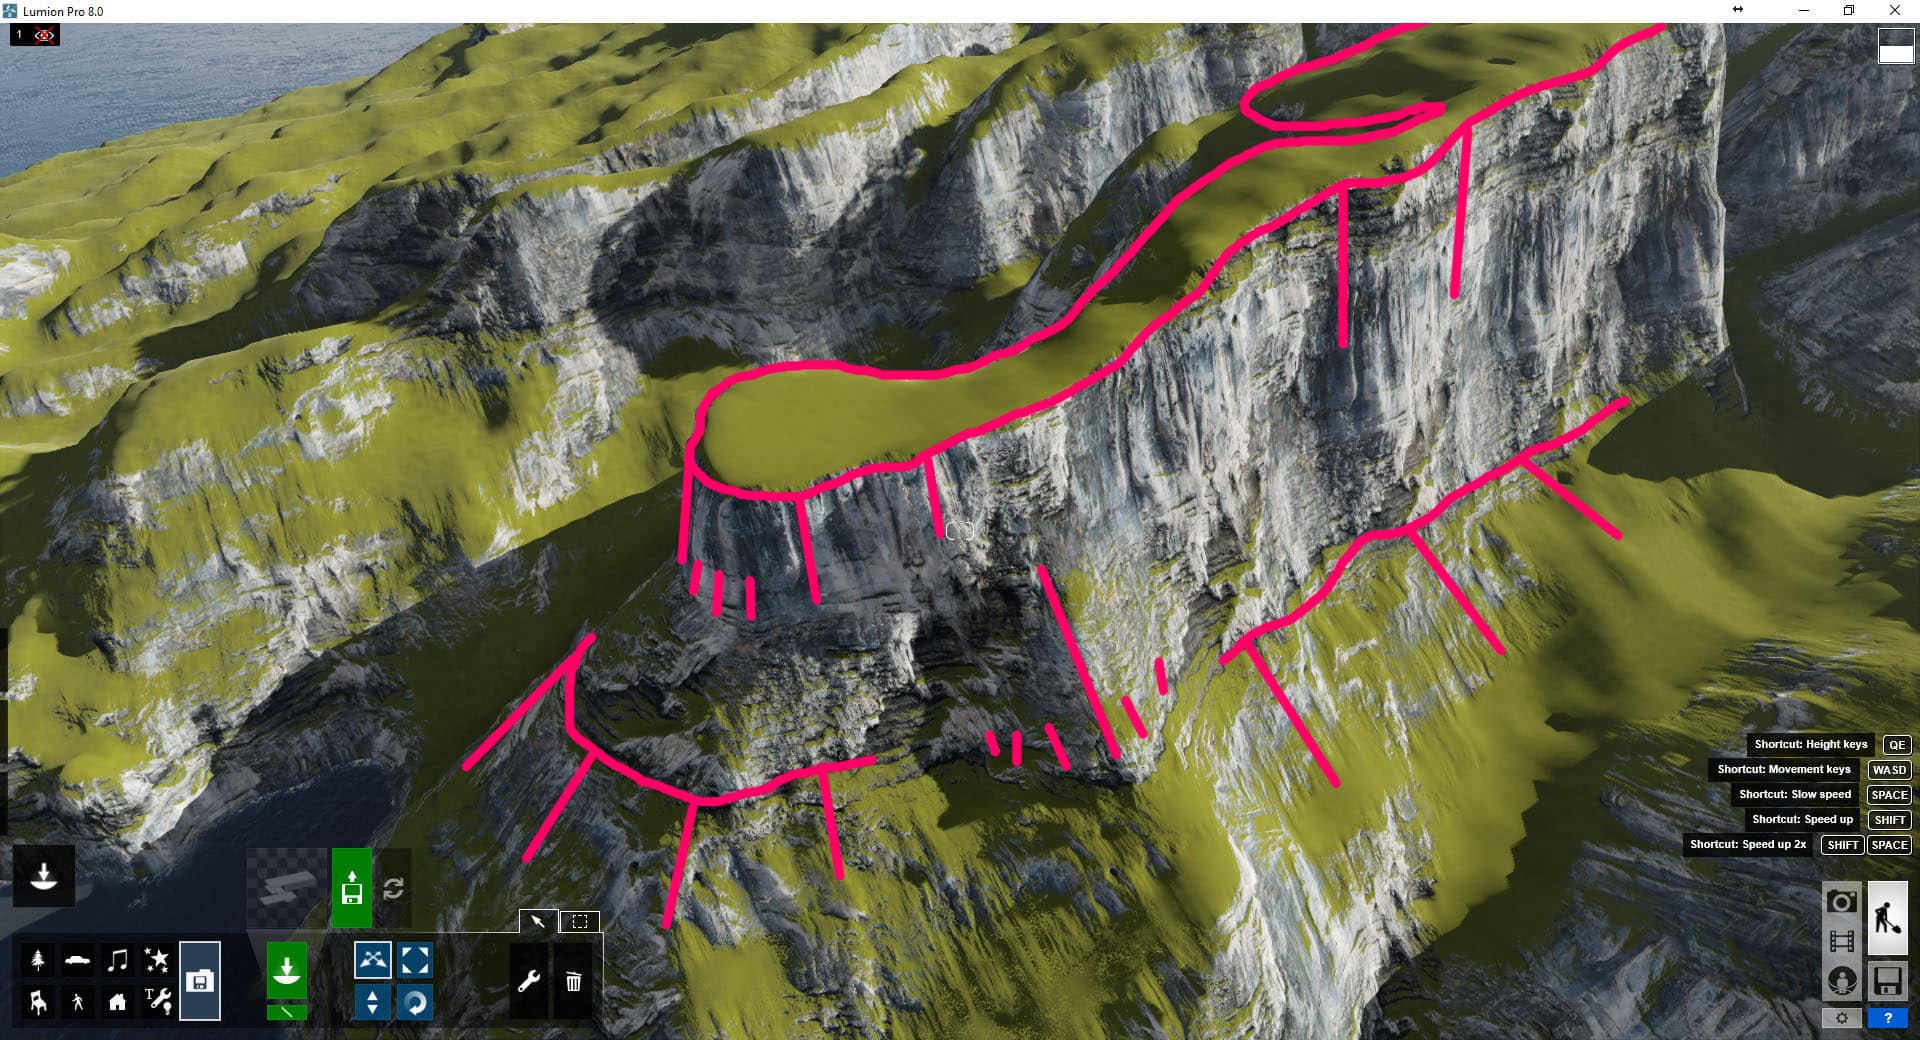
Using Lumion’s Terrain Sculpting Tools (manual sculpting areas indicated).
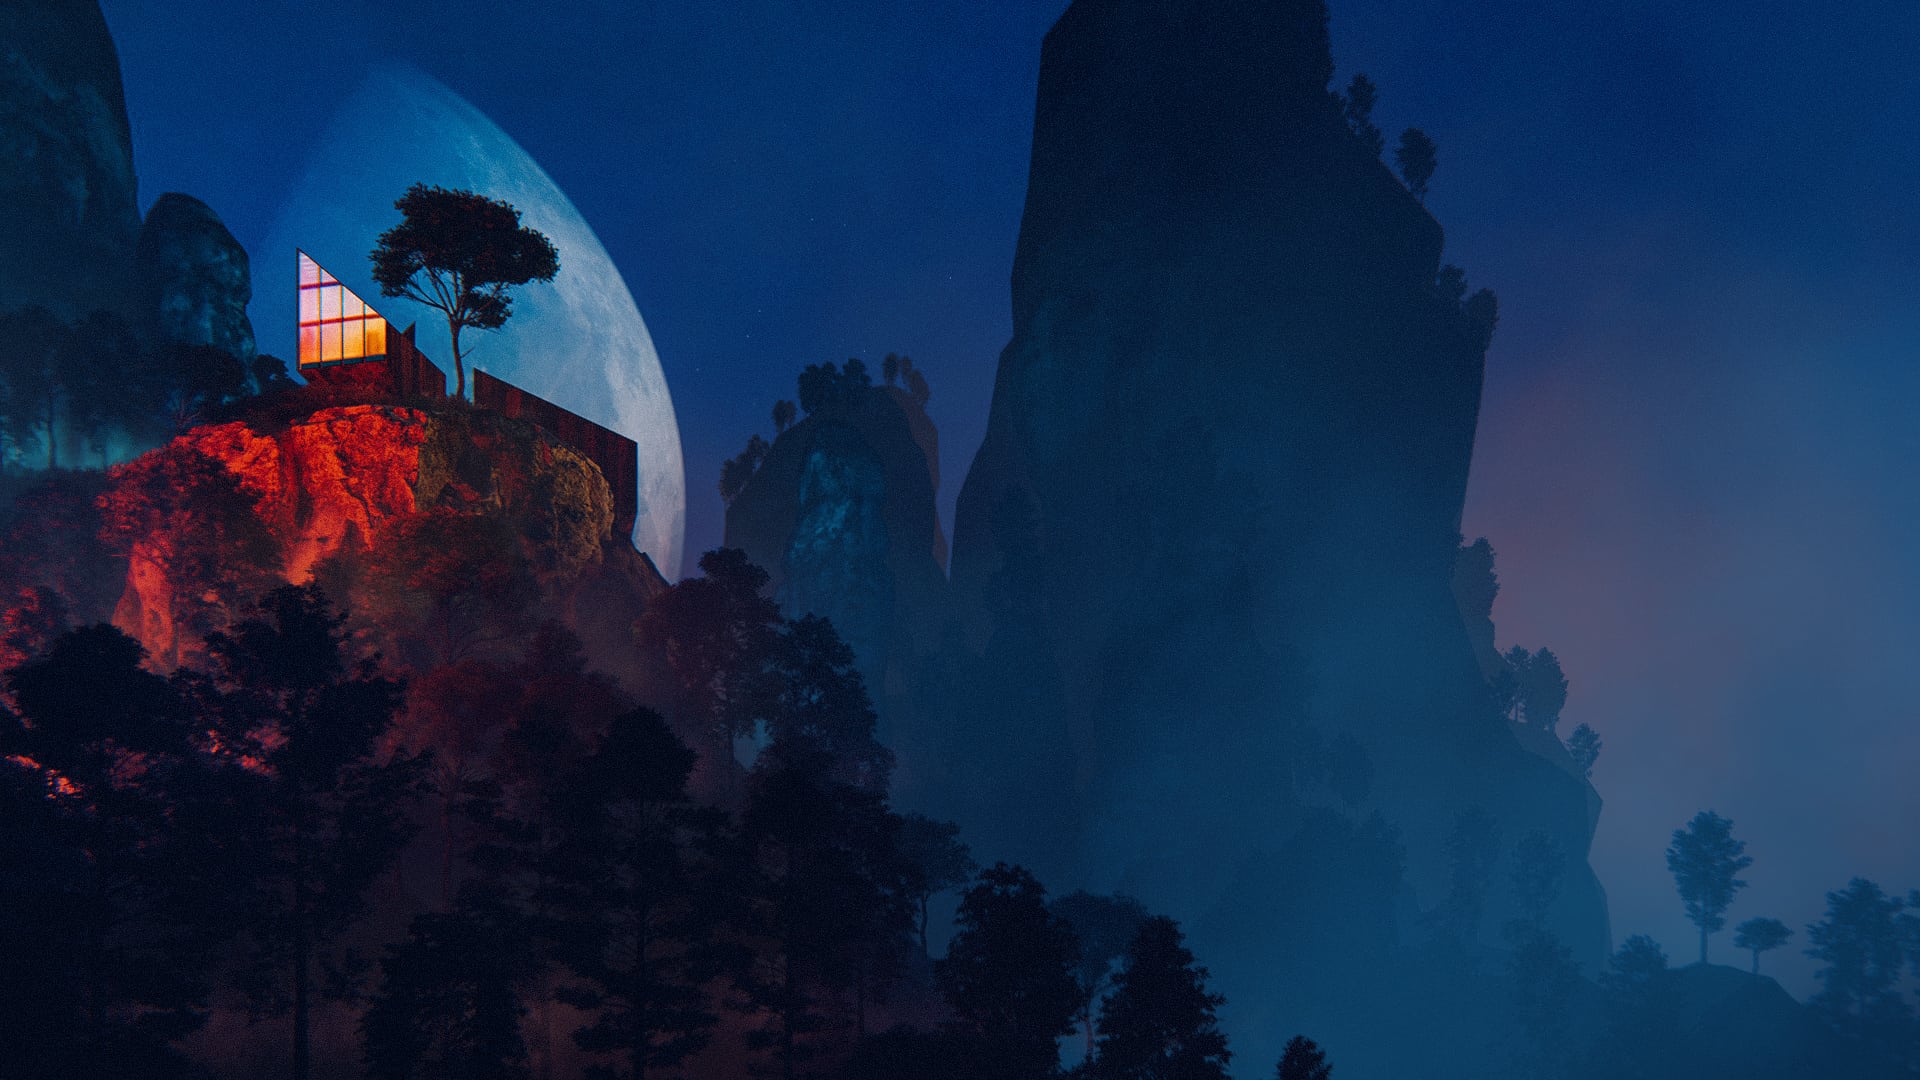
Cabins 7 – Moon Shot
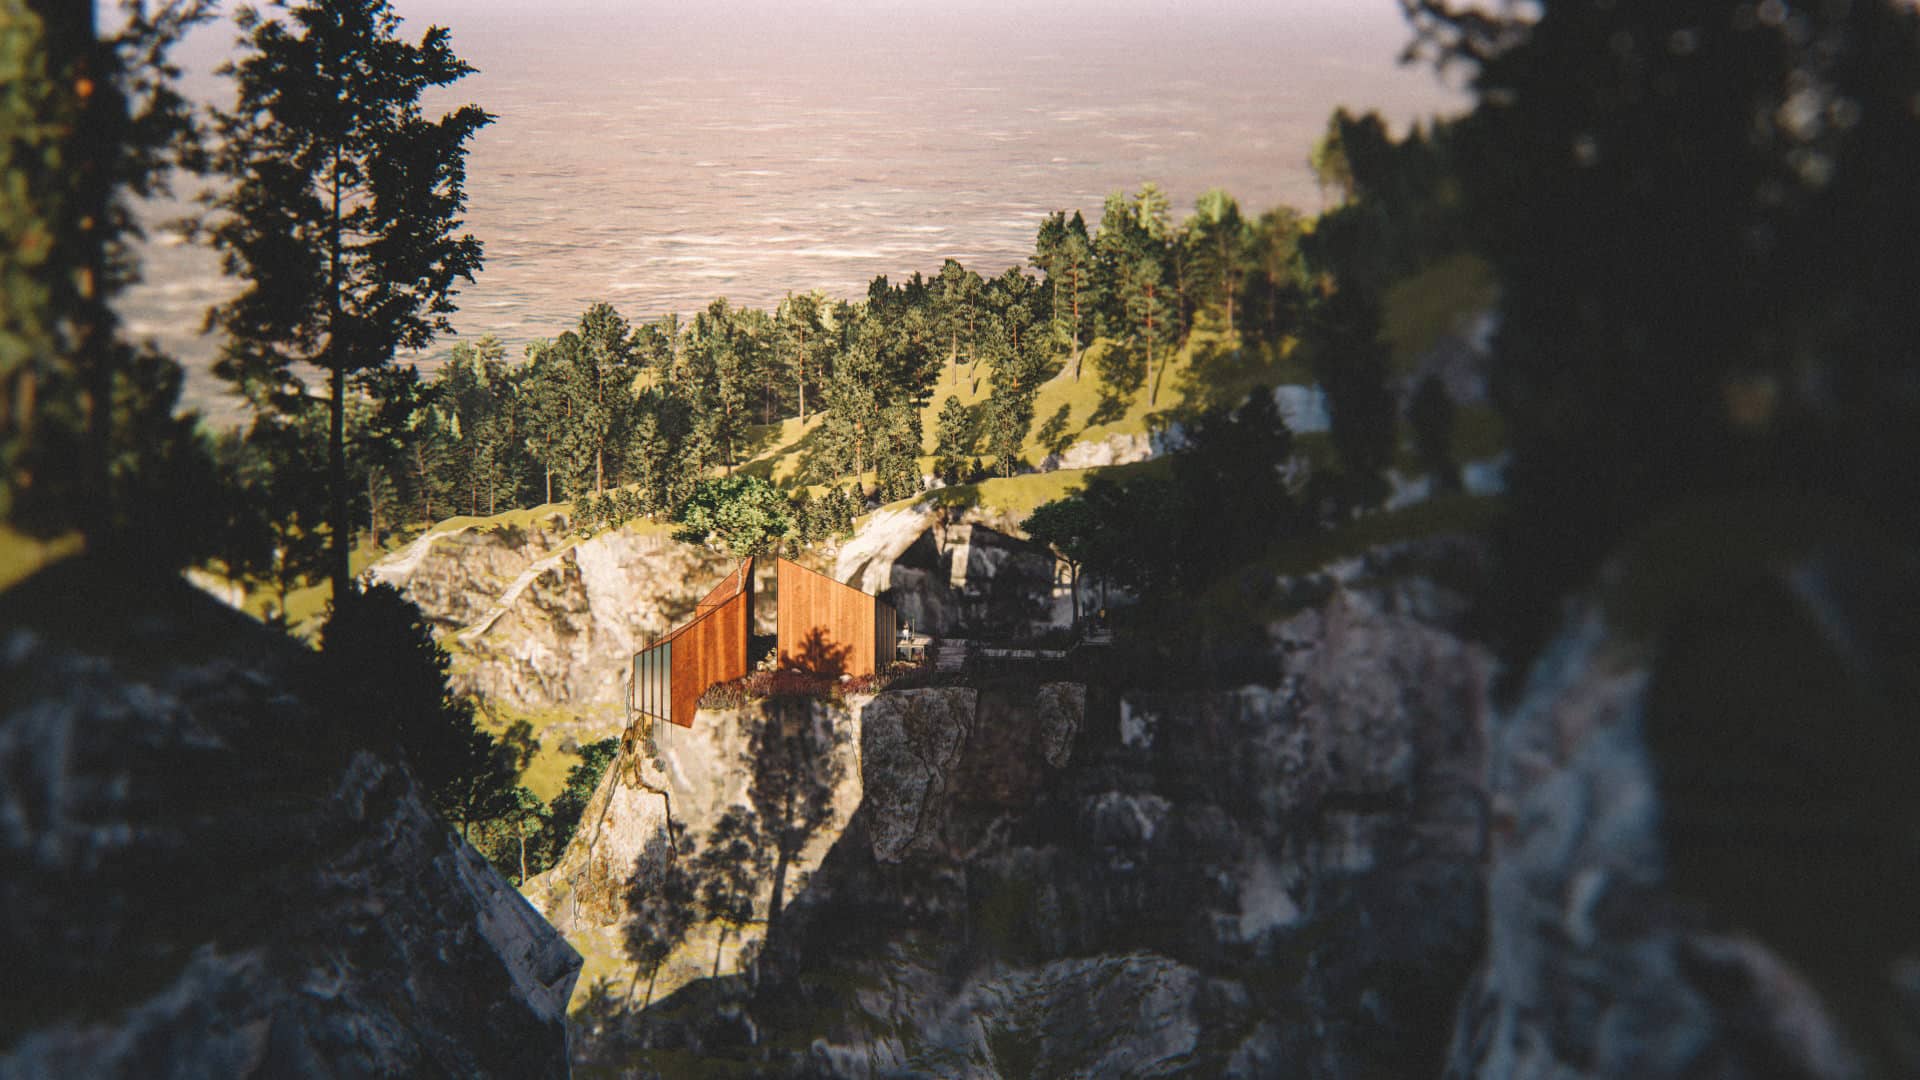
Cabins 7 – Peeking
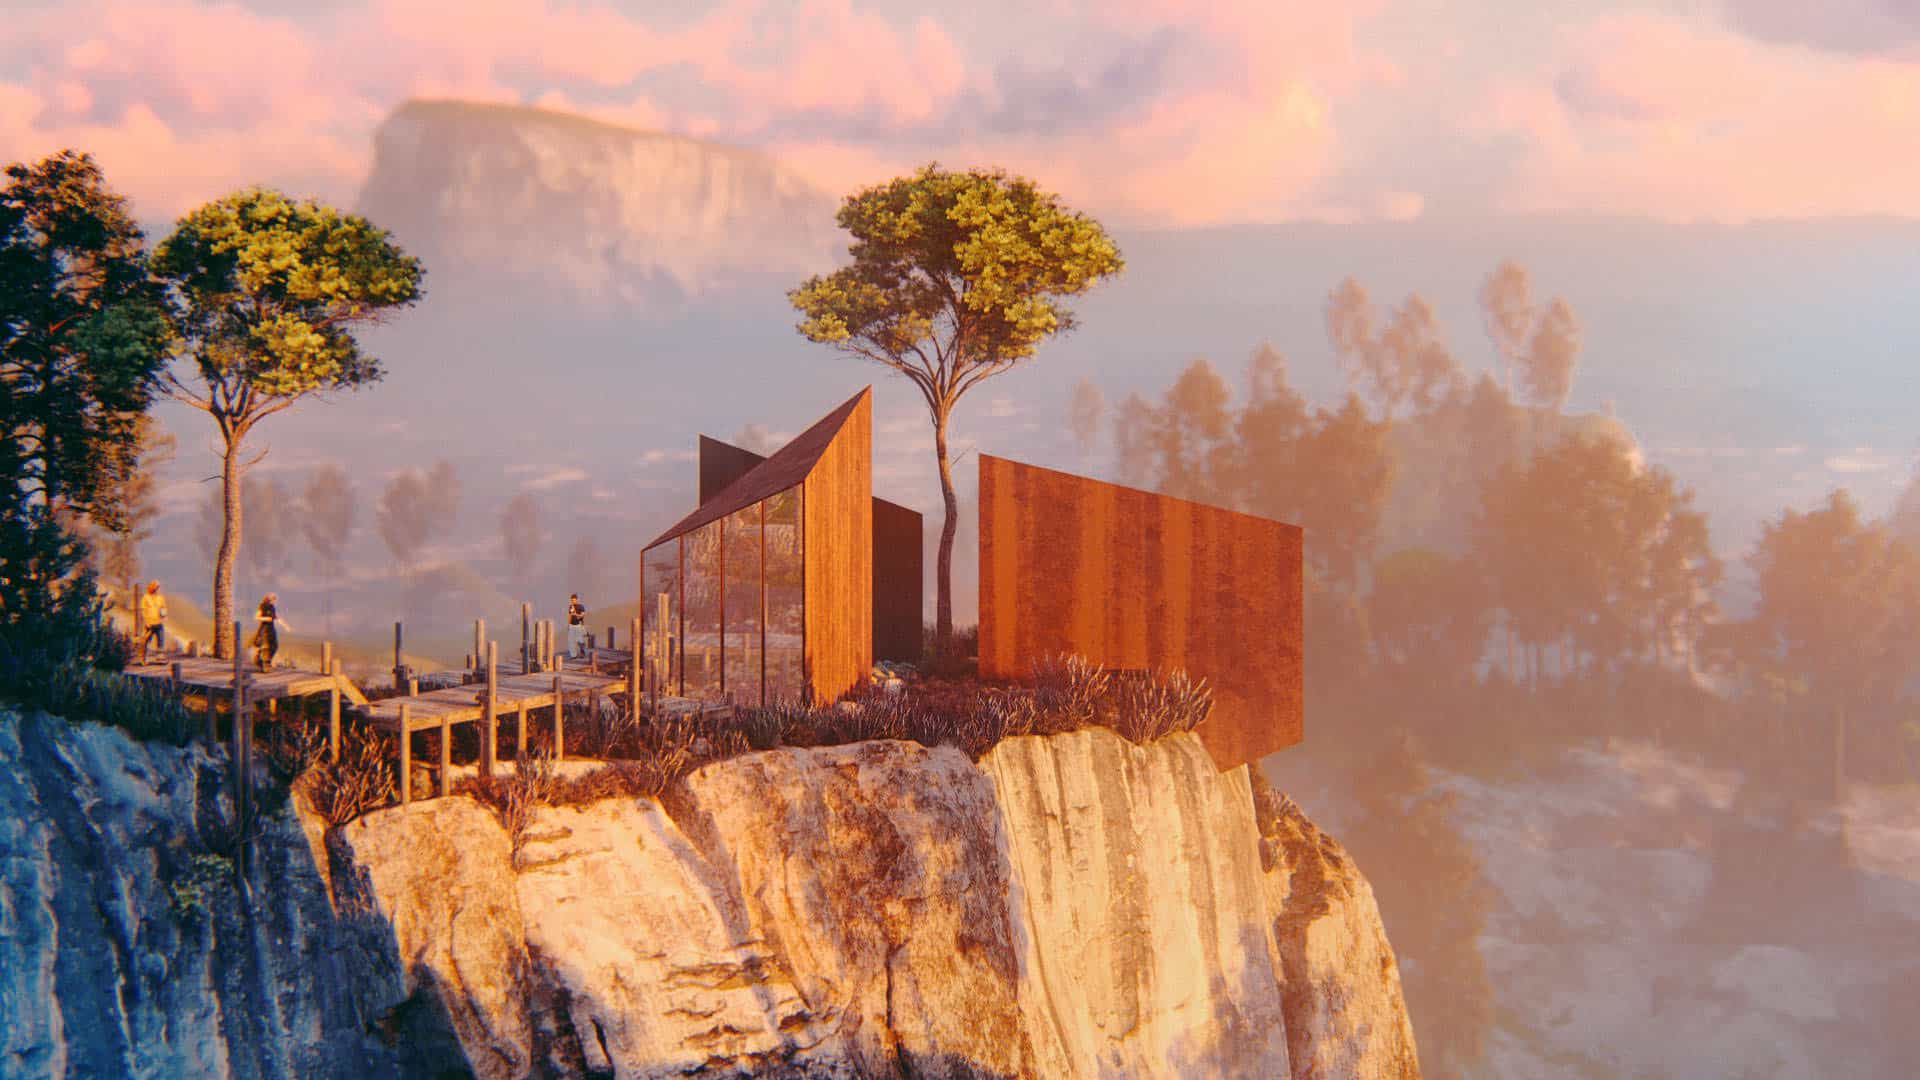
Cabins 7 – Hovering Approach
Lumion Materials
Lumion materials are super simple and yet very powerful. About the built-in library, I would say, it leaves a lot to be desired. It is part of the “Closed Garden” syndrome, which I’ll cover in the end.
That said, I’ve always found my way to get materials to looks the way I wanted.
The K Pool House – All Materials used here are built-in Lumion Materials.
The Built-in Lumion Library
Lumion comes packed with a preset material library for nature, interior and exterior elements of your scene. There is also a custom material library featuring billboard material, simple paint, glass & pure glass, invisible, lightmap, standard (which you’ll use the most), water and waterfall.
With more than a 1000 materials in the library, you can cover a lot before you find yourself in need of custom materials. When you do, it will probably be a tile-based material you’ll look for since there is not much room to play with these inside Lumion.
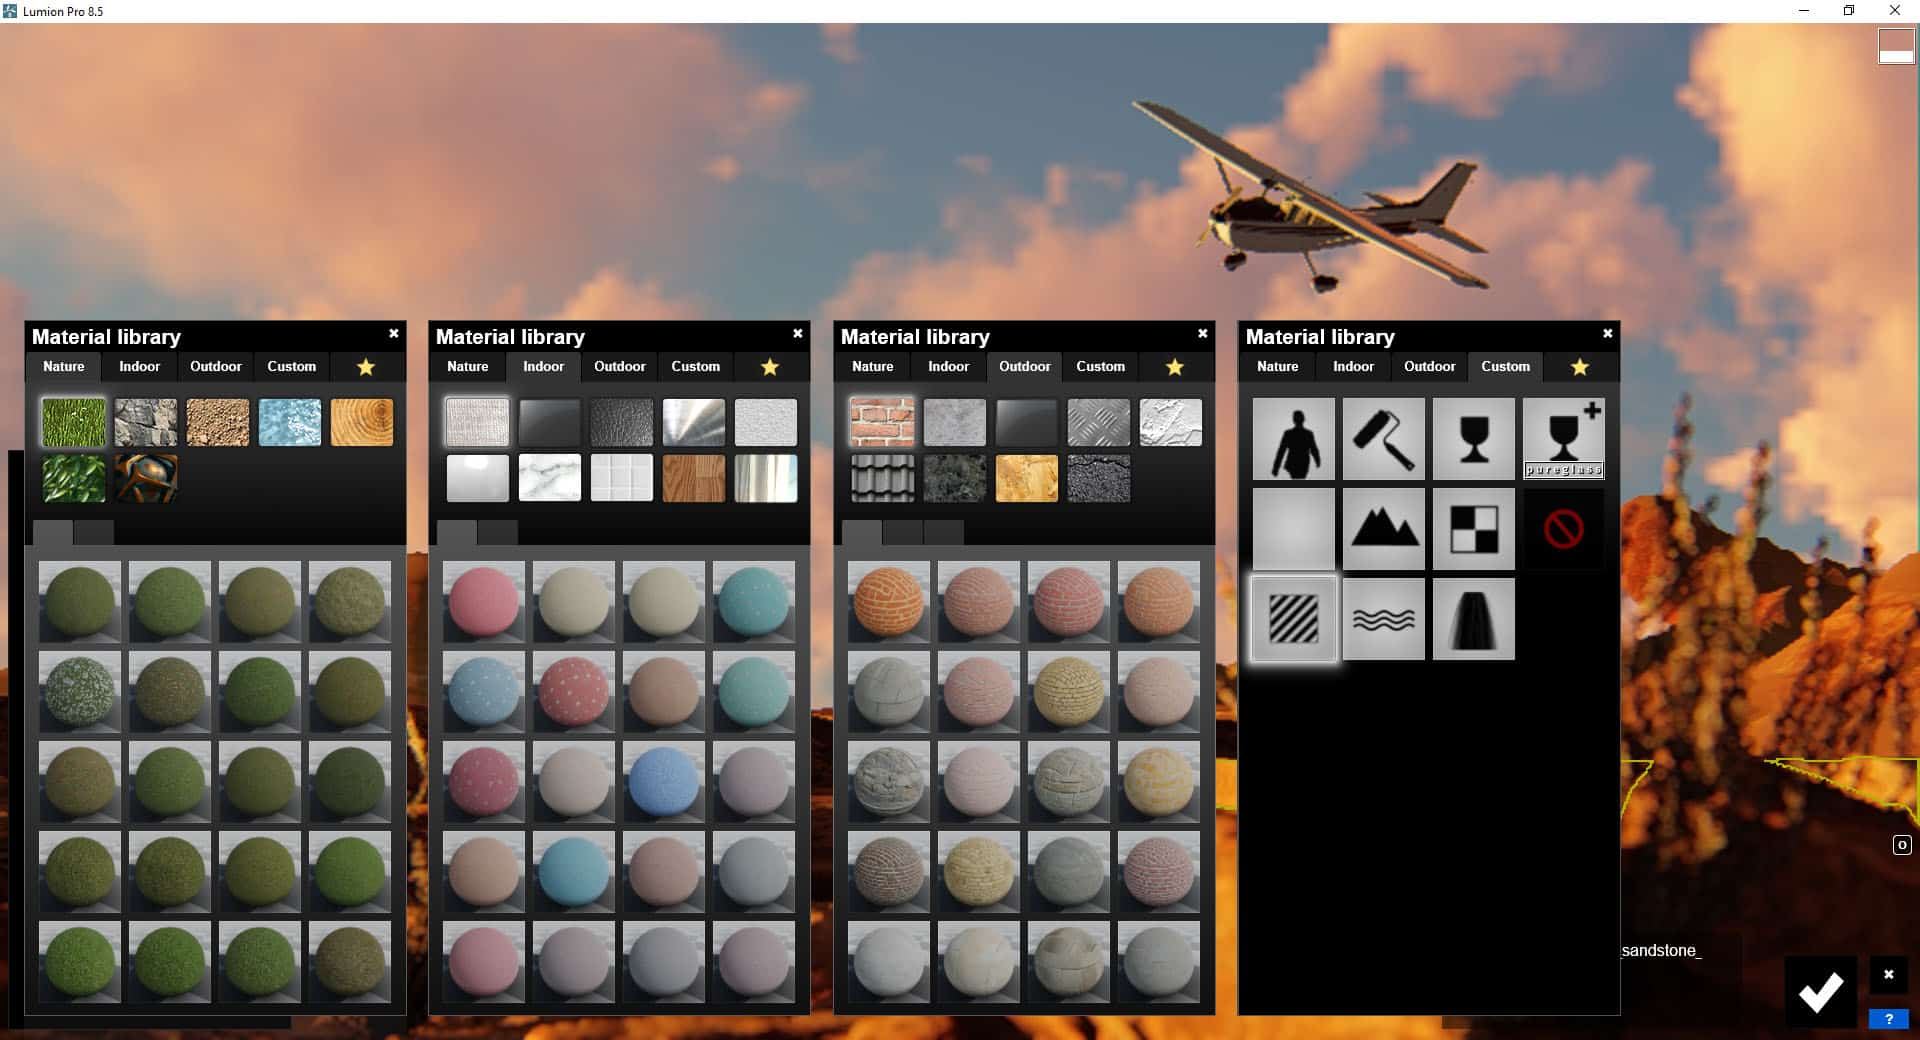
All four Lumion main Material Library tabs
Diving a bit deeper into the Custom Materials tab, you’ll find :
- Billboard – Intended for 2d cutout elements like people images on flat planes. Using this material will make the flat plane rotate based on the camera and the shadow to fall correctly.
- Paint – Simple color picker, and that’s all!
- Glass – The simple glass material
- PureGlass – Introduced with Lumion 7.0, this technology gives you access to transparent, translucent or frosted glass that looks more compelling and realistic.
- Invisible – Useful for hiding geometry based on the material.
- Terrain – Assign that to geometry you like to become part of the scene terrain in terms of texture and being able to paint on it and turn 3d grass on for it.
- Lightmap – this is for using baked light. I will not cover this one.
- Standard – The primary material you’ll use. Most built-in library materials are standard and customizing new ones is done with it.
- Water – For all things liquid.
- Waterfall – For the rare cases you need to show a vertical fall of water.
Customizing Lumion Materials
Creating custom materials inside Lumion is pretty easy and straightforward, so there is no need to worry too much.
All you need is the diffuse (albedo) map.
Lumion generates the Normal Map automatically, and you have the option to flip direction for it when you do use the auto-generated one.
You can use your own custom Normal Map instead of the automated one, but from many tests, I can say that Lumion’s automated Normal Map tends to perform better than the dedicated Normal Map that comes with the texture you import in. You’ll need to check that on a case-by-case basis.

A Design Connected Model Imported into Lumion with its custom texture tweaked for the perfect look. I’m using Lumion’s automated Normal Map here.
Besides the main material properties, there are additional settings you can edit called Extended Settings and these are shown in the collage image below.
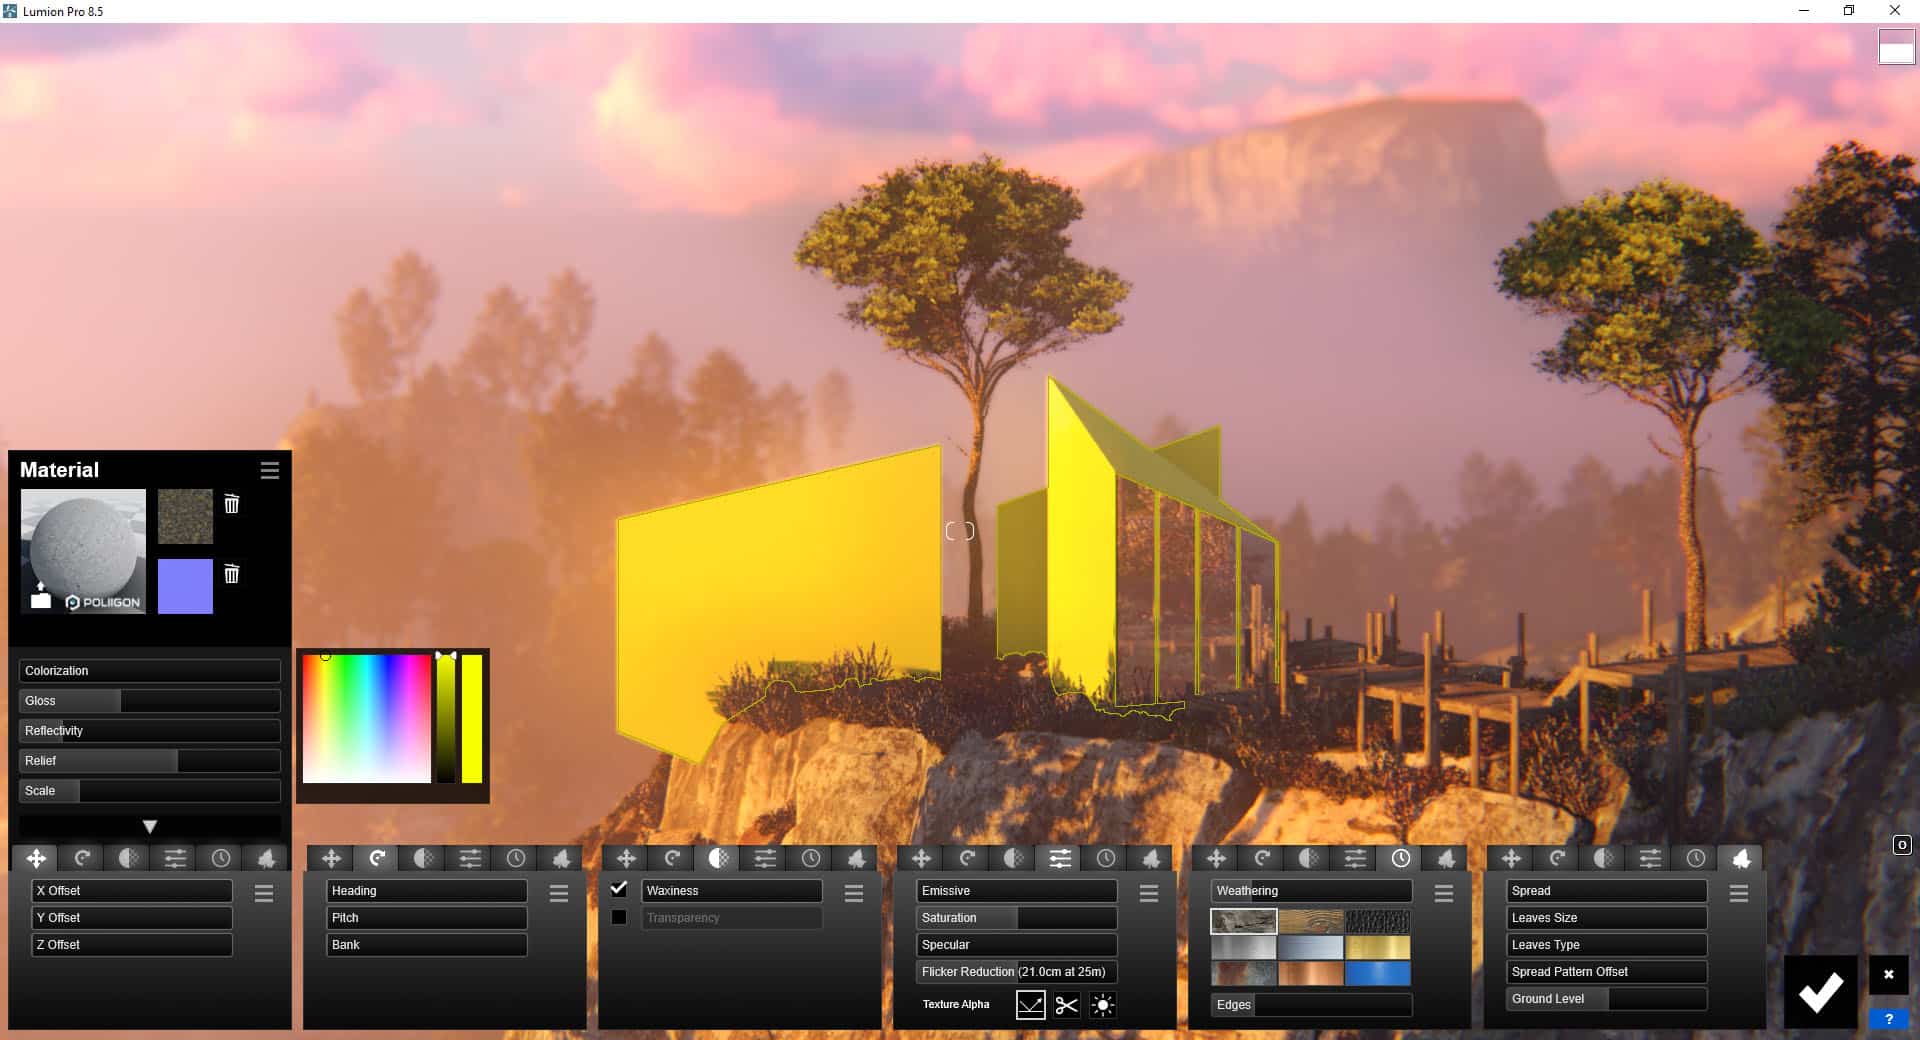
A collage of all Material Extended Settings options.
The base settings always appear in the sliders below the material image. To the right of the material image, there are two smaller images for the diffuse and normal maps. To the right of them there will be a trashcan icon to delete the maps, and next to the normal map there is a small icon that defines the direction of the relief.
Below that you’ll find five sliders to control :
- Colorization
- Gloss
- Reflection
- Relief (bump)
- Scale
And below that, the Extended Settings tabs for the material for :
- Texture position control.
- Texture rotation control.
- Transparency control – Simple or Wax (SSS Like) for things like leaves, which is what I used Waxiness for so far.
- Emissive, Saturation, Specular control – I use the Emissive slider mostly, for spotlights to show lighten up the source (it does not cast light into the scene).
- Weathering control – I’m using this one a lot! Just pick the preset that fits your material most and move the slider to the right. Lumion mimics the aging effects on the surface the material is applied to. It takes geometry into account too as does this and darkens things more in corners for example.
- Leaves growing control – Perfect for growing Ivy on things based on the materials assigned to it.
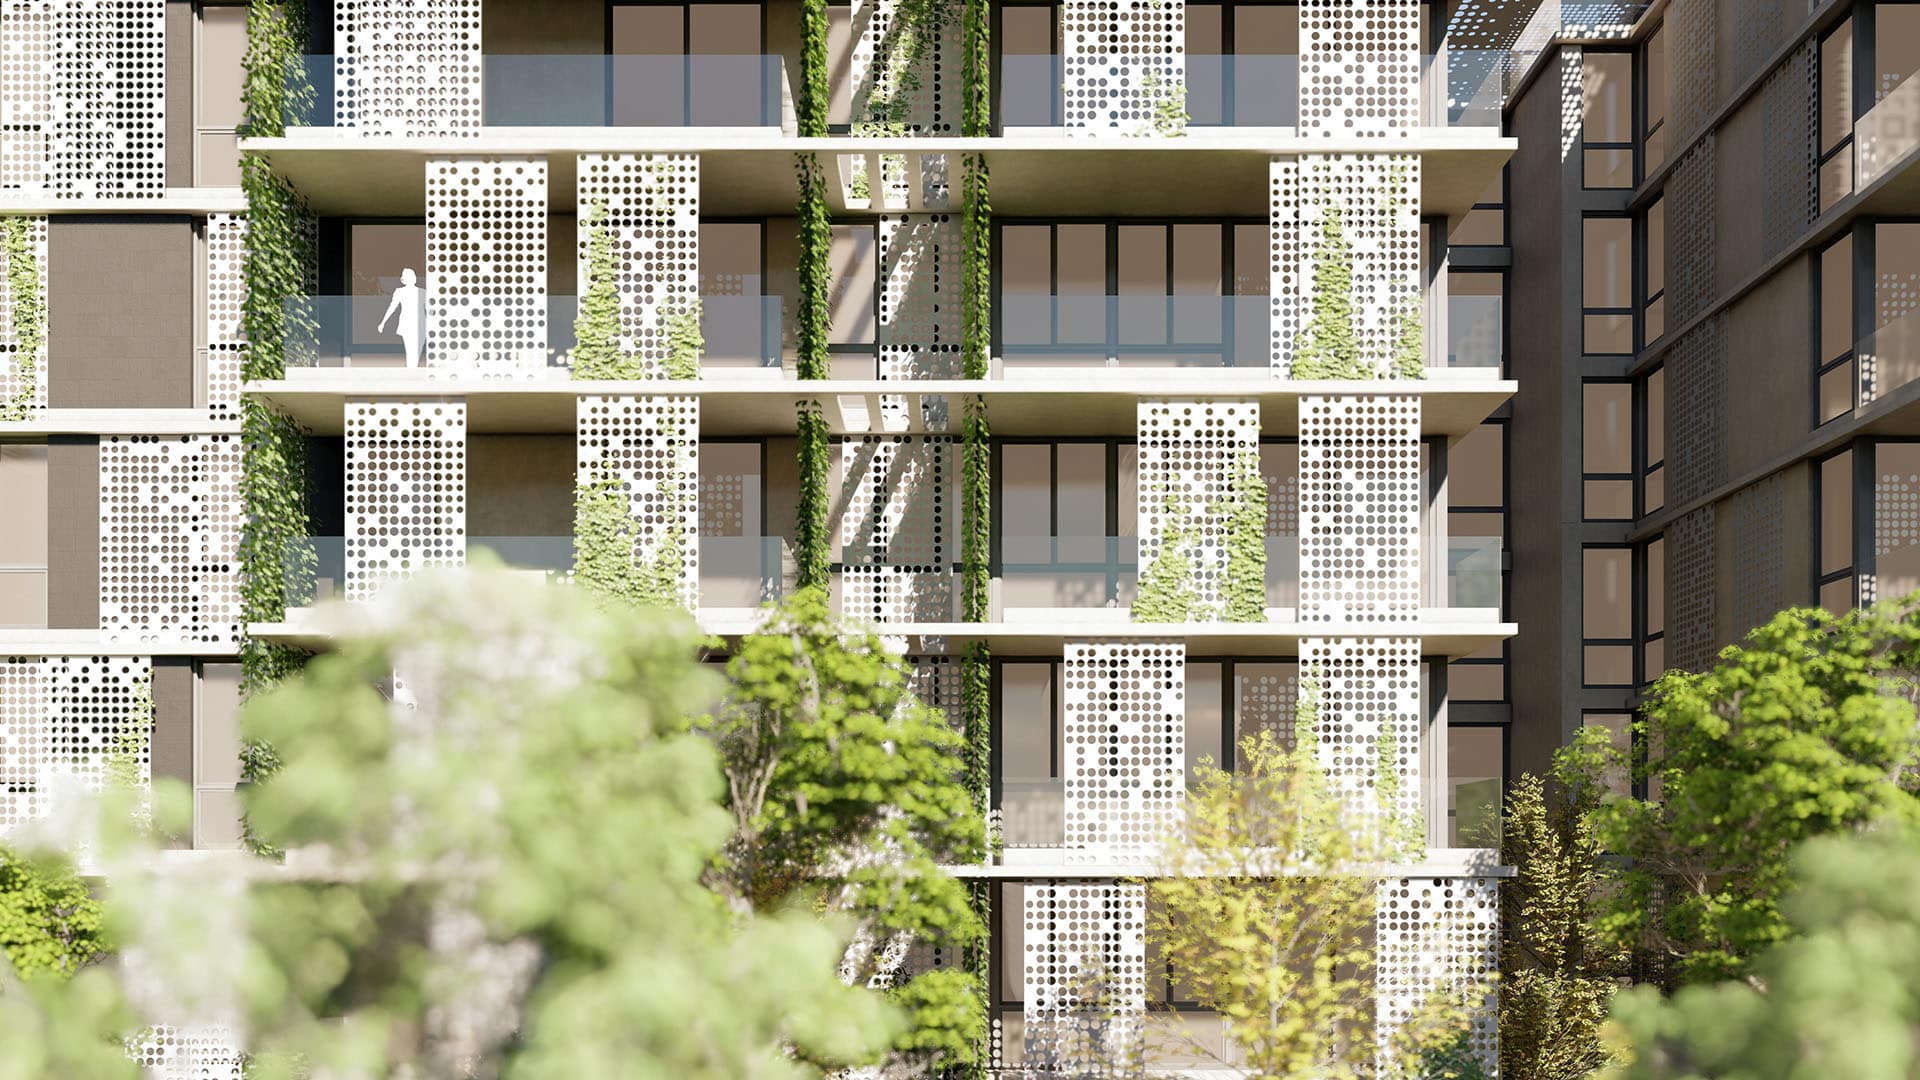
The resulted look of using leaf growing extended material settings
Above you’ll see facade panels with Ivy growing on them using leaf growing in the extended settings. Since Lumion defines the starting point of growth in global scene terms with the “Ground Level” slider, you’ll need to be smart with materials assignments.
See below how I did it. All you need to do after this setup is play with the Leaves Type, Size and Spread. Super fast and easy.
Wishlist: I would love for the Lumion team to introduce a flipped mode, in which Ground Level becomes Top Level for drop down type of Ivy.
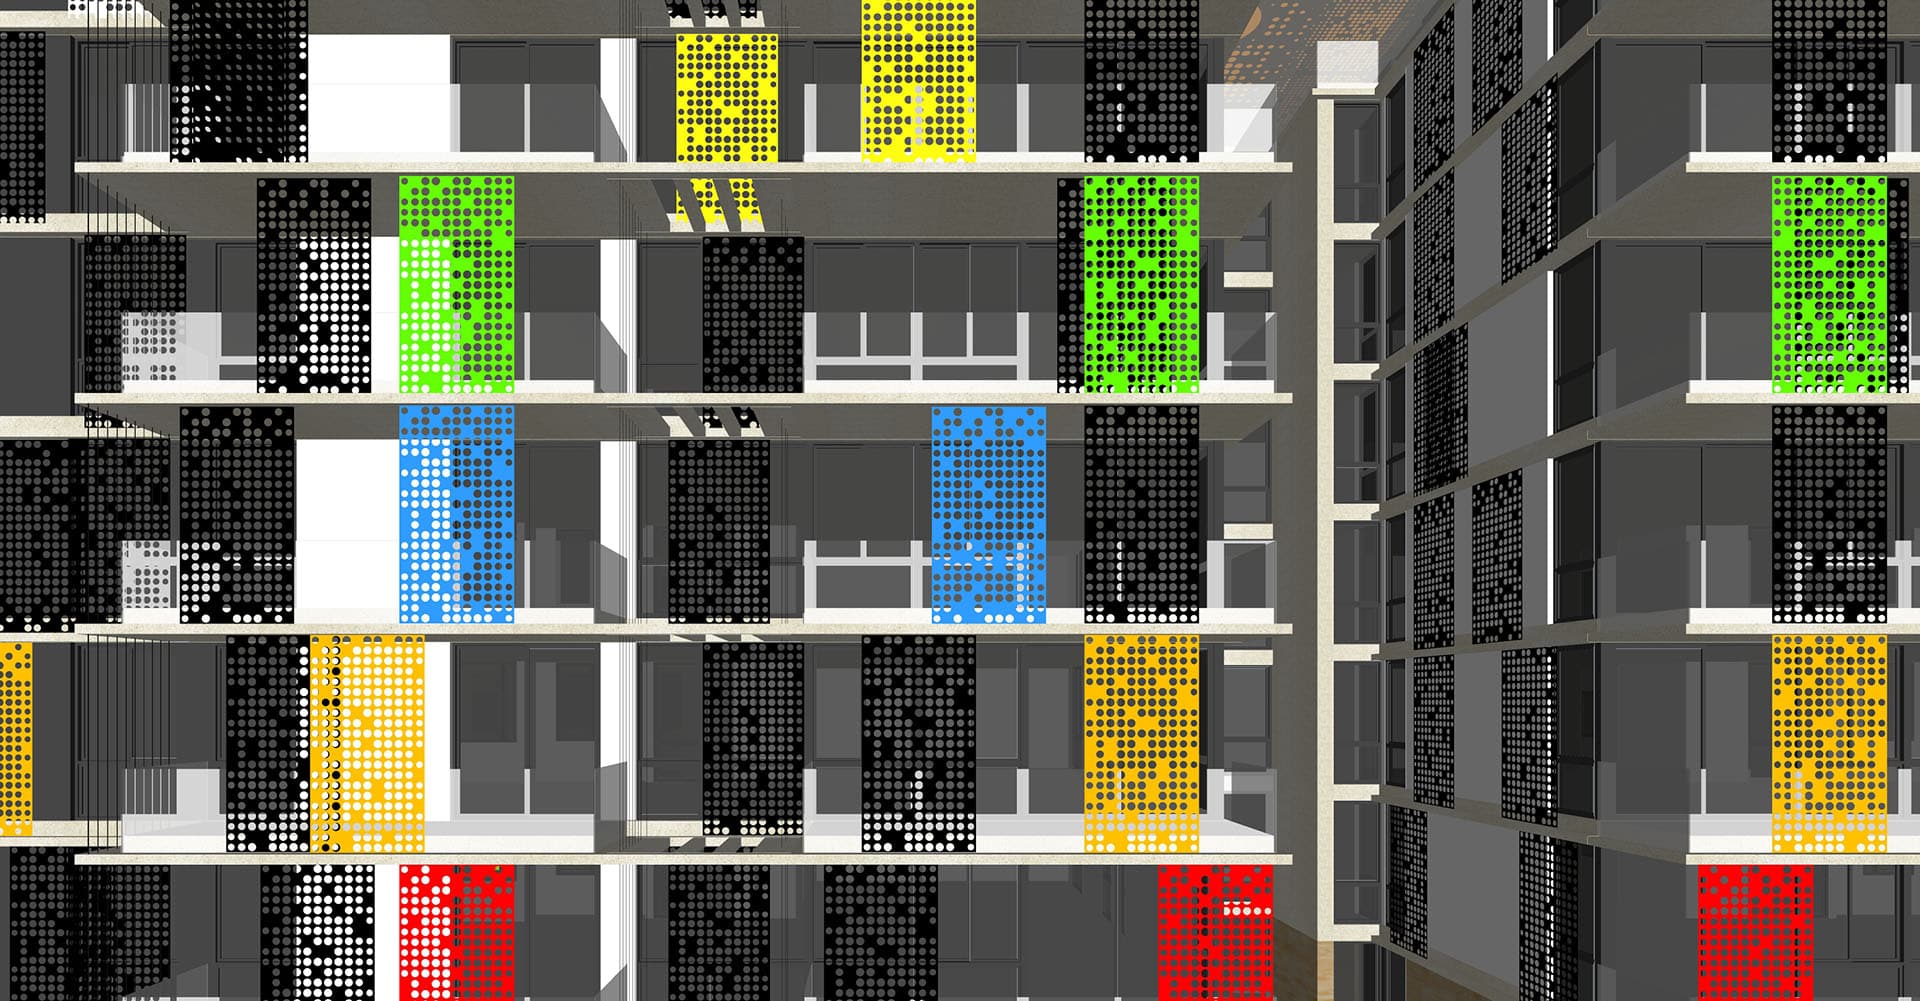
No Ivy on BLACK panels and then each floor gets a unique panel material to drive different Ivy settings.
Keep your eye on the “Three Strips” menus for further options. You can copy, paste, save and load individual materials and settings via these menus. A notable feature is saving the entire scene material set. First, this is an excellent way to backup your material settings overall, and doing so also allows you to save various material sets to reload later to show variations and what I like it most for is to reuse materials sets that repeat from project to project. This is all based on the material names assigned in the host 3d modeling application, in my case SketchUp. As long as you are consistent with your material naming – this works like magic!
From Imported to Customized Material
Let’s take another look at the Design Connected imported MUCKI By LinBrasil and the process from imported to customized (and exaggerated a bit to make a point).


")


You can only push the Relief settings too far without “breaking” the surface look.
Wishlist: I’d love to see some displacement feature added so that the stone wall for example (seen here at the back) could look great from short distances and on corners too.
Materials with Holes
Since you only have one slot for the primary color (diffuse), you might need to use a .PNG file format for times you have materials with opacity propriety to it like in this following example of a chair I imported from Design Connected.
A Design Connected Imported Chair Material AS IS
Once in, the wicker back and seat are 100% opaque. In Photoshop, I convert the diffuse map to a .PNG file after masking out the empty parts and reload that as my main diffuse map.


Lumion than clips out the empty parts and you can see through it in the viewport and renderings.
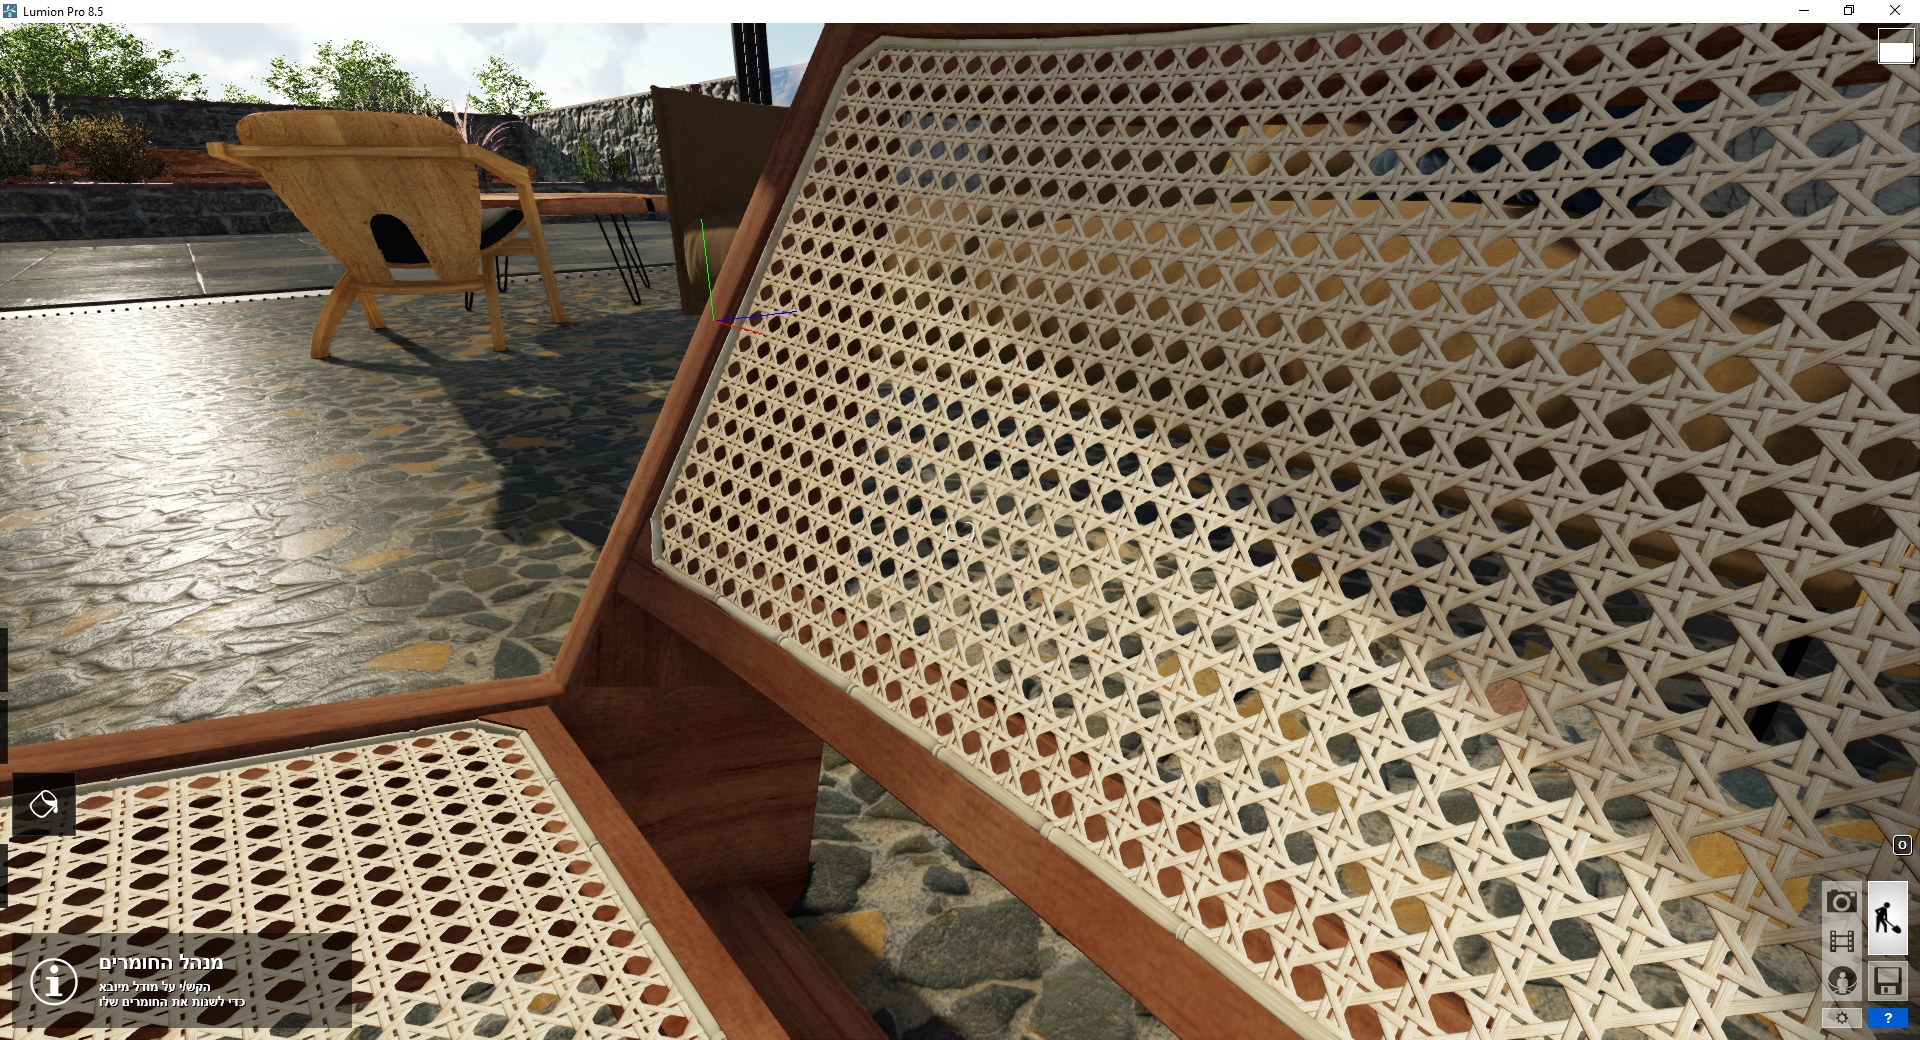
The resulted look inside the Lumion viewport
Wishlist: I think it would be nice to have this as an added option instead of the need to edit the diffuse slot. Just have an extra clip-map slot to use for when you need it.
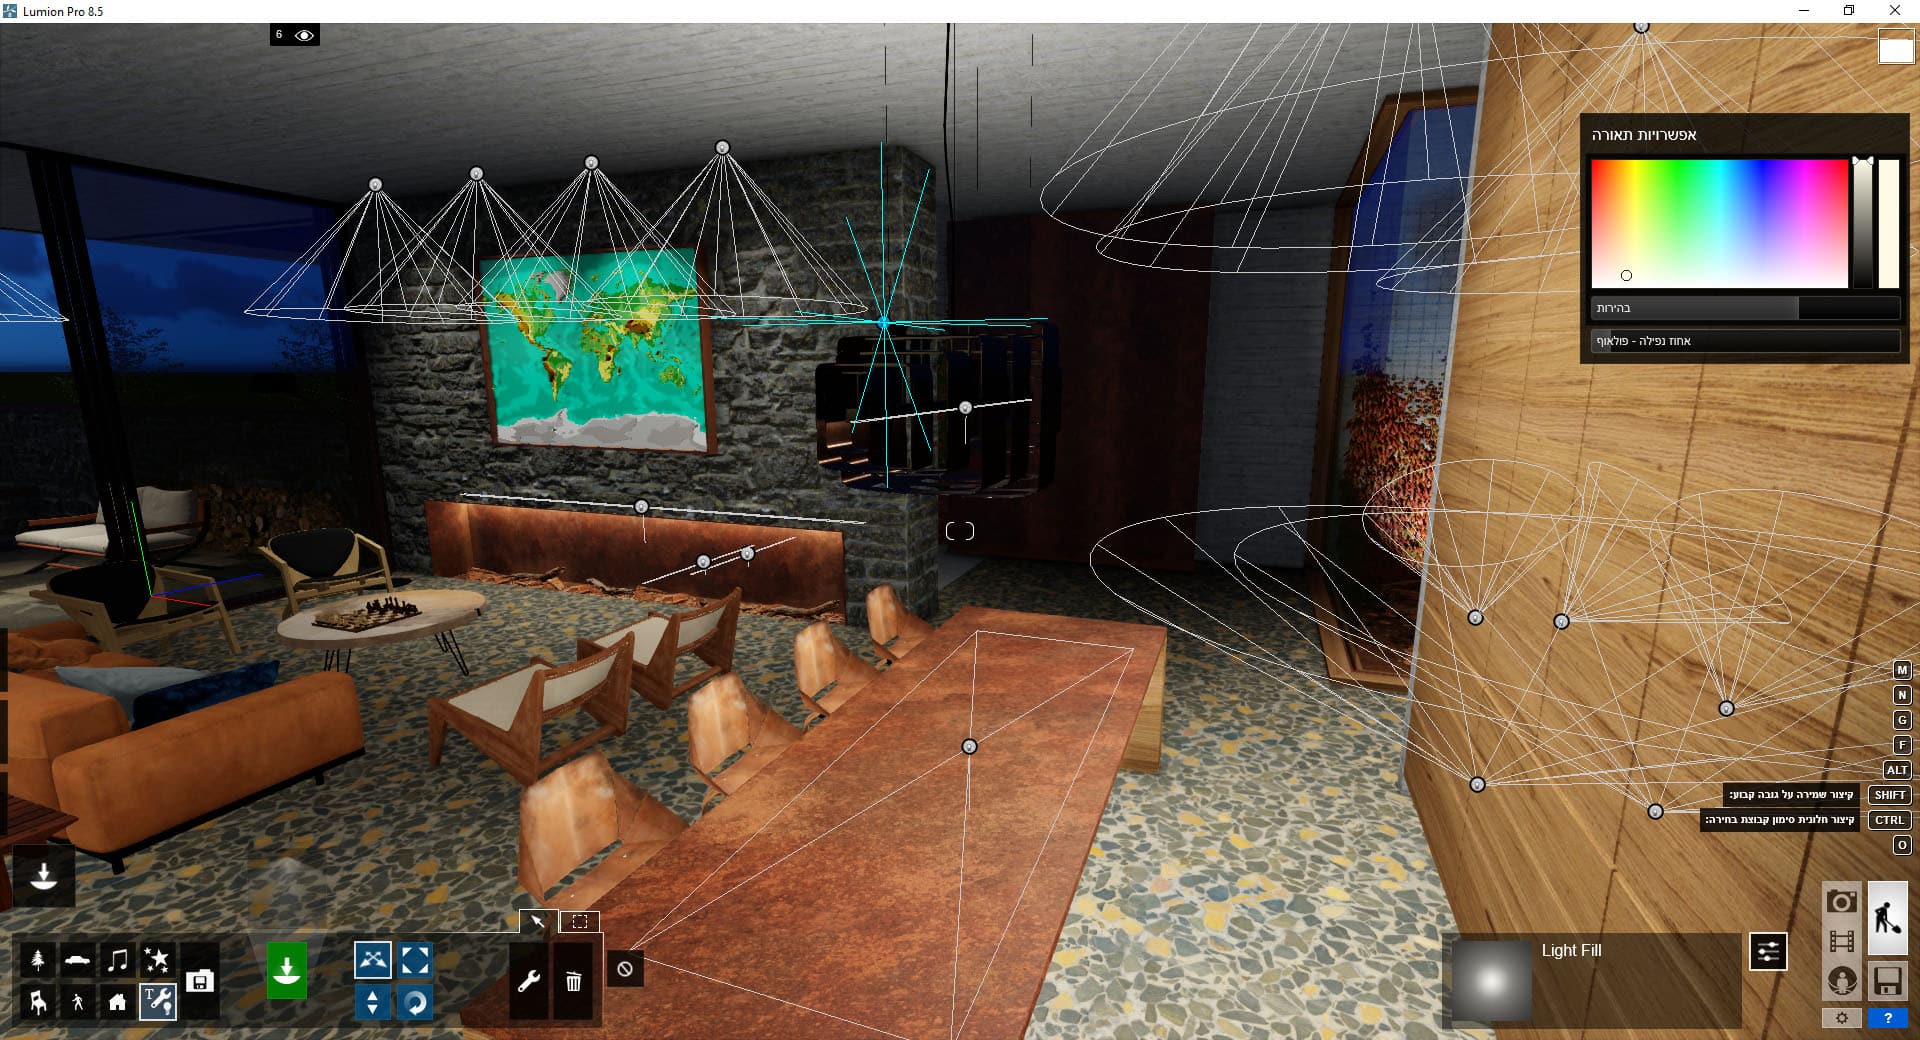
Lumion Artificial Lighting
You’ll find three types of lights to use. Spotlights, Area Lights and Omni Lights.
KK House at Night! Rendered with Lumion
SpotLights
This is the only one light capable of casting shadows and also throws IES-like patterns.
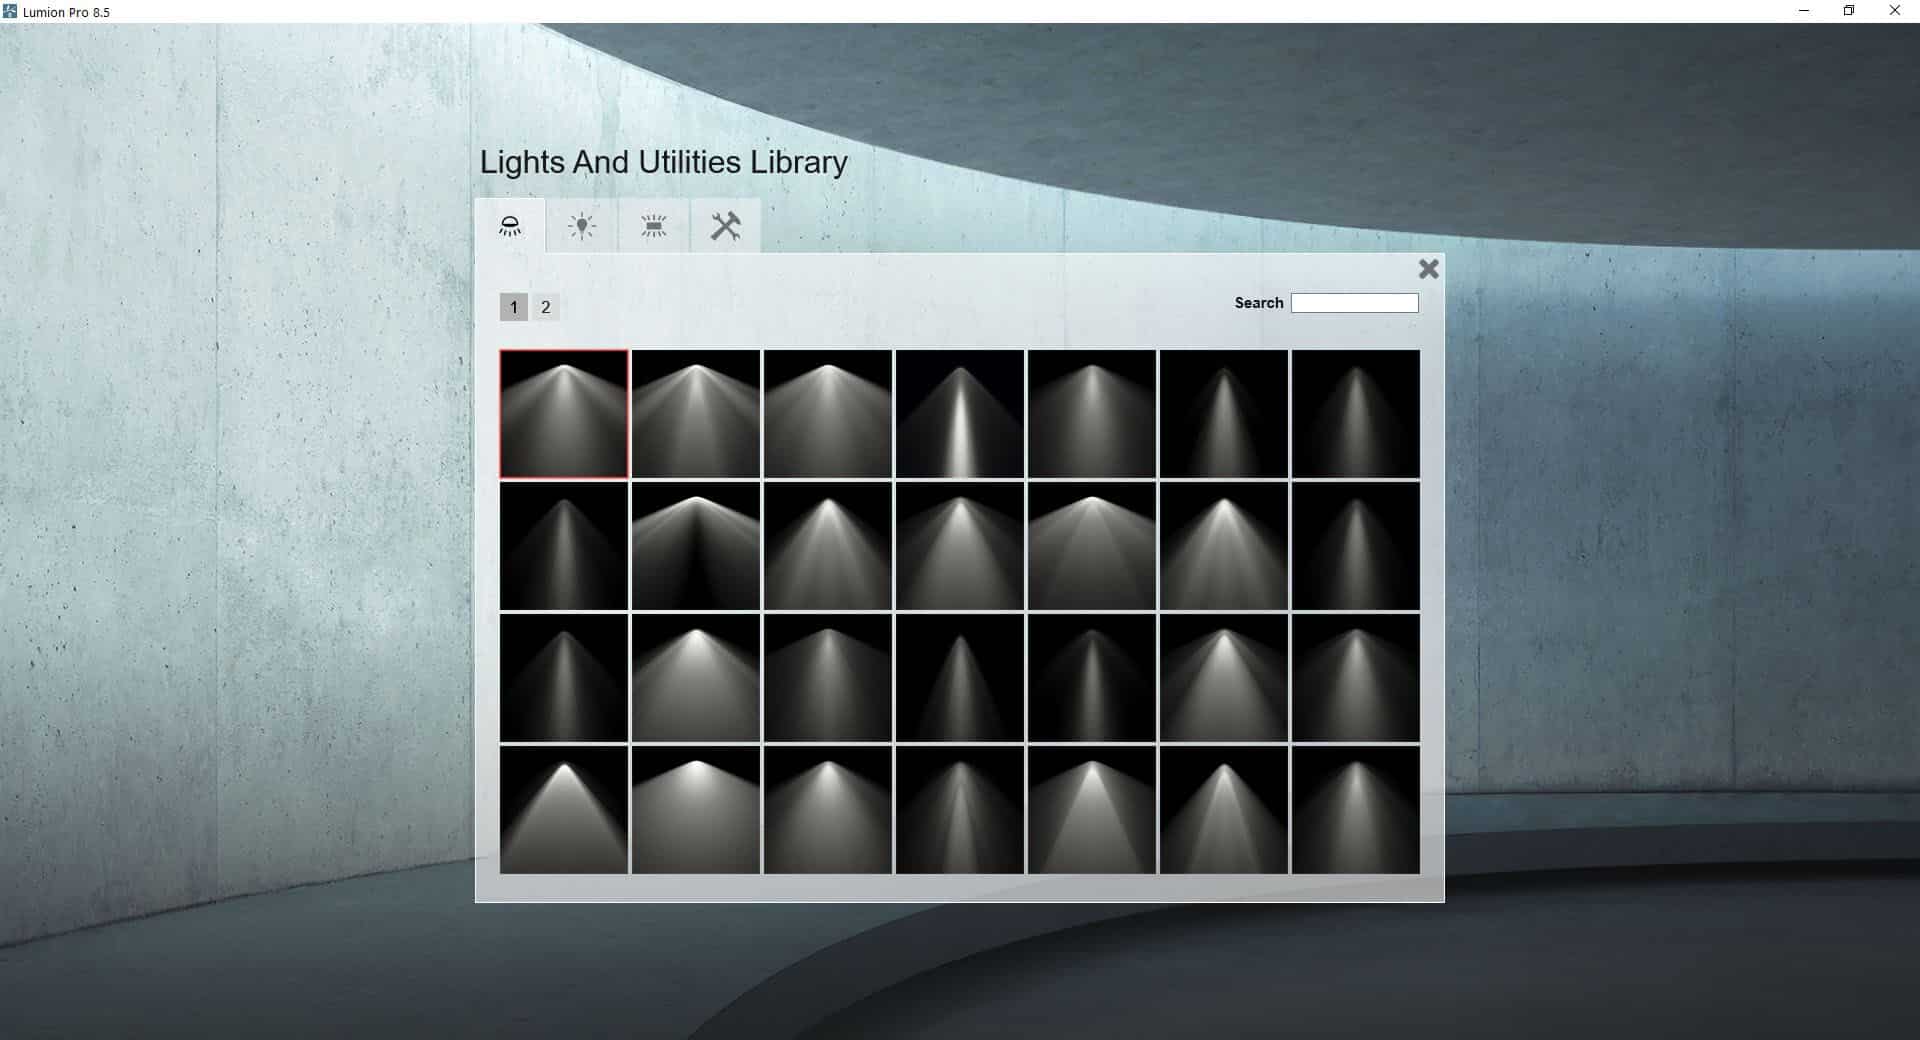
Lumion’s Lights and Utilities Library – Spotlights Tab
It works as you would expect with the light cone, brightness and color controls. In build mode with the lights icon selected on the bottom left you’ll see the light cones too.
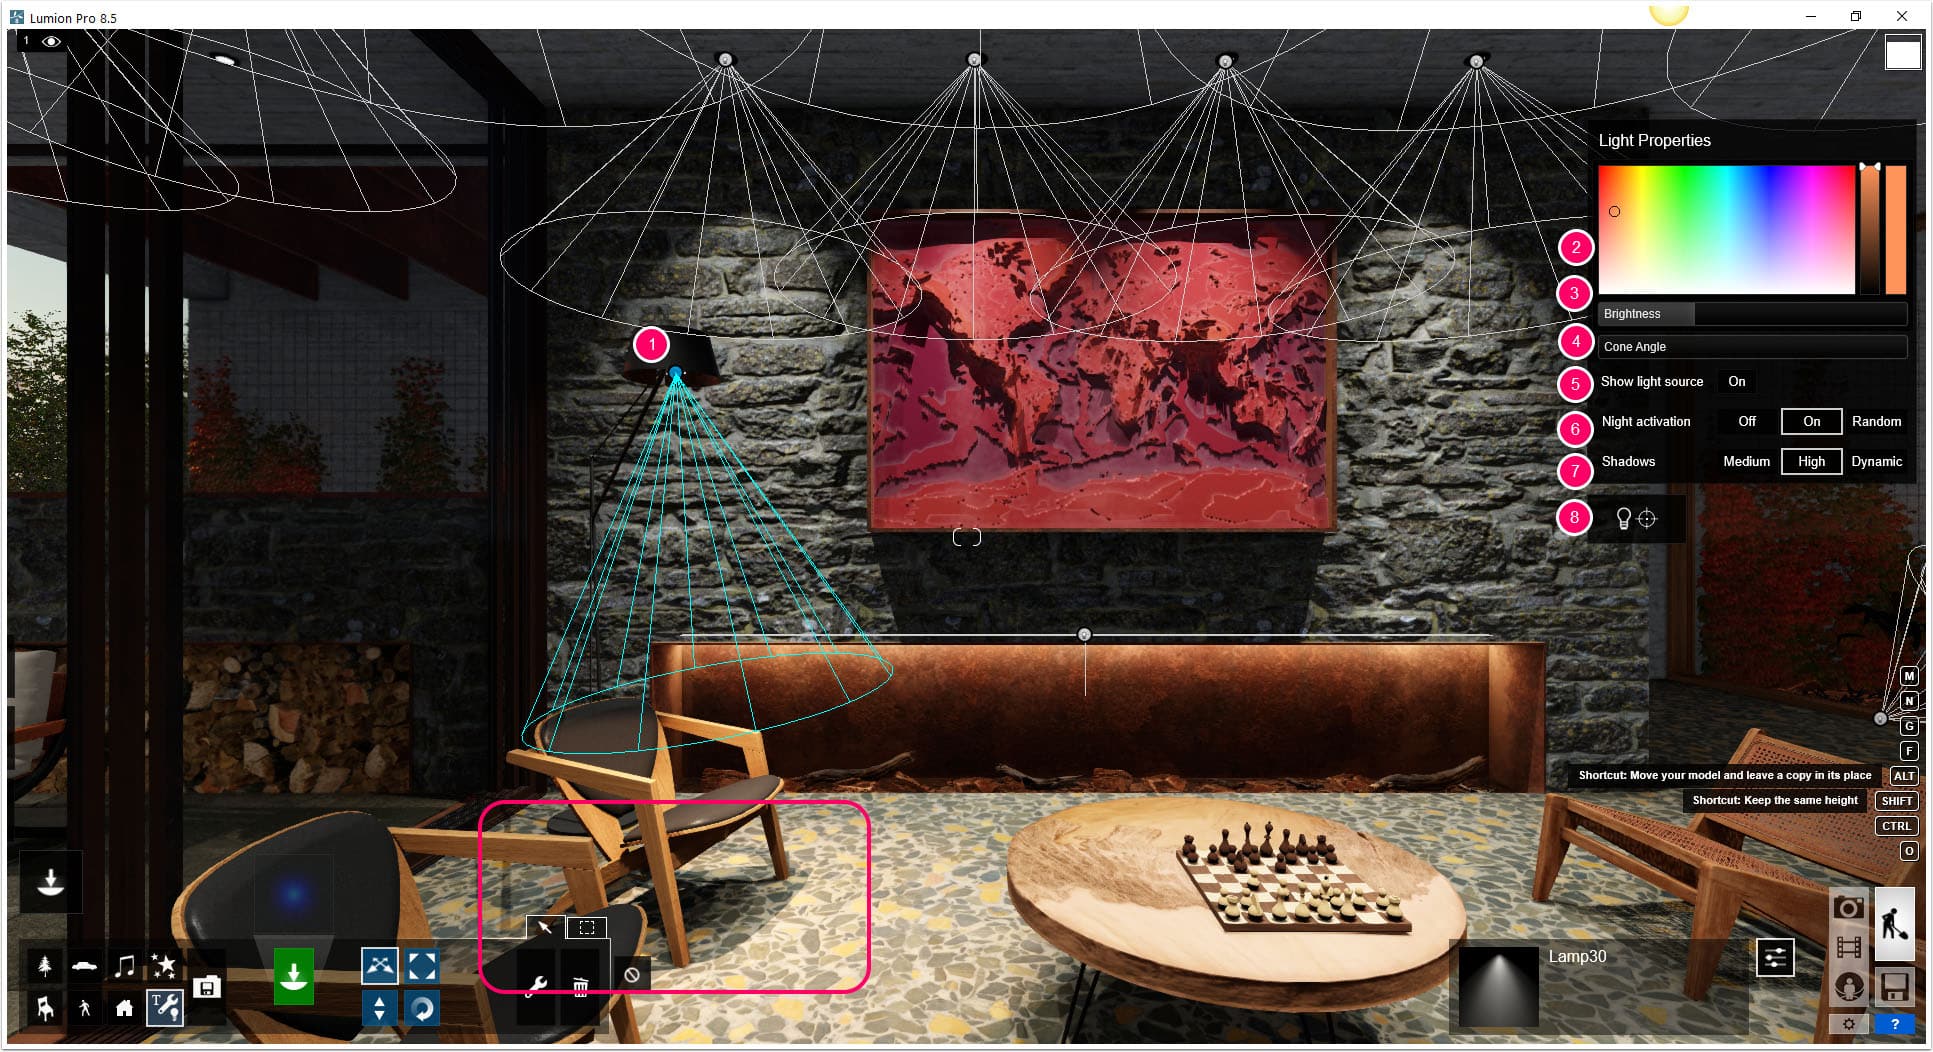
Notice the shadows being cast under the chair by the spotlight(s).
You can place spotlight anywhere you like. They snap to surfaces but since the height is immediately editable by dragging the mouse, make sure you don’t push them a bit into ceilings. They will not cast light due to this.
- This is the spotlight placed inside the standing floor lamp.
- You can pick the light color.
- Set the brightness level.
- Define the cone angle.
- Set if the spotlight itself is visible or not.
- Define always on or automated by the time of day (with random as an option).
- Define shadow quality.
- Define as targeted spotlight and set target.
To see the shadows on the screen push the F8 button. It will show you the shadows preview.
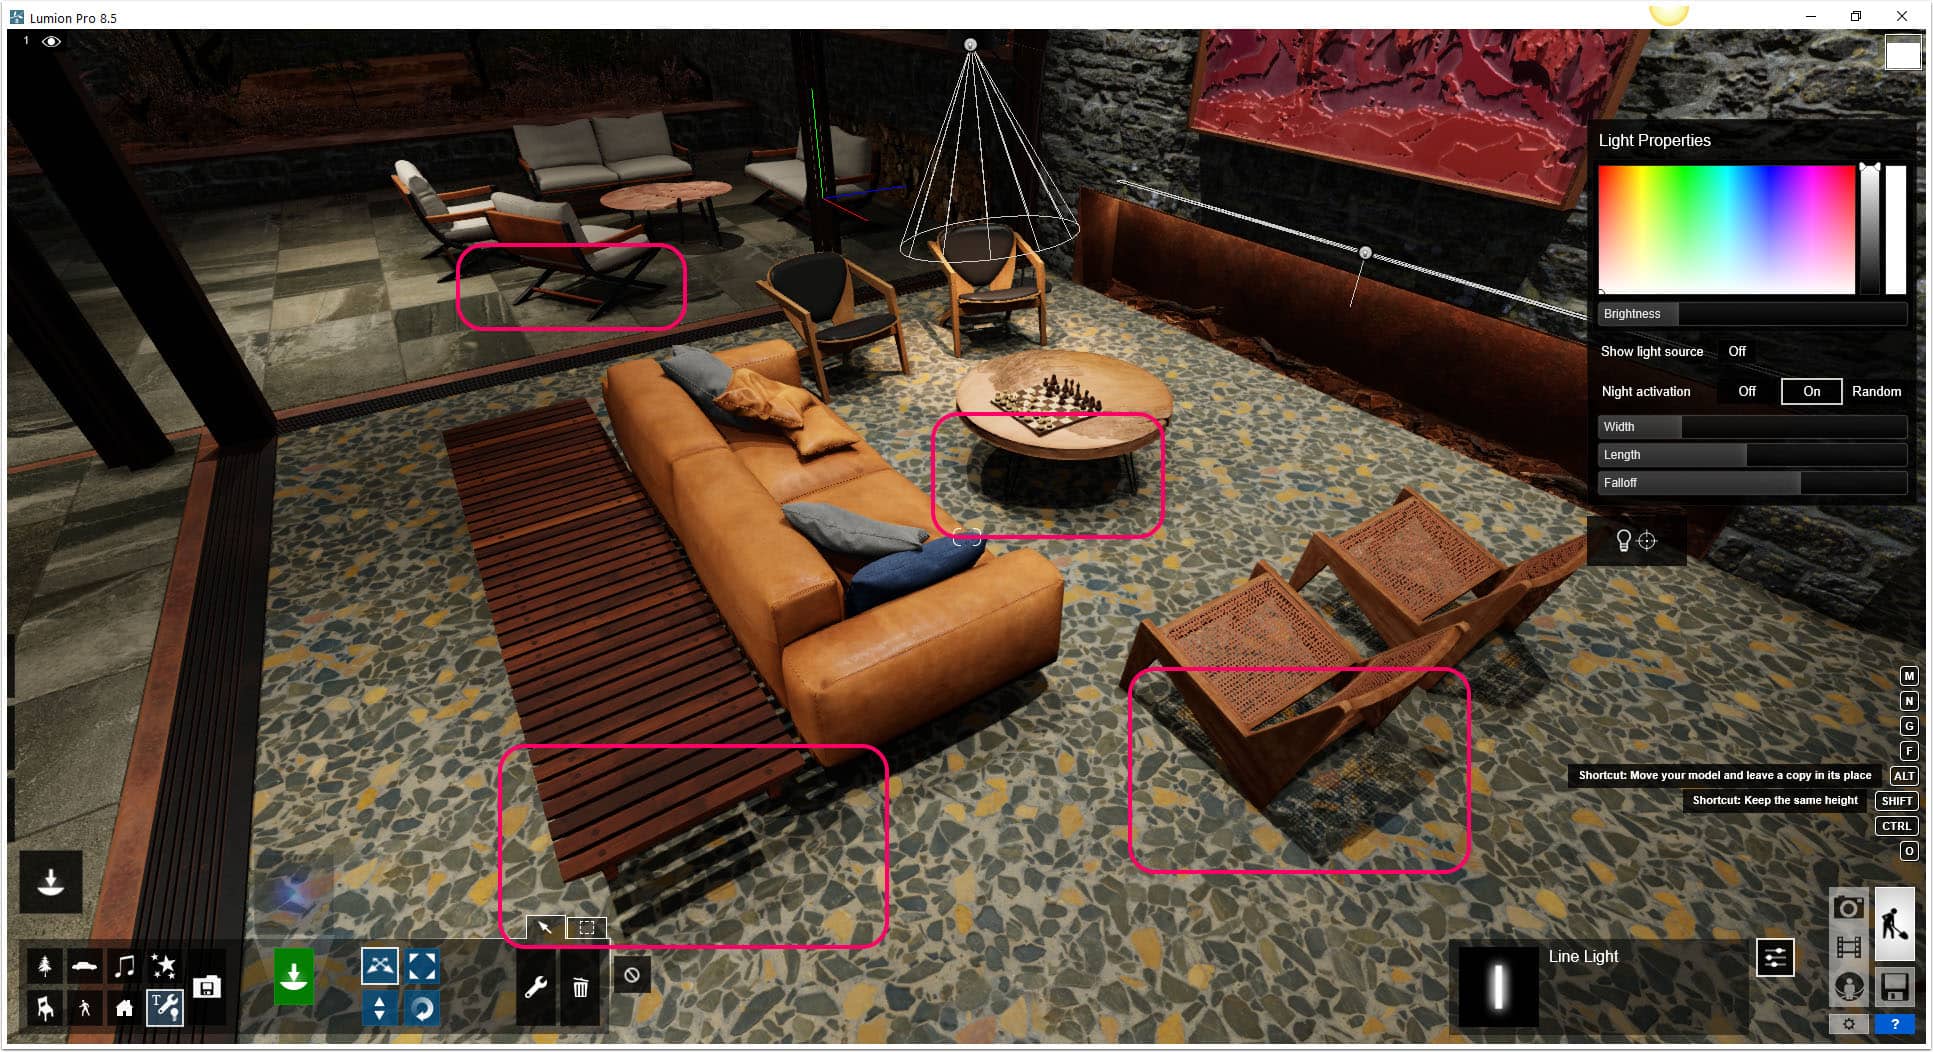
AreaLights & OmniLights
The other two are Area Lights and Omni Lights, both of which will not cast any shadows and can be seen through geometry so keeping tabs on the falloff setting is vital. Even though is see two AreaLights and five OmniLights to pick from, it is just one light type respectively, since the settings allow to can create all other versions.
The various icons are just for convenience I guess. A starting point preset.


These are the Area Light settings.
- An area light placed inside the top side of the fireplace. Set to be long and narrow.
- You can pick the light color.
- Set if the area light itself is visible or not.
- Define always on or automated by the time of day (with random as an option).
- Define width, length, and falloff of the light source (falloff helps prevent light leaks).
- Define as targeted area light and set target (I never found a reason to target it yet).
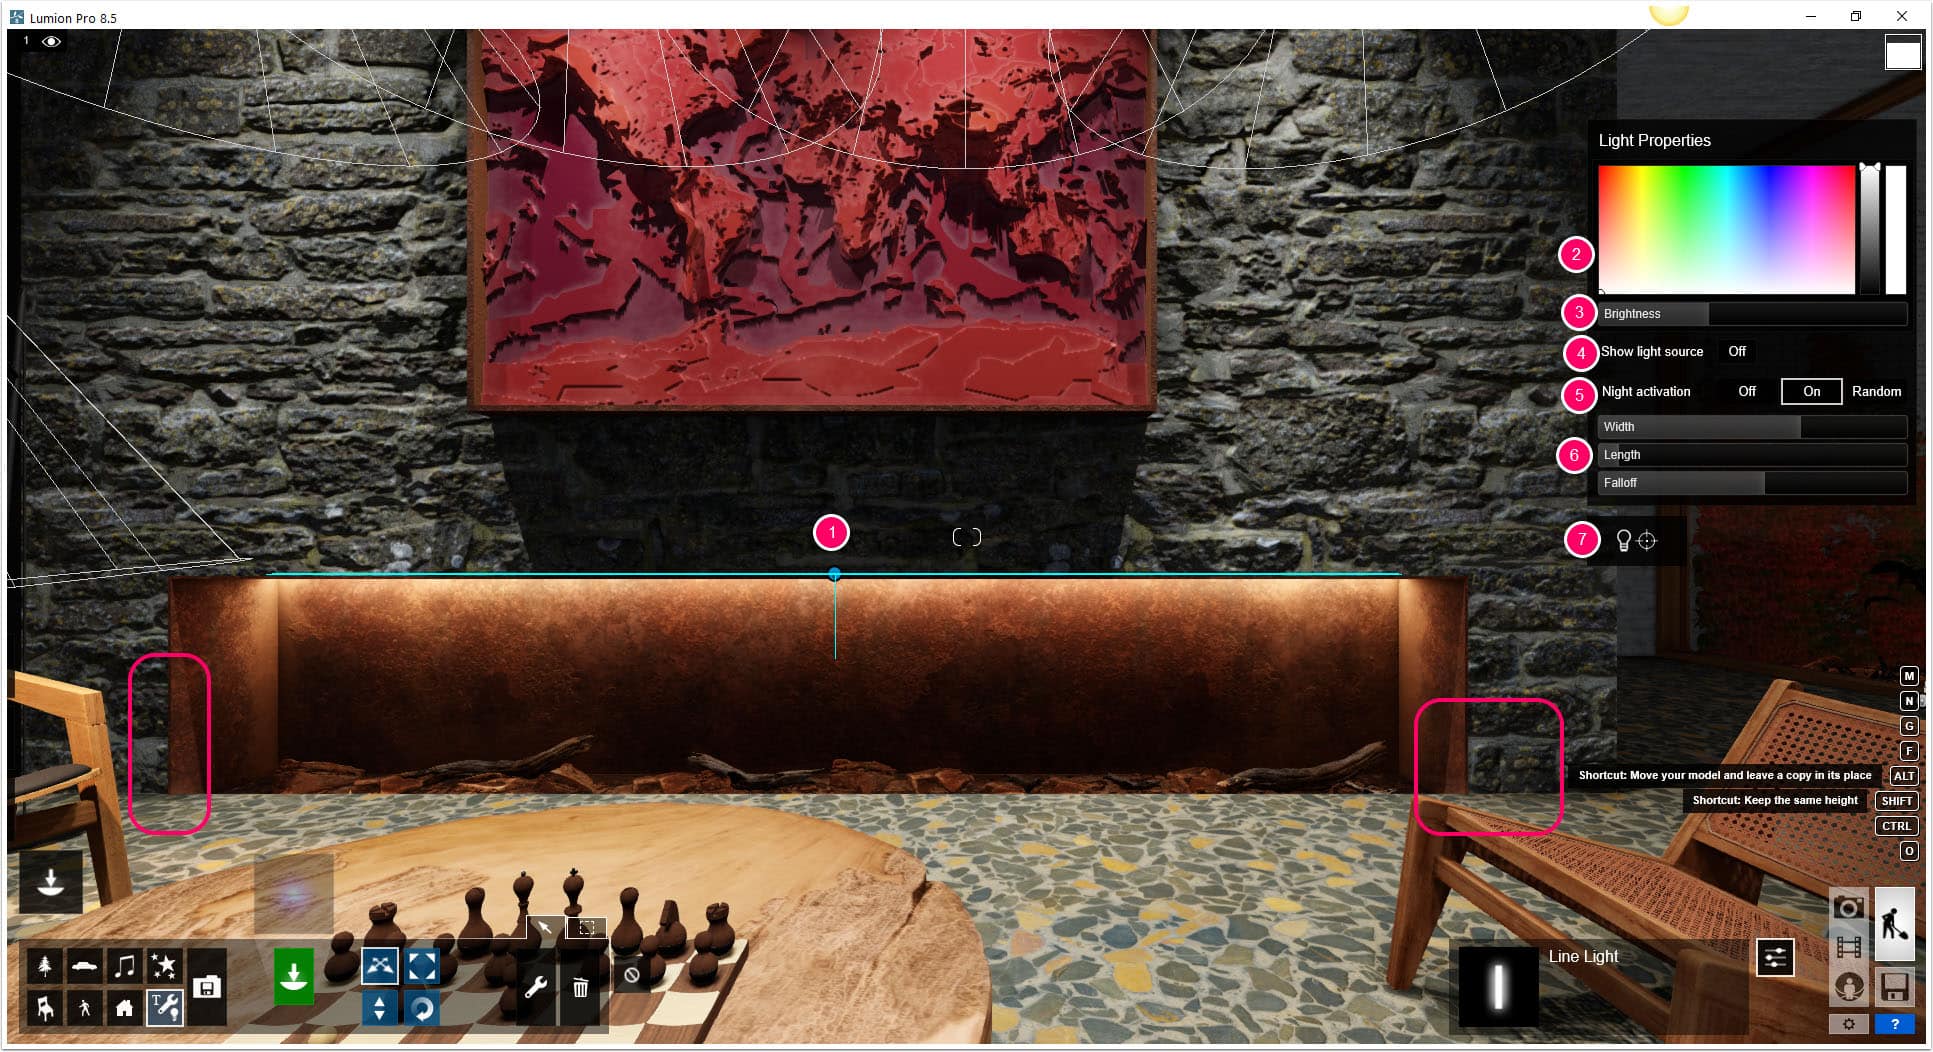
Notice how shadows are missing in the marked areas due to the fact AreaLights do not cast shadows.
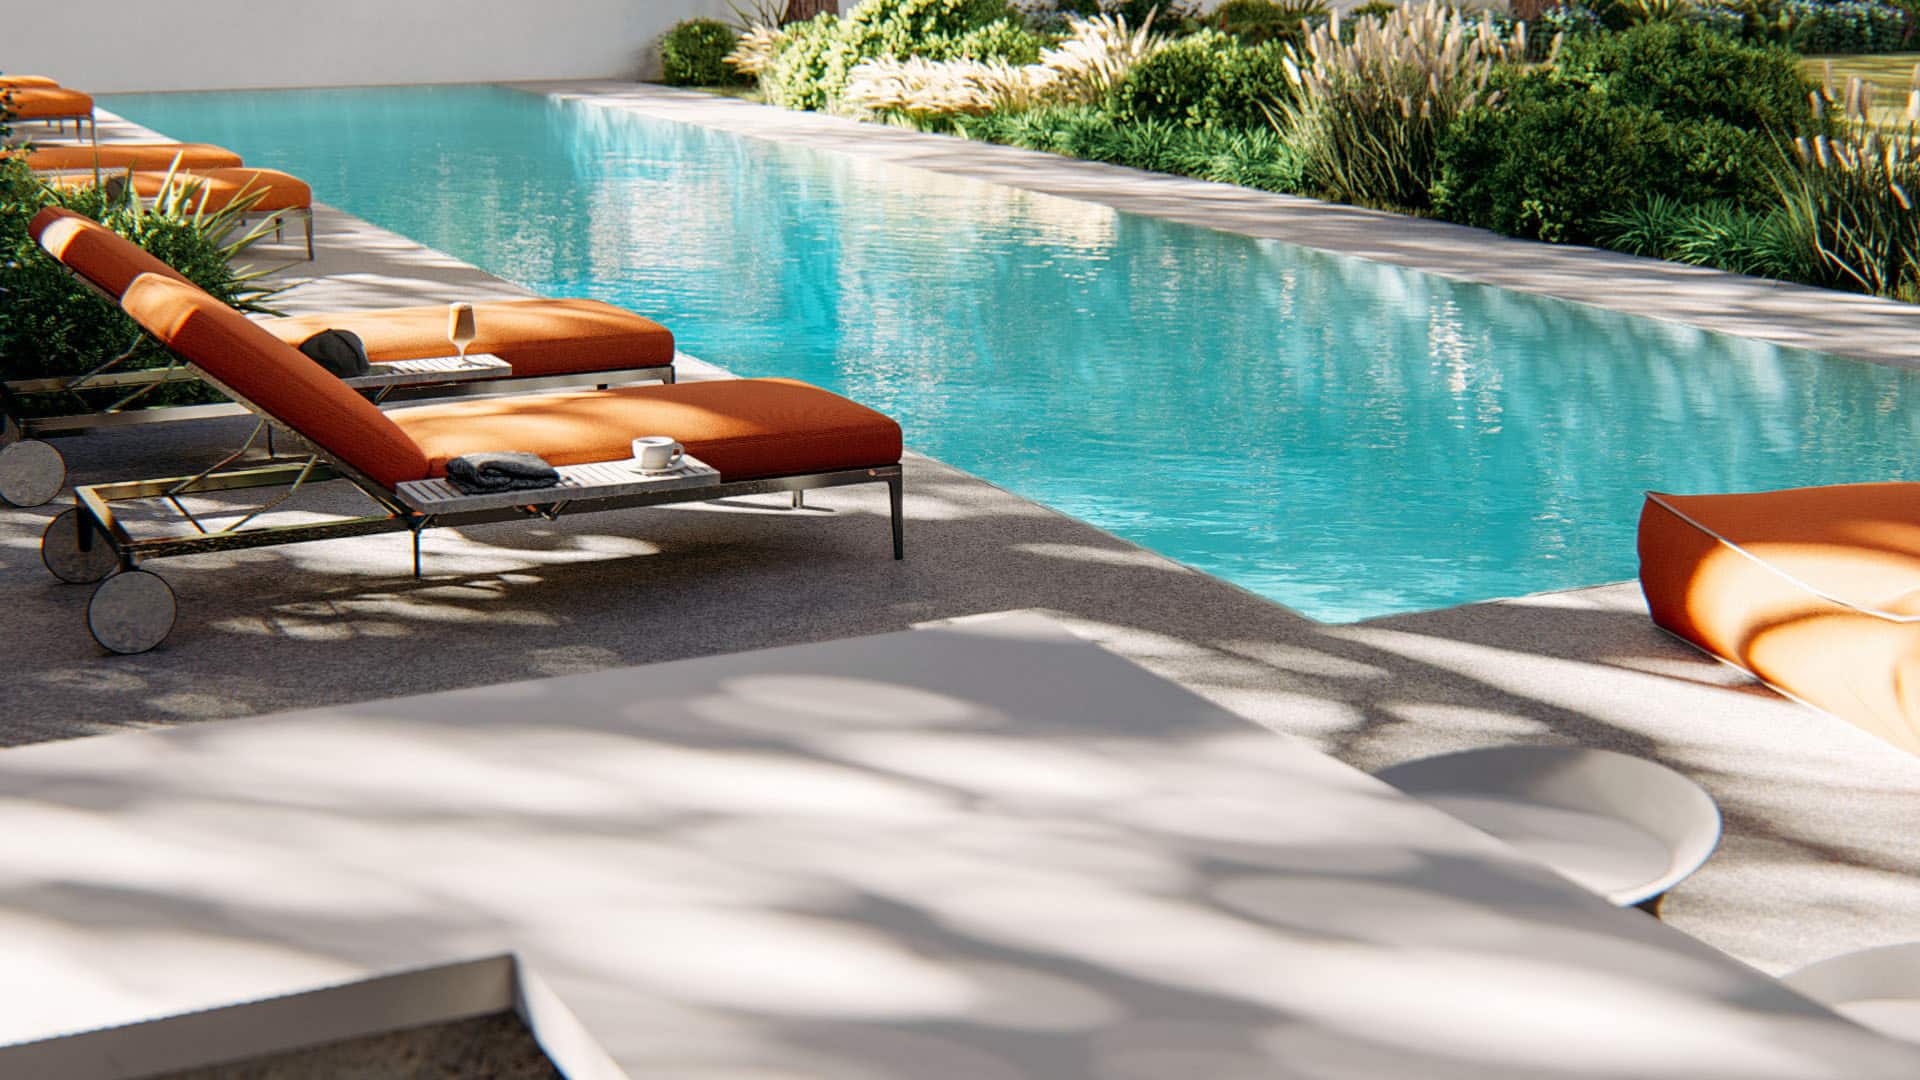
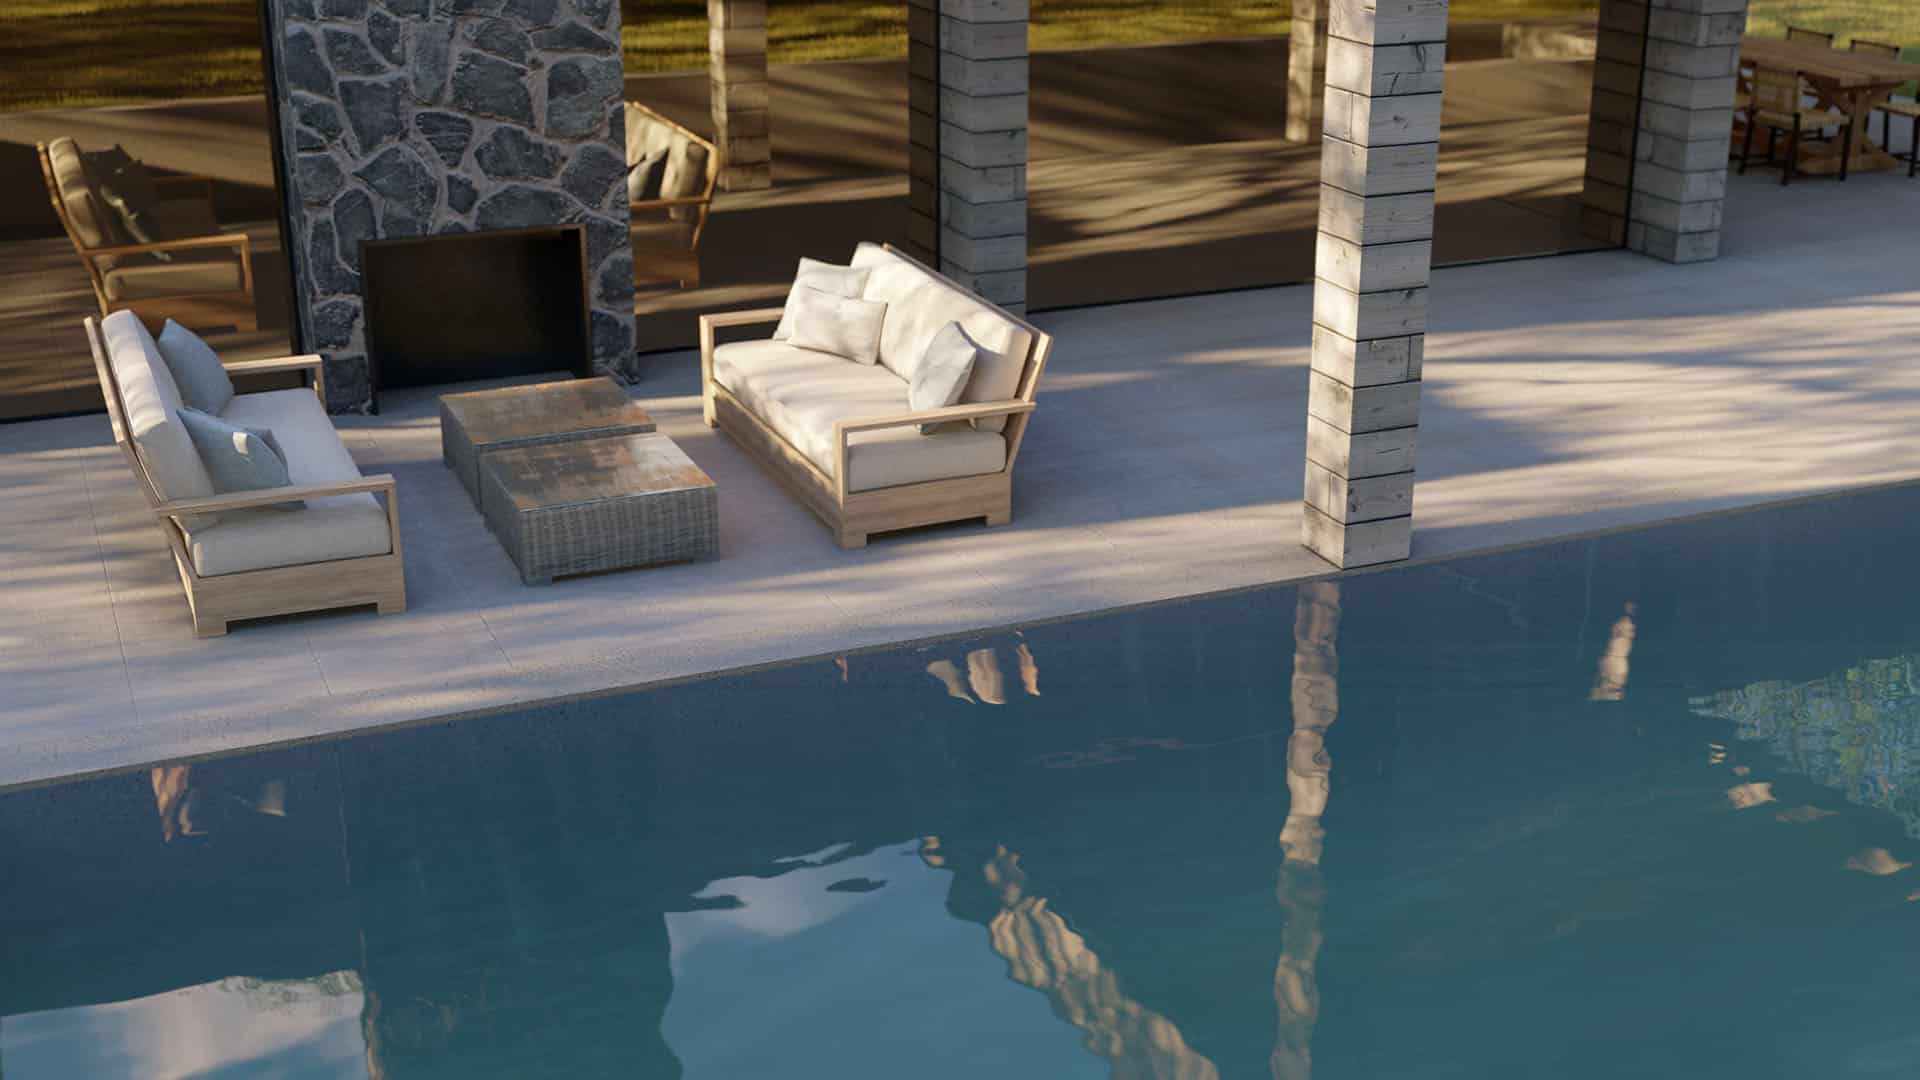
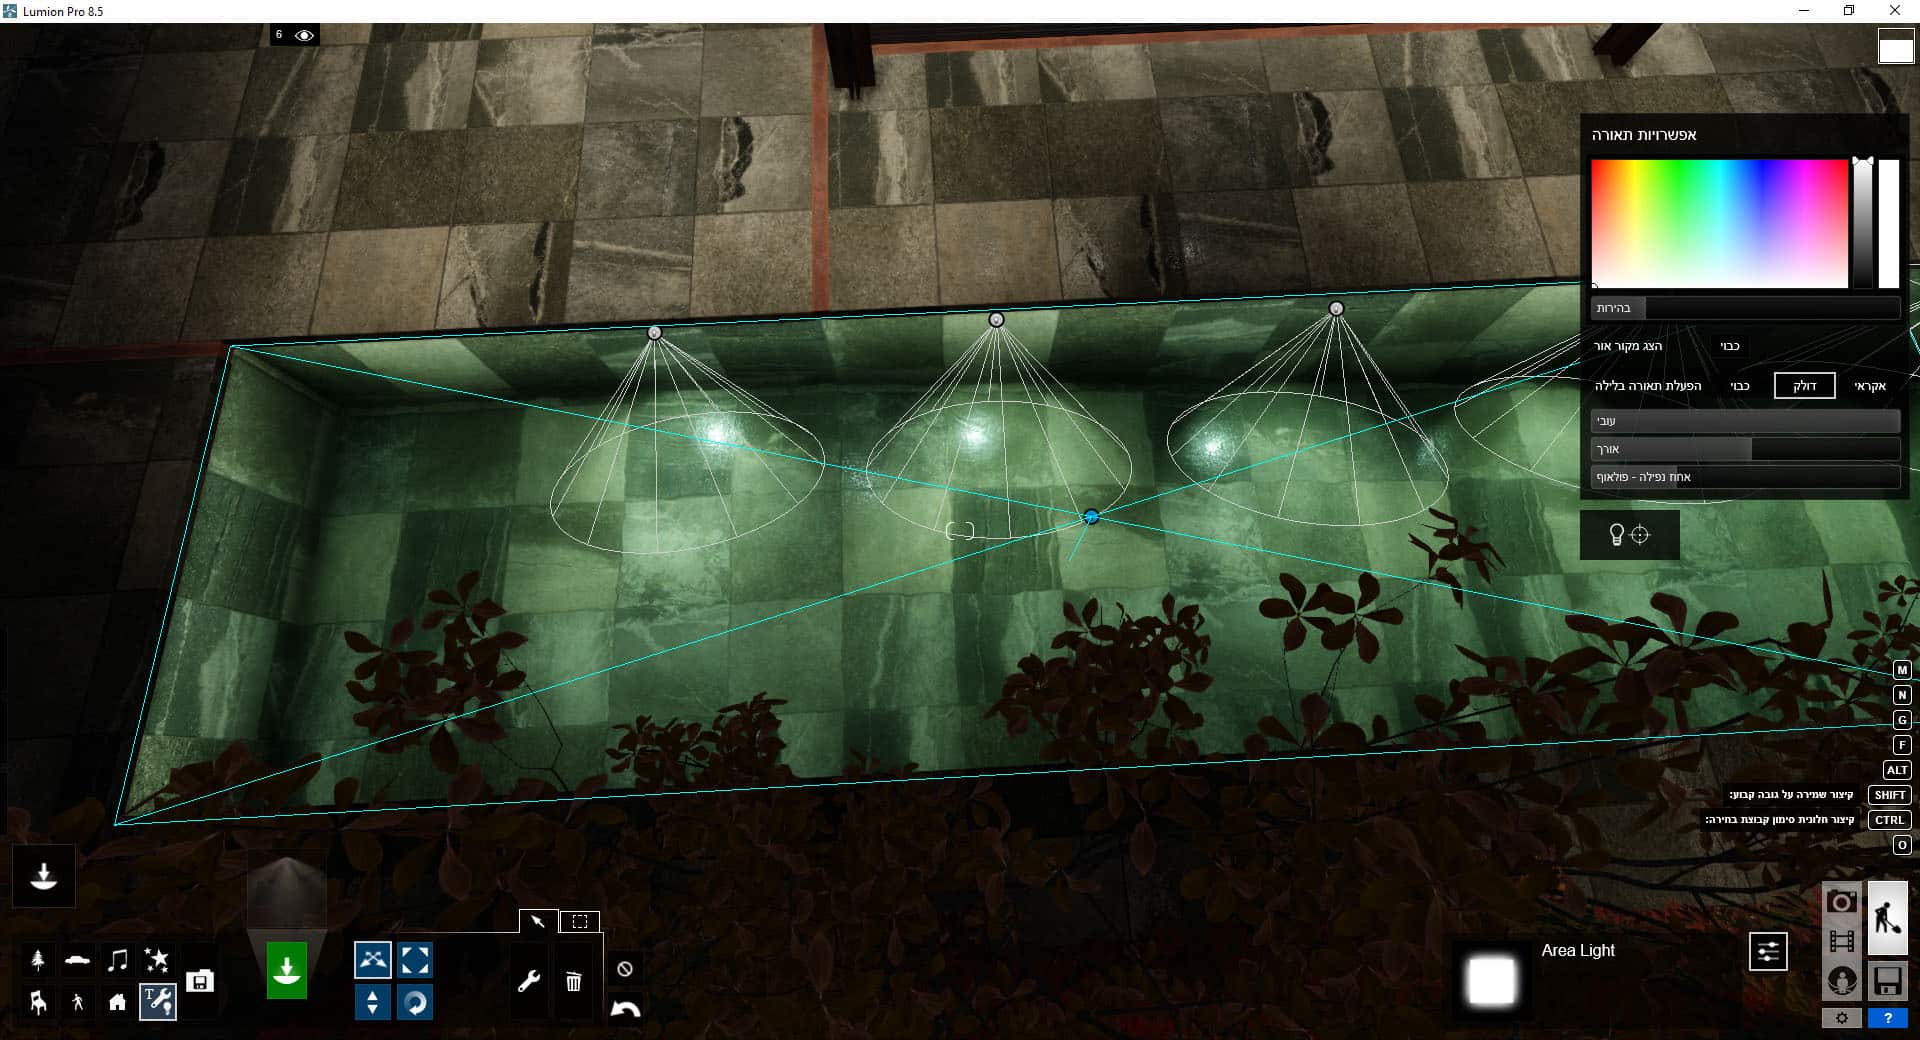
One cool use I found for a very large Area Light is to light up a pool at night in an even way. I also found out that there is a size limit to an Area Light 😉
I used to lights to cover the entire pool area.
The settings for OmniLights are much more straightforward with color, brightness and falloff only controls.
OmniLight above dining table brightness set to ZERO.
OmniLight above dining table brightness raised and how it lightens up the space.
Lumion Image & Animation Making
So after all I’ve described above, now is the time to produce some still images and animations!
The Still Image screen (and Animation screen) is where all the magic happens. This is where you frame your shots, save them and apply the effects which drive the final result.
One of the most significant improvements in Lumion 8.0 is in this department!
I’ll make a broad overview and focus on what I consider the game changers introduced with this version based on my work on the KK House.
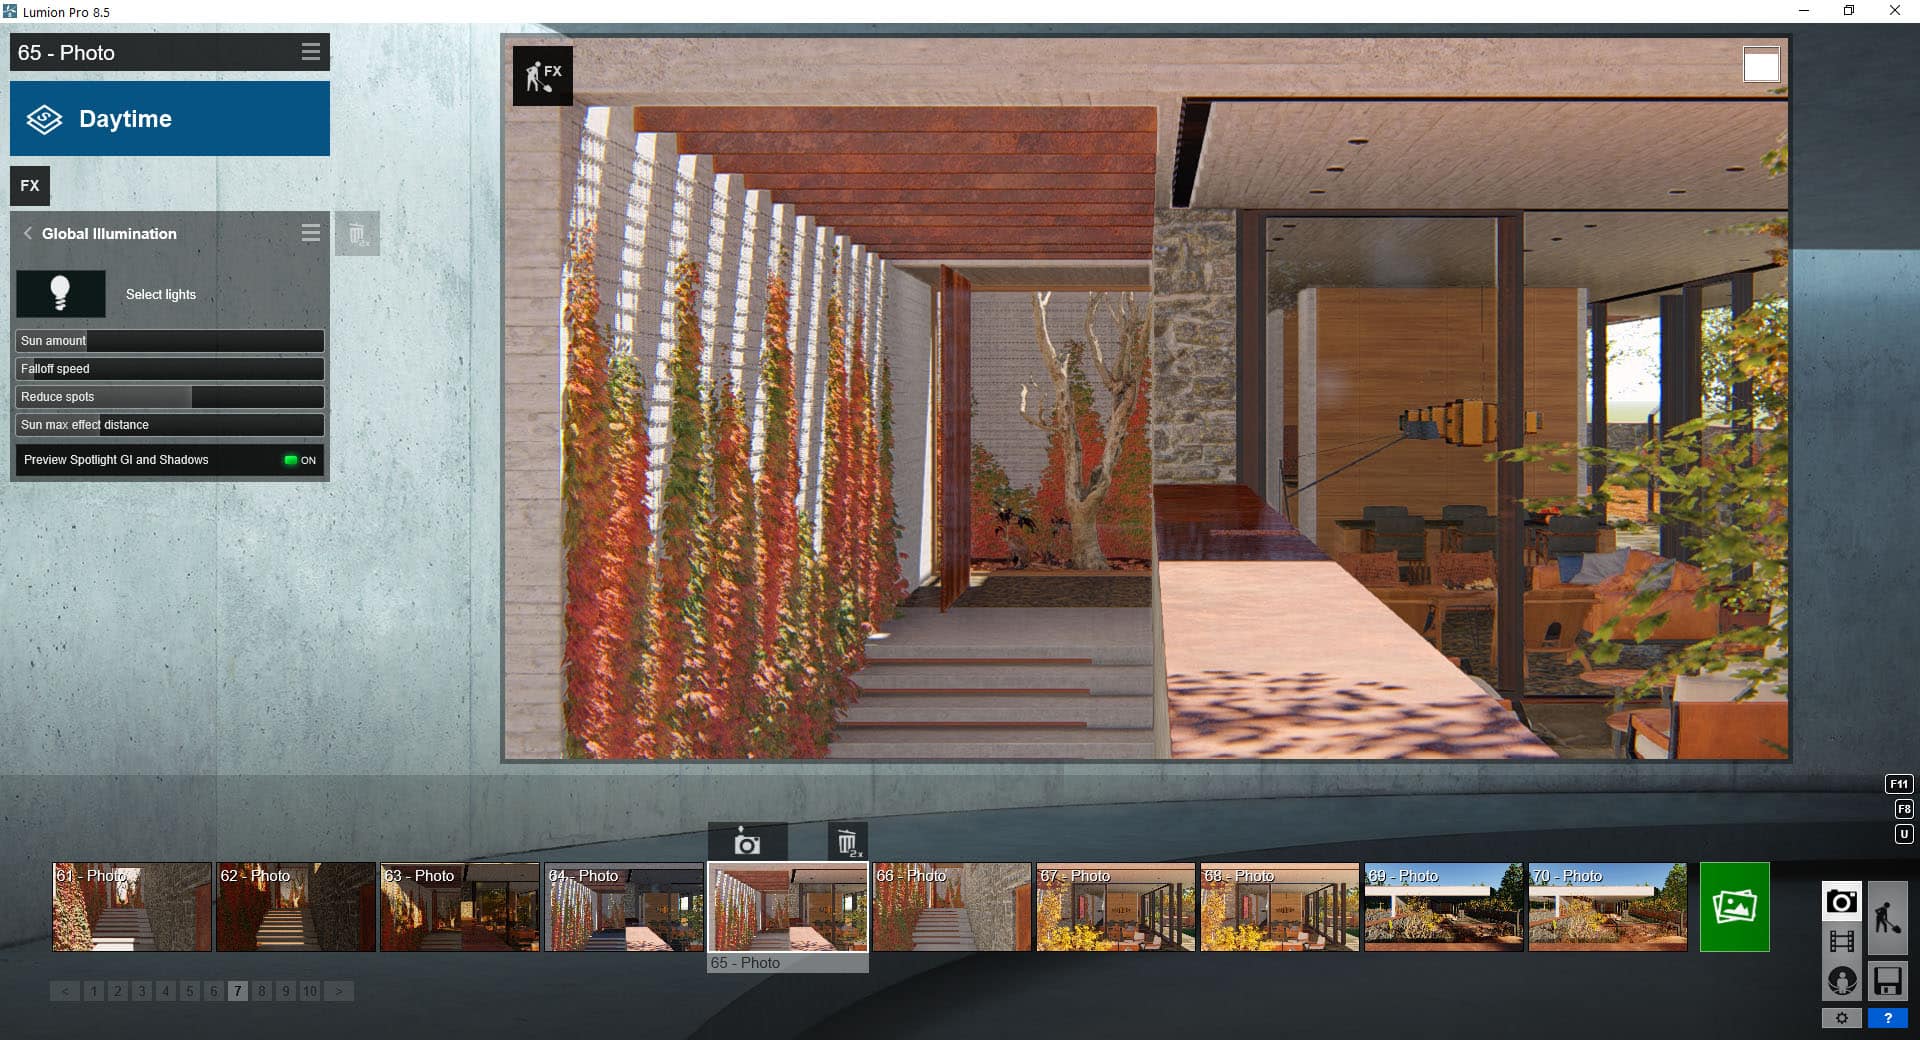
Lumion Still Image & Animation User Interface
Lumion’s features that facilitate the creation of both still images and animations are the preset styles & effects. I’ve touched this a bit above, but this is the time to take a better look at these.
The Still Image and Animation mode UI is the same, but a few small differences, and the workflow is the same. You save views or shots to the slots at the bottom of the screen and assign styles or effects per each (for animations, you can also assign global effects on the entire movie).

Enter the still image mode by clicking the Camera Icon on the bottom right
The Still & Animation UI is divided into three sections. The main viewport showing the scene, to the left of it is your FX stack and menu, and your images of clips at the bottom. You can have 10 images per 10 possible sets, and 10 possible movies with no limit on clips that I hit yet.
- Hovering over this icon will show you scene statistics like memory usage, scene size, and FPS.
- This is your focal length slider specific to the view you are in.
- Hitting this button takes you to Build Mode WITH THE FX ON! Pending on how many effects you use (and GPU), this can be slow or very slow.
- The preset Styles picker (these are FX stack combinations saved by the Lumion team).
- The FX Stack where you add, remove and edit the various effects.
Lumion (FX) Effects
Here are all the FX you can implement on your still images and animations (some only work for animation). Mixing these properly is your main task.


Lumion Preset Styles
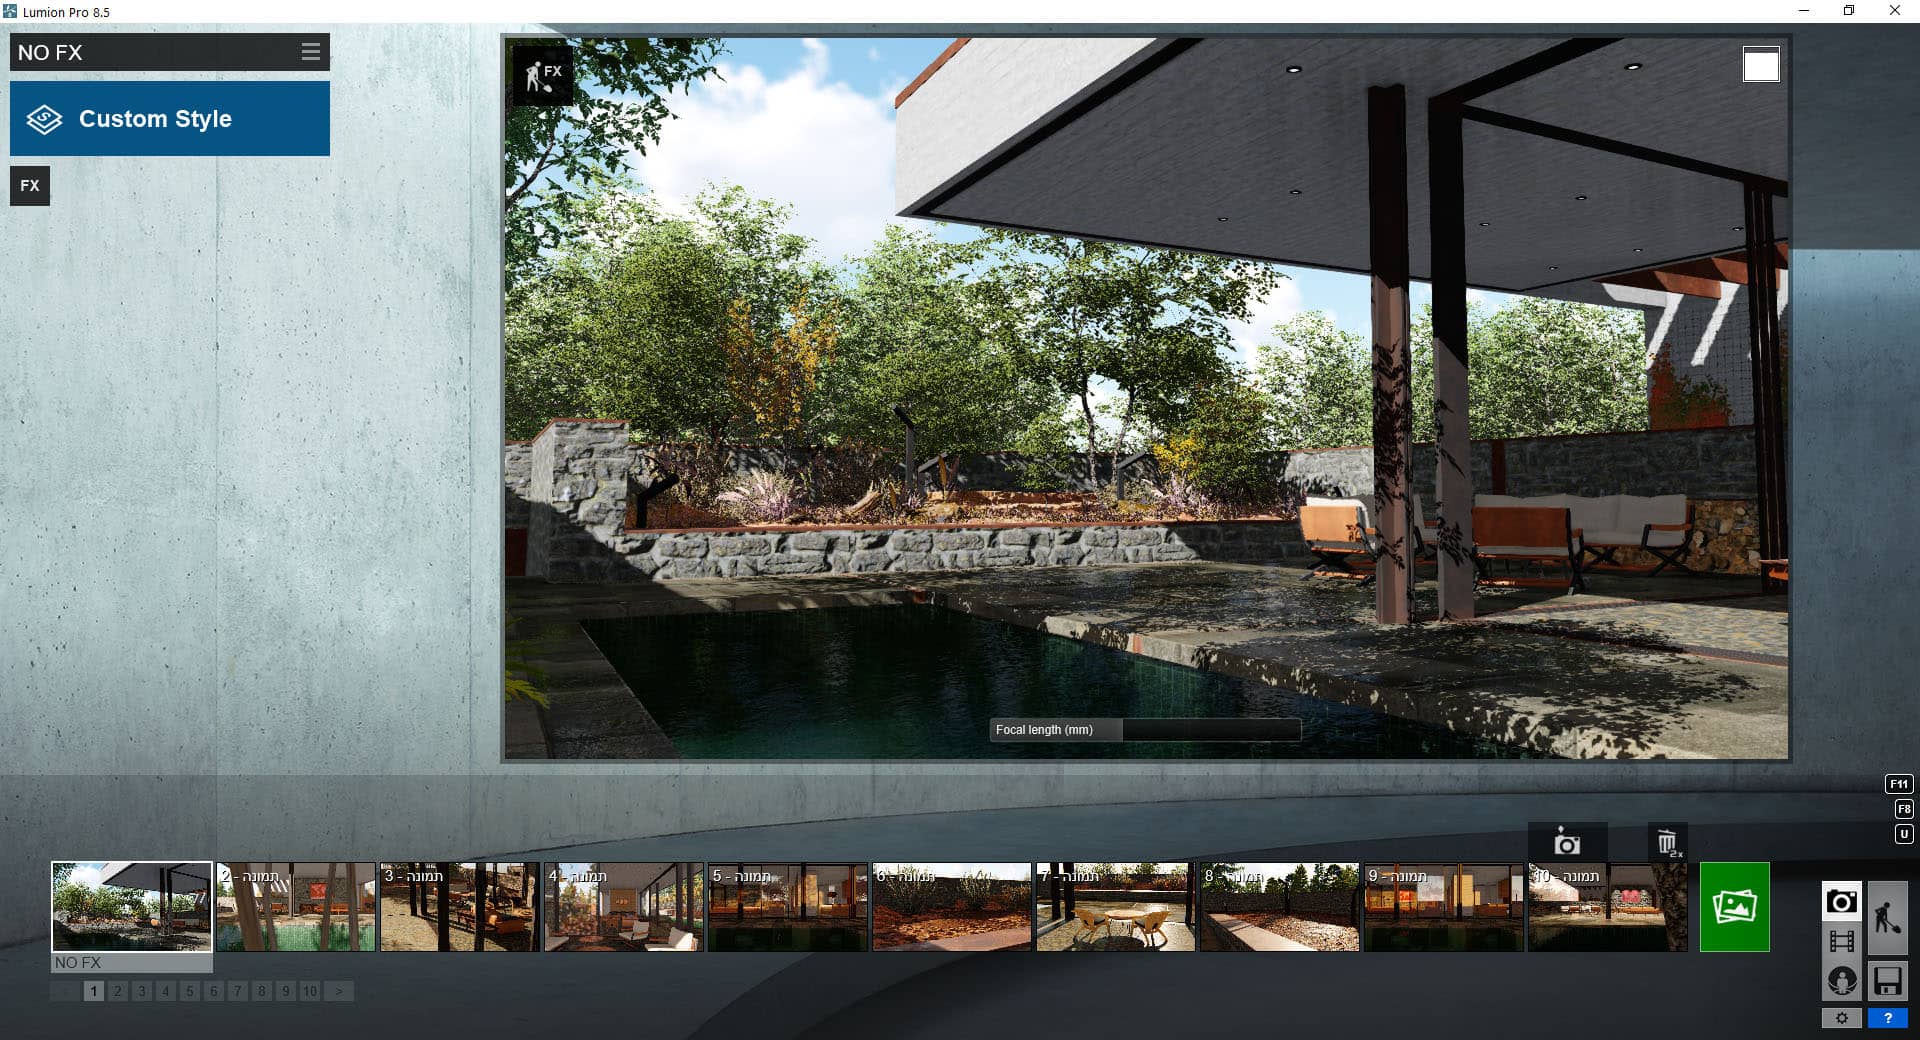
When it comes to mixing, Lumion helps you with these preset styles to choose from, and I would recommend to start with one and tweak it later until you learn what each of the FX can do. “Custom Style” clears the FX stack and I’ll just ignore “Color Sketch” and “Watercolor” in this review.

This is how the UI and preview look clean. No FX applied at all.
The RAW output.
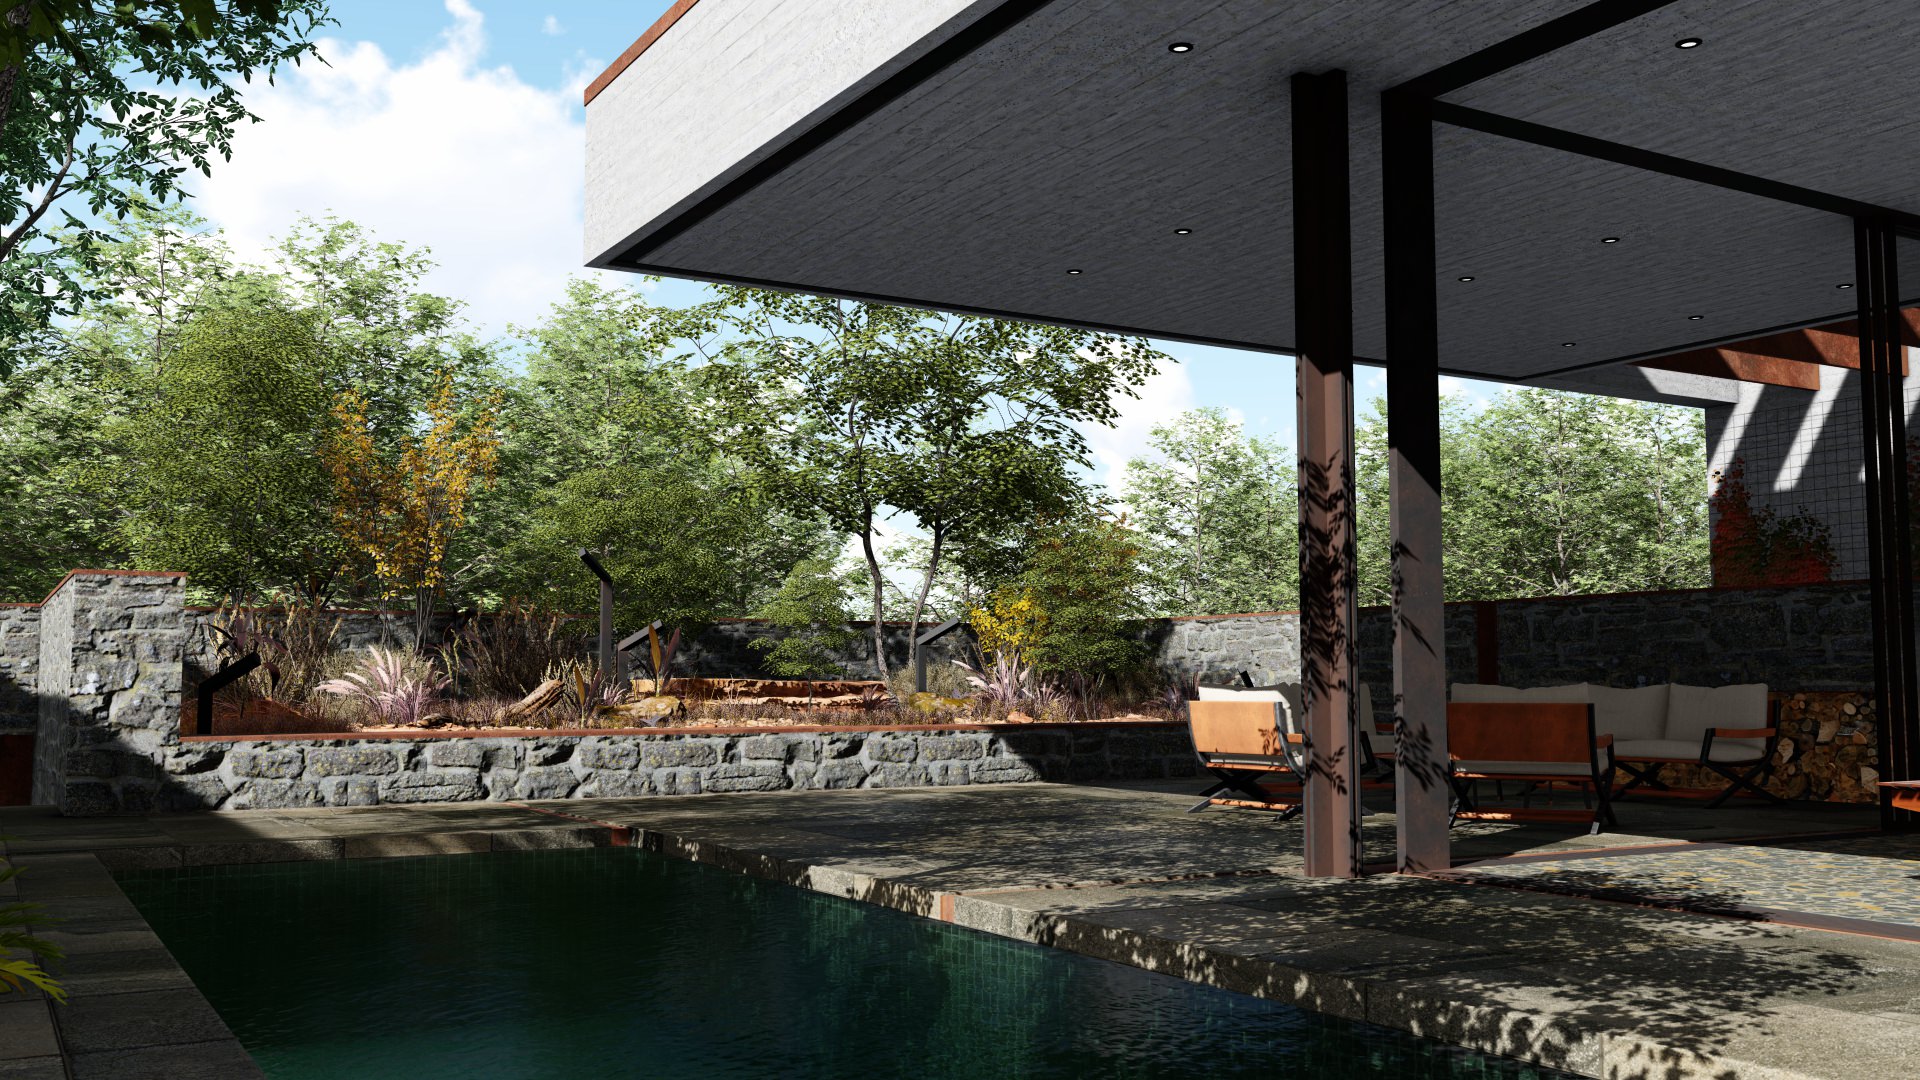
RAW Lumion render with no effects applied to it
Here are all the various output per preset styles AS IS. There are no further editing of effects applied to these (the night one does show spotlights I added to the scene set to turn on automatically at night).


These are already a GREAT START!
You can see the difference between the RAW output and the various styles.
This is new to Lumion 8 and makes a big difference for users with little training in visualization. Once you apply a style, you can keep on tweaking each of the FX used to your liking until you get it just right.
Lumion Soft Shadows, Fine Detail Shadows, and Sky Light
You can get a better feel for the environment, realism, and depth by combining the new Soft Shadows, Fine Detail Shadows and Sky Light Daylight effects.
Improved Shadows in Lumion – Soft & Fine Switches
These are two different approaches for shadows, that can be used together as well. I’ll use the Farnsworth House scene to show you how the new soft and fine shadow options come into play.


The Sky Light Effect in Lumion 8.0 PRO
A great addition to the effects lineup, helping to boost photorealism. This is the first effect I’ll use to boost lighting before I move to GI.
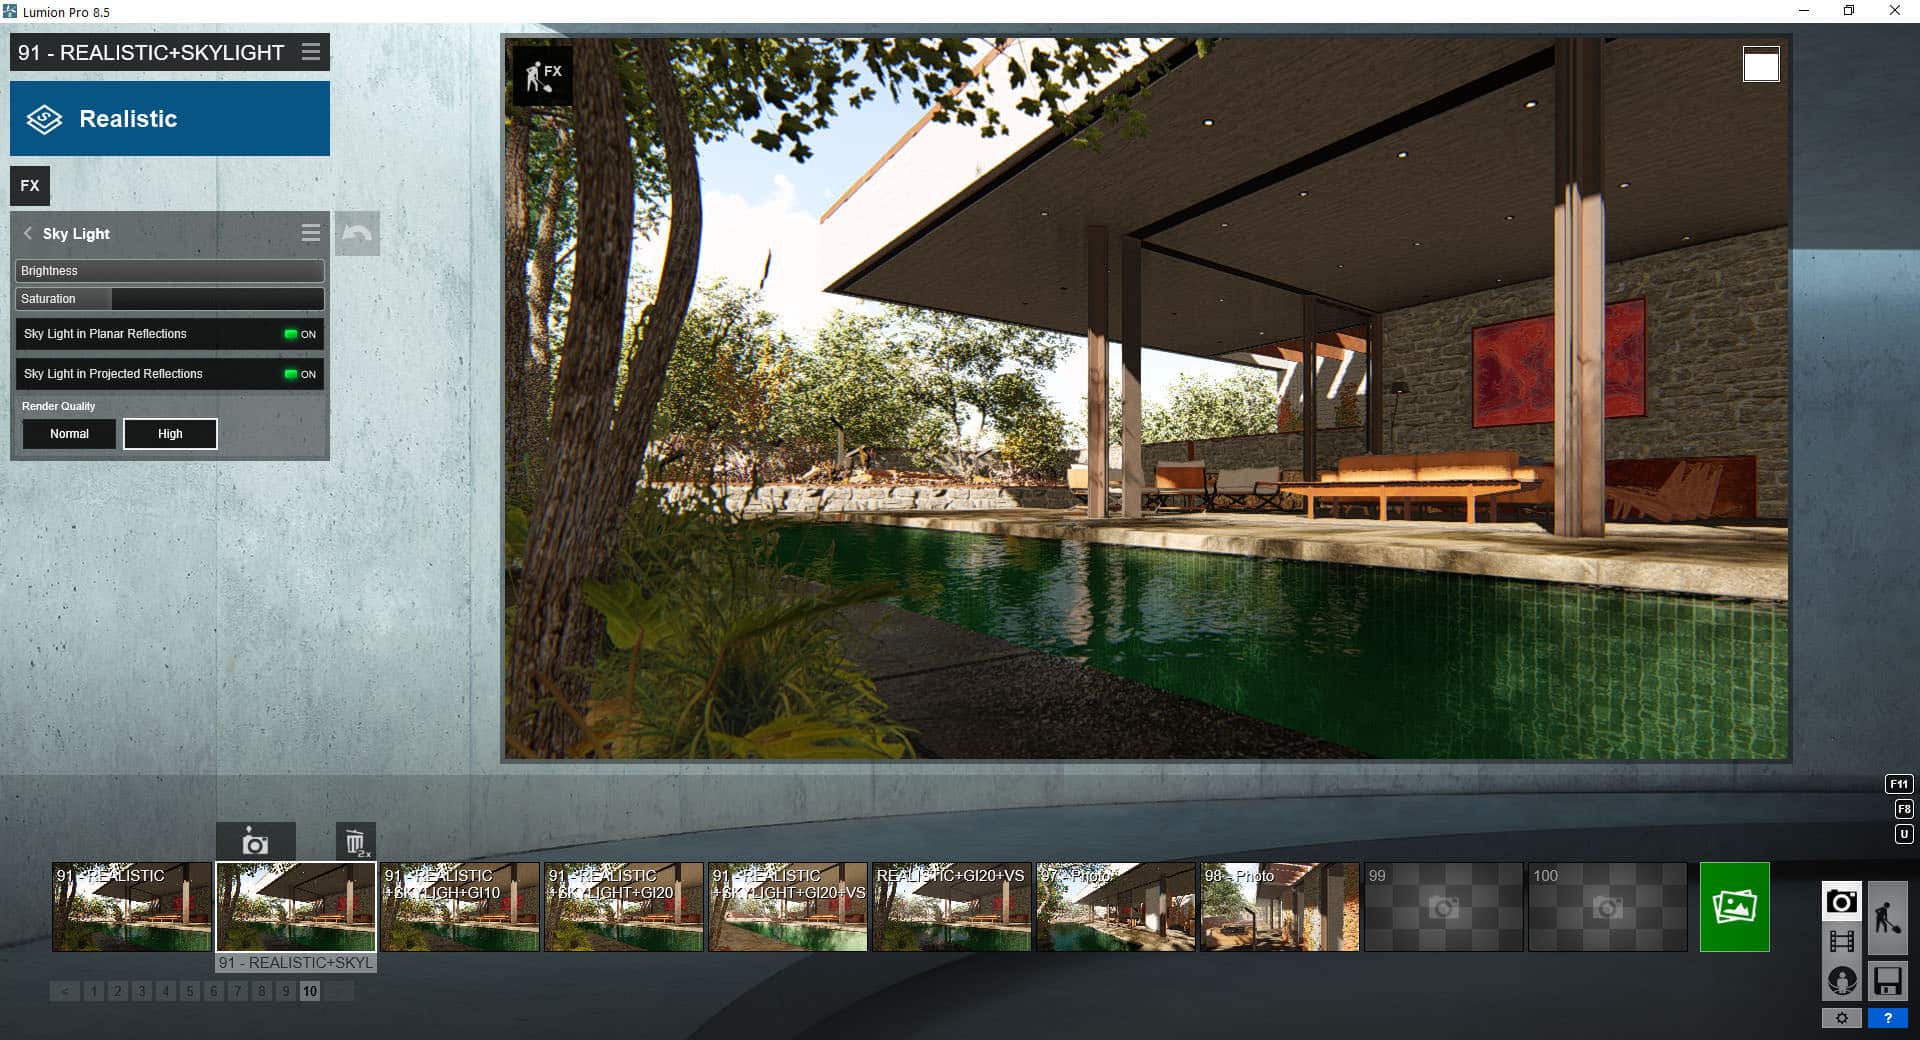
Using this effect defines how the Sky Light affects your scene. Boosting the brightness is straightforward and helps “push” more light into interior spaces and brighten up exterior areas with the sky casting on them.
Saturation defines how much of the sky “Blue” cast all over (I use blue, but it depends on your sky settings in another effect). While I use the brightness setting freely, I keep my eyes on the saturation a bit more since it can be too much and you need to render the view to have a better idea how it looks.
Here’s an example of a Realistic Style output and how it looks with Sky Light applied with brightness at MAX and no Saturation at all.


The reflection related buttons make this all work in reflections as well. I always turn these on and set Render Quality if this effect to High.
One more example. RAW render first.
With Sky Light on with and without Saturation for reference (notice how blue takes over the one with saturation on).


Lumion (GI) Global Illumination
Keeping in mind the results above, see how activating the Global Illumination effect (introduced in Lumion 7.0 PRO) makes a difference for this view considering the deeper interior areas.


The Sun amount slider controls the GI strength for the sun, and go easy with it. The difference between the images above is GI Sun amount 20 vs. 60. all else is the same.
I’ll recommend having the preview switch on at all times and know that you can further modulate the light spread with the Falloff Speed and Sun max effect distance slider.
You’ll need to test this per each view and do test renders to see how it works will all the effects baked into the image.
As you can see, you can control GI for spotlights too, but I stay clear of that in this review.
One more setting I find myself using is the Sun max effect distance to help push more light into the deepest areas.
Below is one more set from a RAW DAYTIME Style image all the way to using GI with Distance setting change.


More Lumion Effects for Photo-realism
This review is already getting too long for its own good, so it is best if I save things for a dedicated KK House making-of article. What I can specify here is that these are effects you will probably always find yourself…
Always use Lumion effects :
- Sun (or Sun Study)
- Shadow
- Reflection
- Sky Light
- Sky and Clouds
Very often use Lumion effects :
- Exposure
- 2-Point Perspective
- Depth of Field
- Fog
- Volume Clouds
- Volumetric Sunlight
- Global Illumination
Make it a habit of rendering out often so you can see a fully baked result. Lumion’s on-screen preview is excellent, but there is more going on in the render that is not showing on screen. It only takes a few seconds to save, so this is not an issue.
Lumion Animation
I’ve decided to skip this aspect since it is very much like working on still images in terms of the effects. Same workflow with a few more effects available for you and the added benefit of being able to render a movie in less than a day!
Here’s a short clip still in progress…
Lumion 360 VR Panorama Production
Not much to add here really. I’ve tested this, and since not all of the FX are supported, I find this feature lacking to the point of not being usable (for me). I need to be sure that what works in Still and Animation also works in VR.
Lumion Review Conclusions
A Closed but Beautiful Garden
Lumion is a complete visualization platform. You need to provide the 3d model, but all else is waiting for you inside as you know by now :
- Terrain System – Import, sculpting & painting, 3d grass, water surfaces, ocean, and urban 3d maps.
- Extensive material library.
- Vegetation that responds to wind.
- Sunlight system.
- Artificial lighting with GI capabilities.
- Weather system with Sky, Rain, Snow, and Volumetric Clouds.
- People that walk and run.
- Birds that fly.
- Moving cars.
- Sound effects.
- Photoshop capabilities for stills and animation.
- Video editing capabilities.
You can pretty much do it all with Lumion, and that is it. It has an easy learning curve and you can get up to speed very fast and output good results very fast. Speed is the key word when it comes to Lumion.
However, keep this in mind…
If you choose to use Lumion, don’t expect to use anything else later on!
You can’t export your work with it out to 3dsmax or Unreal Engine. Be prepared to stay inside. You can import external assets like 3d models and materials, but it is not the main focus. Materials are much easier to import into Lumion than 3d models for example.
One this is certain. The walled garden approach helps Lumion to excel at what it does for the majority of its users.
Value for Money
First thing I hear from people when the price of Lumion is mentioned is that is it expensive. Once you realize what comes with it, with this garden, it doesn’t seem that expensive anymore if you are ok with a closed system.
Working with a render engine like V-Ray or Corona Renderer, you need 3d vegetation and a scattering plugin to scatter them around. You need HDRI Skies, and the more of them, the better. You need 3d cars and 3d people with AXYZ Design’s ANIMA to move them around, and the list goes on and on.
Sum it all up, and you’ll find out you pay more already.
The thing is, I’m not proposing to replace your current pipeline and workflow with Lumion. I added it to mine, and in doing so opened up a new line of business that wasn’t there before. I use it for anything from the very early stage of concept all through the design process until it is all decided on.
Alternatives to Lumion
The most immediate suspects I know about would be :
- Unreal Engine – I’ve tested very little.
- Twinmotion (which now uses Unreal Engine internally) – Tested all three iterations of their engine.
- Unity – I’ve tested very little.
- Blender with EEVEE – I did not test it yet.
- Enscape – I did not test it yet.
I have more experience with Twinmotion and it is the most similar application to Lumion from the ones I listed. I can say that in terms of final quality I prefer Lumion, but would love to have some of the features that come with Twinmotion like how you edit terrain and scatter things in it. I have a recorded session I did with it which I edit and post on Vimeo later for you to see.
A few points to consider (A Lumion Wishlist)
Besides some specific wishes, I already mentioned in the article body.
- Support NVIDIA RTX real-time ray tracing!
- Better mass placement tools, for vegetation mostly – Painting or Geometry / Material based.
- You can only have 20 layers! please remove this limitation – Introduce layer groupings for example (imported, trees, lights, etc).
- Navigation is very sensitive to the touch and it is hard to lock a specific camera position. Introducing a way to finetune views is more than welcome.
- Material weathering does not respect surface smoothing and the polygon topology shows up when using it on surfaces that are not flat. I would love for this to work better so things like sofas, pillows, curved surfaces, and more, will benefit from this.
- I’d love for Area lights to cast shadows too.
- Make the reverse NORMAL MAP button work for custom normal maps too.
- Copy paste materials actions are too tedious. A color picker approach is more than welcome.
- Add a “displacement” like effect is more than welcome. Some kind of parallax displacement… think about how corners behave and look.
- Lumion is aimed at animations but not being able to set still aspect ratio output is a negative aspect for me. I would love to be able to setup portrait views for example.
- I prefer to import via LiveSync rather than importing into Lumion directly – this process is bulky! A drag and drop approach would be very much welcomed for those single items we need to add in.
- Make the 3d Grass Blades work on more than just a single terrain color slot.
- Make the terrain resolution better than it is now.
- Make all effects work for VR too.
Yours truly,
Ronen Bekerman.
Visit the Talk thread for this review for questions and discussion about this article. Feel free to ask me about things you like me to explore in more depth.


Hi all!
I’ve decided to update the original article and added two new sections today :
I aim to add all else for a Monday update!
Cheers
RB
Indeed… this is more of a how-to or making-of style article which I already have in the works and will share info in the The KK House - Diving into Lumion Talk thread.
The most I wait is a few seconds… I think it could be your GPU card that is the main reason. 2GB RAM becomes a bottle neck fast.
Taking KK House into UE4 to learn the ropes… allowing me to better compare it with Lumion.
Using the Datasmith exporter for SketchUp sure helps, but the process takes a long time which makes design revisions seem like a tedious thing. Once in UE4, nothing is straightforward for me “out of the box” so the learning curve is steeper and I need to figure out how steep after a watch some videos about this
SAVING the UE4 scene TAKES FOREVER!!! Why is that?
I’ll keep you posted.
With Lumion 9 out now! I started to test some new features like 3d Fur and 3d Grass… Stay tuned for more as a plan to update the review or add an article just about the new stuff.