


Unbiased GPU Rendering – Getting started with Octane
Third part of the Unbiased GPU Rendering series by Johannes Lindqvist is here. This one is about getting started with Octane Render, and completes the mini-journey that started with Daniel Reuterswärd‘s counterpart article about the same thing with FStorm. There is a lot of insight to be found in the 4 articles published on this topic here. I’ve explored my GPU, and what it can offer me, a lot in the past 2-3 weeks. Hopefully, so can you. Read on and test it out!
So, I guess that most of you who aren’t already into unbiased GPU rendering have gotten a pretty good idea of what it’s really is all about. If you missed the previous two parts, be sure to that you do :
- Part 1 : Unbiased GPU Rendering – What’s the Big Deal?
- Part 2 : Unbiased GPU Rendering – OctaneRender vs FStormRender
As for this part, No. 3, I thought I could just go through the very basic knowledge you need to get started with Octane Render. The MED as Ronen described it (Minimum Effective Dosage).
I actually wanted to write this guide for FStorm, but it felt like a waste of time considering Daniel Reuterswärd already did such a great job on it – Unbiased GPU Rendering with FStorm. Please note that this is not a tutorial, but if you’re completely fresh to FStorm it might be a good help to get started.
Installing Octane Render
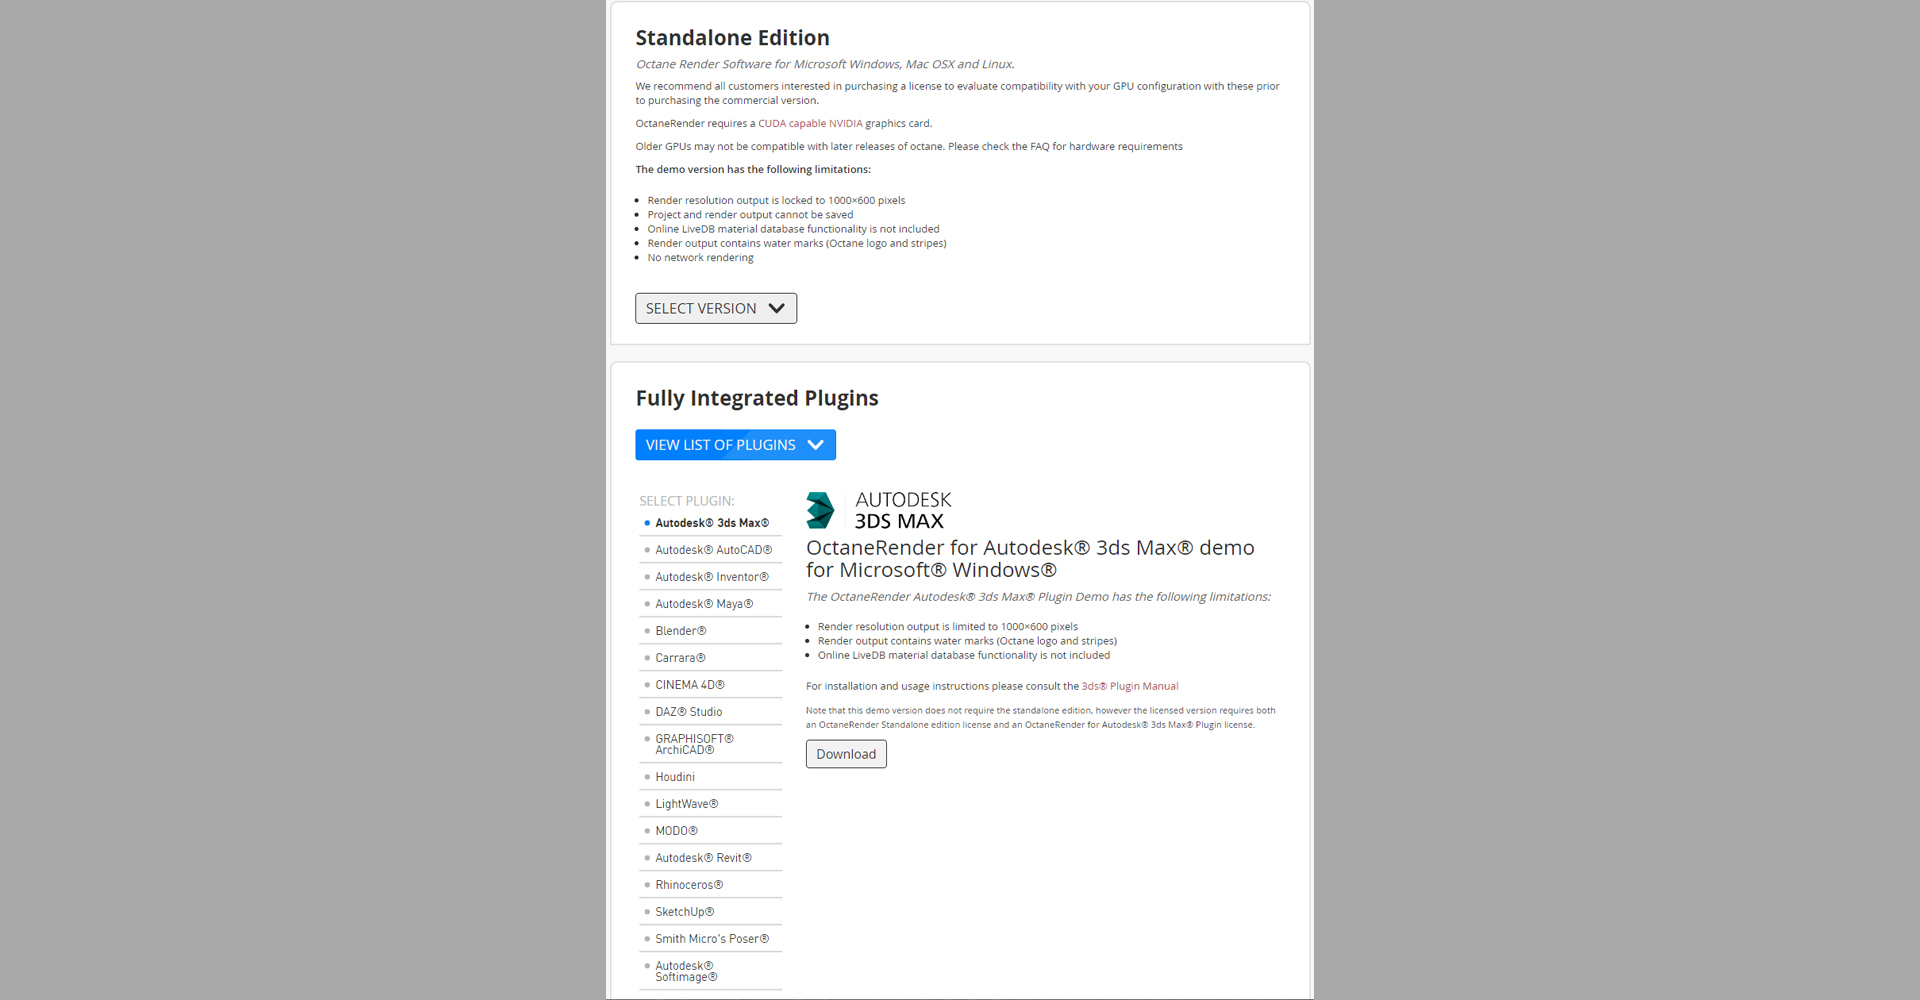
Octane is made out of two parts. The first is the Standalone application, which is the render engine itself. This is the same no matter what 3D software you are working with. The second one is the plugin for your 3D software, for example, 3ds Max. This plugin acts as the link between your program and Octane Standalone Renderer.
If you’re buying Octane, you must buy both the standalone and the plugin. But if you’ve read part two of this article series, you are aware that any network render node ONLY needs the standalone. Although you must buy one extra standalone license for each computer you want to network render on.
Both standalone and plugin are available on their website, link on the end of this article. They have a demo version which is water stamped, download it and get a feel of what Octane can do.
Important Things You Must Know
There are key points to know about. I’ll start with the render settings. Note that these things might not work exactly the same way in all programs as they do in 3ds Max, but the general idea is the same.
- In the kernel tab in Octane for 3Ds Max render settings, the most important thing you should do is changing the “Kernel type” to Path Tracing or PMC. This since the default “Direct Light” will not give you global illumination.
- Max samples value determines how many samples you want to give the rendered image. More samples = longer render time but less noise.
- “Use CPU memory” is a very handy feature, it allows Octane to store textures into the standard DDR RAM memory instead of in the Graphics card’s “VRAM”. It can make sure that you can render images that otherwise wouldn’t fit in the memory. The amount you should use depends on how much RAM you have installed, make it as high as possible but be sure that there’s enough left for windows and other programs to use.
- “Diffuse Depth” controls how many times a light ray can bounce around the room. Higher value = more and higher quality GI, but slower render time.
- “Glossy depth” determines how many times glossy rays can bounce (or something like that?). Basically, a value too low will make glass and other glossy surfaces look weird.
- “Caustic blur” will blur out caustic calculations, eventually making caustics disappear but instead you remove hot pixels / fireflies and can speed up the render.
- “GI Clamp” does what it says, clamps the GI. This can also be helpful to avoid hot pixels / fireflies. Don’t set it to low (usually, 1 is fine), since it will start killing the light in your scene.
- “Coherent ratio” allows Octane to, in some way, speed up the rendering. Can’t explain what it technically does, but avoid values over 0,4.
- “Open OctaneRender Viewport” button will obviously open the real-time renderer.
- In the Camera tab in 3ds max render settings, you should activate “tone mapping”. Things that are important in this tab is of course aperture, exposure, gamma values etc. Also here you can activate the post-processing filter (glow/glare).
- The “response” drop down (default set to AgfacolorFutura100CD”) is a way to apply different Color lookup tables (3D LUT) to your image. Scrubbing around and playing with it, can give you some really nice results.
Here’re the render settings I use for a particular scene. As you can see, not very much to care about.

Setting HDRi Lighting
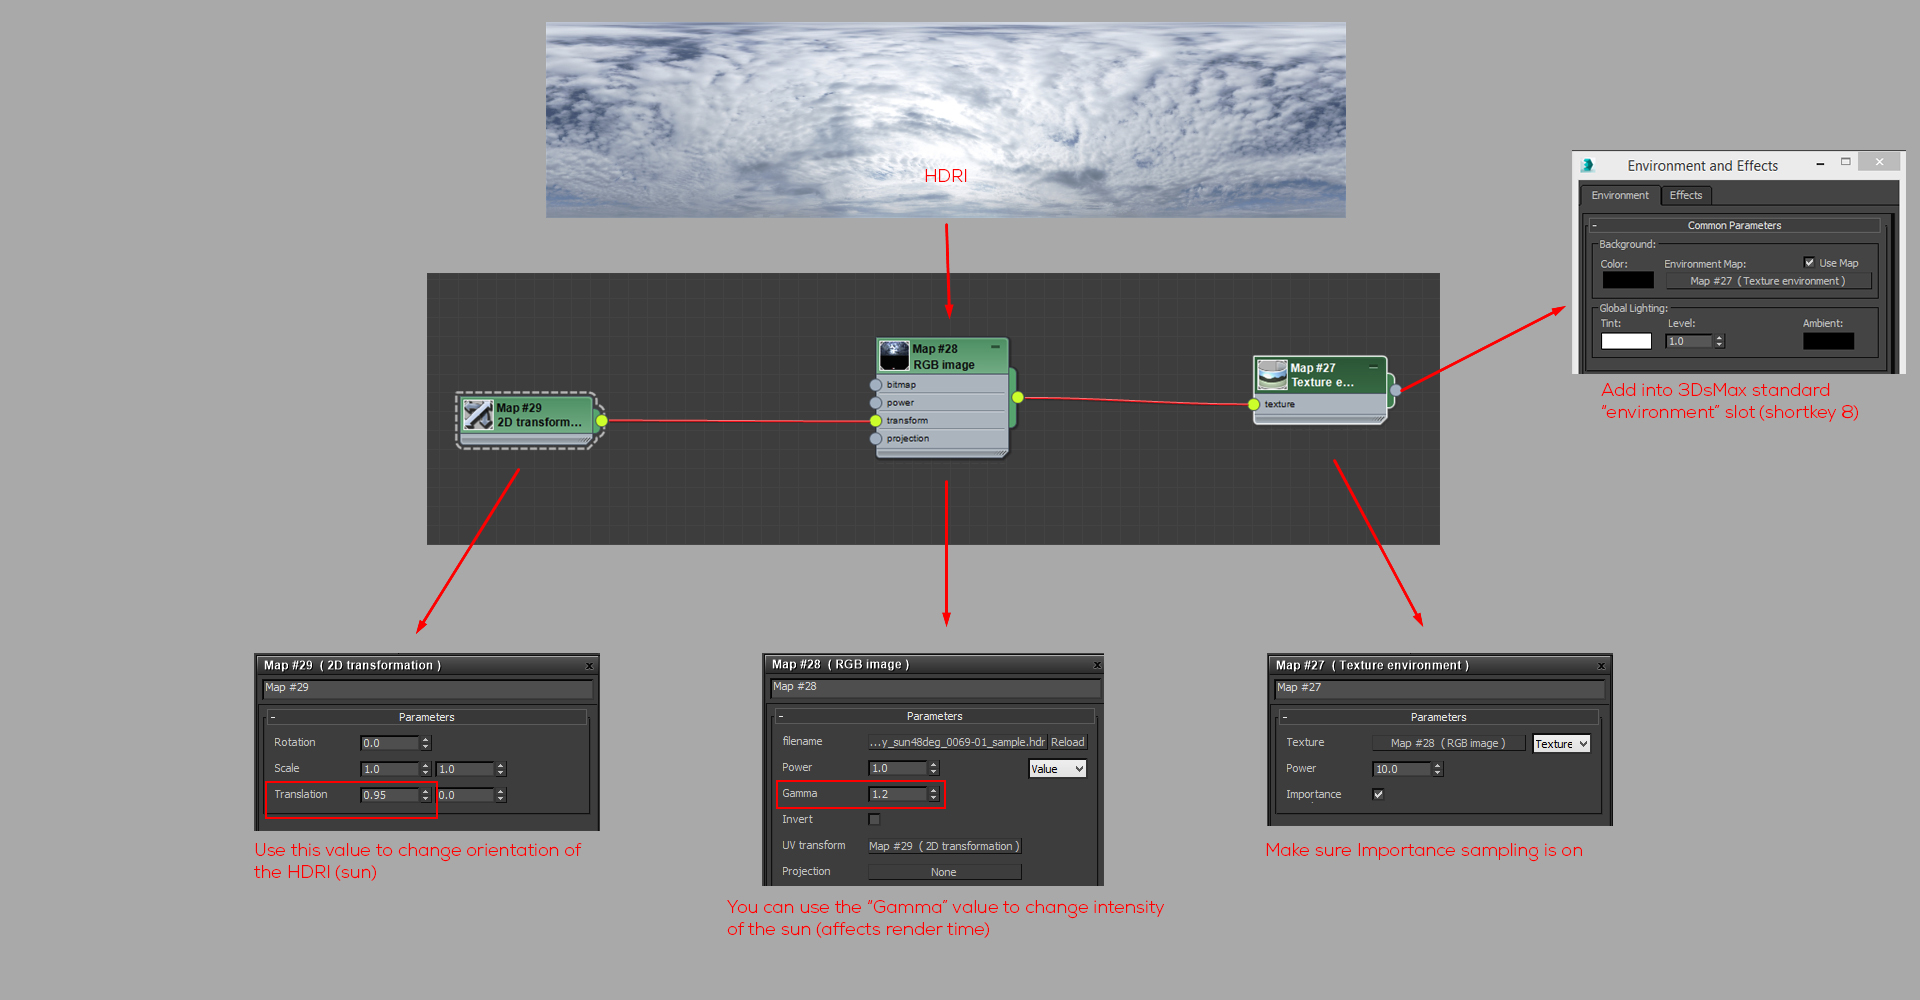
Setting up HDRi is easy, but it doesn’t really work as in V-Ray. Instead of having a V-Ray Dome light, you put it in the 3ds Max environment slot (not sure how this works in other 3D packages than 3ds Max, however). You would want to create a “Texture Environment” node, and inside that create an “RGB image” in which you open the HDRI image you want to choose. Now just apply this into 3ds Max Environment slot, and you’re ready to go.
If you want to change the orientation of the HDRI, you do that in the “2D transformation” node that is by default connected to the “RGB image” where you’ve put your HDRI.
In the bottom of this article is the final render I made with this lighting setup :
Basic Shader Knowledge
Octane material creation works a bit differently from V-Ray. FStorm is more like V-Ray which I think is preferable. In Octane, however, you have different material nodes for different material types :
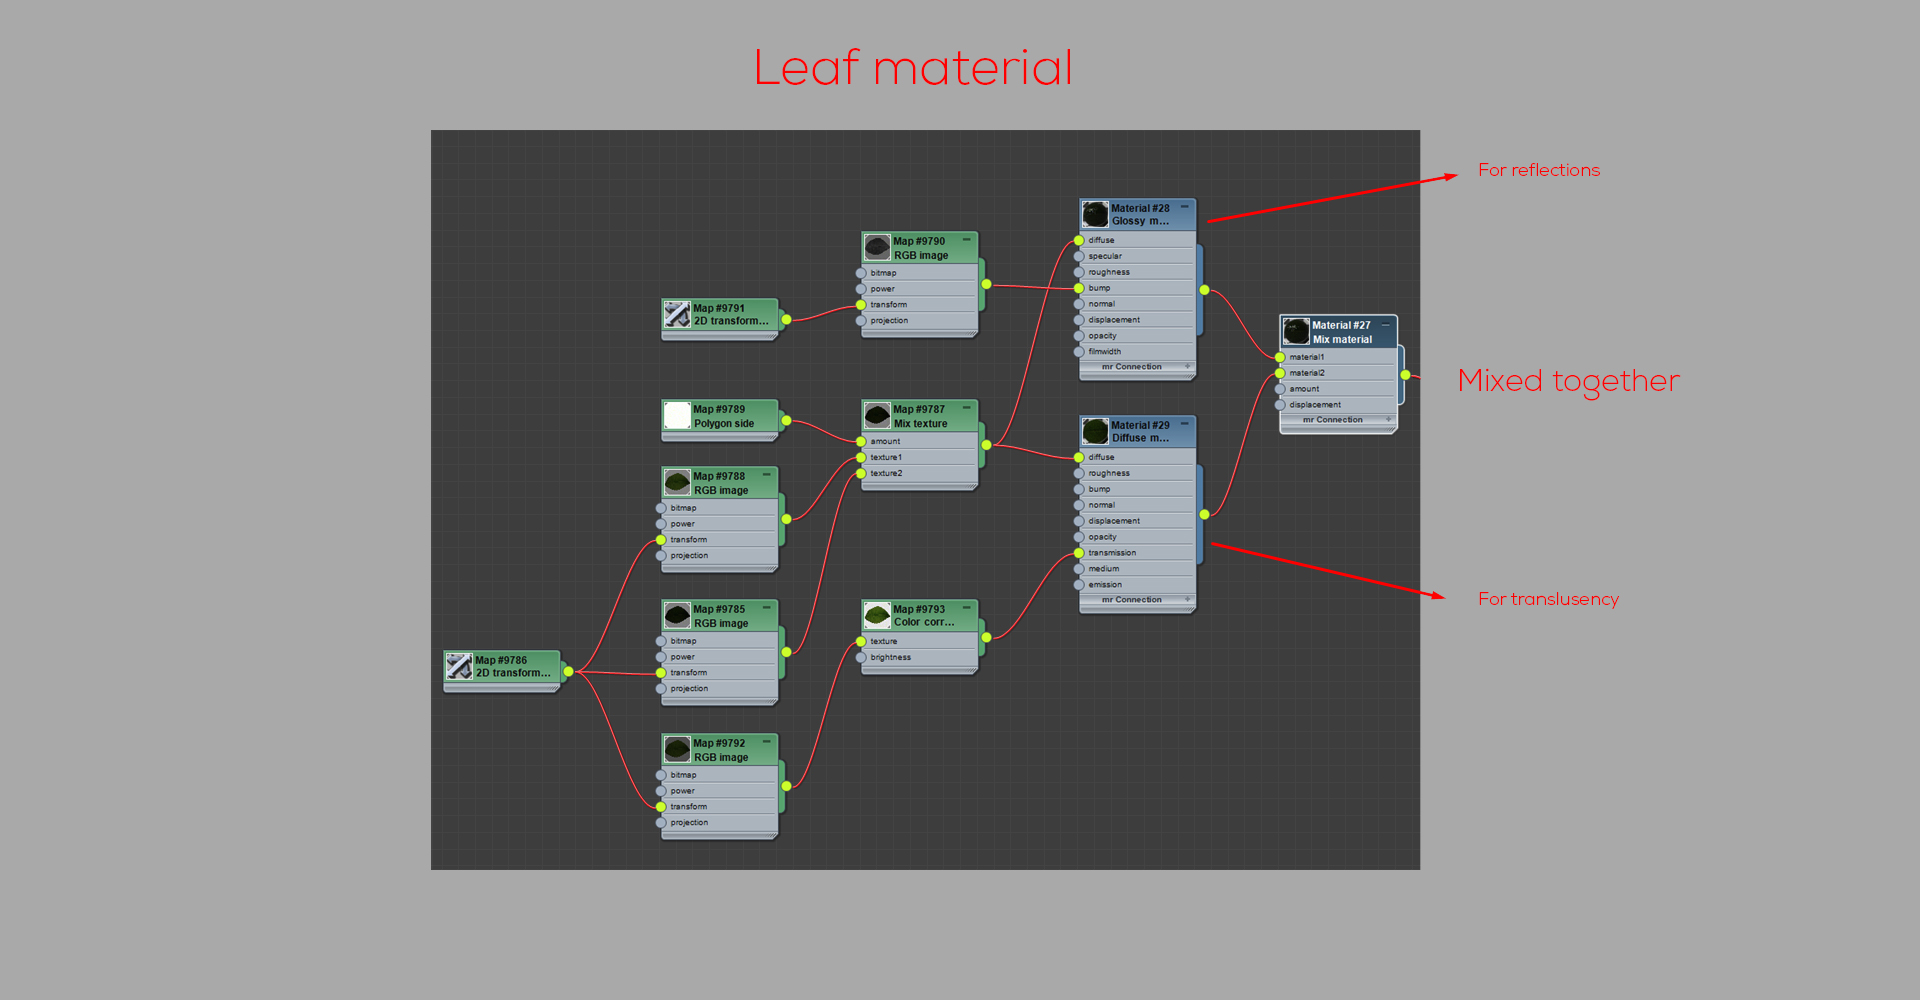
- “Diffuse” is a material that can’t reflect, but it has translucency, SSS, and emission.
- “Glossy” is the most common one. This is for all reflective but not refractive materials, like plastic, metals, wood, etc. It has reflection and opacity, but not refraction, transmission or SSS.
- “Specular” is for refractive materials like glass or SSS materials. With this, you can do refractive materials, but are limited to how you can do reflective and there’s no translucency.
So if you need a material that has both reflections and transmission for example, you have to create a “mix material”. In this, you’d have to add one diffuse material which contains the translucency, and one glossy material which creates the reflections. Of course, since you mix those two with, let’s say, 50%, that means that 50% of your reflections made in the glossy material will disappear. So then you have to mixture with the reflection amount and IOR to get the desired effect.
Material creation is, according to me, the biggest downside of Octane. It’s tedious and takes a lot of tweaking to get right. FStorm has a much simpler shader. Materials that you might need 5-6 nodes for in Octane, you can do with only one node in FStorm.
However, making a material in Octane is still usually faster than most other renderers due to having realtime feedback.
Instancing
Octane can handle millions and more millions of polygons. Large grass fields and forests made of pure geometry is no problem. However, to make this work properly, all the geometry must be instanced.
The problem with instancing in Octane is that even though a model I instanced in 3Ds Max, it won’t be instanced in the renderer. The solution to this is to right click on all instanced models, and choose “Octane properties”. There, you must enable the “Movable Proxy” checkbox. Now your models will be instanced in rendering. This is an important step in optimizing your scene.
The movable proxy is also designed to do one more thing. It allows you to change or move around the object while rendering, and it’s now shape or position will be updated in the real-time rendering instantly without you having to reload it.
Note that FStorm works the same way, but instead of choosing “movable proxy” in the Octane object properties, you’ll have to choose “instance” in FStorm object properties.

Optimizing Memory Usage
Most of my work, interiors that is, doesn’t force me to optimize. My scenes are quite small and even though there is a lot of high-quality furniture in them, I can always hide things in other rooms or things that are simply not visible from that particular camera angle I’m rendering. Because of this, I hardly ever have to care about optimization.
But it happens, and then it’s important to know how to do it. Polygon count is not a big problem for GPU renderers, it doesn’t take very much memory. The problem is textures. You must know that the render engine doesn’t read images like windows do. They don’t care if the image is an uncompressed TIFF file, or a very compressed JPG file, as long as it’s the same size and bit depth, it will take exactly the same amount of memory. With that being said, a JPG texture that is 2mb in file size can easily take 50mb of GPU memory.
When loading textures into the memory, the only two things that matter is, as I just mentioned, how many pixels there are in the image, and what bit depth they’re in, that would be grayscale, 8-bits, 16-bits or 32-bits for HDR lightmaps. No matter how the image is compressed, if it’s the same amount of pixels, it takes the same amount of RAM.
So, the key to optimizing textures is, first off, make sure that they aren’t bigger than what they need to be. A 3000x3000px texture for a bump map on a mug, for example, is probably not very necessary.
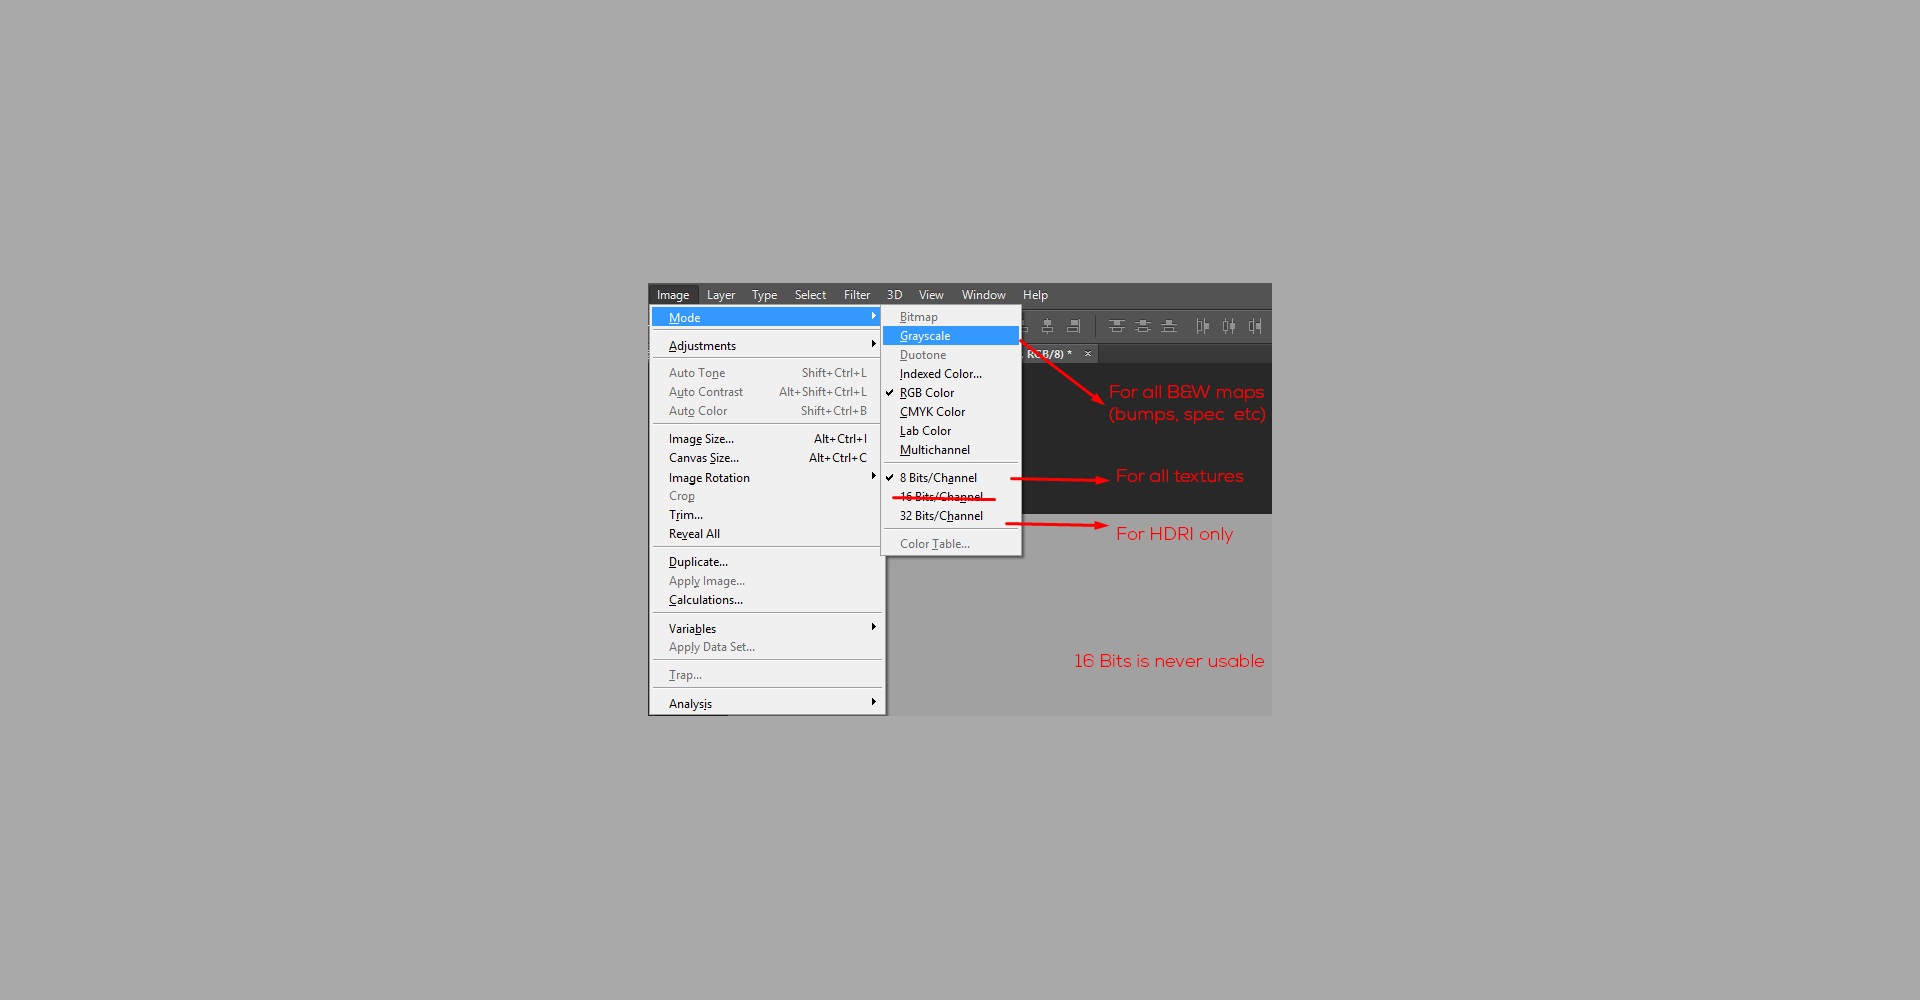
Secondly, and just as important, make sure they are not in a higher bit depth than they need to be. Black & White bump/specular maps, for example, should not be in 8,16 or 32-bit depth, instead, they should be set to grayscale. All colored textures should be 8 bit and the only 32-bit texture you’d probably need is an HDRI map.
Just by making automated actions in photoshop that quickly allows me to change the textures I use for a particular scene, can easily reduce my GPU memory usage from 5,5 GB to 2,5 GB and suddenly I can make a scene twice as big.
Rendering
Just activate the real-time renderer and start looking for nice camera angles. Use the focus picker in the frame buffer to set the depth of field.
Final images…

Thank You
Thank you for taking the time to read this series. I hope that I’ve been able to convince some of you to discover the world of unbiased GPU rendering. And even though I’ve written this with a strong personal view on what I think about the two renders, both are insanely good and you will not be disappointed with whatever you choose.
In fact, so far I think every single one that I’ve introduced to Octane or FStorm are now using it as their main rendering tool. Do not forget that Next Limit are releasing their Maxwell GPU support too. Nothing I’ll be able to write about for a while, though.
If you have any thoughts that are unanswered or you want to get in contact with me for any reason, don’t hesitate to visit my Facebook page.
Last but not least, I want to send a huge thank you to Ronen Bekerman who let me write these three articles. It has been a pleasure and I can’t express how valuable Ronen’s work with this site is to the community.
Also, congratulations to the 7 years of running the blog, Ronen 🙂
/Johannes L
Related links:
My Facebook page : https://www.facebook.com/JohannesL.Visualisation/
Download FStorm (free) : https://www.fstormrender.com/downloads
Download Octane (watermarked trial) : https://home.otoy.com/render/octane-render/demo/
FStorm Facebook group : www.facebook.com/groups/FStormGroup/
Octane Facebook group : www.facebook.com/groups/OctaneRender


Yay, the OR love! My favourite renderer. (Totally biased opinion!)
Thanks a lot Johannes for writing this guide, this will be useful if we try to move a part of our workflow to GPU rendering
AMAZING!