


The Amazing Unreal Engine Drones at The Vineyard
It’s here! Part Two of the Making of the, Award Winning, “La Geria” Vineyard by Factory Fifteen. If you missed Part One, go ahead and read it first. Today’s article focuses on the unique craters landscape and amazing grape harvesting drones that hover all over the place! Paul also covers topics such as camera setup, blueprints, music and packaging projects as levels in Unreal Engine 4. Enjoy!
Today we continue the exploration of “La Geria”, Factory Fifteen‘s article about their Grand Prize Winning Entry at “The Vineyard” 6th Architectural Visualization Challenge. The focus in part tow will be on the Landscaping, Drones, Cameras, Blueprints, Music and Packaging it all up!
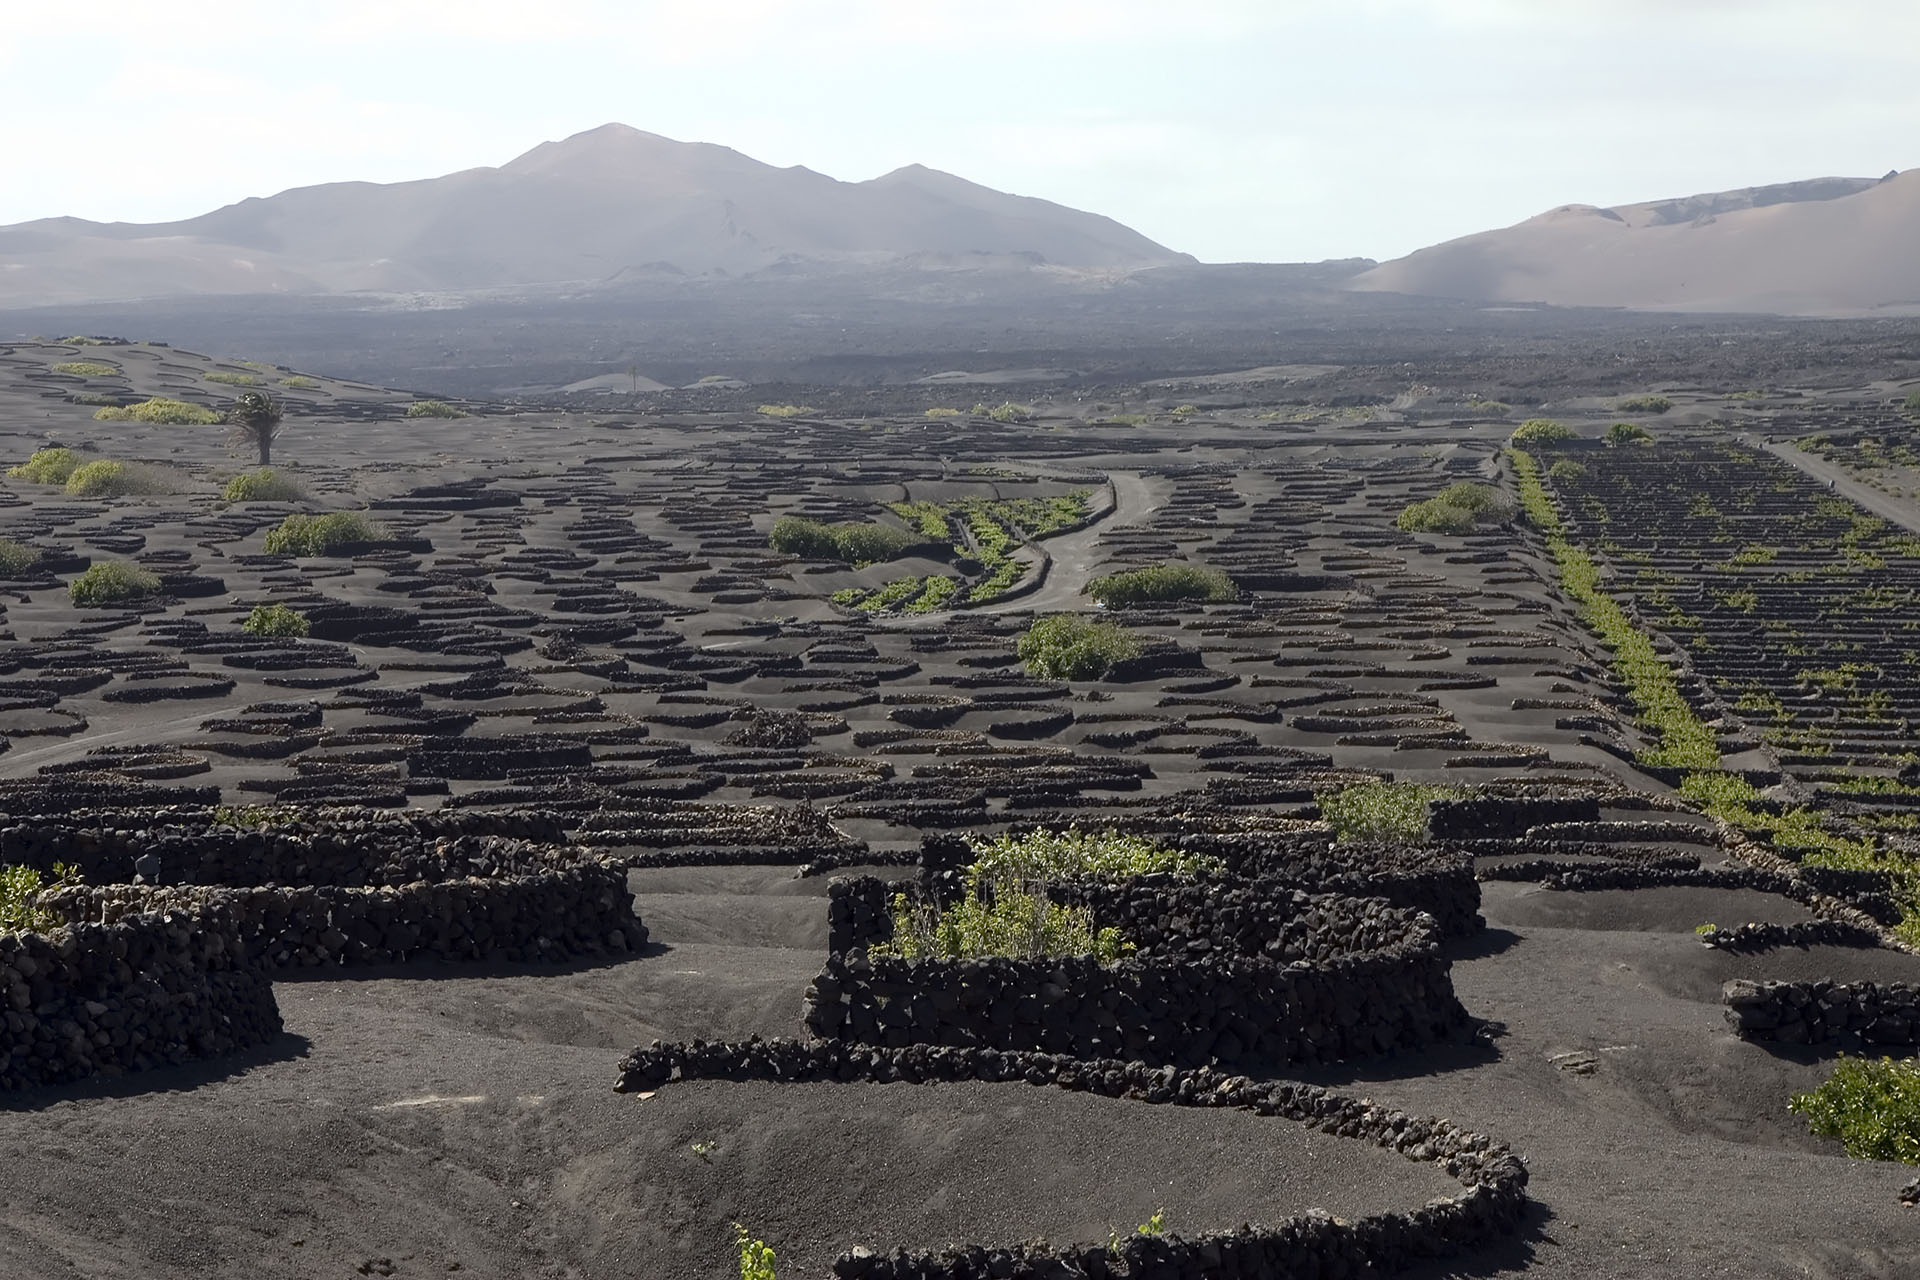
Here’s a photo of the actual site…
The Unreal Landscape of “La Geria”

Landscape Design
We designed the building to sit on the slope of a volcanic mountain, overlooking a sea of man-made craters full of vines. The actual site of “La Geria” has a great range of vine and crater sizes, distributed along an undulating landscape with paths intersecting and separating crop fields. It provided a great direct inspiration to our landscape. We placed larger mountain assets in the distance to surround the space.

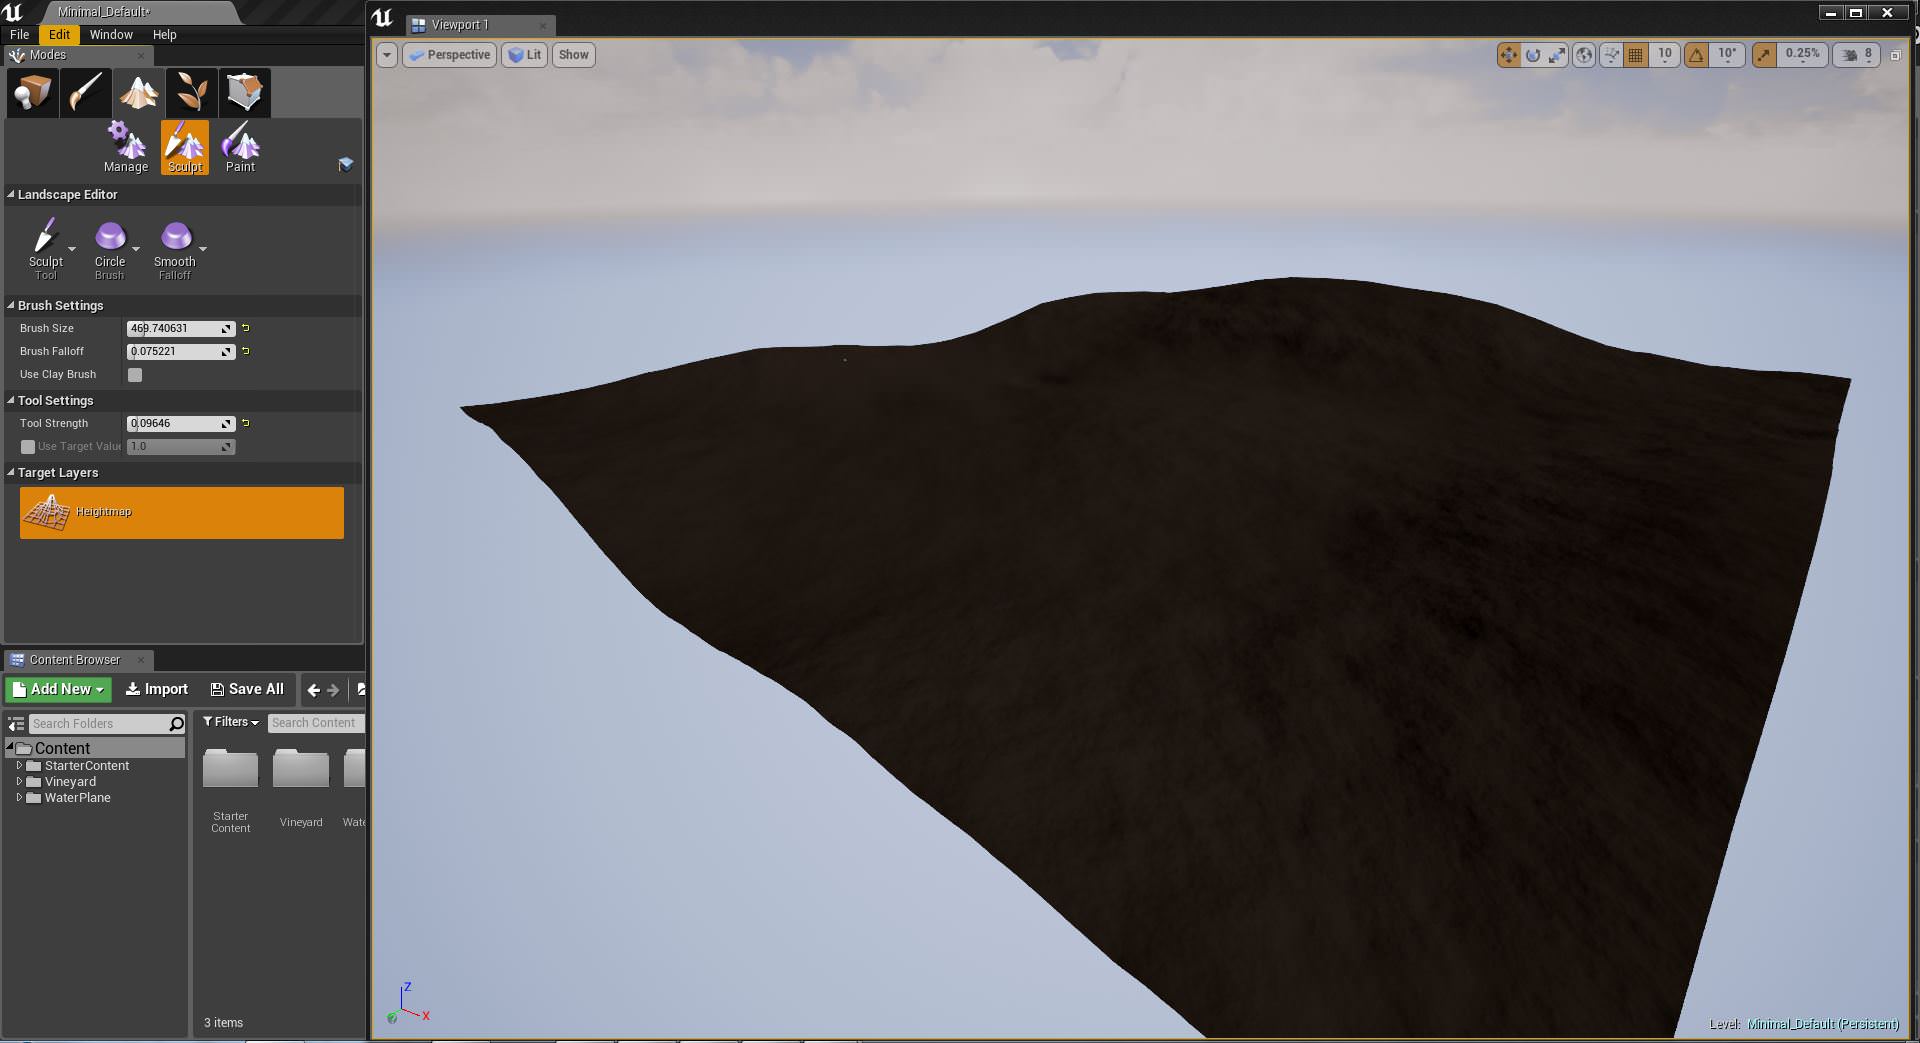
We wanted to design our landscape to work seamlessly with the building and its surrounding terrain so instead of using a program to procedurally produce height-maps we modeled it in 3dsMax and rendered a ZDepth pass from above. To use the full gray-scale we set the maximum distance as the distance between the camera and the lowest point of the mesh and the minimum distance as the difference between the camera and the highest point of the mesh. We then added some noise in Photoshop to add some details and irregularity.
Landscape Modelling / Heightmaps

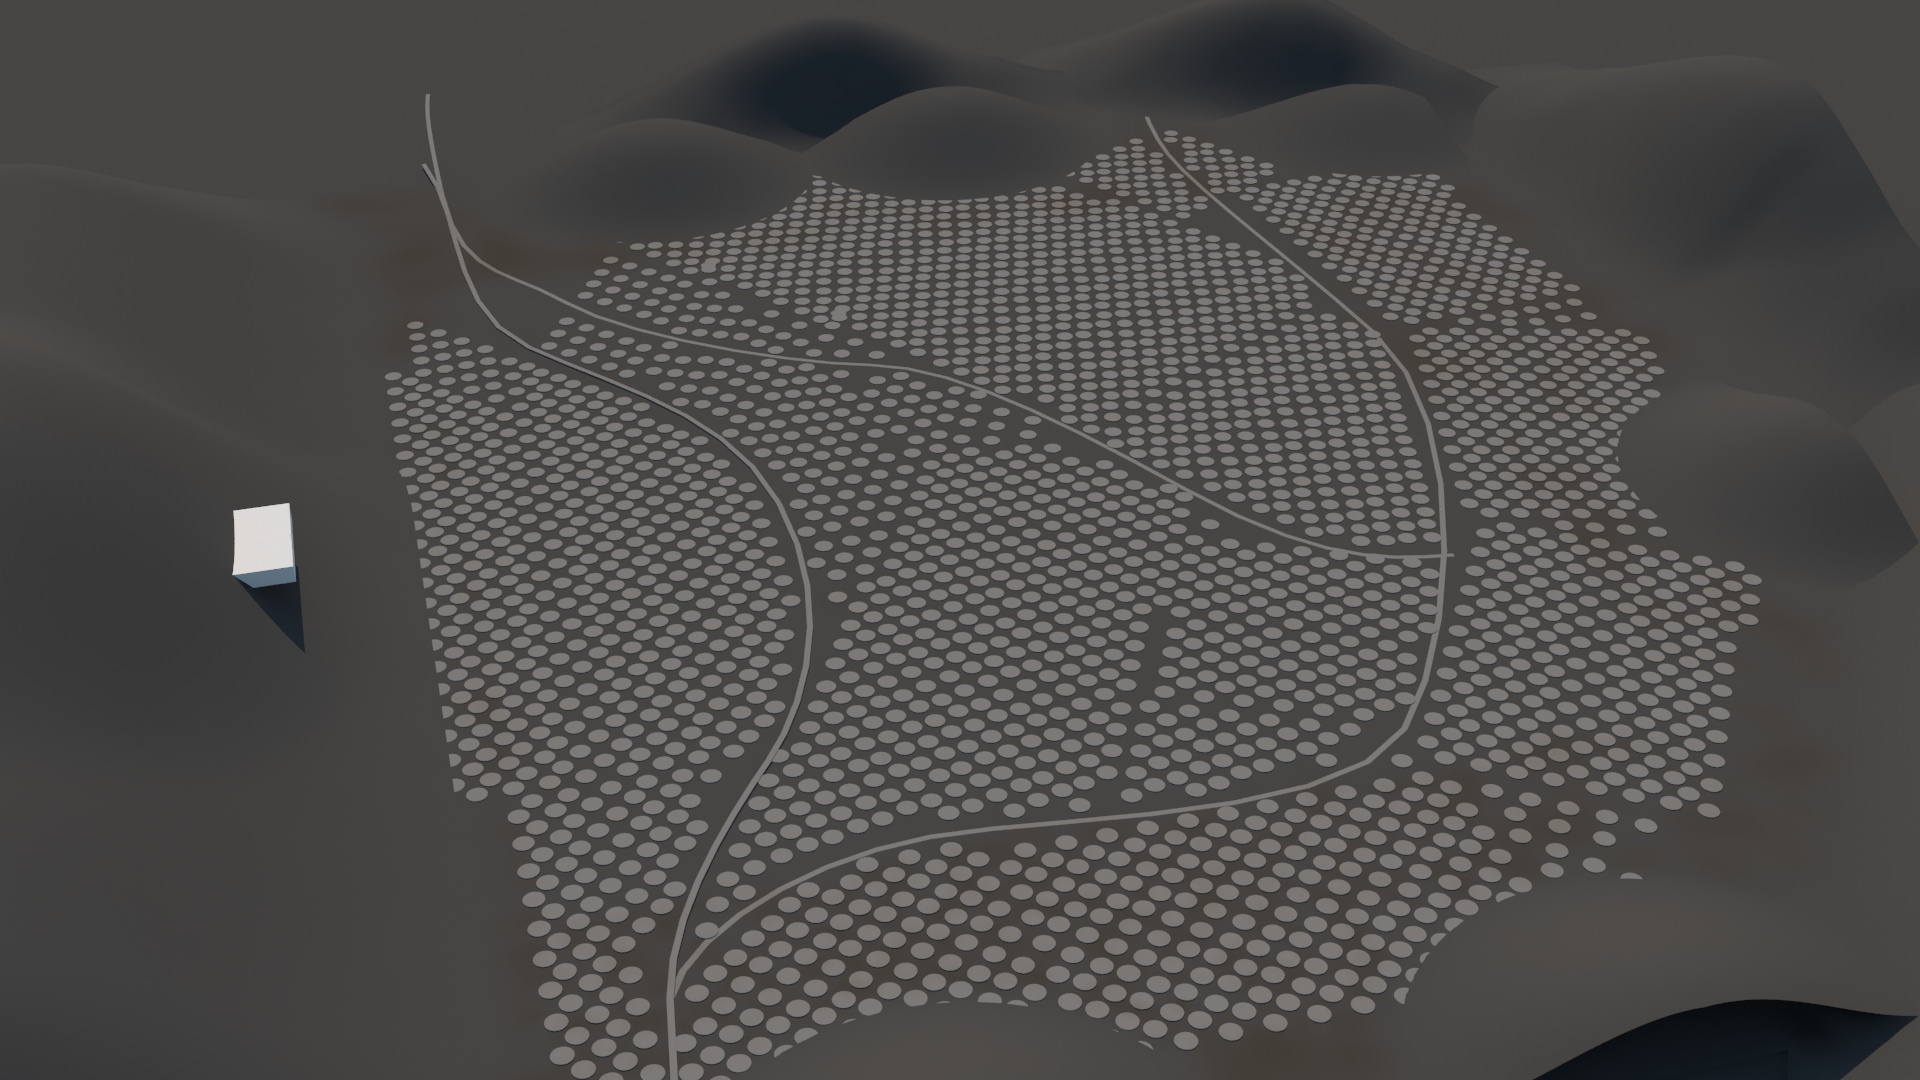
In UE4 we created a Landscape actor, set the size and imported the height-map. To make the landscape mesh density dependent from the viewer position, the Max LOD Level has been increase to 6 and the LOD Distance Factor to 10.

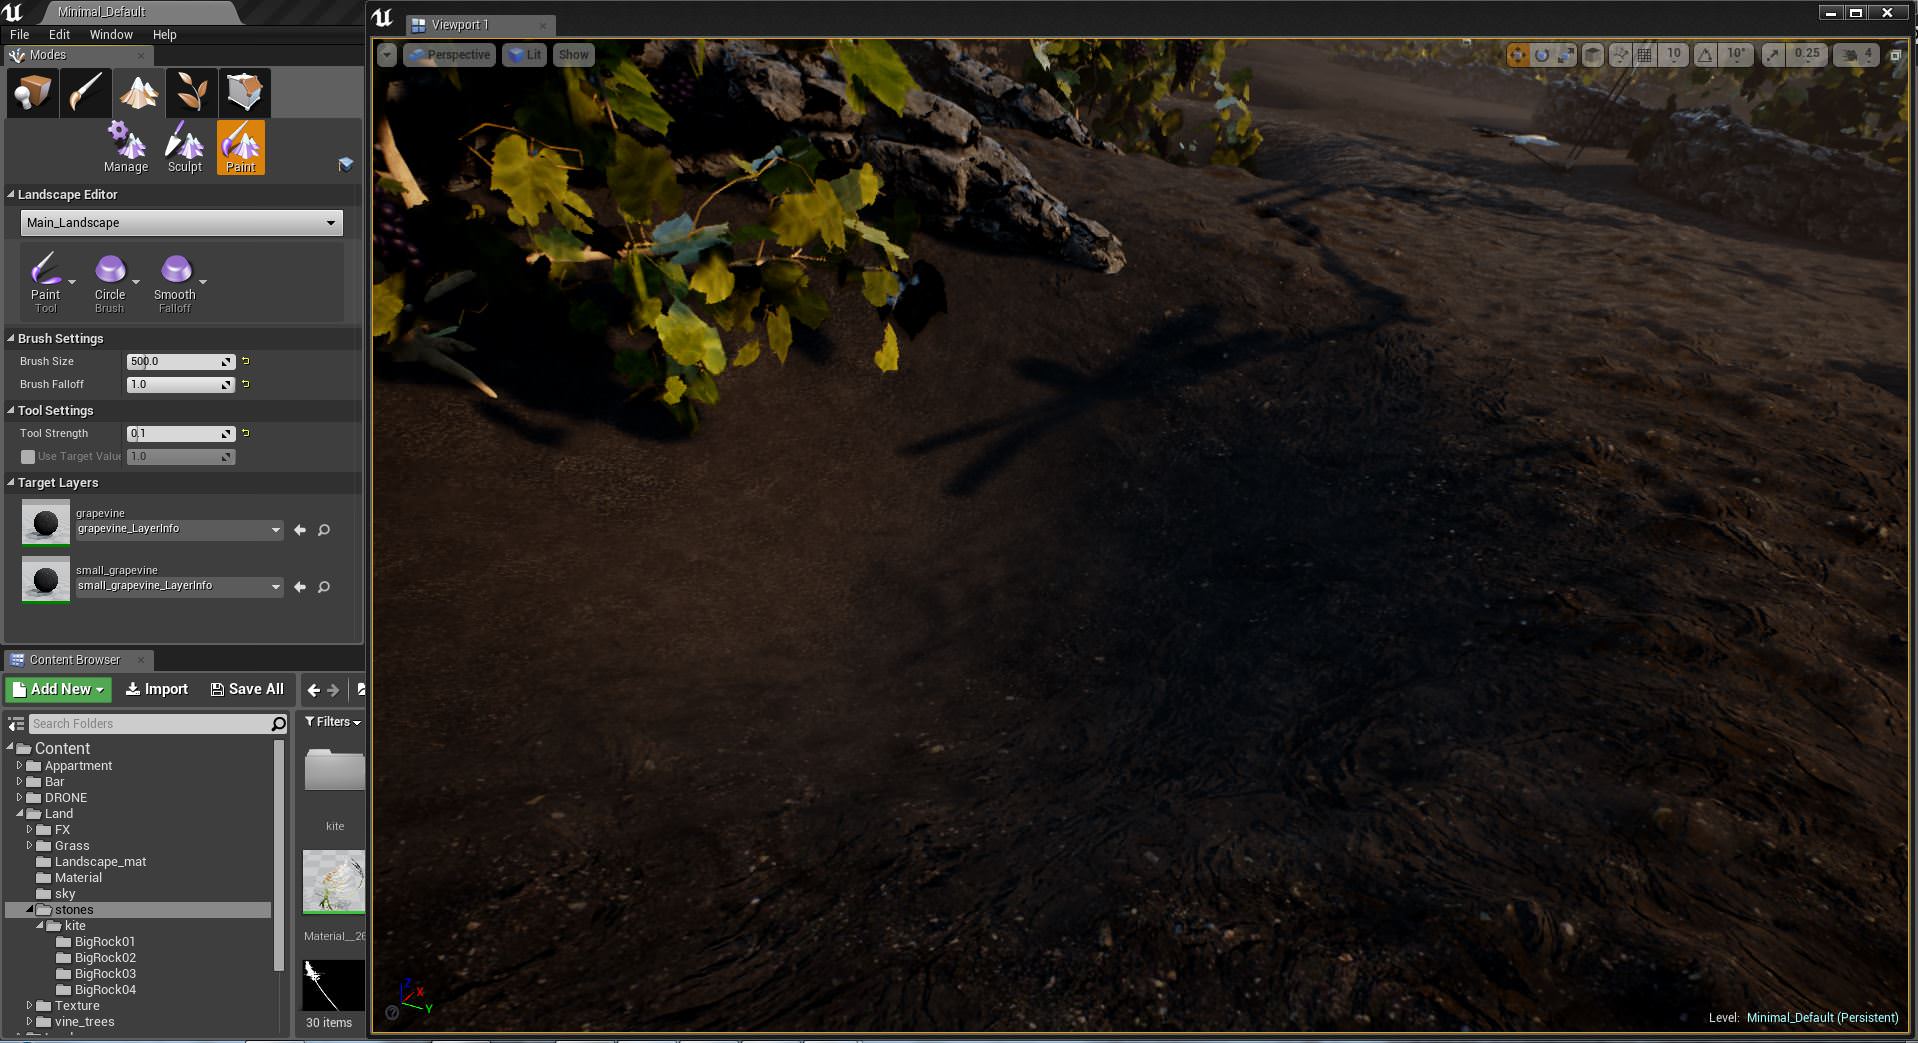
The crates are created with sculpt tools inside UE4. We placed the location of the different sized craters in max, rendered a channel in plan and used this as a texture in Unreal Engine to help us place the craters in a purposeful way.
Landscape Texturing


The landscape has three materials :
- One for the interior of the crates.
- One for the paths and one filling the rest of the space.
- A map is used to drive where each of this material is applied.

The landscape material is designed to have a different color variation both on a large and a small-scale. A displacement texture is used to add details and it is applied only to the piece of terrain surrounding the viewer. We used an instance material to have more control, especially to find the right amount of reflection on the landscape surface and to tweak the displacement to avoid cracks.
Landscape Detailing
We have created four models of different size of the vine trees using SpeedTree for UE4. They come into Unreal Engine already with UVW, lightmaps, collisions, LOD’s, materials and wind deformation. The material is further developed in UE4 adding translucency to leaves and grapes and a node that gives a color variation to the leaves.

The trees are scattered using the Grass tool and a texture. Small trees are placed using the green channel and big trees the red and they all have a random rotation.


The blades of grass and the rocks are scattered with the Foliage tool and painted where needed. The settings allow a high level of customization giving the possibility to randomly scale and rotate each of the scattered meshes and set their relative and absolute density.
The round walls and the big stones are placed manually.
Additional FX
A very simple but powerful feature we added is the Wind. It’s highly customizable, allowing to set direction; wind strength; speed; min / max gust amount.
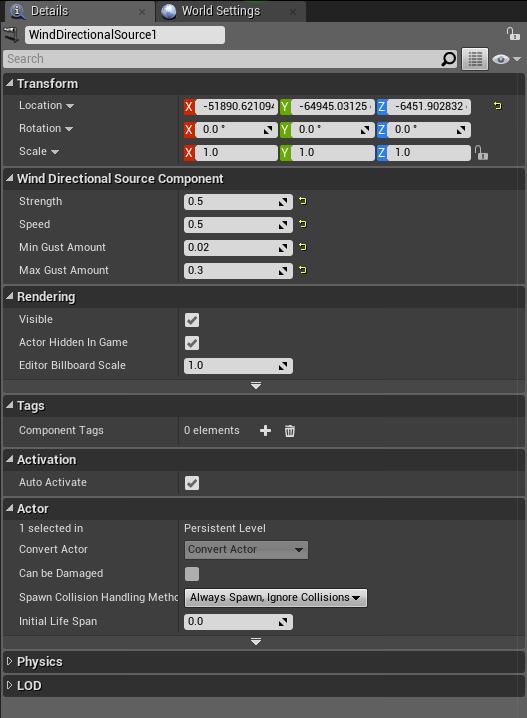
The UE4 Wind Settings
The landscape is finally completed adding the effect of dust moved by wind and drones. This is done through the Particle System tool that allows to spawn a dust material in the scene controlling its initial position, rotation, velocity and its size, color, acceleration, etc. during its lifespan.
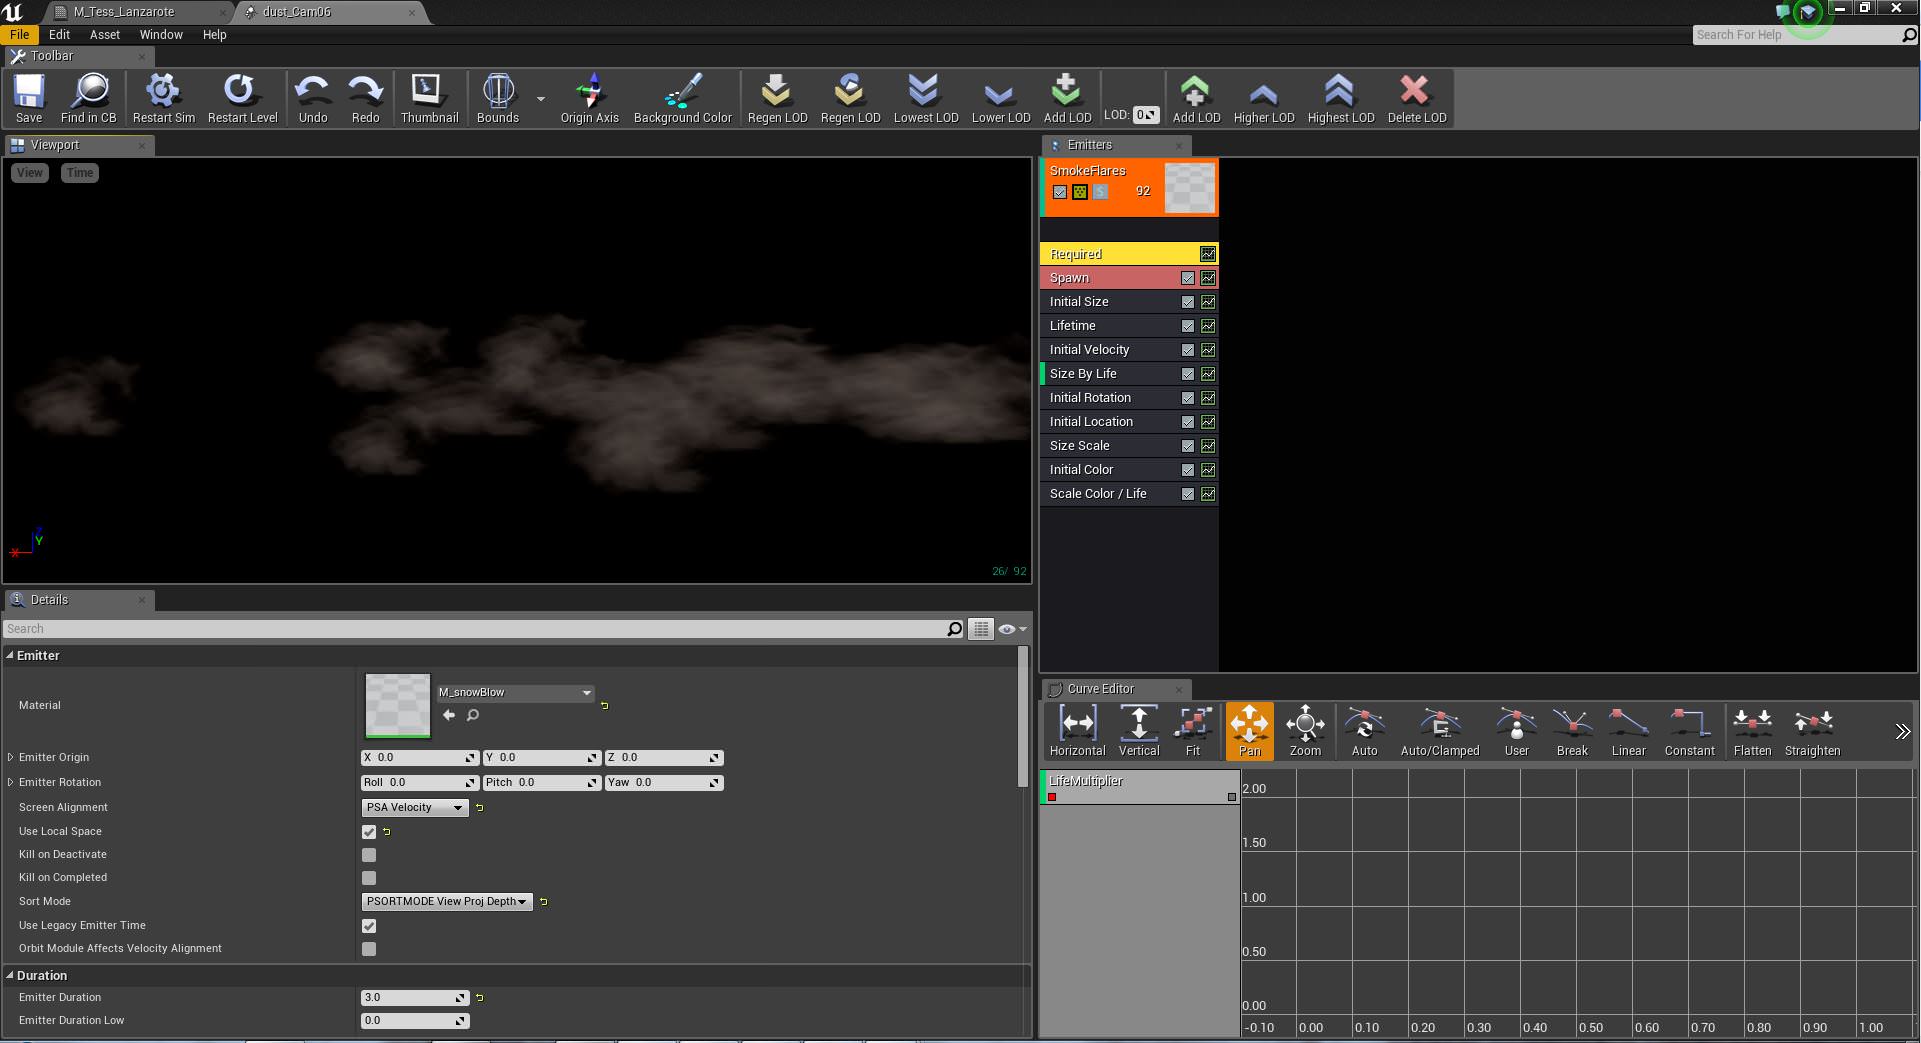
We used a similar effect also to simulate the water vapor in the SPA.
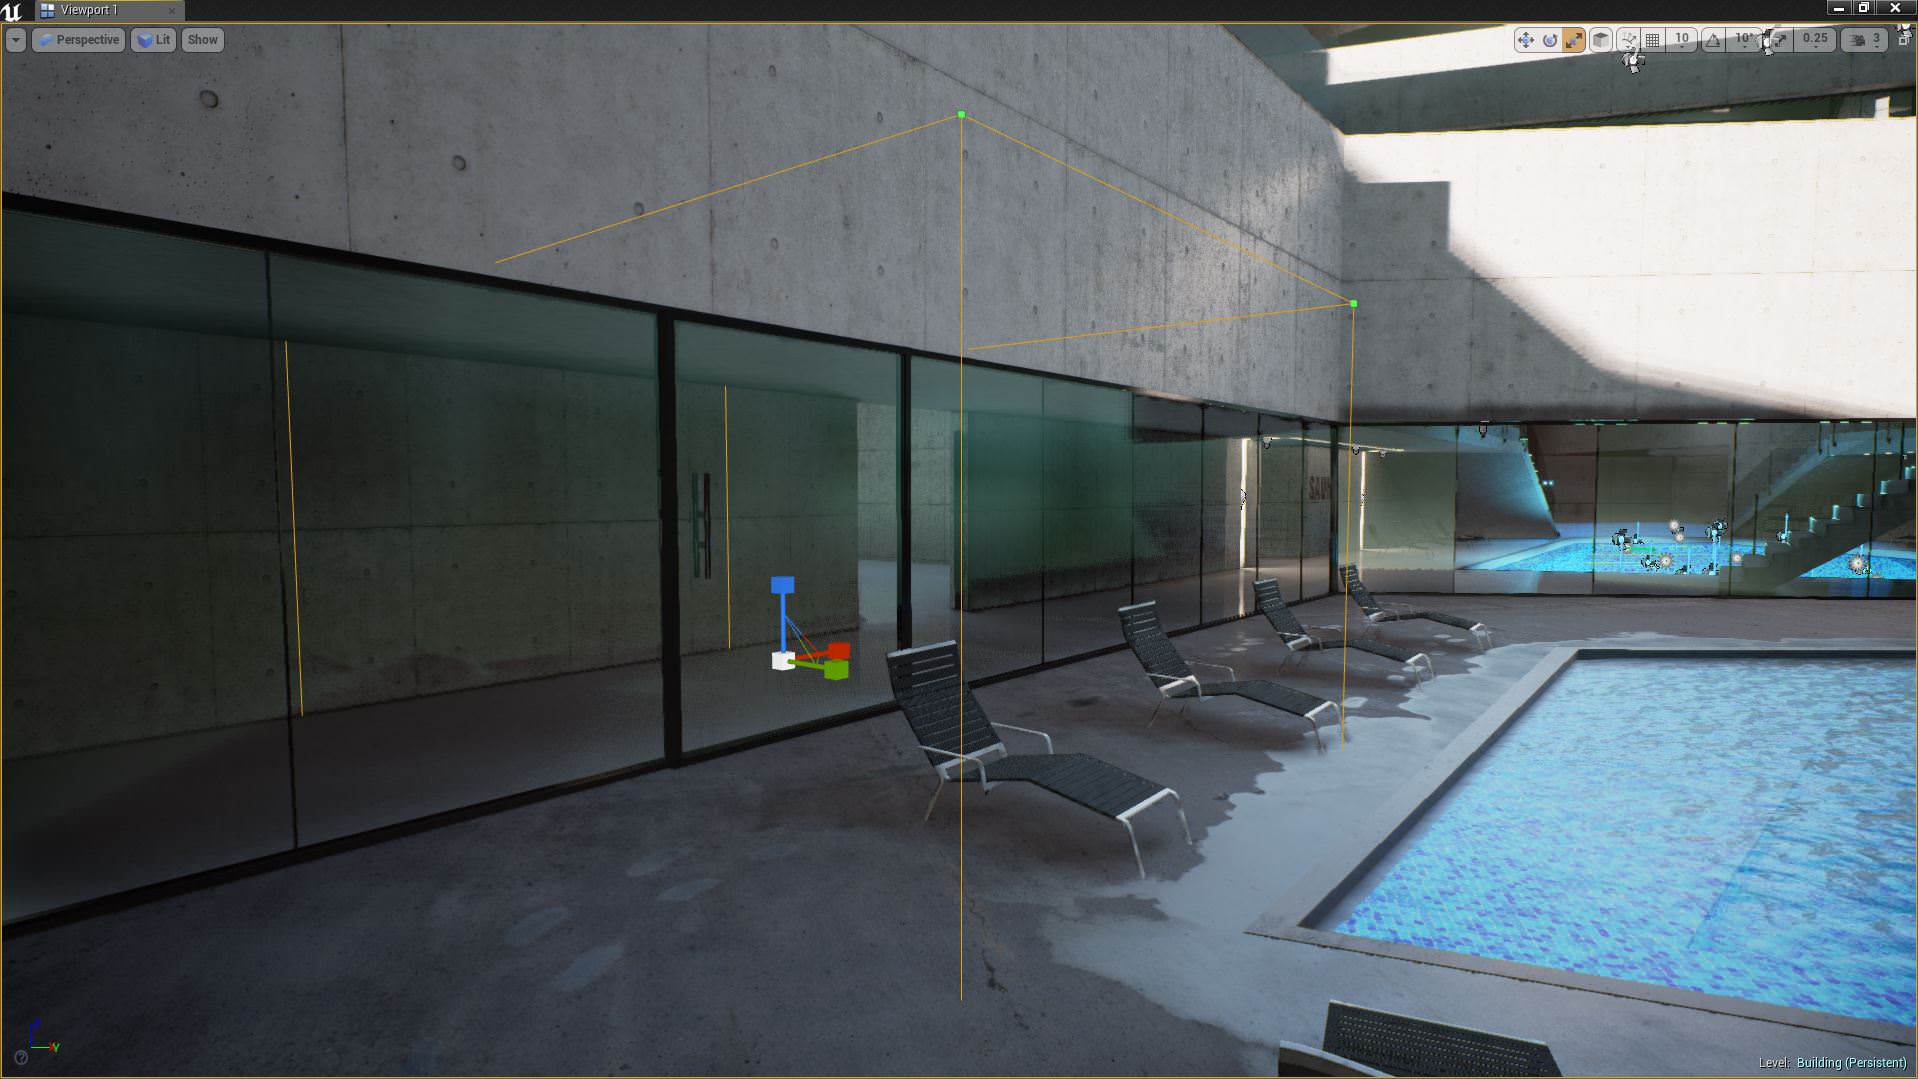
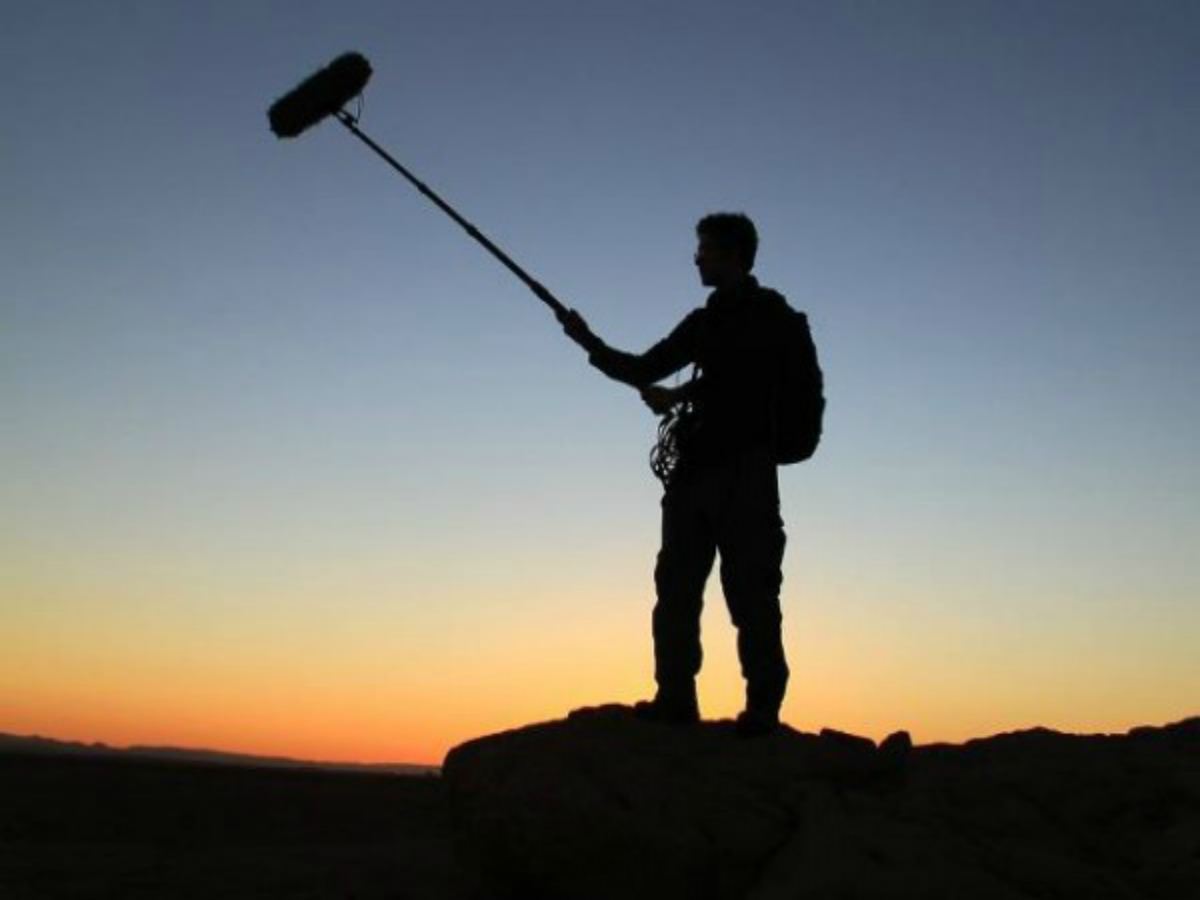
Unreal Engine Cameras

picture of an old camera in a tripod with a retro effect
Matinee Editor
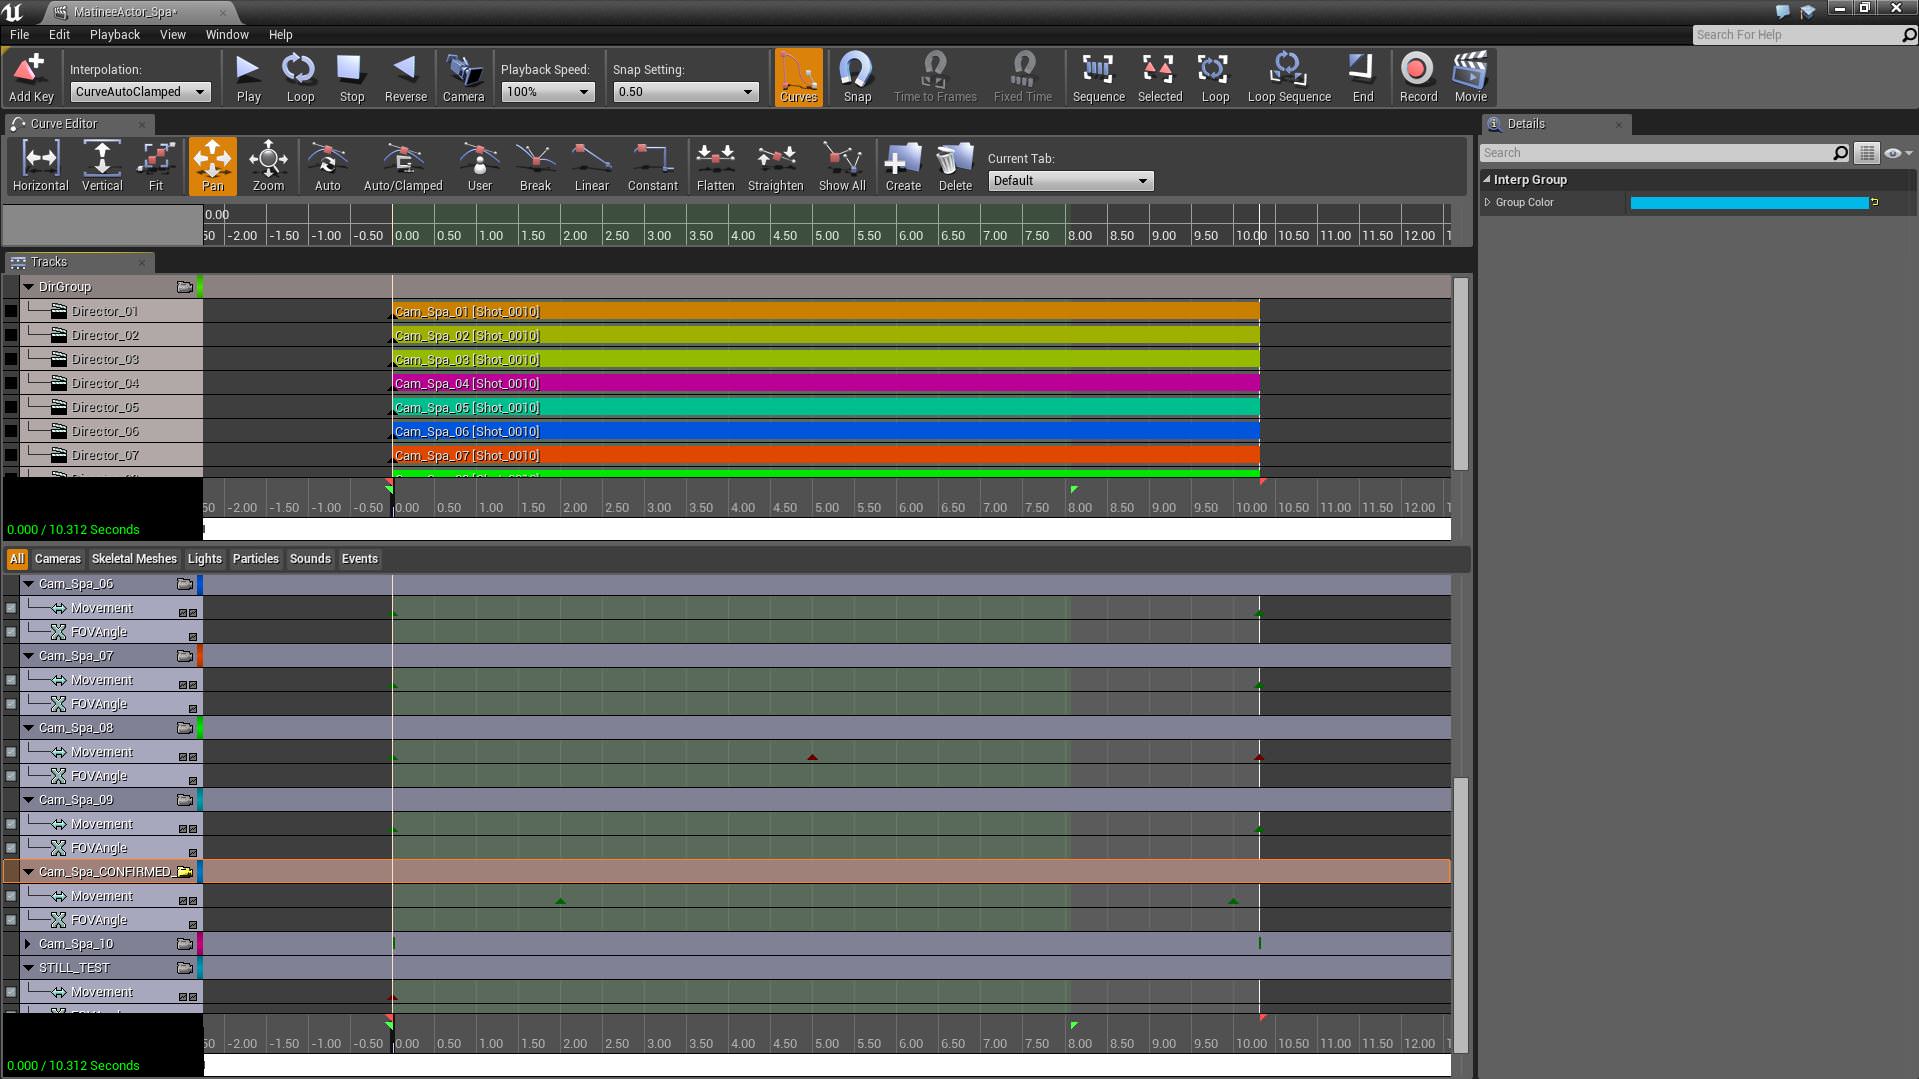
When working with cameras you might think the first thing you would do is drag a camera into the scene. It actually works much better creating the camera through the matinee, which is a Unreal’s timeline feature. You can edit inside here too but unless you’re creating cut sequences or introductions to a real-time file then I wouldn’t bother doing anything too complex as it’s not easy to use for actual editing.
When you create a camera track within the matinee, it automatically creates a camera from your viewpoint within Unreal. If you click the camera button just next to the track then it will turn yellow, indicating that you are inside the camera. It will also place a keyframe where the camera was created which you can delete, move the camera exactly in position and then create a new keyframe as desired. You can then move the camera to where you want it to finish and create another keyframe. You can edit the curve, length, bezier type and so on as you would expect to do most basic camera moves.
You can play the camera move in real-time. Once you are happy with it you have to link it to a director track. We created a director track for each camera and then switched them one at a time to export them which I’ll come onto in a minute.
One important thing to note is that when you want to play or export a camera, don’t create your animation from frame 0 as Unreal will need a few moments to load the scene. We put a 6-20 second buffer before all cameras to allow our extensive landscape to load once the engine runs. More on this later.
Camera Settings

Once you have created a camera within matinee, a camera gizmo will appear and as long as you are not inside the camera you will be able to see it and select it, editing it’s properties. The properties will look familiar as they are the same as the post process volume properties. A few additional camera specific ones exist like field of view and crop format. You can grade and add effects like boom, depth of field and motion blur. We graded the scenes with overall post process volumes and then tweaked the settings further within individual cameras.
If you are not inside the camera it will display its view once you click on it in a little window at the bottom.
Exporting a Sequence
Exporting a sequence is a little more complicated than you might imagine.
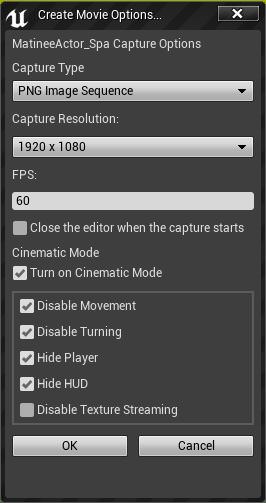
You have to remember that this is a game engine and behaves as such. To export a sequence you have to first select the matinee which the camera is within which you wish to export, go to it’s own object properties, and select play on level load. Then within the matinee, with the director track checked, with the attached camera, click movie. The create movie options dialogue box opens and you can select the format, size and fps.
Once you hit OK a new .EXE file of the same scene will load and the camera will play out, saving the images within the project’s root directory. You will need to copy these images into it’s own folder before exporting another camera. Once the camera move is complete you will need to close the .EXE otherwise it will keep capturing the scene for eternity. Maybe there is a way to close the file after the camera has stopped but we haven’t figured that out yet. Unreal Engine is essentially capturing the screen in play mode and saving the pictures within it’s game engine. Rather than rendering it within the editor, which you might expect. I think this process should and will change in the next release or two.
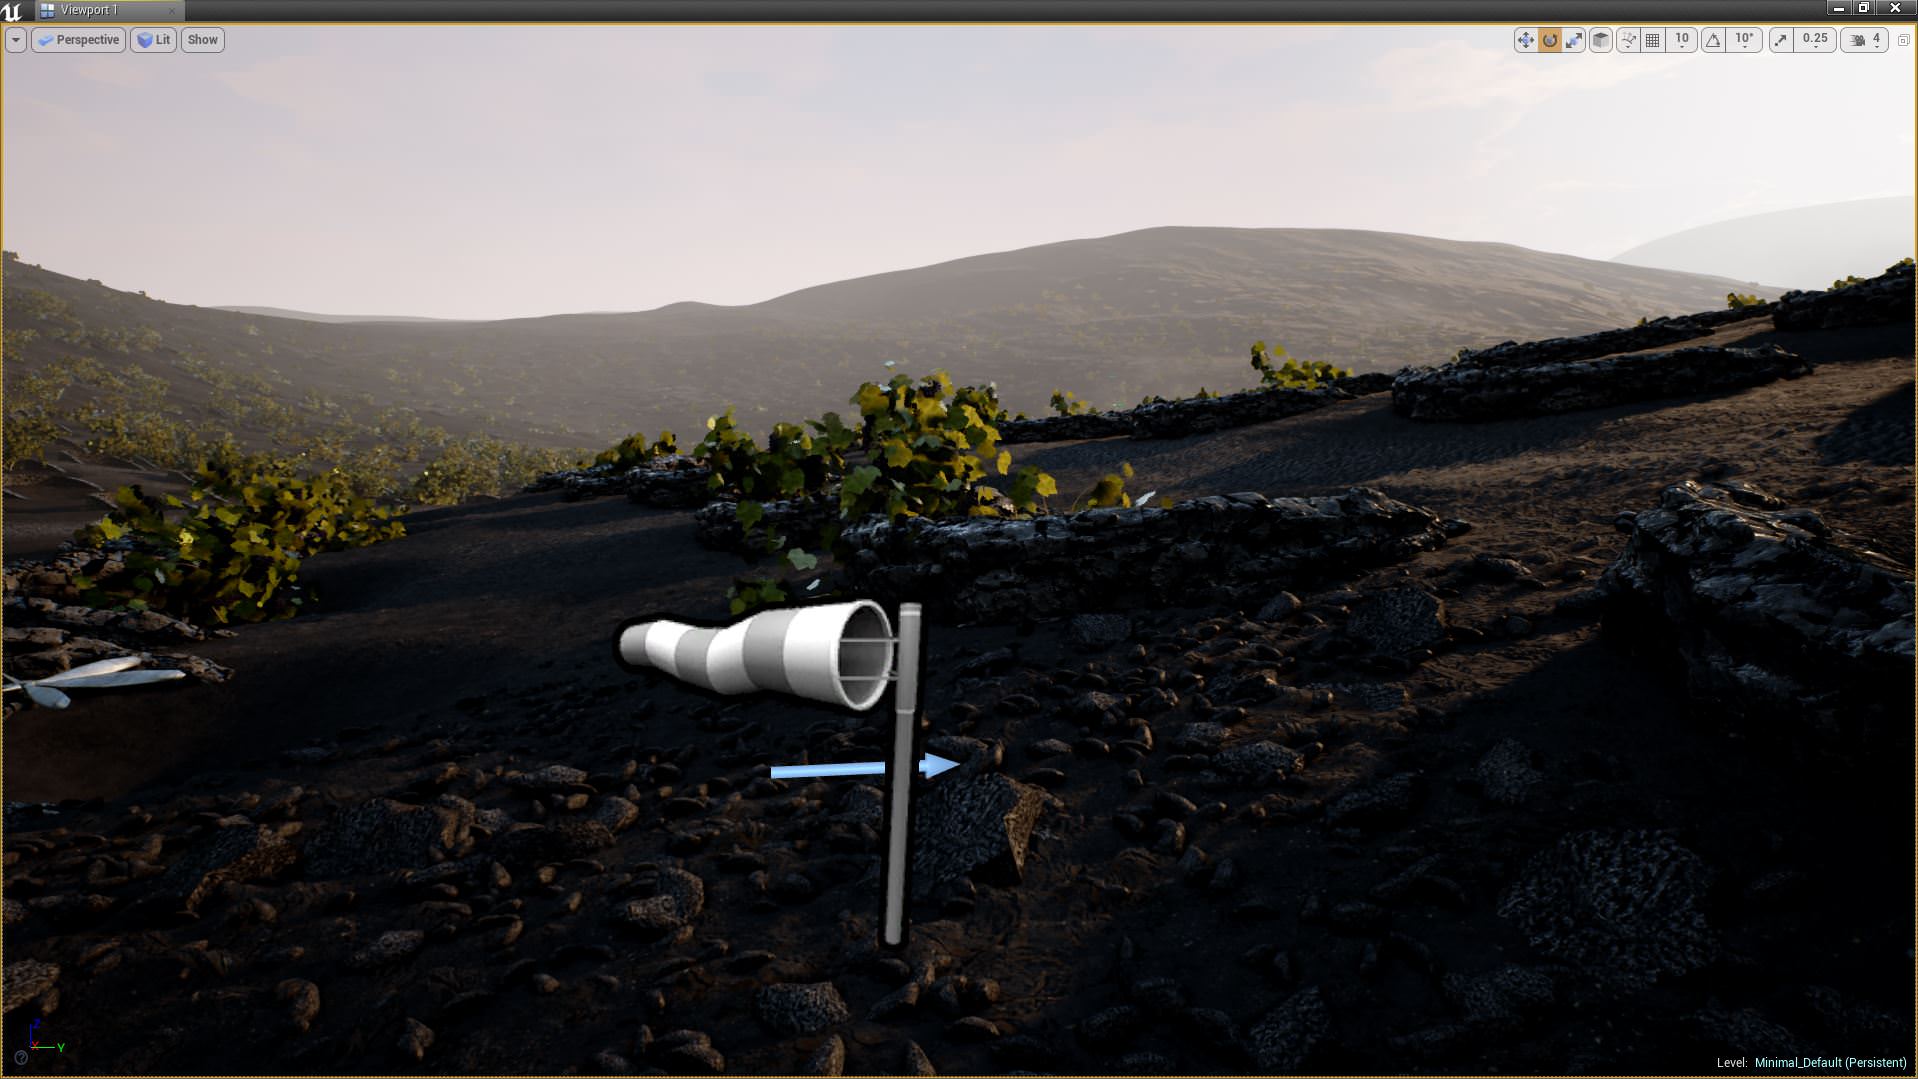
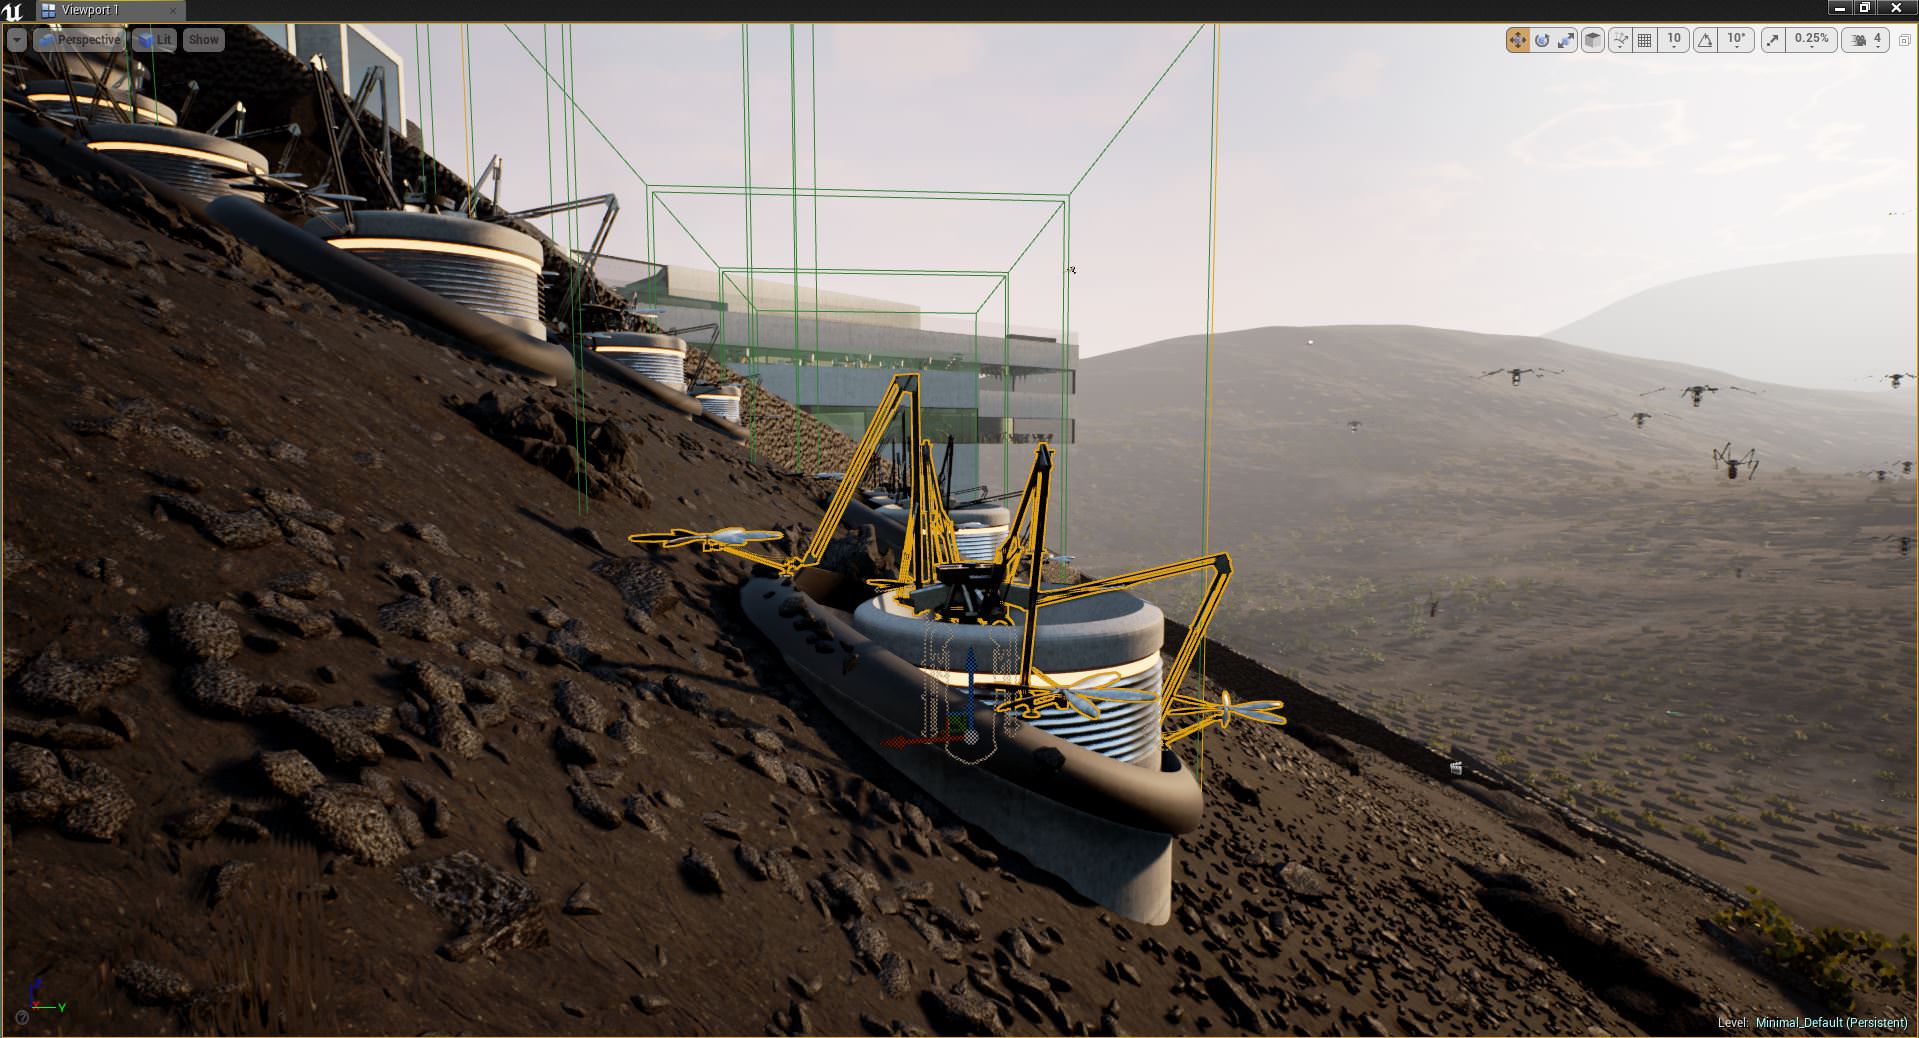
Drone Harvesting

Drone Concept & Design
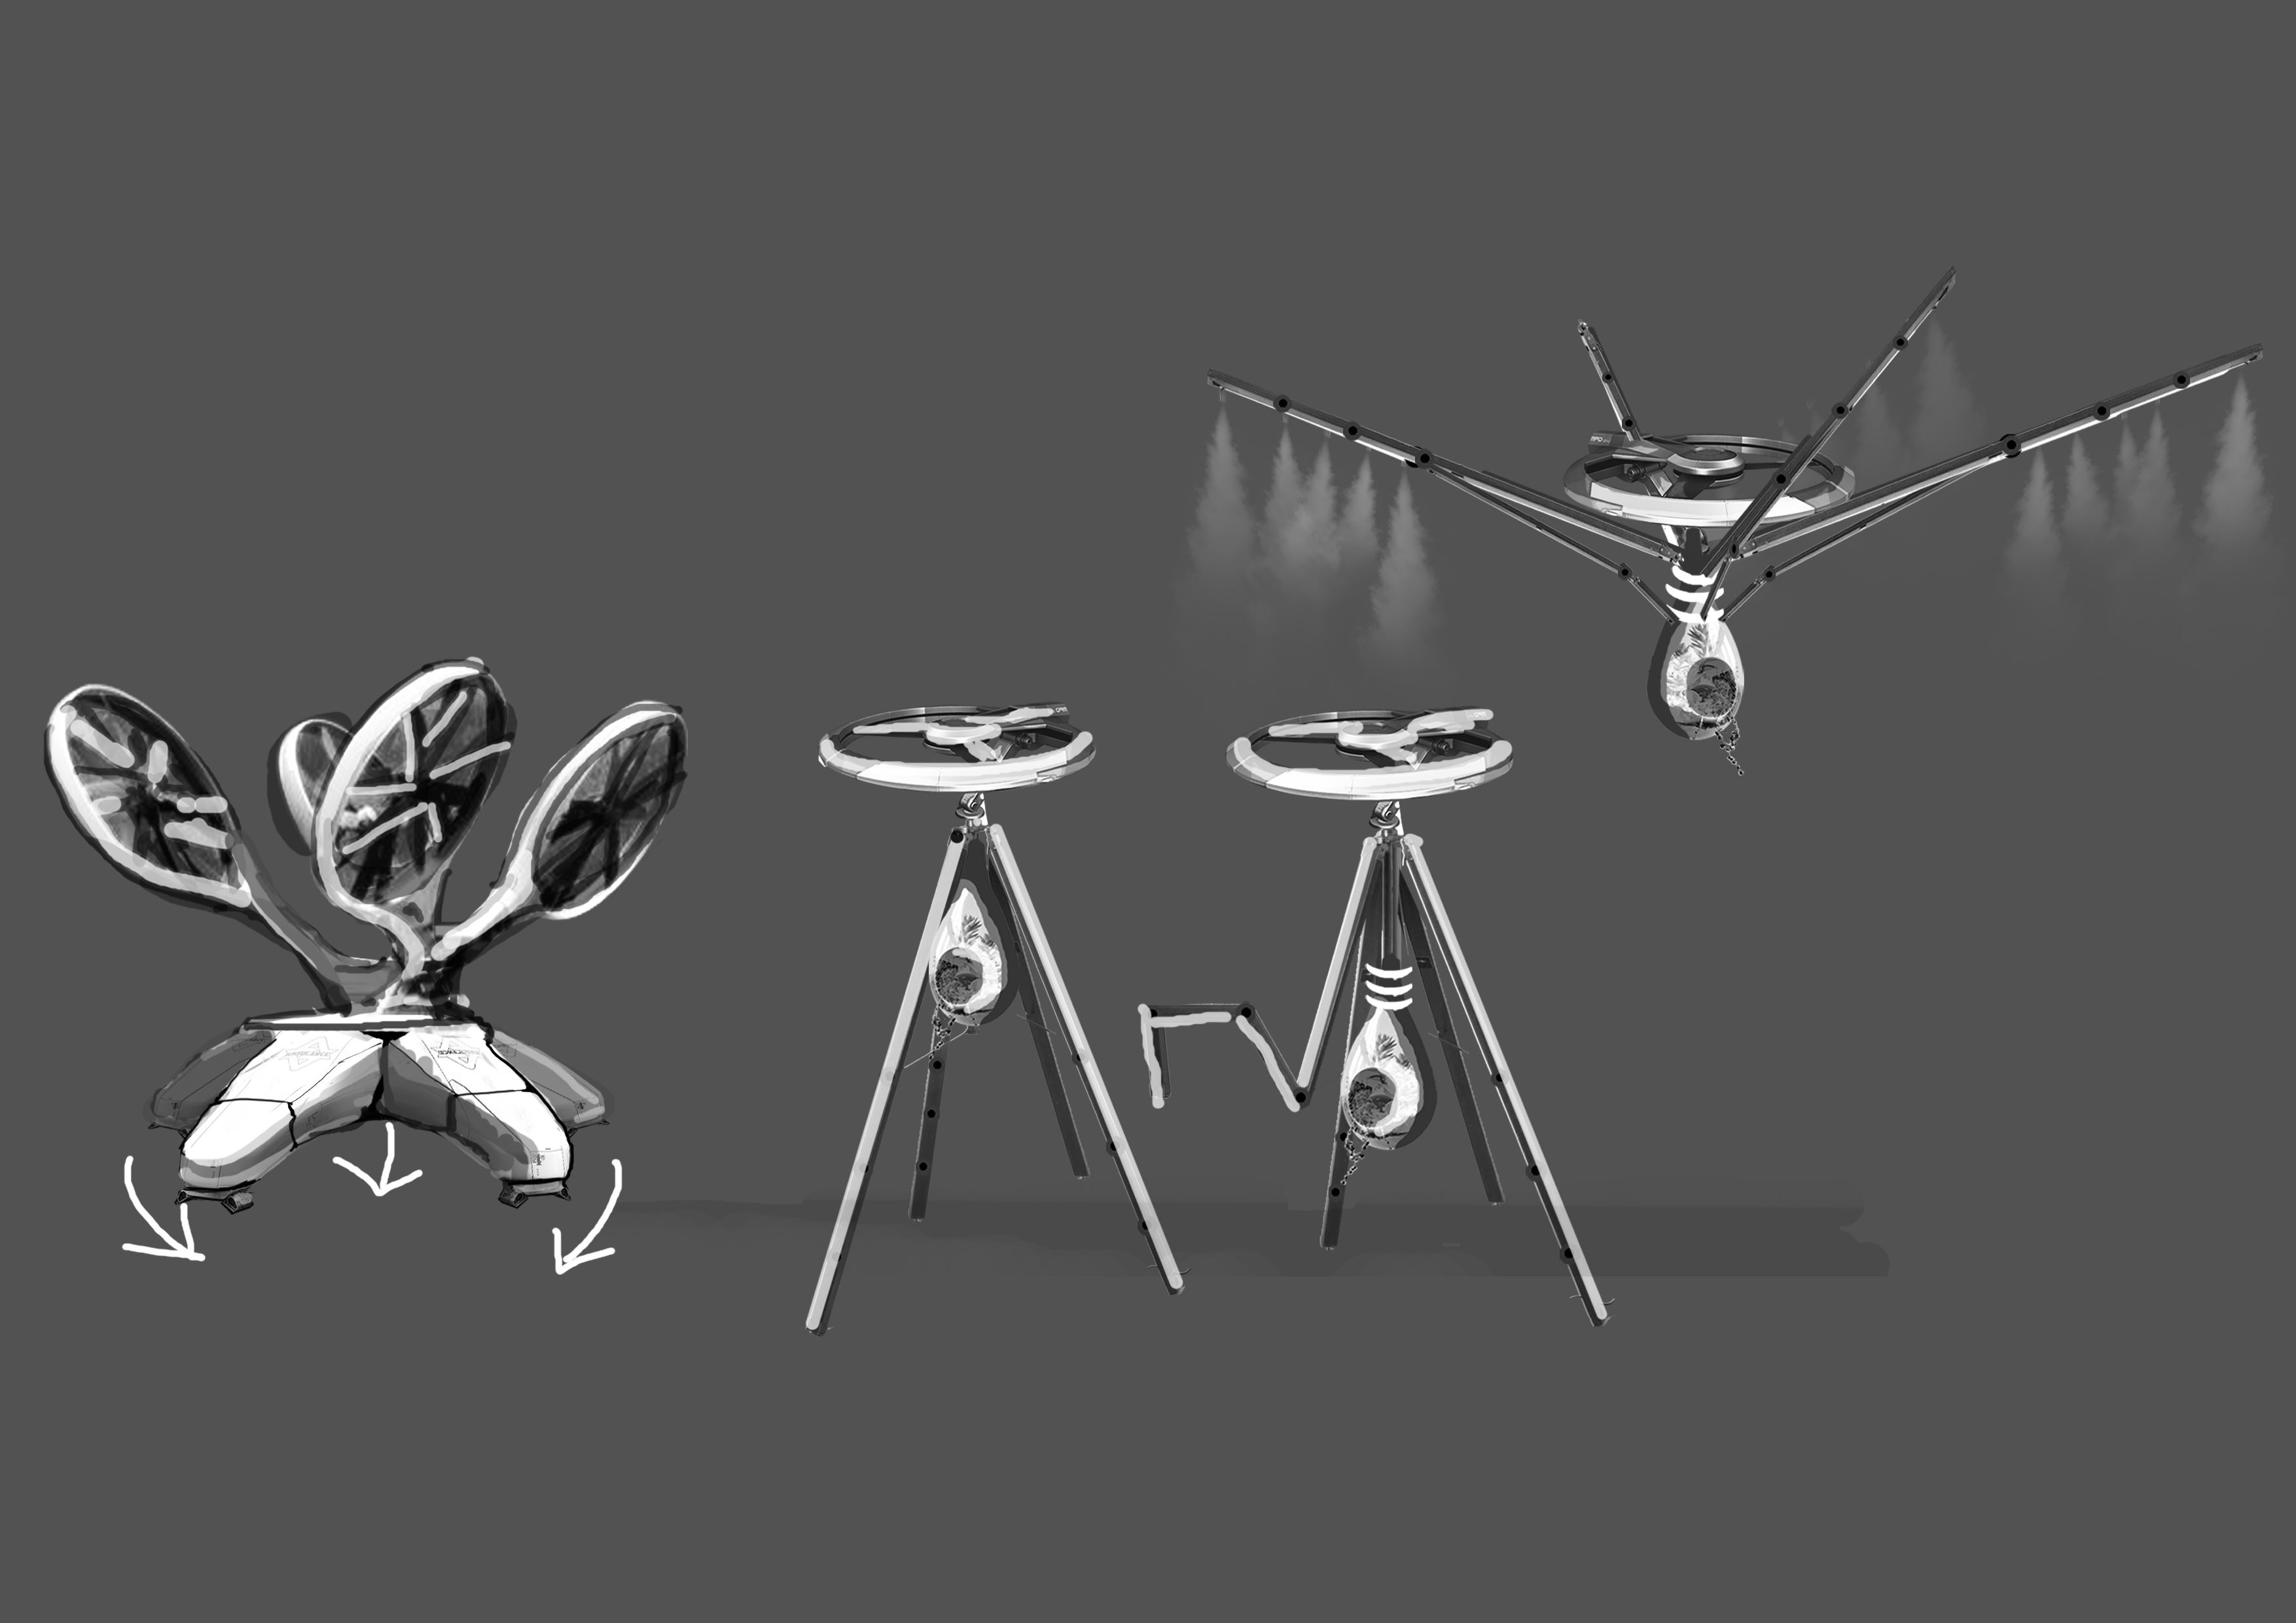
The design of the drones came quite quickly. Our internal brief was that they had to be design with today’s technology in mind, be lightweight, and incorporate an interesting harvesting strategy. Our design combines mechanics found in tripods, hinges desk lamps and hoovers.
Before rigging we would manually place the concept model in certain positions to illustrate how it would hover, land, and lower itself into the vine bushes.
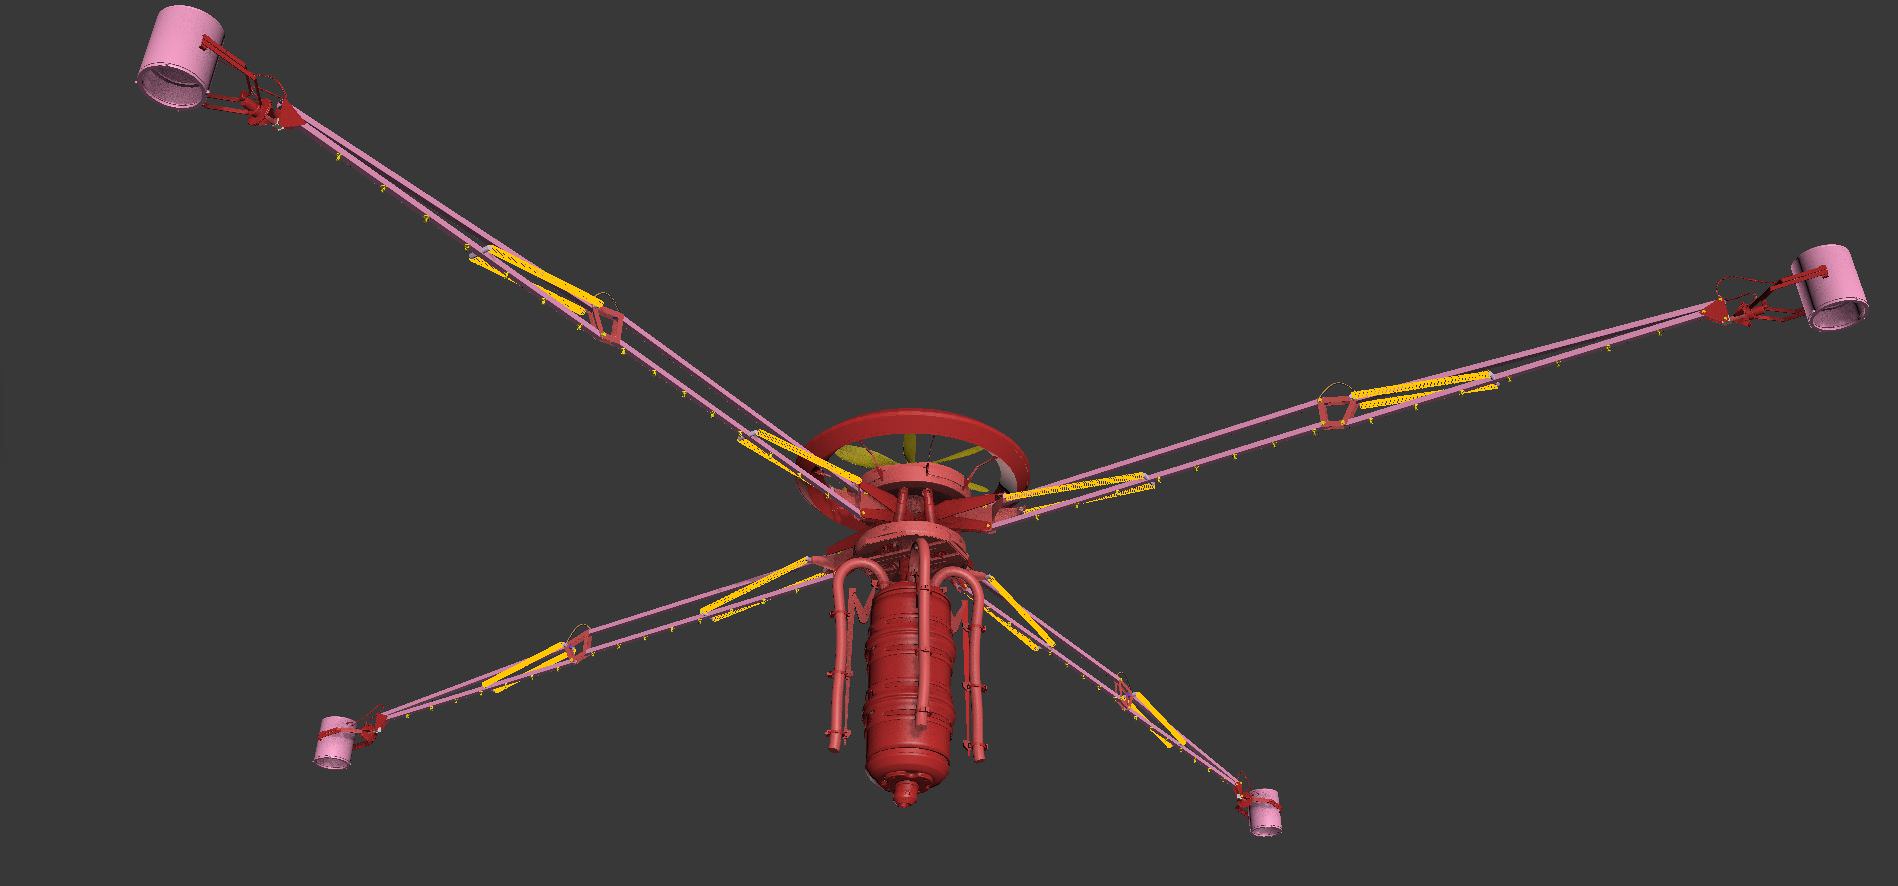
Drone Animation & Unreal Engine Import
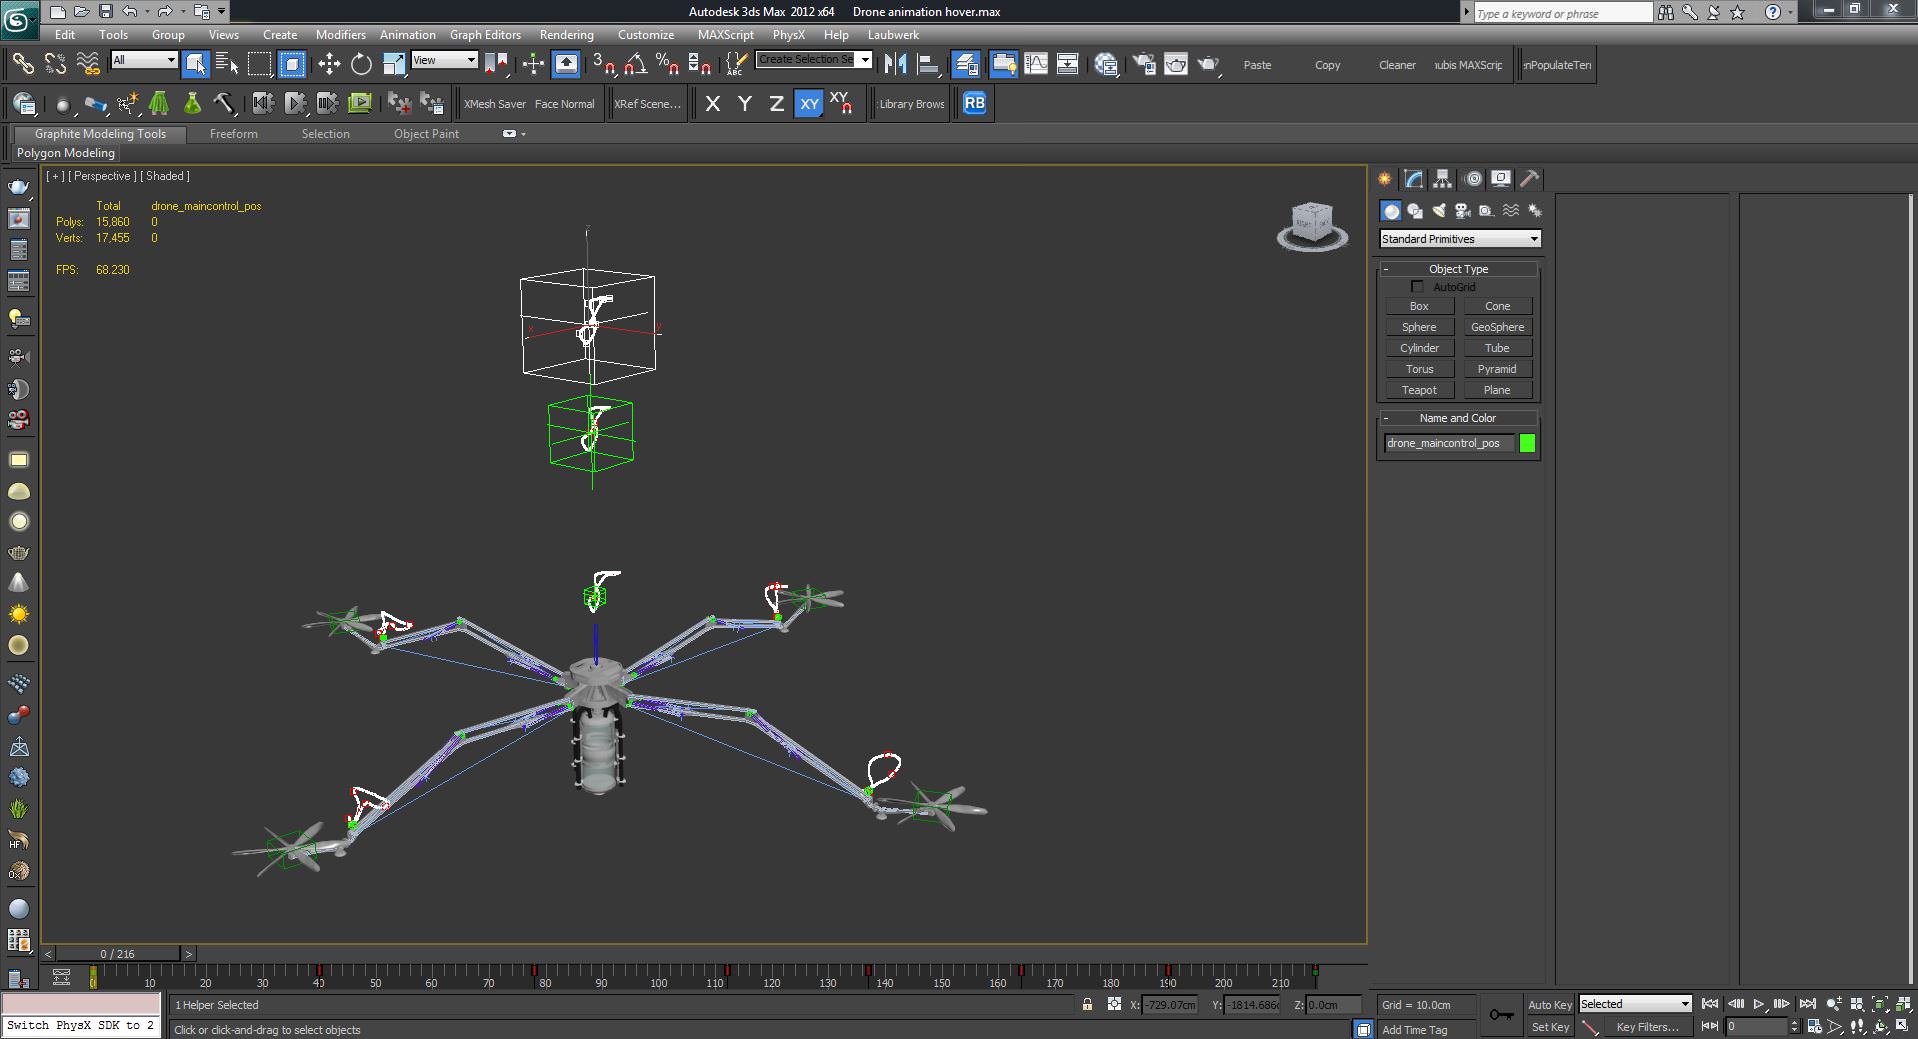
The drones are animated with a relatively simple rigging system. There are four dummies for the fans, four IK solvers controlling the arms, a dummy for the body position, one for the rotation and one for the absolute position. Once the model is animated a script is used to bake it into the geometry. Finally all the pieces are grouped and exported. We created three different animations of the drones, leaving the docks, hovering in the air landing on a tree.

The drones are imported as skeletal meshes. It’s important to import the animation length as animated time.
Blueprints
Drone Blueprints
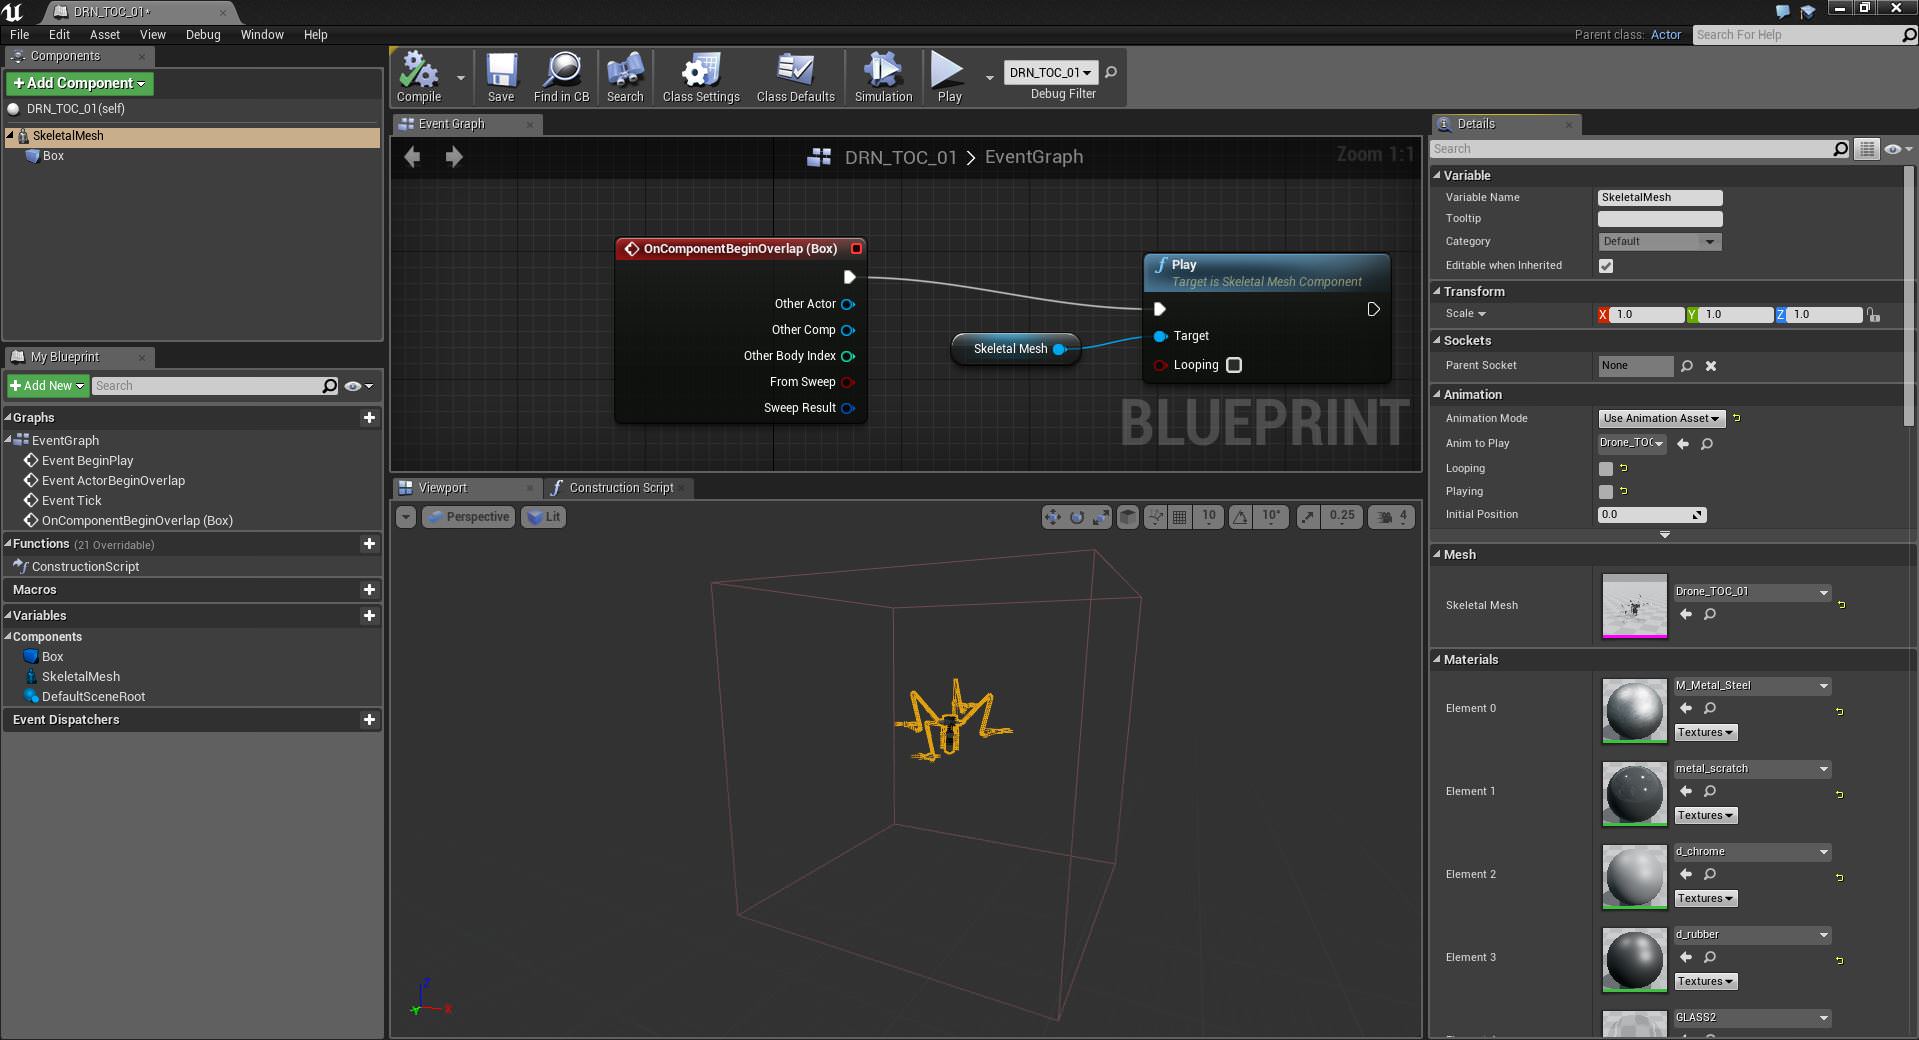
The Blueprints are a visual scripting system based on the concept of using a node-based interface to create new types of Actors and script level events from within Unreal Engine Editor. The most common Blueprint types you will be working with are Level Blueprints and Blueprint Classes. Different types of Blueprint Editor are available depending on the type of Blueprint you are working with. The core feature of most Blueprint Editors is the Graph mode, with its central Graph tab for laying out the network of your Blueprint.
The drones are placed in the scene as Blueprints Actors. Once the skeletal mesh is imported in the Blueprint, in the Animation section it’s possible to associate it with its own animation and untick Looping and Playing. If we were not doing it the animation would start as soon as the level is loaded. Instead we want it to be triggered by the proximity to the viewer. This is achieved surrounding the drone with a collision box. When the player overlaps with the box the animation starts.
Door Blueprints

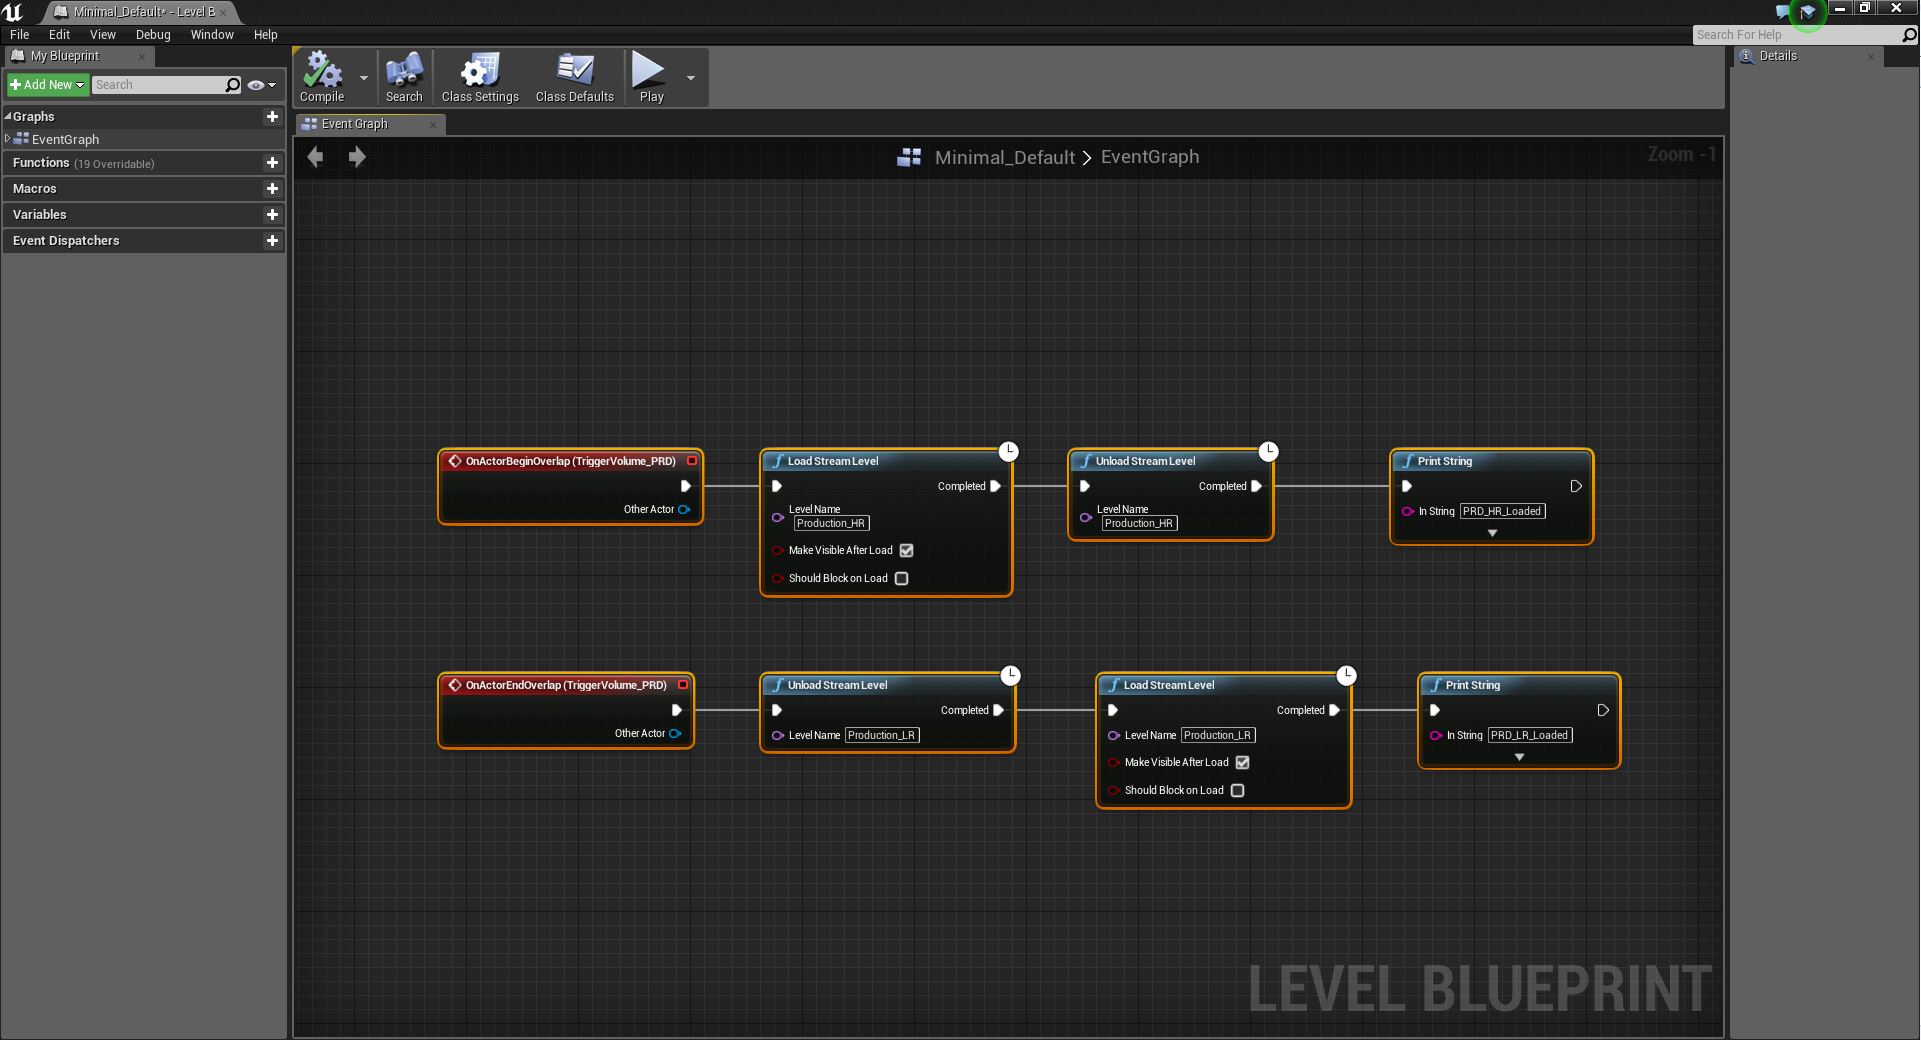
As for the drones, the doors are animated in 3dsMax. Once imported in UE4, a Matinee actor is created and a skeletal group added. The animation is then loaded into the Animation Track. The Matinee is referenced in the Level blueprint and triggered by a Trigger Volume.
Lights Blueprints
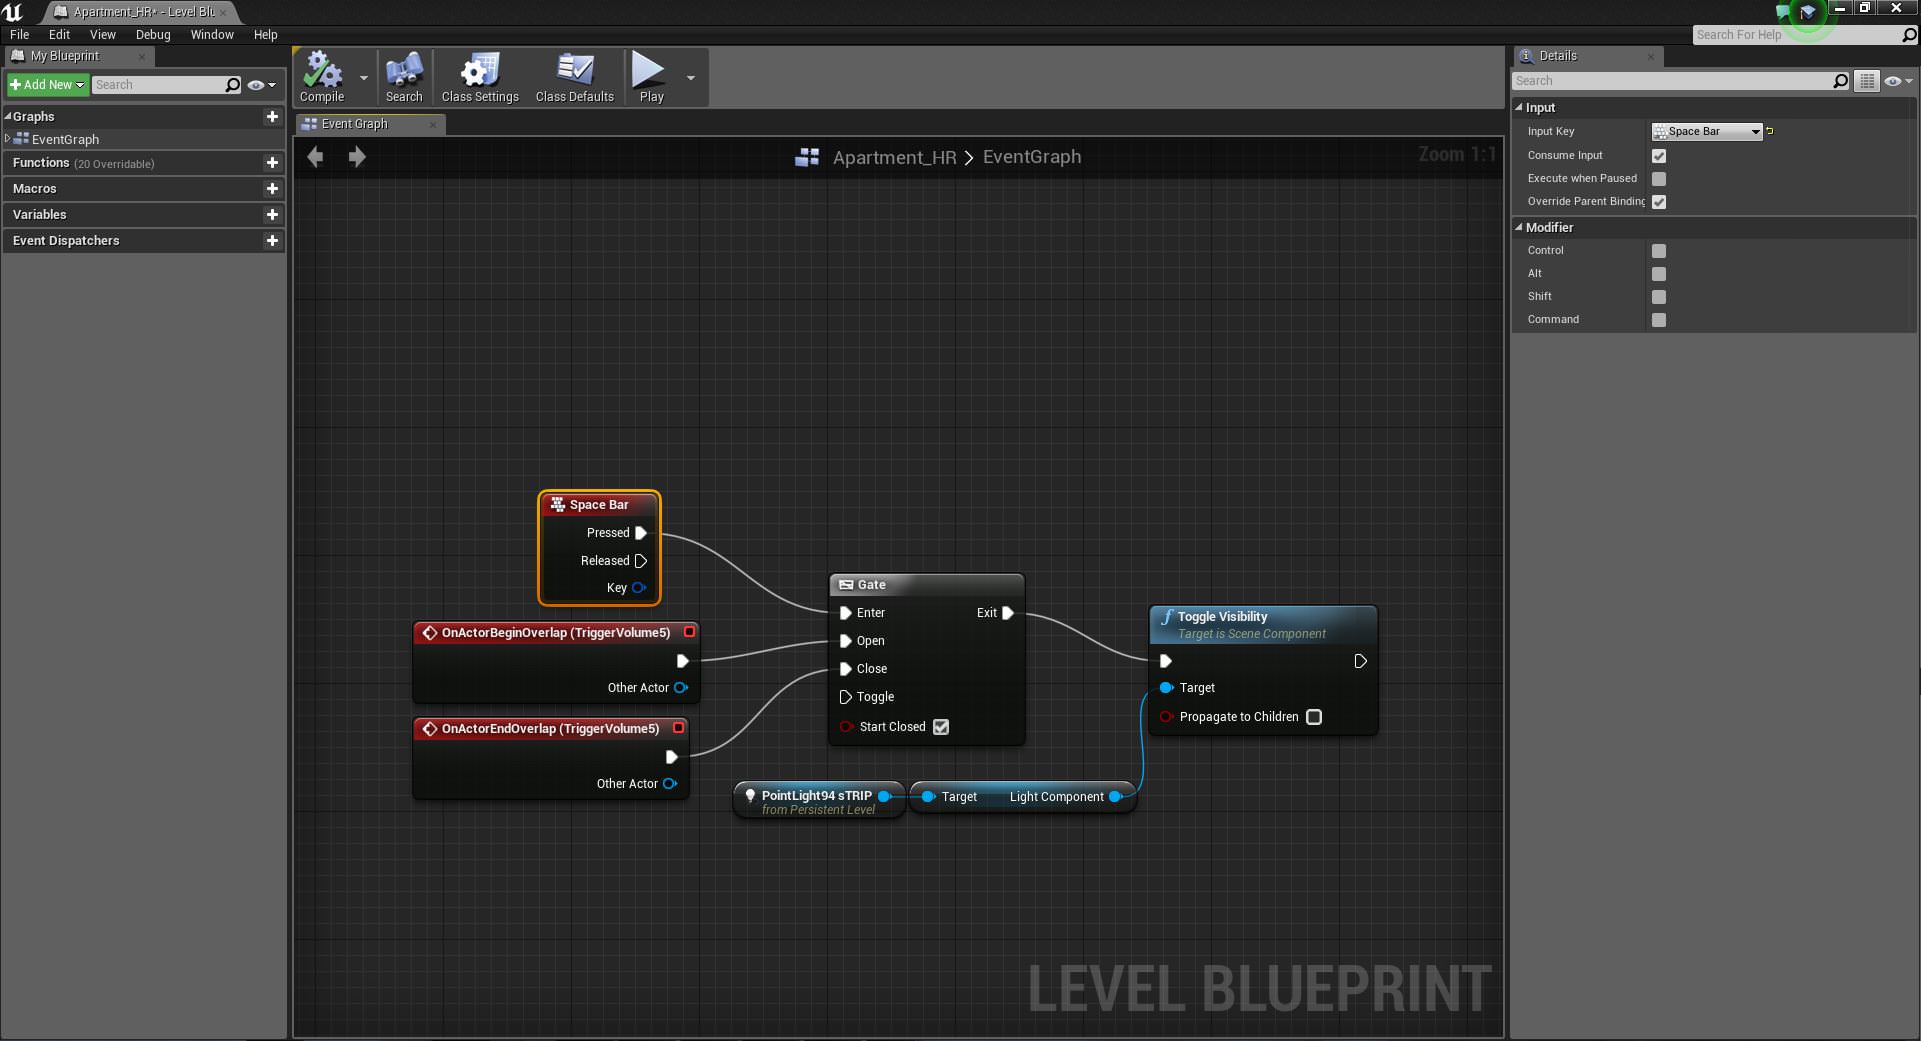
We set simple blueprint triggers to switch on and off some of the interior lights. This is achieved by toggling their visibility pressing the spacebar and works only when inside a trigger volume surrounding them.

Packaging
Level Loading
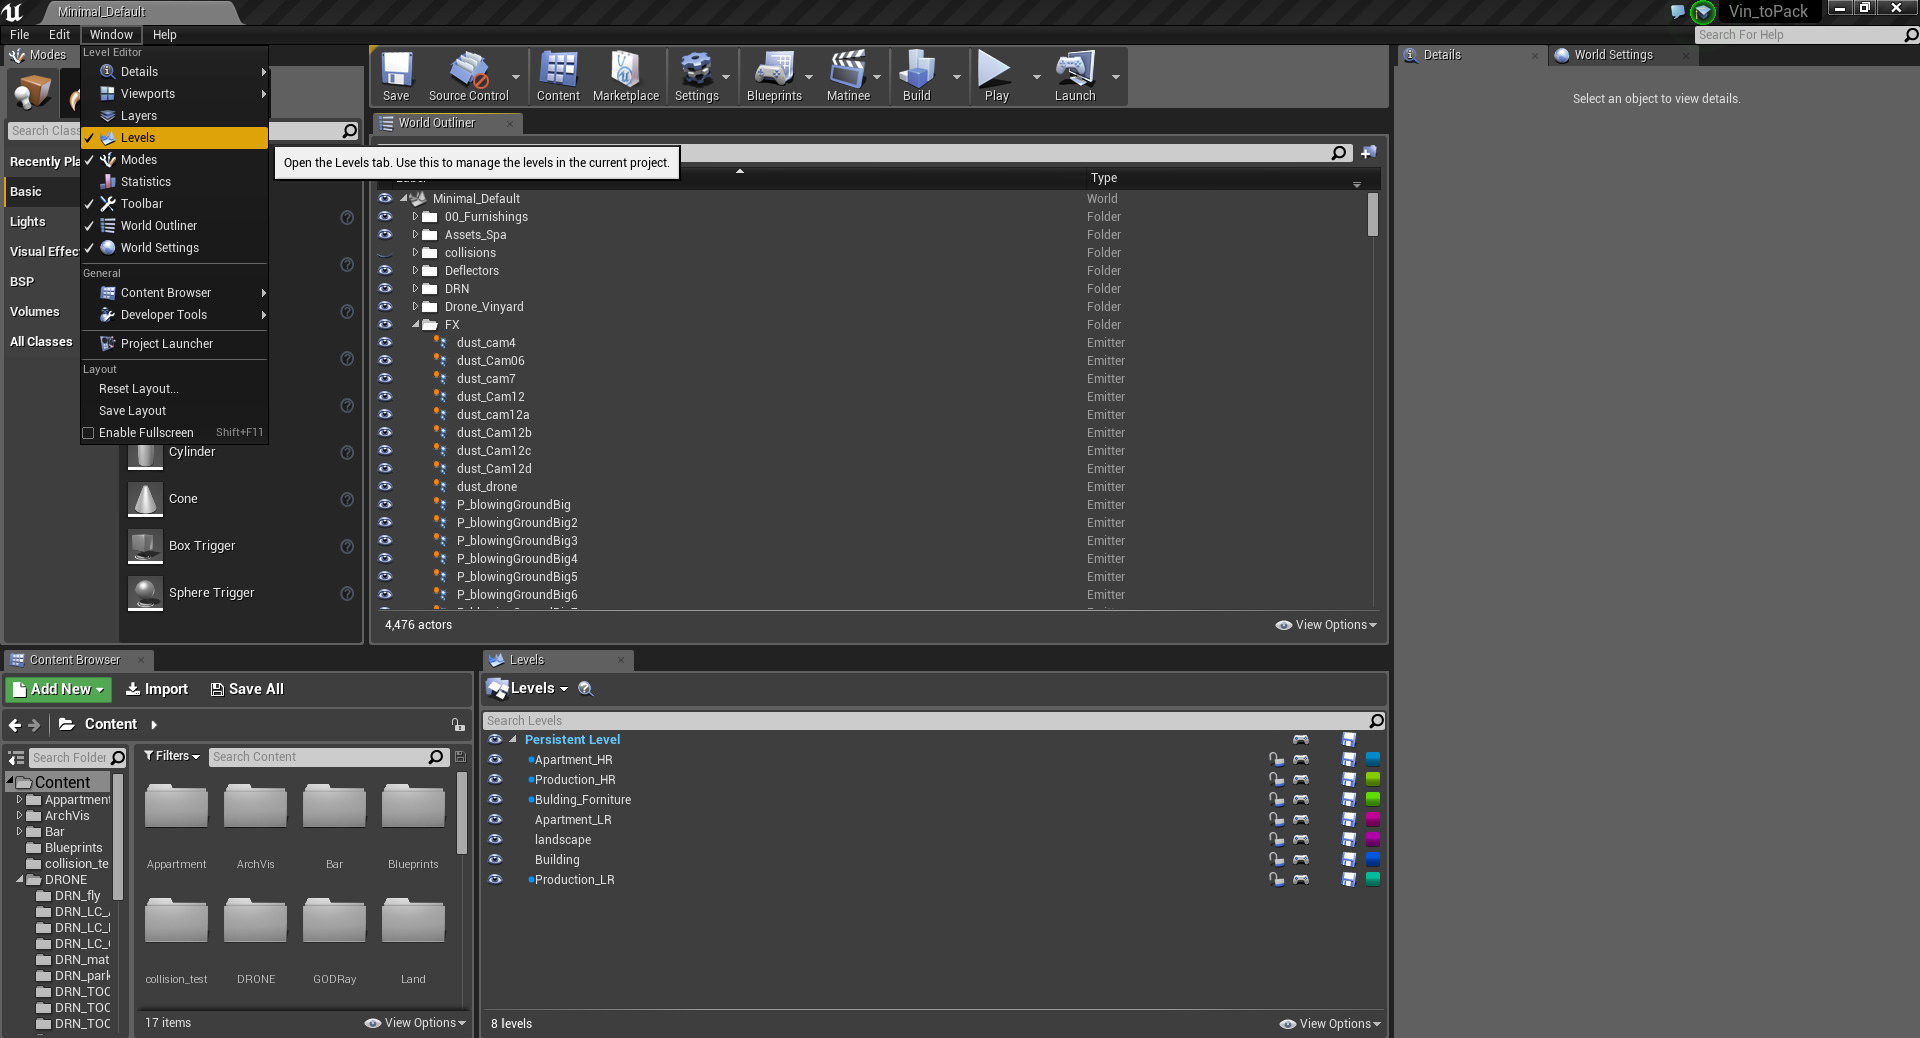
It’s good to organize all of your key spaces or buildings in their own folders. This will make it very easy either at the beginning or later in the process of separating the scene out into levels. You then have the ability to load different versions of those levels in high res or low res.
In theory you can create a more detailed lighting bake for an interior, but when you are outside looking in it’s a different level, with a less intensive bake. It also allows you to work a bit more in teams. Multiple people can open the same file and work on different levels, saving only the level they are working on. Perforce is also used to enable version control and better teamwork. The possibilities of level loading are vast and something the video game industry has been hacking and evolving for decades.
Within Architectural Visualization I see it as a way of controlling lighting and memory usage but we are yet to fully understand the workflow in all situations.
Interface Overview
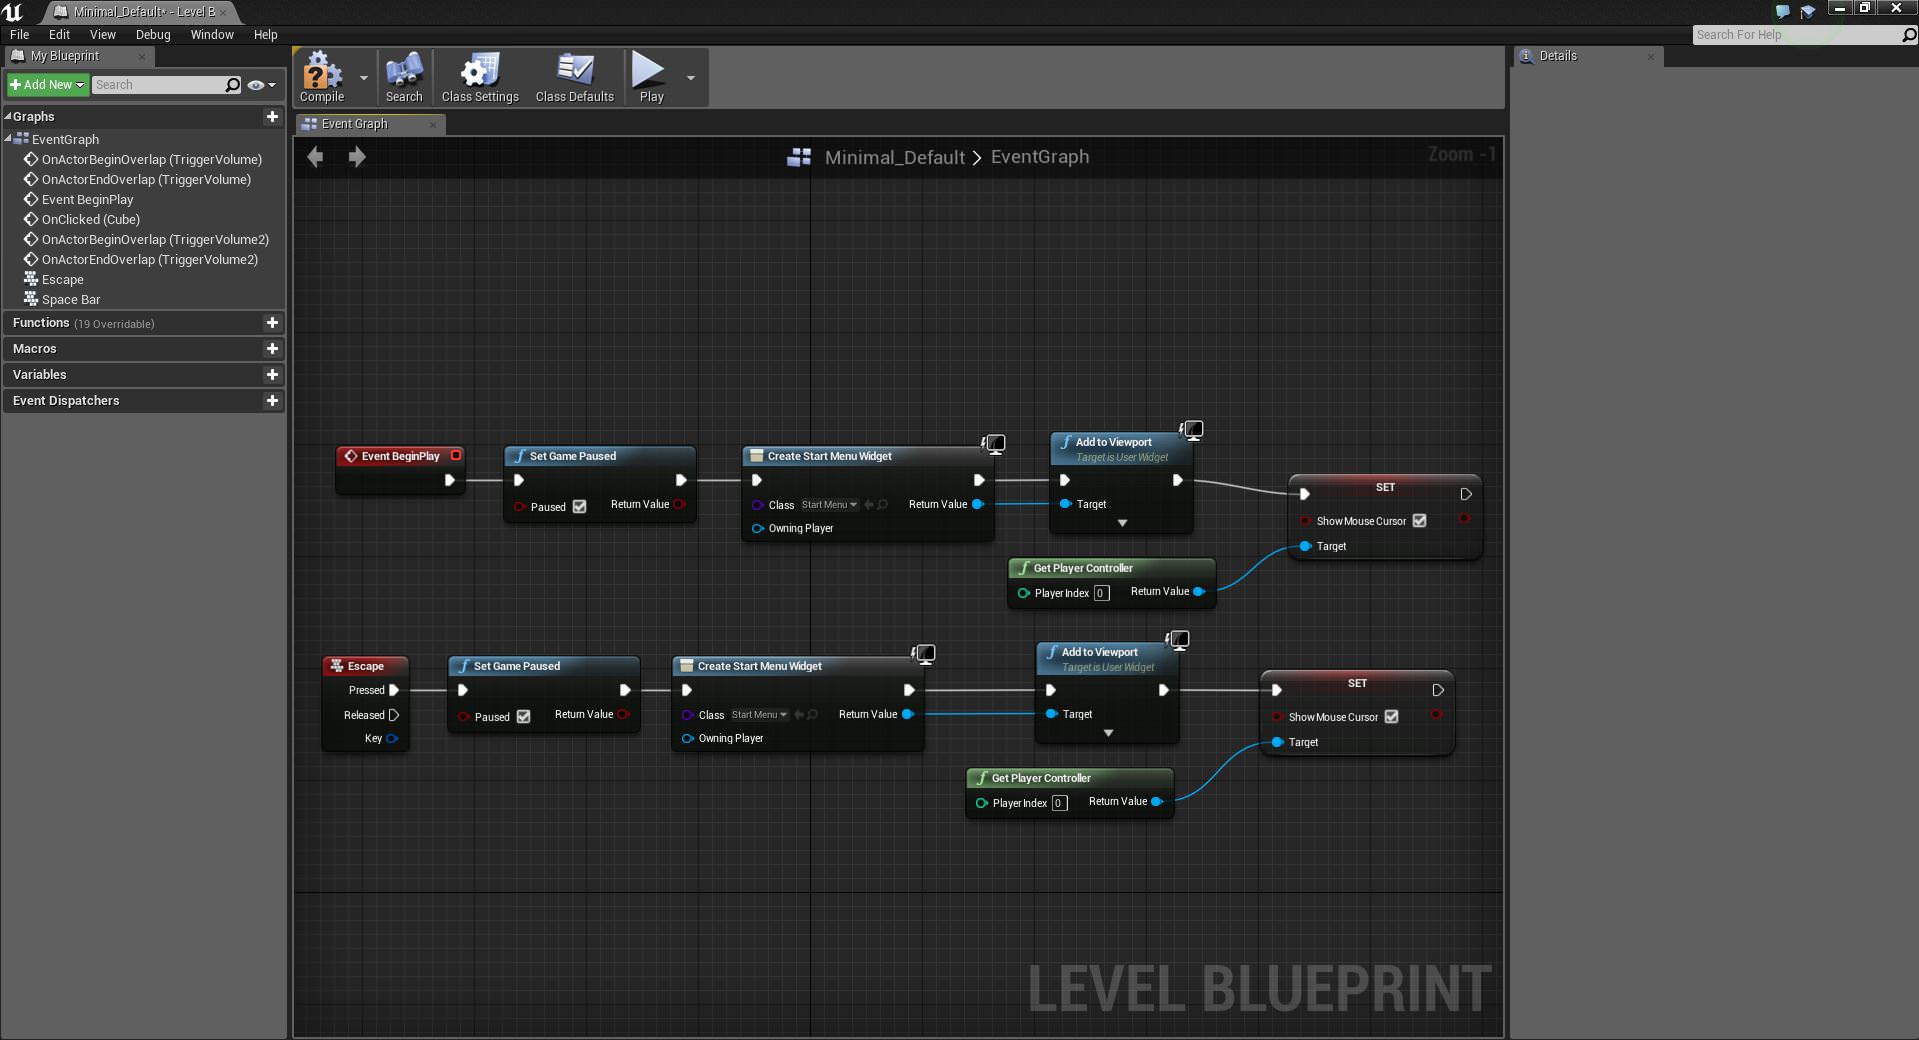
In the level blueprint we added a command to open the Widget that we designed to work as a main menu. Pressing Esc does the same, bringing us back to the Widget menu. We also added the command Set Game Pause, in this way the position of the character is freezed and doesn’t change while the Widget is open.
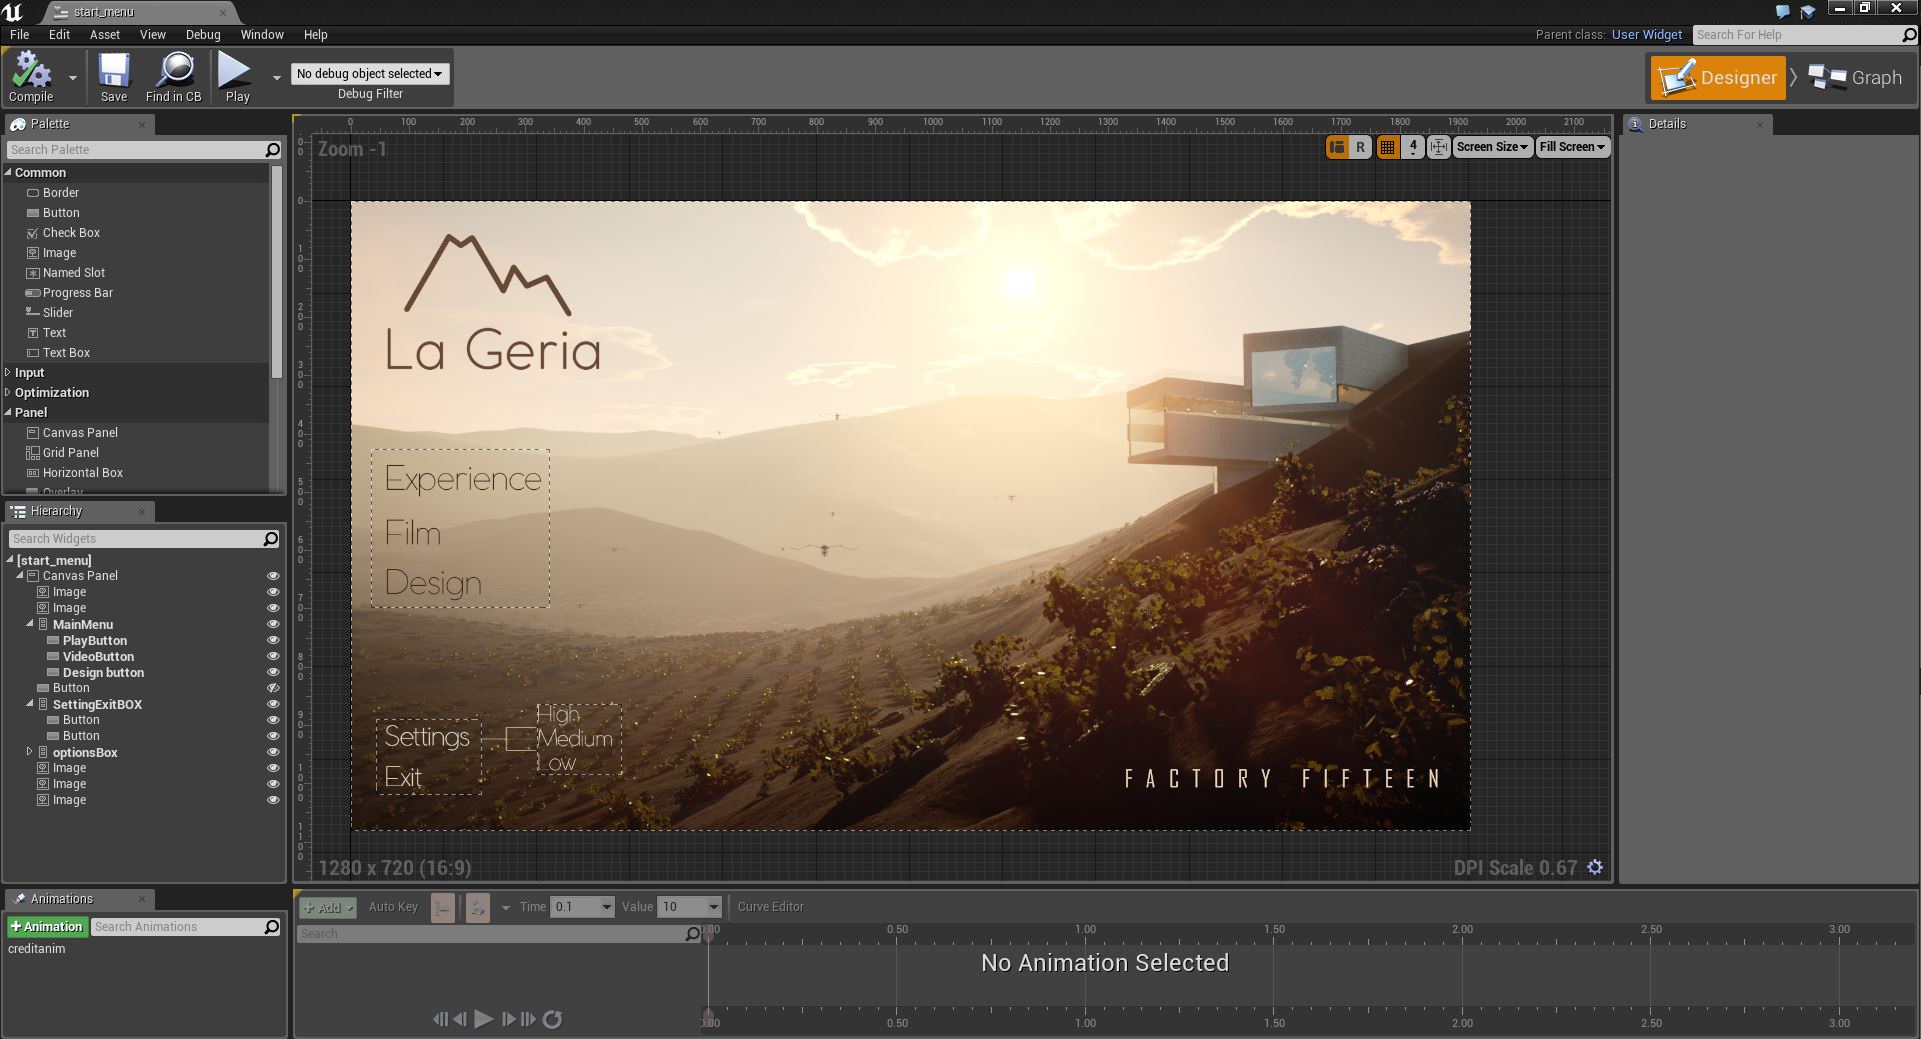
Widgets are a series of functions that can be used to construct an interface. They are the base of Unreal Engine Motion Graphics UI Designer and are split into two tabs :
The Designer tab for the visual layout of the interface (buttons, images, sliders, text, canvas, etc). The Graph tab that works like a Blueprint and allows you to visually script the commands associated with each graphical element.

The starting menu consists of buttons that trigger various events like starting the game and unpausing it, seeing the film, going on another menu that presents the design of the project, changing the settings and exiting.
Packaging
One final thing we did before exporting was to set the animation to play by default before you hit the menu. What this does is allow the scene valuable time to load everything before you play it. You have the option to skip the film and go to the menu so you’re not waiting every-time. Within the config settings we also set it to open in full screen.

Finally we can export it to run on windows 64 bit.
Film & Sound
The most powerful aspect of Unreal Engine for us, as filmmakers, was the ability to have a working edit that was much more than a previs. From the moment we had something that looks ok lighting wise inside UE4 we set up views and exported test sequences. Instead of rendering only a few seconds we would export 10-20 second clips from tons of cameras. It makes the whole process a lot more like actual filming as you are not concerned by render times. We didn’t use the Matinee in Unreal for the edit, we exported individual clips and used Premiere to edit properly.
We had so much material to play with it was great. We had a loose structure as the film was only to be a minute long. We wanted to communicate the unique design and production process our project had and we wanted to flow through the spaces with a kind of rhythm and connection.
There were a few cool transitions that came naturally. The first was the exterior to interior moment where we pass through the ground, showing the connection of the drones to the production facility. The second was using the pictures of the building to transition in and out of the apartment.

When we had a very rough structure to the edit we worked with Angus MacRae who developed the music and sound scape. The music and sound design on our projects are always hugely important in setting the tone, atmosphere and feeling behind the piece, so it was important to create something bespoke to our vineyard.
Initially, Angus supplied us with a score which contained an ambiance for the beginning and an original piece of music developed for the building section. We used the beat of this to cut to and then once the direction was agreed Angus worked his magic on the final version. There was a bit of back and forth with the edit but the process was very smooth.
High-Res Stills

To create high-res stills of your scenes in Unreal is a doodle. Just don’t get too greedy with the resolution. Select the top left arrow in your viewer and press High Resolution Screenshot. A new window will appear. The multiplier is basically saying how many times bigger than the current display should I capture.


We had 2.5k screens so capturing X3 was way enough. Obviously the first time you do this you crank it right up to the max, expect an immediate crash when you do this. We exported 7k images in the end. Select Write HDR format visualisation targets to get a 16 bit exr of the image instead of a jpg or 8 bit png. You can render out channels like reflection, refraction and so on but they are pretty rubbish compared to offline renderers and we didnít use them.
It has huge potential though going forward. Rendering a 7k in like 2 seconds, you can’t complain!


End of Part Two
Overall we have really enjoyed the process of working with Unreal Engine and feel that (although a lot needs to be learnt) we have developed an understanding that we can apply not only to archvis projects, offering new services, but also for working in creative real-time and game projects.
Factory Fifteen has always been about creating it’s own IP and we hope in the very near future that we can design and build interactive worlds to tell interesting stories in.
Thanks to Ronen, thanks to Epic Games, thanks to Lasse Rode and the rest of the community for your support.
You can download our packaged ‘La Geria’ HERE
Credits
- Concept / Architectural Design : Paul Nicholls, Matt Townsend
- Unreal R&D : Ares Simone Monzio Compagnoni
- Unreal Production : Ares Simone Monzio Compagnoni, Paul Nicholls
- Drone Design : Prince Yemoth
- Drone Rig / Animation / Blueprint : Alexey Marfin / Ares Simone Monzio Compagnoni
- Music / Score : Angus MacRae


Colossal work!!!!!!!
cool work!!https://goo.gl/O4b1ce
« Maybe there is a way to close the file after the camera has stopped but we haven’t figured that out yet. »
In Level Blueprint, right-click, search for
“Quit Game”, then right-click, search for “Create a Matinee Controller for
MatineeActor” – wire Finished into Quit Game