


Making of LA GERIA – “The Vineyard” TEAM Grand Prize Winner, Part ONE
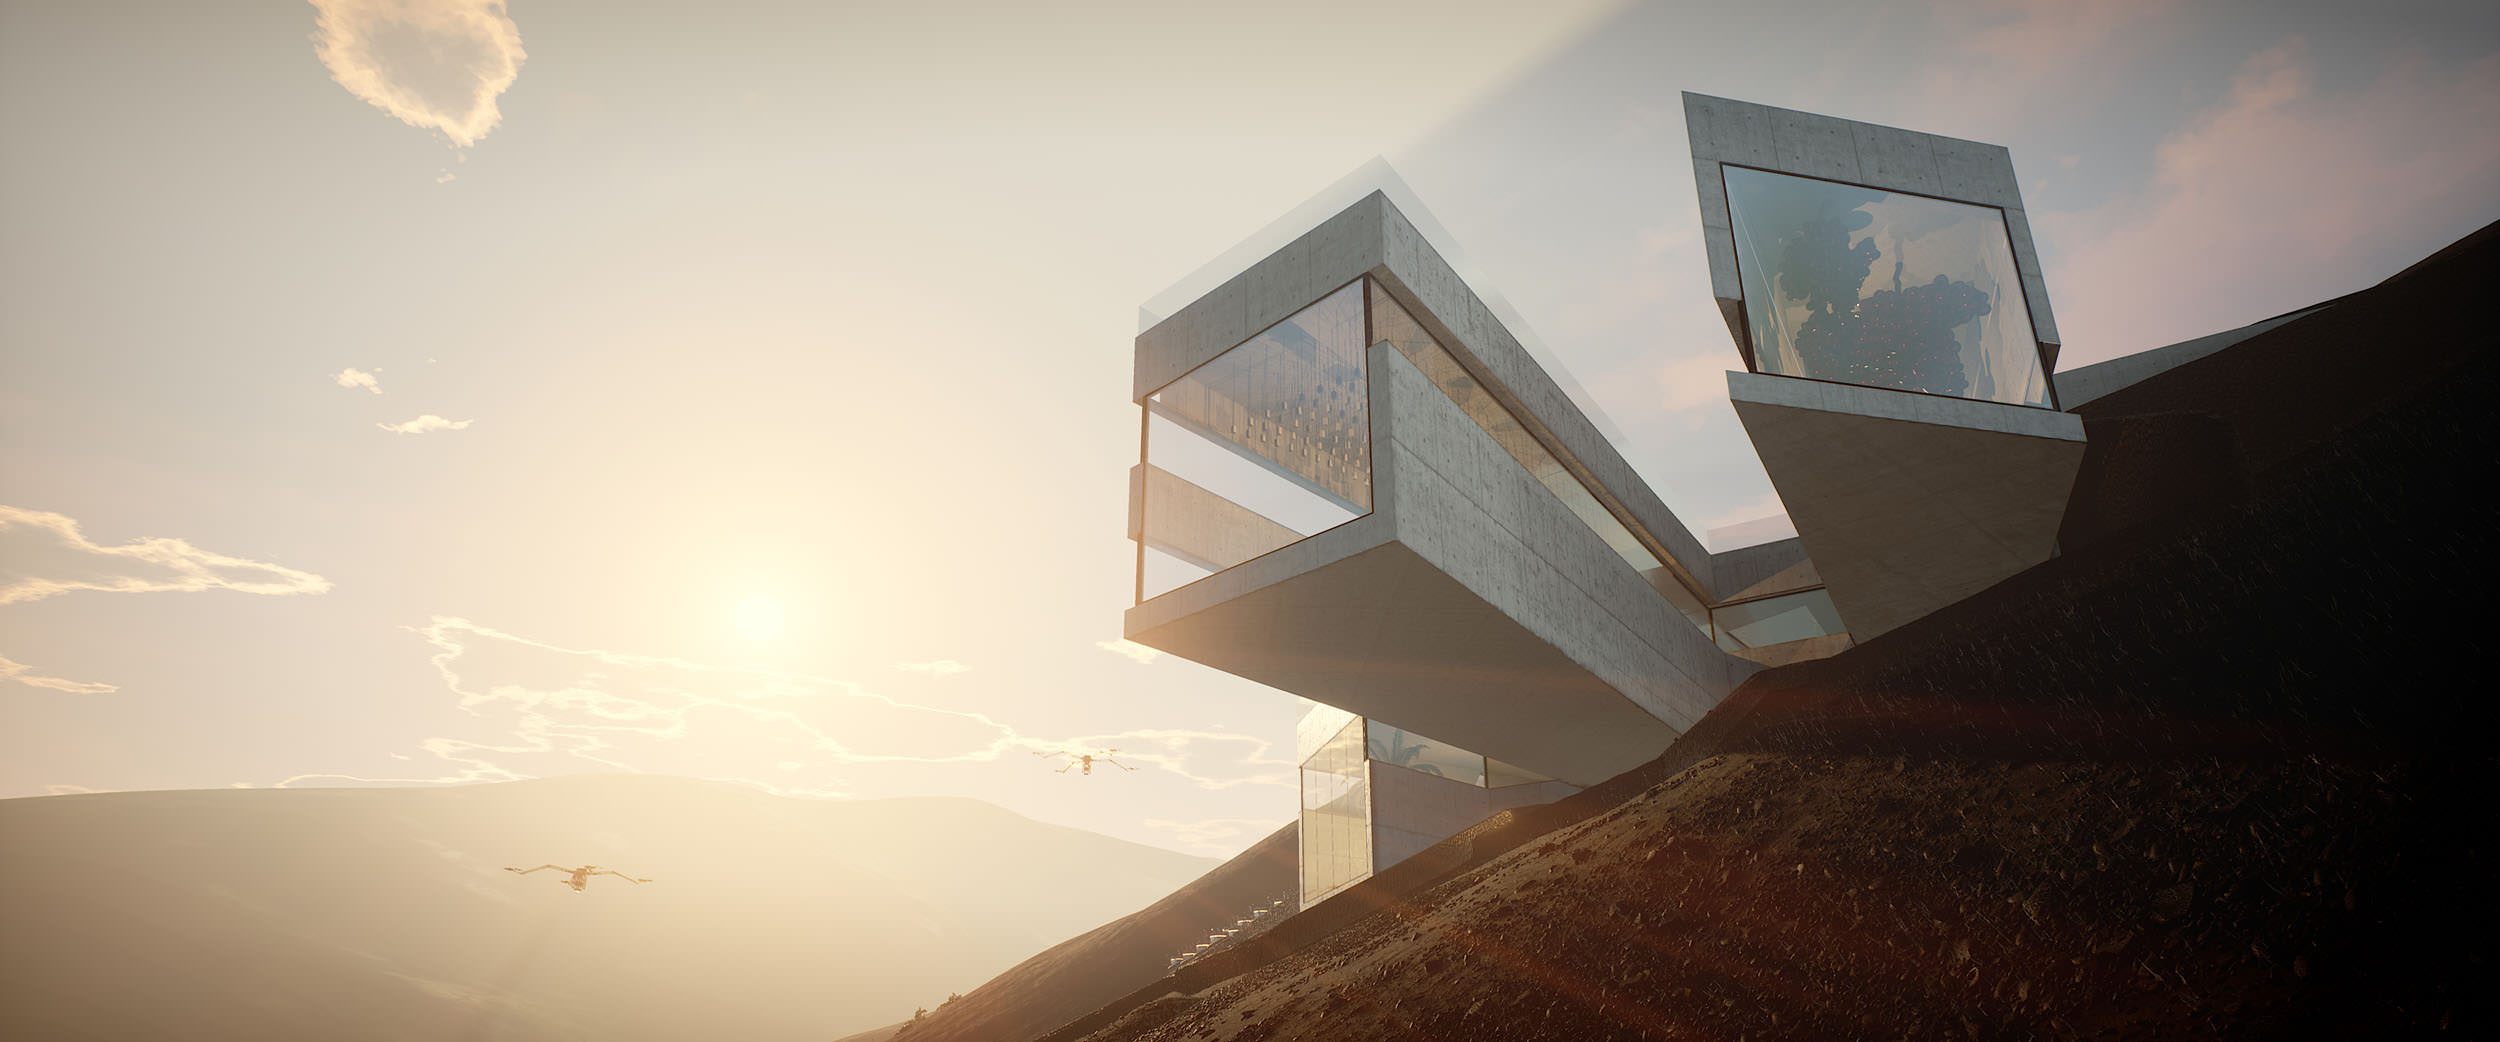
Set in the remote volcanic mountains of Lanzarote, this high-tech vineyard utilises automated harvesting drones to pick the grapes and process them on transport. This vision coming to life via Unreal Engine 4 by the UK-based studio, Factory Fifteen, won the Grand Prize award in “The Vineyard” Challenge last October. Today I’m sharing the first part of their making-of which covers a design that includes an underground production facility, wine storage and tasting area, 6 luxury apartments, a world-class spa with interior and exterior pools, massage parlours, steam rooms, saunas, interior and exterior restaurant / bar and a gallery space for local artists. The film they produced, along with a bespoke soundtrack, takes us on a short journey from the drone harvesting fields through to the buildings interior.
Before I let Paul take over in this article – An apology!
It took me too long to get to this point, In which I start publishing “The Vineyard” Winner’s making-of articles. All the winners did a great job with the write-up an delivery, and it got stuck in traffic on my side – so my apologies to them and you too, the readers, who have been missing out on all this good stuff for so long.
We start today with the first part of Factory Fifteen‘s article about their Grand Prize Winning Entry Making of “La Geria”. Enjoy!
From Factory Fifteen
Firstly we are very thankful that we had the opportunity to learn Unreal Engine while being part of Ronen’s active community which combined architects, visualisation artists and game developers alike. It was a fun challenge and one we are honoured to win.
This project for us was about learning.
learning how we could use Unreal Engine to tell stories, design and visualise spaces and to offer potential and existing clients an exciting new service of interactive, real-time photorealistic models.
This making-of is very extensive and covers our entire process from beginning to end, from design to gameplay.
On each notable section we have included a screen grab, a brief description and a link (if appropriate) of where you can find more information on the topic, which will go in detail technically from what we touch upon. This could be a specific page on the Unreal Engine online manual or a YouTube video. The idea is that this becomes a sort of encyclopedia for the building blocks of using Unreal Engine for Architectural Visualisation and beyond.
We really hope you enjoy reading this as much as we enjoyed creating it.
The Vineyard Site – LA GERIA
Location
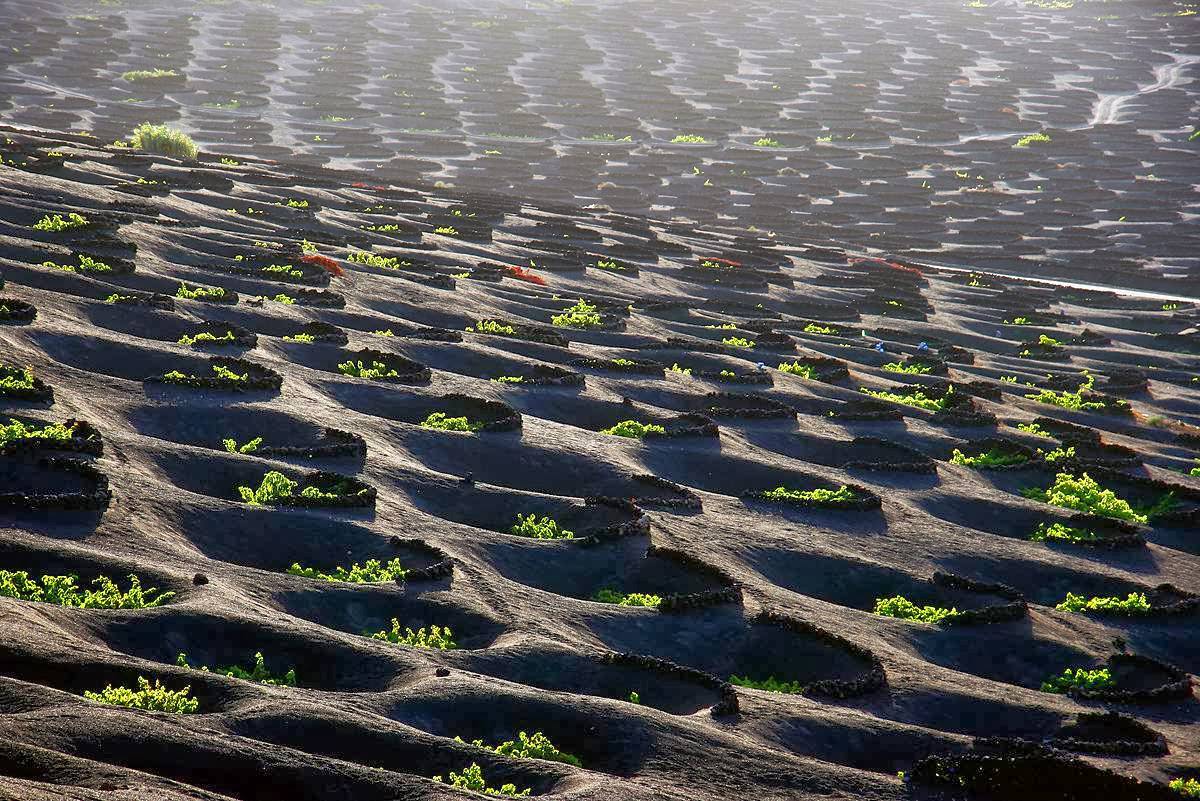
We decided to focus our concept on the stunning Vineyards of ‘La Geria’ in Lanzarote, one of the Canary islands. It is an incredible location with scenic black landscapes scattered with thousands of man-made craters. We wanted to find a real, natural landscape that would require an interesting design response for our vineyard.
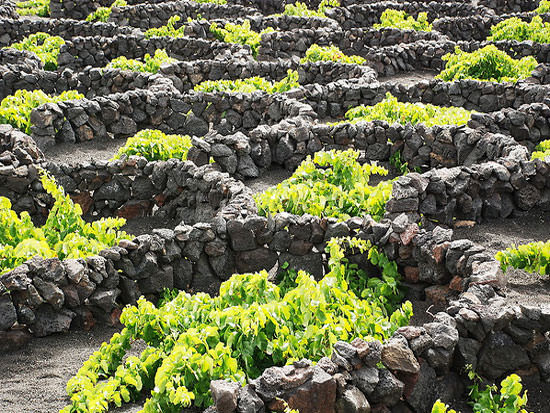
Each crater is surrounded by volcanic rocks which protects each of the wine-producing plants from the wind. The craters are cut into the ground, in a spherical hole, submerging the vine in part.
The Vines

To model the vine trees we used SpeedTree for UE4. It allowed us to model parametric vines in a fast and consistent way. Looking at the reference images of the vines in Lanzarote we went for a more bushy effect compared to that of an archetypical vine tree.
The model is composed of a trunk with roots, main branches, secondary branches, leaves and grapes. The main branches grows looking up but are attracted to the ground by a magnet modifier and are repulsed back by a box at the ground level. The secondary branches are attracted up. Leaves are scattered both on main and secondary branches while the grapes only on the secondary branches. SpeedTree allows also to set the wind deformation, the lightmap, the LOD’s, the material and the collision objects.
The Vineyard Design
Building References


With our site in mind we knew we wanted the building to sit on the side of the volcanic mountain somehow, so our initial architectural references were based on that notion. We tried to find examples where the building was cut into the landscape somehow and was made of simple forms and materials.
As we were planning a vineyard that utilised technology in its production process. It was important to us that the rest of the design felt realistic and grounded in reality. We didn’t want to it to be too science fiction, but at the same time we wanted it to represent our studios design and critical thinking process
Concept Models
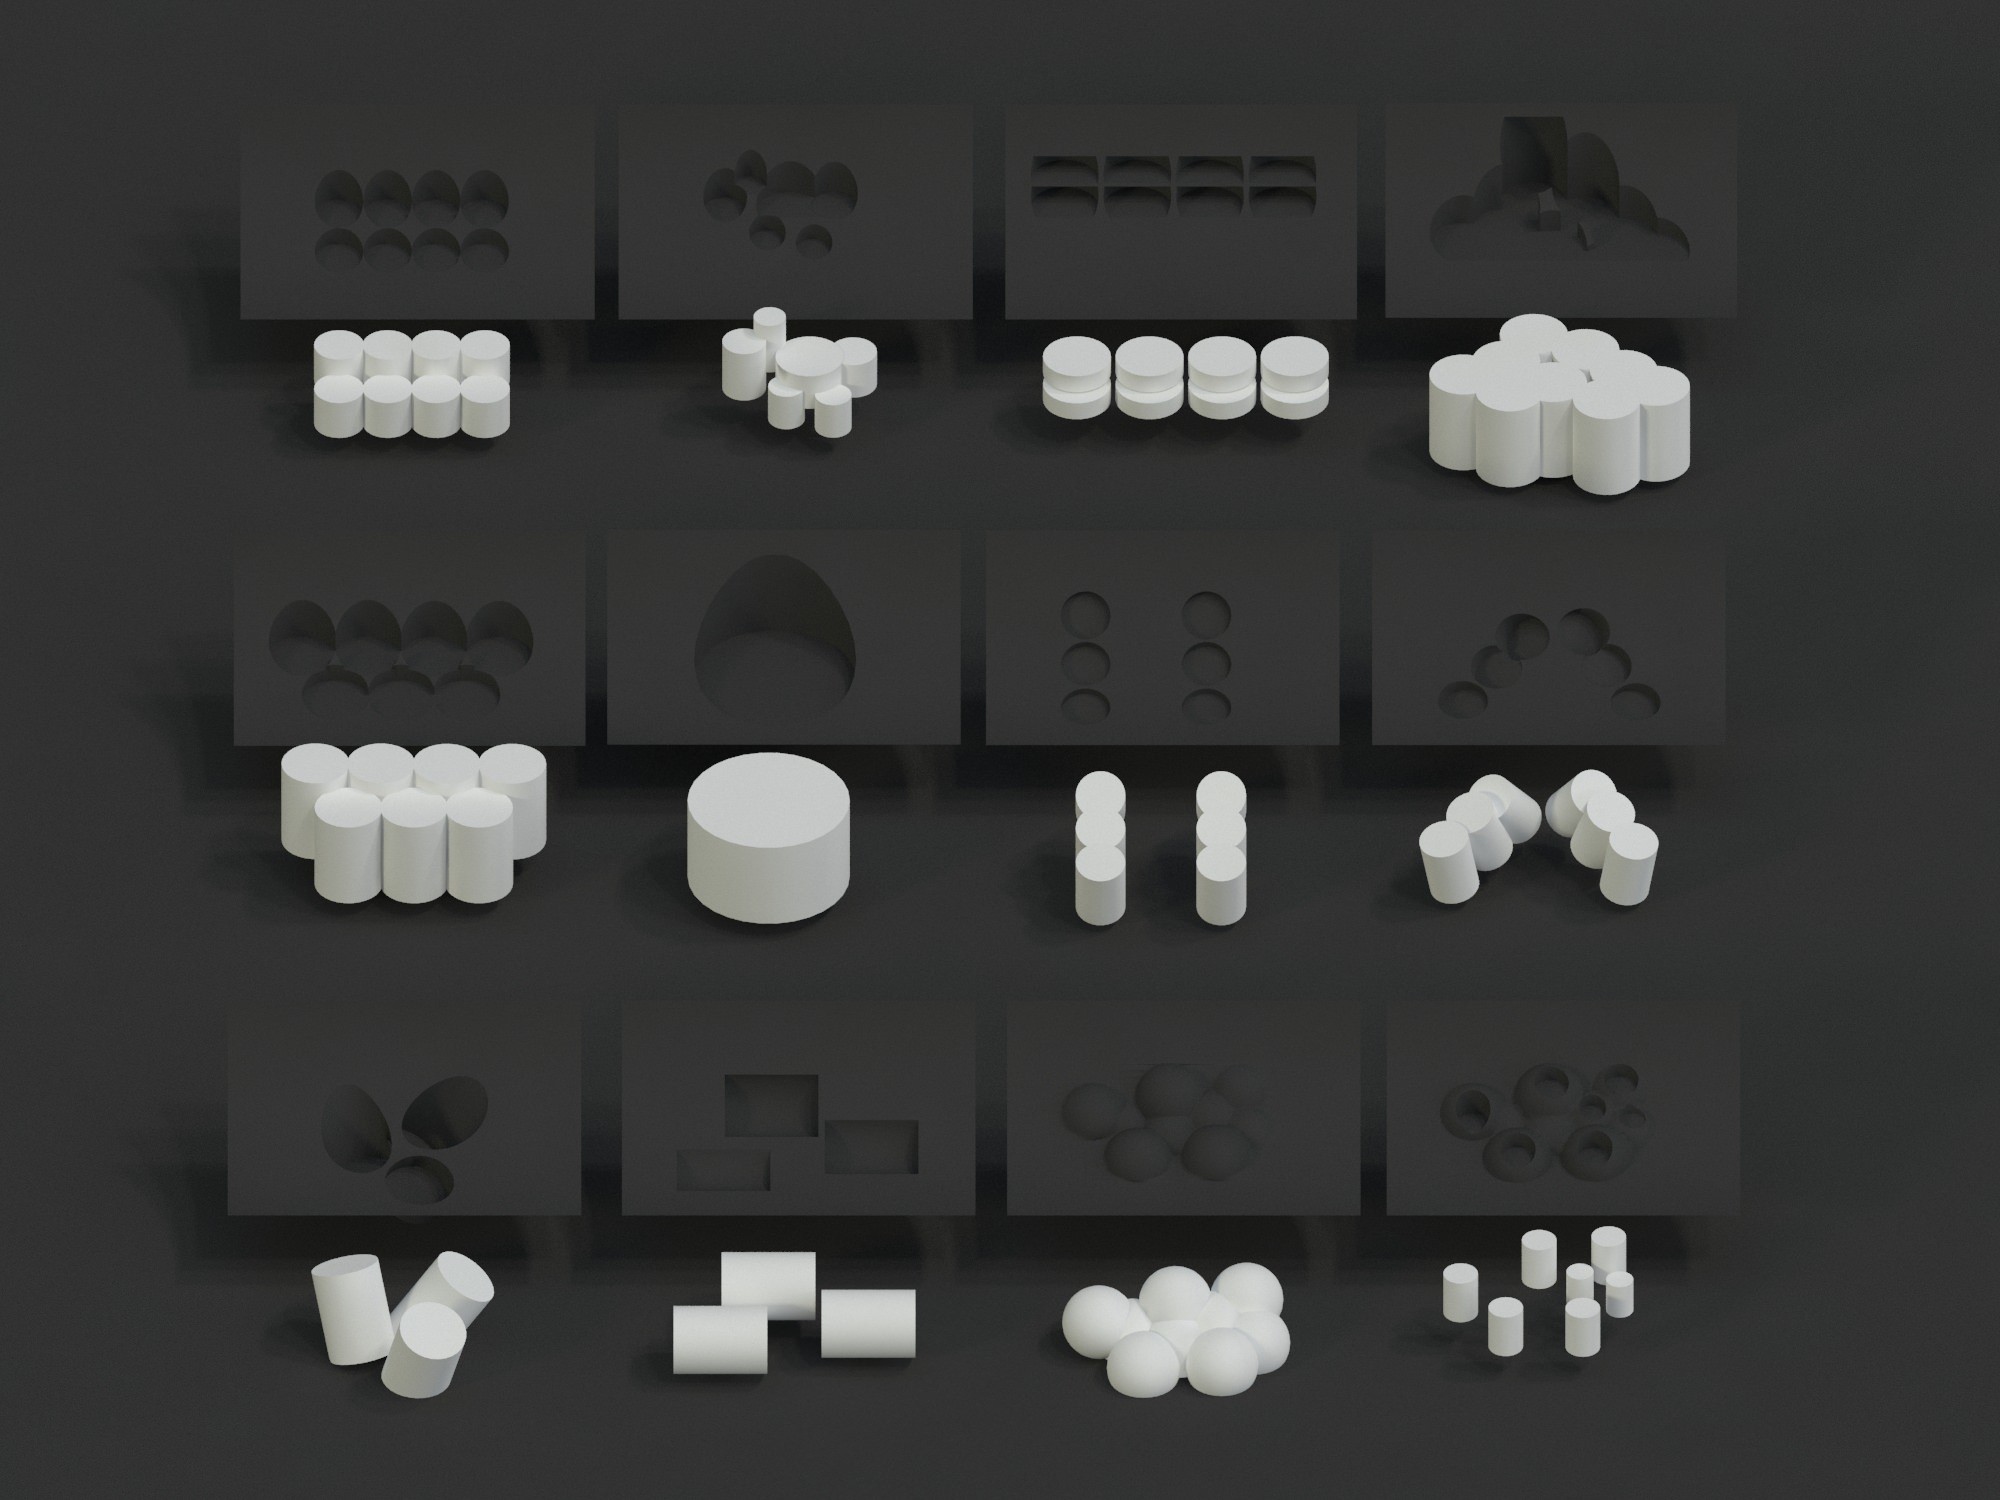
We wanted the design of the building to somehow reflect the landscape and the unique way the craters are formed. Inspired by the site use of cutting into the landscape, we took this as our initial design process. We started of by creating clusters of spheres and cylinders and booleaning them out of a sloped surface. We were trying to see what interesting volumes were created in this process.


We found that harder edged geometry was working better for creating interlocking spaces buried into the landscape so we progressed on this basis. We started copying and in-setting the same geometry we were cutting as the building volumes themselves.
Final Massing Model


Several extruded volumes were placed and cut into the landscape. The same geometry was used to create the building itself but scaling and in-setting within the holes. Some simple boolean union operations and we had a design we were happy with which filled the program nicely and was the right scale.
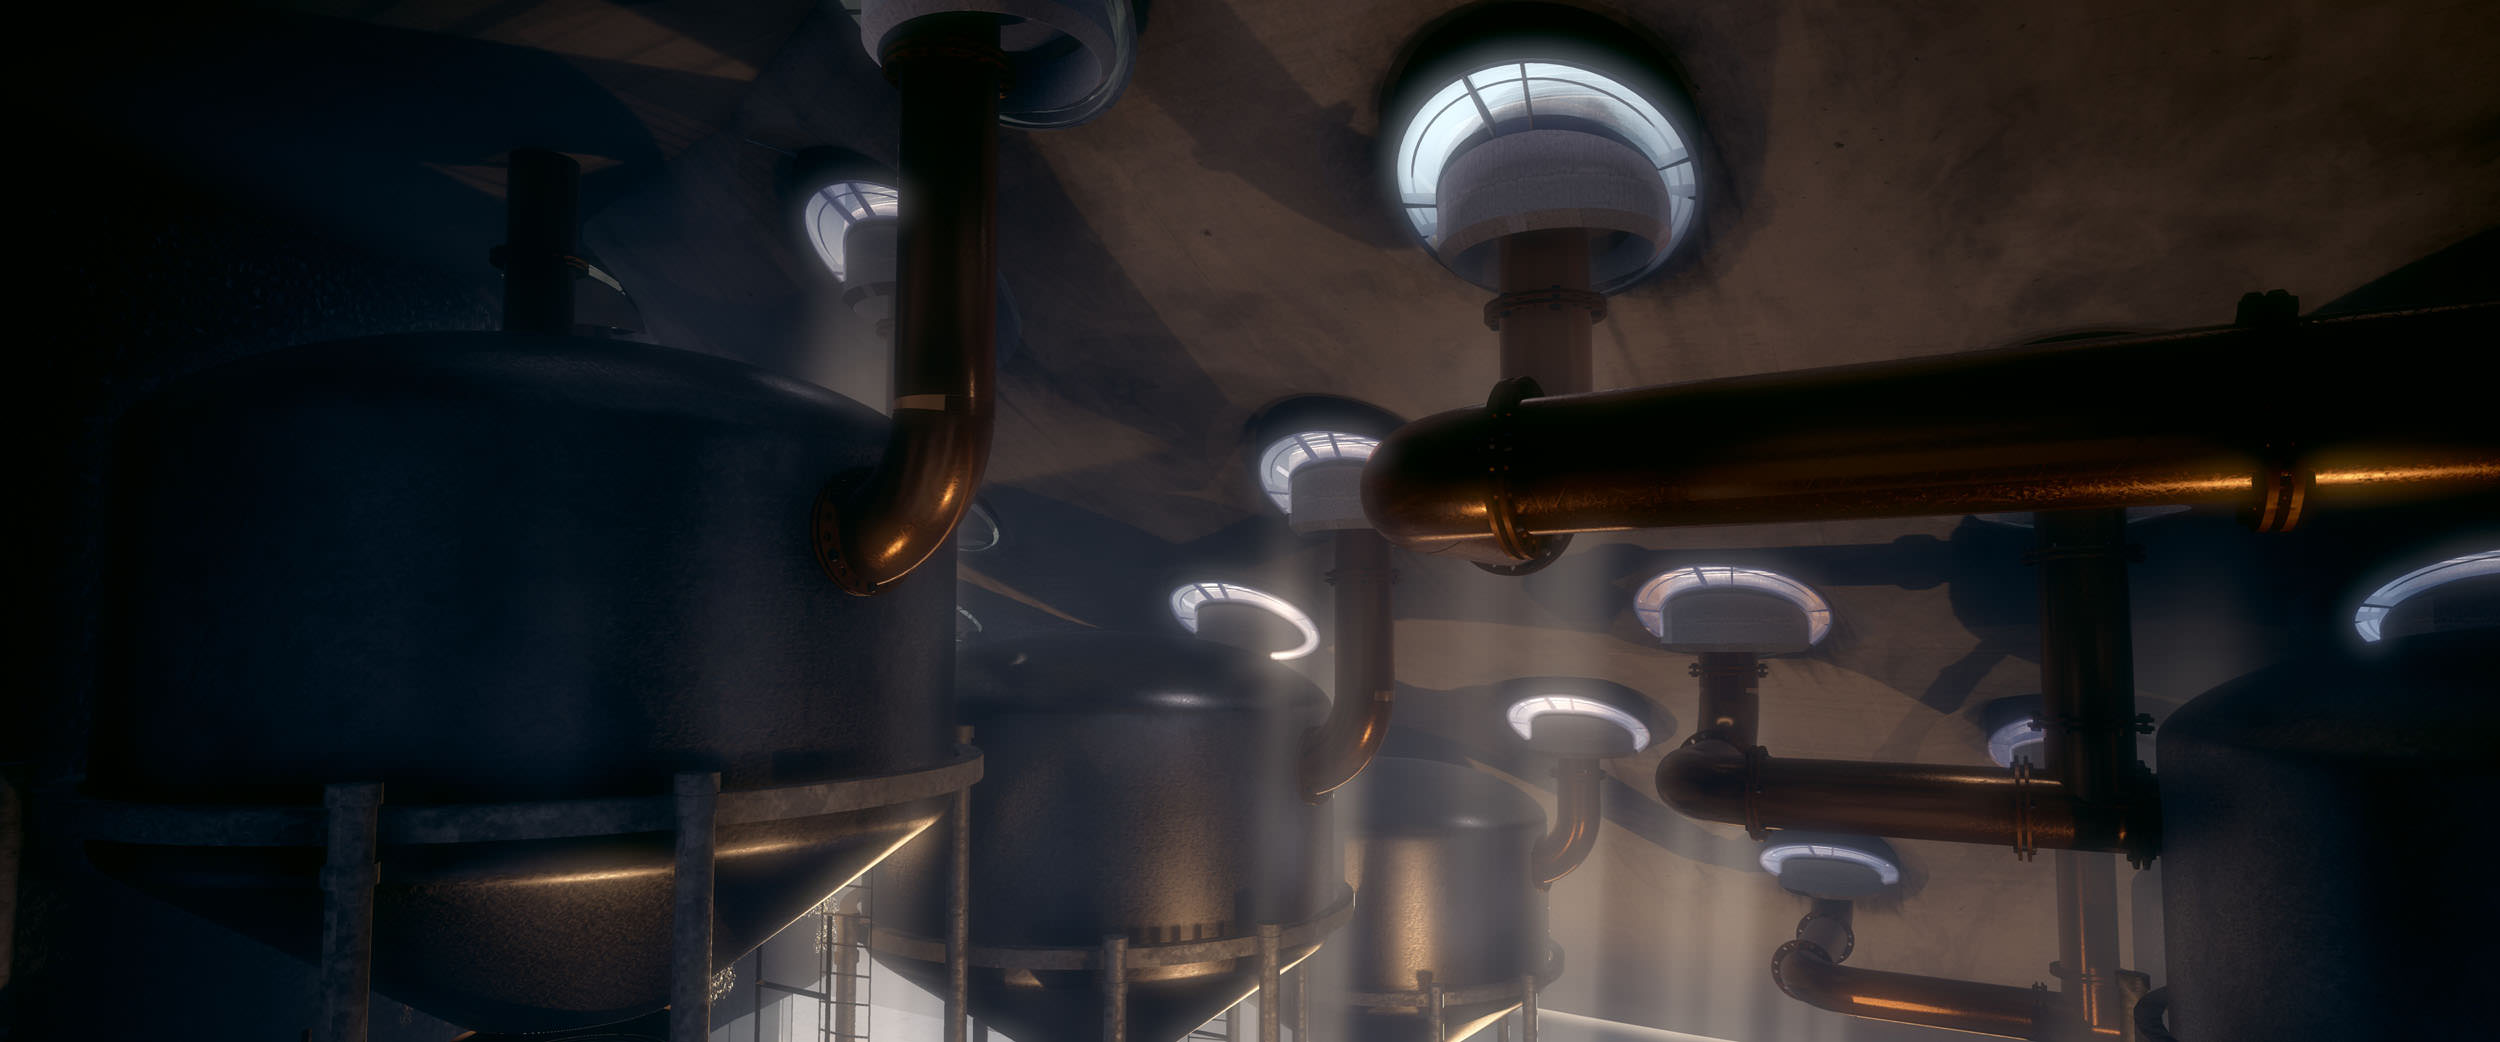
From here we began to edit the geometry, defining the walls, glazing and openings. We wanted again to mimic the vine craters by having a protective rock mountain facing wall which would protect the building from falling rocks and heavy winds. The circles on the right are landing platforms for the harvesting drones to drop of their collected fruit into the production facility, which we planned to be underground.
Exterior Design


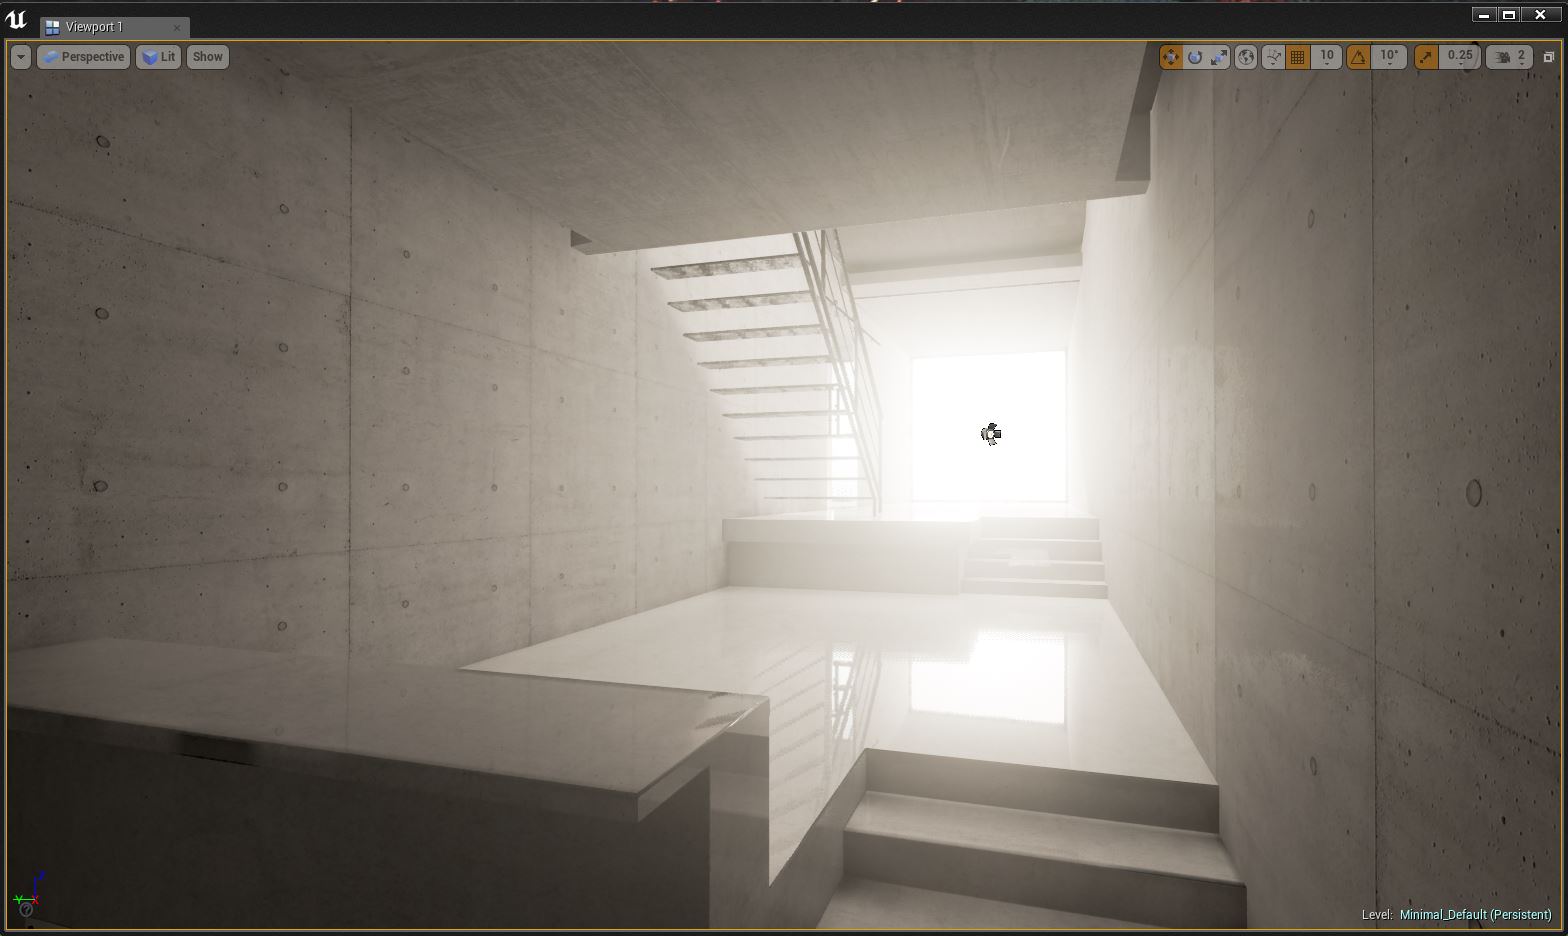
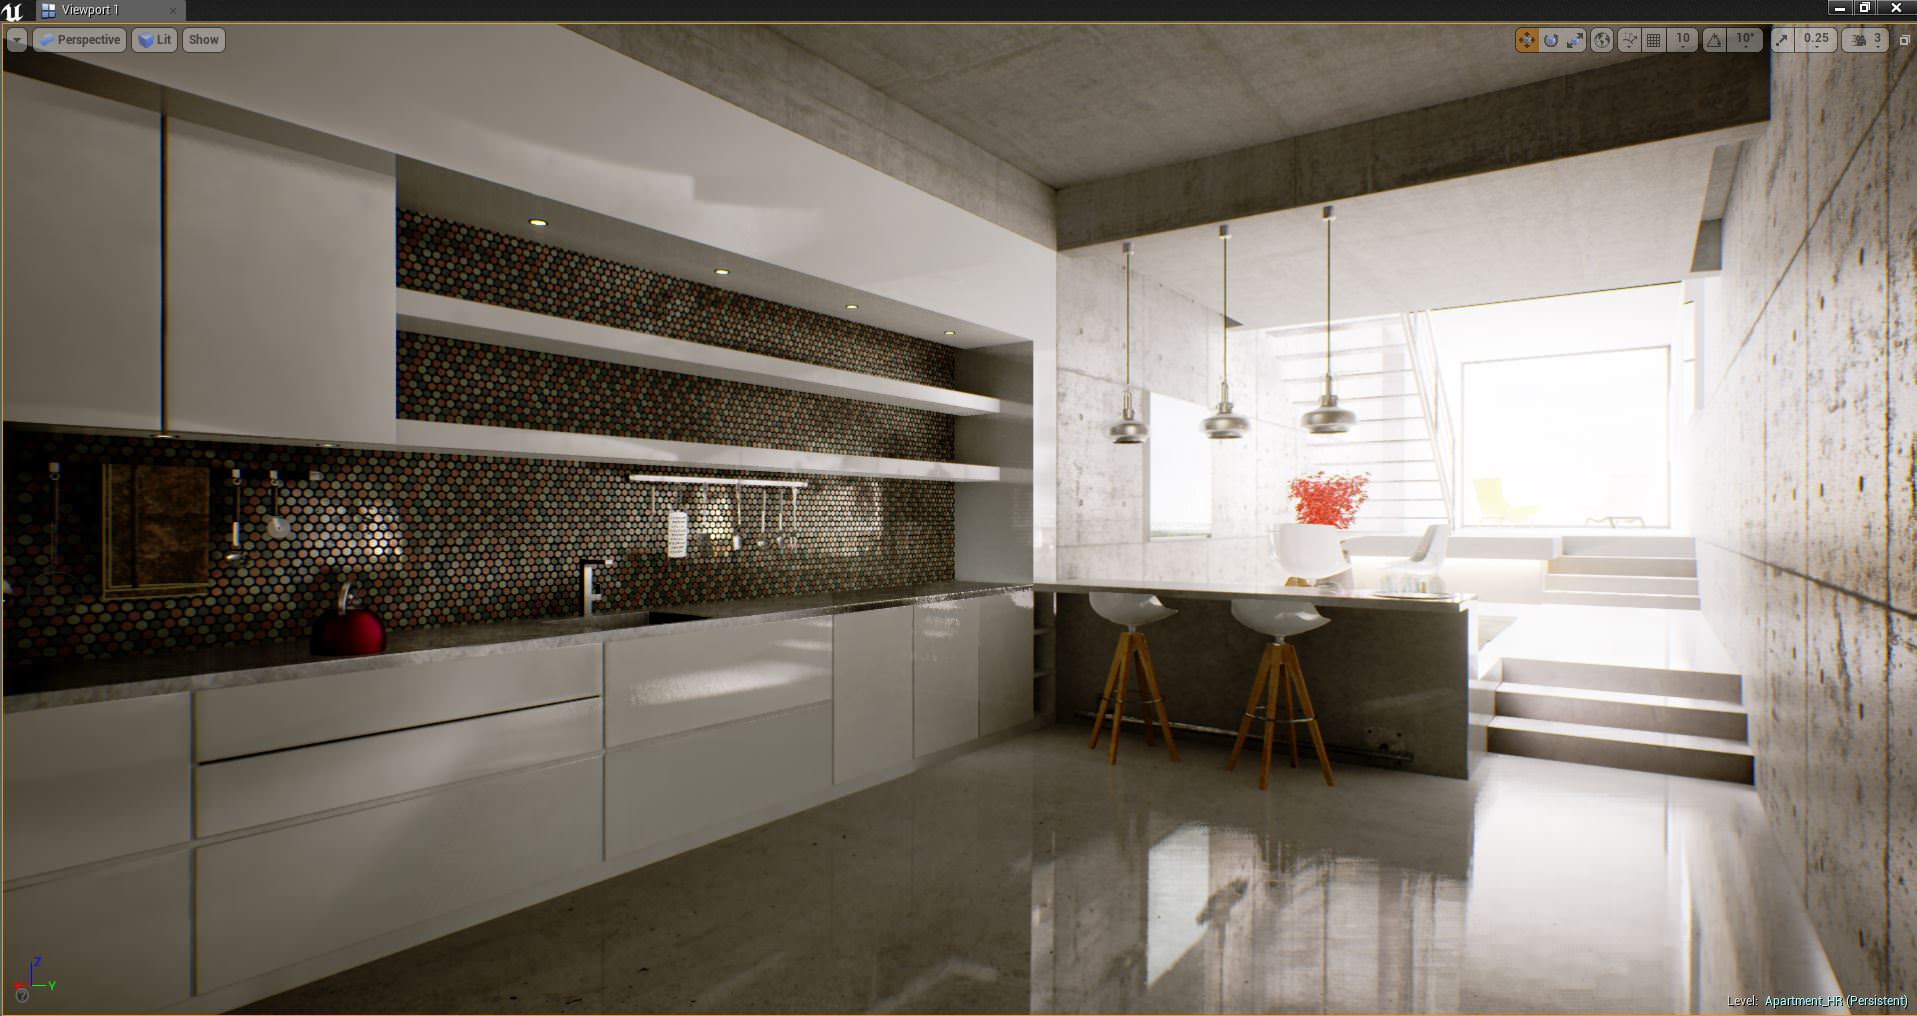
Our final building design is a series of intersecting white concrete volumes cut within and extruding out from the black volcanic mountain, containing 6 identical apartments, a restaurant and bar, spa, wine tasting area and underground production facility. It has access from the top and bottom of the mountain via stepped pathways.
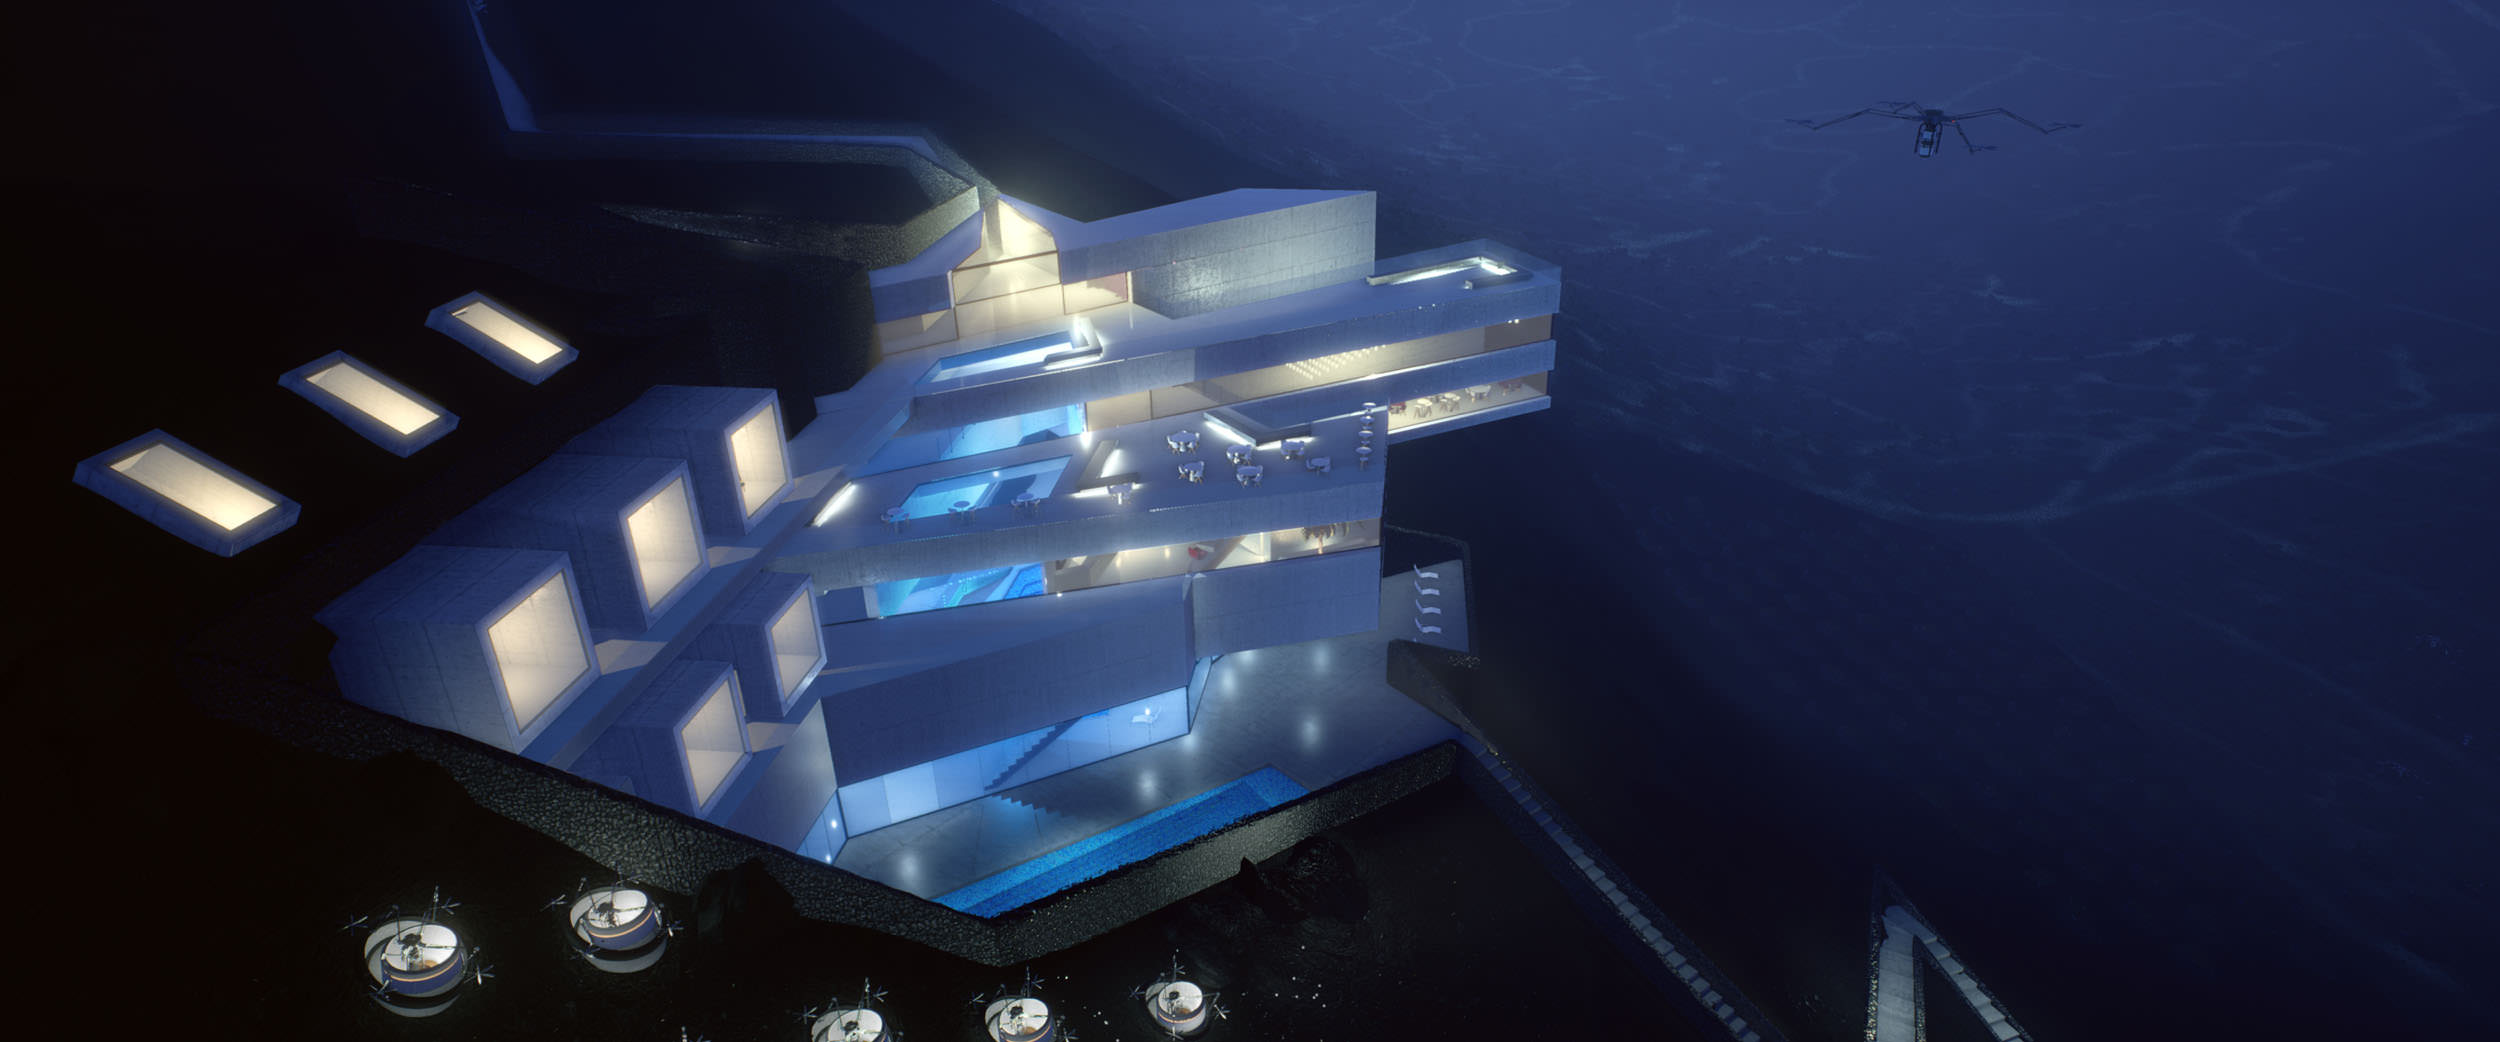
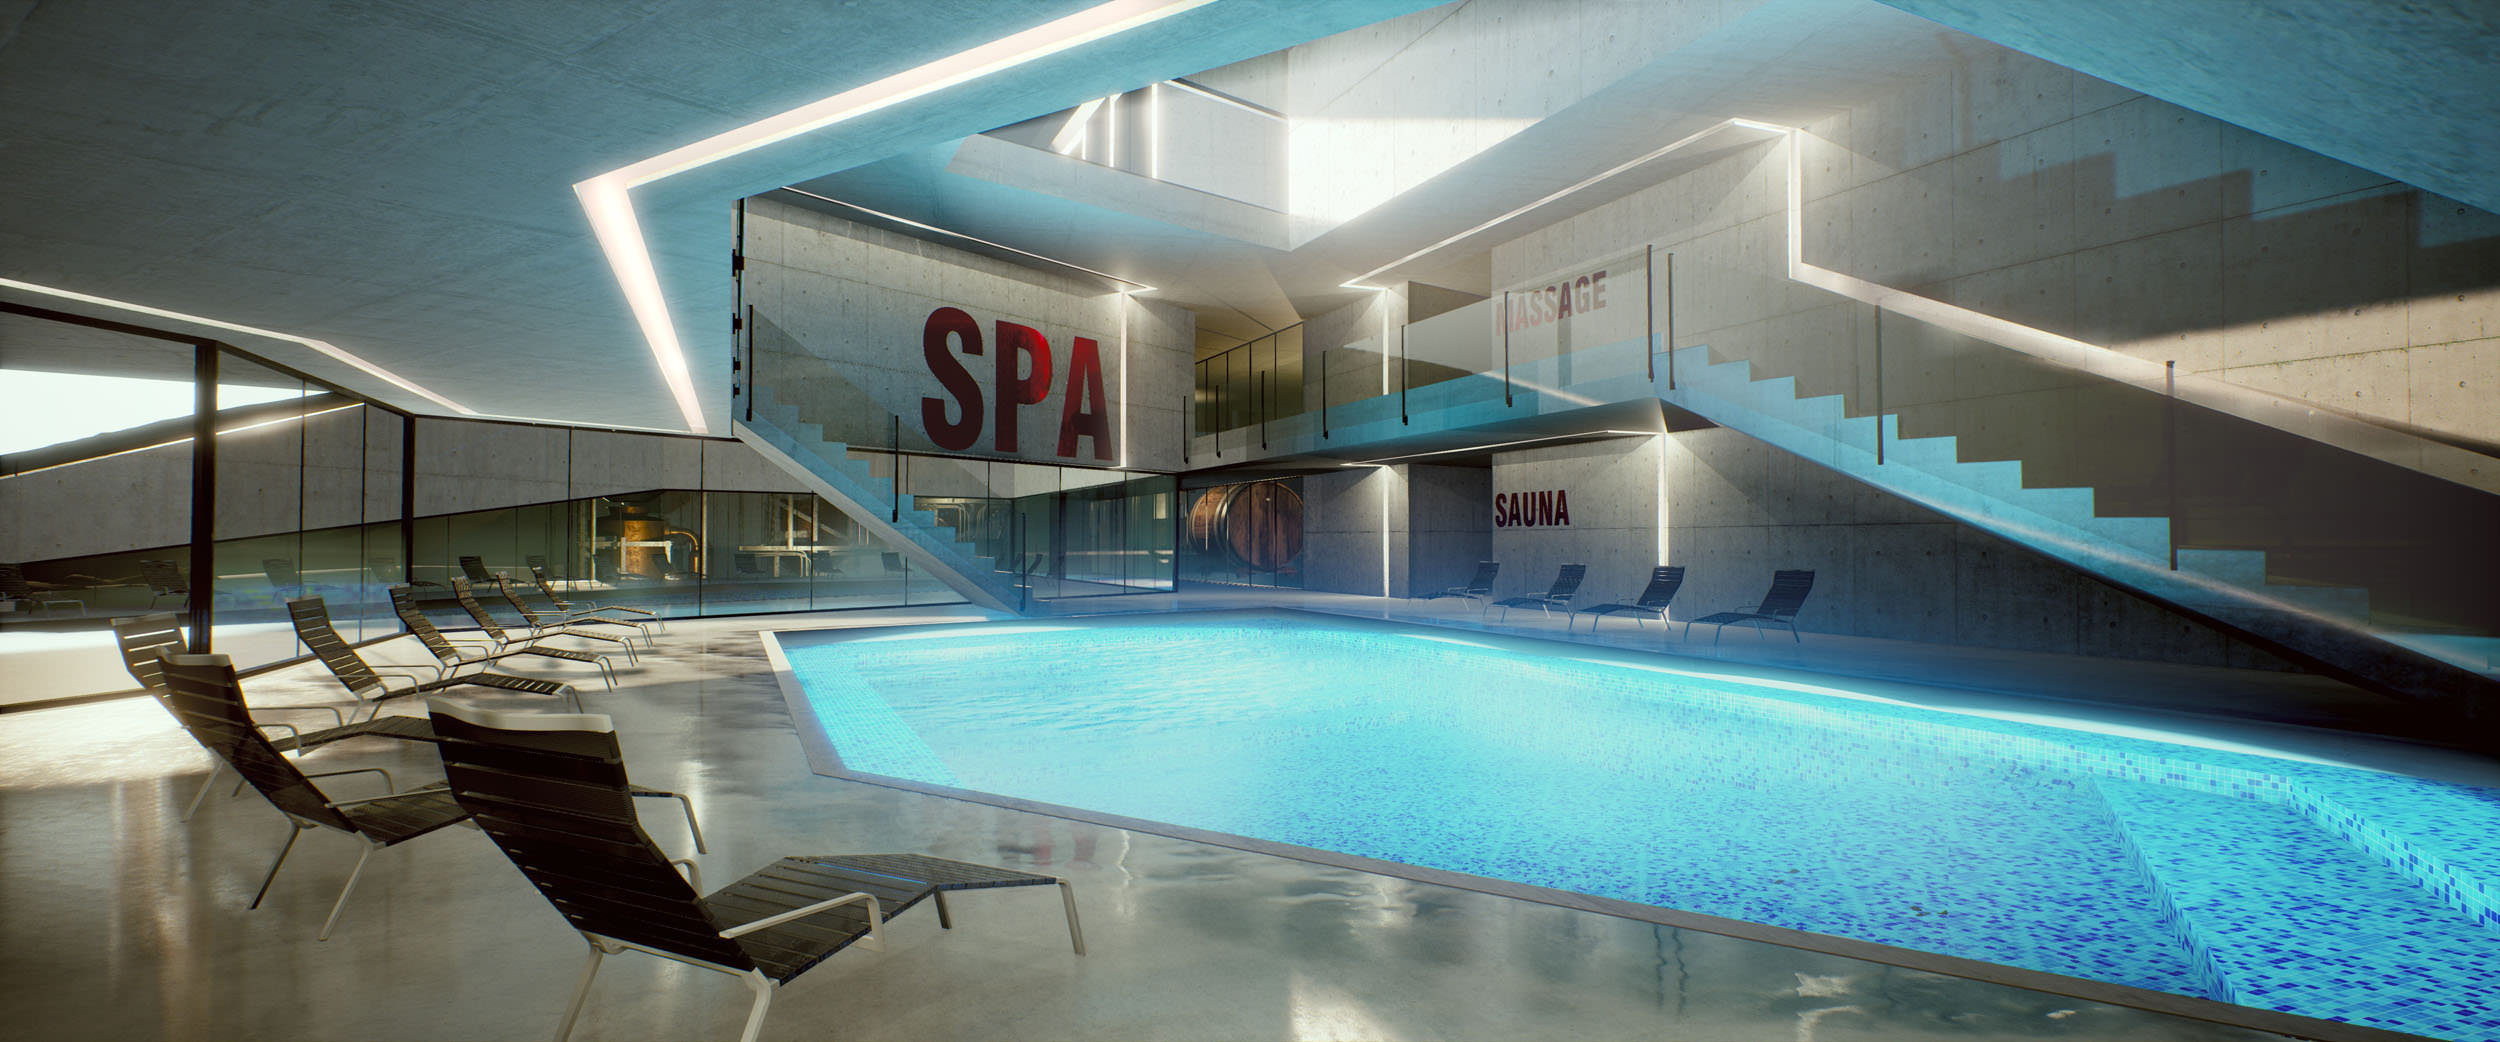
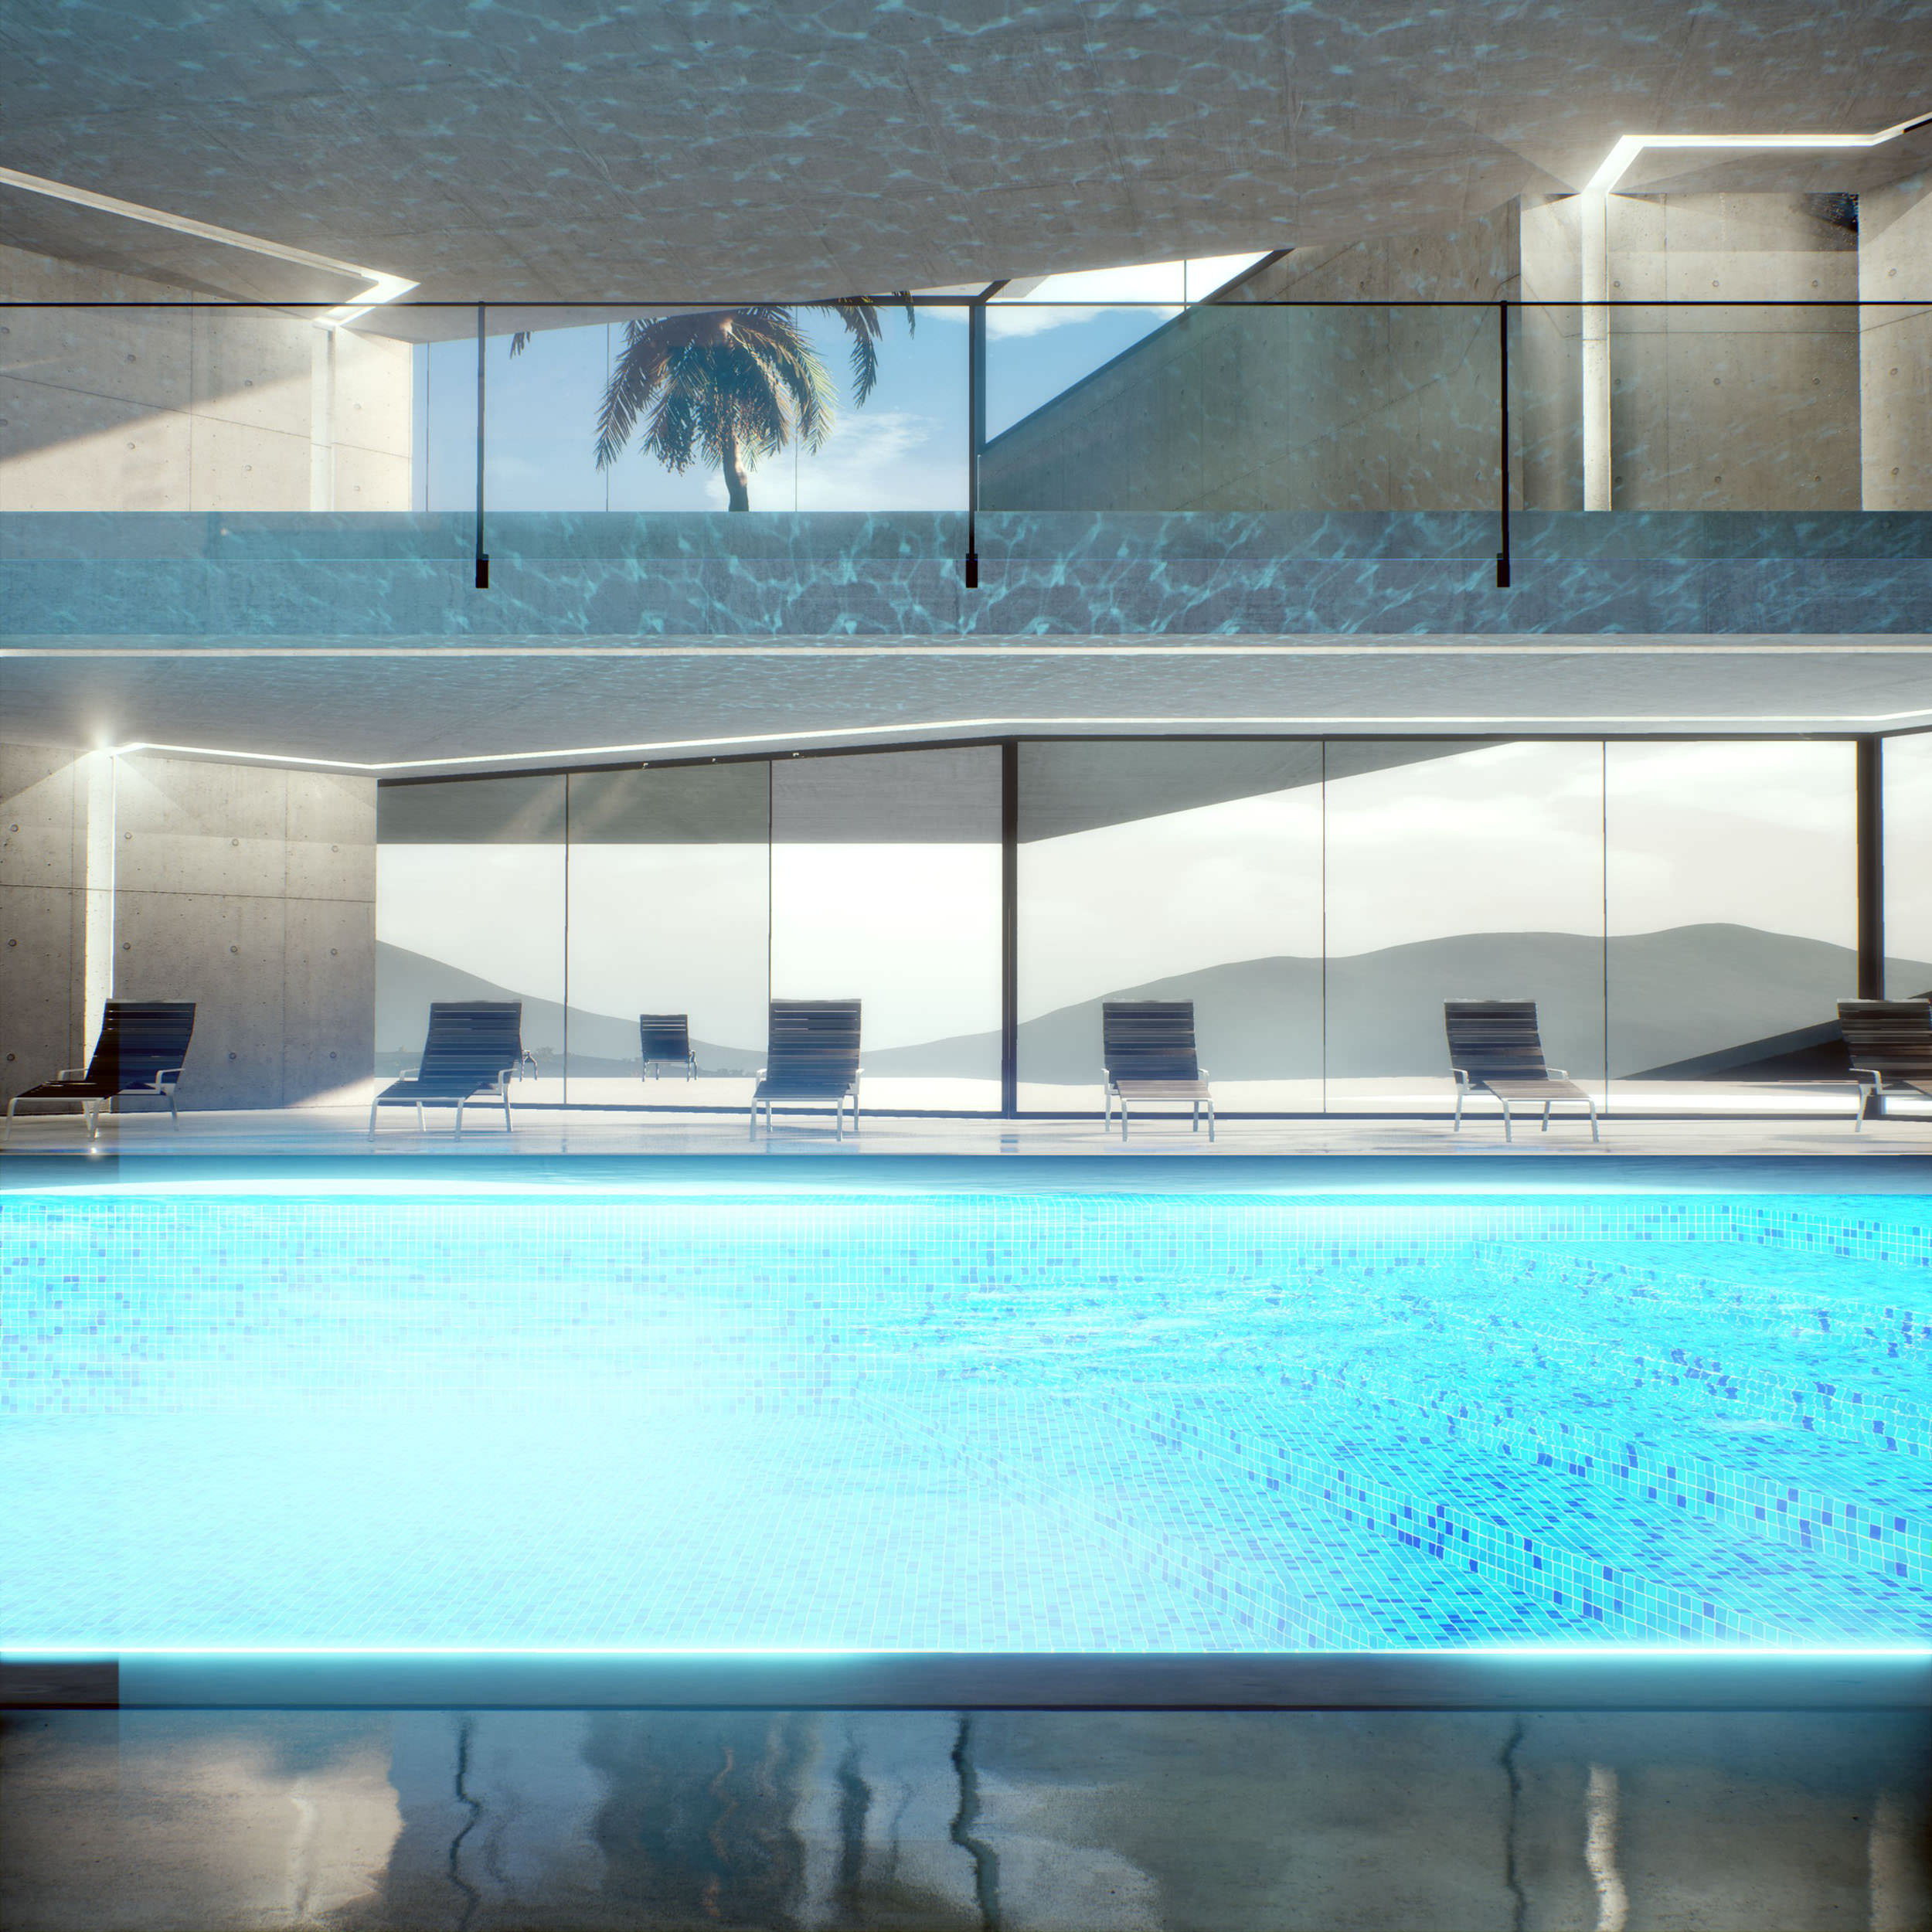
Spa Design
The spa occupies the main central space within the building. We created a large atrium type void through the middle with several skylights filtering light down from above. All other levels can look down into it. We had initial ideas of a waterfall but we couldn’t get this looking non ‘game like’ and a real-flow sim proved a bit too heavy at that scale.


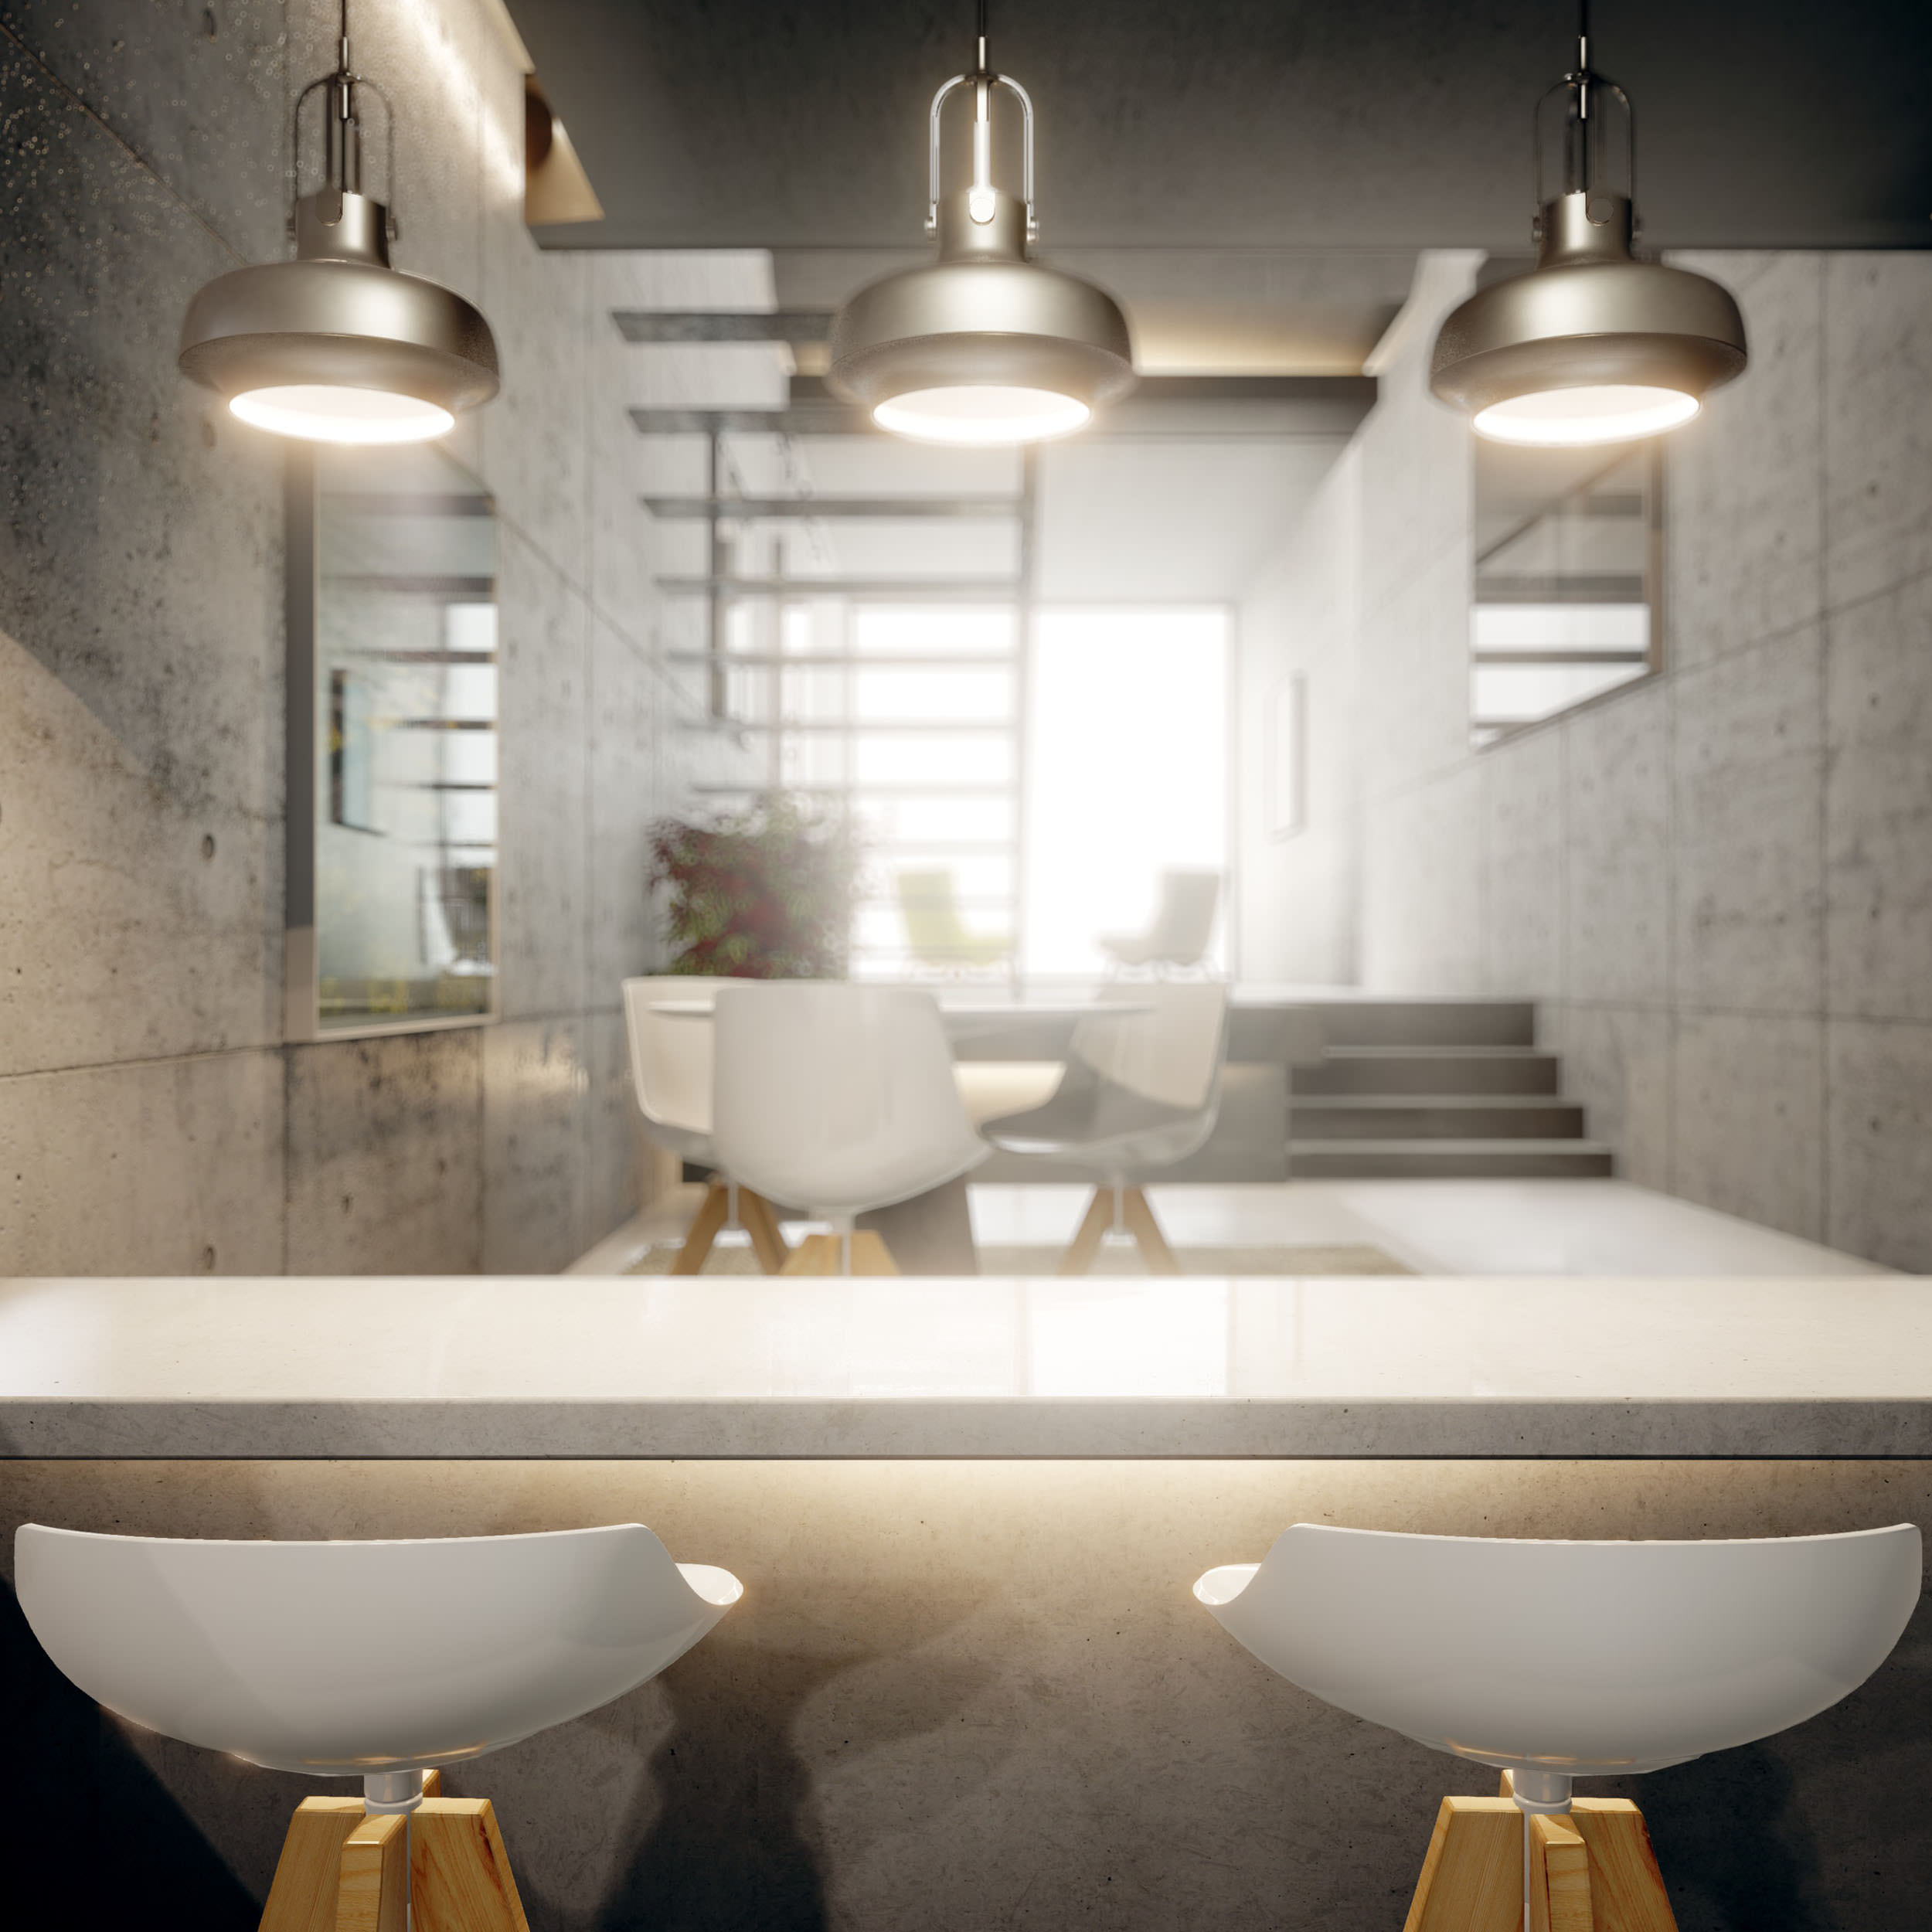
Apartment Design
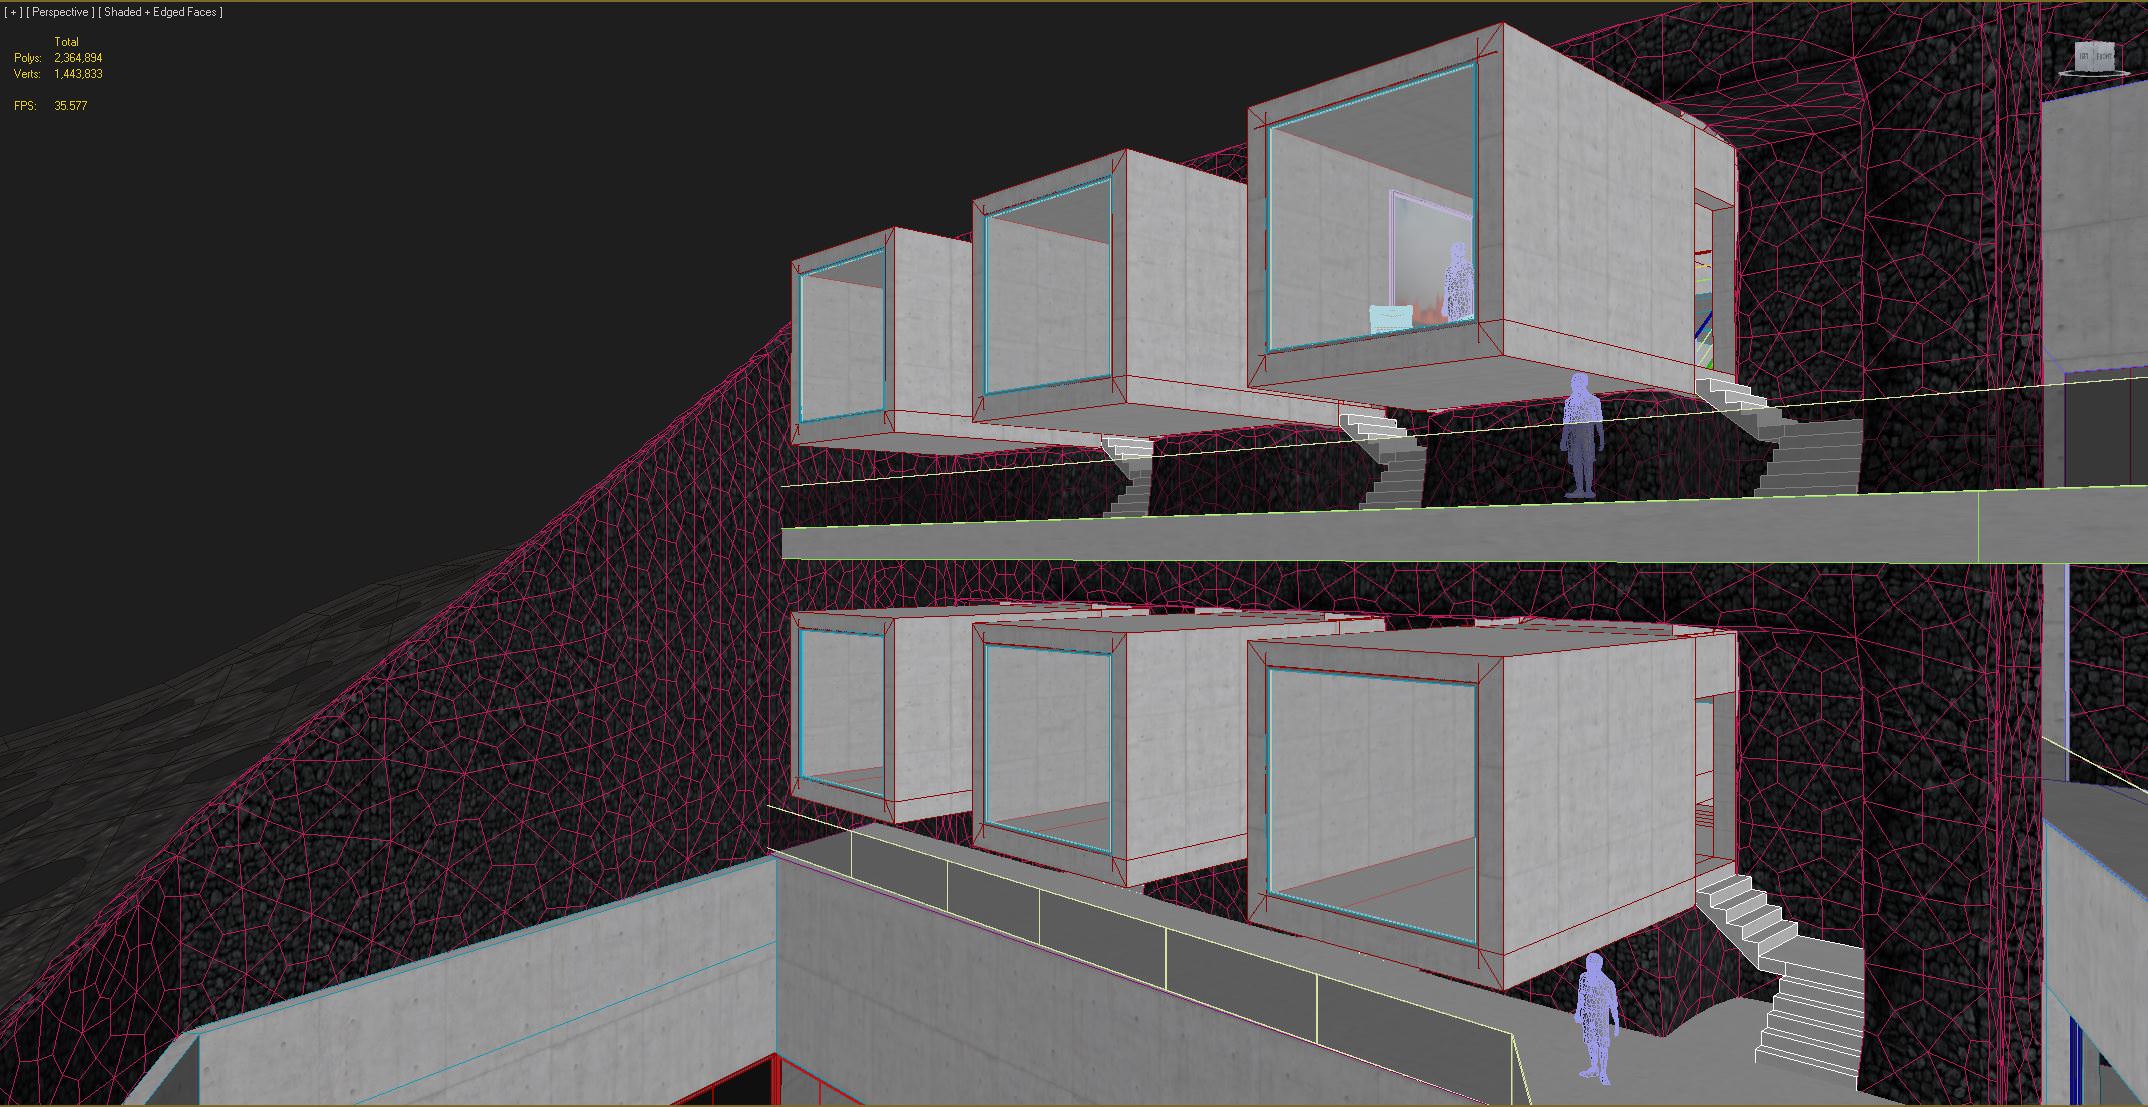


Six apartments protrude out from the rock face and overlook the exterior spa and landscape. We wanted a simple open plan split level design which contained everything one would need in a self-contained apartment. The upper apartments benefit from an additional skylight window. The apartment became our test bed to explore all of Unreal Engine’s features like baking GI, interactive material changes and light switches.

Restaurant & Bar Design
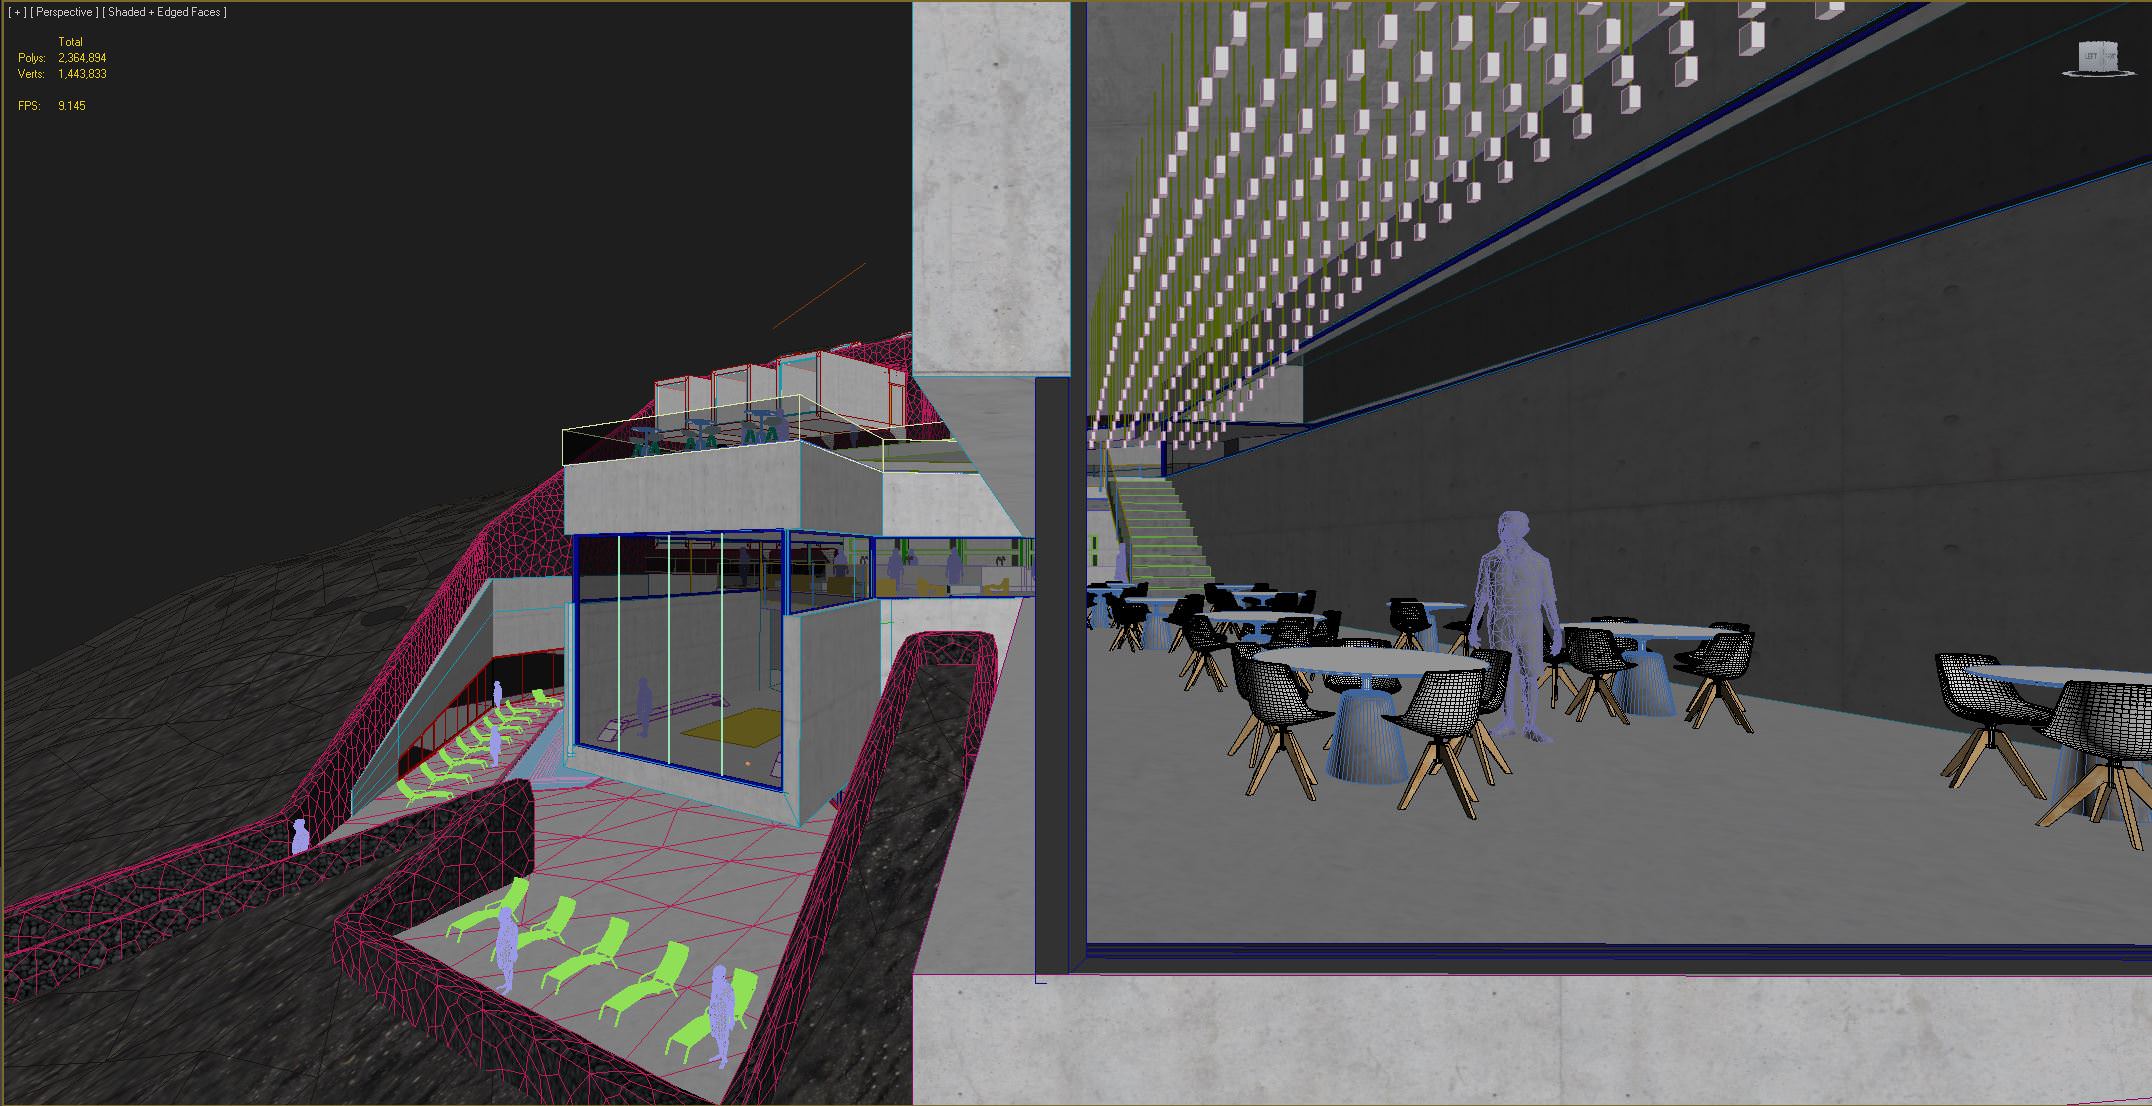


The restaurant and bar feature in the main cantilevered extrusions of the building, both within the interior and on the exterior balconies. A gallery space also features in one of these voids which we designed a sculptural metal installation of hanging grapes.
Production Facility Design
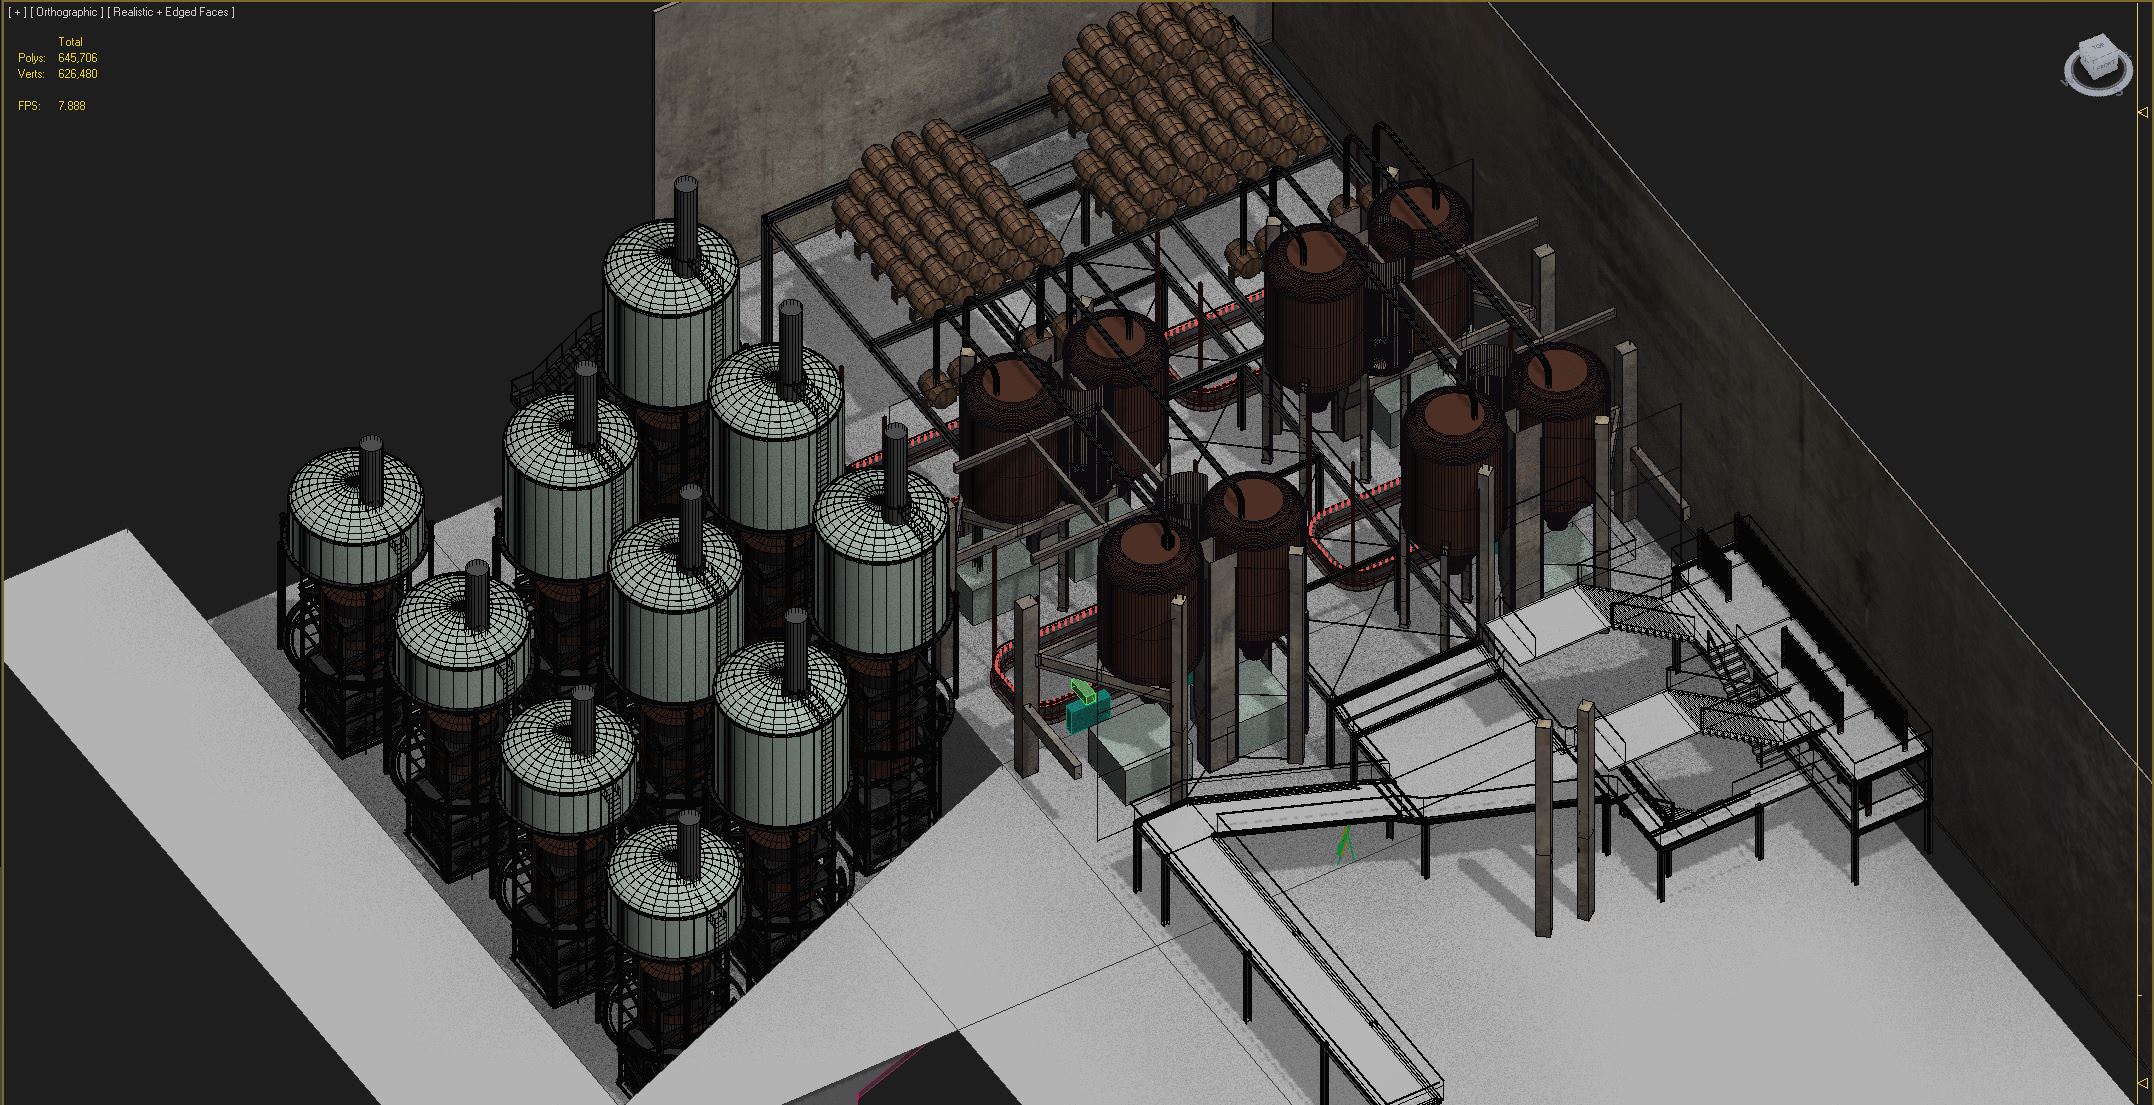


The production facility and wine tasting area took a few design changes. We researched the entire process of wine production and designed a working model towards this. We soon realized that the work was extensive to get this all into UE4 and looking good and as the previs developed, it became clear we were not showing all of the space anyway. We simplified it to only what we saw in camera. So within our build you can walk around, this is a little empty.
Geometry
Intersecting Geometry is Good
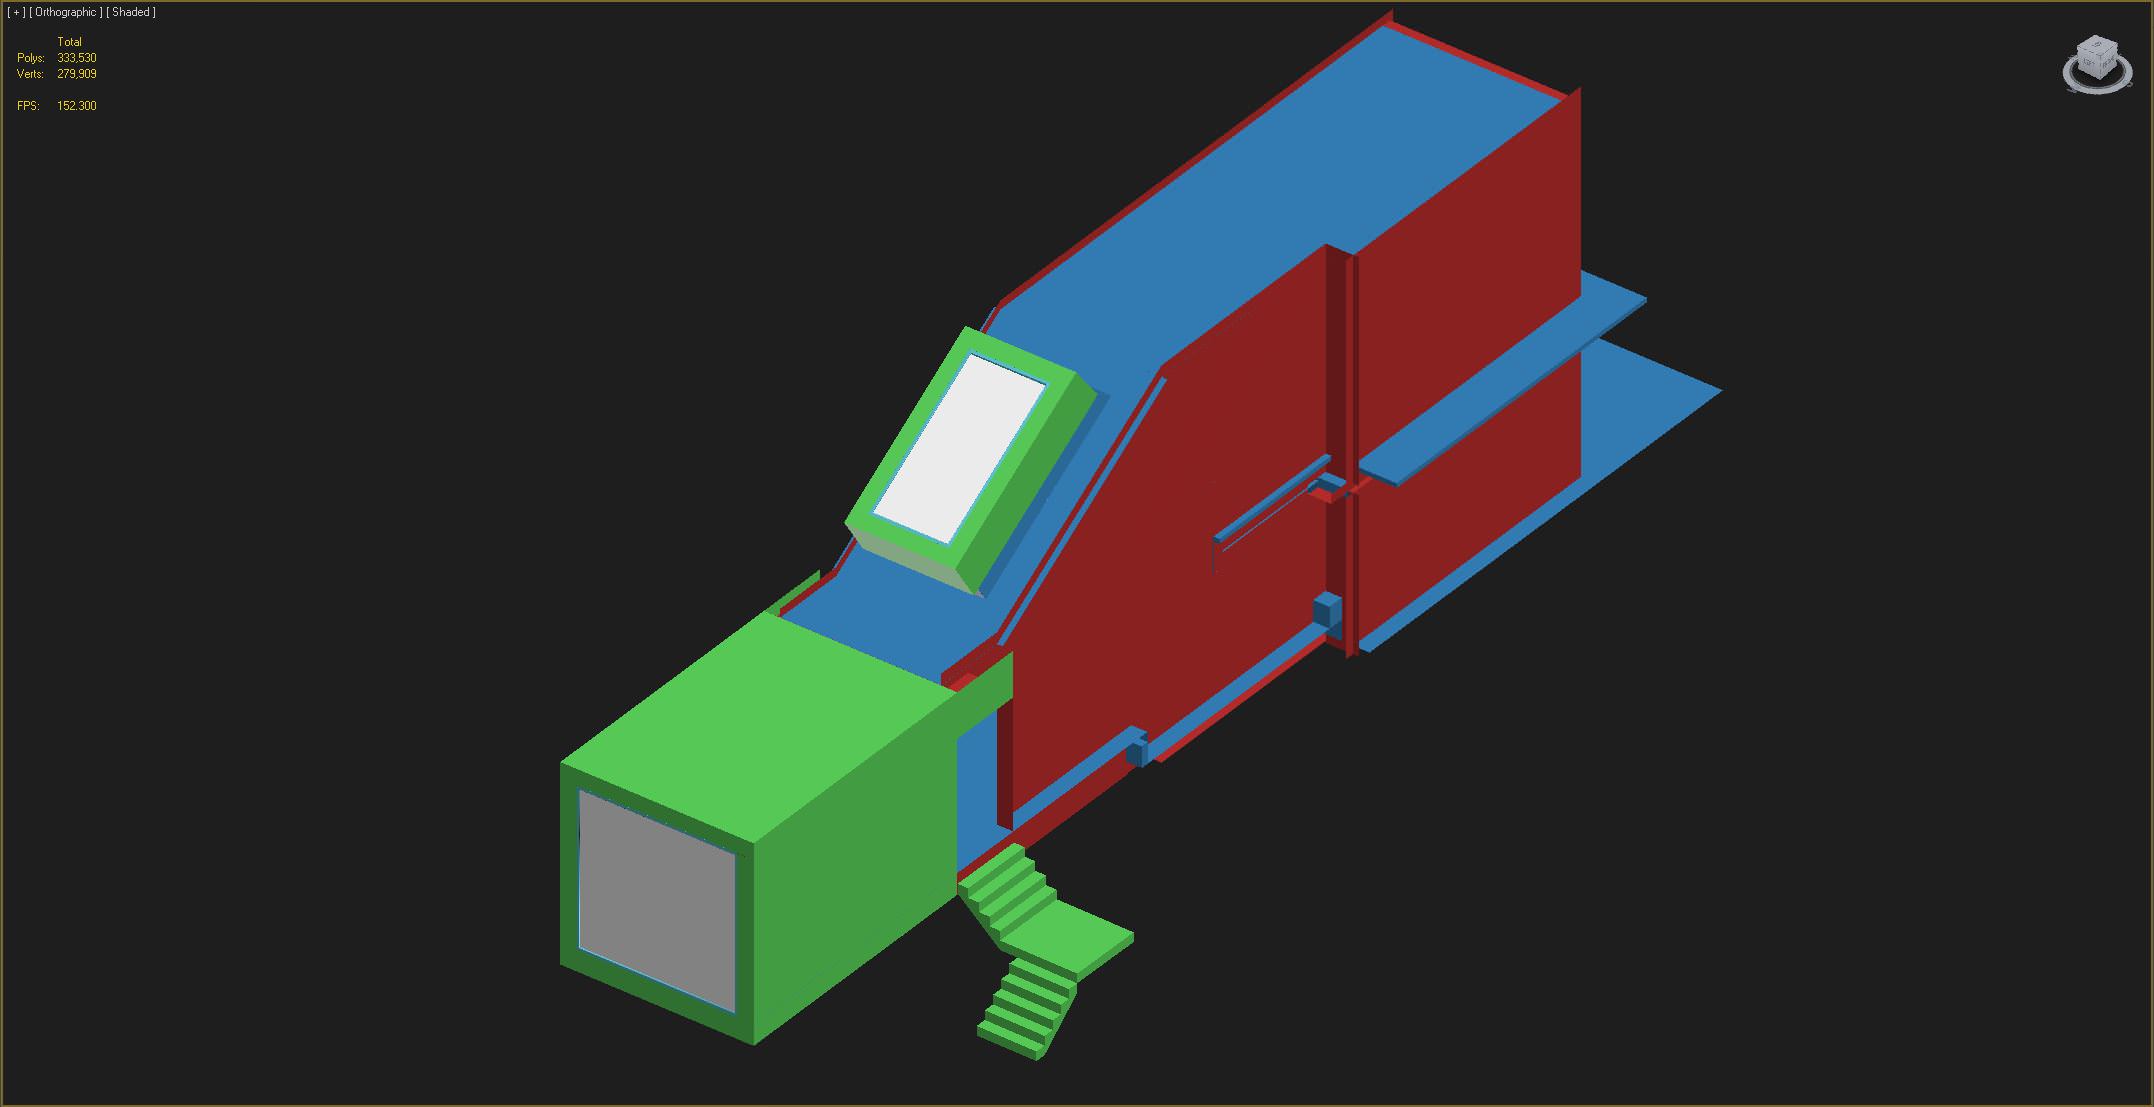
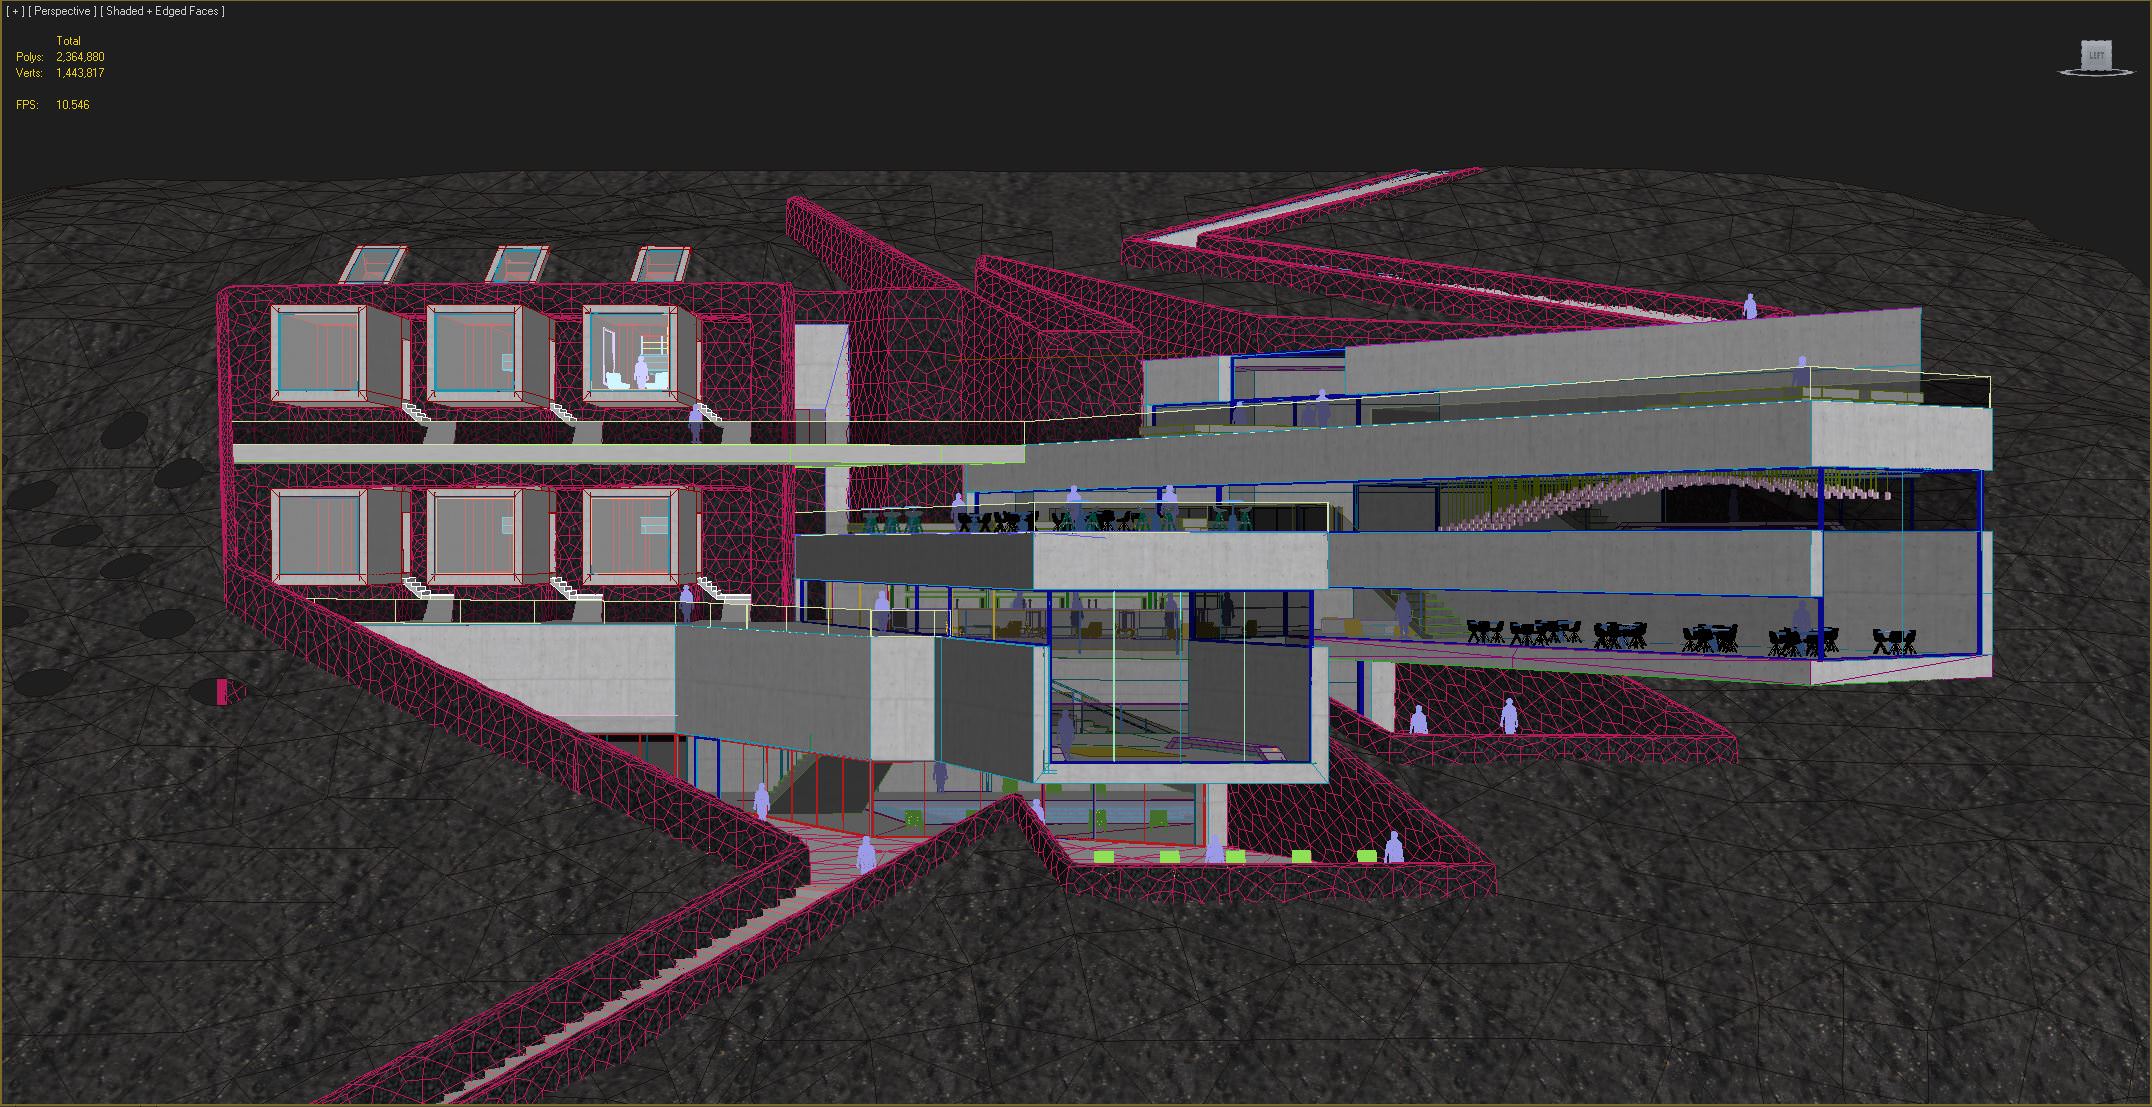
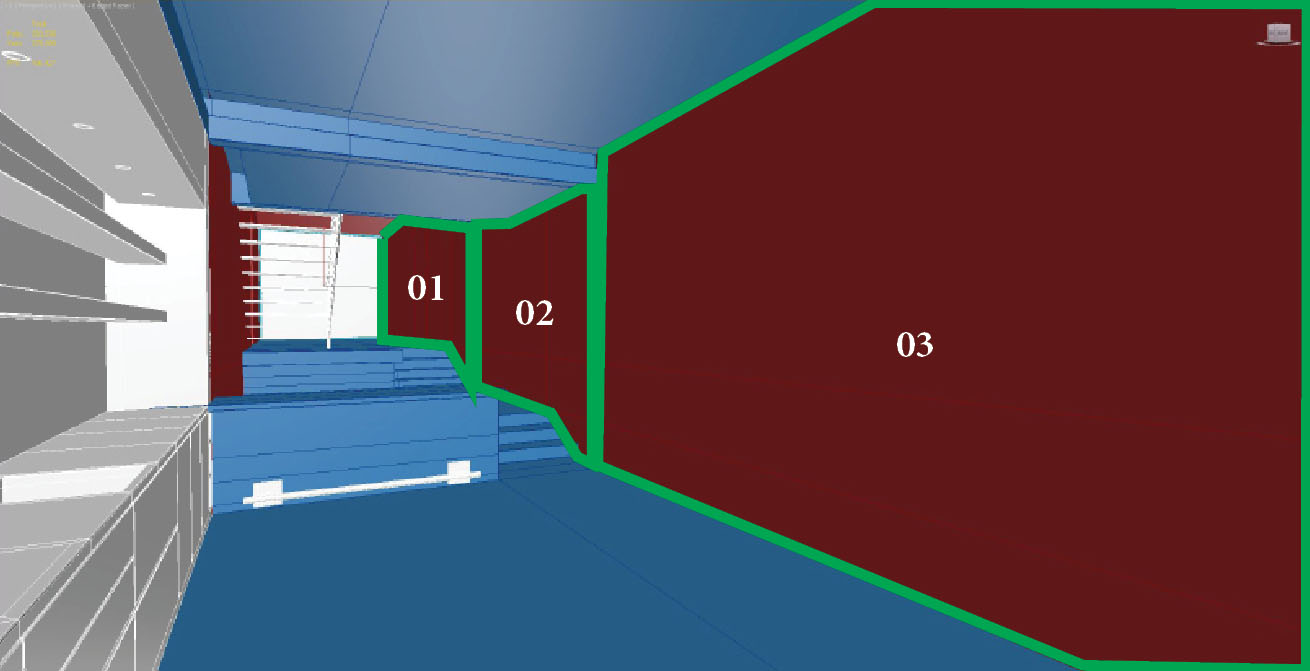
The first thing to plan when thinking about bringing your geometry into unreal is that intersecting geometry is a good thing as is splitting your model up with interior and exterior single faced surfaces. The reason behind both of these is to avoid light leaking in Unreal. Above you can see how we split the main geometry of the apartment. Green is exterior walls, red interior walls and blur floors and ceilings.

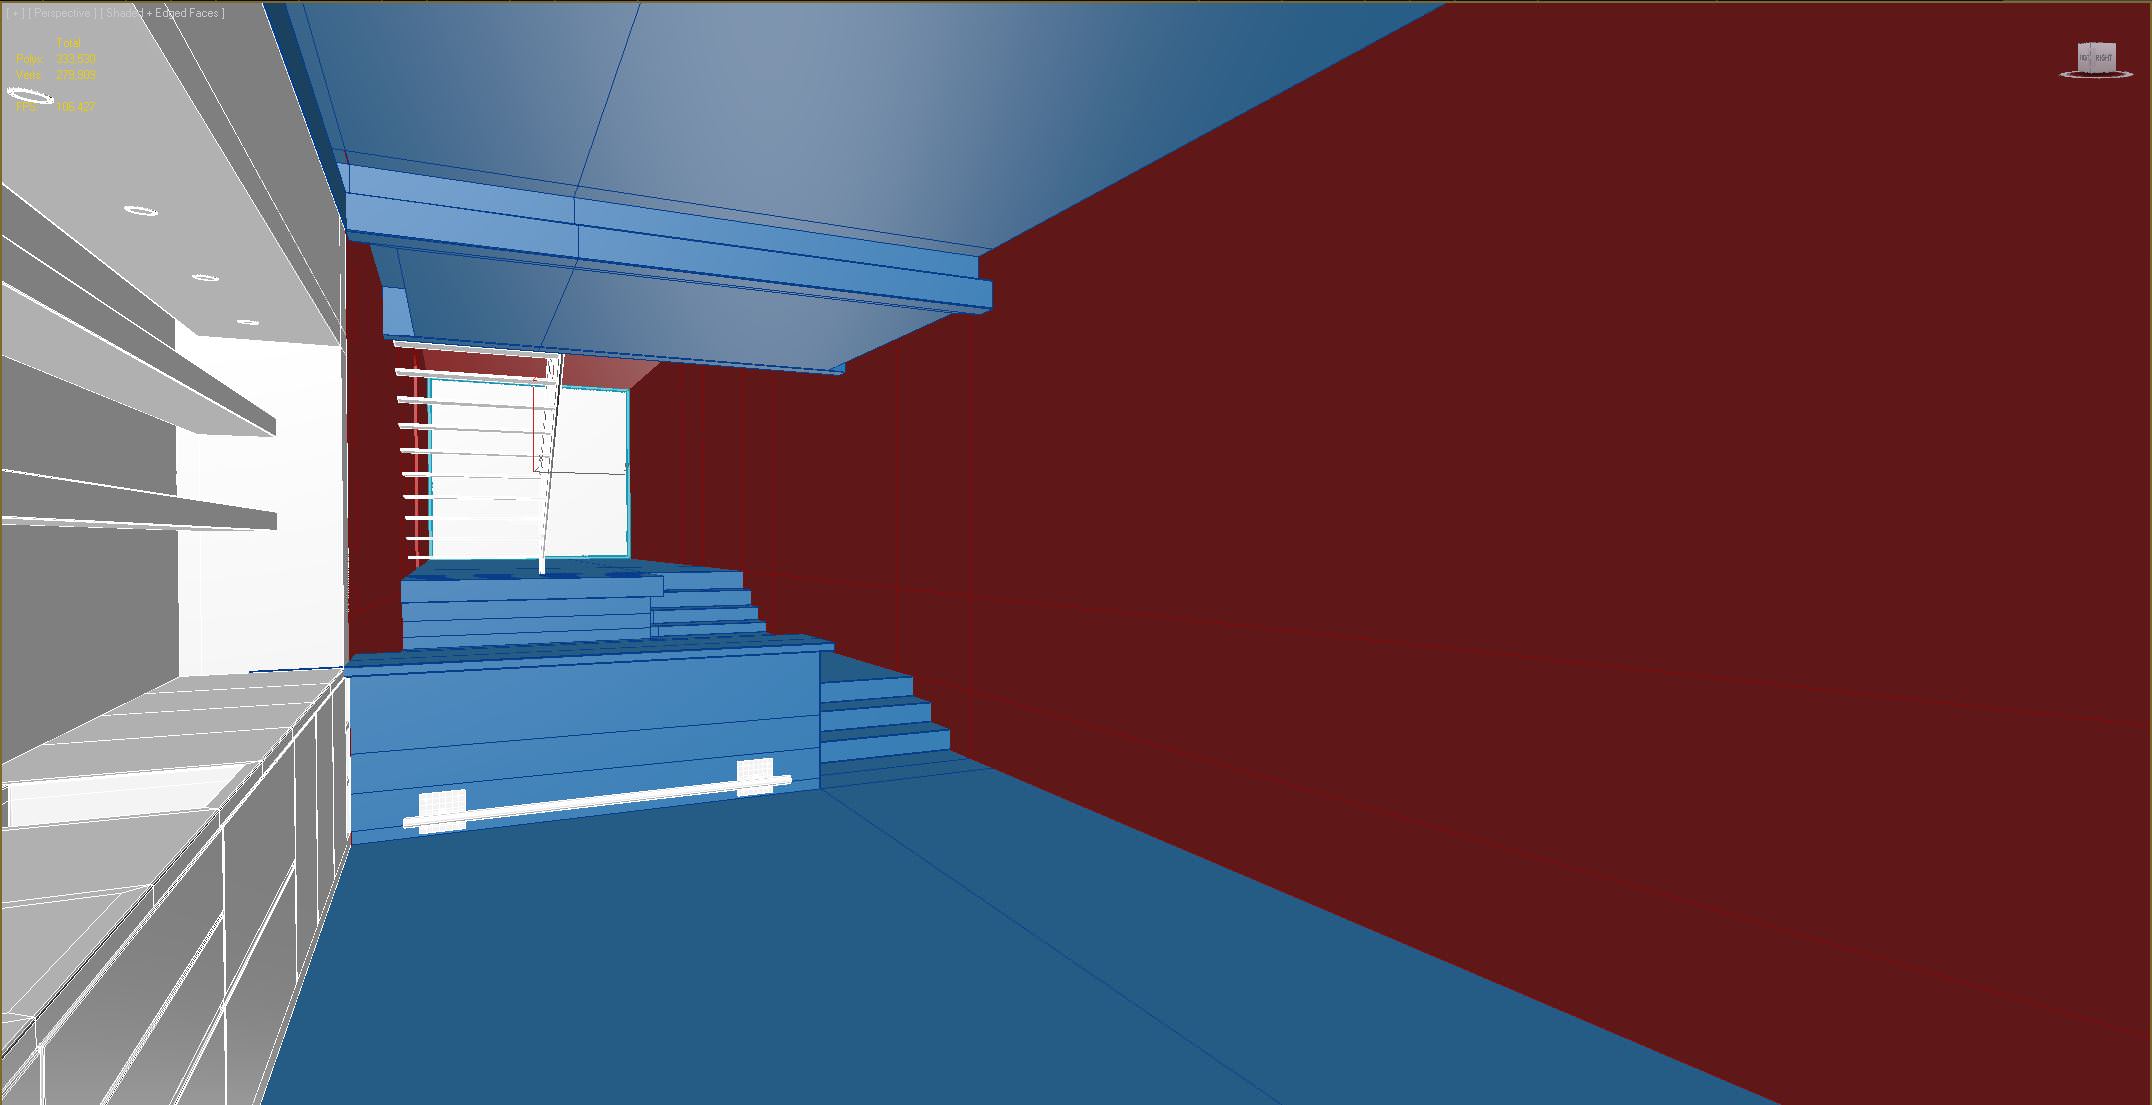
Here you can see the floor steps intersecting quite a bit through the interior wall.
Break Up Your Model
A large interior surface like this could be too big for lightmass resolution in UE4.
Another thing to realise sooner than later is that in Unreal Engine, you are baking the GI to a texture, so if you have a large piece of geometry then the resolution of the texture generated might not be enough for very large surfaces. It will be wise to create natural breaks in the geometry. Try to carefully think about where you cut however, as sometimes you can get slight differences in tone with GI bakes later in unreal. Split up your geometry along texture seams can work pretty well.
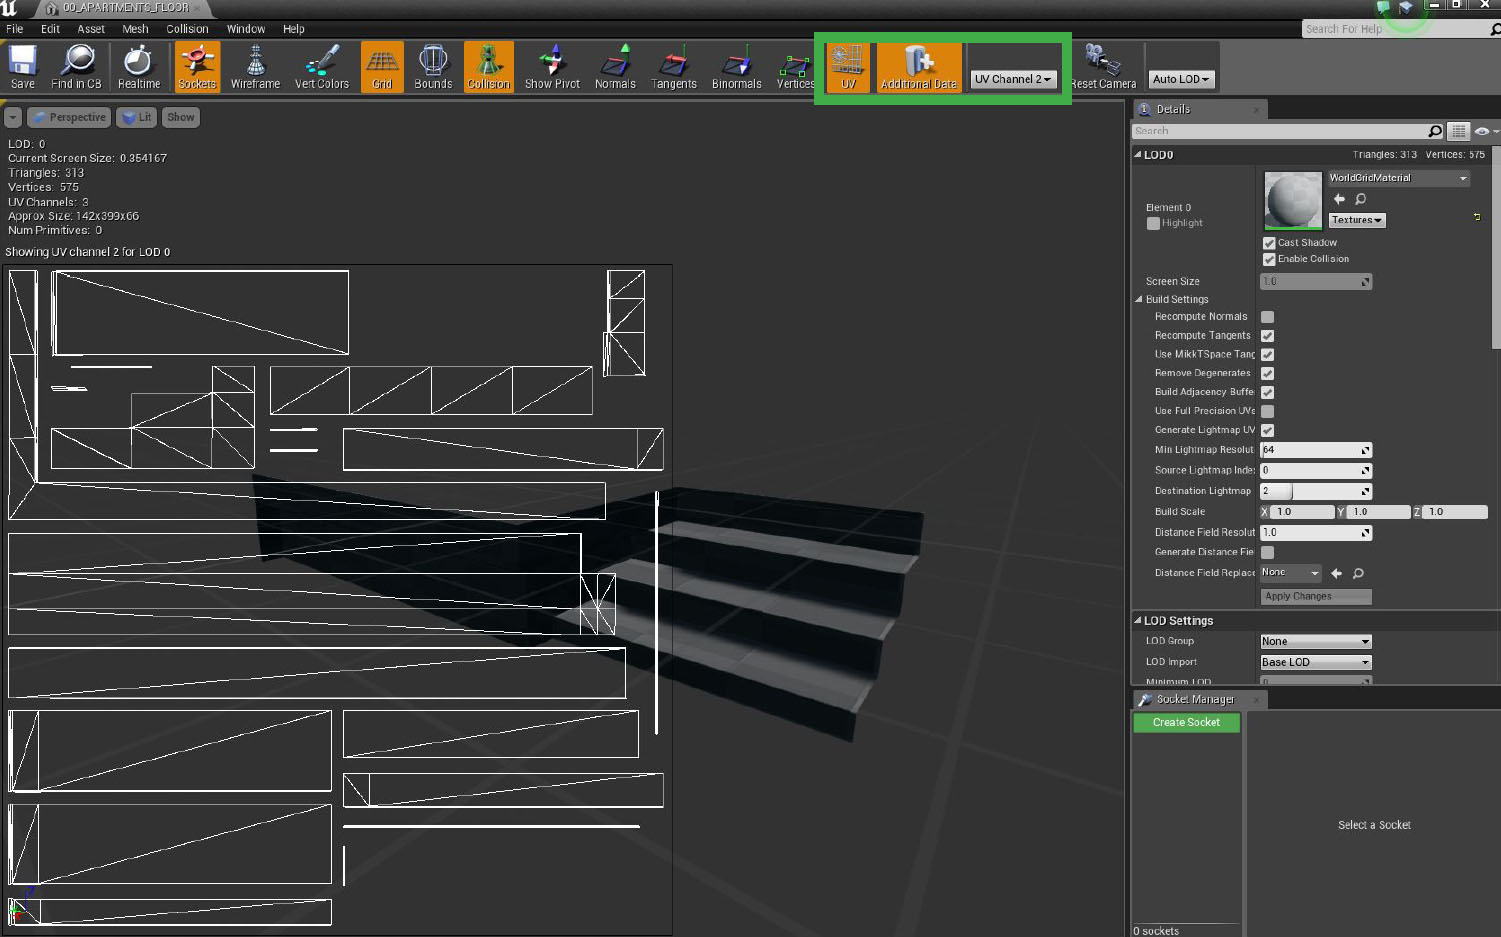
Object UV’s For Lightmass

The object above is the steps and breakfast bar. Everything is single faced to reduce the space taken up by the UV’s in the next step.
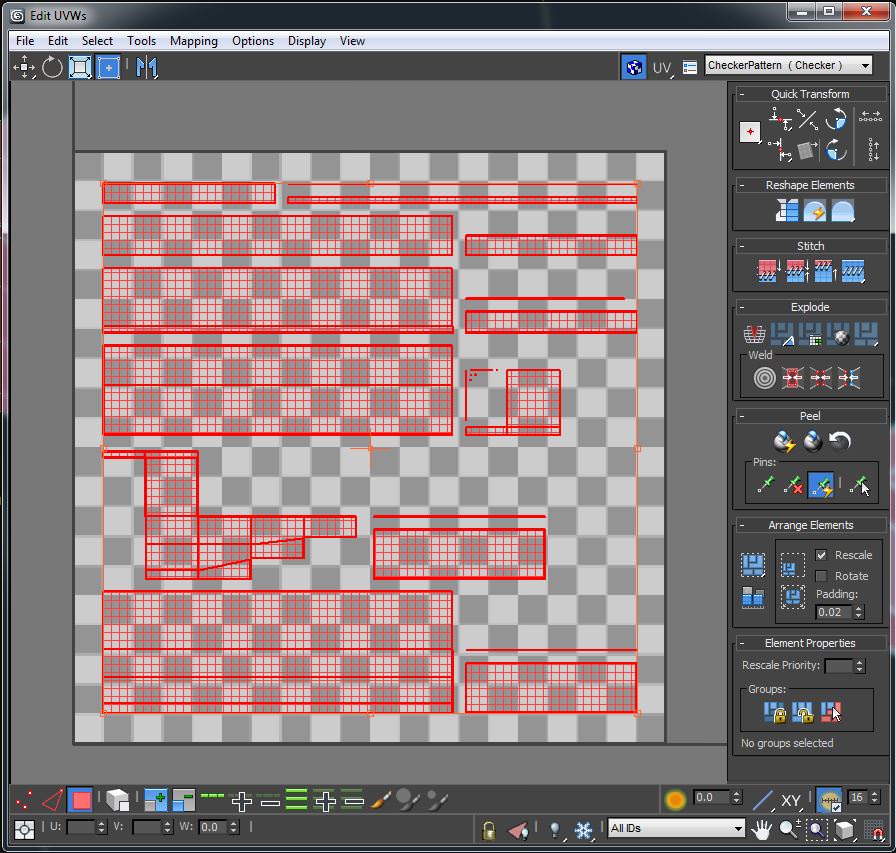
The next thing to add to your pipeline is to create an additional UV channel on all of your geometry that UE4 will use to bake the lighting onto. Think of it as render to texture but for the light only. [Editor Note : Since then, UE4 auto-generates that second UV channel for you during the import step, and if there are issues with the auto-generated version (we see issues in a small percentage generally) then you can modify it manually to correct any issues]. To do this you need to add an unwrap modifier, set to channel 2, select all of your faces and flatten the UV’s. You may need to re-arrange and scale some parts of the UV. It’s also a good idea to inset the faces a bit so they’re not too close to the edge, this can reduce additional light artifacts in Unreal Engine.
Object LOD’s
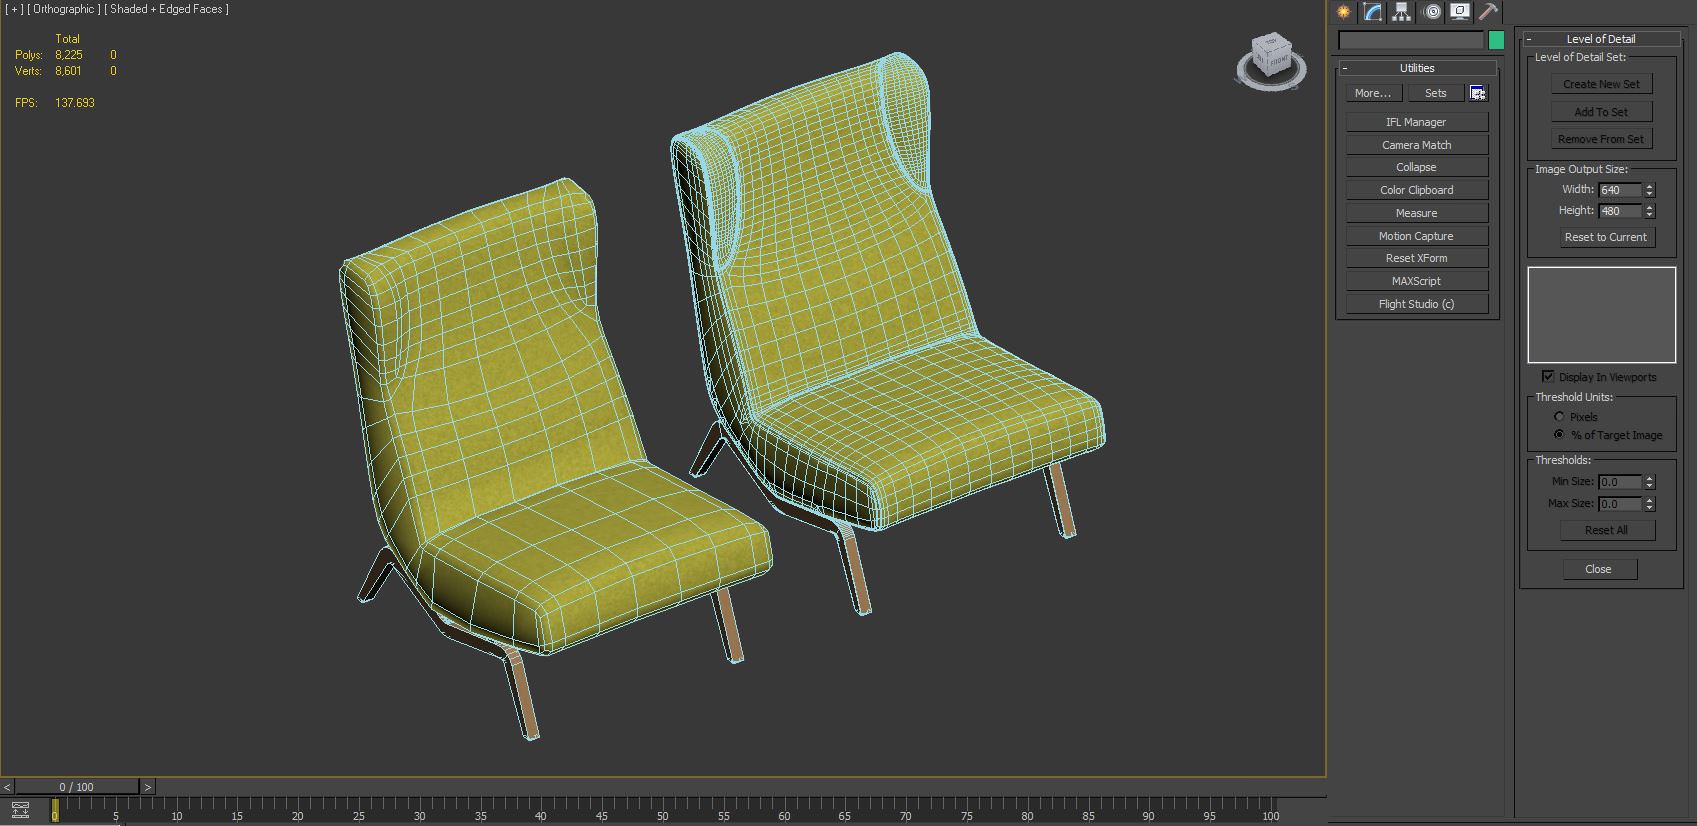
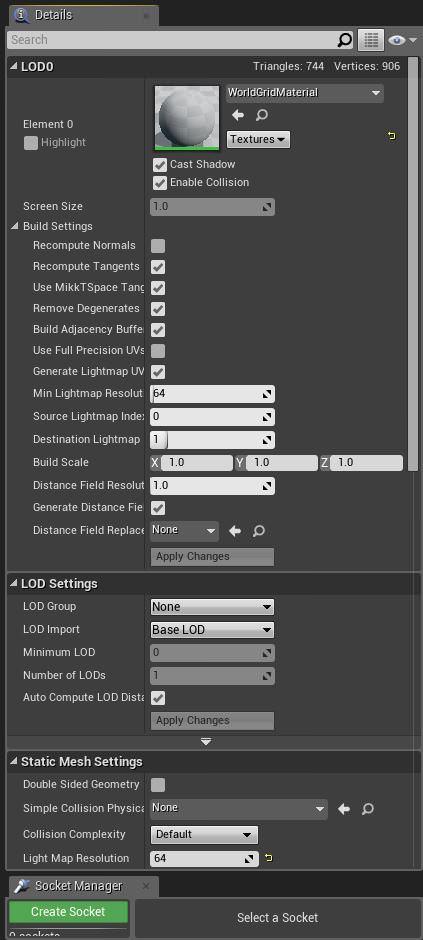
In UE4 it is possible to set different levels of details of a mesh based on its relative position from the viewer. It is possible to do it directly in 3ds Max optimising a clone of the mesh, grouping them and creating a new set in the Level of Detail tool in the Utilities panel.
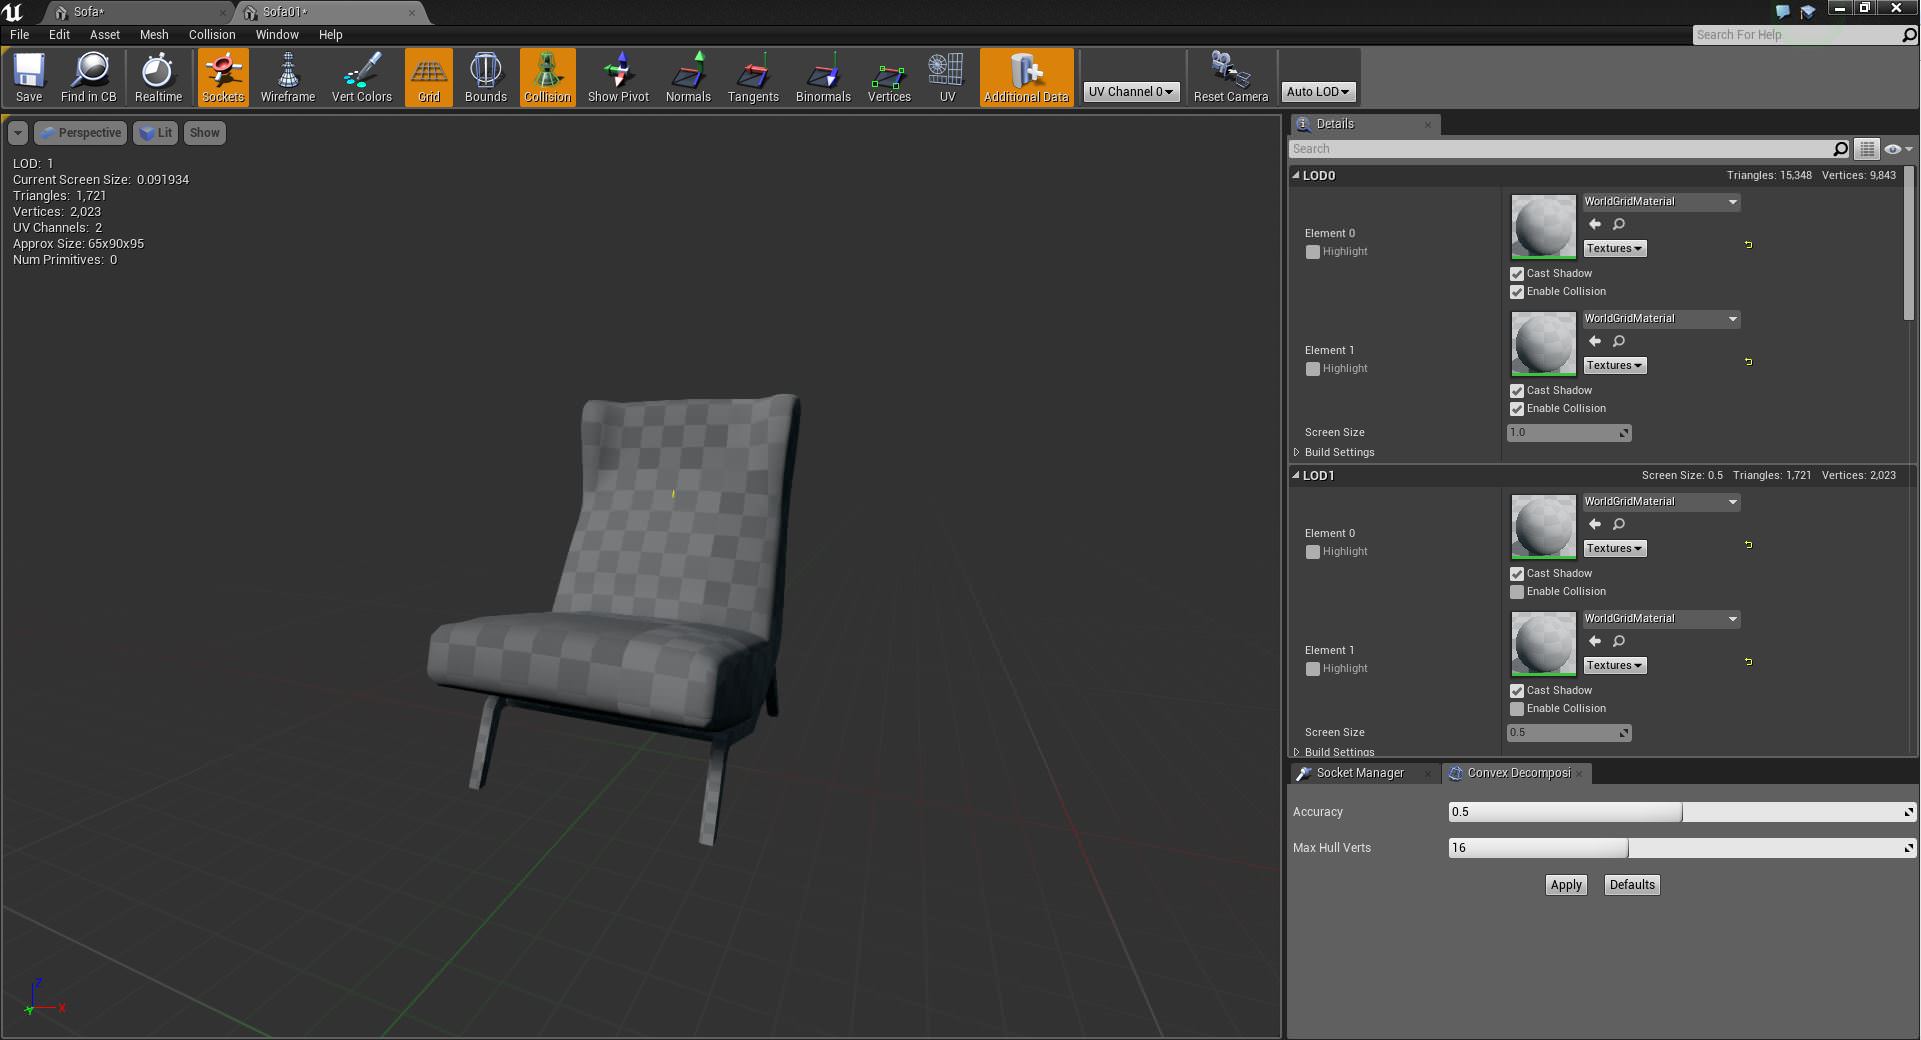
The meshes are then exported, taking attention to check the Animation box in the FBX options and imported in UE4 ticking Import Mesh LOD’s. The meshes are imported as a single asset that contains the two LOD’s and it’s possible to set at which screen size the lower-res one is loaded.
Building
Importing Geometry
So when you open Unreal Engine you are going to want to firstly import your geometry.
Before doing that though, create a few folders in the content browser. Start off with what space you’re bringing in, in this case apartment, and create meshes, texture and material folders within that.
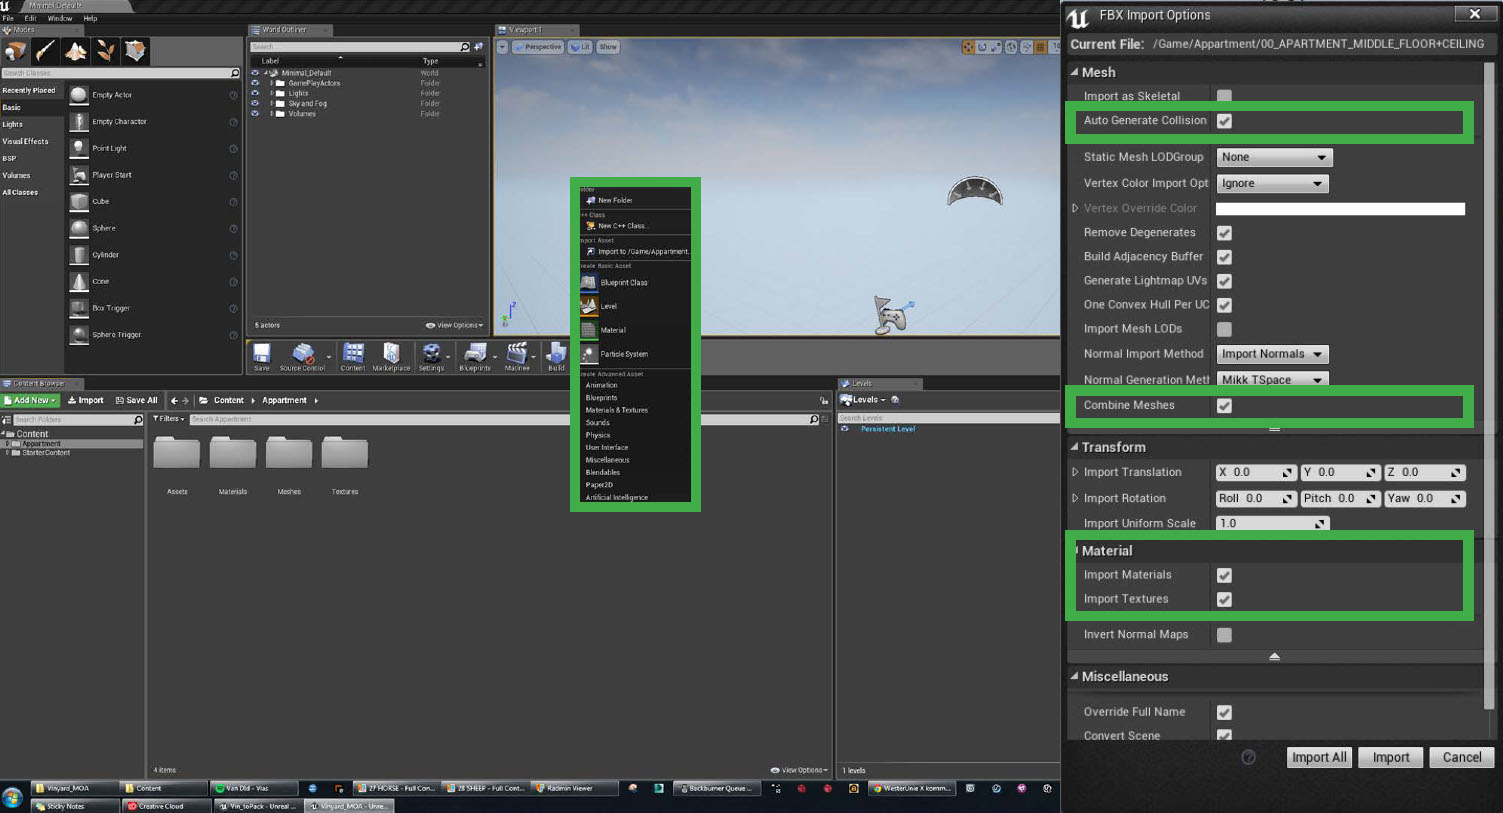
Within meshes, right click and select import to game. A dialogue box will appear with loads of options. A few things to note here :
We don’t use auto generate collision. We bring in separate geometry for collision objects later on for memory efficiency and control.
We don’t combine the meshes, it gives you greater light mass resolution control.
We don’t import the textures as many objects will have the same texture and material name in max so we don’t want duplicates in Unreal Engine. We create and assign the textures inside UE.
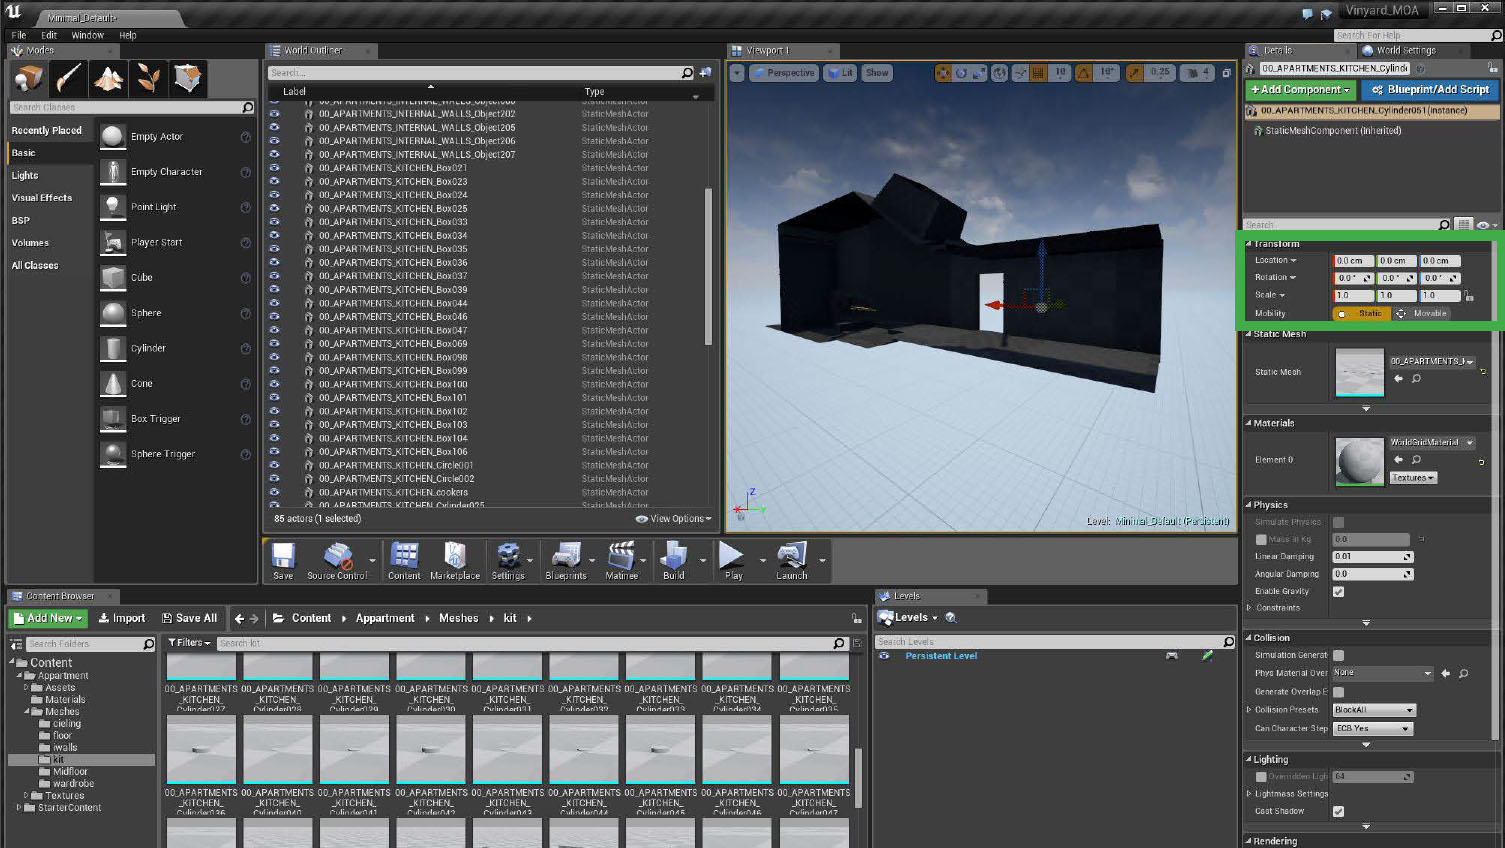
When all of your geometry is imported, select all and drag them into your main window. Your geometry should have a checker standard material on it. We had specific co-ordinates of our geometry as it was on a specific location on the mountain in Unreal Engine. The co-ordinates would be types in the transform box.
Light Leaks
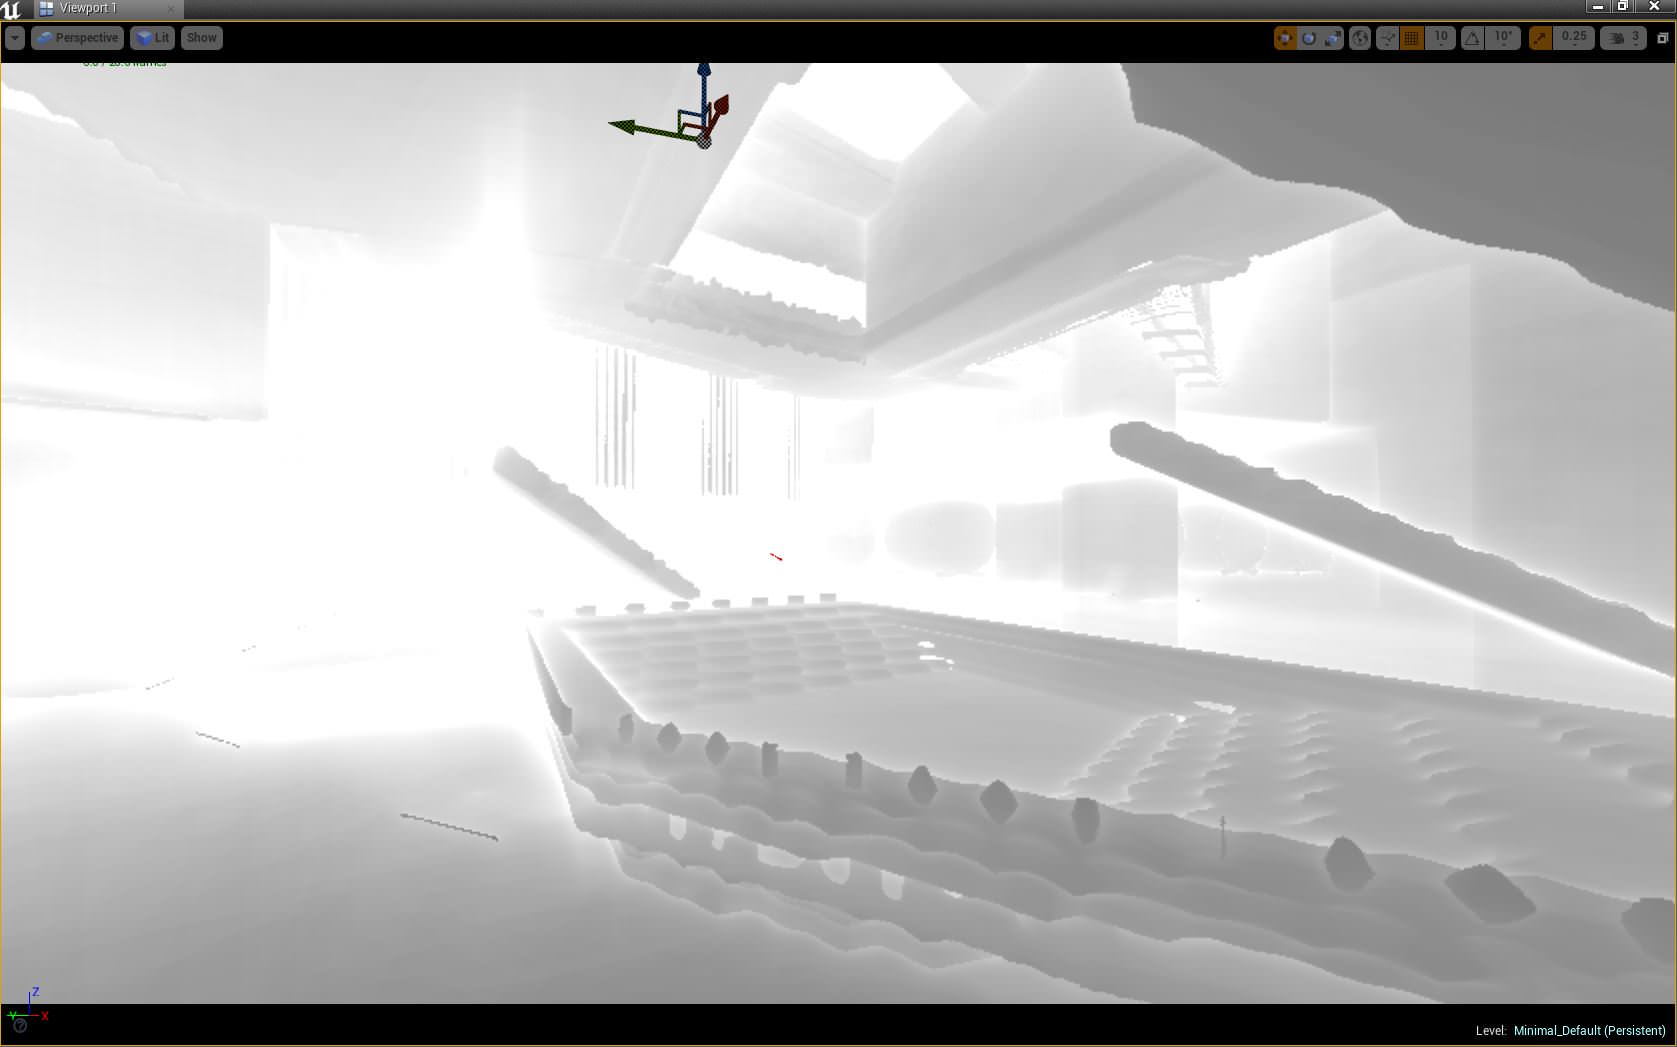
The scene will have a default sun and sky in it so you can get a good idea of how your geometry is working straight away. Have a look inside. You can see in our model here that the light is still leaking into the interior in certain places, even though we intersected the geometry.


The best way to fix this is to create a few boxes around your model in certain places, or in our case, around the whole thing. You can see that the model is now leak free. The blocking geometry you can set to not visible in game in the object settings. You will notice that there is a little preview icon on the geometry. This is because the scene is not baked.
Lightmass UV’s # 1st Bake
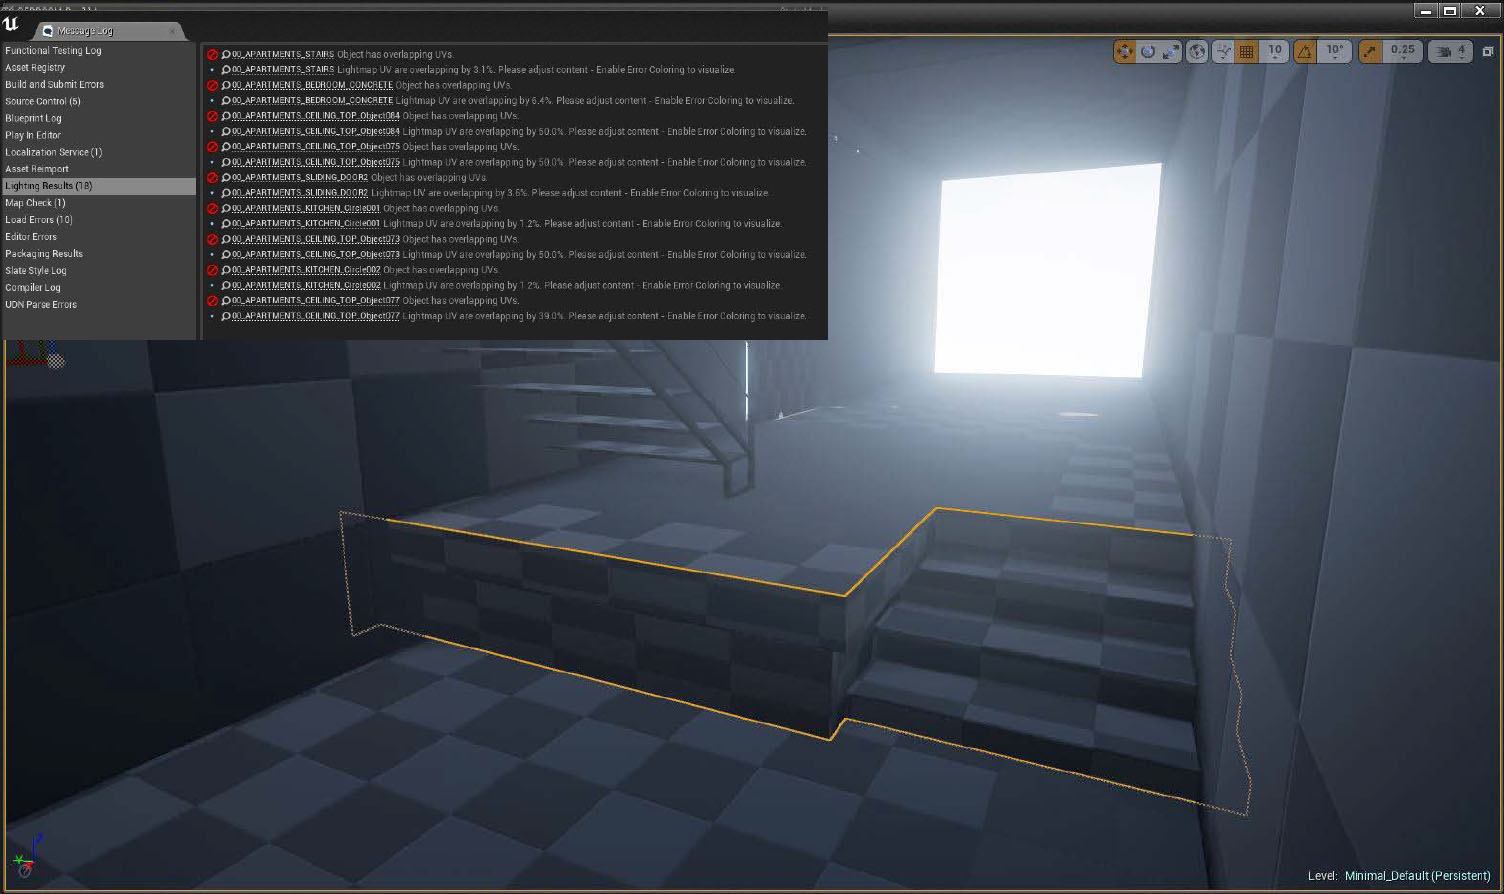
Once you press the bake button and wait a moment you will see the preview label disappear and the message log displaying a few errors. It’s worth having a look at these errors to see what they say. Most of the errors will be related to UV’s overlapping.
If click on an object and enter it’s mesh properties you can check the UV’s. Click on the UV button and select UV channel 1. It’s worth noting that Unreal Engine starts the UV channel at 0 and not one, so your UV channel set in max at 2 will be displayed at 1 in UE4. A little annoying but not the end of the world. You can see that all of the UV’s are within the square box so are not overlapping, as with all of the geometry imported. So the error displayed is related to texture channel 0 which was simply box mapped in max, which is fine and nothing to worry about.
Materials


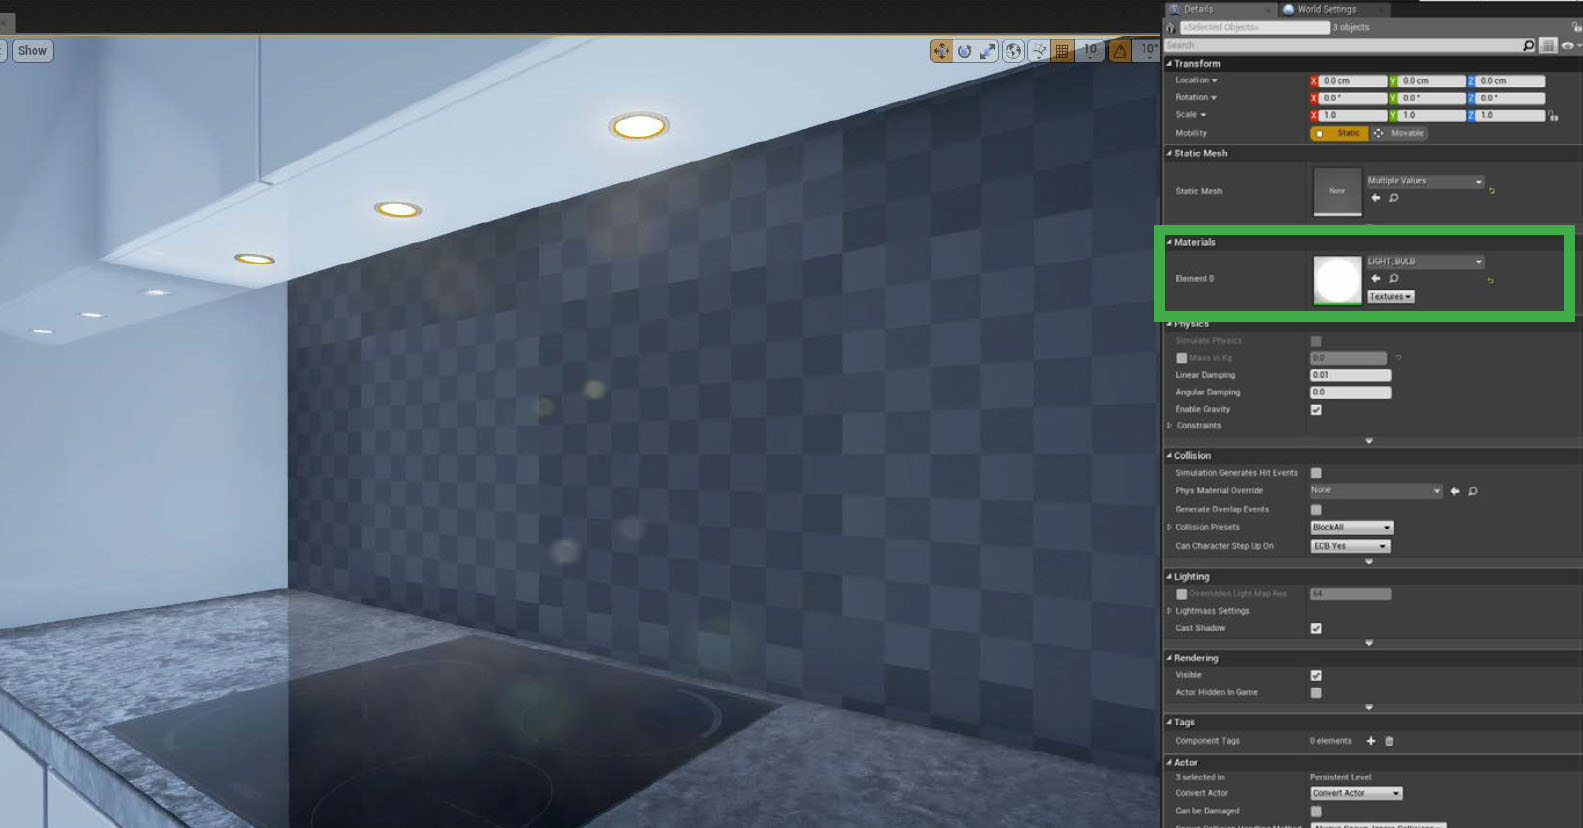
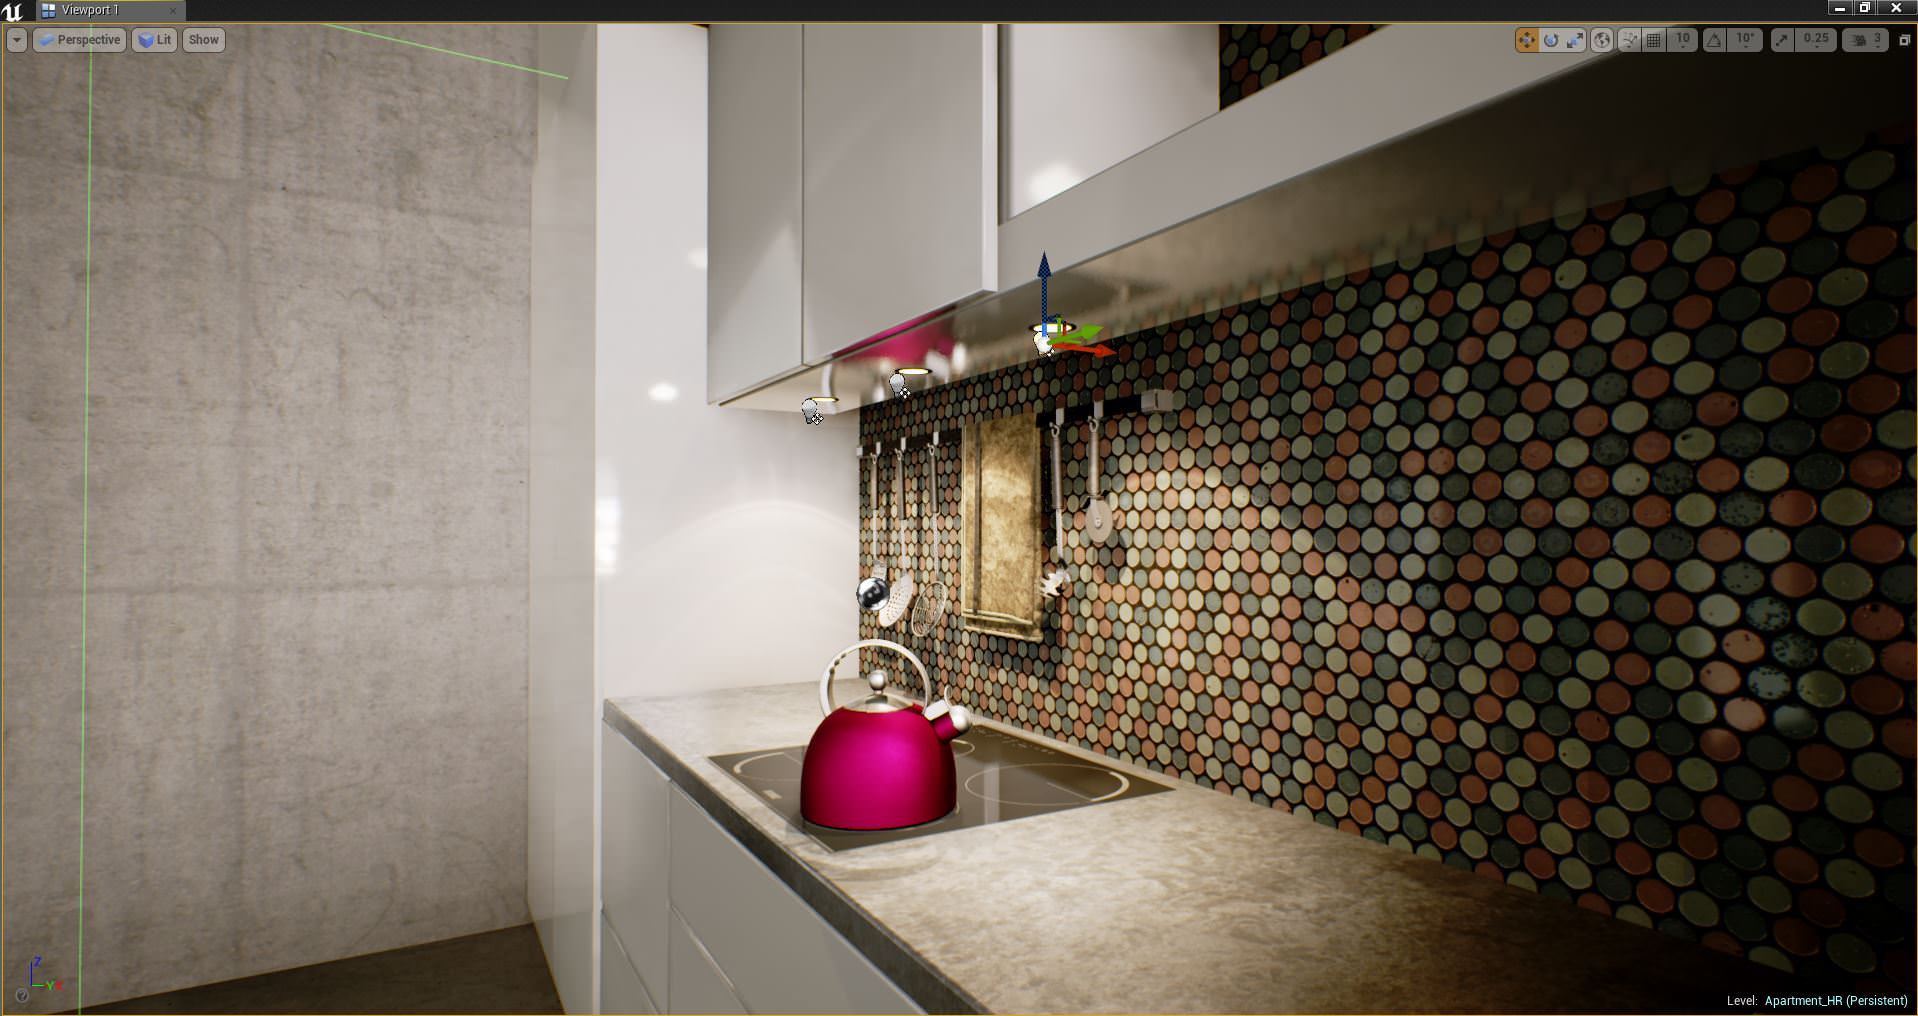
The materials we used ranged from super basic, to very complex. The main building textures were very basic. Just a diffuse, specular, and normal map for bump. Certain values were set for roughness and metallic with constant nodes.
Glass is very tricky in Unreal Engine. We downloaded and researched lots of glass materials and ended up combining a few we found (that we could understand). Once we had camera positions for the animation we created reflection scene captures, which created much more realistic glass reflections at the cost of performance. It’s worth having a look at the starter content material packs to familiarize yourself with the textures in there. We used a few of the metals which turned out just fine and saved lots of time.
The UV mapping is done in max with any technique you want, so when you re-apply the texture in unreal it maps the same. You apply the material to the material slot on the objects general settings. It’s important to note that Unreal Engine really doesn’t like textures bigger than 4k.
General Settings
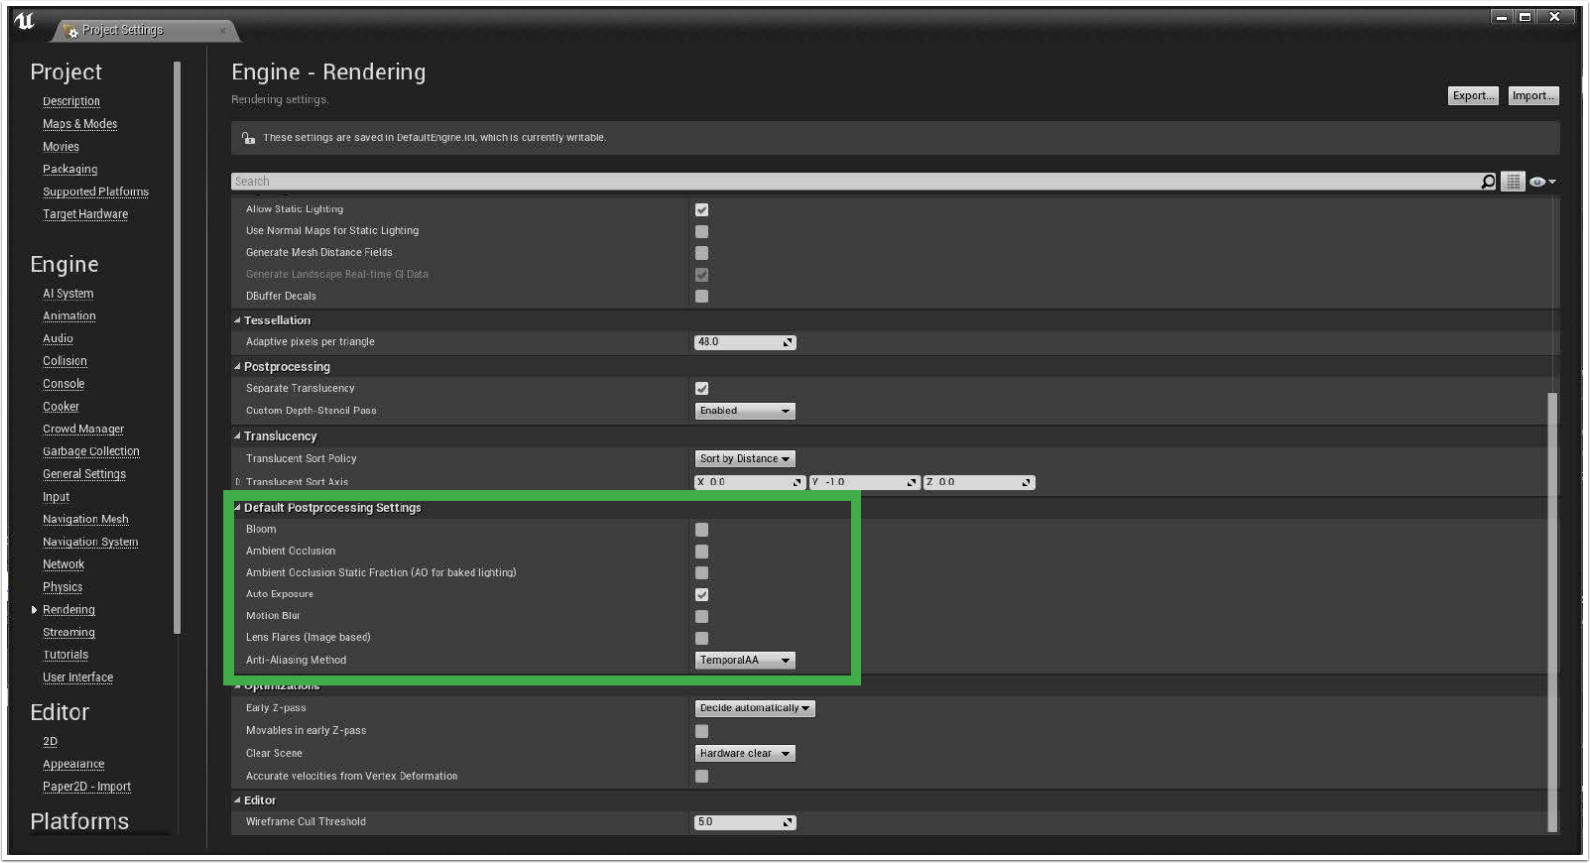
Once you’re happy with your first pass at texturing you building, take a moment to adjust a few core system settings.
Project Settings – Rendering :
Turn off all default post processing settings, this will be done with more control later.
World Settings :
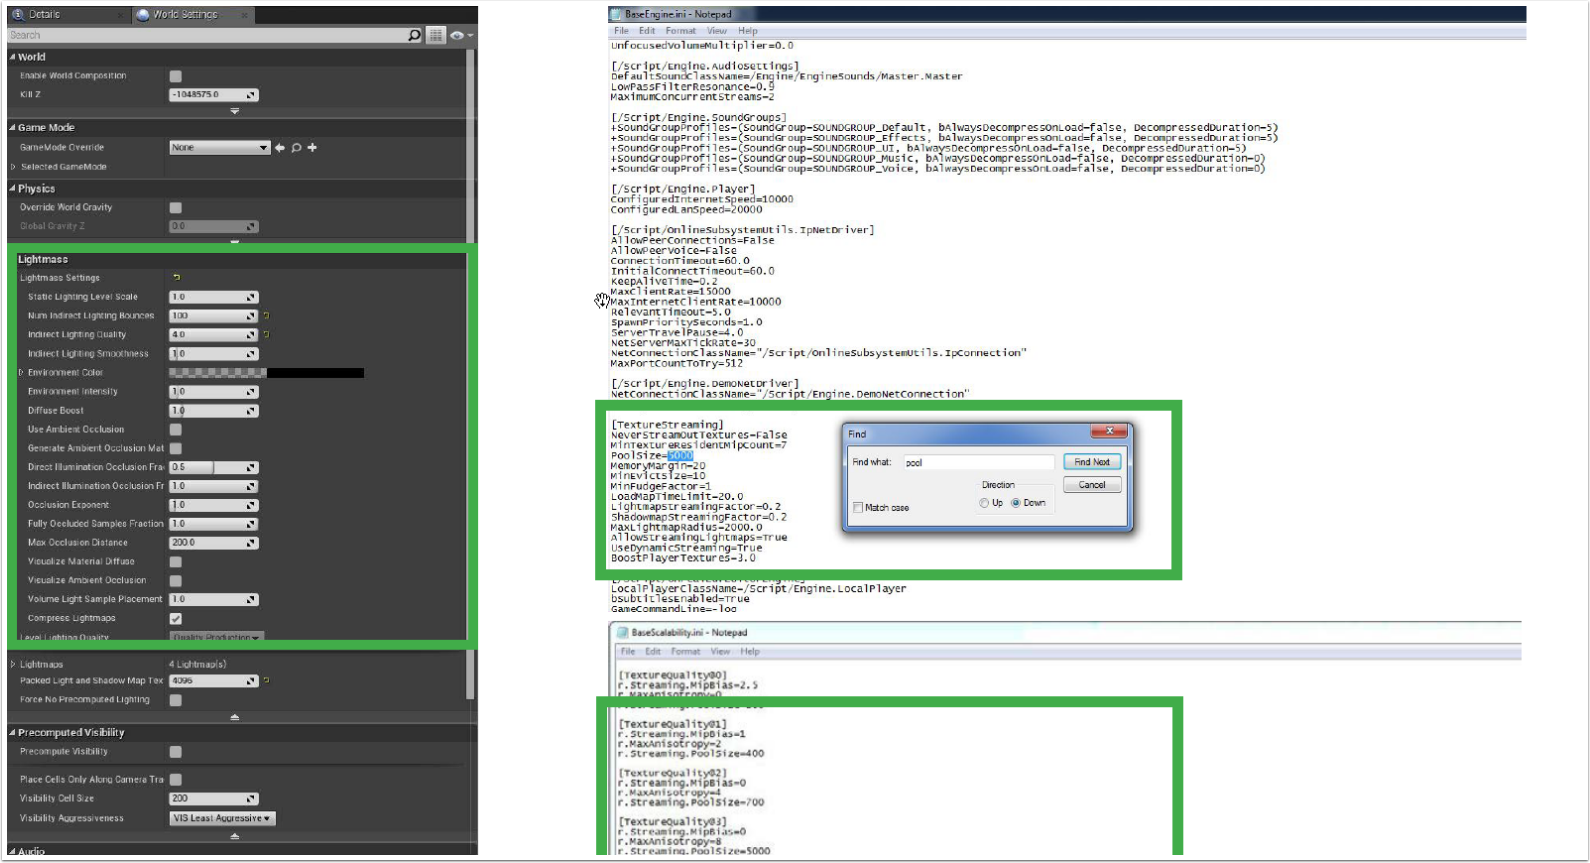
Set your indirect lighting bounces to somewhere between 10-100. There is very little difference between 10-100 in result to be honest but people seem to be maxing this out in the hope of a bit of extra GI performance. The difference in build times above 6 bounces is pretty non-existent to why not. Set the indirect lighting quality to 4. With Unreal Engine closed, go to the BaseEngine.ini file within C:Program filesEpic Game4.9EngineConfig, search for pool size under texture streaming and set this to above 5000. Do the same in the BaseScalability.ini file. This will avoid that annoying memory issue with the textures loading every time you boot a big scene in UE4. There are lots of engine settings to tweak but we found the default works fine for most things.
Sun & Sky
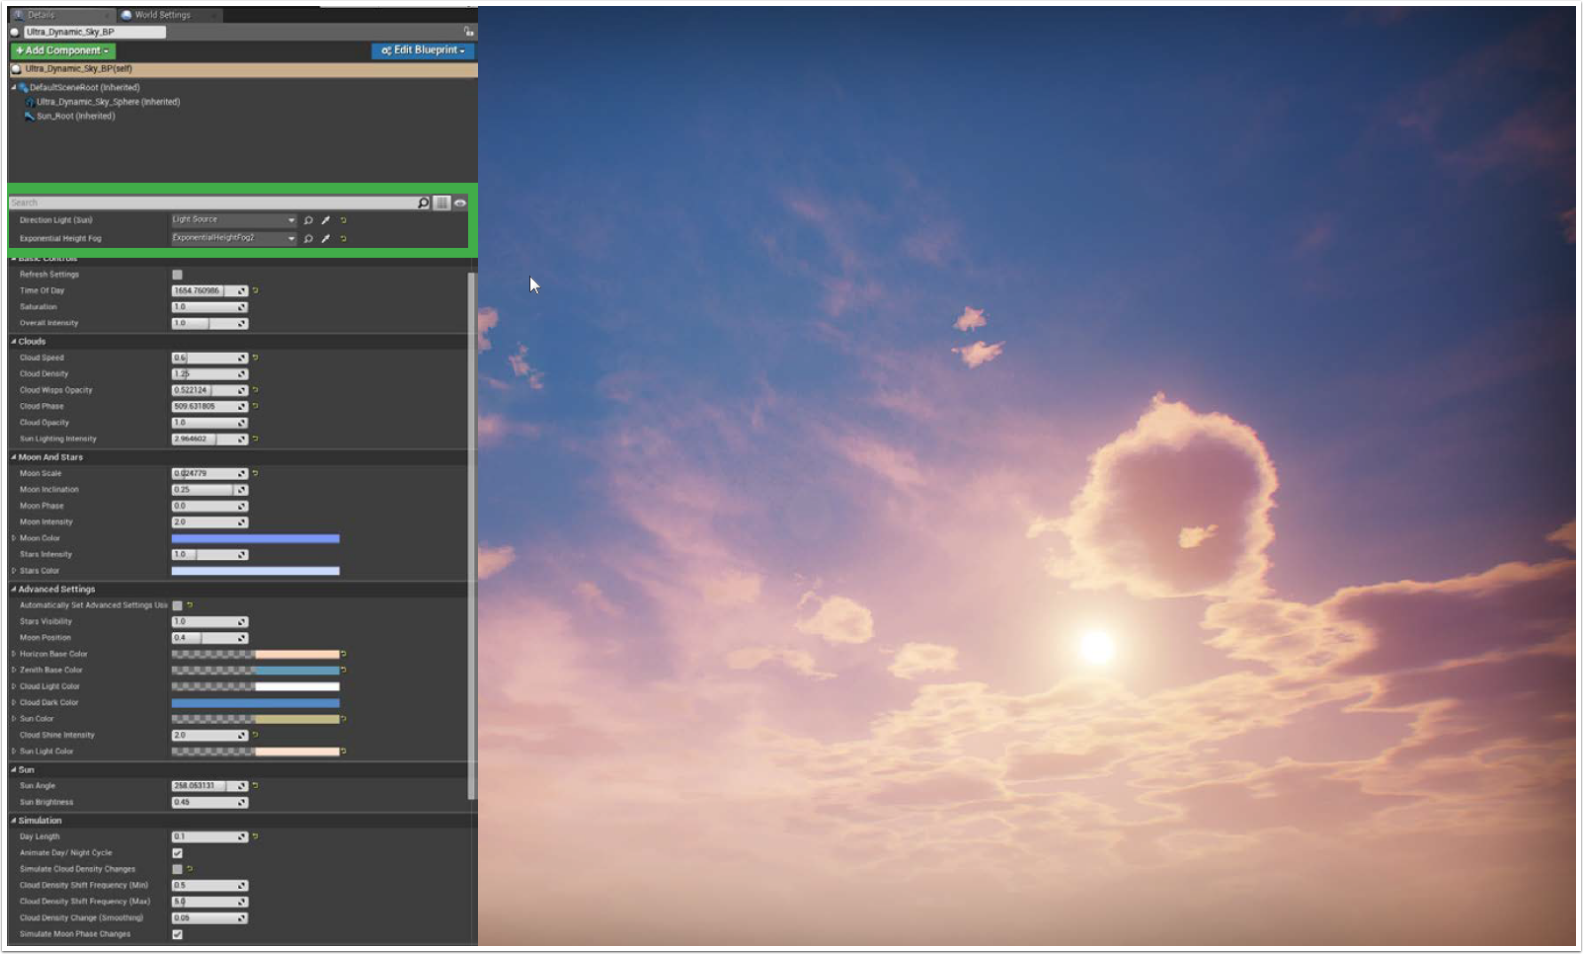
There are several sky blueprints you can download but we went for the ultra dynamic sky blueprint as it was really simple to use and links with existing sun and exponential fog assets.
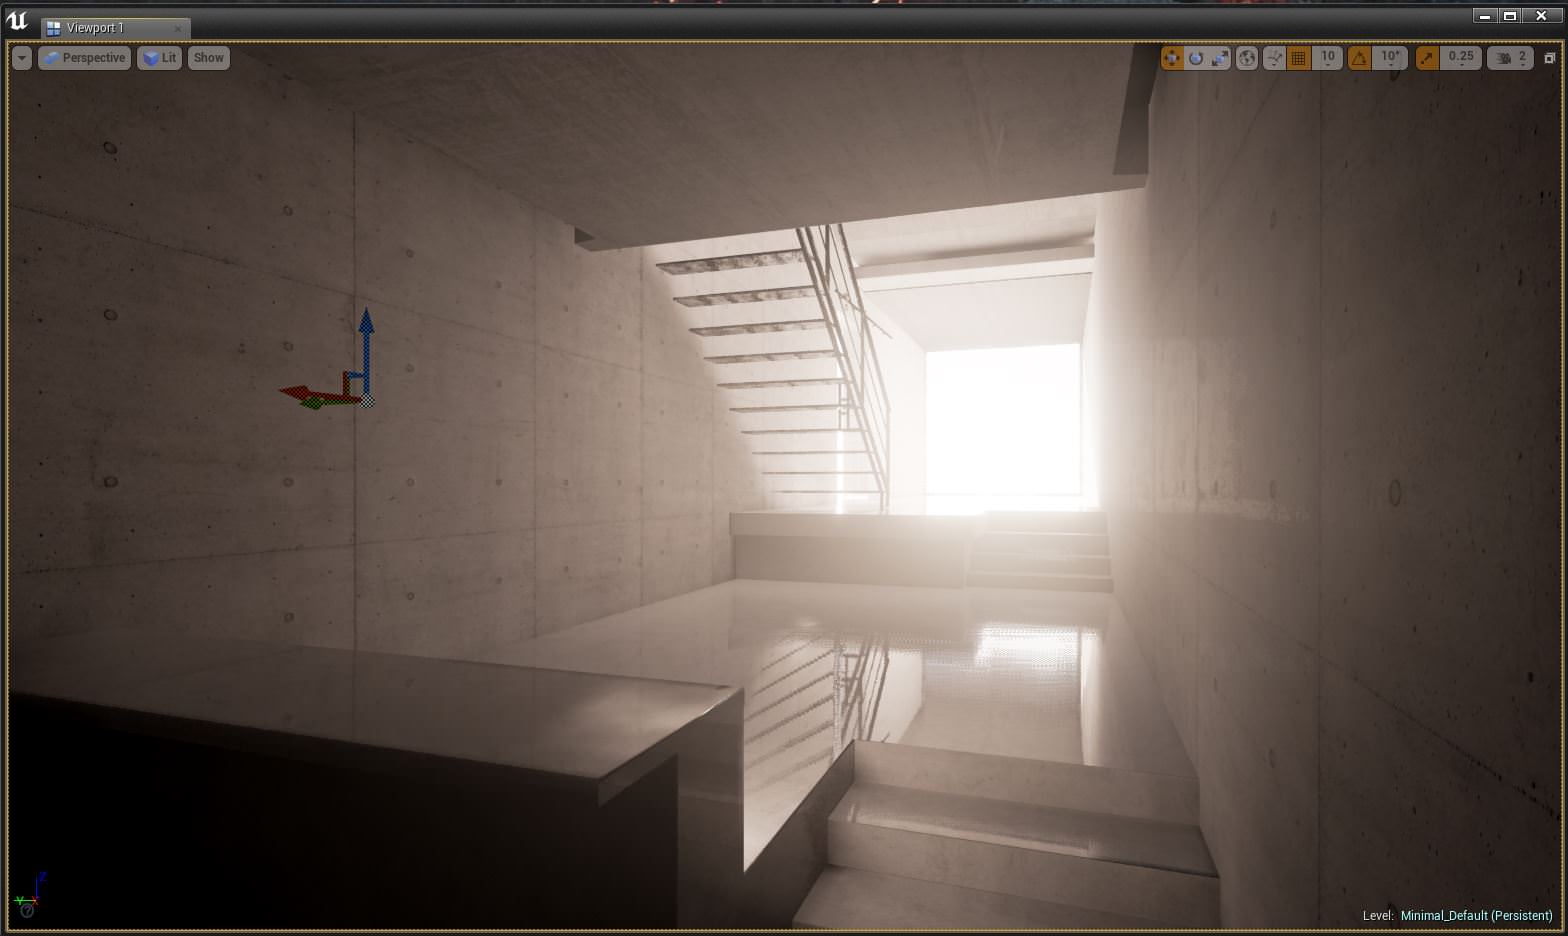
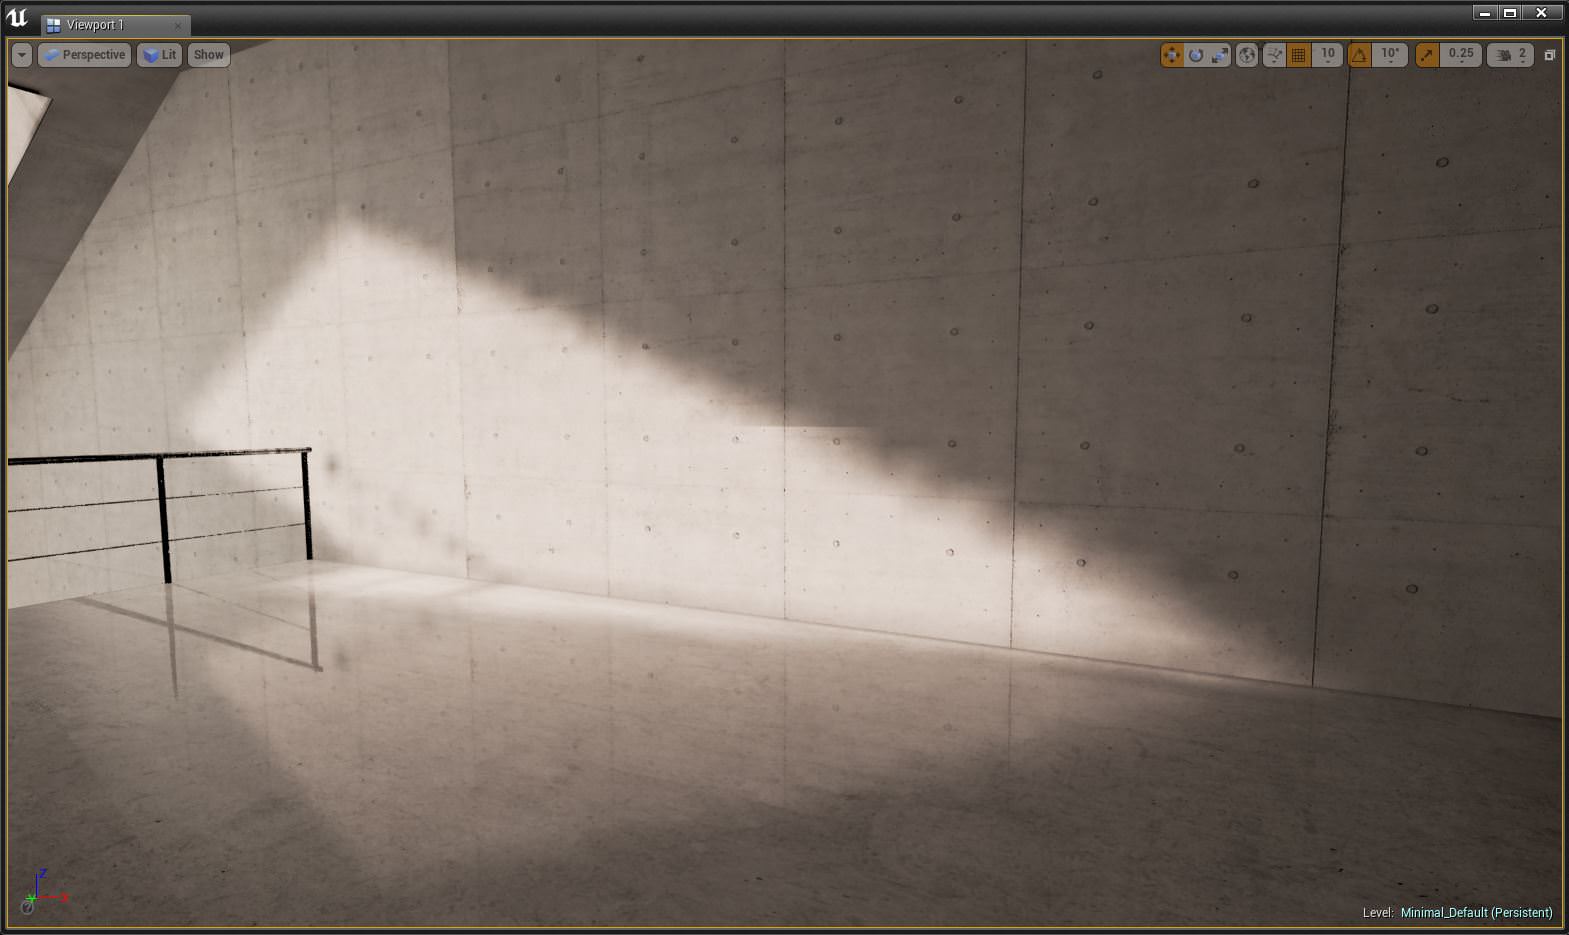
With the sun and sky set, here is a bake of the interior scene with preview settings.
Deflectors
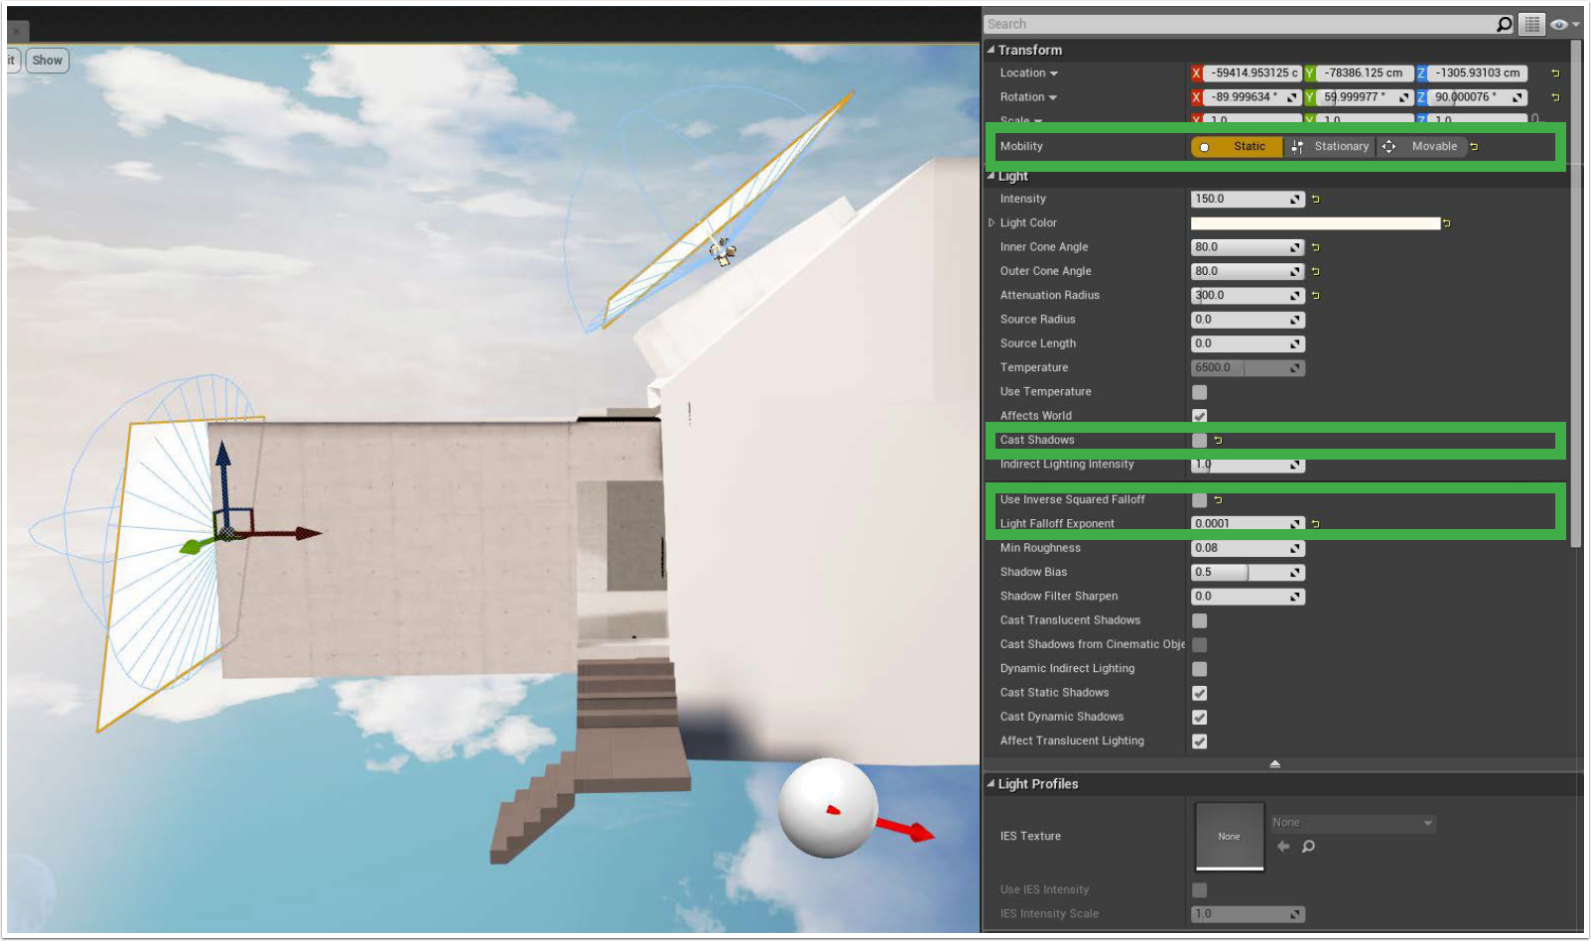
Light deflectors are simply spotlights, pushed onto immersive planes, that bounce light into the interior with a soft diffusion, similar to that of a V-Ray Plane Light.
For the interior apartment we used them to completely replace the skylight. The light should be set to static, to not cast shadows and for inverse squared falloff to be turned off. The reason the scene looks different after baking is that the scene has calculated the lighting and baked it onto the maps created in that second UV channel in max. The plane lights themselves are set to hidden in game so they are not visible when you walk around. They can be set to visible if you don’t need to see through the window specifically, and can give off a nice soft glow.
Above is a a bake of the scene with deflectors on production settings.
Lightmass Resolution
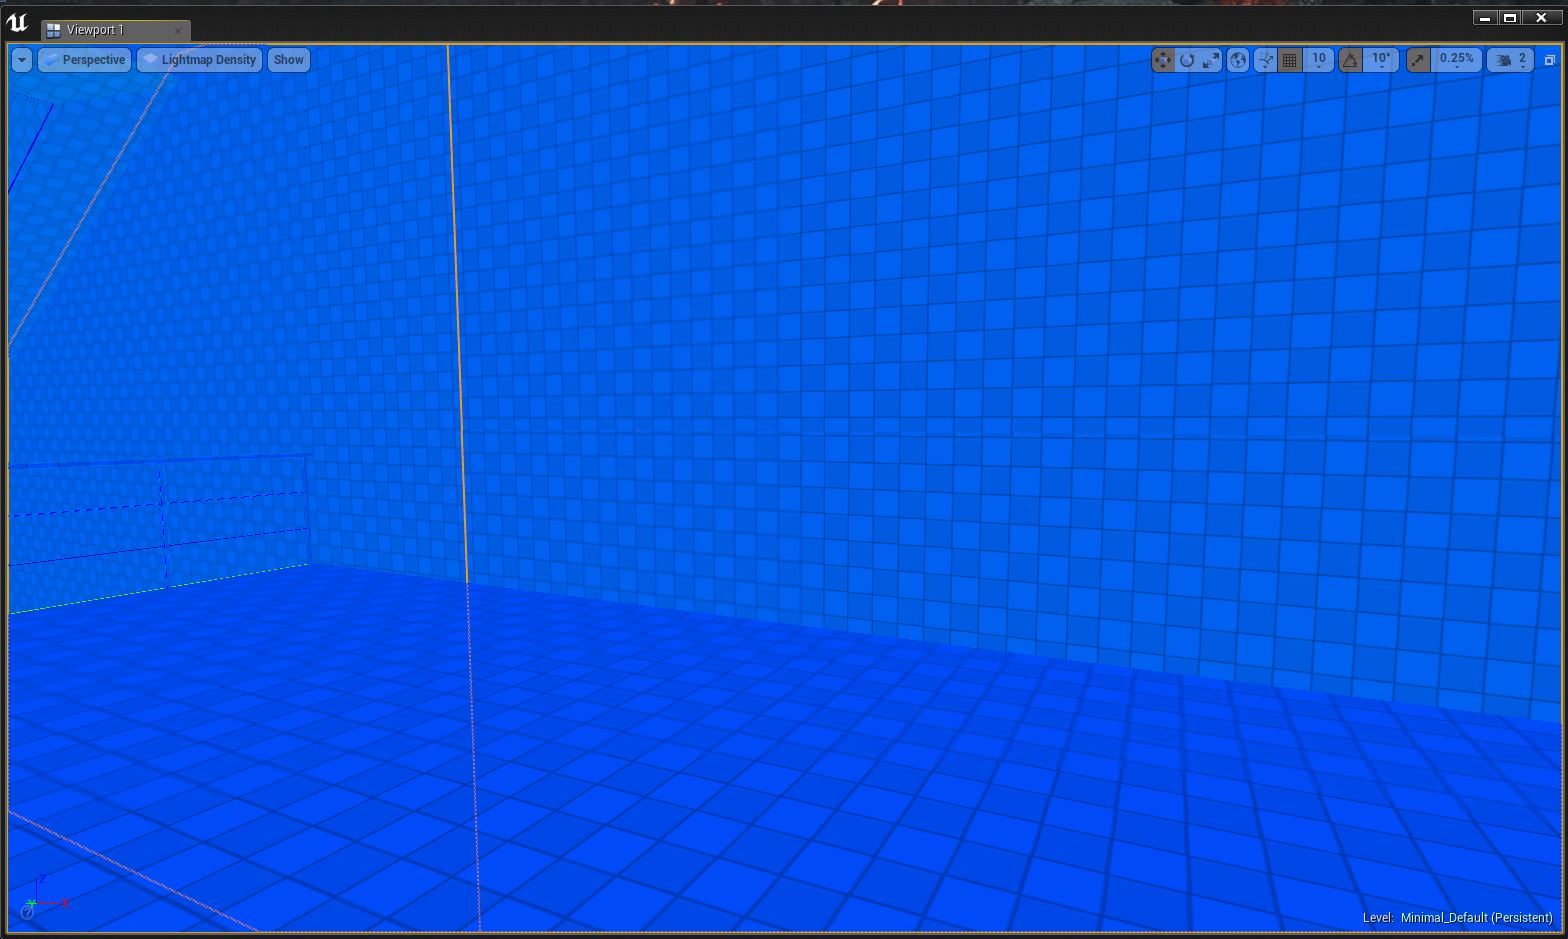
You may notice that some of the shadows even on production settings, are very low in resolution. Luckily Unreal Engine has a way of changing each object’s lightmass resolution, to get better shadows. UE has lots of ways to visualise certain aspects of the scene. Displayed in blue is the lightmap density viewer. Blue is showing you that there is not enough resolution on the geometry for optimal lightmass, red is too high, and green is perfect. The default lightmass resolution for objects is 64.
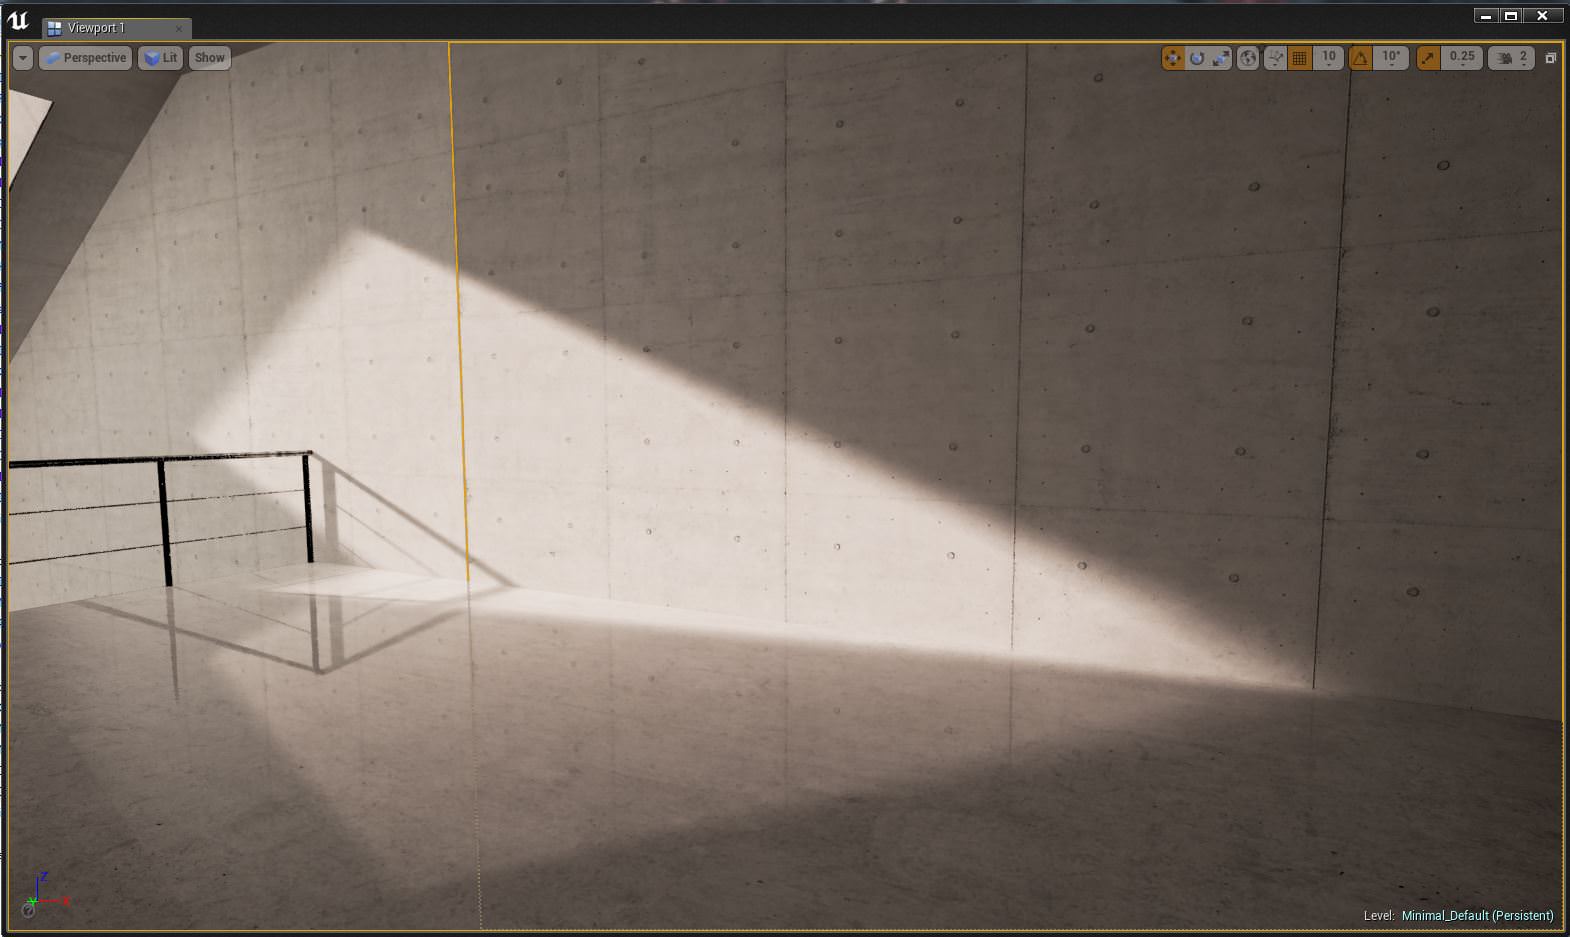
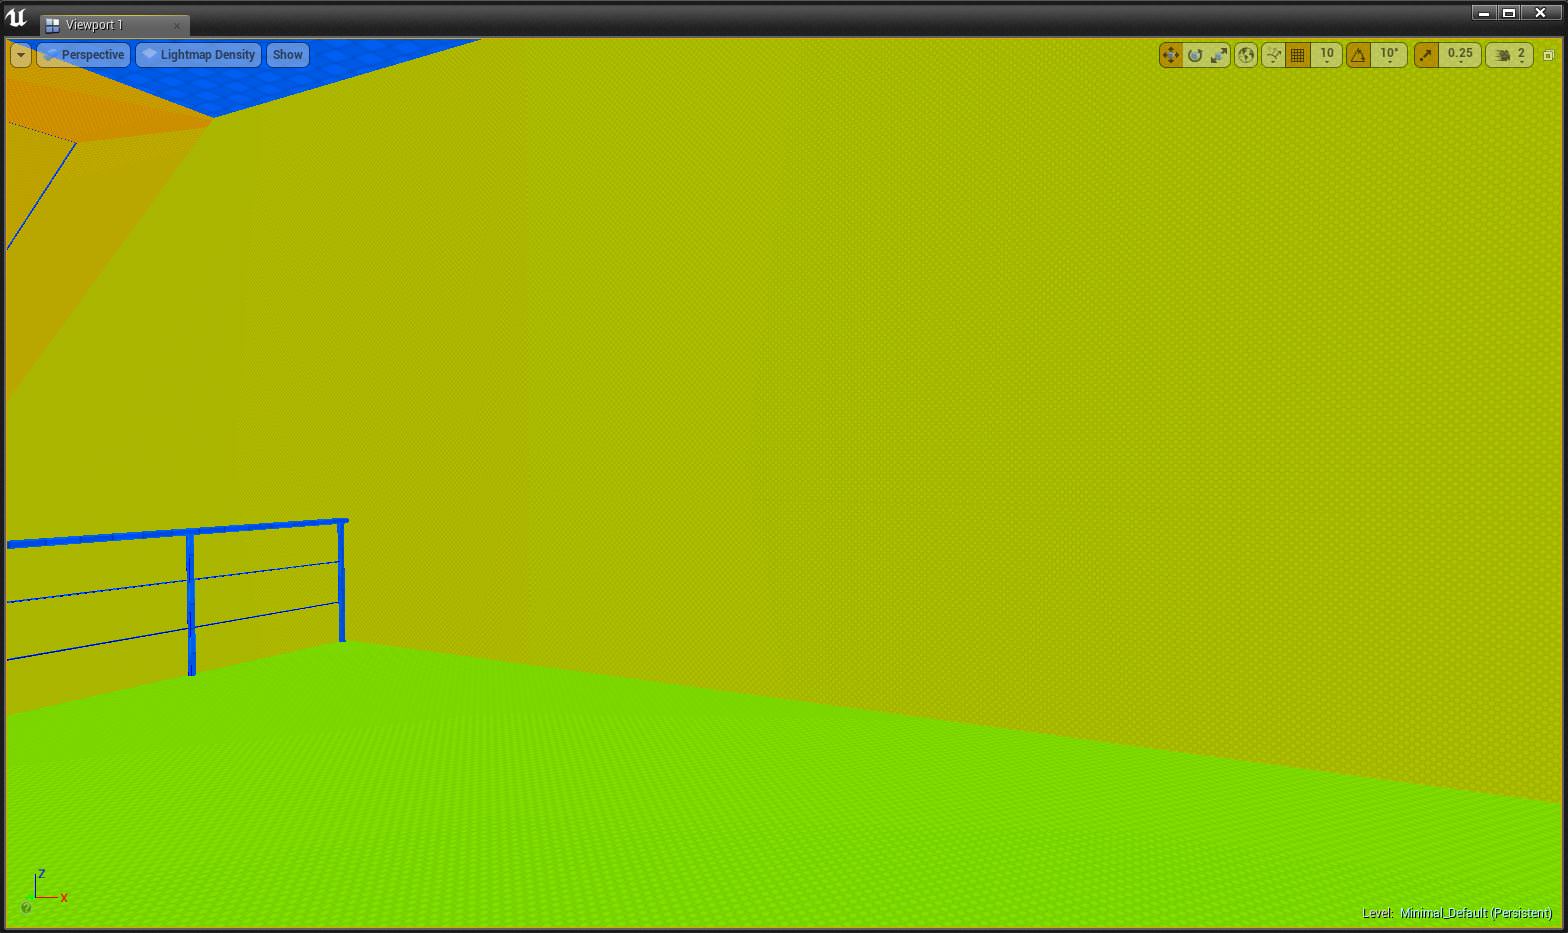
Turn it to 500 and then bake again. The bake will take longer but the shadows are now much nicer and the geometry displaying a greenish colour, indicating optimal resolution. If you simply crank up every big of geometry to 2000 then you’re going to have massive build times later down the line. It’s good to do this now at this stage before things get too heavy
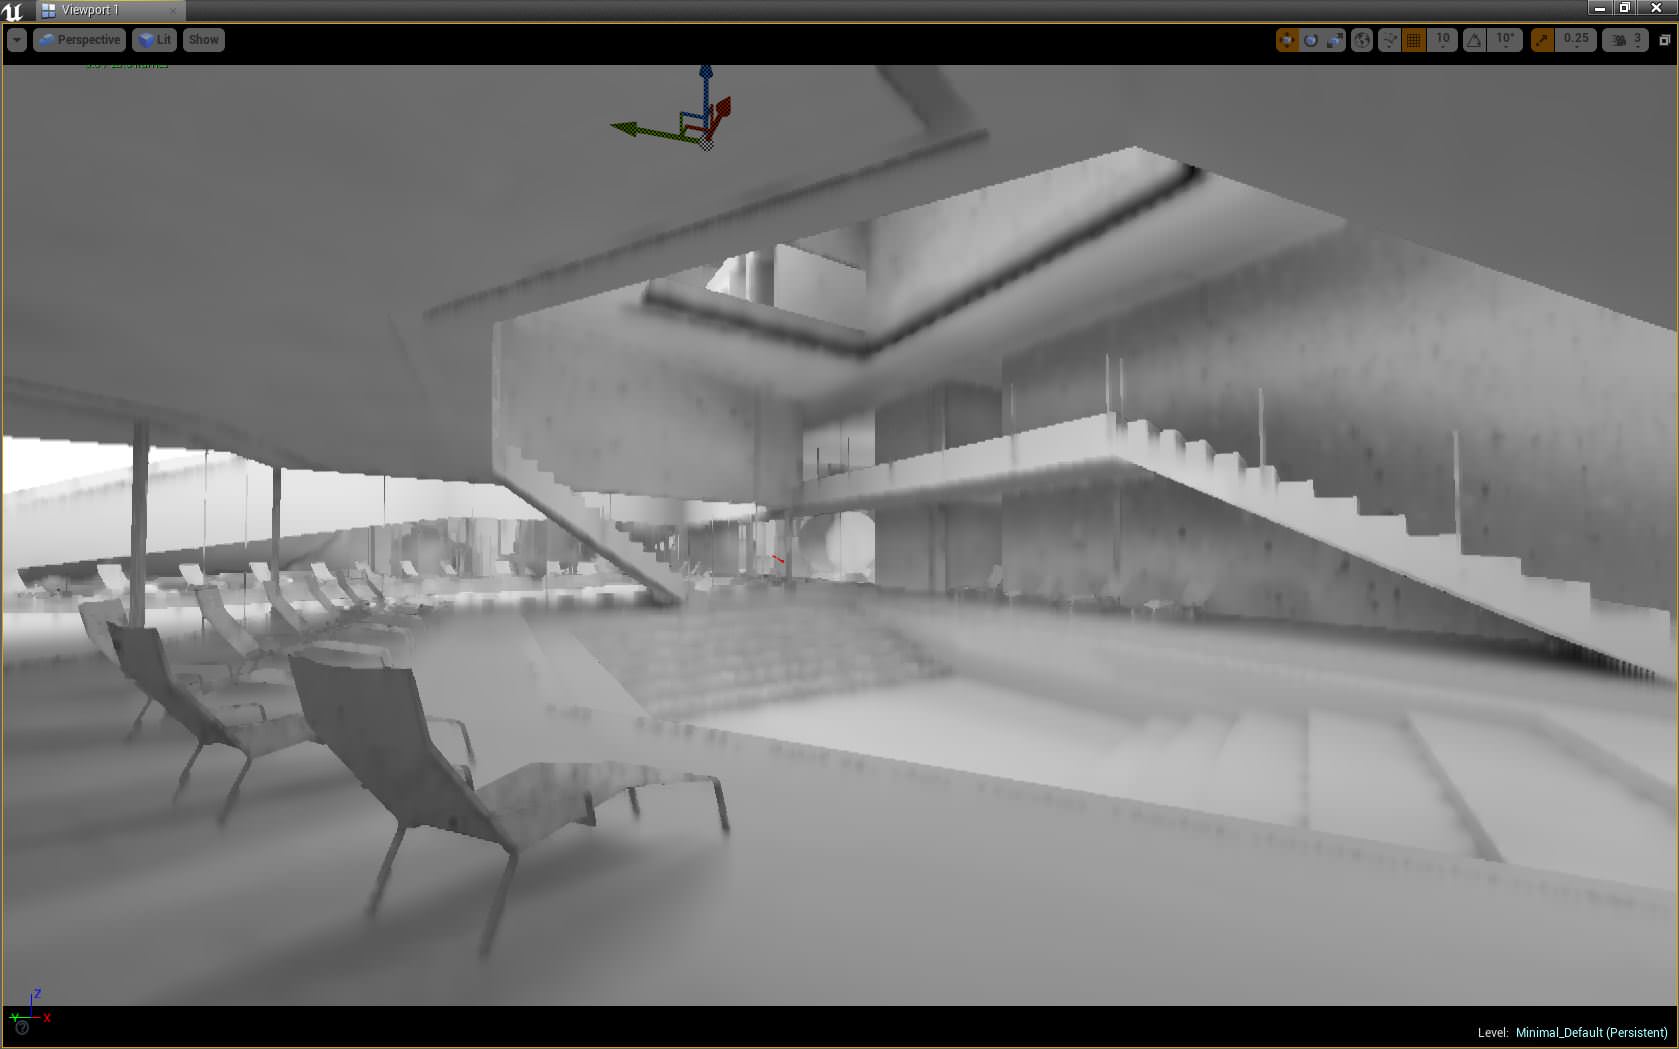
Checking Lighting Only
Adjust the lightmass on all of the objects and surfaces in your base model before going any further until everything is yellow or green in the lightmass viewer.


Another great visualization tool is viewing lighting only. It’s like a clay render but in real-time. check for leaks, errors and shadow resolution. It’s really important to get this base bullet proof as it will save a lot of headaches later one.
Assets


Once you are happy with your lighting you can bring in some assets like furniture. These are imported in the same way as the main geometry. You will notice that as the object is imported as a single asset, the elements are read separately and you can texture them separately. Assets are always exported with their pivot at the bottom and located at 0.0.0 co-ordinates.
You will notice that they do not look embedded in with the scene as you might expect yet. The left image is the stools just imported in, the right after baking the lighting again.
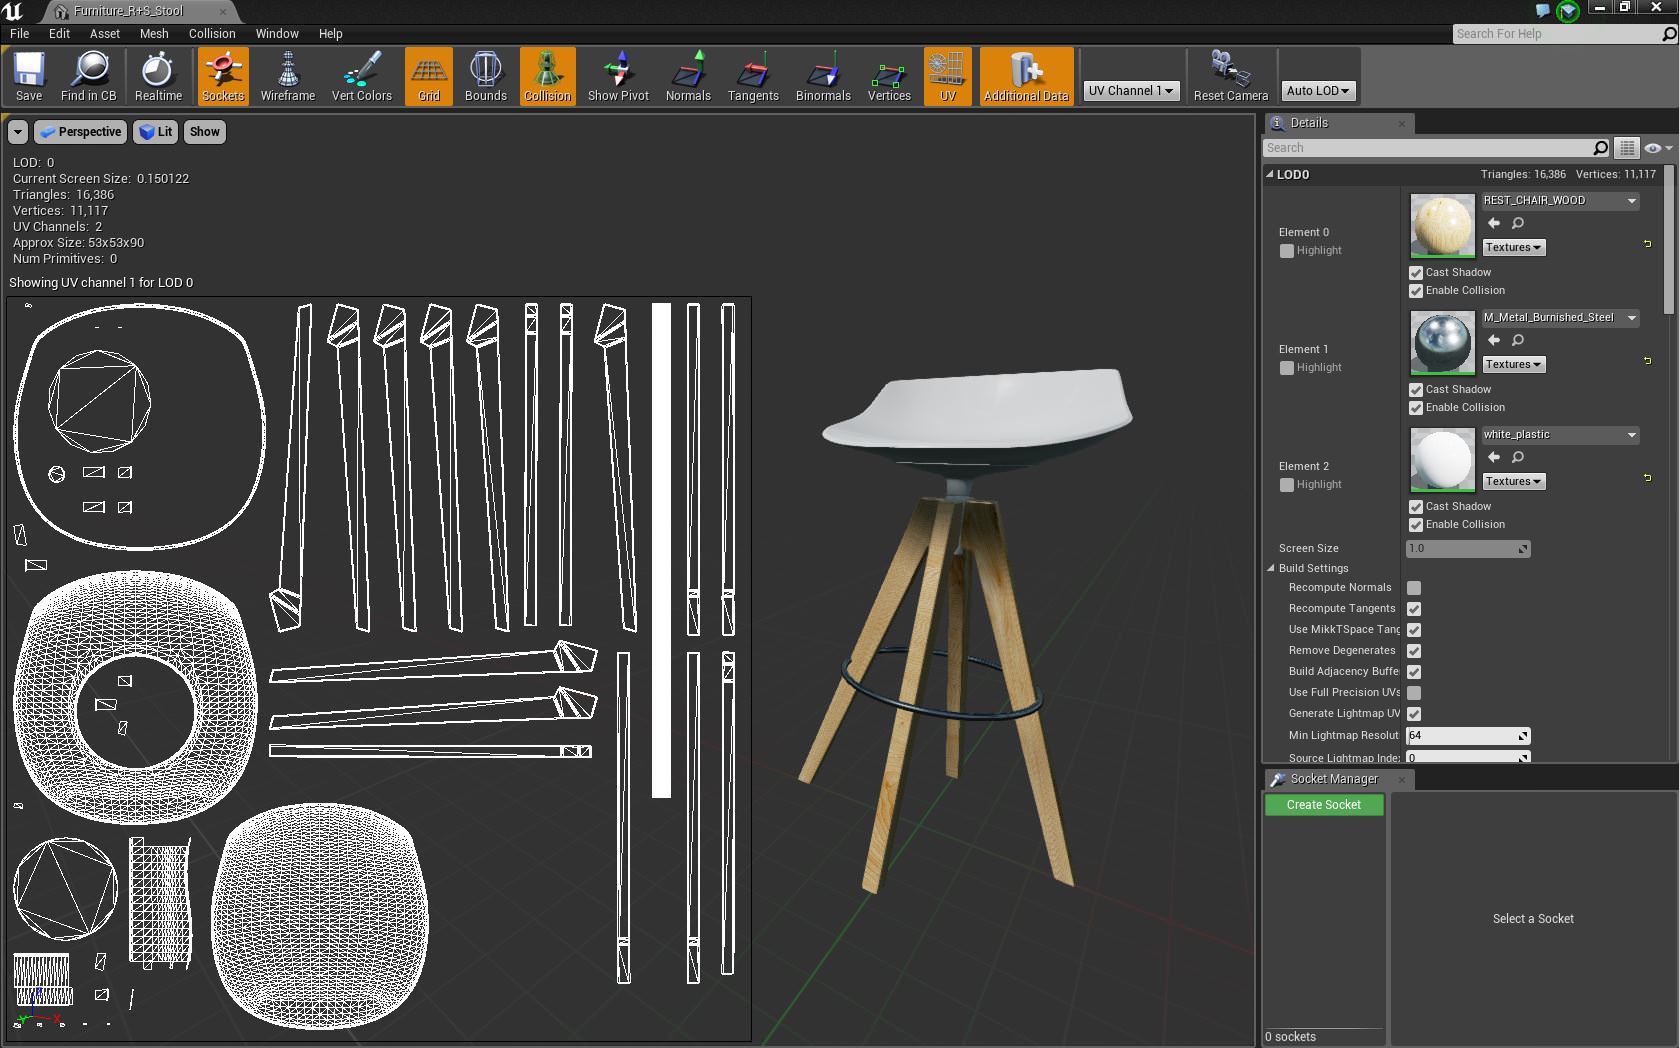
Here you can see UV’s have been exported for lightmass in the same way as the building, ensuring a solid bake.
Assets Collisions

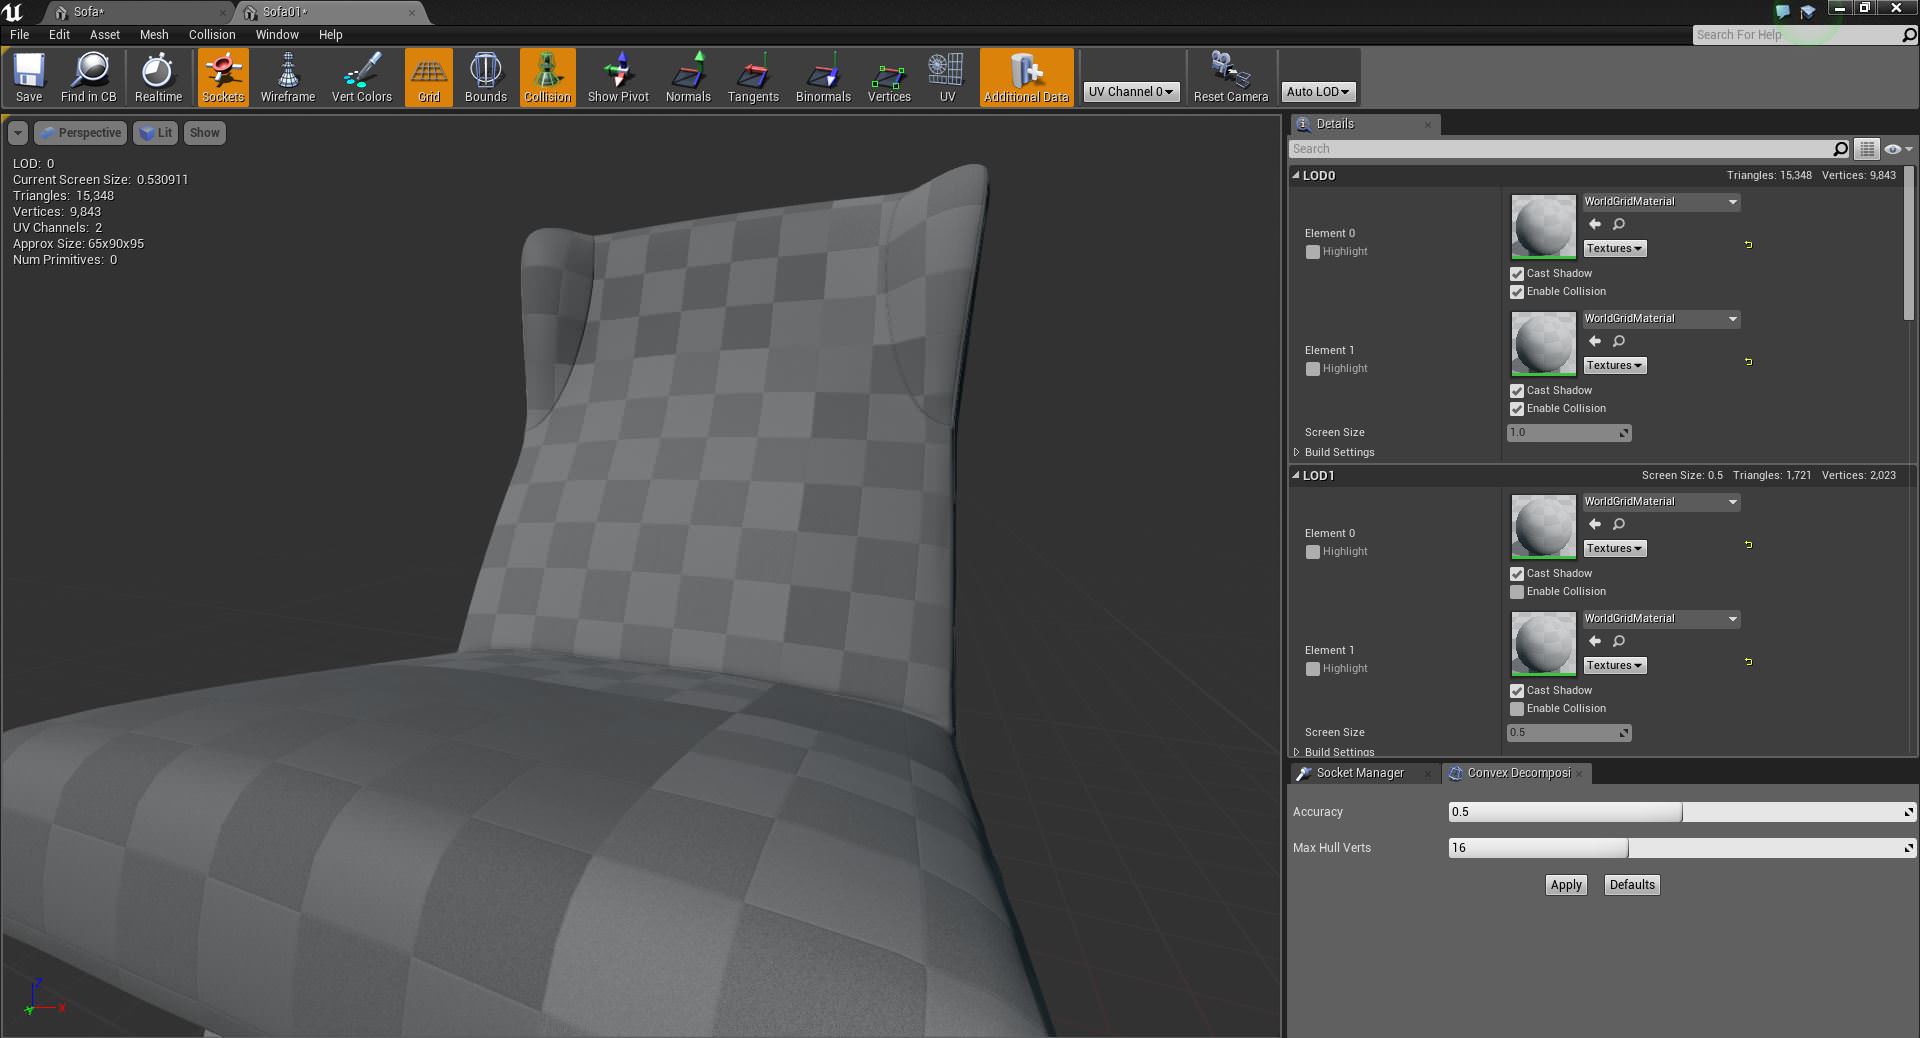
Collisions polygons are need to physically interact with object inside the game. A very handy tool we used to add them, that in most of the cases does a great job, is the Convex Decomposition tool. Alternatively, UE4 gives the possibility to add box, sphere or capsule collision primitives.
Post Process Volume
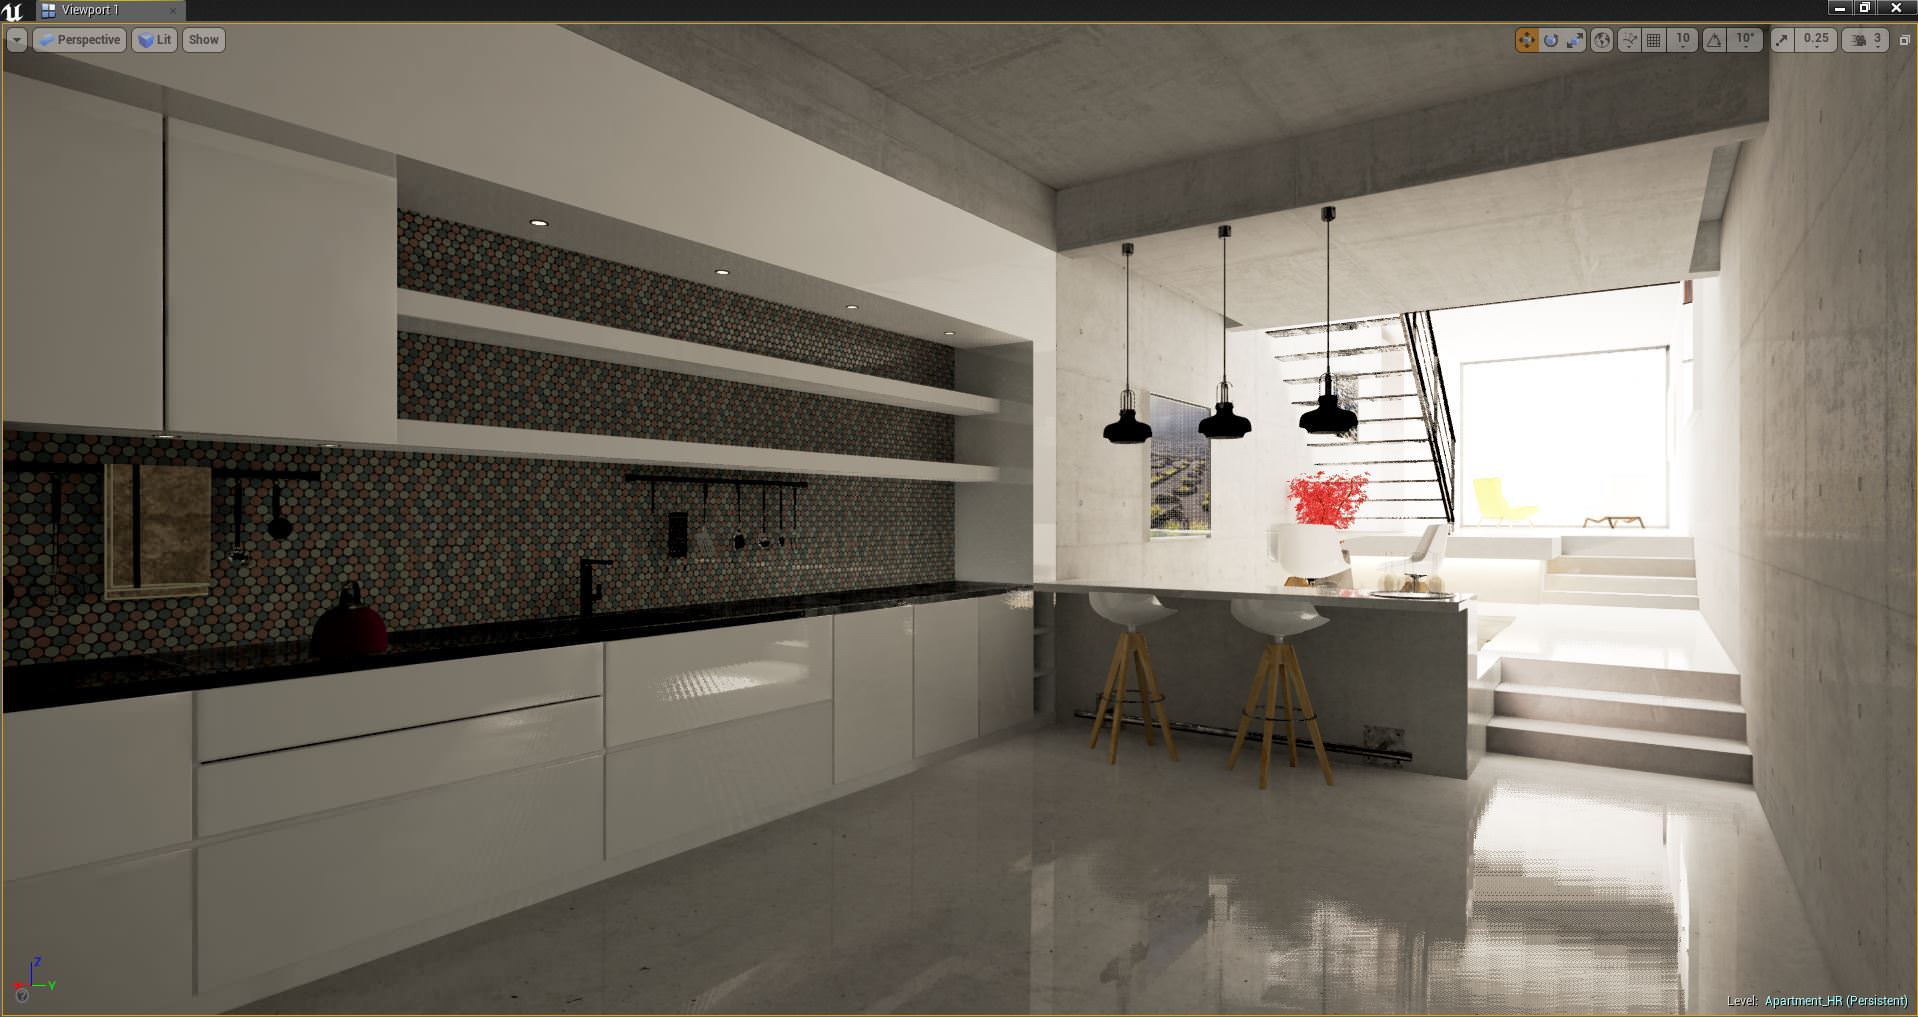
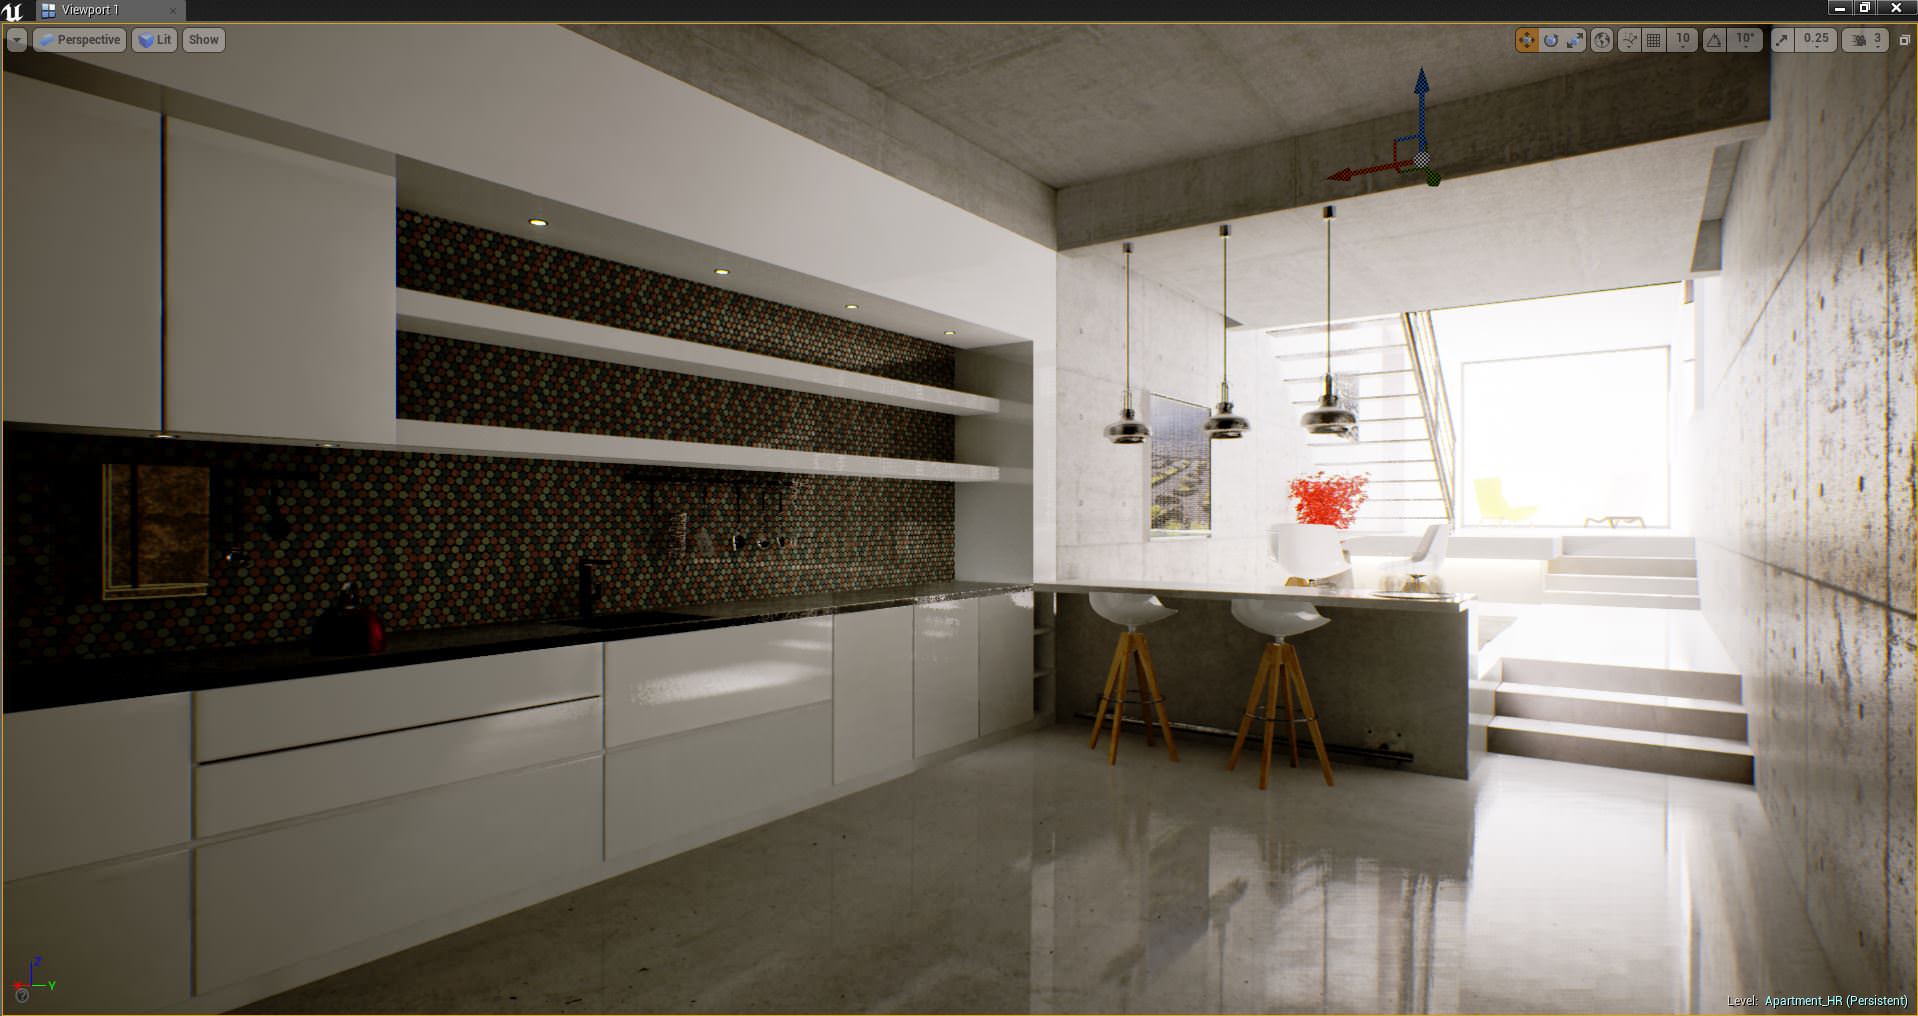
The top image is the scene with all the assets brought in. The bottom image is the same scene with some post process volumes adding additional effects. We used multiple post process volumes instead of one controlling all aspects. It gave greater control and allowed us to turn certain effects on or off easily.


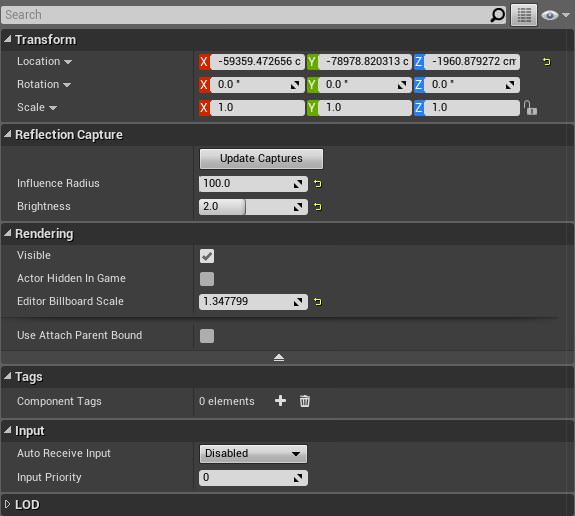
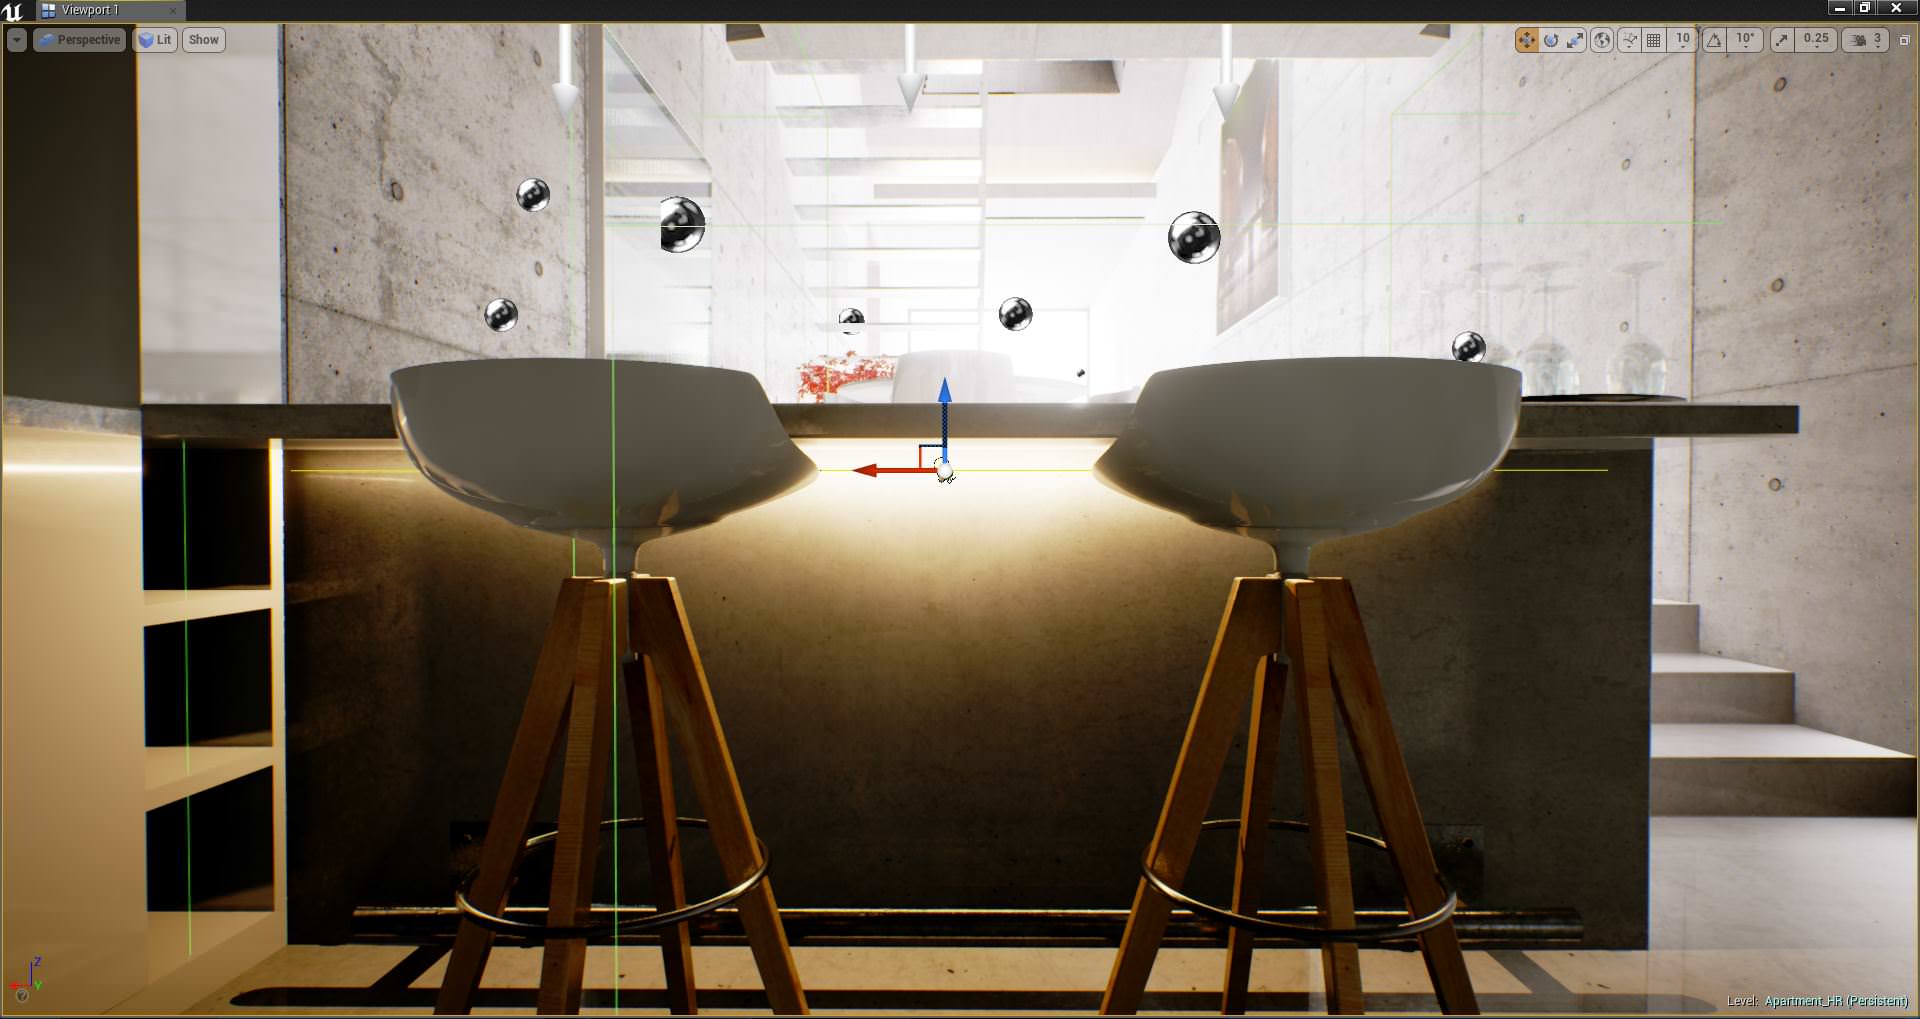
Reflection Capture
Unreal Engine has a few ways of cheating reflections. Reflection spheres allow you to add reflectivity to areas within local radius around the model. It doesn’t add much cost to performance and greatly improves reflection quality and brightness in your scenes.
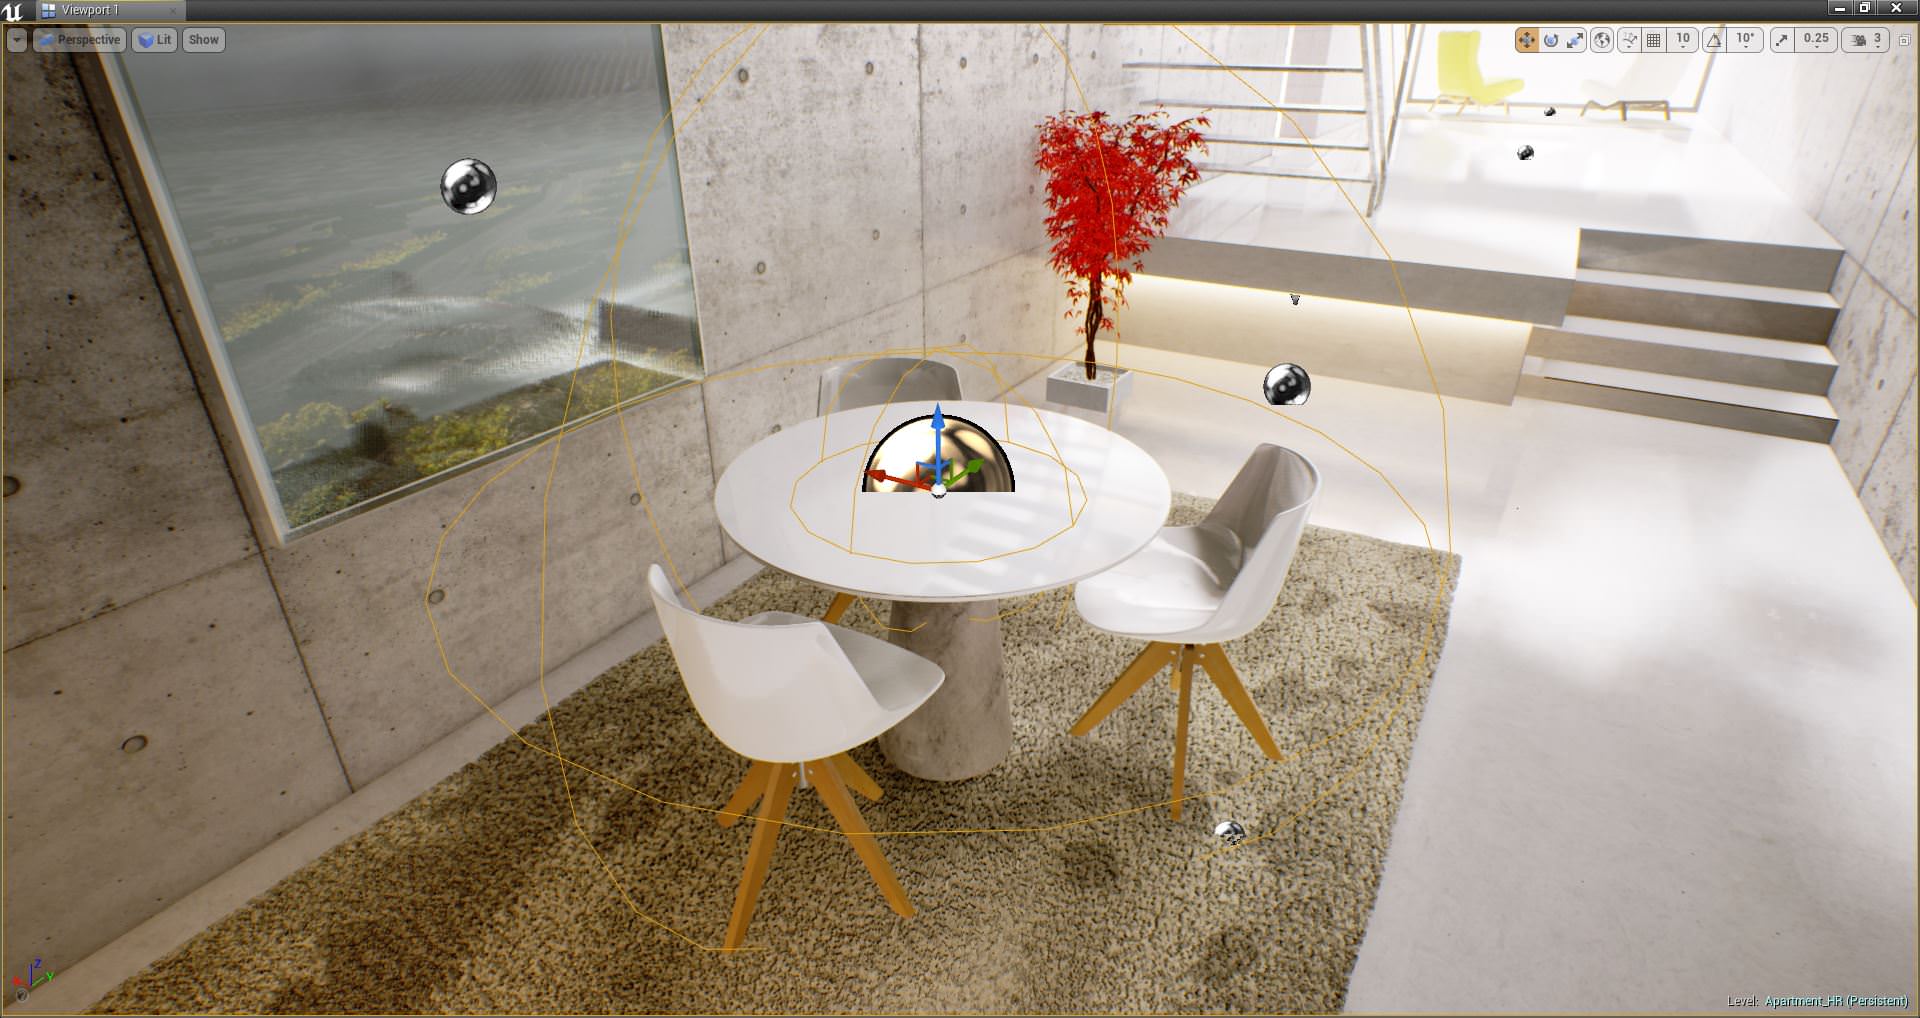
They are best places per area or object rather than one big one only per scene. For example, on this table.
Additional Lighting
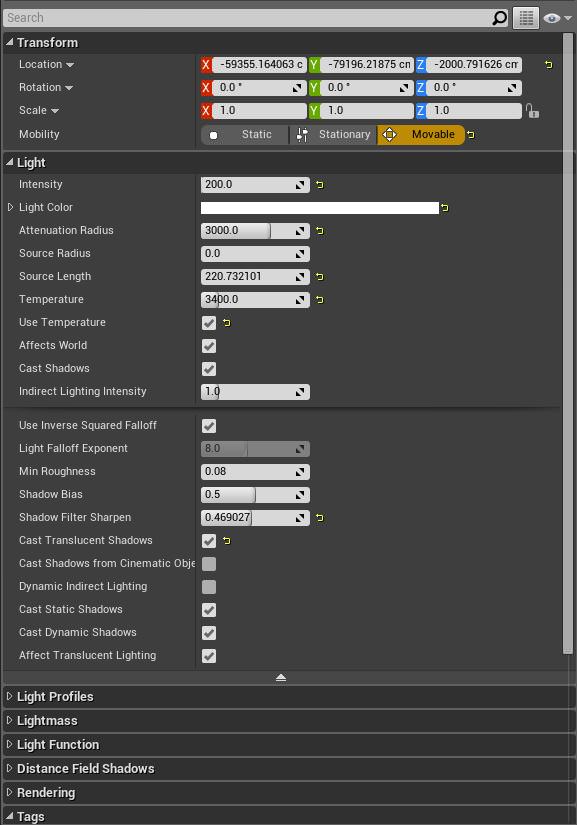
Depending on what you want to do with your scene, you may want to place additional lights and bake this information in too. We wanted to create interactive switches so we left the lights on movable and grouped them by area to program within blueprints later.

You can create strip lights, spotlights, and load IES data within lights in Unreal
SPA & DFAO
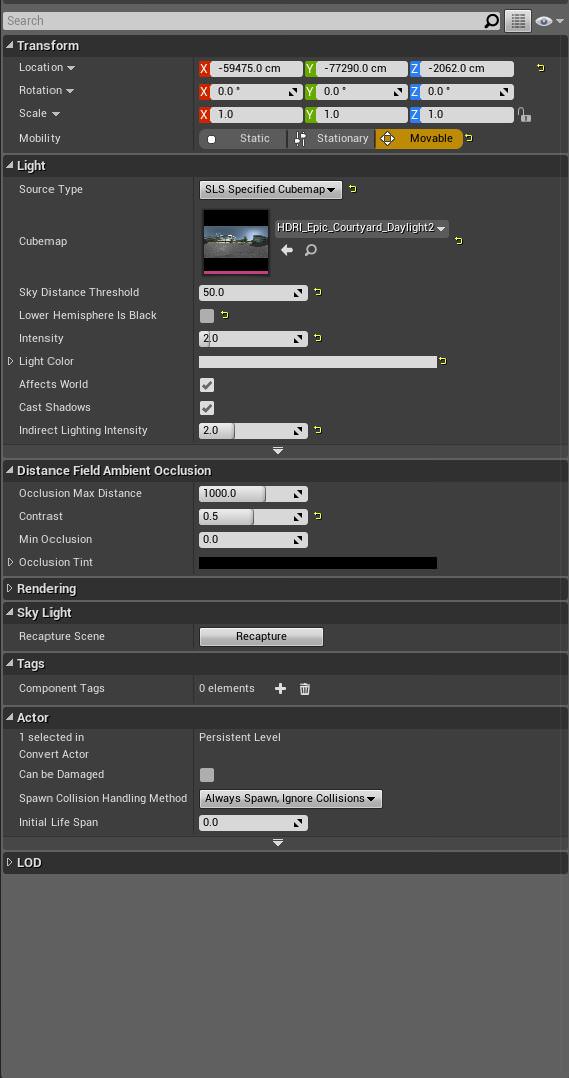
So in the spa and main exterior level we are using a slightly different method of faking the GI. Instead of using deflectors we are using a skylight, with a HDRI loaded. The skylight is set to movable and is being shadowed using Distance Field Ambient Occlusion (DFAO). The split image above shows the scene lit and visualising the DFAO. It’s basically a more advanced ambient occlusion which takes into account lighting direction.
This screenshot is visualizing the distance fields themselves, generated by each object. In this situation the splitting of the geometry with outside and inside meant that the DFAO was mainly black until we edited each object to generate the distance fields on both sides.
This caused a less realistic shadowing of the skylight however, as the distance fields themselves became much more transparent. It’s an interesting feature and one to be explored to understand it’s benefits and limitations. Hopefully a more robust workflow using mesh distance fields will be documented as right now I would say it is still relatively experimental for the precise needs of architectural visualisation. It worked for us on levels where it wasn’t practical to use deflectors, mainly with spaces which are semi indoors and outdoors.
—
End of Part One
Overall we have really enjoyed the process of working with Unreal Engine, and in part two we’ll cover : Landscaping, Drones, Cameras, Blueprints, Music and Packaging it all up!
We will add our final words at the ends of part two 😉
Thanks to Ronen, thanks to Epic Games, thanks to Lasse Rode and the rest of the community for your support.
You can download our packaged ‘La Geria’ HERE
Credits
- Concept / Architectural Design : Paul Nicholls, Matt Townsend
- Unreal R&D : Ares Simone Monzio Compagnoni
- Unreal Production : Ares Simone Monzio Compagnoni, Paul Nicholls
- Drone Design : Prince Yemoth
- Drone Rig / Animation / Blueprint : Alexey Marfin / Ares Simone Monzio Compagnoni
- Music / Score : Angus MacRae


Thanks Ronen, it was great to work on this project and happy to share all we learned doing it!
Lot to learn here , so great making of
Is definitely an excellent project, congratulations on the well-deserved award!
Is there anyway to to download it for VR testing?
We tested it but it is not optimized for VR so there are really not enough FPS. We are still working to have it run smoothly with the oculus.
Hi Ares, thanks for your reply!
I will be looking forward the VR version. (Y)
Gran #proyecto en Lanzarote RT ronenbekerman: Making of LA GERIA – “The Vineyard” TEAM Grand Prize Winner, Part ONE http://www.ronenbekerman.com/making-of-the-vineyard-ue4-team-grand-prize-winner-factory-fifteen-la-geria/
Ares Monzio Compagnoni Thank you! 😉
The fun LANDSCAPE and DRONE stuff is yet to come in part two
Wonderful! Can`t wait for part two…