


Making of Tomczak House
Peter Oldorf received great reviews for his ‘Tomczak House’ 3d renderings a week ago when first published on the forums. All his visuals in this set are beautiful, but the inner court dusk shot turned out most striking of them all. I asked Peter if he can share more information about the creation process of this scene with us all and he kindly agreed, and so I’m happy to present to you this article today featuring his work.
![]()
Author : Peter Oldorf
Peter Oldorf studied graphics design in Rostock, Germany. He started with 3d about 5 years ago working for the lichtecht company in Hamburg, Germany. There he learned all about 3d modeling, animation, simulation, texturing and architecture.
Hi everyone,
last week I posted my latest work for a client, the Tomczak House. Ronen kindly asked me to write about the making of this scene and I’m honored to do so. Big thanks to Ronen and all the nice comments and likes all of you have given me about this work since published.
First, i’d like to send a big thank you to the lichtecht team! For all the know how I gathered thanks to them. We’re mainly working with 3ds max, Photoshop, and After effects next to hundreds of plug-ins and little helpers. Below you can see the final stills produced for this project using all that I mentioned.


You can also find this posted on the forums at the Tomczak House thread.
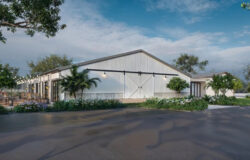
The architecture, materials, details and surroundings were already set, so I just had to base my work on the plans I got. I tried to fix the most parts directly in 3d to save time for post work and make it more easy to do changes according to any wishes the client may have.
Modeling
At first, I arranged the plans inside 3dsmax 2012. My Units are set to “metric” and “meters”. It´s important to check the measurements of the plans to get the right scaling of the house and to weld the nearby vertices in each plan. There are many of them that are useless for the 3d modeling process and just slow down the viewport performance.

So I just had to build it up, bridge the windows and put them in. I also modeled some details like metal plates on the roof and wood planks on some walls and it was done.

For the glass railings on the balcony I used the very helpful and time saving plugin – RailClone from iToo Software. Just created a spline, attached the geometry and after some tests I got a procedural mesh everywhere I wanted it. I could also make any changes I liked without wasting too much time. Awesome for late changes by clients!

The little pond is just a plane with a noise modifier and water material applied to it. Under this “waterplane” I just put some plants and low poly fishes. The plants in the front are standing on hundreds of little stones, which I scattered using the MultiScatter plugin. For this powerful tool it´s very easy to crash the scene if the scattered geometry is not set up with proper collisions. In such a case to many stones are colliding with each other and you can get an “unhandled exception” errors, so pay attention to this fact.

The plants in the scene are mainly proxies. There are trees in the background and some bushes around for reflection. Only the plants in the front are kept as meshes.
Scene Setup
The scene setup is quite simple. Just a VRayDome Light with an HDRI texture from VizPeople for global lighting, which makes a good diffuse look and awesome reflections.


The rest of the light is set by VRay Lights and the camera exposed correctly. The lights color is set to deep orange and the camera’s white balance is set a bit yellowish white. That creates a good contrast of blue and yellow in the pure rendering.
The “light cubes” are simple boxes with milky glass material and a VRay Lights inside.


Textures
Most of the materials are quite simple. Inside the house I tried to use low quality textures or just diffuse colors to save on render time. The only high-resolution textures I used are for the ground, a 6k Arroway Textures concrete and for the bricks on the wall, with a map from CGTextures.
Both are displaced with the 2D VRay Displacement Modifier. Here I used filter-blur instead of the diffuse-map. This makes the edges more soft and it doesn’t´t look too sharp. The quality of this modifier highly depends on the resolution of the map and the resolution factor on the modifier. I think in this case 2048 is a good value, everything higher doesn’t have a big noticeable effect.
For the bricks map I needed a good displacement and reflection map. So I used the program PixPlant to help in making these. It´s very easy to create normal and reflection maps that way. Usually I try to use normal maps for better render times, but in this case I needed displacement to get the deep effect of light and shadows under the lights.
The water is based on a plane with an simple noise modifier. The Material has a simple noise in the bump channel and a bit of green fog. I never set the refraction to pure white to get a better fog effect.


Rendering
Usually we´re rendering with irradiance map and light cache to save a lot of render time. But in this case I had the time to render it with brute force. Especially for night shots brute force is awesome. Everything looks good, clean corners, soft shadows and of course no ugly spots.
For this shot one 24 core Mac calculated over 17 hours. That´s really too long 🙂

Post Production
In Photoshop I used the render-channels to tune up the colors, contrast and lights. We´re using the “German” Photoshop, but I hope my screenshots will show the main items just as well.
Here is the pure rendering…

I Mostly use screen mode on “lighting”, “raw-refraction” and “reflection”, but always experiment with the different modes for each channel to get the result I´m looking for.

For some more reflections on the glass I used a bit of “raw-reflection” and what I really love is the effect around the light cubes which stand in the plants. I painted the “vray-shadows” path with a mask around the cubes, using the screen blend mode. Now it looks like the light shines through the green leafs.

Then I gave it some more contrast with a curve and used “selective color correction” to make the yellow more discretely and orange.

In the end I used “Photo looks” from “Magic Bullet”. I use this tool to add better contrast, vignetting and intensive color boosts. I always try to use it carefully, cause it´s very easy to make too much and the picture doesn’t look real anymore.
Here´s the final image.

Ok, that´s it.
I hope some of this was helpful for you. Thanks for reading and your comments!
Cheers, Peter.
nice work! you can share your model ? i am learning 3ds max thanks