


Making of Ouverture I-X
Michael Feuerroth‘s highly detailed scene “Ouverture I-X” awarded him Best Visualization of the Week NO. 34 using 3dsmax as his main platform for setting up his scene in general, as well as getting into the smallest details too. He also used Marvelous Designer extensively and rendered it all with V-Ray. Check out Michael’s process as he describes it in great detail below. Enjoy!


Author: Michael Feuerroth
Michael Feuerroth is a media artist specialized in architectural visualization and architectural photography. Hes born in Karlsruhe, Germany where he runs his atelier and teaches architectural visualization at the University of Applied Sciences Karlsruhe, faculty of architecture. He is also guest lecturer at the SAE Institute in Hamburg, Germany and does visualization and analogue photography since the late 90s his passion is light, architecture, interior design and everything brought together.
Introduction
I am very happy and proud for having the opportunity to pick up on Ronen’s kind request to write about my latest project that was posted on the forums. I hope that my contribution is as inspiring to you all as the others here were for me.

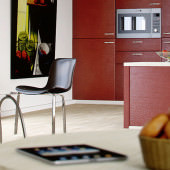
I am going to share a few thoughts and insights behind the making of my latest piece of love called Ouverture I-X. It is a set of 10 images of a contemporary attic space done as a personal study. I aimed for modeling all details, using as little 3rd party content as possible.
Buying pre-made content for commercial work is a given, but for personal work and for being unique – custom modeling and texture making is crucial.

That said, I did use book models that were purchased in the past. Also the Jielde Floor Lamp & Vitra Eames Chair are from Designconnected & model+model… Items that I had in my library already.
The Custom Elements
You’ll probably find my source of inspiration for custom elements a bit odd, but it is really a great one – The Local Flea Market!
You can do the usual online hoarding like the next guy, but I really recommend getting out there and actually touch & feel the items you are going to model and put into your scenes.
There is a little Flea Market in Karlsruhe where I live during Fridays that I frequent and find extraordinary things there. I can take photos there, and if find myself taking many for a specific item – I just buy it (if it’s worth taking reference photos of then it’s worth buying in many cases, too). For example, I bought this sheep hide you can see in the rendering for 6 only! It started to rain and the owner just wanted to go home but didn’t want to take his stuff home again… Lucky me 😉
One more source of inspiration is focused on a bunch of incredible interior designers like Hans Blomquist for example. I really adore his work and he is always inspiring me to do unusual things, he is into using natural materials, colors and moods.


Maybe that is the key – Doing unusual things, things people havent seen before. I never felt like recreate photographs or just copy other’s work. After gathering all the inspiration I filter it by what makes me move and then I set it all aside in a safe place and don’t look at it again for the whole process (keeps me from falling into the copying trap)!
The Project
Time to get down with the actual project…
Here are first sketches of the concept. I only use rough pencils with a really dull tip to make sure I dont get any detail at this stage… no point wasting time on that just yet.

Scene Setup
With all the inspiration in mind, concept drawings done and thoughts marked down – I start 3dsmax. The basic scene setup will be disappointing for most of you as there’s nothing special about it.
I set my units to CM since I experienced problems with lighting units in other unit scales.
Tip : This is for beginners mostly – Select the Increment on save option in the general preferences of 3dsmax. This automatically increments your file names on save, thus creating a new file each time. You will love it the next time your scene gets corrupted during the save process.
I set me scene to work with linear workflow as most people do with output of 1.0 for V-Ray.
I prefer not to use proxies if I can avoid it. Might sound odd to you as many of you use it all the time to save on resources, but I find it hard to do compositions with the vague proxy tri-clouds all over the place. The “lines” I need for strong compositions are lost with proxies and so as long as I can handle it – I stay away from them.
Modeling
For the bed, pillows, curtains and the wood cloth lamps I used Marvelous Designer. I tried to get a realistic looking result just by examining real pillows, curtains and bedspreads.
There are several great Marvelous Designer articles on this blog, so I will not get into too much detail about it here. All I want to add is, you have to take a look, examine and really research the items you are going to recreate in 3d to achieve the most realistic result. This is where most fail by the way.
The bedspreads consists of 2 Models like in real life. One for the inner model, representing the feather filled part with the square fluffy sections. Second one for the outer cotton cover that you replace from time to time. The inner layer need not be too detailed, just enough to give the impression of volume and fluffiness.

Above is the inner part, and below you can see it covered by the second cotton layer.

I tried to focus on the imperfection beds have when you just woke up and got out of it – seeing the trace for life in the scene… things actual people do. You can fall easy into the “Intentionally Created Disorder” while trying to do this by the way… DON’T!
Intentional disorder is easily recognized and will lend your scene the CG look right away. Try to focus on real disorder. You can do so by observing yourself – the way you leave things behind.

For things like the Smena (old Russian Camera), film rolls, Ilford paper, bicycle, etc. I used common poly modeling techniques taking advantage of the graphite modeling toolbar, which is totally underrated in my opinion.
The most interesting details of the bicycle would be the Handlebar Tape which is modeled with the Path Deform Modifier, the Tire with the Array Tool and Bend Modifier and the Welded Steel Frame with standard poly modelling techniques.

Here are some details :


The dried out branches were made with an amazing plugin called GrowFX, you definitely have to check it out! and Lasse Rode’s (studio xoio) article about his experience with it – GrowFX Custom Foliage Creation by Studio xoio.
When it comes to little stones, copic markers or the firewood logs I used the MassFX plugin to simulate real-world situations, mostly done in separate scenes and merged it to the main scene later.
For the ceiling wall I used the all-time classic FloorGenerator 3dsmax script as it produces fast and easy to handle tiles and boards. The downside of this script is that it only operates on flat laying surfaces and splines with Z Axis pointing up. No chance for slanted walls or anything bent… yet.
The Floor is for once not created with the floor generator as I wanted more control over the UV-mapping and texture-process. After modeling and re-texturing the floor became a little! noise in x, y and z-axis to simulate bent boards.
For the wax candles I used a standard poly modeling technique and added details with mudbox.
Here are some other details :

For the bed I used 4 euro-palettes as they are 120cm x 80cm and it fits the 140cm x 200cm egg crate mattress pad probably good as futon bed frame.

I guess I have to admit, the upper part of the mesh of the camera is a bit messed up, actually you dont see it and its not gonna be animated so, whatever.

If I am doing art projects, most of the time I put custom lamps in it. I have a little passion for special lamps and I love to design handcrafted lamps.
For all items and stuff I mostly use an ingenuous maxscript called mass randomizer from tik works to mess up things if necessary. The rotation, move, and scale randomization are really important on objects where I do not use the MassFX simulation. Mostly with Rotation and Move values around 0.1-1cm, because every object place by human hand is not perfectly lined up.
I will post a detailed tutorial on my website for the handlebar tape as you can use that for other purposes, too and there will be a detailed tutorial for the cotton floor lamp in near future.
Many people across the internet asked me about the sheepskin and how its made. I want to share some insights but will not do a full detailed tutorial as this is a making of Ill give you an idea to start working with. Maybe Ill do a detailed tutorial later.
First I took lots of time looking at the sheepskin I own. It consists of two components – The leather on the backside, and the fur on the front side. The fur has lots of grouped hairs, is curled on the end and does not really follow any gravity.
I modeled a piece of leather with the rough shape of the skin in marvelous designer and threw it over the Eames Chair, the other one, for the floor, I modeled in 3dsmax with splines and garment maker. As I do not own any third-party hair or fur plugin and the V-Ray Hair&Fur turned out as too simple, too basic, I decided to give the 3dsmax native plugin Hair&Fur a try. You have lots of settings there and that was pretty much what I needed, control.
There is a mighty hair-styling-toolset within this plugin but try not to overdo anything so I set the scale, cut length and thickness of the hair, also the count and used the option recomb from splines the magic button that gives everything its place and brings some order. After that I used the stand tool to pull up some of the hairs at the edges. It is important that you use select hairs by ends in the selection tab because otherwise you dont touch the tip of the hairs while moving it.


I guess the most crucial part of the settings is the hair thickness, the clumping and playing around with the kink and frizz parameters. I also used the multi-strands option with some splay and randomization on it youll get nice results if you gonna play with these parameters! The hair count multiplies with the multi-strand, that is why I used only 15.000 hairs in this case.


If you tick the tip fade option, V-Ray will render way more slowly but the result is much better because the hair wont look like cut-off splines.
As you can see, the best way to make it look believable is to tick the Apply mr Shader option and put a VRayHair shader in it. I used a slightly modified White matted preset.
Textures and Materials
Most of my textures are from CGtextures.com, I have a premium account there as in rush hours I sometimes need a lot of texture material to choose from or to recycle. Since I do not want use only well known textures I prefer, if I can, textures made by myself.
I always try to keep the materials straight and simple as if I have to manage a lot of materials and change them frequently it is better to use simple shaders and the “new” Slate Material Editor, the more complex it gets, the more you’ll love the node-based Material Editor. Whatever, this is not the main reason. At the beginning I thought the more complicated a shader is, the better. Eeeeeerrrrrrrrrrrr! False. Like every beginner I needed to add this, and that, till I was satisfied and ended up in a mess through trained eyes.
Nowadays I try to get rid of everything that is not out of the way within three seconds… Sergej Koroljow, a russian engineer has inspired my work and art one day. I couldnt find the English quote, so Ill translate it for you
The ingenuity of a construction lies in its simplicity. Everyone can build complicated things.
thats primarily what I am trying to say in this context. Details are good, but not like everywhere and not like in any case. I often see renderings, mostly done by advanced persons, with a room full of details, chairs, rugs, tables, hides, placed – that the room is full of stuff and I nearly get a claustrophobic panic attack because when I look at the image Im feeling like I cannot breathe, only because they want to show details everywhere. On the other hand I often see, mostly renderings by beginners, that they do not have the touch to place things harmonically and try to move everything out of the room and press all furniture against the wall. I always try to develop a well balanced room, that results in a well balanced rendering in most cases.
Okay enough ramble, back to topic
In general, as I said before, I try to stay as simple as I can. Therefore, for most shaders, I do use a normal VRayMtl with a diffuse map, a reflection map, a reflection glossiness map and a bump map on it. This varies as some shaders do not need bump or no reflection map. I often just tick the Fresnel option in the VRayMtl parameters and sometimes I use a falloff with type set to fresnel as they differ in their appearance.
A good advice is to stay away from the often used IOR-Values. You have to change that only in extremely rarely situations, like special transparent materials, diamonds for example. If you do, you are messing around with Monseur Fresnels theory, what you probably shouldnt, if you want to stay as close as possible to real world physics. If you cant get to make it looking right there are definitely a fistful of other screws you can work on first. In a matter of emergency, delete the material and build it again with fresh thoughts. Really, I would leave that parameter alone.
Here is an example for the white wood shader

Now you probably see why I only use the SME (Slate Material Editor)
I used the diffuse texture for all 4 texture slots by adding a color correction node (set to monochromatic).
You can always add more color correction nodes behind that node to have more control over the intensity of the glossiness for example. You can add contrast and change the lightness on the fly so you do not need a texture for every single slot and do not have Photoshop involved in a trial and error for intensity of the maps. If this doesnt work out for special materials I have a tool called crazy bump what is brilliant. It analyses your texture and puts out depth, specular, bump, normal, occlusion maps etc. not only for realtime use.
Here you can see, that this also works for a bunch of other shaders.

Here is an example of the shelf shader

As you can see, there is only a fingerprint and scratch, dirt and dust map on the reflection glossiness, all other parameters are nothing special, but this little map gives the spirit.
The dirt on the windows, which can rarely be seen because of the blown out window lights, is realised by a plane placed in front of the actual window glass with transparency on it.

The most complicated shader of this scene is the kamin (fireplace) shader

I wont go into detail but I bet advanced users do understand what I did here. The main material is a blend material combination of a coat material and the rust layer blended with an opacity map.
The curtain shader looks like this, also no magic tricks

This is just a 2Sided Material with a black and white laces map in the opacity slot. I set the tiling very high because I didn’t want to waste time with UV mapping of high-res cloth that come out of Marvelous Designer.
Here is the shader for the white boards between the big wooden pillars.

Here I utilize the Multitexture maps (also from cg-source.com) to get variation to the boards. I Use a special workflow for that.
First I create the boards with floor generator (there you can put variation in the position and rotation). Then I use a little script to detach all elements. At the next step I use the slice tool in Photoshop to cut out all planks I want to use from the main texture and save it automatically to single textures. Then I use the mentioned mass randomizer script as you can randomize material IDs, for the count of IDs I count the generated maps from Photoshop. Then I locate the folder in Multitexture map and attach all boards again, put the material on it and that’s it.
Ill do a detailed tutorial on my website for this special workflow.
You have probably noticed that I do not use the subdivision parameter in a single material. This is because with my workflow all QMC related calculation is done at a single point in the V-Ray Rendering Rollout, but more about this later.
Lighting
When it comes to lighting, for me the most significant part in my work, I am pretty straight. I mainly use 1 Light. A VRayLight set to dome with one of my HDRIs on it.
No additional lights. No VRayLight in front of windows. No VRaySun. No VRaySky. No SpecialFX. I stay, as always, as close as possible to the real world.
To get more contrast to the lighting I usually play with the inverse gamma option of the VRayHDRI map. A lower value means more contrast, which means a bigger gap between light and shadow, also more saturated colours. I wouldnt go below 0,6 for realistic results but that depends on the HDRI.
In some cases the client wants additional lights, artificial lights such as IES lights. If I have to use them I make sure that I only use VRayIES lights because they render faster than normal IES lights.
Also, I always light the scene perfectly with the HDRI by rotating the HDRI in 10 36° steps to get a feeling of the light, even on sunrises, dusk and dawn… only then I turn on and balance the additional artificial lights.
As I am pretty familiar with light in architecture, because I am doing architecture photography professionally, a strong concept on paper and a well developed image in my mind, I usually dont make a single testrender while modelling and camera-setup as this returns as a huuuuuge time waster. V-Ray RT comes in here very handy, but if I am honest, I don’t use it very often – imo its tendency is more visual than feeling. I always try to develop feelings about things, not always go the visual way.
If you dont do photography professionally, I strongly recommend you to do it as a serious hobby. It will have a tremendous benefit to your renderings. I usually dont focus on light at the beginning. However, many people do that because they are curious how its looking or just unsure.
Just believe your concept and the image in your imagination, do all the modeling and scene setup, do your lighting setup and shaders at the end and your shot will look great! In real architecture photography you also can not modify the building and materials because of the light and there are many killer photographs of architecture on this planet.
Normally I do the lighting process before I develop a single shader! You cannot develop a believable shader without believable looking light.
Okay, so before I do some shaders, I put a material with a light grey (200) without any reflections in the material override slot and exclude the window glass. Then I place a single V-Ray light into the scene, turn it to into a dome light and put one of my HDRIs in it.
I mentioned that because my HDRIs are configured by me, that you dont need to balance them hardly and can use them with real world camera settings without changing any parameters.
You can download 3 Free HDRIs to convince yourself here


Visit Michael’s Free Stuff page on his website as he adds new things from time to time.
[/wpsharely]In the following image I used a V-Ray camera with Film-gate of 70mm | f-stop of 22 | ISO setting of 100 | shutter speed of 1s | WB neutral

pretty close to what I would use as a starting point in real life in this situation. Maybe a little lower ISO and a longer exposure… As I couldn’t figure out a way to let V-Ray expose longer than 1 second I throw in two options :
- Either I adjust (higher) the ISO settings, as we do not experience any noise gain unlike in real world.
- Or I adjust the f-stops (this will only work smoothly if you do not use the V-Ray built-in DOF) because otherwise you change the depth-of-field settings with changing the aperture.
I left the Multipliers of the VRayHDRI at default 1.0 for multiplier and 1.0 for rendering multiplier, as well the settings of the VRayLight, I just left it at the default multiplier of 30. I do that because if I decide to switch the HDRI I dont have to mess around with the intensity of the light over and over again.
Leaving all settings at default makes it on one hand more comfortable because you dont have to balance anything and on the other hand you are always close to real-world camera settings, no fictive values that dont mean anything… This helps you to stay on the right track at all times, as many people have big problems with their light balancing. Its always a good idea to set the white point at this stage.
I discourage you from setting the white balance too neutral as neutral white has no emotion and result in a imo too clean image.
Id recommend to always leave a little tint of blue for cold or red for warm moods, whatever you would like to create.
Now with updated camera settings it looks like this

Film-gate of 70mm | f-stop of 22 | ISO setting of 400 | shutter speed of 1s | WB D75
From that point on I go forward onto the final settings. As I do not need to adjust any light parameters but rotating the HDRI or choosing another HDRI this workflow is pretty straight forward.
When it comes to the Placement of the HDRI I only wait for the light cache to be computed as you can get a roughly impression whats going on… saving time not rendering the image just calculating the light cache. Alternatively you probably want to take advantage of V-Ray RT for this now.
Rendering
My rendersettings are intentionally really, really simple. I tried to have V-Ray at the point where its setting is suitable for ALL scenes. As I mentioned earlier, it has to be simple, the more complicated the settings are, the more tweaking is required. Actually when I am doing art, I dont want to tweak anything as I am nowadays no IT-nerd anymore.
I work with V-Ray since the first Beta days and a lot of things have changed and developed since then. Some time ago I came over the V-Ray Universal Settings and that sounded pretty much what I was looking for.
For the Image sampler type I’ve chosen Adative DMC because it is the gateway to this setting. As antialiasing filter I frequently use the lanczos filter as it produces nice and smooth edges and gently deals with the noise in the rendering. Since then I am using this setting because everything Monte Carlo related is controlled with one parameter, the Clr threshold.
In the image sampler I choose max subdivisions to 100, that will override every parameter set in the materials, lights etc. while I leave the minimum subdivisions to 1. It is important that you turn off use DMC sampler tresh. because you want to control everything with the Clr threshold. If you want to make a test rendering choose something like 0.05 or 0.1 for production rendering I choose about 0.01.
You will experience that all Monte Carlo parameters will be overridden by that threshold. That means, every light, every material, pretty much everything the whole thing is about controlling 1 parameter. The primary engine is set to bruteforce to get strong shadows, believable noise, really nice details (you dont have to set any subdivisions, as they will be overridden) and the secondary engine is set to lightcache (set the number of passes to the count of your processors) as it just has to fill out the gaps. In the DMC sampler adaptive amount Ive chosen an amount of 1.0 but you can play with this setting (youll find a good documentation here).
For the dynamic memory limit I always choose two-thirds of the installed RAM to get the most out of my RAM and rendering speed.


What I love about this setting is that it produces a very lovely, balanced and believable noise I dont have to synthetically add in postproduction. Also it has a great amount of detail in the shadows and textures. I simply love this setting.
Clamp output and sub-pixel mapping are turned off to get nice intense light but turning of subpixel mapping could tremendously slow down your rendering in different situations. Do not use color clamping as it cuts down your light information for further postproduction. For the V-Ray color mapping I use Reinhard as Reinhard is a blending mode between exponential (burn value 0.0) and linear (burn value 1.0) and gives me the most control over saturation of light. Here I used a burn value of 0.2. Just set the Gamma to 2.2 if you use the regular LWF, if you dont, leave that parameter alone and consider reading something about LWF.
You probably wonder why I dont use any Ambient Occlusion. Actually I overrule this ambient occlusion technique as it is de facto not physically correct neither it is used correctly by most people.
In my opinion – If you can see it, it is too much.
In my opinion – just leave that crap if you want to do high quality work.
In realtime applications or in tight timeframes where you are not able to use a brute force option, it is often a good choice (especially with the VRayExtraTex map) but dont overdo it!
I found 3 test renderings I made. One to test the believability of the bedspread and the others to test the mood in general, both rendered overnight. No other WIP renderings… sorry.
Here you can see a separate test scene to proof if the bedspread is looking believable, folds, fluffiness, disorder and color mood balancing between the bed, the frame and the rug.

Here you can see a pretty early overnight test rendering to proof the general mood, colors, shaders etc. pretty much a half-time check-up.

TIP : as you can see in these test renderings, you can tint the room with a color you want when the sun I shining on specified objects. Youll notice a really nice looking bluish-reddish-gradient between the bed and the hanging lamps. That is no shadow, its light-color bouncing away from the bed and the nightstand.
Postproduction
Youll probably going to hate me for that because I wont tell you anything new here.
I hardly do any kind of post-production.
My renderings are exported directly to a PSD file by the cebas PSD manager plugin, A really handy tool worth taking a look at. You can export a PSD file directly with the correct bit-depth settings, masks of objects, layers, materials and G-buffer elements. In commissioned work this often a lifesaver! But here the only thing I did was balancing the colors really slightly with the color correction tool of PS or AE and also slightly increased the contrast with copying the background layer, setting it to overlay and pulling down the visibility to something around 30%.
When it comes to DOF, I use dofpro. It is a plugin by Richard Rosenman and helps you to produces really nice bokeh effects in post because you can load your own aperture maps. its not that expensive and you can load your own Z-Depth map into it. In the end a little vignette for charming focus and leading and a bit of chromatic aberration for making edges smoother.
Chromatic aberration is pretty much like ambient occlusion, done wrong because of overdoing by most people. If you can see it, it is too much… Why would you want to deliberately introduce to your visuals something photographers go to great lengths to avoid/remove.
Thats pretty much it, because I love the elegant look of a not so color-exploded-contrast-burned-photoshopped-to-death rendering. I want to live with its flaws, imperfections, natural colors as I like that also in traditional art, photographs and of course natural beautiful women not covered in make-up.
I hope you liked this making-of.
I tried to take the time to explain things and not just giving some insights. You will find some tutorials at my website in the next weeks, just check back.
Michael Feuerroth
magnifique!!!
could you tell us the the white color material rgb values that you often use for testing your lighting !
maybe it’s a stupid question , i don’t know….
thanks for all the tips
rico26 There are no stupid questions, just stupid answers. Hopefully this is not one 😉 –> Try using a value around 180 to 200 grey. I hope this helps!
Hi Michael,
Just saying we had a speech about your work by our 3D teacher here in Switzerland…
You’re an amazing internationnal artist
Keep going and Bonne Chance !
Etienne
EtienneGuigon Hi Etienne, thanks for such kind words. Say hello to your teacher 😉
Michael, amazing work, beautiful images. Thank you for taking the time to make this detailed “How to” article.
My only question is about the camera shutter speed. How does the 1 second translate to actual value entered into the camera? I will try out a few but I wonder, still.
All the best, and thanks for some inspiration, too. Always nice to see some amazing work by others to strive toward.
Hi
I absolutely love your images! Thanks for sharing some of your techniques. I was wondering if you could help me with a problem I’m having? I’ve recently switched to 3DsMax for my visuals from Cinema 4D, and I’m trying out your HDRI lighting technique. I created a vray dome light and added a HDRI image in. I have a basic interior scene set up with a couple of windows, but when I render all I get is a very faint light outside the window, and absolutely no lighting in the interior. I have my GI switched on and I have tried playing around with the Inverse Gamma and the camera exposure, but with no luck. Any help would be greatly appreciated.
Thanks!
Sophie
sophiej3d, you may want to look at some peter guthries tutorials on his blog regarding interior HDR lighting.
Hi Sophie, I think this isn’t a place for questions. I will give you this link, which is ment for beginners and questions. All for free:
https://plus.google.com/u/1/communities/116904343385131862566
Best regards
Michael
sophiej3d I think that posting on the forums with an image showing the problem would be best – https://www.ronenbekerman.com/menu/forums
Hi Michael..
I learn some sweets tips reading this. This is why I love 3d, there is always something new to learn and try.
best regards!
Matias
It’s so lovely to read all these comments and there is this guilty conscience when i think of all the years that have passed without participating to the community and having a construction site named blog on my website… because of too much commissioned work. The making of is a bit outdated, but it’sa pleasure for me to stil help some of you out with some hints.
There is obviously one thing left to say: Thank you!
p.s.: maybe in 2016 there is some spare time to do something great, we’l see.
cheerio, michael feuerroth
Sorry, but how you with this three hdrs and without other lights could receive the sun shining from top? 🙂
Great work!