


Making of NYC TAXI
I first saw Efim Armand’s NYC TAXI scene during the CityLIFE challenge. He did not get a chance to complete this on time but his remarkable work could not go unnoticed, and I wanted to learn more about how he went about creating this little chunk of NYC and letting a taxi run wild inside it. Efim was very kind to put it into words in the form of this making-of article. Enjoy!
Author: Efim Armand
Efim Armand is a 3d artist based in Russia, specializing in Architectural Visualization and the use of Nuke for advanced post production.
Introduction
Hello, my name is Efim Armand. I work as a 3d artist in the ArchViz industry for the past 10 years, doing the modeling, texturing, shading, lighting, rendering and final post production compositing.
Here I would like to present the Making of NYC TAXI animation, which is currently in production stage. I will try to pay attention to each creative part of the piece, and tell you about some of the difficulties that I faced and decisions that were made along the way, as well as mentioning any special features during the project.
This project was intended as a studying of rigging/animation at first, but as I kept working on it I decided to make it a complete scene. I hope that you will take something interesting from this article for yourself.
Here is the animation, before we dive into the making of it…
References
I start each new project by collecting as many reference photos as possible. I find this step to be very essential. The main reference was the Google Street View, which helped a lot for understanding the atmosphere and dimensions of NYC streets and even getting some texture samples.


Modeling
All the modeling was done with 3ds Max (with small bits in SketchUp). First of all, I set myself the task of creating a scene considering that it should be adapted for animation, so low poly modeling was the main technique.
This was the hardest part of work, because of the need to make complete streets full of buildings. I started my scene with simple, low poly blocks out to help me find the right scale, camera compositions and basic light set up.
One of the problems that I ran into with this project was the large number of individual objects, and so I had to create layers based on object types. It helped me to make the workflow easier. I just turned off layers I did not need at any given time to provide clean, fast and focused viewport.

The environment was divided in three distinct parts…
- Foreground buildings and street elements (hi and middle poly counts) for close-up views.
- Middle-ground (low-poly buildings, mostly textured models).
- Background with distant buildings as simple textured planes.
This way it was really easy to manage the level of details according to the distance from the camera.

Buildings
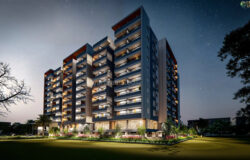
I browsed the SketchUP model library for models of city skyscrapers for the background, so I could fill the scene with this pretty nice low-poly buildings which actually look very nice at a distance or in foreground for camera views with motion blur.
Below is a collection of Times Square surrounding buildings. Since Alex Romans famous Exeter tutorial it is nice to start your project with searching reference models at Google 3D Warehouse.

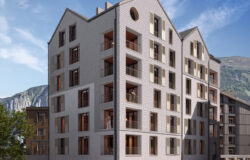
I had to make more detailed buildings from the reference pictures for using them in close-up views. Here is the process of modeling a sample building (E.V. Haughwout Building, 488 Broadway).
First I collected a lot of reference photos together to understand the shapes of the building and make textures. I tried to choose high-resolution photos with overcast lighting to avoid shadows or obvious light sources.

There were a lot of unwanted elements in the pictures, like antennas, cars, flowers, cables, people, etc. So I took them into Photoshop and cleaned them up a bit. I used the distort tool to push them into shape, laying down a grid helped to make sure lines are parallel to each other.

When the textures were ready I started to model. At first the building was a single polygon plane with UVW mapping and the final texture applied, then I made cuts and extrusions following the underlying texture as a guide. I used the same texture as a background in the UV editor to get even better control in matching my model to the texture.


It was quite enough for the dynamic animated views.

In the same way I modeled several other buildings. After the modular building facades were finished I saved the objects to a separate file and then merged them as xRef objects to the main scene.
It helped me to optimize the scene weight, Also considering the proxy mode of xref used less memory. After that I scattered my buildings, combining them to the city blocks as I liked.
Street elements
The main street elements were…
- intersections.
- sidewalks.
- roads (with three and five lanes).
- traffic lights.
- curbing.
- Other small street elements (mailboxes, newspaper boxes, signs, trash cans, etc.).
which are reused in modular way.


The road mesh have a noise modifier applied to avoid the lanes regularity in perspective views.

Traffic light objects had scripted Attribute Holder modifier to quickly animate light switch.

Materials
The building shaders were setup with the basic V-Ray power shader:
- Diffuse Component – Painted and color corrected photo-based maps, primarily collected from cgtextures.com.
- Reflection Component – Greyscale specular breakup map piped into the reflection and Reflection Glossiness slots. Reflection was used with the glossiness turned down (around .95), Fresnel reflections turned on
- Bump Component – A grayscale, high frequency image used on all shaders.
Traffic Lights Material
The following chart showcases how the traffic lights materials was constructed.

Road / Intersections Material
At first I applied individual IDs for road lane and intersection faces.

Instead of using Multi/Sub-Object material I chose VRayMtl with VRayMultiSubTex on diffuse slot. The main goal of this choice was the ability to modify reflection, glossiness, textures color correction and other options in one place without switching from one sub-material to another.

To simulate the wet look of the street, I had to produce a reflection map and glossiness map. I used desaturated and color corrected diffuse map. All of these adjustments came after a long journey of tries and errors.

After the base road material was finished, I decided to add some extra details to it. The material was converted to VRayBlendMtl. I added some extra glossiness and puddles blended to the base material by several masks. Also some asphalt cracks and lane signs were blended.

Glossiness material and blending mask for puddles

Below is the screenshot of how the final material node looks like it seems to be complicated at first.

Car Materials
With such an amount of car models in scene I chose a way of using one material for car bodies. The feature of this material was in MultiScatterTexture in diffuse slot. This method helped to create vast amount of various tones to gain a more realistic appearance of various colors of cars.
I also blended the base car body material with a simple dirt material using the combination of Falloff/Noise maps as a mask.

Below is Glass material with dirt map:


Taxi Dirt Maps


Lighting & Rendering

The scene is lit only by a VRaySun (Daylight) and a VRaySky map placed in the environment slot of the V-Ray rendering settings.

Here are some previews


And a bunch more

The render settings were simple. you can see the render setting below.


One of the tips I had applied was overriding of motion blur samples in V-Ray object properties for wheel objects in the scene to provide more correct motion blur. Most of the other objects have used Geometry samples defined in V-Ray Motion Blur settings.


The rendering process had three stages for each animated camera in scene (three backburner jobs) :
Light cache – just one single frame of animation rendered.

Irradiance map based on the pre-rendered light cache map, active animation range rendered.


Final render based on the pre-rendered Irradiance map, active animation range rendered.

The Taxi Headlights
At first the taxi headlights were turned off. Later, during compositing I decided to add some glowing effects and flares to the project. So I rendered headlights separately with mental ray using its Glare and Glow Shaders with patterned lens.

There were three basic headlights parts :
1. Chrome – Raytrace material.
2. Lens – Architectural material with Checker on Bump map slot

3. Glowing lamp: Standard material with Glow shader on Diffuse slot

Mental Ray and Flare shader settings…

The Final result…

The Smoke
For the sewer smoke I used the FumeFX plug-in. After smoke fluids were calculated I instanced the FumeFX grid over the scene and placed the instances wherever I wanted them to be. For some cameras more detailed smoke sources were calculated (cars interacting and tire tracks smoke).
After this part was over, I applied VRayMtlWrapper material to all the geometry in scene by Override option in Global switches rollout; then for each camera in the scene smoke sequences were rendered without GI, I used them later in Nuke.


Render Elements
Before I talk about going to Nuke, let’s look at main render elements I used for this project :

VRayAO

VRayAtmosphere

VRayObjectID

VRayReflection

VRayRefraction

VRayRenderID

VRayZDepth

Compositing
This process was rather an important stage for this work, because it allowed me to fix any rendering mistakes and to add some artistic retouching. During compositing process I blended the Reflection pass to the roads to increase the reflection a bit more. Also adding more dirt to some parts by using the VRayAO pass, which brings more reality to the image.
The reference images played and important role again. I tried to achieve some film look for my animation.
Such works as ‘We Miss You’ by Hanna Maria Heidrich…
And ‘Solo L.A.P.D.’ by Lasse Gretland…
inspired me greatly in searching of color and environment mood.
First of all start with adjusting the brightness and contrast of the image and make a quick objects color correction based on ObjectID and RenderID masks. The base compositing tree was built and later I used it for other cameras with adding some modifications where I had to.
You can see the approximate process of compositing on breakdown video.
And the general overview of the Nuke Tree!

Some animation screenshots


Conclusion
Personal projects are amazing. They allow us to use full and complete creative freedom and to show the world what we can create. If you have any questions, don’t hesitate to ask by commenting below.
Below is the list of software used during the creation of these scenes.
- 3ds Max 2012
- V-Ray
- MultiScatter
- GhostTrails
- FumeFX
- SketchUp
- Nuke
- Photoshop
- Premiere
- After Effects
Thank you all!
Efim 😉


it’s awesome, it’s really really awesome. Efim did a great job.
this is great !!
impressive amount of work…congratulation !
This is amazing! great job…. I like your other works also
Very nice work and great tutorial. thank you!
Its one of the most outstanding work I have seen in a long time. Congrats and thanks for making of.. 🙂 Also thanks to Ronen for posting 🙂
Excellent work on the animation. Great making of article. Specially the compositing work in Nuke called my attention. Congratulations to Efim Armand for the top quality work! Thanks, Ronen for sharing.
Wow, a work really impressive. There are a lot of talent there.
Congratulations.
Excellent, it’s been a long time I didn’t see any kind of making of likes this, so much useful information dude, thanks again for share your knowledge, best!!Fernando
Great work. WOW. Excellent tutorial. Congratulations!
A driver would add more realism to the scene. 😉
Amazing work! Can you please explain how did you do people composite/render? I notice that you render it separeted. Did you use some kind of matte or vray sphere technic?
Thanks a lot for the helpful tips and tricks 🙂
@carretel Hi! tnx for your reply. It was rather simple pass, only people and ground plain (with matte/shadow material applied) + dome light. I rendered people separately and then added them in post production stage with some masking.
@Efim Armand Were the people AXYZ models or what?
Thanks to all responded! 😉
Beautiful. Just Beautiful.
Beautiful work Armand. Just Beautiful.
It’s just awesome Armand!!!! Very nice tutorial!
Awesome work 🙂
This is the talent..Great work.
This is one of the best animations I ever saw. Bravo !!
wow – pretty amazing work!
@ronenbekerman i could barelly imagine how much of the work has been put to this.. Insane!
amazing work is not enough! brilliant, fantastic… etc! congrats
may i know the spec of PC you used to make this amazing film?
@Albert Natako nothing special; i7, 12GB RAM and.. a renderfarm (60 servers)
😉
@Efim Armand thank you efim =) hope you’ll make a video tutorial for this =P i’m a newbie as 3d artist and dunno how to make 3ds looks more realistic like this, guess i should learn more about render elements and shading or maybe compositing. coz i don’t find any video tuts that teach how to do it, step by step. so it’s hard for me 🙁
@Efim Armand haha! please tell us how didi you get that AO pass? vray dirt? thank you in advance
Unreal work mate, the rendering realism is mind blowing! Great cinematography as well. Only small criticism would be that animation of the hero car at some moments could be improved, it could react more to the force of sudden turns. It is very impressive that you did it all by yourself. Question : Can you tell us the total time you spent on production including post?
@Yatzenty Thank you dude! Nice notice, I decided not to animate driver and hide it as much as possible behind the glass reflections 😉 As to production period, I have been making this animation during my free time, couple hours a day for 3-4 months I guess.
@Efim Armand That’s less than I expected for the production time and only free time. Well done. You must be very experienced. Anyway, you can tell by the way this video looks 🙂 By animation I meant the car body which could swing to the sides bit more, it feels bit stiff at times. I totally agree with the driver decision
I think this is one of the most amazing things Ive ever seen!!!
Thanx for tutorial!
Can you explain your choice for GI?Why you render a single frame light cache and then enalbe iradience map?
thanx again
@silvermehran hi, I must say it wasn’t a correct way of rendering. I just tried to to so to save some render time and for test. The right scheme would be rendering irradiance map (animation prepass) + light cache (single mode, camera path enabled) at the same time.
@silvermehran hi, I must say it wasn’t a correct way of rendering. I just tried to do so to save some render time and for test. The right scheme would be rendering irradiance map (animation prepass) + light cache (single mode, camera path enabled) at the same time.
Thanks for share it dude!
It’s so motivational.
If someone see this video, will think that’s a company production. It’s looking so good!!
Great work!!
holy sh*t!……..amazing, congrats.
Don’t know what you do for a living, but if you send that to any major film studio (ILM, Pixar, etc) you’ll be hired in a heartbeat.
WOW – Amazing video. I really like the camera movements, animation and post work 🙂 And how cool you made your own rigging scripts!Perhaps the taxi model could use a little more work. – It seems a bit flimsy around the roof and wheel arches – but then again, it is an American car… 😉
WOW – Amazing video. I really like the camera movements, animation and post work 🙂 And how cool you made your own rigging scripts!
Perhaps the taxi model could use a little more work. – It seems a bit flimsy around the roof and wheel arches – but then again, it is an American car… 😉
hi, do you have anything similar in cinema 4D?
@combo hi, unfortunately no