


Making of Loft
Matheus Passos created the Loft scene as a personal project inspired by the works of MIMO Studio and Insomia Architects from Poland in tandem with the 2011 Forum Summary – as an entry for it. He did a great job on this one, managing to achieve high levels of realism… especially in the detail shot you see up above. Read on as Matheus shares more information about his workflow in the creation of this scene.
Introduction
The work on the Loft scene was carried out in tandem with Ronen’s 2011 Summary on the forums, and inspired by the work of Insomnia Architects & MIMO Studio from Poland. I loved the Loft project very much and decided to give it go myself… modeling and rendering it.
Units
Working with good reference plans is very important, and keeping within real world units (no matter what you use mm, cm, M) and have all elements scaled and proportionate to the scene. Here is my units setup.

Linear Workflow
I usually use LWF in my work, although it seems many have their own take on what LWF (Linear Work Flow). There are several tutorials on the internet where you can read about it one of the best was posted on this blog at Linear Workflow Made Simple by Matt Gorner.

Modeling
Before I begin the 3d modeling, I prepare a 2d blueprint lines model serving as a base. I then use extrudes to push this base into 3d form and further detail the structure adding bevels and chamfers were needed to enhance the look.

To create the wall openings I use a method that some of you might consider odd – I use Pro Booleans for this… For me it’s the easiest way.

Here you can see how a small chamfer is used to soften the edges of the wall that arent perfectly sharp in real life.

The floor was modeled using the great Floor Generator plugin. It has been featured on this blog so many times, and for good reason! Check out Bertrands write-up about it at Using Floor Generator Script. It would be nice to see this work on vertical surfaces (or any other type of surface) too.

Lighting
The main lighting source for this scene is a VRay Sun that work in tandem with a VRay Dome light loaded with an HDRI map.
I also added VRay Lights as Skylight Portals to the wall openings, to help with the faster calculation and light spread in the interior.
You can see my lighting setup below

Viewpoints / Cameras
Picking good viewpoint good compositions is super important , and so I setting up the cameras. I use the VRay Physical Camera due to the correlation with real-life camera settings.
Notice the color balance tweaks I made due to the warm nature of the scene having lots of wood I use WB to counter balance that for the end result.

I great advantage we as CG artist have vs. real world photographers is seeing behind walls! Like Superman!!!
You can only push the wide angle so far before it looks way too odd and you still did not capture enough of a given room. Here’s where the camera clipping plane feature comes to your rescue.
I place the camera outside the room behind the wall and the clipping plane was pushed forward just so I pass that wall slightly and so uncover the room interior for the camera.
Furniture 3D Models
Many people asked me about the furniture I used in this scene. Did I model them myself, or purchased ready made models?
Well theres nothing wrong with buying ready made models (as long as you do keep trying modeling some yourself, perfecting your skills you can learn a lot form the works of other this way).
I did some shopping prior to my work on the Loft scene, and tested the models in it. Some of the 3d furniture models were made by Bertrand Benoit (BBB3viz). He is a great inspiration to me and his work is of the highest quality in our industry.
I also used 3d furniture models by designconnected which I like to highlight here. Using them for the first time I was very glad to find they were well modeled and have great realistic quality in textures too (even though I tweaked those for my own purpose and taste). They are also very affordable, which is super important for me and anyone else I assume. The balance between modeling it yourself vs. buying them depends on that greatly, so this helps.
In this experiment I found it very important to use professional models, which made ??my work faster. I used 5 DC models : Cityloft Sofa, Lanshire Clock Works Dancer, Ligne Roset Africa, BD Barcelona Flamingo and an N/A Pendant Lamp.

Materials
Sofa Fabric

The material node view

One bump on the top right and variations of the diffuse color.

Wood

The material node view

Wood Floor

The material node view

I used the MultiTexture plugin for creating the variation in the floor wood planks.
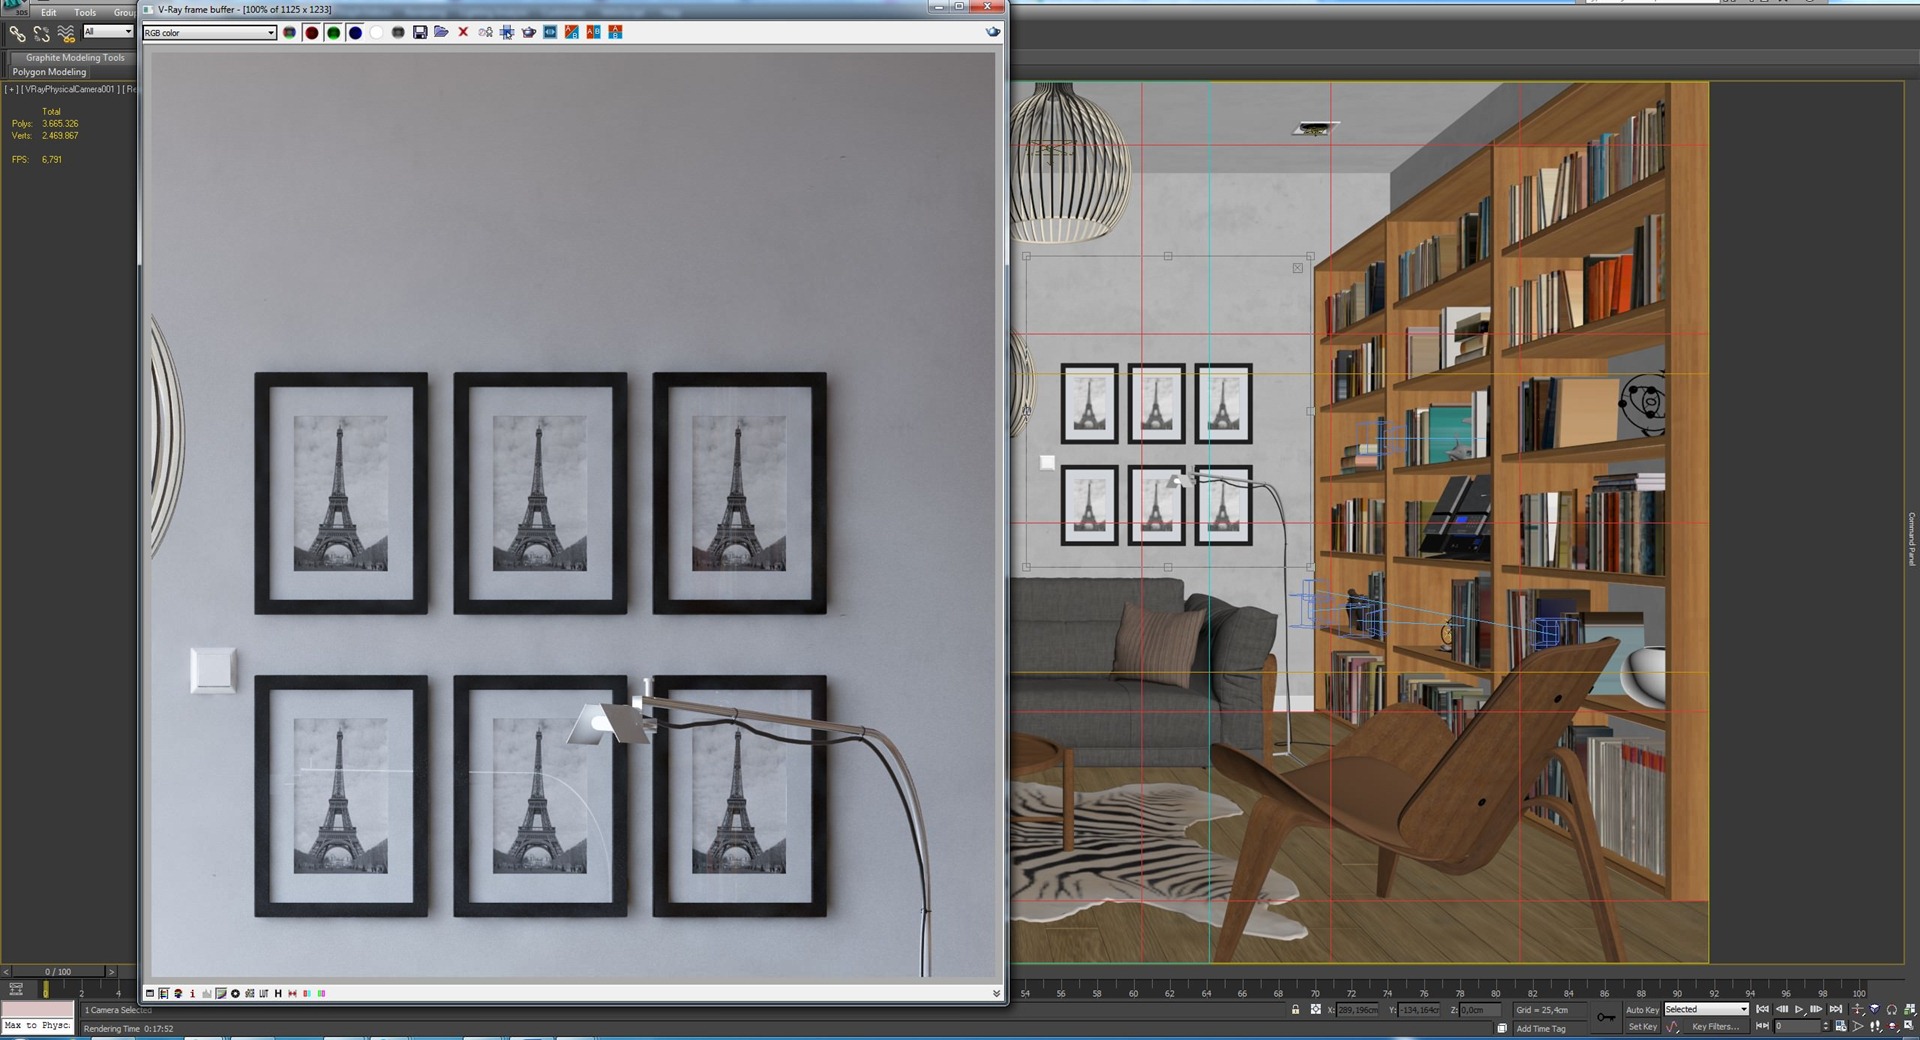
Rendering
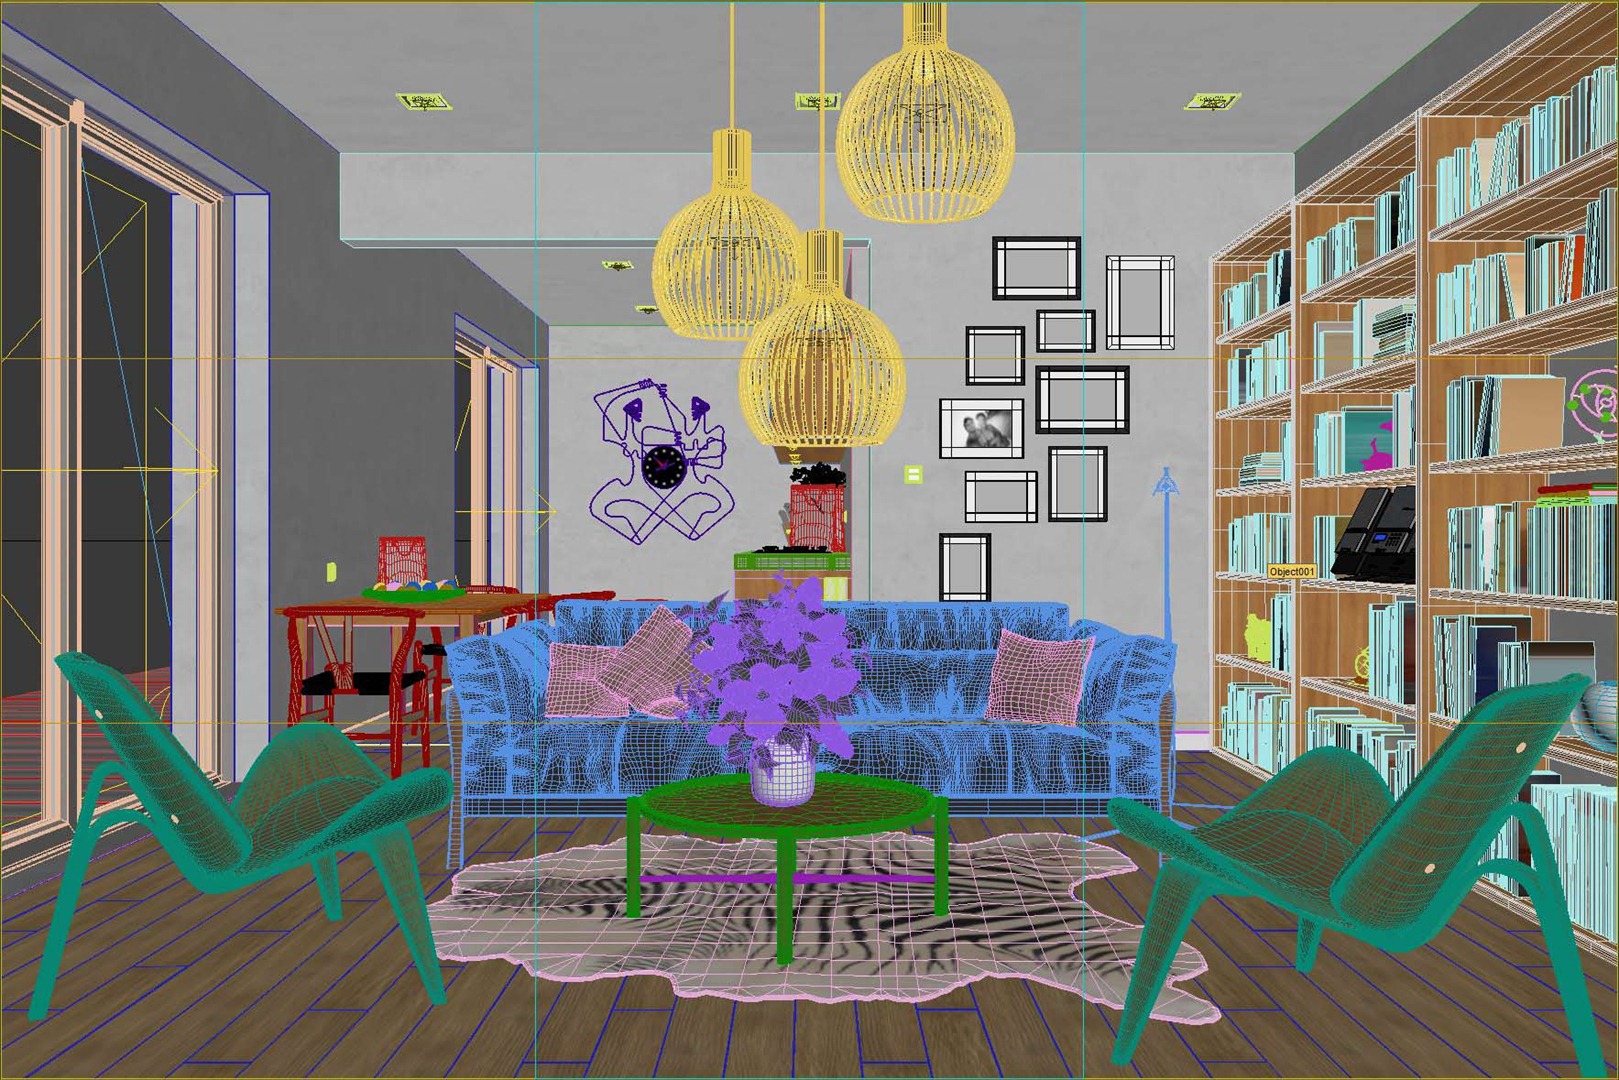
Heres the viewport camera view selected just before I went to rendering the final image
You may find that the irradiance map method quality is low, but it can be easily solved if you increase the number of the global subdivision multiplier…
In the original rendering I used the value 3. But I re-rendered with the value of 8 which gave me a result of walls without spots
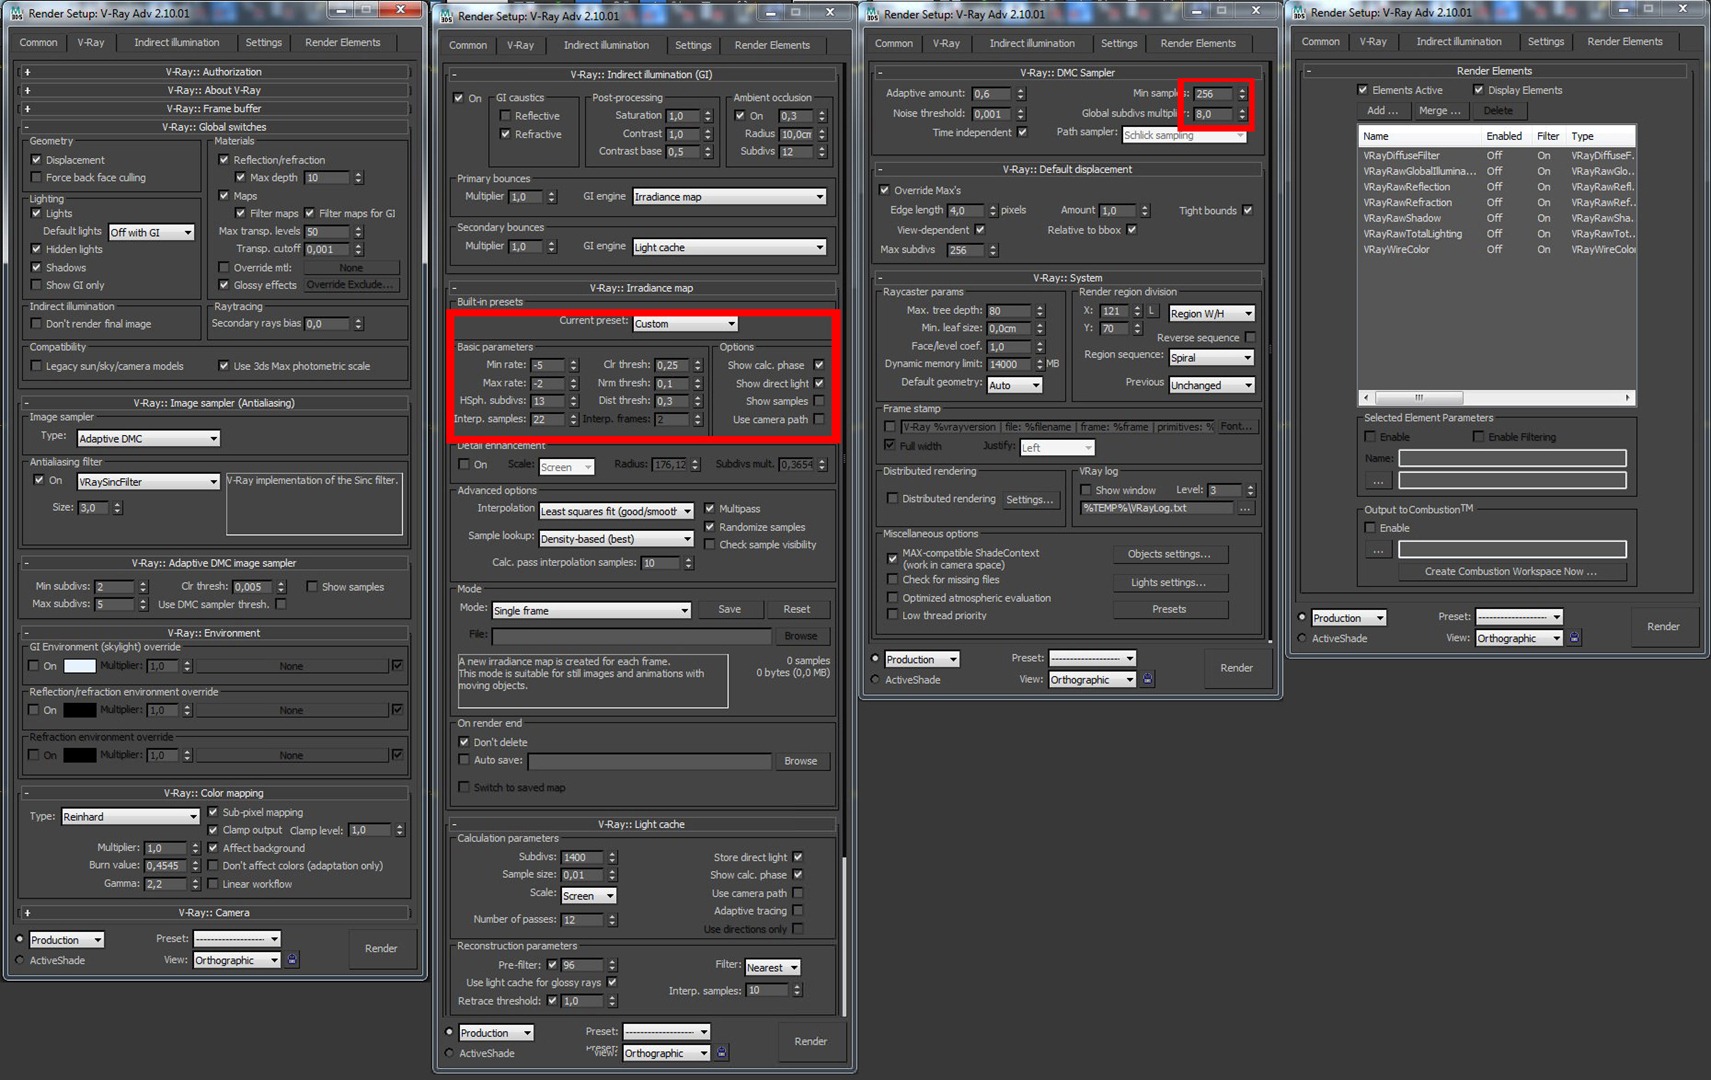
I might have started to low, but this is none important what you need to know is that you can and should play with the settings to learn what they do and thus better optimize your rendering process (or get a monster computer and just use brute force even then you will quickly demand more of your workstation, since we always want more so learn to optimize).
Here is the new render with the global subdivs multiplier at 8
Post Production
I did very little post production in this project and aimed for getting it all done in pure render as much as I could. I do output some passes just in case I need them, but mostly do a few color corrections and that is it!
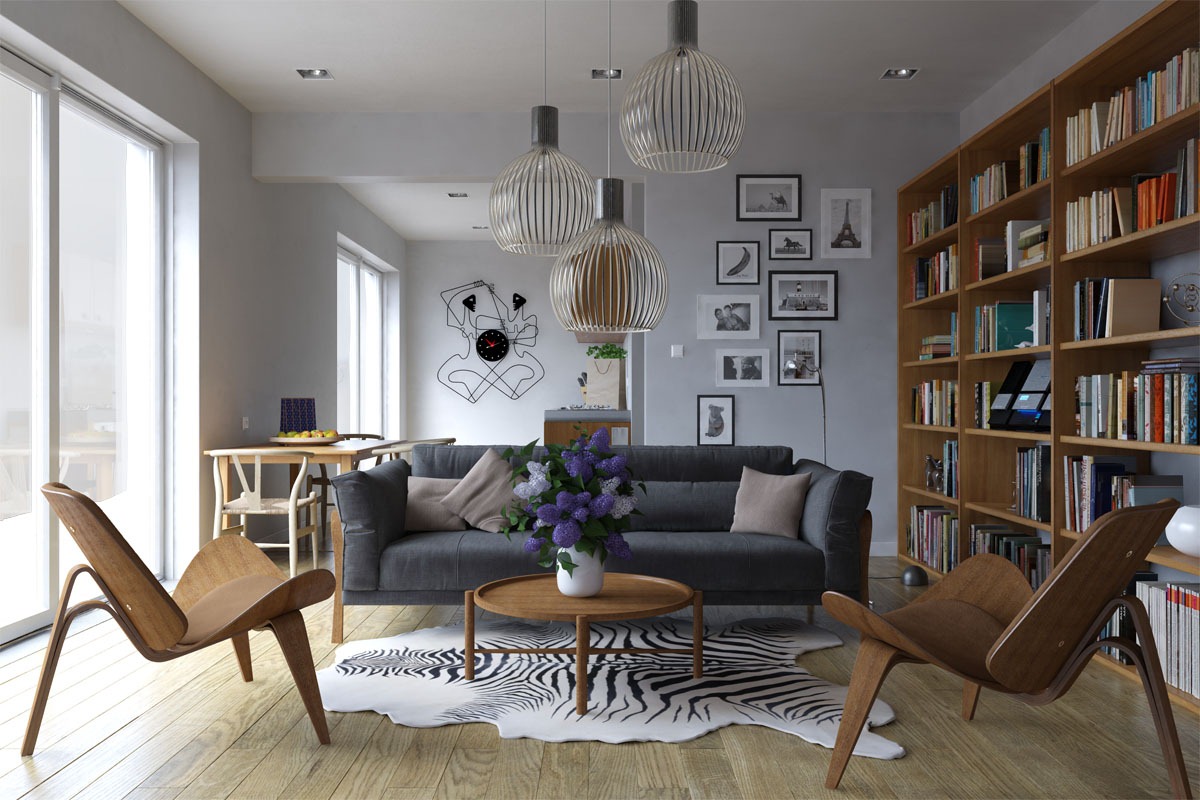
This is how it came out the renderer.
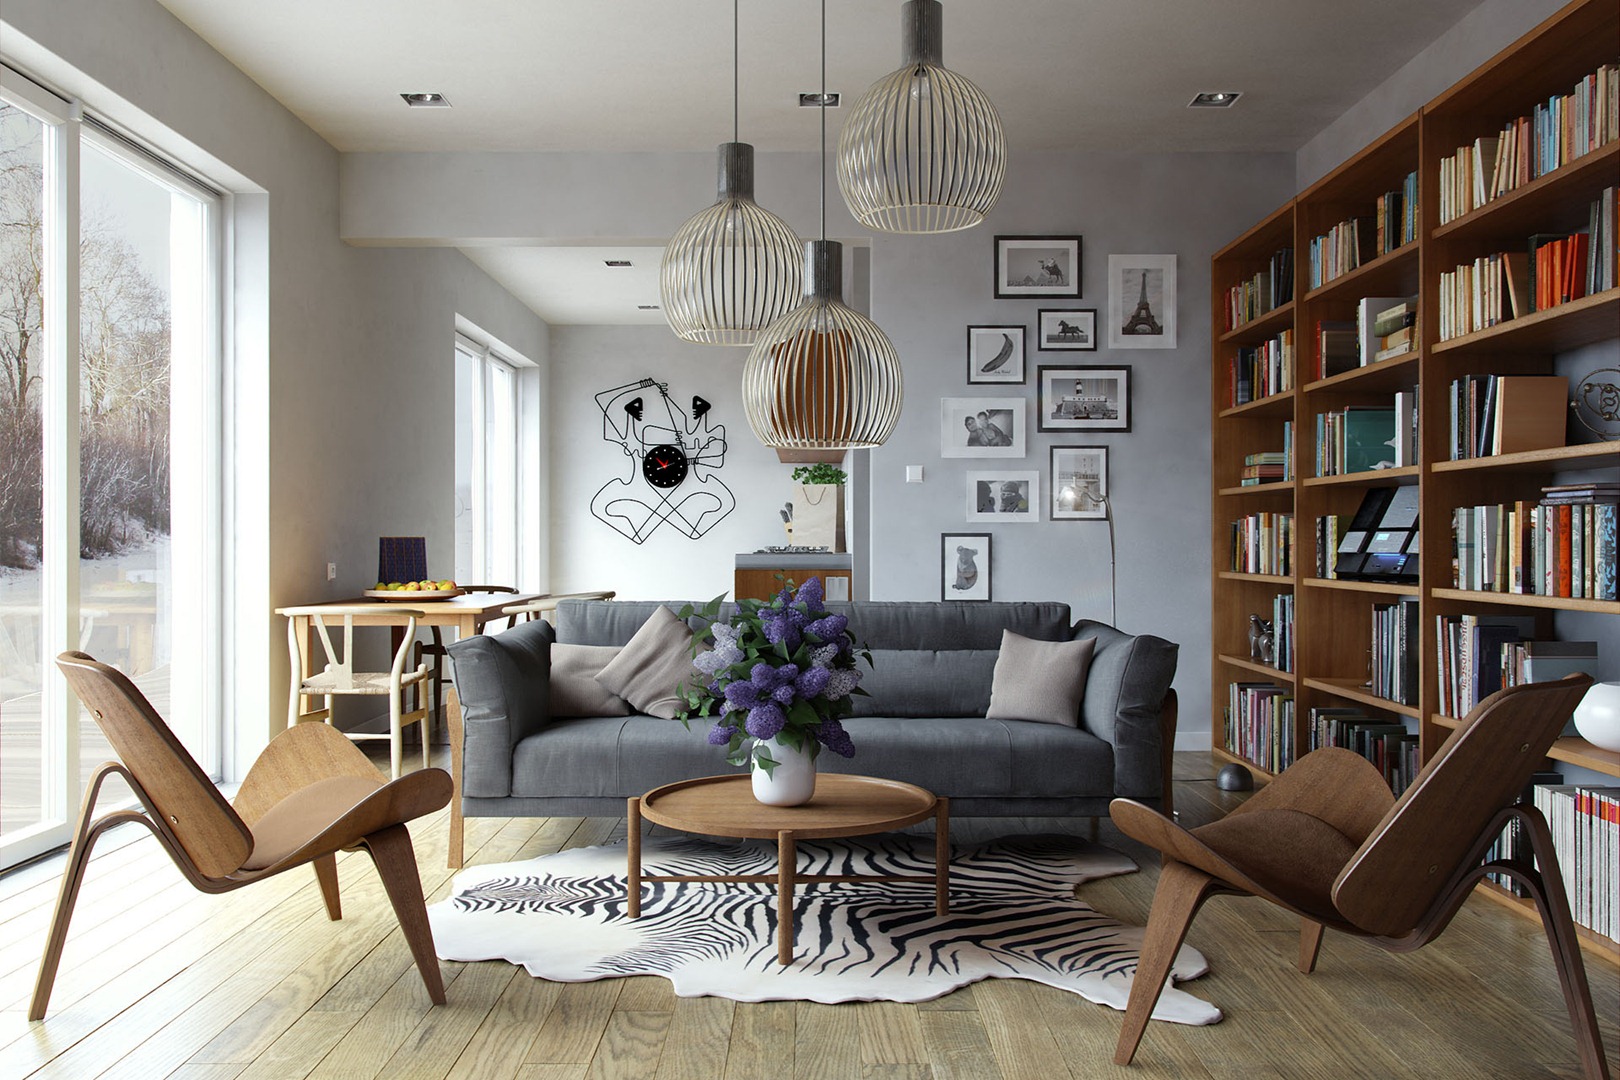
And this is the result of post-production. To simulate the light from the lamp I used Magic Bullet for Photoshop.
I hope this article helped you in some way. I enjoyed writing it and please feel free to ask anything you want in the comments section below.
Thank you very much,
Matheus.
Love the Renders 🙂
As i have an opportunity to ask i would like to ask you 2 Questions :-
1) What would be the result if you have used Cat-Rom instead of Vray Sinc Filter ? What it be a gr8 diff ? Is it neccessory to stick to One anti -aliasing Filter for all moods ?
2) What Diffrence would it make if the DMC Min & Max Divisions are increased ?
Will be helpfull 🙂
@anwar522 Hi anwar52212,Thanks for asking …I’ll try to answer ..The filter Catmull-Ron is very sharp …But it is very heavy .. processing time consumingThe VraySinc has a lot of sharpness, and is much faster … I like to use Vray to render all the tools that provide Vray …. I know it can work very well … But for example: I see no reason to use vray offers VRaySun Dayligth use …. I say it’s better to work with the best program compatibilityThe basic parametersMinimum Rate – This value determines the resolution for the first pass gastrointestinal. A value of 0 means that the resolution is the same for the final processed image resolution, which will make the irradiance map similar to the method of direct calculation. A value of -1 is the resolution is half of the final image and so on. You want to keep it usually negative, so that LI is calculated quickly and the large flat regions in the image. This parameter is similar (but not the same) the parameter of the minimum rate of samplerAdaptive subdivision of the image. Max Rate – This value determines the resolution of the last GI pass. This is similar to (but not the same) the parameter of the maximum subdivision sampling device for adjusting the image.Hugs my friend
@anwar522 Hi anwar52212,Thanks for asking …
I’ll try to answer ..
The filter Catmull-Ron is very sharp …But it is very heavy .. processing time consumingThe VraySinc has a lot of sharpness, and is much faster … I like to use Vray to render all the tools that provide Vray …. I know it can work very well … But for example: I see no reason to use vray offers VRaySun Dayligth use …. I say it’s better to work with the best program compatibility
The basic parameters
Minimum Rate – This value determines the resolution for the first pass gastrointestinal. A value of 0 means that the resolution is the same for the final processed image resolution, which will make the irradiance map similar to the method of direct calculation. A value of -1 is the resolution is half of the final image and so on. You want to keep it usually negative, so that LI is calculated quickly and the large flat regions in the image. This parameter is similar (but not the same) the parameter of the minimum rate of sampler Adaptive subdivision of the image.
Max Rate – This value determines the resolution of the last GI pass. This is similar to (but not the same) the parameter of the maximum subdivision sampling device for adjusting the image. Hugs my friend
I am noticing some irradiance map problems on the right side of the ceiling, eventhough your lc and irmap settings are high and the lc filtering and irmap interpolation samples are pretty high too, so this should not be happening. Do u have any idea why is this occuring?
nice to get some insight in your workfow, matheus –
how long did your render take? the setting the global subdivs multiplier on 8 sounds like a very long time, no?
maybe pressing the “detail enhancement” button would have made you getting rid of the splotches, which look more like irradiance-splotches to me rather than a subdiv-problem (increasing the global subdivs surely can can help here – but all other subdivs in your render might get raised as well)
really good rendering on this one and thank you for the work writing this article
best regards
Lasse
@xoio
i dont think these are im splotches. these must be caused from the wall material texture. With such high lc filtering value and im interpolation samples i doubt that any splotches can appear.
@xoio Hi Laser,Peace my good friend …
Each rendering took an average of 20-40 minutes.Global in three subWhen I went to 8 sub … The response time spent for 1 hour and 20 minutes.But I do not complete the render
.About the stains, I believe it is a fair result ..Textures and IM below.For when I raised the subdivision to 8 spots disappeared.
@xoio Hi Laser,Peace my good friend …
Each rendering took an average of 20-40 minutes.Global in 3 subWhen I went to 8 sub …
The response time spent for 1 hour and 20 minutes.But I do not complete the render.
About the stains, I believe it is a fair result ..Textures and IM below.For when I raised the subdivision to 8 spots disappeared.
Hugs my friend
best universal setup for interior is:
AA – min 1 max 100
all light shodows to 256 sub & all material spec sub to 256
In my case this is the fastest HQ setup…error free 🙂
best universal setup for interior is:
AA – min 1 max 100
all light shadows to 256 sub & all material spec sub to 256
In my case this is the fastest HQ setup…error free 🙂
Great Work !
How long did the render take ?
i see some splotches but it doesn’t affect your render, maybe you should test Bruteforce next time to avoid them.
@ChakibRabia I appreciate the words my friend ..
Each rendering took about 20-40 min …
have not tried to use the BF …
I think Vray 2.0 is full of noiseYou can see more on my side of the page
http://www.facebook.com/media/set/?set=a.347440848614675.105132.260861987272562&type=3
Nice and clean render and tuto !
Love how you worked on your floor, very realistic !!
Nicely explained @MatheusPassos , only thing i would change is up the hsph subs of the irradiance map so there would be no GI glitches under the ceiling. All in all some very good light and visualization. Thanks for sharing your knowledge. 😉
Very nice and clean, it remainds me Architectural digest look. may i ask what material setting did you use for the white walls?
Congrats again
Excellent
How much time does it takes the final image?
@RodrigoNavarrete HI friend
Each rendering took about 20-40 min …
Set of 6 renders
See: http://www.facebook.com/media/set/?set=a.347440848614675.105132.260861987272562&type=3
Hi, ronen how are you?
is it possible for you to make a litle tutorial about This Couch Modeling? texturing? Or
How to make those wrinkles? im having some Problems how to make them looking good..
i would like that if you make Some Short Tutorial 🙂
Thank u!
@ShimonSundruci Great idea… Added this to my list 😉
@ShimonSundruci DC users – if you like these models here, wait a bit… I’m arranging something for you 😉
@ShimonSundruci I think we will soon have a more rapid
http://www.cgrecord.net/2012/05/autowrinkles-for-3dsmax-beta-test.html
@MatheusPassos @ShimonSundruci check the source forum thread on iCube site – http://forum.rendering.ru/viewtopic.php?f=25&t=1085
Hi 🙂 Is it possible to add all textures from that scene ?
Hello! It looks fabulous! Someday I hope to have this perfection! Allow me a question from novice user: how to apply the texture to the books? Do you use multi-subobject or exists some other method? Thank you for your time and your knowledge! Cheers!
@JuditBustos @ronenbekerman Yes Mapping the books Tutorial would be really helpful 🙂
Really inspiring work! Great mood.
But in my opinion the splotches/spots (whatever you called them) are really apparent on some of the renders.
Question:
Could you explain to me all those falloff nodes on the sofaMaterial. Why and how do you use them, being a Maya user I would really like to recreate a similar result.
Thanks for sharing your workflow!
@tarjep Hello my friend Ronen Bekerman is preparing something really cool, I think you’ll get what you want
@MatheusPassos @tarjep Check out the DC LOFT PROMO at https://www.facebook.com/ronenbekerman/app_322805704439844 Matheus also added his own tweaked sofa model to the mix so you’ll get it as made by him too 😉
Has anyone got theirs yet? I filled out the form yesterday morning and didnt get any kind of email aknowledgment.
@GeorgeR Hi George, there is no email sent – just the confirmation on page after you submit. I got your entry, but you sent me the invoice url within your own profile – I can’t access it obviously 😉
The voucher is on its way to you – but send me that invoice in PDF form for the records.
excellent work, excellent tutorial!
is very gratifying to see models made ??by me in the work of others, the microsystem on the shelf ..!
Here you can download:
https://rapidshare.com/files/4029122427/Microsystem.rar
enjoy it
@glastre Thank you my friend … Your model is beautiful
Hi Matheus , Nice tutorial and thanks for sharing it.
Some questions. Why do you not increase your HSphSub instead of increasing your Global Subdiv Multip (8 ???) to avoid your “Spots” ?
I’ve tried your settings on one of my scene. I’ve to abort it after 8 HOURS !!! (without finishing)
I Think your Min Samples and Global Sub mult are much to higher ( even for a i970 6 cores).
Cheers
@BondsAlex My friend, I could not explain it right ..But in my scene increased almost three times as long to render …On my computer the Sub 8 overall … took about 1 hour and 20 min
Nice simple effective workflow and a great result.. Good job Matheus.
@ShaneDale Thanks friend
Great Work Matheus, congrats!
@toni fresnedo Thanks Tony, You are an excellent artist
Hello Matheus, congratulations for that extraordinary work. I’d like to know How much would I have to pay for a work like that? I’m really interested in rendering. Thank you very much.
@Naimadlg please, oi@matheuspassos.com
Matheus..está um espetáculo!!!;)
It really look great. Can you tell me which HDR map you used? Was it a cloudy picture? Where can I buy it? Thanks a lot, Michael
Great.
Any chance to get the DC Loft PROMO models yet? hihi…
Thank you Mr.ronenbekerman for this awesome tutorial
but
would you make this tutorial as video or pdf and put them in page so we can download it
I am from Kazakhstan, please share your file… architectdesign2014@gmail.com, thanks you very much!
nice rendering~~ unforturnately i can’t use floor generator. i already put the scripts file into the fold , but everytime i start 3dmax it is said “MAXScript Auto-load Script Error”
thank you so much for the tutorial..its amazing
can you tell me the length and width of the wall please???