


Making of Starbucks Coffee
Reinaldo Handaya got the Best of The Week award for his 3D recreation of Starbucks Coffee by Kengo Kuma. Since I liked both the original project and the remake I asked Reinaldo to share his workflow with us and he kindly agreed. Follow him as he describe the process from modeling, through texturing and lighting all the way to an important post-production stage as the base render is far from the end result as you will see. Enjoy! And ask away at the comment section in the end.
![]()
Author : Reinaldo Handaya
Reinaldo Handaya is a 3d Artist from Indonesia, and one of the founders of 2G Studio and the online 3D course at www.nelsoncourse.com.
Introduction
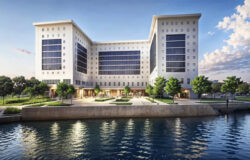
The first time I’ve seen the photos of Starbucks Coffee by Kengo Kuma it really caught my eye. I loved the design very much. Simple materials but complicated. And after several observations I decided to recreate it in 3d.
You can see them all at – Starbucks Coffee / Kengo Kuma & Associates on Archdaily.
I’m using 3dsmax 2012, VRay, Photoshop CS 5.5 and Magic Bullet to help me in post production. For some of the modeling, I got help from my friend, Sinung Wahyono… He is indeed a great 3d modeller.
Units
For interior rendering I always use centimeter units. Scale in this 3D rendering does matter. To get a good image we also need good proportion of our objects in the scene.

Gamma Space
Before you start you must decided in what space we want to work… Gamma 1.0 or Gamma 2.2 space…
I often work in Gamma 1.0 space actually, but this time I decided to work in gamma 2.2 using Linear Work Flow.
Working in Linear Work Flow (LWF) is very easy because in real life camera also work in Gamma 2.2. There are lots of advantages in using LWF gamma 2.2. You will get your scene brighter than with Gamma 1.0 and the black part will not contrast so much too. This will help us to control the dark side of our rendering.
You can learn more about LWF here – Linear Workflow Made Simple by Matt Gorner
Here are the settings…

Modeling
First thing to do was to create the building. I used splines to define the walls, ceiling, and floors and then used the extrude modifier to create them.

After that I continued to the woodworking. Nothing special here actually… I modeled the single wood group the would be repeated along the walls with chamfered boxes, and then copy pasted them to arrange along the walls… old school, takes time, but simple.

I then added the interior furnishings such as the tables, chairs and bar area to fill up the interior following the reference photos of the real thing.

Lighting
In the image below you can see my settings for the lighting…


This time I used an HDR as the main light source in the scene, tweaked a bit using color correct.
I used HDRI for the first time in this scene and found out that it needs more render time since you need a high enough subdiv setting. On the other hand you can get away with lower hsph subdiv value.
I also used a VRay Light Plane for the indirect light from the floor. As you can see in the option, I didn’t check the invisible option. This will be useful for the render element and I will explain it later.
Also, for down-lights I use VRay ies because it count Light Cache very fast, not like ordinary IES photometric light.
So as you can see I use a simple lighting technique here.
Camera
Setting up your VRay Cameras is an important stage. You can see my settings in the image below

I tried to stay true to real photography aspect ratios and find the best viewpoints possible… Thinking about the woodwork on the walls catching the light and having the rule of thirds in mind to as I set the entrance on the lower left third. There is also a strong diagonal line going from top left to bottom right, catching the wall to ceiling line and the benches too.
For White Balance, I always start using the neutral preset. This would be the baseline for any corrections made later. After the first tests I will consider to change the WB, but this time I stick around with neutral until the end of the process.
Please see the HDRI setting once again. There I set the render multiplier to 1.0 and just change the Camera Settings to tweak the exposure… Why? I think it makes things simple with just one place to control the exposure of the image. It also resembles real life photography conditions, as the sun and skylight are given and you set the camera to fit.
Materials
Concrete Material
I created the concrete material out of two base textures blended using Photoshop and you can see the mat buildup below…

I did the same thing with the ceiling and the floor material since all of them are concrete.
Wood Material for the Table
As you can see in my scene there are lots of tables there, and there is no way all of them will look the same in real life… the wood texture they have. What I did was attaching the table tops into one object and assign material by element modifier to it.
After that I created one multi/sub-object material. Defined 8 different wood textures in it, and there you have it… table tops do not look the same. I did the same thing with the woodwork on the ceiling and walls.


Rendering
Now its time to render the final image. Below you can see the preset I use for the final rendering.

As my previous explanation on HDRI section. You can see the hsph subdiv are set to only use 60 and global subdiv multiplier 1. This was good enough and I was satisfied with the result of the base render.
Below you can see the result of the rendering.

As you can see, the result is clean enough and I’m very happy about this.
It is not bright enough, but that is perfectly OK… I do not have any blowout at the entrance and will compensate for it all in post production.
Post production
I did a lot of work in this stage, and I’ll do my best to describe it in detail here… so let’s go!
First, I want to brighten up the scene a bit. However, I don’t want the floor near the entrance to blowout. I used a brightness and contrast adjustment layer with the floor being masked out of it. Just select the floor using wirecolor and that will help you fill in the mask using black color. And as you can see the result is the floor still like the original rendering.

Next, using the reflection render element… once again I mask out the floor and, enhance the reflection by changing the blending type to linear dodge (add) and give 70 percent of the opacity. This is done by feel, there is no fix law about this.

I wanted to enhance the downlight and also the starbucks logo, for both of them I used VRay Light material, so I could use the VRay Self Illumination render element. I use linear dodge (add) opacity 100 percent.

Next step is to enhance the indirect light on the floor. I use VRay Light select render element and I only select the VRay Light plane for the indirect light. Now as promise, explanation why in the VRay Light plane is not checked as invisible.
Because then this render element won’t be active. So in order to activate this you must not check invisible. Below is the image of how this render element looks like.

Here I use linear dodge (add) and 76 percent of opacity. And the result is below…

I continue to enhance the VRay ies for the downlight. Once again I used VRay Light select and only selected the VRay ies objects (all the ies). I use linear dodge (add) and 59 percent opacity. See the table near camera with croissant on it (makes me feel hungry now) actually the result is not good on that spot, the ies effect got over burned, so I decided to reduce it there by using local masking to reduce the strength of the light on the part only.

Next was to enhance the ambience from the ies light on the sofa. Once again I used a VRay Light select render element using VRay ies and this time I masked it black and brushed in white back where needed. I brush the sofa area only to enhance the yellow ambience. Here I use linear dodge (add) 60 percent opacity.

Now its time to use magic bullet photolooks. To start, I use a film like curve and I tweak the curve a bit, and as you can see, the result is very contrasty. I always like high contrast in my images, but overdoing it is not good.

After seeing the result I desaturated it a bit so I use saturation tool and change the amount to 89 percent.

Here I change the mood to look more greenish. I use 3-way color corrector to do the color correction. And I tweak the parameter until I got the green look I wanted.

I also wanted to enhance the brightness on the window / skylight in the ceiling and also on the entrance. I use spot exposure, this does a really good job at it. I used 2 or 3 spot exposure in the places I wanted to enhance.

At this point the image looked good, but some warmth was needed… as the image seemed to cold to me now. I used the warm/cool tool to make it warmer.

I still feel we need to do some more color correction. I did a 3-way color corrector once again…

The result is much better than before. I commit the changes and go back to the Photoshop layer. I do some level corrections, tweaking the Red, Green, Blue levels one by one.
Here the result…

Now lets do the glowing sky part…
Back to magic bullet photolooks. I use diffusion first and after that I use star filter.


The result is not affecting the windows area only, it affects all the image. We don’t want that foggy lens look all over…
I use a black mask, brushing white to bring back the effect to the desired places only – glass windows area.

Next thing was to set a background on the entrance area. Here I wanted to have a good result just like in real life, so I added a background and controlled the exposure to make it fit the light levels of that area.

The corner of the ceiling still looked too dark for me… I used a hue saturation channel mixer and raised the lightness value, using a mask to affect the specific corner only.

To enhance the image more, I gave it a depth of field effect…

And the last touch was a vignette effect…

Well, actually there are still some other last touch, but I guess you can pick this up from here and go on pretty good on your own…


Thank you for reading this making of starbucks designed by Kengo Kuma, and I hope this tutorial can help you in your own work. Always remember, just like my teacher Nelson Liauw always said, in VRay is just setting numbers, the best way to improve is to sharpen your own sense.
Man.
Looked so Difficult and you made it so Easy 🙂 Gr8 Post Process 🙂 Love the shots and the Result in the end 🙂
awesome!!!!
Thanks, very well detailed article 🙂
Really love all those countless making-of out there !!
Great job and nice tutorial!
Hi ronen, thank you for publishing my article, its an honor for me to be here with you all.
@anwar522 hi anwar, first i have done lots of trial and error to do the lighting, i try lots of HDRI. Indeed its difficult., but once you got the workflow, its very easy. the key is see lots of reference image and try to do post production similar with the reference you want it
Amazing how much ‘rendering’ we do in Photoshop! Great work.
great work! I love the wooden composition of the beams! Although it seems difficult to model, it is just a simple a you said. I have though a question about magic bullet. I can see that the correction you have made with magic bullet probably you could use photoshop too. Why didn’t you? Is it more flexible magic bullet than photoshop?
@vikoum Although Magic Bullet is very nice, I opt for core PS+LR workflow. I started to use LR for photography edits and I like it very much as it offers great control over things and a way to save presets and apply them on many images.
I really like the work you did on the coffee shop. Thanks for sharing.
great man your work is so good
I am your fan
@vikoum hi bro, thanks. indeed you can use photoshop instead of using magic bullet. but as you can see at the 3 way color correction i feel more comfortable using magic bullet. also to create the glowing sky also i feel comfortable using magic bullet although we can create it using photoshop manualy. for me the glowing sky created using magic bullet is more easy and looks more natural, but as long we can use any tools it does not matter we use magic bullet or photoshop manually.
@mutsu80 yes, I totaly agree that we can use sometimes more than one program to do the same thing. you did a great job! waiting to see more of your projects!
@ronenbekerman yes ronen, i ever try to use light room, its a great program too. in fact i ever change evening mood to morning mood in light room
@SyedMohammadDaniyal hi bro, thank you very much
@ck_1138 hi bro, thank you for coming by
@Valerostudio hi bro, thank you very much
@Daniel_Jarvie where is your epic starbucks design?
@Josh_noon in the mind bank dude, nz ain’t ready for my starbucks.