VRayLightMtl + VRayDirt for Quick AO Render Checkup
Here’s a quick tip I use almost all the time now, mostly because I really like the look and it’s easy and quick to setup, but the main advantage of an AO (ambient occlusion) pass is spotting problem areas in the geometry – especially holes and flipped normals you might have missed
Setting up the AO pass with VRayLightMtl & VRayDirt is real easy and fast. You don’t need to turn on GI or use a VRay Physical Camera for this (if you do, make sure to tick off the exposure option). After I import the model into 3d Studio Max, or just finished modeling inside 3dsmax, I run this quick pass to check the model for geometry bugs such holes and flipped normals i might have missed.
In the image below you’ll see how those problem areas will show in such a pass. This will only work if the Emit light on back side option in the VRayLightMtl is off allowing for all those problem areas to appear pure black since they are not emitting any light.
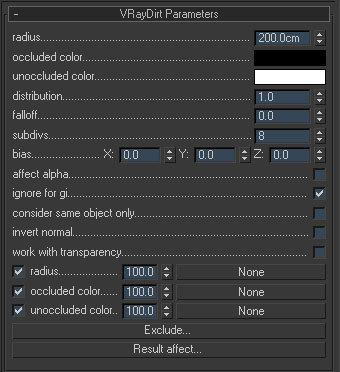
The material settings
Using VRayDirt map as color, making sure Emit on back side is off.
Setting pure white and pure black for colors and radius to 200cm gives me good result, but you can play with it.
Check out Peter Guthrie’s VRay Dirt Tutorial at his blog for more cool uses for this great VRay map.


I’m using render elements VRay_ExtraTex_Map with VRayDirt. I think it is faster, but there is a problem with the loft objects.
HiWhere do I put the material for de VRay_ExtraTex_Map, I can’t seem to find it anywhere
great tip, I was looking for some way to do AO in vray for quite some time now, this is great, thanks for the tip!
good result very quickly!!
thanks
I cannot seem to get this to work, when i render I get a fully white frame, can you please provide more details?
I get a fully white frame too, any explaination for more detail…? I really need this.
Might be the radius value is not fitting to the scale of your model… resulting in very small black in the light mat.
My scene is setup in metric centimeters, my object is a car model with a size approximately 480cm X 185cm. Then I set the AO material, just like the tutorial above, and adjust the VRayDirt radius with variant range from 200cm to 10000cm, the render result is still the same “all white flat image”. I use 3ds max 2009 with VRay 1.5 SP2.
Any further explanation will help. Thanks!
I think there’s a small problem with this tut. Where it says use pure white and pure black… it’s never a good idea to use pure white or black for any material or VRrayDirt, it’s not physically possible and would result in strange GI calculation, for example if you use a pure white and there are lots of lights and GI you might end up with a totally burnt image (because light bounces 100% off pure white which is not possible for any physically correct material) and if you use pure black it will absorb all light falling on it, etc…
@ sansamuel: is your light setup set for a physical camera? if so, did you try to render your AO pass through your physical camera?
You are correct about the pure black / white issue with render… but this is true for the normal render and not this AO pass – this is not intended to be real in any way so it’s no problem.
The thing I try to get from this pass is catching errors and a general feel of the geometry before I move on. You might also use this pass in post to enhance shadows.
I use a physical camera but with exposure off – so it acts like a regular camera this way. I use the VRay camera since when I advance with the scene i can use the same on with exposure set to ON.
Hope this helps 🙂
Hallo, I read this powerfull mini tutorial and i find it very helpfull but can anyone help with the position we put this VRayLightMtl? In the environment of max may be?
You put this inside a material and then use it as a global material override in the VRay global settings. It replaces all other materials in render time.
Hey Ronen,
Gongrats on the great blog! My comment has nothing to do with this post (Even though its gratifying that I have been using the same technique). Just wanted to comment on the carpet, it looks great.. How did you make it and how do you get such an object to not flicker when animating? Especially in the AO pass?
Thanks Shano!
I used 3ds Max Hair & Fur modifier for this carpet… and I wouldn’t know about the flicker since I did not animate such thing ever before.
thanks for the tip. I’ve been using this technique for mental ray, although the exposure is turned off in the environment slot. i forgot that vray’s camera has its own exposure, and this is where you need to turn off so your image will not turn black.
Hi,
I am working on an interior scene in decimal feets. Using a vray camera and light setup for the same. But whenever I render, i just get a white image with only a few lines of black on the central AC put just next to the camera.
using the same settings. exposure to off… no GI… I tried with lights on and off, default lights on and off, no change.
Please help!!!
Hey guys,
I had the same problem with it rendering a white photo. This is something I discovered while playing with the settings:
I have found that (at least in my case) unticking the “ignore for GI” option in the VrayDirt Parameters seems to make it work. It renders just fine with this option unchecked.
Hope I helped you.
Hi,
I am getting the objects rendered black and only few objects in the scene are getting the effect………. please help
I have unchecked exposure in camera, used vray lightmtl with vraydirt.