


591
Interior591
Access the Best Articles about Architectural Visualization. Learn about all aspects of crafting images that tell stories.
Making Of's Case Studies WorkflowsShare your work and get immediate appreciation through discussion, feedback, and a possible nomination for the…
![]()
A weekly experiment, exploring the creative minds in Architectural Visualization and more. Find out what makes us all tick and push the limits.
Listen Now! Subscribe on iTunesOut with the old and in with the new! In Converted, I’m asking you to take an in-depth look at existing architecture near you or one you love worldwide and introduce something new.
See Entries & Join! About ConvertedInterior591
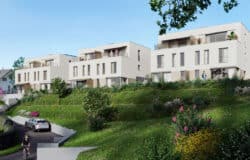
LND interior
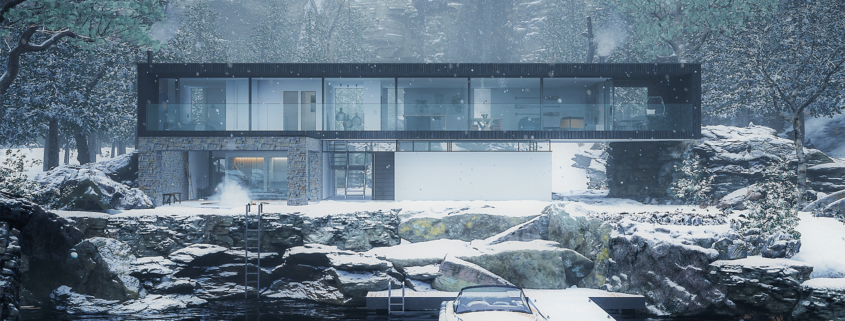
A personal project based on Hurst House by John Pardey Architects + Ström Architects. The aim of this project was to create a complete experience of a large home powered entirely by Unreal Engine 4. This scene offers compelling animation, interactive tour and full virtual reality support with HTC Vive, all running in real-time.
Interactive Tour Video :
The interactive tour in real-time…
Set in an expansive habitat; the user can switch between winter and spring seasons, explore the surrounding landscape and customise the design. The layout of the house has been adapted to suit the nature and views, this includes a home spa overlooking the misty lake. In addition to the animation and walkthrough, exploring this scene with HTC Vive offers the user a unique immersion and forms a powerful, personal connection with their dream home.
I believe real-time rendering and virtual reality are a key player in the future of architectural visualization (despite the Unreal Engine throwing every possible technical issue and bug my way during the project). I look forward to taking what I have learned here to improve rendering quality and workflow efficiency on my next scene.
Software Used: Maya, Substance Painter, Unreal Engine 4.

ARTISTIC SIDE:
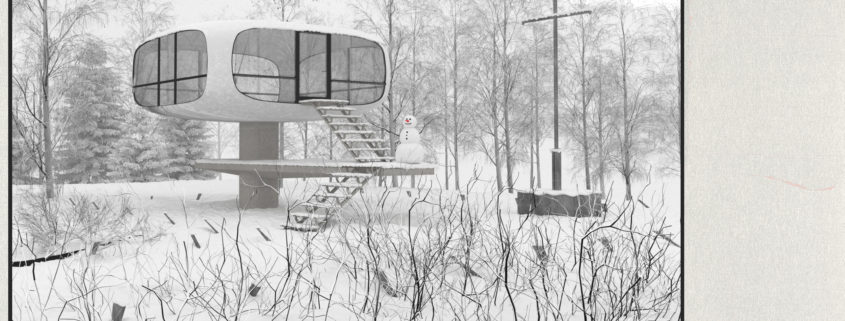
IMAGE PLANNING: I’ve planned my shot keeping in my mind this points that rule our perception.
Dark foreground-the tree drives you in the focus-the pavillon is in the third-red nose of snowballman that caputure your attention and drive you into the building-the cross stops your clockwise occidental reading of image- mountains close the picture.
TECHNICAL SIDE:
The creation of winter mood has been diveded in two step: MODELING & SHADING.
For creating a belivable snow that melts on steps and cross and of course the snowman, I chose Maya with SCULPITNG TOOL, starting with box, smoothing with a high level and scuplting on mesh.
SHADING:
The shading process is focused on snow and concrete.
For snow I use a TOP/BOTTOM MATERIAL in which i plug two Vray material, one with diffuse black & the other with diffuse total white, I played with BLEND & POSITION value. For the cross I use a VRAY BLEND MATERIAL in which i plug a black Vray material in base and a Vraymaterial with scratch map in opacity slot, the Vraymaterial is very reflective and it enters in Coat 1.The house material is a VRAY BLEND MATERIAL MATERIAL in which i plug a white Vray material in base and in Coat1 a Vraymaterial with a Grunge map in Diffuse, the Vray blend Material has a Gradient map in the Blend 1 value .The concrete material is a VRAY BLEND MATERIAL MATERIAL in which i plug in the base a VrayMaterial with concrete map in diffuse and in Coat 1 & Coat2 another VrayMaterial with the same concrete map in the diffuse slot but with a color correction on it.
In the Blend1 i hooked a Vraydirt map with a grunge map, the Vtay dirt has a radius of 0,6
In the Blend2 i linked a Vraydirt map with a grunge map, the Vtay dirt has a radius of 10
Both of grunge map is under a color correction.
LIGHTING:
Snowy atmosfhere is supported by a soft light, I create this kind of G.I. usig a VRAY DOME with no map only white.
The snow comes from PARTICLE SISTEM_SNOW with a flake size of four and then I played with time slider to obtain the perfect frame.
ENVIRONMENT:
I create the mountain with a simple plane and then I shaped the faces
I added a VRAY ENVIRONMENT FOG for creating atmosphere with scatter gi flagged and fog height of 1000.
In the PHISICAL CAMERA I enable motion blur for the flakes and put the shutter to 1/500 sec.
I used PROGRESSIVE MODE with noise threshold of 0,03 .
ARTISTIC SIDE:
IMAGE PLANNING: I’ve planned my shot keeping in my mind this points that rule our perception.
Dark foreground-the tree drives you in the focus-the pavillon is in the third-red nose of snowballman that caputure your attention and drive you into the building-the cross stops your clockwise occidental reading of image- mountains close the picture.
TECHNICAL SIDE:
The creation of winter mood has been diveded in two step: MODELING & SHADING.
For creating a belivable snow that melts on steps and cross and of course the snowman, I chose Maya with SCULPITNG TOOL, starting with box, smoothing with a high level and scuplting on mesh.
SHADING:
The shading process is focused on snow and concrete.
For snow I use a TOP/BOTTOM MATERIAL in which i plug two Vray material, one with diffuse black & the other with diffuse total white, I played with BLEND & POSITION value. For the cross I use a VRAY BLEND MATERIAL in which i plug a black Vray material in base and a Vraymaterial with scratch map in opacity slot, the Vraymaterial is very reflective and it enters in Coat 1.The house material is a VRAY BLEND MATERIAL MATERIAL in which i plug a white Vray material in base and in Coat1 a Vraymaterial with a Grunge map in Diffuse, the Vray blend Material has a Gradient map in the Blend 1 value .The concrete material is a VRAY BLEND MATERIAL MATERIAL in which i plug in the base a VrayMaterial with concrete map in diffuse and in Coat 1 & Coat2 another VrayMaterial with the same concrete map in the diffuse slot but with a color correction on it.
In the Blend1 i hooked a Vraydirt map with a grunge map, the Vtay dirt has a radius of 0,6
In the Blend2 i linked a Vraydirt map with a grunge map, the Vtay dirt has a radius of 10
Both of grunge map is under a color correction.
LIGHTING:
Snowy atmosfhere is supported by a soft light, I create this kind of G.I. usig a VRAY DOME with no map only white.
The snow comes from PARTICLE SISTEM_SNOW with a flake size of four and then I played with time slider to obtain the perfect frame.
ENVIRONMENT:
I create the mountain with a simple plane and then I shaped the faces
I added a VRAY ENVIRONMENT FOG for creating atmosphere with scatter gi flagged and fog height of 1000.
In the PHISICAL CAMERA I enable motion blur for the flakes and put the shutter to 1/500 sec.
I used PROGRESSIVE MODE with noise threshold of 0,03 .
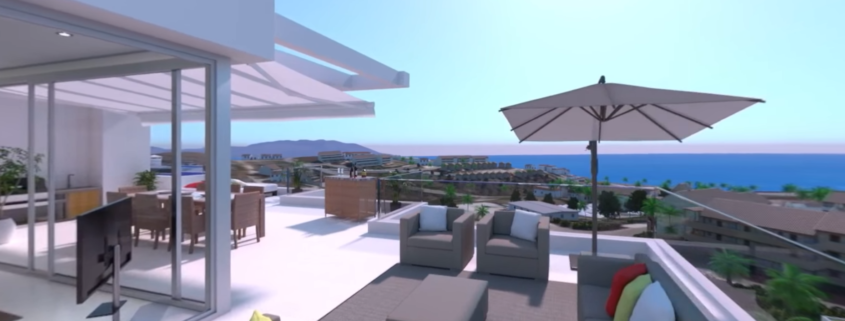
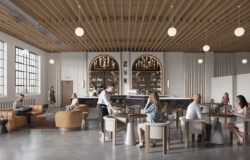
This was our first large scale 360 ArchViz project and it was a real learning curve. The client required something different in terms of ArchViz so that they could stand out from their competitors. I offered up the idea of allowing the audience to look around the resort whilst being taken around the resort. The fact that you can pause the video and still look around and the fact that you can use this with a VR headset as well as mobile devices sold this idea to the client.
When we create other ArchViz projects we only build for what the camera will see, so the difficulty this time was building for a camera that see’s all !
I had to make sure that wherever the audience decided to look there would always be something, no black un rendered areas.
The other problem I faced was render times v the amount of frames. The video is over 4 minutes long and 4k .
We had to pull back on the photo realism as a 360 video doesn’t allow for camera effects such as depth of field which always adds some realism.
We had only 5 weeks to model the entire area and all buildings, swimming pools, furniture and basically everything you see here. We also had to deal with the site plans changing mid way through the build.
For the surrounding areas we used Google maps from the proposed plot and took many screen shots of the area and then created a point cloud from this these images which we then used to model over the top for elevation and building placement and reference. We used over one hundred Vray Proxy’s for trees and outer buildings.
I had to make sure that the animated camera was dead flat for the entire duration and also had to make sure that the camera spent longer in certain areas for the user to look around.
Modeling had to be very fast (luckily I am fast) and we had to adhere to the interior designers view of what every single piece of furniture should look like inside the penthouse. This however is being changed again soon.
Time was not on our side with this project and many late nights and weekends were spent on this over the duration, but the client was very happy with the end result and now uses it to send out to potential clients and also has a VR Headset set up in their sales office for a very cool experience.
This was a great project to learn from and I learnt allot.
This was a project of over 7000 images to think about!