


Making of Tribute to H&DEM
I’ve noticed more great visuals being done recently using the SketchUP + V-Ray combo. The latest v2.0 release surly contributed to this bump with many great feature additions making the SketchUP native plugin much more capable and not so far from its bigger brothers on 3dsmax & Maya. It is also important to note that most of these visuals are being made by architects that use SketchUP for their design process… they are not professional visualization artists first. François (Frankoi) RIBOULEAU is one of them and his tribute to H&DEM 56 Leonard Street project captured my attention. His process is simple and the result is great looking. Enjoy the read and tell us what you think in the comments section.

Author: François (Frankoi) RIBOULEAU
Frankoi studied architecture in Marseilles and worked there for 3 years. He also worked few month in NYC and now based in an architecture office in Toulouse, France. He’s doing Architecture Visualization both at hiss job and as a hobby.
Introduction
This model is a personal creation inspired by the 56 Leonard street project designed by architects Herzog & De Meuron.
I chose to build this model to test my ability to create a complex building quickly with SketchUP by using some very useful tips.
I think that SketchUP offers a lot of solutions to make everything you can imagine, especially with the latest new SketchUP Make and all the plugins available for it.
V-Ray is one of the best render engine you can use today, and with the latest update to their SketchUP plugin, offers remarkable possibilities considering this combo.
Thanks to Ronen Bekerman for his interest in my work and inviting me to showcase my process here, I hope this making-of will help the SketchUP + V-Ray users among you… maybe some none SketchUP users will consider using it more too.
Modeling
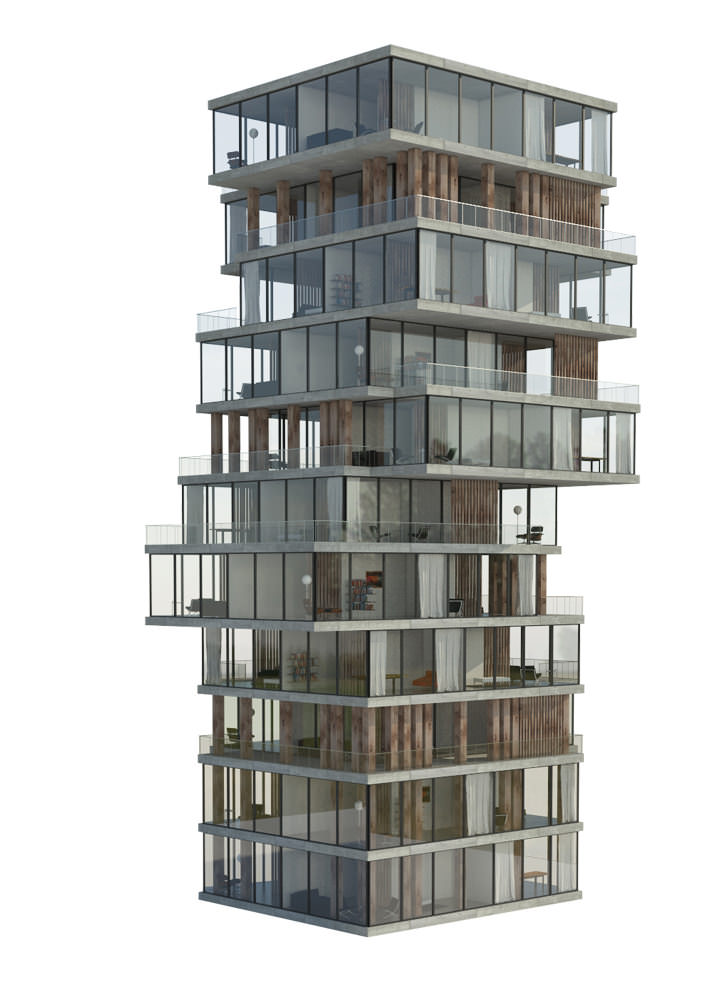
To create my model, I chose to make only one stage by creating a component. The idea was to make a stage with all the furniture objects inside and to assemble the tower by an addition of rotation and mirror scaling to disturb the perception, to suggest that each stage was unique.
This solution makes modification of the composition very easy since adding new elements to one comportment updates all the others. I could also change the actual building stage and it will reflect across its height.

Once each floor was created, I just made a concrete structure by a succession of concrete slabs. The size and disposition variation created all the balconies.

Lets go back to the making of the glass railing. I have used a tip with a dynamic component you can find in SketchUP (the fence component). I modified it by deleting all the bars, replaced it by a glass plane and changing the shape of all the profiles. This way I ended up with my own dynamic component. This type of component can be really powerful, as it can hold within itself information that changes the geometry based on interaction, scaling, etc.

You can see the result of the final structure in the render point of view.

Texturing
The principal textures used for this model are very simple. It wasn’t the main focus of here, so I did not went deep into it. This will probably be the subject of a future personal project. Below is a zoom view on the building…

Concrete
1 diffuse picture with a good definition
Glass
Reflect layer with a texFresnel with IOR 1,6 and Refract IOR 1,6

Wood
1 diffuse layer with a High Definition jpeg
1 bump
Rendering
For this scene, the V-Ray settings are :
- Output : 4000 x 3250
- Channels :
- RGB color
- Reflection
- Alpha
- Primary bounces 1,0 Irradiiance
- Secondary bounces 1,0 Light cache
- Physical Camera is on :
- Type : Default
- F-number 8,0
- Shutter speed 200
- No vignetting
- Environment :
- GI is on with a 1,0 factor and a skylight with intensity 1.
- Background is off.
- V-Ray Dome Light is on with a HDRI sky.
If you use a dome-light, your model will be smartly lighted but if you add a skylight, your shadows will be more intense. The way to have more realistic render is to turn your dome-light texture in the same orientation as your skylight.
You can see here the V-Ray render :
Postwork
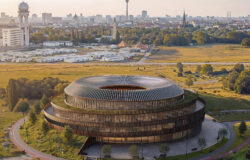
I found the background picture (right picture) on the internet but I cropped it and modified contrast and sky to fit my project (left picture).

I couldn’t find out who took this picture, but here’s a link to the original location where I found it.
I’ve inserted the V-Ray render into the scene.

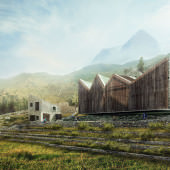
This picture did not satisfy me because the tower was to far to appreciate the interior of the model, so I added the second extension in the foreground.

I used the reflection render to give more light on one face of the building.
To give more realism I added some reflections by using a part of the background with transparency on the building facade.

For additional color effects I used the excellent Photoshop plugin by Nick Software to finish my work.
My favorite filter :
Glamour Glow – Gives a soft light touch you can change cold or warm.
Details Extractor – Good to enhance your shadows.
Photo Stylizer – Gives your picture a color unity with very good tones.
Vignetting – Darkens the corner of your render to focus on the center.
And this is the final result…

And this is it!
Many thanks for reading, and do comment below…
Frankoi.


Trackbacks & Pingbacks
[…] https://www.ronenbekerman.com/making-of-tribute-hdem-sketchup-v-ray/ […]
Comments are closed.