


Making of Matelasse Film by Mica Cruz
Mica Cruz‘s highly detailed scene and animation inspired by the Florense Furniture Company’s Charm Collection impressed me very much and I asked him to share with us all more information about the making of this film. In this article he describes the key stages of making the film using 3dsmax, V-Ray, Mudbox, SpeedTree, Marvelous Designer, Nuke and After Effects. There will also be a follow-up article going into more technical details about elements such as the bed, tree and animation setup, so do ask anything you like about it in the comment section below – Mica will address these questions. Enjoy!

Author: Mica Cruz
Mica Cruz is a talented Brazilian CG Artist specialized in product visualization for film, animation, interactive websites and advertising images.
INTRODUCTION
First, I would like to thank everyone who watched and liked the Matelassé Film. Thank you very much!
I also want to thank Ronen for the opportunity of presenting the making of this project on his blog and say Im very happy for this… Thank you Ronen!
Last but not least – Big thanks to a very good friend of mine, Douglas Alves. He helped me with the production of this project.
If you havent seen the Matelassé Film yet, watch here, making sure you do this in full screen please!
Here are some Hi-Res images too :

THE IDEA
The Matelassé Film is an animated movie directed and produced independently by me, inspired by Florense Furniture Company‘s, Florense Charm Collection – Matelassé scene.
I set out to re-create this wonderful scene in 3d, aiming for producing a 60 second’s animation which could capture the details and small subtleties of the original… perhaps also transcend beyond the mere technical aspects of it. Adding some emotive quality to it.
CONCEPT AND REFERENCES
Starting out, I gathered all the references I could find so that I can better re-create it all in 3d.
Here are some of them :

STORYBOARD AND ANIMATIC
At this stage of the process I’m creating a storyboard with basic geometric forms to get a sense of camera angles, the elements position, the path of the camera and the movie rhythm.
I had produced a digital version of the Matelassé scene for another project, so I skipped the main modeling stage and started to set and animate the cameras finding the best framing for each of the animation takes, totaling at 16 cameras.
Here is the Animatic made prior to going full render on this…
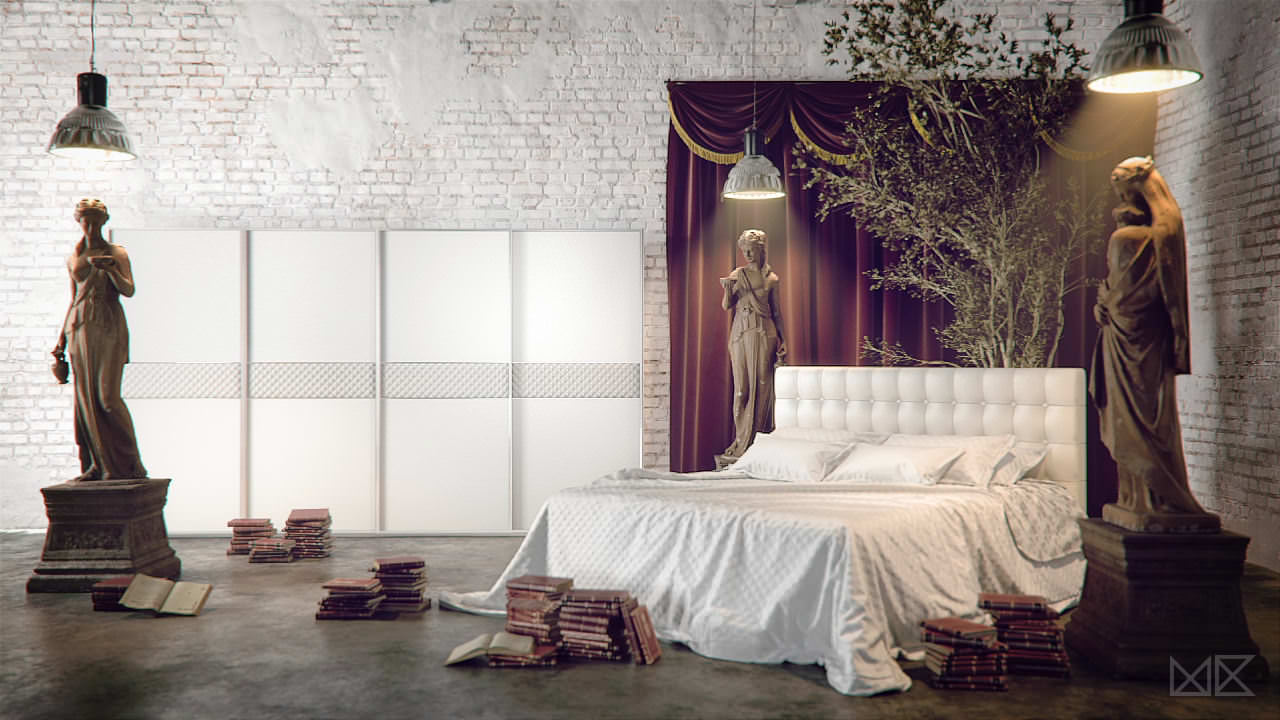
MODELLING AND SCULPTING
I will not go deep into the subject of modeling, rather just give a general idea about what techniques I’ve used for each object.
The scene modeling and its objects changed according to my desire or aim for details I intended to reach for each one of them.
FABRICS / CLOTHS 3D MODELING
For the bed, pillow and curtains I used the Marvelous Designer, which I believe is the best software for fabric / cloth modeling.
Bed :


Curtains :


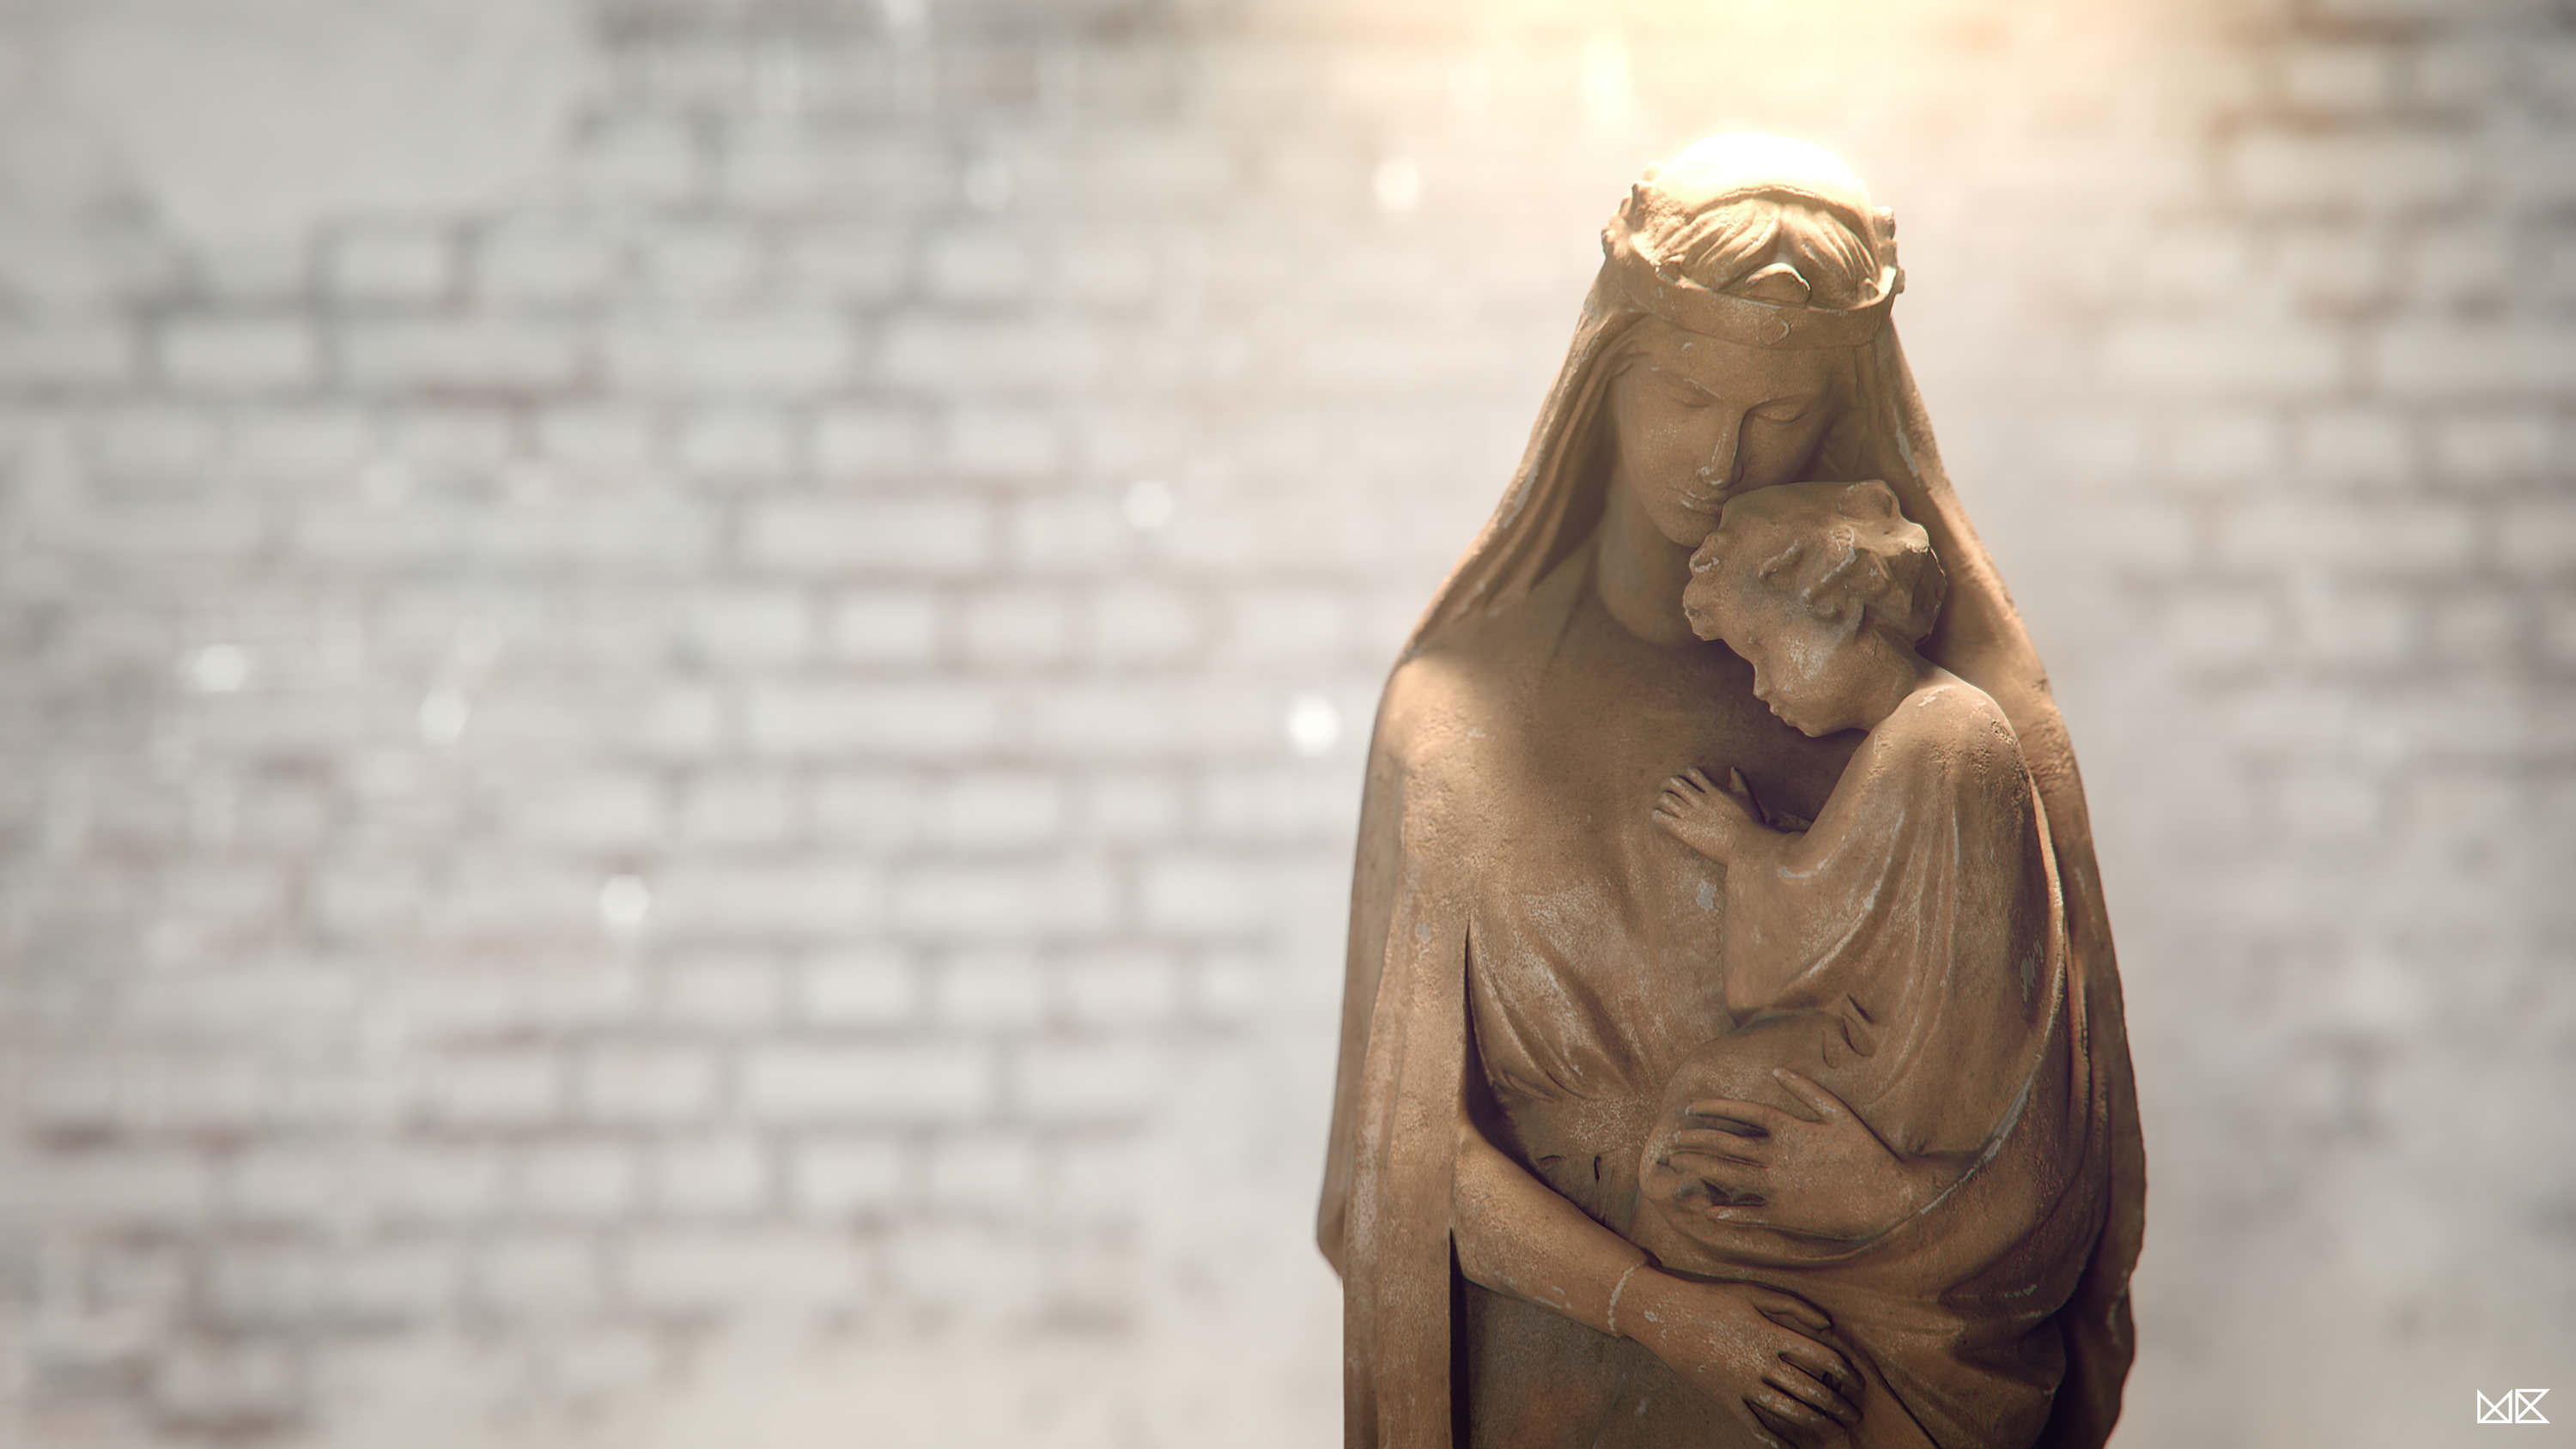
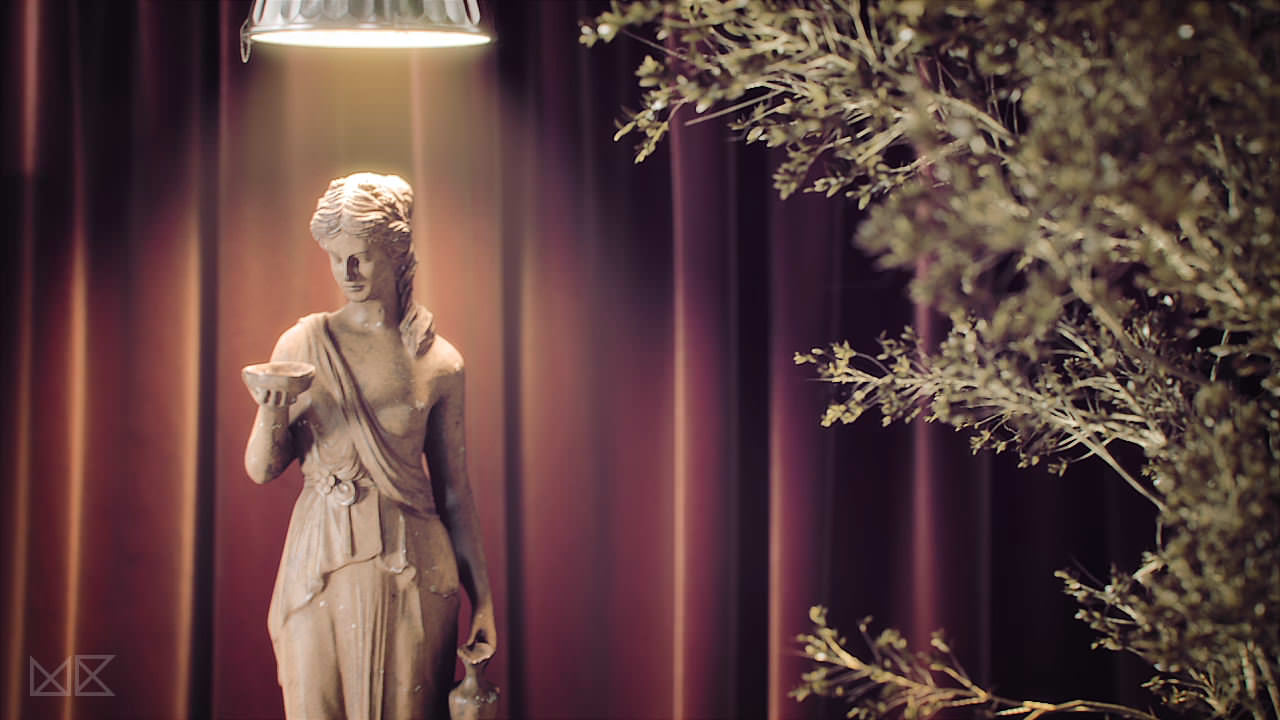
THE STATUES
These are my favorite and I spent more time on them than any other object. I chose to work with Mudbox 2014 to complete this task.
I started the statues modeling using a 3D base model from the internet and I didn’t pay too much attention to details such as following a correct topology for the mesh. I just used the re-topology function and started sculpting the details while going down the subdivision level.
Venus :


Virgem :


THE TREE
I created the tree with SpeedTree following a photographic references. I like the SpeedTree modeller because its fast and intuitive with good compatibility with 3ds Max.


BOOKS AND MORE…
The books and the rest of the scene objects were created using the traditional modeling techniques, nothing special really.


TEXTURING AND MATERIALS
I tried to keep a minimum size of 6000×6000 pixels for all the textures, because I wanted to be able to render detail shots without losing any visual quality.
After some Photoshop editing I got total control of the bricks and concrete texture features such as the dirt, plaster, scraped paint, cracks, etc.
The results were 6 different maps for each one of the main textures : diffuse, specular, bump, RGB matte, displacement and dirt mask.
Some masks I prefer to control inside the material itself, as you can see.
Texture of the Books :

Texture of the Bricks and Concrete :

Materials of the floor and walls :

After sculpting the statues inside Mudbox, I’ve extracted the maps for the displacement and ambient occlusion (done automatically by Mudbox). The rest of the maps were hand painted using Mudbox and Mari at 8000×8000 pixels resolution for each one. You can notice I used Mudbox automatic mapping for this task.
The final result is the same but you can find it difficult to edit the maps in Photoshop, as I have always used Mudbox or Mari for this, I didn’t have problems with that.
Venus and virgins textures :

Venus and virgins materials :


For the bed material I didn’t use anything special, just a 8000×8000 pixels displacement map and some material settings. For the curtains I just used a material with falloff and bump.
The curtains, bed and pillows materials :

On the wardrobe I used a displacement map for the Matelassé and a basic material for the wood and chrome.
The Matelassé and Chrome materials :

For the tree leaves I used a V-Ray 2 Sided material combined with some leaf textures that I photographed. On the stalk I used just a simple material with bump.
The leaves material :

The stalks material :

LIGHTING AND CAMERA
Let there be light!
This is definitely one of my favorite parts of the process. I didn’t use anything out of the ordinary to do the light, I just tried to follow a very basic guideline :
Dont put lights where you wouldn’t have them in a real world setup.
Always keep in mind the correct hierarchy between the intensity and the color temperature.
CAMERA SETUP
F-Stop : 8.0, White Balance : Neutral, Shutter Speed: 1/50 and ISO : 100.
The lights hierarchy :

The lights setting :

For this scene, the lighting was fairly easy but its not always so easy.
RENDER SETUP
To create the images I used the V-Ray Render Engine, which is my favorite. Doing the walk-through animation, with a single camera move, I had the befit of calculating the GI just once.
You can get more information about this at the “Rendering a walk-through animation” page in the online V-Ray Documentation. The render setup is easier and the images are self-explanatory.
The render time is between 1-15 minutes for liter shots and between 30-60 minutes for heavier frame sequences. All in all, there were 4800 rendered frame (Including the render passes), using 3 PC’s i7 six-core which took about 20 days to get finished.

POST PRODUCTION AND MUSIC
I believe the post production is one of the most interesting parts of the process. It is when you give the final touches… The decorating of the cake!
I dont spend too much time adjusting colors, reflection intensity, etc. True, it is always best to get this done in render first time, but its now always possible in post.
I separate the Post Production into two stages : – Composition – Final adjustments
Not that I always stick to it. Its just a guideline to follow… my own way to do it.
COMPOSITION
Its in this stage that I use all the render passes to improve the results of the RAW render… correcting the mistakes, manipulating the colors, putting some effects, etc.
Some textures that I shown before are used in this stage, for example the RGB Matte. To compose, I always use the EXR Multi Channel format, its the best option to work inside Nuke.
Render Passes :

Matte Passes :

FINAL ADJUSTMENTS
In this stage, the RAW render gets a lot better. The colors are corrected and the effects applied are ready to get finished. Thats why I use After Effects After importing all the sequences into After Effects and doing the final editions like calibrate the white balance and give the images more sharpness.
Nuke node tree :


I repeat all the composition process for all the 16 takes of the movie, here they are :

For the soundtrack, nothing is better than a classical music by the talented Michael Nyman- The Promise. It fit just perfectly dont you think?
The only thing I concerned about was coordinating and adjusting the input and output of the music, nothing more.
CONCLUSION
From the beginning until the end, the movie took about 5 months to get ready and going through each stage of the process is always a great learning. I guarantee you I had fun in each part of it and if you have in mind to produce something on your own – find your inspiration and just do it!
I hope you liked this making-of and if you have any questions please ask me using the comment section below.
Thank you for the attention!
Mica Cruz.


Hi Mica ,
Can I have ur mail id so that I can ask few doubts regarding the works which u have posted here… it would be great that if u share ur mail id…… very impressive and awesome work….
Regards
Vinodh
Vinu3d Hi Vinu3d, my email is mica@micacruz.net
spectacular work…. amazing rendering….
simplesmente do caralho !
Awe inspiring work, and very well written.
But please split these articles into multiple pages, it takes ages to load for people on slow internet.
Great work! Where did you get the 6000×6000 plux pixel images?