


Making of House in the Forest
Juan Carlos Torres‘s cold and foggy visuals of a House in the Forest awarded him Best Visualization of the Week NO. 06/2014 for the great composition and mood he managed to convey, blending in the design so nicely with the forest environment. Follow this article as Juan describes his process of creating this scene using 3dsmax and V-Ray, with some extra shots at the end. Enjoy!
Author : Juan Carlos Torres
Juan was born in 1977 in Quito Ecuador. He is an Architect and CG Artist, Founder and CEO of CAD Services.
Architecture and Conceptualization
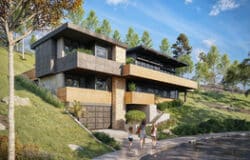
The intention was to design a low-impact house for a single person in the middle of the woods. The house was designed to blend into the environment, with bare concrete as the main material selection. Large spans were used as windows, as if they are clean openings for allowing light in and view out, in what is otherwise dominant concrete forms. I was aiming for a cold and foggy environment that plays well with the concrete as main material of the house and helps blend it all together.
Modeling
The architectural geometry was modeled in AutoCAD (I know… don’t ask). The primary units are centimeters, principally for the low poly solids, and the result was a very light model , this will give me a lot more versatility in the rendering stage.

Units Setup in 3dsmax
The first step in 3dsmax is the units setup , I configure this in centimeters for both the display and the system. I’m importing the model via the file link manager feature which allows a faster refresh of the model when needed.

Gamma and LUT settings (LWF)
I started the Linear workflow process setting the gamma and LUT to 2.2 in 3dsmax to visualize real colors and textures, and the lighting is correct too.

Lighting and V-Ray Physical Camera Settings
The lighting of the scene is a V-Ray Dome light with an HDRI by Peter Guthrie, linked with a V-Ray Sunlight to get strong shadows and a little warm highlights.

The V-Ray Physical Camera Settings :


Here´s the first light test with an override material…

Texturing
The principal materials are the concrete and the ground, for both I used textures from CGtextures, modified in Photoshop and color correction inside of V-Ray material editor.
Concrete

Ground


Textured Scene…

Landscaping
I used species from different companies for the landscaping, the grass and small species are from iCube R&D, the medium species are from Evermotion , and the trees are from VIZpeople Birch collection.


The stones are modeled with rock generator script.

I used MultiScatter plugin to create the environment, in the case of the trees and medium species I used a border spline around the house to limit the entry.
The first plane trees was located manually using V-Ray Proxies.


V-Ray Environment Fog
This step is really hard because the tests are very long. I recommend turning off all the scatters and turn on the override white material for the tests. Create basic geometry like primitives around the scene like trees. The V-Ray atmosphere element will help us to tune the in the post-production process.
Dont forget turn on the optimized atmospheric evaluation in V-Ray System miscellaneous.

Final Settings

The V-Ray render elements for the post-production process :

Some WIP’s :


The RAW render :

Post Production
I used Photoshop for the first post-production session , adding render elements to improve reflections , contrasts , fog, leaks, in screen mode and soft light blending modes.
The first PS breakdown :

The Magic Bullet PhotoLooks pass adding effects like vignette, color corrections and diffuse bloom :

The final pass in PS and adding flares whit knoll light factory in black screen layer :

The final render :

More shots of my project :


I hope this information will be helpful to you. Special thanks to Ronen for selecting my work as a forum spotlight and pushing towards the realization of this making-of .
Feel free to ask anything in the comment section below.
Juan.


GREAT JOB JUAN… MADE IN ECUADOR
amazing work sir!
Great bro Render Cad!!!!
I have a quick question about the use of fall-offs in you reflection. You plugin a desaturated material into a fall-off map for you reflections is there a reason you do this….Does it achieve more realistic reflection?
how did you make the interior light?
yhjul The indoor lighting is comprised of three types sphere lights with a yellowish hue.
bwhammond The use of fall off FRESNEL with desaturated texture in the reflections is for more phisical-realistic result, the fall off fresnel increase the reflections according to the angle of incidence.
bwhammond The use of fall off FRESNEL with desaturated texture in the reflections is for more phisical-realistic result, the fall off fresnel increase the reflections according to the angle of incidence.
RenderCad Thanks so much for your response, I’m thankful for you and Ronen helping with the Arch viz community
Nice. What was the exact sky you used from PG?
PG 1929 Cloudy sunset
Hi,
I really love the mood of the renders. Great work.
Can you perhaps share the link to that rock generator script?
Love it!
I always wandered, how long does it take from start to finished renders for this quality pictures?
What machine configuration do you use? and also how do you transfer your post between ps and after effect?
Jorge Ramirez Larios I do not use AE , is magic bullet inside PS.
Excellent making of! I love the quality of the landscaping elements!
Do you have any recommendations for books / references / tutorials for understanding texturing in Vray/3ds Max?
Really nice render. I have some things to ask because you seem to be the only person I have heard that spoke very clearly about LWF workflow. What do you save your images in before transferring to Photoshop – exr? When you transfer via exr I find the image comes into Photoshop washed out do you then need to apply gamma correction and is so what value do you use to corrrect the 2.2 gamma? Or do you just do it by eye? My trees (from Xfrog) seem to come with very dark shadows within the trees themselves even I have tried adding some traslucency etc to the leaves. Trees in real life always seems much brighter than I can get in Mental Ray. Is there something I should do to get them right?
NigelStutt the only missing step to complete the lwf process is to activate the srgb button in the vray frame buffer.
This will allow you to save the image with true color in any format. =)
hi. your work is very good. i like tihs. can tou tell me about where is the setting light cache?? i can’t find . tanx a lot
awesome job !!
convert your comp layer into a Smart Object and apply the magic bullet.. Then you can RE edit later on by double clicking in the Smart Filter ….
cheers!