


Making of Narrabeen House
Guillaume Favre takes us into the process of making his January 28 Best of Week forum entry – The Narrabeen House 3d recreation, originally designed and realized by Choi Ropiha Fighera architecture studio. Located in Sydney, Australia, I fell in love with this work for the same reasons Guillaume picked it as his personal project subject… great contemporary design with generous use of wood. I love the wood treatment in the 3d version and the end result as a whole, which has a stylistic feel to it vs. the real project photos.
![]()

Author: Guillaume Favre
Guillaume Favre is 31 years old French 3d artist. After a degree in Product Design, he changed orientation towards 3D graphics… learning it all by himself. After more than seven years of experience in an agency, he launched his freelance business. Guillaume works on all types of image, not just architectural visualizations.
Visit also : The Narrabeen House Forum Thread
Introduction
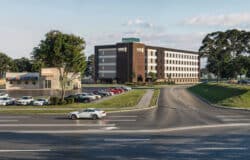
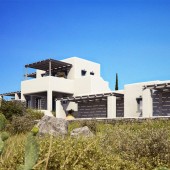
It all started when I first discovered the Narrabeen House, designed by the architectural studio Choi Ropiha Fighera. A superb contemporary villa built in the area of Sydney, Australia. with Large volumes, a remarkable swimming pool and massive use of wood both in and out. Also contrasting the warm wood with cold concrete and plaster interior. All this compelled me to want to make some visuals of this house as seen in the reference photos below!


I had to elaborate on the plans and elevations I had to work with, since they weren’t too detailed. The reference photos played a big part in the modeling stage, helping me get the model a near as possible to the real thing.


Modeling
I used very simple and basic poly edit method for creating the house model, while the walls were initially derived from splines. You can see how the basic model looked below…


On top of that base, I added all other details.
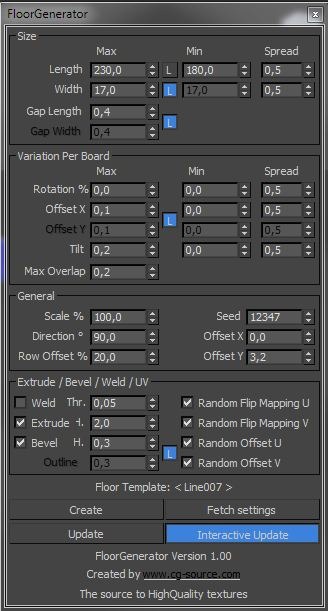
The Floor Generator script by CG-Source was used for all the siding and flooring with settings as follows…
After the general modeling of the house was done, it added furniture. I drew on my previous personal models (the Tolix or Eames for example). For important parts missing, I used 3d models from DesignConnected and model+model.
Here are some worked on areas…


The next step was the placement of vegetation. This was done in 4 steps:
- Vegetation “target” is the placement of some readable elements, giving specificity to the whloe. Here I speak about large and small palms, bamboo and trees in foreground in general.
- Then I just put many generic trees in the bachground. For little scenes I used “Object Paint” Max tool.
- Next, the grass. Very simple. Two modeled tuft of grass, converted in vrayProxy, distributed with multiScatter. Simple, fast and efficient.
- Finally, depending on the camera, I just clone trees to generate shadows cast in the image.
Lighting & Camera
The setup works on a basis of a VRayDomeLight + HDRI linked with a vraySun. Here I used Peter Guthrie’s hdri-1614-sun-clouds.

And this is how the exterior view looked prior to the texturing work done on it…

Next, I work on interior lights. Depending on the situation:
- VRayLight plane for root spot.
- VRayIES for classic spot.
- VRayLight sphere for bulb.
I added a standard omni light in the large suspended light above the diner table for better shadows projection control, given the fact the light had to pass the light fixture holes and cast all over that area walls, floor and ceiling.

Here’s also the top layout and light list so you have better understanding of how much lights I added in.


This is how I setup my VRay Camera for this scene…
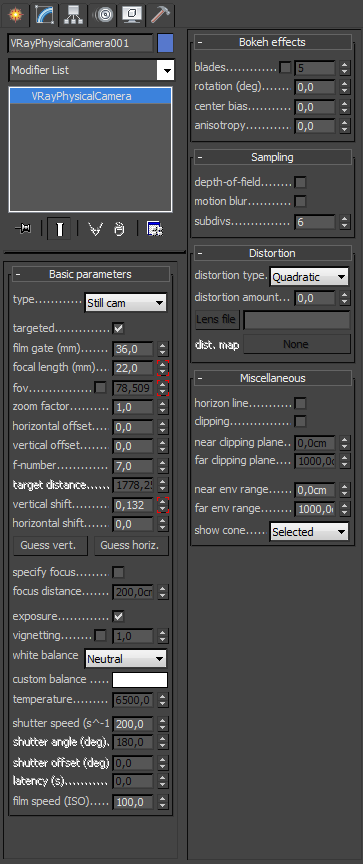
I always turn vignetting off since I do it in composting. If some settings are animated in my screen-shots its due to me working on one animated camera for all shots. Not necessarily the best way… not very flexible.
For the camera placement, I adjust it throughout the process. Drafts are placed at the early stage and adjusted all along the construction.
Here is a quick animation, made with Nitro. To get a better overview of the entire modeling + basic lighting. Not very qualitative, but it allows a clear view of all things…
http://vimeo.com/40751080
Textures & Materials
For me, the work on the materials is one of the most interesting parts of the work. At first, I search for texture… Mainly on CG Textures.

Here are the most important material details…
Brown wood siding. Based on a set of MultiTexture by CG-Source.

Black wood siding. Based on a set of MultiTexture by CG-Source.

Polished Concrete. Based on CG Textures image.

Wood Veneer (Kitchen, furniture, …). Based on CG Textures image.

Rendering
I used the classic Irradience map + light cache, and a hybrid gamma 2.2 method similar to the one Peter Guthrie uses. I do not change the main gamma setting of 3dsmax, just work on the VRay Color Mapping setting.
Here are the settings detail…

To be able to work comfortably in compositing, I took out a series of render elements. The dirt pass is pulled with a VRayExtraTex + VRayDirtMap.
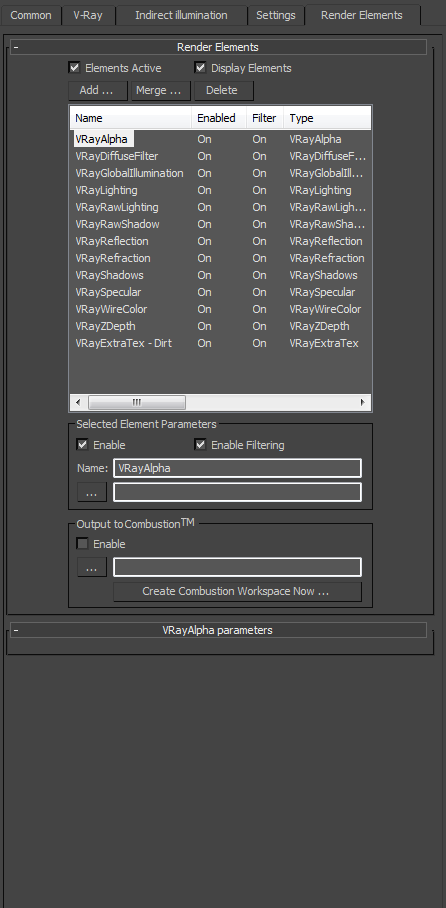
Finally, also in anticipation of compositing, I draw a series of alpha passes. I used the “QuickPass” script for that.
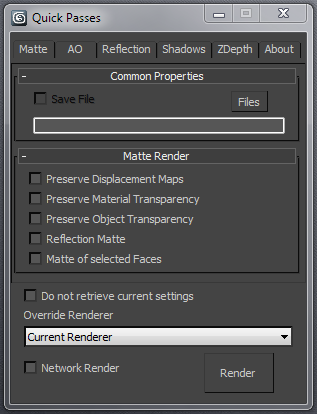
Launch rendering with backburner in 4K, on 3 station, in TIFF 16bits.
A good night’s sleep later, all render are done.
Compositing
I’ll showcase the post production process on the backyard exterior image. This is the raw render straight out of the oven…

And now the passes being layered out on top of each other with more post operations.
Fire up Photoshop, and let’s go…
I always start by stacking all may render elements in one layer folder which is then masked with the general alpha.

After turning on all 3d elements, this is what it looks like.

I then added the sky with some contrast and color correction.

Adding 2D trees in the background, adjusting their color too.

Adding a series of global or selective correction on top of it all.

I then worked the general details. I paint shadows to force some contrasts. Add clouds and palms reflection on windows upstairs. I start the shades of blue / red tint. I used a ZDepth pass in negative to simulate depth fog.

The Lens Effect! a delicate subject. In these images I wanted to work atmosphere more than photo-realistic rendering. So I forcing the line through the lens. While waiting the budget to pick me up a dedicated plug-in, here is some free-hand work. Thanks to Google images.

Another step of effect and correction. Contrast, lead to dark areas, overall coloring with curve tool.

For the vignetting, I duplicate the entire composition and collapse it. Darkened with curve tool and paint a simple mask.

Finally, I collapse all the composition and apply the “Lens Correction” filter to add focal blur, with help of ZDepth pass.
A final stamp tool for small details, and voila!
For making selections easy during the composting process, I used VRayWireColors pass and some masks.
That’s what it look like…

And this is the final result for this camera…

Exactly the same method was applied to all seven other cameras.


Conclusion
I wish to thank Ronen for his invitation and the wealth of information that constitutes this great website, and also thank all whom I learn from more and more every day.
Special thanks to Choi Ropiha Figher agency.
All the best,
Guillaume.
Very nice work, I really like the mood of the scene! Bravo Guillaume!
Very thorough making of! Great work and great breakdown of your process, much thanks!
increible render…. felicitaciones… desde colombia un saludo…
Nice renders! I think you overdid the flares a bit..
I have a question about the post process. How did you setup the blending mode for the layers?
Thank you all !
AdamHoej : Blending mode depends of render element and/or the desired effect. Test in condition, but I didn’t have any rule for this step.
hi, great images.
I like a lot your polished concrete, can you pls share it?
Thanks
Thanks Tatafontes.
About the polished concrete, I have already shared. You will find the capture in the making of.
From a texture (CGtexture) of concrete, I added simple ColorCorrection to adjust the levels according to the entries.
Adding in a simple vRayDirt in diffuse with a large radius, and that’s it.
I love it!
Great job! I like the way you had organized your photoshop workflow. I usually work in this way too.
I have two questions for you. The first is approximately how many hours did you work on this project to finish it, without having in mind the rendering time.
The second question is about the “Special thanks to Choi Ropiha Figher agency”. Was it necessary to get a permission from the agency in order to use their drawings from their site?
@designvkm Thanks ! =)
For time, hard to say on a personal project. I made ??in my free time. Approximately 6 days. Rendering time on simple images has no real impact : I turned on by night.
I still indicates credits or thanks. For this project, I submitted these images for Exposé 10. As a courtesy, I asked the studio permission.
@GuillaumeFavre Many thanks for your info! Some personal projects are really becoming occasionally a vicious circle! Hope to see some of your work again and share with us useful tips. Keep the good work!
@designvkm Absolutely agree with the vicious circle of personal projects!
I have a Honda RA-272 project for over 2 years … Damn !
I would like to submit one more question about the workflow in photoshop.
Except the well known render elements, such as ambient occlusion which goes multiply in photoshop and specular or reflection, is there any kind of a rule about the others? (at least the one that used most common). I have seen a lot of tutorials about the post production but, as I have also seen through my projects, I have used some render elements in different modes, depending on the project and what it would seem better as a result.
I am just wondering whether there is a norm about the screens, overlays or soft lights applying to render elements or we adjust them as they seem better?
@designvkm Well no, I have no rules. Feeling work, based on my raw render. I simply try to have as much flexibility as possible in Photoshop, to keep control as long as possible.
Hi,Is there any chance that you could post a screenshot of your grass patches, maybe even a material?
@DushanBoshnyak About the grass, Peter Guthrie wrote two very good tutorials on this topic. They will be more complete than any screenshot !
http://www.peterguthrie.net/blog/2009/03/vray-grass-tutorial-part-1/
http://www.peterguthrie.net/blog/2009/04/vray-grass-tutorial-part-2/
@GuillaumeFavre
I get the basics and everything, but yours just looks very very good. Much better than the tutorial. 🙂
@DushanBoshnyak Ahahah. Thanks, but I have done nothing more! Cast shadow and compositing did the rest.
Tests to paint shadows and high lights to give more volume to your grass. Tests a simple noize to add some relief on your ground.