


Making of Restaurant in Bordeaux
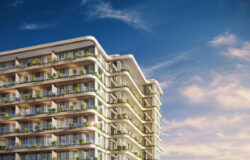
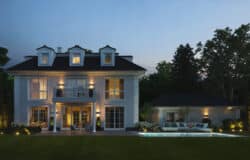
Pawel Podwojewski the owner & founder of MOTYW shows us how he done this night time image above in the project ‘Restaurant in Bordeaux’ by using Autodesk 3ds Max, Vray, and Adobe Photoshop. This scene is a part of a more complex project that consist of three buildings. You can see some image of this complete project directly below before the article starts. I hope you’ll enjoy this article, learn from it and share your thoughts by commenting at the bottom of this article’s page.
 Author: Pawel Podwojewski
My name is Pawel Podwojewski and I am an architect and CG artist, owner and founder of MOTYW company. I live in Gdansk, the city in the north of Poland.
I am nearly 2 years on the market with my company and we’re still evolving. Basically, I started with 3d stills, architectural visualization. At this point I am aiming in animations and high detailed environment (nature) creation. I especially like to play with night scenes. The best part from in the production process for me is the search after perfect reflection and refraction in a night shot. Of course a day setup scene is a very hard thing as well but somehow nightshots seem to be more attractive.
I hope one day I’ll reach a level which will make my work recognizable and lasting in peoples memory.
Pawel was kind enough and prepared this article also for www.cgrecord.net, a great 3d news site you should check out. Feel free to comment about any aspect of this article or things you think need more detailed explanation. I’m sure Pawel will answer it all 🙂
Restaurant in Bordeaux Video
Restaurant in Bordeaux Image Gallery


Introduction
As mentioned above, this scene is a part of a more complex project that consist of three buildings. I tried to keep the poly count as low as possible. After the camera position was set I have added more details on the foreground.

Terrain / Ground
The idea for the terrain was very simple… some wooden chips in the main area and grass to get the scene more alive. I used a bitmap from www.cgtextures.com for the ground wood chips creation and also changed the diffuse map into a grayscale and adjusted the contrast with curves in order to get a proper displacement map.

After that was ready, I applied the V-Ray displacement modifier to a simple plane surface which was representing my terrain.

Grass
For this scene I have prepared some new grass and wheat models. I have used the basic edit poly techniques to achieve the final effect. Below you can see the rough geometry. I started with a single strand, one leaf and some seeds. I placed them by hand and multiplied using the Advanced Painter script developed by Herman Saksono. Each strand has a very simple texture that I have painted using photos as reference. When few small groups of strands were ready I have converted them into editable poly and attached into one object and in the end exported all geometry into V-Ray proxy. The proxies are represented through green and orange boxes visible in the scene screenshots.


Working on the light in dusk and night scenes is one of the most exciting elements in the whole creation process. This time I have used many V-Ray sphere lights to lit the interior and also photometric lights with IES distribution profiles to simulate halogen bulbs. The environment lighting consist of two basic sources.
Lighting
Ambient light which is the V-Ray sky combined with dome light and a direct light. The V-Ray sky map is not used directly though. To lit the scene and gain proper GI I have used a V-Ray dome light with the V-Ray sky map as texture. The V-Ray sky map was clipped to a target direct standard light in order to receive a nice ramp on it. In fact the direct light (standard) was turned off at all times. I know this might be confusing but in this particular scene the described setup worked in the most efficient way including time and quality of rendering.


Most of the lights inside the building have a bit orange color in them to achieve a warm feeling of the place.

Render Settings


Post Production
Postproduction in this case was pretty simple. The original rendering is a bit washed out of colors and contrast. To fix this I have played with curves and contrast. I Also used exposure control with some blue and orange tint and mixed the channels. Using the reflection filter channel I was able to control the reflections. The outside lamps have some glow. To achieve this effect I used the glow filter with elliptic masks and feather control to blend them nice. A color correction was also applied.
Raw rendering

Total lighting

ZDepth

Reflection filter

I also added a star filter. To do this we can use the line shape. Draw a line with the width that will fit to your composition in my case 2 pixels.
Once you have done that rasterizing the layer and apply to it a gradient with orange color, feather the sharp edges and adjust the position and rotation. To blend it better with the picture you can decrease the opacity level. Work with different width of stripes to gain a more realistic result.


I hope you have enjoyed this making of… My very best wishes to you all 🙂
Final image

You are welcome to comment on this article and ask questions using the comment box below!

That Was Awesome!.. Thanks for Sharing! 🙂
awesome work dude , where can i get the restaurant plan file
Very nice, lighting is just great!
Thanks a lot for making of 😉
Cheers
Big thanks goes to Pawel and MOTYW for showcasing and sharing the insides of doing such great work.
Very nice! But what about gamma settings? Standard LWF?
Hello! Thank you Ronen for the lovely making of and all users for the feedback.
About colormapping:
I have used the reinhard c.m. with 1.0 gamma and 1.2 multiplier, 1.3 burn value. I did some tests using LWF but in this case the grain was to high in the shadow areas. In the end I got better time and quality results with 1.0 gamma.
Very best wishes
Pawel
congratulations Pawel. I like it very much. The light is excelent.
Jeszcze raz gratuluj?. Ile czasu zaj??o Ci renderowanie ?
Thank you kodissimo! I am not sure about rendering times for each scene but probably about 1.5-2 hours in this case. I will dig the forums maybe I made a note about it 🙂
P.S. W jakim miescie rezydujesz?
Dzi?kuj? Pawe?!!!
Very inspirational work, great mood.
Excellent x 10000000000000000000 times.
Hard to understand lighting settings 🙁
Please ask about what do you not understand, I will try to explain everything in the best way I can.
Great!!, thanks for sharing. your lightning its incredible.
Great, love your lighting in night scene so much .
i have a question for you
how can i make volume light at 1’05” 3D movie ???
thanks for sharing
best regard !!!
thanks SIMON for sharing. I have been waiting for your tutorial since i saw it on evermotion.
Can you explain the purpose of a turned off Direct light while using vray sky and vray dome.
Also can u tell us how you have used those passes in pshop and in what layer modes especially the total lighting and reflection filter pass.
The last part explains making a star filter but i havent understood it at all. maybe u can explain in better way.
thanks and regards
one more thing i wanted to say
the next best animation i have seen after ALEX ROMAN is yours my friend
keep up the good work
Here is Pawel’s latest replay that was lost due to the database error and restore I made today…
@3dsmaxed
Thank you for compliments,
I have used the direct light to clip it with the v ray sky. Doing so the sky has been affected by the light even though it remaind as turned off. All this to have a nice ramp on the sky which was used in v ray dome light to lit the scene.
about the star filters- its a simple glow with a feather mask and for the star filter fan few stripes with smooth edges to blend nice with the back ground.
channels- dof channel used as depth map in lens blur filter,
raw reflection-normal model with reflection filter channel as mask to control reflections( controlled over opacity)
@BuisonTung
U can do the volumetric effect using the v ray enviroment fog as I did:)
Thank you again for your time and feedback! I hope this will help a bit. feel free to ask at any time.
Very best
Pawel
I’d love to hear more about the modelling process – was it done in Max? Sketchup? What were the challenges, etc.
amazing renders…
Thanks for sharing but!?
I tried to reproduce your setup but it don’t works ::-(
Could you share your camera setting?
or a empty 3dsmax file with lights and cam ?
Regards
Alphonse
Really nice,
I tried your workflow , and it looks really fast and the result it is excellent , The Problem is the backround , it looks too bright or too dark..
can u share please the camera settings)
It would be really helpfull
Thank
and Congratulation!!!
@george-all models were done in 3dsmax
@alphonse-I will try to post some additional settings soon
@mirame- you can change the bg by making the dome light invisible and then in the enviroment slot place the map you want to be seen during rendering.
Thank for your time guys.
P
thanks simonhc, I understood you were using the VraySky for lighting and bg… thanks for the info. Anyway I don’t get a nice light just with the sky map, do you use any fill light?
Thanks again for sharing 🙂
No fill lights:) All I have used can be seen on the screen grabs. Keep trying, I am sure it will work.
Good luck!
Beautiful ! somehow I missed this post.
It’s really wonderful to see the animation, than the still images. Somehow it gets the feel much better. Nice presentation !
Beautiful work!
I hope you don’t mind me asking, but where did you get your tree and plant models?
thank you,
most of the plants are made in Onyx, one or two are from evermotion collection
great work …. awesome render 🙂
my question is about “. The V-Ray sky map was clipped to a target direct standard light in order to receive a nice ramp on it”
how to clip the vray sky to the target direct light???????
In the v ray sky material is an option to choose a source of light that will affect the sky.
Check the manual sun node, in sun node choose the light
Done:)
when i apply it… it gives me a great awesome sky mode but when i try to move the target direct lower still no changes… 🙁
try to move the light, change the altitude. It’s working 100%:)
You can see it in my video tutorial here:
https://cgworkshop.org/showtut/32
very best
simonhc
very nice, very helpful to me as a beginner. thank you
In what program he made that video of slideshow?
Very nice renders 🙂
may i ask how did you do the pine tree? and can you tell me where i can get them
thanks
Heey guys!
Stephanie, I use Onyx for the pines.
Very best!
S
Hi!
You were using only V-Ray sky map as background in all scenes?
thx!
I still do not understand how to achieve that beautiful orange glow effect in PS…
Great images, just beautiful..
Thanks!