


BrainTRUST Session 2, ‘Hill Chapel’ by Andri Ini
Following the success of the first BrainTRUST session, I bring you the second one and hopefully many more sessions such as these in the future. The current session features two renders of a wedding chapel, situated on a cliff edge, by Andri Ini .
The BrainTRUST is a group of well known and respected professional 3d artists and members of this community. Their aim is to provide detailed and constructive critique for images you submit. These critique sessions, once finished, are edited and published on this blog for all of you to read, learn and further comment on it.
Session Image Description
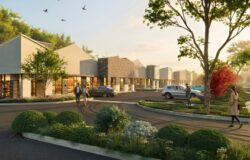
The renderings I submitted for this session were made as part of a commercial work, visualizing a wedding chapel on the edge of a cliff in a Bali island resort complex.
Duration of work was about 1 month in total. It took a long time for a single image to render on a Quad Core 6600 with 8GB of RAM memory 50 Hours long to be exact!
I don’t think the images are realistic enough. please spare me some cold hard truth 🙂 Ill call the right image the top side and the left cliff overhang so you can refer to them as such in the feedback.
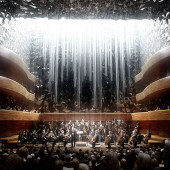
More specifically about the cliff overhang view
For this shot at the wedding chapel from below the cliff, I tried to create a different mood aiming for just a little before sunset. Initially I wanted the trees to be as realistic as possible, so I tried to do them in 3d. The render times were killing me though (4 days for an image!!!), So I was thinking maybe it would be better to compose the trees in Photoshop.
I used the following software :
- 3d Studio Max
- Advanced Painter Script
- VRay
- Photoshop

And the same viewpoints in wire mode.

Thank you very much,
Andri Ini.
About this Session
I took your comments from the previous session into consideration and introduced the Critique Overview Section to start with. This section summarizes the key points mentioned by the BrainTRUST members in their full critique along with my own personal feedback too, since it was impossible not to add this in during editing.
You can then go and read the complete feedback by each member to get more in depth and detail.
Session Members
Critique Overview
The key points covered in this overview are:
- Render times.
- General look and feel.
- Paper lanterns modeling and shading.
- Better 3D Grass.
- Project context.
- 3D purist approach vs. the post production fan boys.
Render times
First thing that strikes us all as odd, are your ender times. Considering your hardware and the demands that a scene such as yours calls for it does seems a bit over the top much improvement could be done here.
Other then taking a good hard look at your rendering settings, and try to lower them down while keeping an acceptable visual quality, we will address this issue in relation to the grass displacement and 2D/3D foliage treatment discussion.
General Look and Feel
It is agreed by all that both of your images look pretty good and we are mostly talking about making them great, with more attention to detail such as your paper lanterns, trees, grass and scene composition.
Paper Lanterns Modeling & Shading
The paper lanterns are very dominant in the top side image, even to the point of being too much, or missing the point completely, as Tom mentions in his feedback. But lets first address them as they are.
Here is a crop of the original image so you can see them better.

And this is an example I found online.

Taking both these references into consideration, it is clear to see that you lanterns look more like plastic or wax tubes, rather than paper. Roberto mentions this and suggest not to use any thinness for the paper like we see in your image, and to use an actual paper texture for the diffuse and translucency channels. Ill add that it should be more box like then round. But really, a good reference is all you need (and execute on it, obviously).
Better 3D Grass
I think that using a simple displaced grass today just doesnt cut it anymore. And we really got some great examples to follow, such as Peters great two parts explanation of how he does it.

In many ways it is even faster and more efficient then displacement. Sure look way better up close. And you can also mix workflows, doing both displaced and scattering actual grass blades Bertrand explains such a method in his feedback later on.
Project Context
Tom mentions in his feedback that he feels the framing of the top side image is lacking something. I feel so too.
It seems you went for the same frame ration in both images just to keep them similar, while this work well with the cliff overhang and enhances the image, the top side view really needs more to it as my fast sketch below suggests.
Where is Bali?
The actual site might be totally different and will not allow such a view like I show here, but the key point still stands The top side image needs more focus and something to look upon, connecting the chapel with the context surrounding it.
Tom adds further detail about the concept of focus in the image and Ivo will show a similar example for the cliff overhang view.

3D purist approach vs. the post production fan boys
Members of the Trust disagree! But its cool we are still friends and hope to set good example to you all.
So when we talk about the foliage in the scene 3D all the way, or can we cut corners and do stuff (dare I say fake them) in post production?
The answers depends first and foremost on you, as the artist, and what you want to do. But considering client work with many other constraints such as deadlines to keep, fast update turnaround and more You must consider the full spectrum between the two options.
Lets see two examples then first one from the latest MIR interview.

And now let look at one of Peter Guthries Farnsworth House images.

It is my belief that both these images represent high standards of visualization quality and yet they were both approached in a very different way.
Bertrand, as all of you probably guess, favors the full 3D approach. Other members of the trust feel that doing things in post using 2D images of the real things might be better on many aspects, and yet we do understand and favor full 3D for the many benefits it brings to the table, most importantly the fact it is inside the scene casting real shadows, catching the actual scene light and shows up in reflections.
There is no clear cut here. It is a mix of artistic style, project design stage, client work or personal, time constraints and you name it The end result and what it makes you feel matters most. Both MIR and Peter managed to get me to say Wow.
Ill now hand you over to each of the Trust members telling you to check out the nice video I embedded in the end (more about post production magic).
Roberto De Rose
I must start with saying that 50 hours of render are an absolute waste of time in this case. All the trees, the grass and background could have been handled in postproduction using photos with correct perspective.
The Grass
The 3D grass in the top side image seems fake and without any remarkable change of height, coloring or leaf type. To introduce more variations, other than the actual grass displacement, you can edit the surface manually and add general large scale detail by pushing it up and down a little bit. You can also scatter additional grass, weed and small plants to further enhance the look and breakup the monotony.
The Paper Lanterns
The paper lanterns are a good idea IMHO, but you need to improve the shader since they look more like orange wax tubes currently. I would personally make them without a shell modifier, less deformed and with a paper texture to define the translucency.
Top side image background treatment
I think you could have also used a ZDepth pass here to help you add some depth to the scene behind the chapel. A little bit of glow would have been perfect too, enhancing the chapel and internal lights even more.
2D vs. 3D Foliage
Overall, I like the composition and the colors palette you have chosen. For a scene like this I would aim to keep the render times under 30 minutes, doing the grass and trees in post production using photos.
I can relate to what Bertrand is saying later on about doing it all in 3D philosophy. His images and those by Peter Guthrie for example showcases that remarkably well. I think it’s even more productive once you start to have a library of 3d models. But in some cases like this, when the trees are being shown more like silhouettes and you are under client and time constraints, the 2d approach may be the wiser of the two considering how fast and effective a solution it can be.
Once last thing, small thing really, the tress could use some motion blur to them in the top side dusk image.
Ivo Sucur
I must agree with Roberto’s remark about the excessive render time, as Im sure anyone else would have, considering all the scene details and the use of VRay as the render engine.
Cliff overhang view background treatment
I played a little with the cliff overhang view background, and though it might not relate to the actual scenery on site or client demeaned, It serves as an example for adding elements to enhance the overall look and help to focus on the chapel… It could have also been done by adding some dramatic clouds in the sky (MIR Style for example)

The Chapel Roof Structure
I presume that the roof and cladding panels do have some reflectivity but maybe enhancing this a little bit more, making them more metallic, could improve the general look and feel. One thing that puzzles me is the yellowish light burn in the middle of the columns. It looks as if there is more than just one direct source of light.
The Trees
Im more towards the post production foliage approach then doing it all 3D, but if there’s few hours to spare (and I’m sure you can convert some of the 50 hours of render for it) I’d try to tweak those nice pines a little. Some tropical palm tree could really add to the general feel considering the location.
The Cliff
I’ve found some references for cliffs at Bali that could help you improve your cliff texture a little. The main thing is I think it lacks color variation in relation to the height. A diffuse channel could be mixed / blended with some extra brown and grey ground texture to introduce such variation.

Image by alidarbac

Image by Jaymi M
One small thing that I think needs work too, is the grainy sky in both images. I know high resolution sky backgrounds might be hard to come by and also fit the mood you look for, but the rendered elements need to be matched with a good quality sky too.
Bertrand Benoit
First of all, I must say that both images look pretty good. I think we are mostly talking about nailing the details and being just a tiny bit more perfectionist.
Render Time
The first thing that struck me is there must be some major problem with your settings if these pieces are taking from 50 hours to two days to render! It could be caused by excessively high displacement settings.
First, try 2D displacement instead of 3D and lower your settings to see if you can get an acceptable result and a lower render time. Second, if you are using opacity maps for the leaves in your trees, make sure you set the filtering of these maps on “None”. Or better, remove filtering altogether in the VRay Global Render Settings.
The Grass
Displaced grass looks ok from a distance and sometimes it is definitely the best workflow. But up close it just does not cut it anymore these days. Get your hands on a scattering plugin such as Multi Scatter or Forest Pro, and use meshes on that grass. Forest Pro has a light version that is free and very capable. One more way to do it using a free script, is to cut your ground mesh into background and foreground and use displaced grass at the back and with the help of the Advance Painter Script, add mesh grass in for the foreground. You need to make sure your materials are ok. Grass is a lot more reflective and a lot glossier than one tends to assume. You want these strands to catch highlights from the paper lanterns.
The Trees, 2D or 3D?
My next plea would be not to do the trees in PS. You can go down that route, but chances are you will sacrifice realism a lot. Other esteemed members of the Trust may disagree but my philosophy is, if you can do it in 3D, you should do it in 3D. And there is no reason even thousands of trees should take too long to render.
The Background Skies
Your skies, particularly in the cliff overhang view, need more work. You can do one of two things:
- use your an HDR image as the back plate
- use a different LDR image (JPG) back plate applied in post production.
I would always go for solution the first option if I have the choice for the following reasons:
- It is more realistic.
- you can move your camera the way you like and don’t have to worry about matching your back plate’s perspective or lighting.
- you get accurate reflections, refractions and coloring of the sky.
But, and it’s a big But!
you should only do it if your HDRi is 15,000 pixel wide or higher. Anything smaller will result in what you have here, pixilated, blurry skies and backgrounds that just don’t match the grain of your image. So if you are working with lower resolution maps, make sure you add appropriate back plates in post.
About DOF (Depth of Field)
Finally, I would not recommend any DOF blurriness in these images. If you have to do it, do it only on the top side dusk image. The reason is that you are using quite a wide angle on these two images, which would normally give you quite a wide depth of field, in other words, no blurriness. Shallow DOF would be more plausible in the night image because we could assume that your aperture would be much wider. That’s of course if you use 35mil film.
You could try a medium-sized format (120mil) and do a test render with the VRayPhysicalCamera and DOF activated. This should give you a much shallower DOF. In any case, it’s always worth doing a low-res test render with in-render DOF. Even if you intend to do the final effect in post (for shorter render times or more DOF control), it will give you a good reference of what is realistic and what is not.
Tom Svilans
I won’t add much to the overall 3D debate, save to say that it can very much depend on your workflow and the turnaround time. Mashing up 2d elements into the background can save a ton of time and can sometimes even enhance the realism of the image. I’d shy away from using anything 2d for foreground elements as it’s much harder to match. That’s also why I absolutely hate putting in 2d people in archviz shots, no matter how much clients love it.
About image focus
My biggest concern with the top side view is the lack of focus in the image. The paper lanterns don’t help it at all. If anything, they should be leading the eye towards the chapel and emphasizing it, which they aren’t. I get distracted by the field of orange blobs and then look straight to the saturated blue sky, thereby missing the chapel completely. There could be a couple reasons for this:
- The lantern color is way too similar to the chapel lighting which, combined with the larger area covered by the lanterns, renders the chapel insignificant.
- The foreground and middle ground are much too busy for the chapel. If the foreground was a natural progression from dark grass/bushes towards the warm glow of the chapel, it would lead the eye much better.
- Even better would be if the lanterns created a trail or a path, that guided the eye upward and around toward the chapel.
Either way, I think there are way too many lanterns scattered around the cone of view without any specific pattern to help convey the chapel design ore intent. The orange hue of the lighting is a bit unrealistic and slightly sickening. It may be a matter of taste, as some incandescent lights do look that yellow under daylight film, however it comes off very unnatural and ‘CG’.
About Light & Colors
The contrast between the incandescent lighting and the sky should be a bit more subtle, or at least not as bluntly orange. I think what could help is having more of the blue sky tone present in the foreground, possibly reflecting from the grass and bushes, as Bertrand mentioned. Also, varying the light hue and intensity within the chapel could help get rid of the monotony of the sea of orange there.
Top side view composition
Finally, I think the top side image could use more of a background presence in that it has the foreground (lanterns, grass), middle ground (chapel, trees) but no real background to look at were is Bali? As Ivo did in the cliff overhang image, adding the mountains (which very effectively would put the chapel in a stronger context), widening the top side shot towards the right and adding the sea and coastline in the distance could both provide a better sense of the site as well as providing better context for chapel – what is it looking at?
The session ended and here is the video I promised. Some heavy post work lifting towards a great result by Gordon Tarpley.
Session Closing
Thank you very much for taking the time to read this article. If you like to get such critique on your image do submit it using the BrainTRUST Image upload form.
You can upload more than one image per project by using the form multiple times.
so so so f*** amazing guys!
wow, i like that! the 3ds max masters talking about one image… sounds interesting! great! i learned a lot of things reading this! thank u Ronen! u are my idol! seriously! haha
maybe some day i have the courage to send one image, but i need to learn more more more!
and again dude, i love ur blog! is my initial homepage! haha
thanks! 😉
cya
well, at least I think it’s going better & better!!! so, what’s going to be for the 3rd session???.. impatiently waitin’ for it!
glimpse
P.S. I do like that You divided everything into sections. Do believe it could be more of them =).. but maybe for next time!!!
Horray!! you guys did my images! I notice sections keeps it easier to browse the topic and good for fast reading. I speed read it and get the main idea about whats been talked about. I think its longer than the first session but thats exactly what I need. Really honored to have expert’s words on our work. Thank you Ronen and all session members! Got to get my dictionary ready now.
I really like Andri’s images, especially the one showing the cliff.
Fast sketch over the site view proposed by Ronen is great too. Really shows the hidden potential of the scene.
I would love to see more and more of these articles as they tackle the part I feel least confident in, composition.
Finally a School with supercool lecturers… learnt a lot about composition. Thanks Ronen.