


The Mill by Chris Kowal / Case Study
I featured Chris Kowal’s work on ‘The Mill’ back in March this year and I never got quite enough of it really. The scope of work undertaken by Chris on this one was extensive and there was much left to be told about it. I asked him to share more of his thoughts about the process of making this project… Not just from a technical standpoint, but also from several other aspects we rarely get into like project management, concept design, concept development and above all – the mobile / touch adaptation and the potential Chris sees in working with and for mobile devices in the Architectural Visualization field.
Ronen : The first thing I would be interested to know about is how did you come up with ‘The Mill’ concept in the first place?
Chris : The Mill was very ambitious in scope, and evolved from a print-based project to a mobile interactive project. The need to meet deliverables while being open to new ideas was a tremendous challenge, but also an important learning experience that I am very thankful to have been a part of. Without the support of MP Lighting this interactive work would not have happened.

The Mill was a conceptual architecture project. The idea was to create a unifying project for MP Lightings LED Catalogue.

I pitched the concept to create a theoretical architectural space that could unify MP Lightings product catalogue. This planned digital space would encompass their entire LED product line because it would be designed to evolve over time as this line of products grows. I felt strongly that a unifying vision for such a dynamic line was the way forward.
Ronen : Ok, that sounds pretty cool. How did you plan to achieve this?
Chris : The unique thing about representing lighting is that it really needs a space in which to function. The light is dependent on the architecture. MP Lighting also wanted to give their clients new ideas for the placement of their lights. I didn’t want to do the standard quasi-showroom scenario, that would have been a far miss in my book.
I knew I needed a story something to ground the concept into, and a point to further develop from.
So…
I decided on an abandoned mill that was to be reclaimed and converted into a community theatre and bar.

This gave me a great deal of flexibility when designing the space for potential shots with lighting installations and set-ups. This set could be re-worked for additional lighting products, or any other not previously thought implementation. It could be detail enhanced for high-res print production renders, as well as redecorated and refurnished in areas for even greater longevity and value for the initial investment.
Ronen : Great approach! How did you go about developing the mill structure and surroundings?
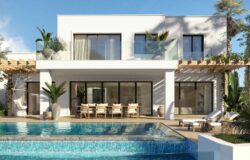
Chris : With the architectural concept, I wanted to retain the focus on the mill building. I also wanted to keep the architecture grounded in the roots of the mills industrial heart and history. I thought the best way to achieve this was to slip a glass barn over the top of the an old mill.

I then needed reference images… as many reference images as possible of abandoned mills, old mills, retro fits, revisions, refurbishments, renovations, and brick restorations. Reference images were extremely important in providing real world design guidelines and ideas. Out of your head is good, but real world is better if you want believability in your 3D designs. Especially when accurate lighting presentation is at the core of the project!


I situated my site, conceptually, somewhere in the Appalachian mountain range. I looked at many reference images for grade heights, broadleaf species, plants etc. I also wanted a large environment so I would have a lot of freedom with camera movements around the mill structure.

There wasnt much in the way of background photos so this environment needed to be self-contained. I started off with a height map from Photoshop. I painted this map in Photoshop slowly building up the white which represents the height. I used this map in a displacement modifier adjusting it closer to what I want. Then I converted the plane to an editable poly mesh. I then selected and detached smaller parts of this large mesh that I wanted to subdivide and add detail to.


I could then brush in more detail, and add more modifiers to these smaller parts. This way of working in a large environment works very well with pre-planning your camera placement, so you only need to add high poly sculpting detail in the areas seen by the placed cameras.


Approximately 90 percent of the final design is mine, with some design consultation from the owner of MP Lighting, Mirek Pospisil. This design counsel was particularly helpful when I encountered a stumbling block. I also consulted with some of my architecture connections on the initial design of the trusses. I wanted a clear span that would cover about 60 feet.


I have found that drawing on other resources and being able to reach outside of the immediate design team is important when working on a project with a wider scope than usual.
Ronen : Can you share with us more information about how the project developed. What was the client level of involvement with the concept and implementation?
Chris : Large-scale projects can take on a life of their own. What they can also do is reveal a direction of their own. In the case of The Mill, balancing the management of the project with being open to intuition and deviations to the plan improved the finished product.
From a 3D design perspective, I started the project by creating the structural elements and building envelope. After that it was the interior stairs and foyer. I then created the bar, the theatre, and then the exterior dock stairs and reflection pool.
As I previously mentioned, this Mill started off as a print-based project. As we got to the first set of deliverables, I realized (as did the rest of the team at MP Lighting) that this somehow had to be on their website. We made a decision to have the project function in a dual capacity. This was decided upon but wasnt fleshed out… We simply had a verbal agreement to put it on the net.
I was told..
You can do whatever you want to do except Flash.
I was extremely busy in the 3D design process so I simply let the idea simmer.
When I was reaching the end of the 3D work, I started to really consider the online aspect.
- How was the online version of The Mill going to look?
- How would it be organized?
- How would viewers navigate the site?
- How would it relate to the original MP Lighting website?
- And the crucial question – How was it going to be scalable?
Ronen : How did the separate lights showcase idea came to see the light of day?
Chris : It just did!
I had this epiphany while rendering, testing the lights each one on its own for the proper exposure… Why dont I just render out the lights separately for production, not just as a test?

The lights could then be turned on and off. It was a simple idea but one that gave people a reason to look at this 3D space. They, as viewers, could interact with the site by turning the lights on and off.
This epiphany was a response to a couple things. When I was discussing rendering and advertising lights with my MP Lighting colleagues, it was brought to my attention that people consistently want to know what a single light source does.
From a design perspective, how can you approach lighting a scene with just one light? This single light source set-up is a nightmare for most CG artists.

In the case of The Mill, the decision to render out separate lights solved this problem. It also opened the door to a whole new strategy.
I was crazy excited about this development. At that point in the project I shared my idea with MP Lighting and I received approval to go forward with this interactive design. I started working with their designer/programmer, showing him my idea and how the interactivity changed the project. Dramatically.
The company wanted The Mill be on all, or on as many, platforms as possible, including tablets. We had made a quantum leap from the original conception of The Mill as a print-based project… Interactivity was now at the fore.
Not being a programmer, I was soon brought back to earth by our developer. There were practical limitations to realizing the project on multiple platforms. Ultimately, the boundaries of the project actually helped me focus my approach in its final stages. But what was becoming more important to me was the fact that there was an interactive mobile device that people were going to look at, and use to consume my 3D images. I also realized that the project became important to the sales team. Now they could bring interactive lighting designs directly to the client.

Ronen : With lighting being the core issue in this project, can you share more information about the technical aspects of implementing it?
Did MP Lighting guide you with that?
Chris : I was lucky in that I had a lot of latitude in how to set up and design the lighting around the project. I basically looked at the MP Lighting catalogue and picked lights that I thought would work best.
I consulted with the designers and sales team on some of them, but this mostly had to do with the technical output of the lights. I would ask if a certain light would have enough power to light a specific space.
It was just placing them around and testing for the appropriate effect.

Ronen : What was your lighting setup?
Chris : I used a VRay Dome Light with an HDRI for my global light. Because of the large windows I also used VRay Plane Lights as skylight portals to get a better GI solution. This increased render times but gave me a more accurate influence of global light from the HDRI / dome light.
I used MP IES files, and plugged those into the VRay IES light to get the best possible simulation of the real thing.

Ronen : How did you go about rendering each light layer? was it just a matter of turning them on/off ?
Chris : Rendering the single lights was actually relatively simple process. To render each light on and off I used the VRay Light Select render element. You can add as many of those elements as you need. Depending on my setup I would set one up as a GI, or lights off then the other respective lights in the scene, which usually consisted of 3 or four more sets.
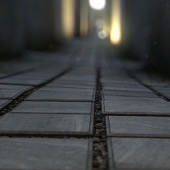
The lights off below with the HDRI lighting up the scene. This is the final look online.

And each light turned on separately


And all of them on

There may have been as many as 25 lights in each render element layer. Now that I had my GI and Lights separate, I would composite the individual light with the GI to create the isolated light layer which would then represent that specific light web page in the interactive implementation.
Ronen : The brickwork is one of the dominant visual features of The Mill. Can you share with us more about the material setup…
Chris : Sure… The brick texture is a VRay blend material. There are 4 coats in this blend material. I controlled the placement and mapping of the coat materials by changing the mapping channels.


I could then assign a separate UVW modifier to each channel. I started with a base brick material. This is all on map channel 1. Next is the sign material on map channel 2. Then I have a darker version of the base brick material on channel 3. All these coats are then masked by dirt or grunge maps so I have even more control over their placement.


Ronen : To close it off, I would love to know more about the inner auditorium part… the seats and the scattering of them.
Chris : Each component of the chair (arm, back, cushion, etc.) was UV mapped separately. I then used a UVW randomizer script to shift the wood grain around. This really helped me getting the most out of the wood texture. I then used the spacing tool to distribute the chairs along a spline.
I then selected the seat parts in the row and randomly rotated the seats using a soulburn script.
Then I selected the whole row and converted that to a proxy. I’ve put the row in place and repeated the steps again…


Ronen : Many thanks Chris for the insight… any closing words?
Chris : Upon completing the project, I was left with what was a genuine interest in interactivity and, in particular, mobile interactivity. I feel that there is exciting, unexplored potential in this field for architectural visualization specialists. Its so new that no one really knows what to do with it. The idea that people can consume creatively is fascinating. Even limited interactivity that gives the illusion of a creative act is a very powerful selling feature for an idea or product.
I would argue that many companies and manufacturers are investigating ways achieve this. This potential definitely has my full attention. Couple interactivity with mobility and the potential for innovation is ever greater.
Thanks for having me here…
Absolutely amazing :- ) On off-topic note, if I can ask, what can of trees did you use ? Did you make ones yourself (since you mention references of broadleafs)
Thanks,I have some trees that I “re-work” to fit my needs. I also make my own.
great work.can u share us the script for uvw randomize .thanks
Thankshttp://www.scriptspot.com/3ds-max/scripts/nrb-random-uvw
What a wonderful creation!
thank you
Great project! Was just curious to know if its possible to obtain the brick texture maps used in this example?