

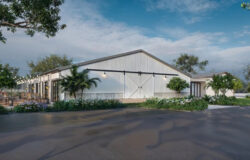


Here is what I have so far for the exterior image, as well as a quick breakdown of the steps I followed!
After coming up with a basic exterior lighting (created in vRay using an HDRI file), and choosing a camera angle, I started modeling some details on the building itself in 3ds Max. The 3D model provided was very simple, but with some high-quality references and a little bit of guesswork, I managed to create most of the missing ornaments and architectural characteristics fairly realistically.
I then focused on adding details to the surrounding environment, and creating basic props to fill the scene. As I was modelling everything, I was also creating and testing the different materials and finishes. Finally, I integrated various trees, shrubs, and other vegetation in the scene. (In order to save time, I didn’t create the trees myself. Most of the tree models come from VIZPARK shrubs/trees packs)
With a little bit of post-production work in photoshop, we now have a good idea of what the exterior image will look like! I still plan to fine-tune this render and add a final pass of details, characters and fine-tuning, but to make sure I meet the deadline for the challenge, I will focus on the interior views for now, and come back to this exterior render towards the end of the project.
Let me know your thoughts! 🙂


Start the discussion at talk.ronenbekerman.com