The working progress that I came up with in this particular project is a bit different than the ones that I take the deal with in everyday projects. Here, I knew that I have all the creative flow to be able to show my artistic senses while showing the wide variety of the technical abilities I possess.
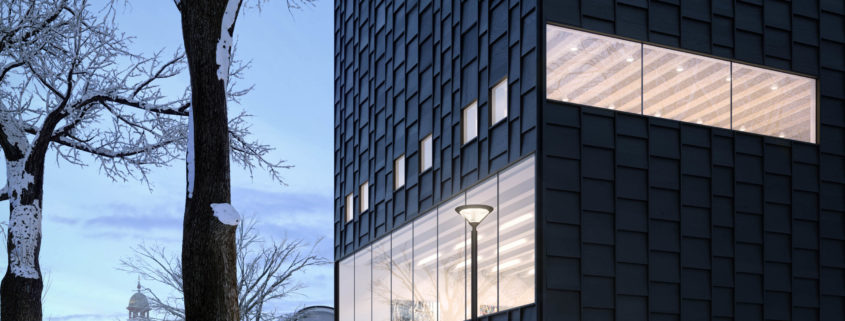
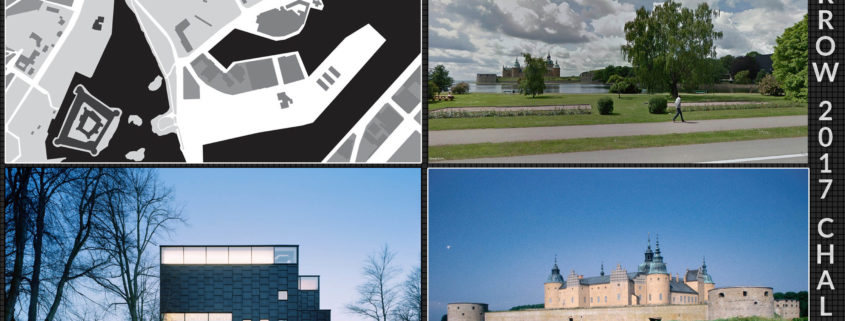
First, I gathered a lot of references and started to do some research about the building and the area. While researching the location, many things were speaking to me and intriguing me. One of them was the old historic town, with extraordinary architectural pieces, and the other was Kalmar Slott. The later felt like an interesting motif and a possible subject of a delightful contrast. The image contrast has the main objective to divide the image in different depths and put the idea of the old – new contrast in my story. On one side of the picture – the old and misty Kalmar Slott and on the other side – the new and clear Art Museum. With that idea in mind, I started modeling the building and in the meantime started my base concept. The contrast of the elements went hand in hand with the natural and realistic look of the image demanded since the Art Museum is in fact close to the Kalmar Slott and could easily be photographed from the precise angle that shows both of the remarkable pieces. With time, I developed my main guiding principles from which I based all of the future work to.
Main guiding Principles: Art Museum, Kalmar Slott, Dark Wood, the contrast between old and new architecture, mist and haze.
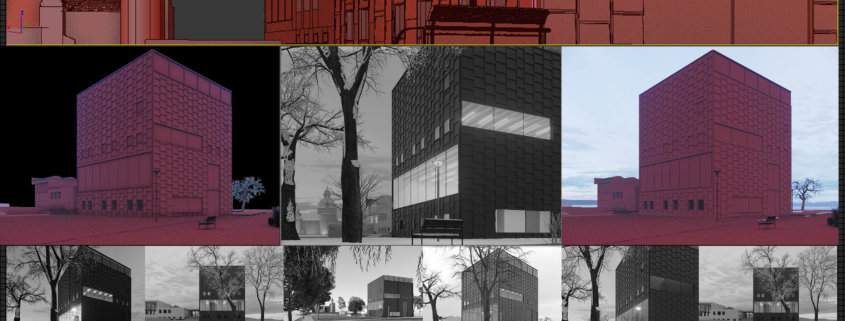
During the modeling process, I started to understand what I want to achieve and felt that the mood will be quite hazy and maybe a bit melancholic. A dusk scene, the landscape covered with snow. Might not be a euphoric one but it definitely is striking. After the modeling process, I started to make different test renders that went hand in hand with the concept that I decided to go with. Testing the view took some time but ultimately, I went with the one that was looking compositionally and atmospherically most fitting with my vision. During the process, I gathered quite a lot of references of the location that I used very often during the project. I like to keep references and the project file tidy since it enables quick managing through the process.
Modeling was pretty straight-forward and does not demand particular elaboration since it is all elementary poly modeling. I modeled some of the props needed for the scene, such as the first plan bench and the lamp post and experimented with modifying snow objects. Multiple plugins were really helpful when modeling and scattering. Some of the used ones: Forest Pack, Railclone, Snow Flow, Creative Tools, Project Manager. Also, I used different scripts: Quad Chamfer, Image Composition Helper, Welder and Siger Scratches.
Next part of the process was the texturing. I was fortunate enough to realize that the material on the Museum is quite familiar to me. A few meters behind where I am sitting at are my Technics speakers that have more-less the same black
Plywood as on the building. That way I was able to understand the material under different lighting conditions and perceive the different angles of reflections that the material possesses. My decision to photograph the material in order to see how it works on the computer screen and what the best photographic settings went out as a great idea.
What would I do differently next time?
Productivity in our job is a huge thing to think of. To be able to solve a problem in a quick and concise manner is as valuable as our ability to develop needed technical and artistic skills in order to be a great 3D artist. The reason I did not feel as productive as I know I am capable of is my wrong choice of composition.
The main problem that I have realized I’ve done is that I was choosing the wrong composition when first looking for the perfect one. That choice actually made me lose quite some time in the final output process since I did not concentrate on the actual output that I am giving at the moment. Therefore, for the next project, I decided to enter the project with more thinking and less work. That might sound contradictory but it has a point. Sometimes just thinking, instead of doing, makes things better and saves us time in the end. That, I think, was this case. In the end, to conclude my thoughts and further elaborate them, I would like to quote the great inventor Nikola Tesla, who was basically able to visualize an invention in his mind with extreme precision, including all dimension, before moving to the construction stage. That technique is known as a picture or visual thinking. Tesla typically did not make drawings by hand but worked from his photographic memory. The words that Tesla said echo in my mind after dealing with this task: “The moment when somebody designs an imaginary device and is connected with a problem of transfer from raw idea to the practice. That is why any discovery made this way has a lack of details, and usually, it is inferior. There is hardly any scientific discovery that can’t be foreseen mathematically, without visualization… The introduction of unfinished, crude ideas to the practice is always a waste of energy and time.”
I would like to thank all of you who made this competition challenge available and congratulate to all of the folks who published their final images.
Cheers.