


Making of Container Dwelling
I’ve been following Roberto Valls work, and Rendertaxi, ever since I first picked up Maxwell Render in late 2005. His work was a big source of inspiration for me, and after he won 2nd place in the NGA House / Maxwell Render Challenge with The Museum / Maxwell Render Challenge brewing, I asked him to showcase his workflow with us based on one of his scenes. I’m happy to share this article with you now, which features the use of Cinema4D yet again – this time with Maxwell Render.

Author : Roberto Valls
Roberto Valls is a 3d Architectural Visualization artist based in Aachen, Germany. Working at Rendertaxi Studio.
Introduction
Some time ago, Ronen kindly asked me to have a go at writing a making of article based on a project done with Maxwell Render. I initially thought of redoing one of my old projects in my portfolio (mainly produced at Rendertaxi Visualization Studio). But then I decided it would best be to try something new for this article, to be fresh and maybe learn more on the way.
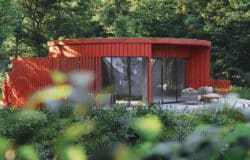
This project is a dwelling made of suspended containers that provide shelter and a variety of different exterior / interior situations. The main concept, after checking the model was to produce an industrial grunge look to the image and take advantage of all the gaps that the structure provided to create an atmosphere based on indirect lighting.
I used Cinema 4D and Maxwell Render in the creation of this scene.
The Model
Pretty basic stuff and since it is out of scope, Ill skip the modeling part Let me know in the comments if you have any specific questions about it.

The Scene
In Cinema 4D the object inspector is a great and powerful tool to arrange and give order to a scene. Materials and object properties (such as Maxwell Render properties) are applied as tags to the objects. Somewhat more flexible and powerful way to do this than the way it is implemented in 3dsmax, since you can actually keep standard settings too alongside the tagging.

Environment and Foliage
As the point of view is quite low the landscape mesh didn’t need to be very precise in geometry and textures.
For the trees I used a Mograph cloner that distributes the trees over a surface and randomized rotation and scale as well as the instance type. The distribution surface has a polygon selection set that tells the cloner to distribute clones only on the selected polygons of the mesh.
For the vegetation I decided on Maxwell Render instances for memory optimization. I created the instances out of the original objects and then added them to the cloner that distributed 12,000 instances.
I manually added the foreground trees, placed where they are, considering the point of view.
Finally I used SurfaceSPREAD to distribute the lawn in the courtyard and pool area (also using Maxwell Render Instances). SurfaceSPREAD is a third-party plugin that does the same things as Forest Pack Pro, but inside Cinema 4D.
As Maxwell Render instances are not recognized for the object buffer (explained later in the render section), to create channels I need to apply a material ID to the materials used in the vegetation.

Furniture
I mainly obtained all the furniture and accessories in Designconnected and Turbosquid. The easier ones, I modeled myself. The layered wood modules or the hanging lamps for example.
This time, as the furniture was not cloned heavily, I just used regular cinema instances for them. This would allow the objects to be recognized when creating object buffers for post production.
The paintings on the walls are from different artists I found on the Behance network, a great resource of great artists.
From foreground to background :
- Me and Eduard http://www.behance.net/gallery/Metamorphosis/2181667
- Alessandro Puccinelli http://www.behance.net/gallery/Intersections/1174365
- Jakob Wagner http://www.behance.net/gallery/Winterscapes/3412243
Texturing
In general I had to create all Maxwell Render textures from scratch. So the built-in Maxwell Render texture wizard was crucial for creating the base materials and then tweak more in-depth the most relevant as the floors, woods, tree leaves, etc.
The Floor
The floor material consists of a base layer and two specular layers.
The base layer with a regular concrete texture which I tweaked in Photoshop to get a grey-bluish tone, as the original had a brownish-grey tone.

The first specular layer with 20% opacity and a roughness map for roughness variations at 18%. As I was aiming for a smooth surface I did not add any weightmap to any of the specular layers opacity.

The second specular layer with 8% opacity and a roughness map for roughness variations at 8% for subtle shinier reflections.

The Tree Leaves
The trees leaves and grass in general are regular materials, as they are not in the foreground, but for the tree in the courtyard and the closer birches I went for the one layer solution provided by Tom Rusteberg in his fantastic 3D Forest tutorial.

Everything works very well in this solution, except for the Attenuation setting. In the first try the leaves looked really wrong and took a while to find the right setting to tweak. Once I found it was the attenuation, I just needed to experiment with the units until I reached the level of opacity I was looking for.
In general you should consider the units you work with and how think things are in real life then add some extra distance to get things less translucent if it is too much.


Lighting
As the base lighting I used one of Peter Guthries HDRI blue dusk skies, without sun.

The rest is mainly rectangular panels placed behind the structural elements to cast the orange indirect lighting.
The emitter materials are mainly set by correlated color and luminance. The ball lamps have a hardly effective emitter, they are there just to show the point of light source. The actual light in this area comes from a hidden panel emitter by applying a maxwell tag to the emitter geometry that hides it from camera and GI.


Rendering
Just pressed the render button!!! The best thing in Maxwell Render hardly any render settings needed to be tweaked.
I rendered it with multi-light enabled to be able to adjust all the different sources later. Also rendered depth and material ID channels.
I did an object buffer render with the Cinema 4Ds renderer in parallel to get different channels for the different objects in the scene like floors, furniture, tree, etc. Very useful in post to tweak any desired object separately.
Postproduction
I adjusted all the lights to the desired levels with multilight, then played with the simulens and saved different images with different versions of simulens, some quite exaggerated so I masked in the areas I needed some scattering.
Separately I imported in Photoshop my resulting MXI, which gave me a layer for every light source so I was able to push any light source.

With the object buffer Cinema 4D render file I imported all the channels that allowed me to tweak different objects or surfaces, such as the sofa, ceiling, etc.


Then some general color correction and effects, like vignetting, depth, etc.

And finally adding the people. The raw photos as seen above.

Doing some color / light balancing.

Matching the people to the scene tone and light.

Adding the light falling on the person in the foreground.

And also some more on other items around.
Multilight
It is always nice to experiment with the multilight feature and come out with different light situations, no matter if it is with or without sun or artificial lights. They can all be enabled in the original render and then mixed in or out depending on the look you are targeting.

Some times the environment lighting is too strong even if set to the minimum level in multilight, then it is possible to save one image with the environment enabled and one without and mix them until you are satisfied with the result. In this image I really like the sensation of flooding from the indirect orange light, resulting in a sense of intimacy.

In conclusion, working with Maxwell Render is very intuitive and easy, and working with the default tools such as the environment and material wizards help much in creating realistic images without many adjustments.
I hope you found this article useful, and if you have any question go ahead and comment below.
Cheers,
Roberto.