


Making of HOVER ‘Spiral’ by Derek Jackson
Im happy to give you the making of the 2nd runner up winning entry of HOVER, Spiral by Derek Jackson. Derek describes his workflow using Form Z and Maxwell Render as his main tools. I hope you’ll enjoy this article, learn from it and share your thoughts by commenting at the bottom of this article’s page.
Derek participated in the HOVER Challenge, winning 2nd Runner Up Award for his entry. Derek has 8 years of experience in archviz and currently works full time for LSI Architects in their graphics and visualization department. Derek models all of his work in Form Z and renders with Maxwell Render. Visit his website at – www.djillustration.com
You might want to open Dereks HOVER Challenge wip thread along side as you follow this article.
Concept
When I first saw the kit of parts we were intended to use for the competition, I was struck by how strong the initial forms were – very blocky and solid. As a result, I started thinking of a building where its creative form was achieved through repetition of the blocks, rather than a single, adapted block.
My first task was to simplify one of the blocks, combine several into one tube, and then start playing around with stacking the tubes in various geometric formations. This would give the building an overall logic, and also achieve the HOVERING aspect through cantilevered tube ends.

Although I initially chose a random, quadrilateral form, I later decided against it, as it didnt show enough of the geometry, and restricted the views of the inside of the building.

I ended up with a form based on a spiral, a series of stacked 3-pointed stars rotating slightly on their center in every floor.
The Structure
I had initially planned on quite a large scale building, using Form Z Symbol tool combined with Maxwell Render Instances to allow me to reuse common elements, such as internal desks and the timber cladding on the exterior. Early tests showed that this wouldnt work – a bug somewhere in the process meant that the instances were either not appearing, or rendering rotated from their intended position. As a result, I drastically scaled back the scale of the structure, resulting in just 2 modules per arm and a total of 4 floors only.
Below you can see the early bug test I made

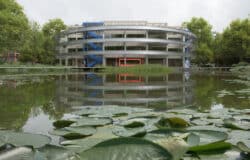
And this is the final form I ended up with.

I then started to think about the building use – some kind of plant research center. I decided the ground floor will be used as a reception space, meeting rooms and cafe, with the first and second floor as offices, and the top floor as a kind of research lab / greenhouse. A central lift core and spiral stair would run up the central pivot of the building.
The ground floor would be the lightest, virtually all glass, adding to the idea of HOVERING. The office floors would be surrounded by a covered walkway, shielded by moving timber louvers, adding to a feeling of movement.

Where possible, triangular open roof-decks revealed by the roof of the floor below would allow for further external space. Finally, the top floor would be structurally light, but feel quite dense with internal greenery.

Internal Details
As the majority of the office floors would be obscured by the timber louvers, their contents were very simple – a repeated desk module, and hanging strip lights – enough to give the feeling of a busy office.

The top floor required virtually no detail, as the plants would be added in post-processing (Ive never successfully managed to take a large number of textured tree symbols through Form Z into Maxwell, so tend to rely on post-work for most entourage)
The majority of the content created was for the ground floor – reception desk, cafe tables, and entrance seating. The reception desk was a simple curve with overlapping translucent sheets. The entrance seating took its form from the building – three-pointed, and slightly hovering.

Landscaping
I wanted the landscaping to follow the geometry of the spiral, so initially created it all in plan view.

I then decided to step the site, partially to hide the left hand horizon, increasing a sense of interest, and also to increase the sense of hovering, with even the ground floor cantilevered off the ground on one of its three points. I pictured the office sitting in some sort of rural business park, with trees surrounding the site. Again, these would be added in post.
Textures
Most of the textures were created in Maxwell Render, with FormZ being used to set up mapping placeholders. The majority came from Arroway Textures, with a few bespoke textures (such as the plywood for the entrance seating) created from scratch, with source images from cgtextures. The final scene used 59 materials.

Lighting
Usually when I light and color my images, I tend to pick my palette from the building and environment materials – getting a sky and lighting to compliment the building colors can give a strong colorful look, but with a limited palette.
I had initially planned to go for a very colorful image – a very red tinted ground floor, with orange and yellow office floors, a very green greenhouse, and then a cyan sky behind blending up to a deep blue – almost the full color spectrum. This would be aided by a red reception desk, orange / yellow tints on the office timber, green lighting in the greenhouse, etc. However, early render tests proved that this wouldnt work – key color areas (such as the lift core) were obscured, the blue sky didnt sit well behind the building, the colored lighting looked forced, and so on.
My second idea was to go for a heavily foggy early evening – this would allow me to have a heavily natural color palette – lots of brown and green, with orangey brown as the dominant color. A plain sky would help pull the focus on to the building. It would also allow me to fade out the horizon on the right, something I wasnt sure how to achieve given the elevated viewpoint. I also tend to like moody visuals, so knew Id enjoy producing this one.
The final scene used a grand total of 434 lights (102 for the external balconies, 168 office strip lights, 90 externally for the landscaping, etc.) – far more than Ive ever used before. All were simple Maxwell emitters of varying strengths and colors.
The whole scene was lit with a grey sky HDRI with Maxwells sun turned off.

Rendering
I made use of Maxwells Shift Lens feature to reduce the amount of foreground landscaping and increase the amount of sky, giving the building a more imposing presence.
As well as rendering the main Render pass, I also rendered a Material ID and a zBuffer pass to help with post-processing – the zBuffer pass would be key in determining the extent of the fog. Rendering took place on a 2 x 2.66 GHz Dual-Core Intel Xeon PowerMac. As the scale of the output image was quite large, I set myself a deadline of hitting render around two weeks before the final deadline. In the end, the final image rendered for around 10 days.
this is the raw render.

and the zBuffer.

I also produced a series of alpha renders directly from FormZ. In a saved copy of the working file, I turn all materials to constant black, then turn a single material (grass) to constant white and render as needed. As reflections, most texture maps, shadows etc. arent needed, this is a very quick process even at large image scales. Alphas were rendered for all key materials (glass, timber, lights, sky, etc ) and pasted into the Channels palette of the final Photoshop file, ready for use in quick, accurate selection of materials.
Post-Processing
The post work is my favorite part of the whole process – its where an image can really be transformed and different moods can be applied. Its also often quicker to fix issues and add elements with decent post skills than to model and render any changes.
As Maxwells output gradually improves over time as the samples converge towards an accurate solution, I tend to start my post-processing work almost as soon as I hit render. Im careful to do any work in separate layers, with the untouched render at the bottom of the layer stack. This way I can keep slotting in improved renders below the other layers as the quality improves, meaning Maxwells slow rendering speed tends not to affect the process. The final Photoshop image ended up with 93 separate layers (including Adjustment Layers).
The most important change to the image was the inclusion of fog and trees, to give the rendering a feeling of autumn woodlands. Standard cut-out trees were used, with color balance and hue adjusted to tint the leaves towards yellows and browns. I also created a depth map for each tree – a grey scale version of the colored tree, with stronger whites towards the central, nearer branches, fading to black at the edges. These were then overlaid onto the zBuffer pass in position, a grey value sampled from where their trunk met the ground, and this color was then overlaid over the tree using Screen blending mode to sit the tree within the zBuffer pass.
The tree images.

The edited zBuffer with incorporated smoothed landscape and trees.

The final zBuffer image was then used as a layer mask over a fog color – a simple grey gradient with the white point representing the sun breaking through.
Grass was also added in post – photos of fields overlaid on to the rendered grass using a variety of blending modes to make them sit in place.

The greenhouse contents were incorporated – a series of scaled cut-out trees and plants with edges tinted towards yellow where they sat near the fluorescent lamps. The reflections on the glass ceiling were a simple aerial photo of a forest.

I added a few grunge layers to give the building some life – green stains running down from the joins between the timber boards, dirt around the base of the benches and external lighting, and so on.
I also used Photoshop to add and fix internal elements – strengthening the color on the reception desk layers, adding a laminated edge to the plywood seating, adding floodlights to the wall behind the desk, and improving the highlighted reflection of the toilet doors.


After WIP feedback from the forum, people were added to give a sense of life and purpose to the building (simple cut-outs color balanced and motion blurred to make them sit naturally in place). Fallen leaves were also added in the foreground (cut-out from a photo) and around the edge of the car park (a bespoke Photoshop brush).
Finally, the finishing touches were added. An overhanging tree branch to balance the image and draw the eye upwards. Then, a series of layers I tend to finish most images with. First, a color balance adjustment layer to pull the colors of the whole image towards the key colors already picked out. Then, a Gaussian Blurred version of the image overlaid using Soft Light blending mode to increase contrast and make the colors pop out a little more. Then a Levels adjustment layer to set the final lights and darks of the image. Finally, a color gradient on a low opacity is placed on top using Overlay blending mode to tint the whole image towards my chosen color palette. I also played with vignetting the corners, but decided in this case that it wasnt needed.

Conclusion
So there we have it. Thanks Ronen for a great competition – it was a really interesting set of parameters to work within. Thanks to the judges, and of course my fellow competitors – it was fantastic seeing so many varied approaches to the same brief!
Derek’s HOVER Challenge thread
You are welcome to comment on this article and ask questions using the comment box below!


Just doesn’t cut it for me, specially after seeing some of the other work on this site.
I think its good but not great.
I’m also glad now I got a copy of Vray instead of Maxwell, the render time is insane, Its a great renderer but they need to do something with the speed.
All in all great work though.
Great render and process
I realy liked it , thanks a lot for sharing
I love how most of the work was done in post-production… ’cause Photoshop isn’t just about color correction!
If I were to change something it would be the foggy sky. It just doesn’t look right… is it too bright? I don’t know… but it looks off.
Having said that, this was still my favourite entry.
Congratulations Derek!
Nice article and congratulations.
10 days of rendering…wow
Nice concept and pretty good post-production, maybe a bit too yellow overall, I mean its nice warm tones, but everything just becomes kind of flat because there is yellow inside and yellow outside.
You should get an award for the most time it took to render, 10 days wow! I think its a record!
Hey Derek,
I was wondering about the rendertime as well. You did not mention your image resolution but I would guess it to be in the range of around 4-5k. If this image was not of truly titanic proportions 10 days of rendering alone suggest to me that something is off-especially since its an exterior.
I can see you are using 1.7 still, so version 2.5 will surely shave something off this render time – even without optimizations. What was your benchmark and SP level?
Are you using displacement mapping alot? Are you using AGS for glass elements? Are your emitter surfaces planar and lowpoly?
Something else I can recommend is using a renderfarm like The Ranch (http://www.ranchcomputing.com/M_index.php) They have just upgraded their hardware and I would bet my money on it that you would get a 4k image exterior back in something like 10 minutes.
Anyway,
Congrats for your entry and article.
Ben
Great work.. but 10 days is an insane render time.. not worth the efforts or time.. You need to change your render engine.. if u wish to save time..
Thanks for the comments, folks. 10 days is indeed excessive. I should probably clarify that the image was fully usable after about 24 hours, I just left it ticking to further improve on the clarity (as there was no reason not to).
The final image res was 2850 x 3800 pixels. I didn’t use any displacement mapping, and the scene has standard AGS for the glass. I put the time down to a combo of image scale, sheer amount of glass, and number of emitters. Using version 2 or a renderfarm would indeed have helped cut the time, but it came down to the single fact of cost- this was the only rendering solution that wouldn’t need me to spend any money!!
Aside from the already mentioned overdone yellow tone, i especially wonder where this big trees are rooting. Deciduous Tress have deep roots.
But the Pic ins’t bad; I like the unyellow daylight shots.
Regards
What a great rendering. This is a great example of how Maxwell, in conjunction with post- work, can be used to create a tonally compelling, artistic illustration.
Derek points out some issues with formZ and Maxwell that I would like to address.
Derek used Maxwell 1.7, which means that he also must have used a very old version of the plugin– probably 2009’s 2.0.0.5 (pre- Pylon Technical era). A great number roof improvements an bug fixes have been incorporated since then. The super-long render times he mentions are primarily due to the use of 1.7.
Nested symbols with rotations have never been fully supported. Solutions to this issue are: 1) use only single-level symbols. 2) Turn off the option to convert symbols into Maxwell instances
Everything to do with symbols is changing with formZ 7, this limitation will no longer apply.
Derek suggests that there is some issue with large numbers of textured tree symbols. We have not heard of this, and have a number of users who use a ton of trees in their Maxwell renderings. (?)
Again, awesome image! Derek–If you want to be in the next user manual, just send us an email.